Quantcast
Channel: Andrew Lock | .NET Escapades
Viewing all 743 articles
Browse latest View live

A bootstrapper script for the Cake .NET Core Global Tool on Windows

$
0
0
A bootstrapper script for the Cake .NET Core Global Tool on Windows

In my previous post, I described how to use Cake.CoreCLR and Cake.Tool versions of Cake to run build scripts on Linux, without requiring Mono. This post acts as a short addendum to that one, by providing a PowerShell bootstrapper script equivalent of the bash bootstrapper.

One of the big advantages of Cake build scripts is that they are cross platform, so the same build script can be run across Windows Linux and Mac. Unfortunately, the bootstrapping scripts are generally platform-specific.

PowerShell Core provides a possible solution to this given that it's cross platform, but I don't know how widespread it really is on the Linux side. The addition of PowerShell Core to the .NET Core 3.0 SDK images may go some way to improving the situation for .NET developers.

In the previous post I provided bootstrapping scripts for Linux, which is how all of the .NET Core apps I work on are built and deployed. When developing locally I use Windows, so the bash scripts I provided are no good. Instead, I use a PowerShell script.

Installing the Cake.Tool global tool locally with PowerShell

On Windows, you can feasibly choose any of the three versions of Cake to run your build scripts. However it's definitely a good idea to use the same version as you use in your CI process, to avoid subtle differences between local builds and your build servers.

The following PowerShell script, uses the global tool approach from the previous post. This script is Windows specific, and assumes you already have .NET Core installed - for a much more exhaustive script that uses PowerShell Core, see the bootstrapper from the Cake project itself.

[CmdletBinding()]
Param(
    [string]$Script = "build.cake",
    [string]$CakeVersion = "0.33.0",
    [string]$Target,
    [Parameter(Position=0,Mandatory=$false,ValueFromRemainingArguments=$true)]
    [string[]]$ScriptArgs
)

# Define directories.
if(!$PSScriptRoot){
    $PSScriptRoot = Split-Path $MyInvocation.MyCommand.Path -Parent
}

$ToolsDir = Join-Path $PSScriptRoot "tools"
$CakePath = Join-Path $ToolsDir "dotnet-cake.exe"
$CakeInstalledVersion = Get-Command $CakePath -ErrorAction SilentlyContinue  | % {&$_.Source --version}

if ($CakeInstalledVersion -ne $CakeVersion) {
    if(Test-Path $CakePath -PathType leaf) {
        & dotnet tool uninstall Cake.Tool --tool-path "$ToolsDir"
    }
    Write-Output  "Installing Cake $CakeVersion..."
    & dotnet tool install Cake.Tool --tool-path "$ToolsDir" --version $CakeVersion
}

# Build Cake arguments
$cakeArguments = @("$Script");
if ($Target) { $cakeArguments += "--target=$Target" }
$cakeArguments += $ScriptArgs

& "$CakePath" $cakeArguments
exit $LASTEXITCODE

Hopefully the script is fairly self explanatory. It starts by checking the installed version of Cake.Tool (if any). If the correct version is not installed, it installs the global tool using dotnet tool install, providing a --tool-path to install the tool locally, instead of globally. After building the script arguments, it runs the tool!

If you compare this script to the Cake project's version, you'll see that this one is definitely minimalist! Consider your use cases, such as whether you want to automate the install of .NET Core, and whether you want a cross-platform PowerShell script, and choose whichever works for you.

Another alternative is to use Cake.CoreCLR instead of the Cake.Tool global tool. This gist by Dmitriy Litichevskiy shows a PowerShell version of the "dummy project" approach I used in my previous post if you prefer. Personally I think the global tool is the cleaner approach, but to each their own!

Summary

In this post I show a Windows PowerShell bootstrapping script for running Cake build scripts using the Cake.Tool .NET Core global tool. The script checks the version of the Cake global tool installed, and replaces it with the correct version if necessary. For a cross-platform PowerShell Core script that also scripts installing .NET Core, see this example from the Cake project.


A bootstrapper script for the Cake .NET Core Global Tool on Alpine using ash

$
0
0
A bootstrapper script for the Cake .NET Core Global Tool on Alpine using ash

In a previous post, I described how to use Cake.CoreCLR and Cake.Tool versions of Cake to run build scripts on Linux, without requiring Mono. In a follow up post, I provided a PowerShell bootstrapper script equivalent of the bash bootstrapper script.

As I mentioned in my previous post, one of the big advantages of Cake build scripts is that they are cross platform, so the same build script can be run across Windows Linux and Mac. Unfortunately, the bootstrapping scripts are generally platform-specific. Bash scripts are generally pretty portable between Linux distros, but the tiny Alpine Linux is one exception; this uses the Almquist shell (ash) instead.

In this post I provide a shell script version of my original bash script that works on the Alpine ash shell, so can be used with the tiny Alpine-based .NET Core SDK Docker images. This is of particular interest given the reduced Docker image sizes in .NET Core 3. The script installs the Cake .NET Core global tool.

Installing the Cake.Tool global tool locally with ash

The following script uses the same global tool approach from my previous post, but instead of using bash-specific constructs, it uses a script that should work with any POSIX shell, including Alpine's ash shell.

Disclaimer: I'm out of my comfort zone here - with enough Googling I can just about manage bash, but figuring out what is POSIX and what is a "bashism" was a lot of trial and error… If I'm doing anything Bad™, please point it out in the comments!

As in my previous bootstrapper scripts, this assumes you already have .NET Core and the .NET CLI installed - this script only bootstraps the Cake global tool, and runs it. Its primary use (for me) was with the .NET Core SDK Docker Alpine images.

#!/bin/sh

# Define directories.
THIS_SCRIPT=`realpath $0`
SCRIPT_DIR=`dirname $THIS_SCRIPT`
TOOLS_DIR=$SCRIPT_DIR/tools

# Define default arguments.
SCRIPT="build.cake"
CAKE_VERSION="0.33.0"
CAKE_ARGUMENTS=""

# Parse arguments.
for i in "$@"; do
    case $1 in
        -s|--script) SCRIPT="$2"; shift ;;
        --cake-version) CAKE_VERSION="--version=$2"; shift ;;
        --) shift; CAKE_ARGUMENTS="${CAKE_ARGUMENTS} $@"; break ;;
        *) CAKE_ARGUMENTS="${CAKE_ARGUMENTS} $1" ;;
    esac
    shift
done

# Make sure the tools folder exists
if [ ! -d "$TOOLS_DIR" ]; then
    mkdir "$TOOLS_DIR"
fi

CAKE_PATH="$TOOLS_DIR/dotnet-cake"
CAKE_INSTALLED_VERSION=$($CAKE_PATH --version 2>&1)

if [ "$CAKE_VERSION" != "$CAKE_INSTALLED_VERSION" ]; then
    if [ -f "$CAKE_PATH" ]; then
        dotnet tool uninstall Cake.Tool --tool-path "$TOOLS_DIR"
    fi

    echo "Installing Cake $CAKE_VERSION..."
    dotnet tool install Cake.Tool --tool-path "$TOOLS_DIR" --version $CAKE_VERSION

    if [ $? -ne 0 ]; then
        echo "An error occured while installing Cake."
        exit 1
    fi
fi


# Start Cake
eval "$CAKE_PATH" "$SCRIPT" "${CAKE_ARGUMENTS}"

The script starts by checking the installed version of Cake.Tool (if any). If the correct version is not installed, it installs the global tool using dotnet tool install, providing a --tool-path to install the tool locally, instead of globally. After building the script arguments, it runs the tool!

Differences to the bash script

As I've already described, the need for this script arises from "bashisms" in my previous bootstrapper script (and other example scripts). There are essentially three differences between the scripts:

  • Getting the directory of the script being executed
  • Collating command line arguments into an array
  • Executing Cake using the provided arguments

I'll briefly compare each of these below:

Getting the directory of the script being executed

In my original bash script, I used the ${BASH_SOURCE[0]} variable, which contains the location of the script "in all scenarios":

SCRIPT_DIR=$( cd "$( dirname "${BASH_SOURCE[0]}" )" && pwd )

This is (unsurprisingly) bash-specific, so, after a lot of searching, I used a different approach for the ash shell:

THIS_SCRIPT=`realpath $0`
SCRIPT_DIR=`dirname $THIS_SCRIPT`

There were a lot of different ways to do this suggested, some of which required additional tools not available in ash by default, but this one seemed to work. As far as I can see, the following should also work for our purposes, which is a more direct analogue. I don't know which is "better" or more idiomatic though! 🤷

SCRIPT_DIR=$(CDPATH= cd -- "$(dirname -- "$0")" && pwd)

Collating command line arguments into an array

The next difference occurs where we're parsing the arguments passed to the script. We want to extract specific arguments like the --cake-version and --script, and collect all the other arguments for passing to the Cake invocation later.

In bash, we can use an array to hold those arguments, extract the special values, and append the other arguments to the array:

# Create an array
CAKE_ARGUMENTS=()

for i in "$@"; do
    case $1 in
        -s|--script) SCRIPT="$2"; shift ;;
        --cake-version) CAKE_VERSION="--version=$2"; shift ;;
        --) shift; CAKE_ARGUMENTS+=("$@"); break ;; # Push all remaining args into array
        *) CAKE_ARGUMENTS+=("$1") ;; # Push next arg into array
    esac
    shift
done

Unfortunately, we can't use arrays like this in ash. The easiest approach I could find to "simulate" an array was to use a space-separated string:

# Empty string for holding the arguments
CAKE_ARGUMENTS=""

for i in "$@"; do
    case $1 in
        -s|--script) SCRIPT="$2"; shift ;;
        --cake-version) CAKE_VERSION="--version=$2"; shift ;;
        --) shift; CAKE_ARGUMENTS="${CAKE_ARGUMENTS} $@"; break ;; # Append all remaining to string
        *) CAKE_ARGUMENTS="${CAKE_ARGUMENTS} $1" ;; # Append to string
    esac
    shift
done

This approach is almost certainly not quite right, but I've found it worked fine for my attempts. I haven't tested it with arguments that contain spaces, or quote marks, so your mileage may vary!

Executing Cake using the provided arguments

This is the part of the script that I'm sure highlights that I don't really know what I'm doing…

In the bash version of the script, we can invoke Cake using exec, and output all of the values stored in the args array using [@]:

exec "$CAKE_PATH" "$SCRIPT" "${CAKE_ARGUMENTS[@]}"

Unfortunately, if we try to use exec with our space-separated argument list in ash, we won't invoke Cake with multiple arguments, we invoke it with a single argument (that has lots of spaces in it!) I couldn't find a way to solve this issue, so I resorted to using eval.

eval "$CAKE_PATH" "$SCRIPT" "${CAKE_ARGUMENTS}"

eval converts the provided arguments to a raw string, then executes it as though you'd written that directly. That works great for my requirements, but it can be dangerous, so is generally frowned upon. Again, it's fine for my purposes (running in Alpine Docker), but if you have a better (safer) alternative for achieving the same thing, do let me know!

Summary

In this post I show an Almquist shell (ash) bootstrapping script for running Cake build scripts using the Cake.Tool .NET Core global tool on Alpine Linux. The script is mostly similar to the bash bootstrapping scripts that I've provided previously, but avoids bashisms that prevent those scripts running on some shells. The script has a couple of issues (namely the use of eval) but it meets my needs, so hopefully it's useful for you too.

Making my first contribution on SourceForge using Mercurial

$
0
0
Making my first contribution on SourceForge using Mercurial

In this post I describe my experience of making my first contribution to a project on SourceForge, using the Mercurial version control system. It's sometimes easy to forget there's a world outside of Git and GitHub, and it was interesting dipping a toe in!

The motivation: improving .NET Standard support

At Elevate Direct, we use a library called Sasa quite extensively in our .NET projects. It contains a variety of utility types, but we use it primarily for the implementation of functional concepts like Option<>. The library has been around for a long time (since 2013), and at the start of 2019, Sandro Magi added .NET Standard support.

He did a great job supporting a wide range of platforms by targeting .NET Standard 1.3. Unfortunately, if you're using a platform that supports netstandard2.x, then referencing a netstandard1.x package can result in a huge dependency tree being dumped in your folder output.

To work around this issue for consumers, library authors can add an additional netstandard2.x target to their library. Unfortunately that can cause issues for people targeting net461. If you follow the official advise on cross-platform targeting to its conclusion, eventually you end up targeting at least four frameworks:

  • netstandard1.x for maximum compatibility
  • netstandard2.x to avoid large dependency trees in .NET Core 2.x etc
  • net461 to avoid issues caused by net461's "fake" .NET Standard 2.0 support
  • net472 to "override" the previous net461 target, as .NET Framework 4.7.2 includes real .NET Standard 2.0 support.

If you already have a library targeting netstandard1.3, then adding the extra targets is pretty easy: just change this line in your .csproj project file:

<TargetFramework>netstandard1.3</TargetFramework>

to this (note the s in TargetFrameworks)

<TargetFrameworks>netstandard1.3;netstandard2.0;net461;net472</TargetFrameworks>

Given all the hard work had been done to convert Sasa to use .NET Standard 1.3, I thought I'd help out by making the update, and sending a PR. I envisioned a 20 minutes piece of work, tops.

Then I realised the project was hosted on SourceForge, and uses Mercurial for version control.

Forking a project on SourceForge

I've pretty much gone my whole life barely using SourceForge. I'm sure I've downloaded a few things here and there, but I've certainly never hosted, contributed, or even really looked at any projects on there.

Unlike GitHub, where the code is front-and-center when you view a repository, it feels like you have to go hunting a bit further on SourceForge. The project landing page is much more focused on downloads and project activity (and Ads 🤮) but overall the process of submitting a patch should be quite familiar in principal if you're used to GitHub.

Start by clicking the Code tab in the project, which for the Sasa project takes you to https://sourceforge.net/p/sasa/code/. This is similar to the default GitHub view, and is where you can browse the code, view branches and commits, and fork the project.

The code page for Sasa on SourceForge

Just as with Git and GitHub, if you want to send a patch to a project on SourceForge, you first need to fork the code (i.e. create a "personal" copy of the project). After clicking Fork from the code page, you'll be taken to your fork of the project. After a few moments, the clone will be complete and you'll see a copy of the code in your account:

The upstream copy after forking

I assume the u/ prefix is to indicate that this is a clone of an existing project, but I'm not sure. It also mentions that the project is a clone of Sasa in the left sidebar.

Once the project is forked, it's time to download the code and make the fix. Sasa uses Mercurial source code management (rather than Git), so you need to install and use the hg tool. I've used SVN before, but never Mercurial so was interesting to give it a try.

The nerd in me loves that their tool is hg, the chemical symbol for mercury). But I'm not sure about having a version control system who's name means "subject to sudden or unpredictable changes of mood"!

Installing Mercurial

After a brief read of the Mercurial about page, it actually looks pretty interesting. It sounds very much like Git in a lot of ways, and was started about the same time. It's a distributed version control system, and branching and merging are cheap, just like Git. It does have some interesting extra features, but frankly it seems like Git has already won, so I probably won't be looking into any more than the basics 😉

You can download Mercurial from their website. As it's mostly written in Python, cross-platform installers are available for loads of different operating systems (compare that to Git, where Windows definitely used to feel second-class!) Version 4.9.1 was the latest at the time I downloaded the Inno Setup installer - x64 Windows, though I see version 5.0 is out now.

Once downloaded and installed, you can test everything is working correctly by typing hg at the command line:

> hg
Mercurial Distributed SCM

basic commands:

 add           add the specified files on the next commit
 annotate      show changeset information by line for each file
 clone         make a copy of an existing repository
 commit        commit the specified files or all outstanding changes
 diff          diff repository (or selected files)
 export        dump the header and diffs for one or more changesets
 forget        forget the specified files on the next commit
 init          create a new repository in the given directory
 log           show revision history of entire repository or files
 merge         merge another revision into working directory
 pull          pull changes from the specified source
 push          push changes to the specified destination
 remove        remove the specified files on the next commit
 serve         start stand-alone webserver
 status        show changed files in the working directory
 summary       summarize working directory state
 update        update working directory (or switch revisions)

(use 'hg help' for the full list of commands or 'hg -v' for details)

Glancing through those commands as a Git user should look vaguely familiar - push, pull, merge, status - they're definitely similar in many ways. Just as with Git, you need to setup your username locally. create a new file at %USERPROFILE%/mercurial.ini with the format shown below and add your username and email:

[ui]
username = Andrew Lock <example@example.com>

At this point, Mercurial is installed and ready to go, but we don't have any code on our machine yet.

Cloning the repository and committing a change

Cloning the repository creates a copy of it on your local machine, including all the branches and history, just like with Git. The code page in SourceForge shows the command you need to run. In my case, it was

hg clone ssh://andrewlock@hg.code.sf.net/u/andrewlock/sasa u-andrewlock-sasa

This command clones the repository into a folder called u-andrewlock-sasa. You'll need to confirm the authenticity of the SourceForge host, and enter your password:

> hg clone ssh://andrewlock@hg.code.sf.net/u/andrewlock/sasa u-andrewlock-sasa
The authenticity of host 'hg.code.sf.net (216.105.38.18)' can't be established.
ECDSA key fingerprint is SHA256:FeVkoYYBjuQzb5QVAgm3BkmeN5TTgL2qfmqz9tCPRL4.
Are you sure you want to continue connecting (yes/no)?
Please type 'yes' or 'no':
Password:
remote: Warning: Permanently added 'hg.code.sf.net,216.105.38.18' (ECDSA) to the list of known hosts.
requesting all changes
adding changesets
adding manifests
adding file changes
added 2168 changesets with 7095 changes to 956 files (+8 heads)
new changesets 69e92c5f6c58:86c9bcbc342c
updating to branch default
223 files updated, 0 files merged, 0 files removed, 0 files unresolved

At this point you'll be checked out on the default branch in the working directory. Rather than mess with branches, I decided to commit straight to the default branch, as I was working in a clone of the real project anyway.

I edited each of the .csproj project files and replaced

<TargetFramework>netstandard1.3<TargetFramework>

with

<TargetFrameworks>netstandard1.3;netstandard2.0;net461;net472</TargetFrameworks>

Once I confirmed everything was building correctly, I was ready to commit the changes. You can check the current status of the working directory by running hg status. This shows the files modified, added, and deleted.

> hg status
M Sasa.Binary\Sasa.Binary.csproj
M Sasa.Collections\Sasa.Collections.csproj
M Sasa.Concurrency\Sasa.Concurrency.csproj
M Sasa.Linq.Expressions\Sasa.Linq.Expressions.csproj
M Sasa.Linq\Sasa.Linq.csproj
M Sasa.Mime\Sasa.Mime.csproj
M Sasa.Net\Sasa.Net.csproj
M Sasa.Numerics\Sasa.Numerics.csproj
M Sasa.Parsing\Sasa.Parsing.csproj
M Sasa.Reactive\Sasa.Reactive.csproj
M Sasa.Web\Sasa.Web.csproj
M Sasa\Sasa.csproj

To commit the changes, use the command hg commit, and provide a message.

hg commit -m "added additional target frameworks"

Note that unlike Git, there's no "staging" area or "index". You just commit the files that have changed. Even though I use the staging area quite a lot, that definitely seems like a plus for users who are new to source control.

At this point, the changes are committed locally, but not yet pushed to the server. You can push using the command hg push:

> hg push
pushing to ssh://andrewlock@hg.code.sf.net/u/andrewlock/sasa
Password:
searching for changes
remote: adding changesets
remote: adding manifests
remote: adding file changes
remote: added 1 changesets with 12 changes to 12 files
remote: <Repository /hg/u/andrewlock/sasa> refresh queued.

Checking on SourceForge, you should be able to see your new commit alongside the changed files:

SourceForge showing the new commit

Now that the code is on SourceForge, you can create a "merge request", to merge the code back into the original project.

Creating a Merge Request

Merge Requests are the SourceForge equivalent of GitHub's Pull Requests (PRs). It's a notification sent to the owner of the project that you have changes for them to review and merge.

Choose Request Merge from the left hand sidebar of your clone. This takes you to the Request merge page, where you can enter a title, chose the source and destination branches, and enter a description. This should be very familiar if you're used to GitHub, though the description text isn't markdown unfortunately.

Creating a merge request

After creating the merge request, the owner of the repository will hopefully receive a notification, and they can review (and hopefully merge) your code! You can track the merge request in the original project's repository (i.e. in Sasa's repository in my case).

It took a while (thanks to a lack of notification from SourceForge it seems), but my contribution was merged! Success 🙂

Trying out both SourceForge and Mercurial for the first time was interesting. Mercurial was super easy to use, and looks like it would generally be easier to get into than Git for newcomers. And I didn't even get to the really interesting parts, like preserving history on file moves or the built in web-server(!). Unfortunately, while Mercurial is in use at some very notable places (e.g. Facebook) and notable projects, it feels like Git has probably won the hearts-and-minds.

And I think part of that has to be thanks to GitHub. It's become somewhat of the de-facto location for open source projects. And after using SourceForge, albeit briefly, I'm not surprised. SourceForge feels like a website from 10 years ago. It's not especially welcoming to newcomers, and was hard to get my head around. I'm just glad the fact the fork/merge request paradigm mirror's GitHub's terminology. If it didn't, I doubt I would have ever figured it out before I got frustrated and gave up.

Still, it was worth it in the end. If you haven't already, check out the Sasa library on NuGet, it has a whole variety of useful utility implementations.

Summary

In this post I described the process I went through of submitting a change to a project hosted on SourceForge, using the Mercurial source control system. I described the process of forking a repository, installing Mercurial, cloning a repository, and pushing your changes. Finally, I described how to create a merge request.

Exploring the new project file, Program.cs, and the generic host in ASP.NET Core 3

$
0
0
Exploring the new project file, Program.cs, and the generic host in ASP.NET Core 3

In this post I take a look at some of the fundamental pieces of ASP.NET Core 3.0 applications - the .csproj project file and the Program.cs file. I'll describe how they've changed in the default templates from ASP.NET Core 2.x, and discuss some of the changes in the the APIs they use.

Introduction

.NET Core 3.0 is due for release during .NET Conf on September 23rd, but there is a supported preview version (Preview 8) available now. There's unlikely to be many changes between now and the full release, so it's a great time to start poking around and seeing what it will bring.

.NET Core 3.0 is primarily focused on allowing Windows desktop applications to run on .NET Core, but there's lots of things coming to ASP.NET Core too. Probably the biggest new feature is server-side Blazor (I'm more interested in the client-side version personally, which isn't fully available yet), but there are lots of incremental changes and features included too.

In this post, I'm looking at a couple of the more "infrastructural" changes:

If you're upgrading an ASP.NET Core 2.x app to 3.0, be sure to check out the migration guidance on docs.microsoft.com.

In this post, I'm looking at the .csproj file and Program.cs when you create a new ASP.NET Core application, for example when you run dotnet new webapi. In a later post I'll compare how the Startup.cs files have changed from 2.x, and with the various different ASP.NET Core templates available (web, webapi, mvc etc).

The new project file and changes to the shared framework

After creating a new ASP.NET Core project file, open up the .csproj file, and it will look something like this:

<Project Sdk="Microsoft.NET.Sdk.Web">

  <PropertyGroup>
    <TargetFramework>netcoreapp3.0</TargetFramework>
  </PropertyGroup>

</Project>

If you compare this to the project file for an ASP.NET Core app in 2.x, there are various similarities and differences:

  • The <TargetFramework> is netcoreapp3.0, instead of netcoreapp2.1 or 2.2. This is because we're targeting .NET Core 3.0, instead of 2.1/2.2.
  • The SDK in the <Project> element is still Microsoft.Net.Sdk.Web. This has been updated for ASP.NET Core 3.0, but the syntax in your project file is the same.
  • There is no longer a reference to the Microsoft.AspNetCore.App meta package.

This last point is the most interesting change. In ASP.NET Core 2.1/2.2, you could reference the "shared framework" metapackage, Microsoft.AspNetCore.App, as I described in a previous post. The shared framework provides a number of benefits, such as allowing you to avoid having to manually install all the individual packages in your app, and allowing roll-forward of runtimes.

With ASP.NET Core 3.0, Microsoft are no longer publishing the shared framework as a NuGet metapackage. There is no Microsoft.AspNetCore.App version 3.0.0. The shared framework is still installed with .NET Core as before, but you reference it differently in 3.0.

In ASP.NET Core 2.x, to reference the shared framework, you would add the following to your project file:

<ItemGroup>
  <PackageReference Include="Microsoft.AspNetCore.App" />
</ItemGroup>

Instead, in 3.0, you use the <FrameworkReference> element:

<ItemGroup>
  <FrameworkReference Include="Microsoft.AspNetCore.App" />
</ItemGroup>

"But wait" you say, "why doesn't my ASP.NET Core project file have this?"

That's a good question. The answer is that the SDK Microsoft.Net.Sdk.Web includes it by default!

No more packages for shared framework components

Another big change in 3.0 is that you can no longer install individual NuGet packages that are otherwise part of the shared framework. For example, in ASP.NET Core 2.x, you could take a dependency on individual packages like Microsoft.AspNetCore.Authentication or Microsoft.AspNetCore.Identity, instead of depending on the whole framework:

<ItemGroup>
  <PackageReference Include="Microsoft.AspNetCore.Authentication" Version="2.1.0"/>
  <PackageReference Include="Microsoft.AspNetCore.Identity" Version="2.1.0"/>
</ItemGroup>

This was generally most useful for libraries, as apps would always depend on the shared framework by necessity. However, in .NET Core 3.0, this is no longer possible. Those NuGet packages aren't being produced any more. Instead, if you need to reference any of these libraries, from your class library you must add the <FrameworkReference> element to your project file.

Another thing to be aware of is that some packages, e.g. EF Core and the social authentication providers, are no longer part of the shared framework. If you need to use those packages, you'll have to manually install the NuGet package in your project.

For the full list of packages that apply, see this GitHub issue.

Changes in Program.cs from 2.x to 3.0

The Program.cs in ASP.NET Core 3.0 looks very similar to the version from .NET Core 2.x on first glance, but actually many of the types have changed. This is because in .NET Core 3.0, ASP.NET Core has been re-platted to run on top of the Generic Host, instead of using a separate Web Host.

public class Program
{
    public static void Main(string[] args)
    {
        CreateHostBuilder(args).Build().Run();
    }

    public static IHostBuilder CreateHostBuilder(string[] args) =>
        Host.CreateDefaultBuilder(args)
            .ConfigureWebHostDefaults(webBuilder =>
            {
                webBuilder.UseStartup<Startup>();
            });
}

The Generic Host was introduced in 2.1, and was a nice idea, but I found various issues with it, primarily as it created more work for libraries. Thankfully this change in 3.0 should solve those issues.

For the most part, the end result is very similar to what you're used to in .NET Core 2.x, but it's broken into two logical steps. Instead of a single method WebHost.CreateDefaultBuilder(), that configures everything for your app, there are two separate method calls:

  • Host.CreateDefaultBuilder(). This configures the app configuration, logging, and dependency injection container.
  • IHostBuilder.ConfigureWebHostDefaults(). This adds everything else needed for a typical ASP.NET Core application, such as configuring Kestrel and using a Startup.cs to configure your DI container and middleware pipeline.

The generic host builder

As I've already mentioned, the generic host forms the foundation for building ASP.NET Core 3.0 applications. It provides the foundational Microsoft.Extensions.* elements you're used to in ASP.NET Core apps, such as logging, configuration, and dependency injection.

The code below is a simplified version of the Host.CreateDefaultBuilder() method. It's similar to the WebHost.CreateDefaultBuilder() method from 2.x, but there are a few interesting changes that I'll discuss shortly.

public static IHostBuilder CreateDefaultBuilder(string[] args)
{
    var builder = new HostBuilder();

    builder.UseContentRoot(Directory.GetCurrentDirectory());
    builder.ConfigureHostConfiguration(config =>
    {
        // Uses DOTNET_ environment variables and command line args
    });

    builder.ConfigureAppConfiguration((hostingContext, config) =>
    {
        // JSON files, User secrets, environment variables and command line arguments
    })
    .ConfigureLogging((hostingContext, logging) =>
    {
        // Adds loggers for console, debug, event source, and EventLog (Windows only)
    })
    .UseDefaultServiceProvider((context, options) =>
    {
        // Configures DI provider validation
    });

    return builder;
}

In summary, the differences between this method and the version in 2.x are:

  • Uses DOTNET_ prefix for environment variable hosting configuration
  • Uses command line variables for hosting configuration
  • Adds EventSourceLogger and EventLogLogger logger providers
  • Optionally enables ServiceProvider validation
  • Configures nothing specific to web hosting.

The first point of interest is how the host configuration is set up. With the web host, configuration used environment variables that are prefixed with ASPNETCORE_ by default. So setting the ASPNETCORE_ENVIRONMENT environment variable would set the Environment configuration value. For the generic host, this prefix is now DOTNET_, plus any command line arguments passed to the application at runtime.

The host configuration controls things like what Hosting Environment the application is running in, and is separate from your app configuration (which is often used with the IOptions interface).

The method to configure your app settings, ConfigureAppConfiguration() is unchanged from 2.x, so it still uses an appsettings.json file, an appsettings.ENV.json file, user secrets, environment variables, and command line arguments.

The logging section of the generic host has been expanded in 3.0. It still configures log-level filtering via your app configuration, and adds the Console and Debug logger providers. However it also adds the EventSource logging provider, which is used to interface with OS logging systems like ETW on Windows and LTTng on Linux. Additionally, on Windows only, the logger adds an Event Log provider, for writing to the Windows Event Log.

Finally, the generic host configures the dependency injection container so that it validates scopes when running in the development environment, as it did in 2.x. This aims to catch instances of captured dependencies, where you inject a Scoped service into a Singleton service. In 3.0 the generic host also enables ValidateOnBuild, which is a feature I'll be looking at in a subsequent post.

A key point of the generic host is that it's generic, that is, it has nothing specifically related to ASP.NET Core or HTTP workloads. You can use the generic host as as base for creating console apps or long lived services, as well as typical ASP.NET Core apps. To account for that, in 3.0 you have an additional method that adds the ASP.NET Core layer on top - ConfigureWebHostDefaults().

Reinstating ASP.NET Core features with ConfigureWebHostDefaults

This post is already getting pretty long, so I won't go into too much detail here, but the ConfigureWebHostDefaults extension method is used to add the ASP.NET Core "layer" on top of the generic host's features. At the simplest level, this involves adding the Kestrel web server to the host, but there are a number of other changes too. The following is an overview of what the method provides (including features provided by the GenericWebHostBuilder):

  • Adds ASPNETCORE_ prefixed environment variables to the host configuration (in addition to the DOTNET_ prefixed variables and command line arguments).
  • Adds the GenericWebHostService. This is an IHostedService implementation that actually runs the ASP.NET Core server. This is the main feature that made it possible to reuse the generic host with ASP.NET Core.
  • Adds an additional app configuration source, the StaticWebAssetsLoader for working with static files (css/js) in Razor UI class libraries.
  • Configures Kestrel using its defaults (same as 2.x)
  • Adds the HostFilteringStartupFilter (same as 2.x)
  • Adds the ForwardedHeadersStartupFilter, if the ForwardedHeaders_Enabled configuration value is true, i.e. if the ASPNETCORE_FORWARDEDHEADERS_ENABLED environment variable is true.
  • Enables IIS integration on Windows.
  • Adds the endpoint routing services to the DI container.

Much of this is the same as in ASP.NET Core 2.x, with the exception of: the infrastructure for running the app as an IHostedService; endpoint routing, which is enabled globally in 3.0 (rather than for MVC/Razor Pages only in 2.2); and the ForwardedHeadersStartupFilter.

The ForwardedHeadersMiddleware has been around since 1.0 and is required when hosting your application behind a proxy, to ensure your application handles SSL-offloading and generates URLs correctly. What's changed is that you can configure the middleware to use the X-Forwarded-For and X-Forwarded-Proto headers by just setting an environment variable.

Summary

In this post I dug into the changes from ASP.NET Core 2.x to 3.0 in just two files: the .csproj project file, and the `Program.cs file. On the face of it, there are only minimal changes to these files, so porting from 2.x to 3.0 should not be difficult. This simplicity belies the larger changes under the hood: there are significant changes to the shared framework, and ASP.NET Core has been re-platted on top of the generic host.

The largest issue I expect people to run into is the differences in NuGet packages - some applications will have to remove references to ASP.NET Core packages, while adding explicit references to others. While not difficult to resolve, it could be confusing for users not familiar with the change, so should be the first suspect with any issues.

Comparing Startup.cs between the ASP.NET Core 3.0 templates: Exploring ASP.NET Core 3.0 - Part 2

$
0
0
Comparing Startup.cs between the ASP.NET Core 3.0 templates

The .NET Core 3.0 SDK includes many more templates out-of-the-box than previous versions. In this post I compare some of the different templates used by ASP.NET Core 3 apps, and look at some of the new helper methods used for service and middleware configuration in ASP.NET Core 3.0.

I'm only looking at the ASP.NET Core templates in this post:

There are many more templates than these that I'm not covering here - Blazor templates, client-side templates, worker templates - you can see them all by running dotnet new list!

The ASP.NET Core Empty template

You can create the "empty" template by running dotnet new web, and it's pretty, well, empty. You get the standard Program.cs configuring the Generic Host, and a sparse Startup.cs shown below:

public class Startup
{
    public void ConfigureServices(IServiceCollection services) { }

    public void Configure(IApplicationBuilder app, IWebHostEnvironment env)
    {
        if (env.IsDevelopment())
        {
            app.UseDeveloperExceptionPage();
        }

        app.UseRouting();

        app.UseEndpoints(endpoints =>
        {
            endpoints.MapGet("/", async context =>
            {
                await context.Response.WriteAsync("Hello World!");
            });
        });
    }
}

The main difference compared to ASP.NET Core 2.x apps is the conspicuous use of endpoint routing. This was introduced in 2.2, but could only be used for MVC controllers. In 3.0, endpoint routing is the preferred approach, with the most basic setup provided here.

Endpoint routing separates the process of selecting which "endpoint" will execute from the actual running of that endpoint. An endpoint consists of a path pattern, and something to execute when called. It could be an MVC action on a controller or it could be a simple lambda, as shown in this example where we're creating an endpoint using MapGet() for the path /.

The UseRouting() extension method is what looks at the incoming request and decides which endpoint should execute. Any middleware that appears after the UseRouting() call will know which endpoint will run eventually. The UseEndpoints() call is responsible for configuring the endpoints, but also for executing them.

If you're new to endpoint routing, I suggest taking a look at this post by Areg Sarkissian, or this post by Jürgen Gutsch.

The ASP.NET Core Web API template

The next most complex template is the Web API template, created by running dotnet new webapi. This includes a simple [ApiController] Controller with a single Get method. The Startup.cs file (shown below) is slightly more complex than the empty template, but includes many of the same aspects.

 public class Startup
{
    public Startup(IConfiguration configuration)
    {
        Configuration = configuration;
    }

    public IConfiguration Configuration { get; }

    public void ConfigureServices(IServiceCollection services)
    {
        services.AddControllers();
    }

    public void Configure(IApplicationBuilder app, IWebHostEnvironment env)
    {
        if (env.IsDevelopment())
        {
            app.UseDeveloperExceptionPage();
        }

        app.UseHttpsRedirection();

        app.UseRouting();

        app.UseAuthorization();

        app.UseEndpoints(endpoints =>
        {
            endpoints.MapControllers();
        });
    }
}

It isn't used in the default template, but the IConfiguration is injected in the constructor in this template. In any real application you'll almost certainly need access to this to configure your services, so it makes sense.

In ConfigureServices, there's a call to an extension method, AddControllers(), which is new in ASP.NET Core 3.0. In 2.x, you would typically call services.AddMvc() for all ASP.NET Core applications. However, this would configure the services for everything MVC used, such as Razor Pages and View rendering. If you're creating a Web API only, then those services were completely superfluous.

To get around this, I showed in a previous post how you could create a stripped down version of AddMvc(), only adding the things you really need for creating Web APIs. The AddControllers() extension method now does exactly that - it adds the services required to use Web API Controllers, and nothing more. So you get Authorization, Validation, formatters, and CORS for example, but nothing related to Razor Pages or view rendering. For the full details of what's included see the source code on GitHub.

The middleware pipeline is fleshed out a little compared to the empty template. We have the developer exception page when running in the Development environment, but note there's no exception page in other environments. That's because it's expected that the ApiController will transform errors to the standard Problem Details format.

Next is the HTTPS redirection middleware, which ensures requests are made over a secure domain (definitely a best practice). Then we have the Routing middleware, early in the pipeline again, so that subsequent middleware can use the selected endpoint when deciding how to behave.

The Authorization middleware is new in 3.0, and is enabled largely thanks to the introduction of endpoint routing. You can still decorate your controller actions with [Authorize] attributes, but now the enforcement of those attributes occurs here. The real advantage is that you can apply authorization policies to non-MVC endpoints, which previously had to be handled in a manual, imperative manner.

Finally, the API controllers are mapped by calling endpoints.MapControllers(). This only maps controllers that are decorated with routing attributes - it doesn't configure any conventional routes.

The ASP.NET Core Web App (MVC) template

The MVC template (dotnet new mvc) includes a few more pieces than the Web API template, but it's been slimmed down slightly from its equivalent in 2.x. There's only a single controller, the HomeController, the associated Views, and required shared Razor templates.

Startup.cs is very similar to the Web API template, with just a few differences I discuss below:

public class Startup
{
    public Startup(IConfiguration configuration)
    {
        Configuration = configuration;
    }

    public IConfiguration Configuration { get; }

    public void ConfigureServices(IServiceCollection services)
    {
        services.AddControllersWithViews();
    }

    public void Configure(IApplicationBuilder app, IWebHostEnvironment env)
    {
        if (env.IsDevelopment())
        {
            app.UseDeveloperExceptionPage();
        }
        else
        {
            app.UseExceptionHandler("/Home/Error");
            app.UseHsts();
        }

        app.UseHttpsRedirection();
        app.UseStaticFiles();

        app.UseRouting();

        app.UseAuthorization();

        app.UseEndpoints(endpoints =>
        {
            endpoints.MapControllerRoute(
                name: "default",
                pattern: "{controller=Home}/{action=Index}/{id?}");
        });
    }
}

In place of the AddControllers() extension method, this time we have AddControllersWithViews. As you might expect, this adds the MVC Controller services that are common to both Web API and MVC, but also adds the services required for rendering Razor views.

As this is an MVC app, the middleware pipeline includes the Exception handler middleware for environments outside of Development, and also adds the HSTS and HTTPS redirection middleware, the same as for 2.2.

Next up is the static file middleware, which is placed before the routing middleware. This ensures that routing doesn't need to happen for every static file request, which could be quite frequent in an MVC app.

The only other difference from the Web API template is the registration of the MVC controllers in the endpoint routing middleware. In this case a conventional route is added for the MVC controllers, instead of the attribute routing approach that is typical for Web APIs. Again, this is similar to the setup in 2.x, but adjusted for the endpoint routing system.

ASP.NET Core Web App (Razor) template

Razor Pages was introduced in ASP.NET Core 2.0 as a page-based alternative to MVC. For many apps, Razor Pages provides a more natural model than MVC, However it's fundamentally built on top of the MVC infrastructure, so the Startup.cs from dotnet new webapp looks very similar to the MVC version:

public class Startup
{
    public Startup(IConfiguration configuration)
    {
        Configuration = configuration;
    }

    public IConfiguration Configuration { get; }

    public void ConfigureServices(IServiceCollection services)
    {
        services.AddRazorPages();
    }

    public void Configure(IApplicationBuilder app, IWebHostEnvironment env)
    {
        if (env.IsDevelopment())
        {
            app.UseDeveloperExceptionPage();
        }
        else
        {
            app.UseExceptionHandler("/Error");
            app.UseHsts();
        }

        app.UseHttpsRedirection();
        app.UseStaticFiles();

        app.UseRouting();

        app.UseAuthorization();

        app.UseEndpoints(endpoints =>
        {
            endpoints.MapRazorPages();
        });
    }
}

The first change in this file is the replacement of AddControllersWithViews() with AddRazorPages(). As you might expect, this adds all of the additional services required for Razor Pages. Interestingly it does not add the services required for using standard MVC controllers with Razor Views. If you want to use both MVC and Razor Pages in your app, you should continue to use the AddMvc() extension method.

The only other change to Startup.cs is to replace the MVC endpoint with the Razor Pages endpoint. As with the services, if you wish to use both MVC and Razor Pages in your app, then you'll need to map both endpoints, e.g.

app.UseEndpoints(endpoints =>
{
    endpoints.MapControllers(); // Map attribute-routed API controllers
    endpoints.MapDefaultControllerRoute(); // Map conventional MVC controllers using the default route
    endpoints.MapRazorPages();
});

Summary

This post provided a brief overview of the Startup.cs files created by the various ASP.NET Core templates using the .NET Core 3.0 SDK. Each template adds a little extra to the previous one, providing a few extra features. In many ways the templates are very similar to those from .NET Core 2.x. The biggest new features are the ability to more easily include the minimal number of MVC services required by your app, and the new endpoint routing, which is the standard routing approach in .NET Core 3.0

New in ASP.NET Core 3: Service provider validation: Exploring ASP.NET Core 3.0 - Part 3

$
0
0
New in ASP.NET Core 3: Service provider validation

In this post I describe the new "validate on build" feature that has been added to ASP.NET Core 3.0. This can be used to detect when your DI service provider is misconfigured. Specifically, the feature detects where you have a dependency on a service that you haven't registered in the DI container.

I'll start by showing how the feature works, and then show some situations where you can have a misconfigured DI container that the feature won't identify as faulty.

It's worth pointing out that validating your DI configuration is not a new idea - this was a feature of StructureMap I used regularly, and it's spiritual successor, Lamar, has a similar feature.

The sample app

For this post, I'm going to use an app based on the default dotnet new webapi template. This consists of a single controller, the WeatherForecastService, that returns a randomly generated forecast based on some static data.

To exercise the DI container a little, I'm going to extract a couple of services. First, the controller is refactored to:

[ApiController]
[Route("[controller]")]
public class WeatherForecastController : ControllerBase
{
    private readonly WeatherForecastService _service;
    public WeatherForecastController(WeatherForecastService service)
    {
        _service = service;
    }

    [HttpGet]
    public IEnumerable<WeatherForecast> Get()
    {
        return _service.GetForecasts();
    }
}

So the controller depends on the WeatherForecastService. This is shown below (I've elided the actual implementation as it's not important for this post):

public class WeatherForecastService
{
    private readonly DataService _dataService;
    public WeatherForecastService(DataService dataService)
    {
        _dataService = dataService;
    }

    public IEnumerable<WeatherForecast> GetForecasts()
    {
        var data = _dataService.GetData();

        // use data to create forcasts

        return new List<WeatherForecast>();
    }
}

This service depends on another, the DataService, shown below:

public class DataService
{
    public string[] GetData() => new[]
    {
        "Freezing", "Bracing", "Chilly", "Cool", "Mild", "Warm", "Balmy", "Hot", "Sweltering", "Scorching"
    };
}

That's all of the services we need, so all that remains is to register them in the DI container in Startup.ConfigureServices:

public void ConfigureServices(IServiceCollection services)
{
    services.AddControllers();
    services.AddSingleton<WeatherForecastService>();
    services.AddSingleton<DataService>();
}

I've registered them as singletons for this example, but that's not important for this feature. With everything set up correctly, sending a request to /WeatherForecast returns a forecast:

[{
    "date":"2019-09-07T22:29:31.5545422+00:00",
    "temperatureC":31,
    "temperatureF":87,
    "summary":"Sweltering"
}]

Everything looks good here, so let's see what happens if we mess up the DI registration.

Detecting unregistered dependencies on startup

Let's mess things up a bit, and "forget" to register the DataService dependency in the DI container:

public void ConfigureServices(IServiceCollection services)
{
    services.AddControllers();
    services.AddSingleton<WeatherForecastService>();
    // services.AddSingleton<DataService>();
}

If we run the app again with dotnet run, we get an exception, a giant stack trace, and the app fails to start. I've truncated and formatted the result below:

Unhandled exception. System.AggregateException: Some services are not able to be constructed
(Error while validating the service descriptor 
    'ServiceType: TestApp.WeatherForecastService Lifetime: Scoped ImplementationType:
     TestApp.WeatherForecastService': Unable to resolve service for type
    'TestApp.DataService' while attempting to activate 'TestApp.WeatherForecastService'.)     

This error makes it clear what the problem is - "Unable to resolve service for type 'TestApp.DataService' while attempting to activate 'TestApp.WeatherForecastService'". This is the DI validation feature doing it's job! It should help reduce the number of DI errors you discover during normal operation of your app, by throwing as soon as possible on app startup. It's not as useful as an error at compile-time, but that's the price of the flexibility a DI container provides.

What if we forget to register the WeatherForecastService instead:

public void ConfigureServices(IServiceCollection services)
{
    services.AddControllers();
    // services.AddSingleton<WeatherForecastService>();
    services.AddSingleton<DataService>();
}

In this case the app starts up fine, and we don't get any error until we hit the API, at which point it blows up!

Oh dear, time for the gotchas…

1. Controller constructor dependencies aren't checked

The reason the validation feature doesn't catch this problem is that controllers aren't created using the DI container. As I described in a previous post, the DefaultControllerActivator sources a controller's dependencies from the DI container, but not the controller itself. Consequently, the DI container doesn't know anything about the controllers, and so can't check their dependencies are registered.

Luckily, there's a way around this. You can change the controller activator so that controllers are added to the DI container by using the AddControllersAsServices() method on IMvcBuilder:

public void ConfigureServices(IServiceCollection services)
{
    services.AddControllers()
        .AddControllersAsServices(); // Add the controllers to DI

    // services.AddSingleton<WeatherForecastService>();
    services.AddSingleton<DataService>();
}

This enables the ServiceBasedControllerActivator (see my previous post for a detailed explanation) and registers the controllers in the DI container as services. If we run the app now, the validation detects the missing controller dependency on app startup, and throws an exception:

Unhandled exception. System.AggregateException: Some services are not able to be constructed
(Error while validating the service descriptor 
    'ServiceType: TestApp.Controllers.WeatherForecastController Lifetime: Transient
    ImplementationType: TestApp.Controllers.WeatherForecastController': Unable to 
    resolve service for type 'TestApp.WeatherForecastService' while attempting to
    activate'TestApp.Controllers.WeatherForecastController'.)

This seems like a handy solution, but I'm not entirely sure what the trade offs are, but it should be fine (it's a supported scenario after all).

We're not out of the woods yet though, as constructor injection isn't the only way to inject dependencies into controllers…

2. [FromServices] injected dependencies aren't checked

Model binding is used in MVC actions to control how an action method's parameters are created, based on the incoming request, using attributes such as [FromBody] and [FromQuery].

In a similar vein, the [FromServices] attribute can be applied to action method parameters, and those parameters will be created by sourcing them from the DI container. This can be useful if you have a dependency which is only required by a single action method. Instead of injecting the service into the constructor (and therefore creating it for every action on that controller) you can inject it into the specific action instead.

For example, we could rewrite the WeatherForecastController to use [FromServices] injection as follows:

[ApiController]
    [Route("[controller]")]
    public class WeatherForecastController : ControllerBase
    {
        [HttpGet]
        public IEnumerable<WeatherForecast> Get(
            [FromServices] WeatherForecastService service) // injected using DI
        {
            return service.GetForecasts();
        }
    }

There's obviously no reason to do that here, but it makes the point. Unfortunately, the DI validation won't be able to detect this use of an unregistered service. The app will start just fun, but will throw an Exception when you attempt to call the action.

The obvious solution to this one is to avoid the [FromServices] attribute where possible, which shouldn't be difficult to achieve, as you can always inject into the constructor if needs be.

There's one more way to source services from the DI container - using service location.

3. Services sourced directly from IServiceProvider aren't checked

Let's rewrite the WeatherForecastController one more time. Instead of directly injecting the WeatherForecastService, we'll inject an IServiceProvider, and use the service location anti-pattern to retrieve the dependency.

[ApiController]
[Route("[controller]")]
public class WeatherForecastController : ControllerBase
{
    private readonly WeatherForecastService _service;
    public WeatherForecastController(IServiceProvider provider)
    {
        _service = provider.GetRequiredService<WeatherForecastService>();
    }

    [HttpGet]
    public IEnumerable<WeatherForecast> Get()
    {
        return _service.GetForecasts();
    }
}

Code like this, where you're injecting the IServiceProvider, is generally a bad idea. Instead of being explicit about it's dependencies, this controller has an implicit dependency on WeatherForecastController. As well as being harder for developers to reason about, it also means the DI validator doesn't know about the dependency. Consequently, this app will start up fine, and throw on first use.

Unfortunately, you can't always avoid leveraging IServiceProvider. One case is where you have a singleton object that needs scoped dependencies as I described here. Another is where you have a singleton object that can't have constructor dependencies, like validation attributes (as I described here). Unfortunately there's no way around those situations, and you just have to be aware that the guard rails are off.

A similar gotcha that's not immediately obvious is when you're using a factory function to create your dependencies.

4. Services registered using factory functions aren't checked

Let's go back to our original controller, injecting WeatherForecastService into the constructor, and registering the controllers with the DI container using AddControllersAsServices(). But we'll make two changes:

  1. Forget to register the DataService.
  2. Use a factory function to create WeatherForecastService.

When I say a factory function, I mean a lambda that's provided at service registration time, that describes how to create the service. For example:

public void ConfigureServices(IServiceCollection services)
{
    services.AddControllers()
        .AddControllersAsServices();
    services.AddSingleton<WeatherForecastService>(provider => 
    {
        var dataService = new DataService();
        return new WeatherForecastService(dataService);
    });
    // services.AddSingleton<DataService>(); // not required

}

In the above example, we provided a lambda for the WeatherForecastService that describes how to create the service. Inside the lambda we manually construct the DataService and WeatherForecastService.

This won't cause any problems in our app, as we are able to resolve the WeatherForecastService from the DI container using the above factory method. We never have to resolve the DataService directly from the DI container. We only need it in the WeatherForecastService, and we're manually constructing it, so there's no problems.

The difficulties arise if we use the injected IServiceProvider provider in the factory function:

public void ConfigureServices(IServiceCollection services)
{
    services.AddControllers()
        .AddControllersAsServices();
    services.AddSingleton<WeatherForecastService>(provider => 
    {
        var dataService = provider.GetRequiredService<DataService>();
        return new WeatherForecastService(dataService);
    });
    // services.AddSingleton<DataService>(); // Required!
}

As far as the DI validation is concerned, this factory function is exactly the same as the previous one, but actually there's a problem. We're using the IServiceProvider to resolve the DataService at runtime using the service locator pattern; so we have an implicit dependency. This is essentially the same as gotcha 3 — the service provider validator can't detect cases where services are obtained directly from the service provider.

As with the previous gotcha, code like this is sometimes necessary, and there's no easy way to work around it. If that's the case, just be extra careful that the dependencies you request are definitely registered correctly.

An idea I toyed with is registering a "dummy" class in dev only, that takes all of these "hidden" classes as constructor dependencies. That may help catch registration issues using the service provider validator, but is probably more effort and error prone than it's worth.

5. Open generic types aren't checked

The final gotcha is called out in the ASP.NET Core source code itself: ValidateOnBuild does not validate open generic types.

As an example, imagine we have a generic ForcastService<T>, that can generate multiple types of forecast, T.

public class ForecastService<T> where T: new();
{
    private readonly DataService _dataService;
    public ForecastService(DataService dataService)
    {
        _dataService = dataService;
    }

    public IEnumerable<T> GetForecasts()
    {
        var data = _dataService.GetData();

        // use data to create forcasts

        return new List<T>();
    }
}

In Startup.cs we register the open generic, but again forget to register the DataService:

public void ConfigureServices(IServiceCollection services)
{
    services.AddControllers()
        AddControllersAsServices();

    // register the open generic
    services.Addingleton(typeof(ForecastService<>));
    // services.AddSingleton<DataService>(); // should cause an error
}

The service provider validation completely skips over the open generic registration, so it never detects the missing DataService dependency. The app starts up without errors, and will throw a runtime exception if you try to request a ForecastService<T>.

However, if you take a closed version of this dependency in your app anywhere (which is probably quite likely), the validation will detect the problem. For example, we can update the WeatherForecastController to use the generic service, by closing the generic with T as WeatherForecast:

[ApiController]
[Route("[controller]")]
public class WeatherForecastController : ControllerBase
{
    private readonly ForecastService<WeatherForecast> _service;
    public WeatherForecastController(ForecastService<WeatherForecast> service)
    {
        _service = service;
    }

    [HttpGet]
    public IEnumerable<WeatherForecast> Get()
    {
        return _service.GetForecasts();
    }
}

The service provider validation does detect this! So in reality, the lack of open generic testing is probably not going to be as big a deal as the service locator and factory function gotchas. You always need to close a generic to inject it into a service (unless that service itself is an open generic), so hopefully you should pick up many cases. The exception to this is if you're sourcing open generics using the service locator IServiceProvider, but then you're really back to gotchas 3 and 4 anyway!

Enabling service validation in other environments

That's the last of the gotchas I'm aware of, but as a final note, it's worth remembering that service provider validation is only enabled in the Development environment by default. That's because there's a startup cost to it, the same as for scope validation.

However, if you have any sort of "conditional service registration", where a different service is registered in Development than in other environments, you may want to enable validation in other environments too. You can do this by adding an additional UseDefaultServiceProvider call to your default host builder, in Program.cs. In the example below I've enabled ValidateOnBuild in all environments, but kept scope validation in Development only:

public class Program
{
    public static void Main(string[] args)
    {
        CreateHostBuilder(args).Build().Run();
    }

    public static IHostBuilder CreateHostBuilder(string[] args) =>
        Host.CreateDefaultBuilder(args)
            .ConfigureWebHostDefaults(webBuilder =>
            {
                webBuilder.UseStartup<Startup>();
            })
            // Add a new service provider configuration
            .UseDefaultServiceProvider((context, options) =>
            {
                options.ValidateScopes = context.HostingEnvironment.IsDevelopment();
                options.ValidateOnBuild = true;
            });

Summary

In this post I described the ValidateOnBuild feature which is new in .NET Core 3.0. This allows the Microsoft.Extensions DI container to check for errors in your service configuration when a service provider is first built. This can be used to detect issues on application startup, instead of at runtime when the misconfigured service is requested.

While useful, there are a number of cases that the validation won't catch, such as injection into MVC controllers, using the IServiceProvider service locator, and open generics. You can work around some of these, but even if you can't, it's worth keeping them in mind, and not relying on your app to catch 100% of your DI problems!
Running async tasks on app startup in ASP.NET Core 3.0: Exploring ASP.NET Core 3.0 - Part 4

$
0
0
Running async tasks on app startup in ASP.NET Core 3.0

In this post I describe how a small change in the ASP.NET Core 3.0 WebHost makes it easier to run asynchronous tasks on app startup using IHostedService.

Running asynchronous tasks on app startup.

In a previous series I showed various ways you could run asynchronous tasks on app startup. There are many reasons you might want to do this - running database migrations, validating strongly-typed configuration, or populating a cache, for example.

Unfortunately, in 2.x it wasn't possible to use any of the built-in ASP.NET Core primitives to achieve this:

  • IStartupFilter has a synchronous API, so would require doing sync over async.
  • IApplicationLifetime has a synchronous API and raises the ApplicationStarted event after the server starts handling requests.
  • IHostedService has an asynchronous API, but is executed after the server is started and starts handling requests.

Instead, I proposed two possible solutions:

With ASP.NET Core 3.0, a small change in the WebHost code makes a big difference - we no longer need these solutions, and can use IHostedService without the previous concerns!

A small change makes all the difference

In ASP.NET Core 2.x you can run background services by implementing IHostedService. These are started shortly after the app starts handing requests (i.e. after the Kestrel web server is started), and are stopped when the app shuts down.

In ASP.NET Core 3.0 IHostedService still serves the same purpose - running background tasks. But thanks to a small change in WebHost you can now also use it for automatically running async tasks on app startup.

The change in question is these lines from the WebHost in ASP.NET Core 2.x:

public class WebHost
{
    public virtual async Task StartAsync(CancellationToken cancellationToken = default)
    {
        // ... initial setup
        await Server.StartAsync(hostingApp, cancellationToken).ConfigureAwait(false);

        // Fire IApplicationLifetime.Started
        _applicationLifetime?.NotifyStarted();

        // Fire IHostedService.Start
        await _hostedServiceExecutor.StartAsync(cancellationToken).ConfigureAwait(false);

        // ...remaining setup
    }
}

In ASP.NET Core 3.0, these have been changed to this:

public class WebHost
{
    public virtual async Task StartAsync(CancellationToken cancellationToken = default)
    {
        // ... initial setup

        // Fire IHostedService.Start
        await _hostedServiceExecutor.StartAsync(cancellationToken).ConfigureAwait(false);

        // ... more setup
        await Server.StartAsync(hostingApp, cancellationToken).ConfigureAwait(false);

        // Fire IApplicationLifetime.Started
        _applicationLifetime?.NotifyStarted();

        // ...remaining setup
    }
}

As you can see, IHostedService.Start is now executed before Server.StartAsync. This change means you can now use IHostedService to run async tasks.

This assumes that you want to delay your app handling requests until after the async task has completed. If that's not the case, you may want to use the Health Check approach from the last post in my series.

Using an IHostedService to run async tasks on app startup

Implementing an IHostedService as an "app startup" task is not difficult. The interface consists of just two methods:

public interface IHostedService
{
    Task StartAsync(CancellationToken cancellationToken);
    Task StopAsync(CancellationToken cancellationToken);
}

Any code you want to be run just before receiving requests should be placed in the StartAsync method. The StopAsync method can be ignored for this use case.

For example, the following startup task runs EF Core migrations asynchronously on app startup:

public class MigratorHostedService: IHostedService
{
    // We need to inject the IServiceProvider so we can create 
    // the scoped service, MyDbContext
    private readonly IServiceProvider _serviceProvider;
    public MigratorStartupFilter(IServiceProvider serviceProvider)
    {
        _serviceProvider = serviceProvider;
    }

    public async Task StartAsync(CancellationToken cancellationToken)
    {
        // Create a new scope to retrieve scoped services
        using(var scope = _seviceProvider.CreateScope())
        {
            // Get the DbContext instance
            var myDbContext = scope.ServiceProvider.GetRequiredService<MyDbContext>();

            //Do the migration asynchronously
            await myDbContext.Database.MigrateAsync();
        }
    }

    // noop
    public Task StopAsync(CancellationToken cancellationToken) => Task.CompletedTask;
}

To add the task to the dependency injection container, and have it run just before your app starts receiving requests, use the AddHostedService<> extension method:

public class Startup
{
    public void ConfigureServices(IServiceCollection services)
    {
        // other DI configuration
        services.AddHostedService<MigratorHostedService>();
    }

    public void Configure(IApplicationBuilder)
    {
        // ...middleware configuration
    }
}

The services will be executed at startup in the same order they are added to the DI container, i.e. services added later in ConfigureServices will be executed later on startup.

Summary

In this post I described how a small change in the WebHost in ASP.NET Core 3.0 enables you to more easily run asynchronous tasks on app startup. In ASP.NET Core 2.x there wasn't an ideal option (I proposed various approaches in a previous series), but the change in 3.0 means IHostedService can be used to fulfil that role.

Introducing IHostLifetime and untangling the Generic Host startup interactions: Exploring ASP.NET Core 3.0 - Part 5

$
0
0
Introducing IHostLifetime and untangling the Generic Host startup interactions

In this post I describe how ASP.NET Core 3.0 has been re-platformed on top of the generic host, and some of the benefits that brings. I show a new abstraction introduced in 3.0, IHostLifetime and describe its role for managing the lifecycle of applications, especially worker services.

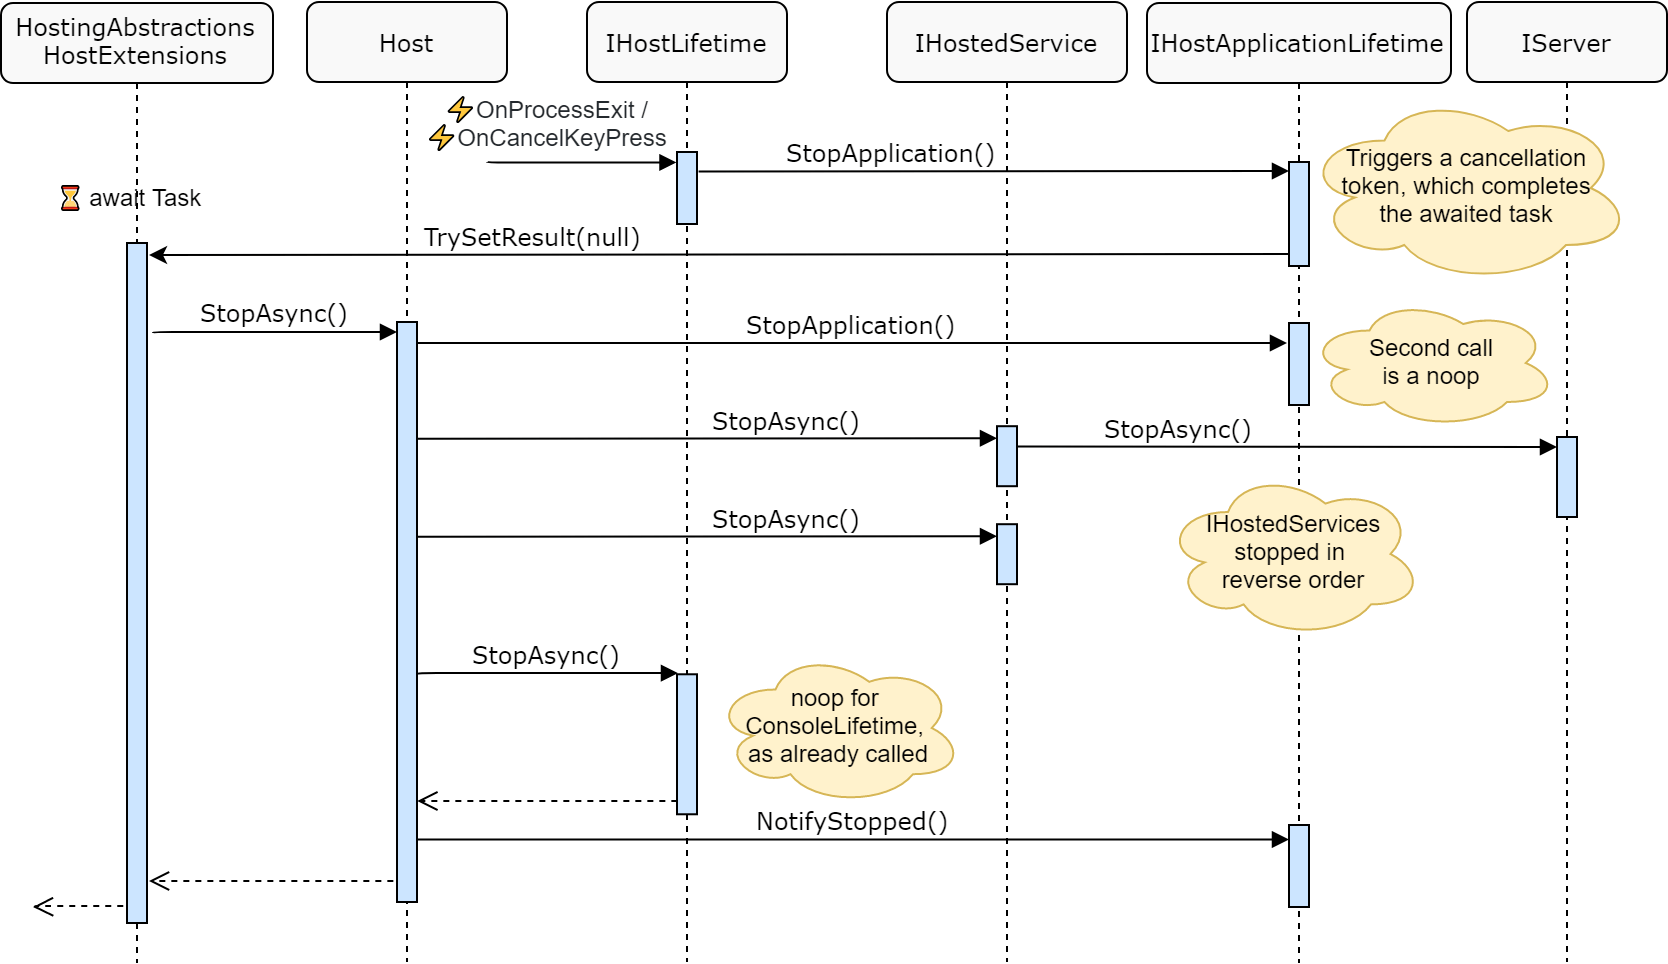
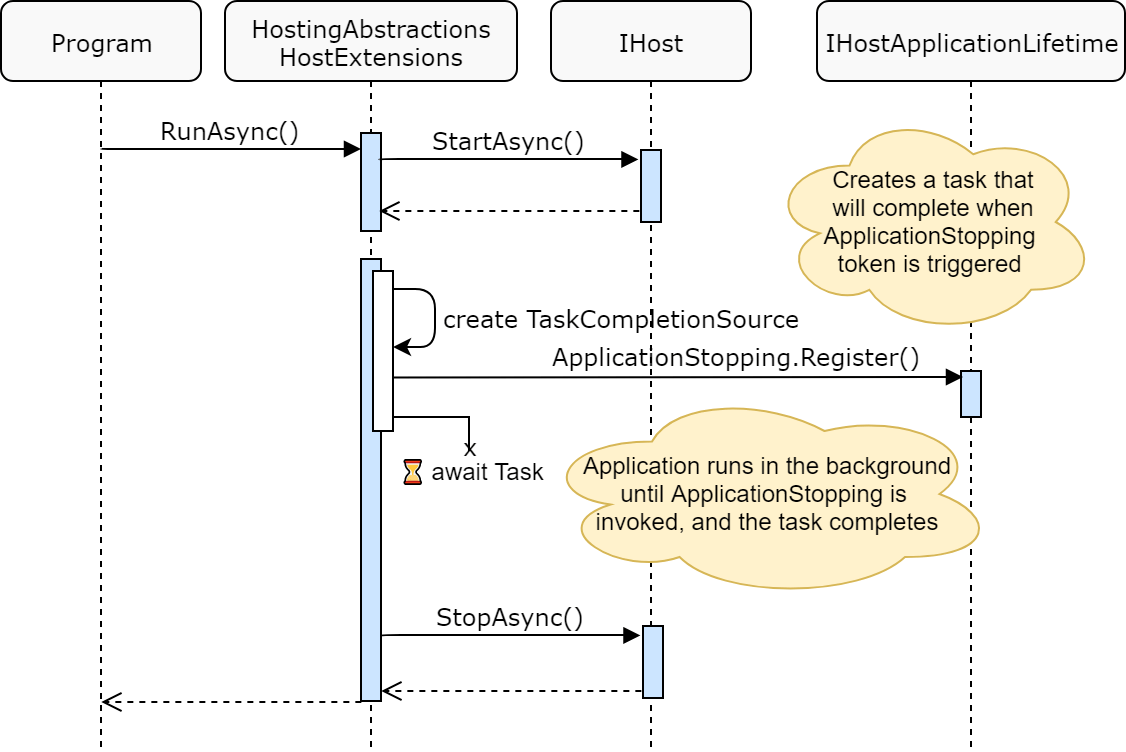
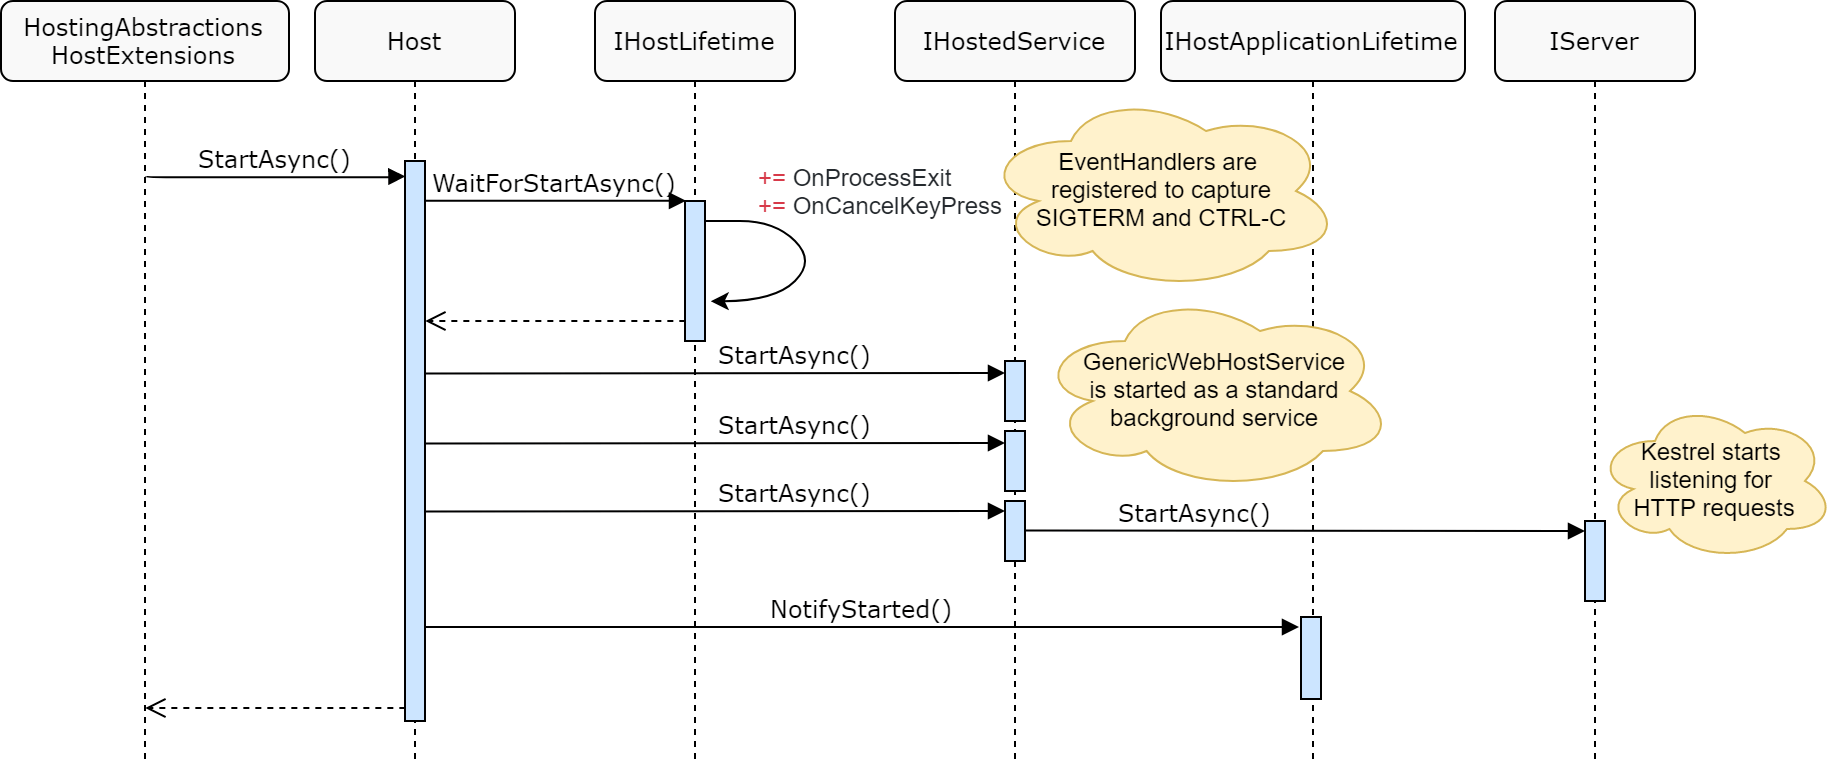
In the second half of the post I look in detail at the interactions between classes and their roles during application startup and shutdown. I go into quite a bit of detail about things you generally shouldn't have to deal with, but I found it useful for my own understanding even if no one else cares! 🙂

Background: Re-platforming ASP.NET Core onto the Generic Host

One of the key features of ASP.NET Core 3.0 is that the whole stack has been re-written to sit on top of the .NET Generic Host. The .NET Generic Host was introduced in ASP.NET Core 2.1, as a "non-web" version of the existing WebHost used by ASP.NET Core. The generic host allowed you to re-use many of the DI, configuration, and logging abstractions of Microsoft.Extensions in non-web scenarios.

While this was definitely an enviable goal, it had some issues in the implementation. The generic host essentially duplicated many of the abstractions required by ASP.NET Core, creating direct equivalents, but in a different namespace. A good example of the problem is IHostingEnvironment - this has existed in ASP.NET Core in the Microsoft.AspNetCore.Hosting since version 1.0. But in version 2.1, a new IHostingEnvironment was added in the Microsoft.Extensions.Hosting namespace. Even though the interfaces are identical, having both causes issues for generic libraries trying to use the abstractions.

With 3.0, the ASP.NET Core team were able to make significant changes that directly address this issue. Instead of having two separate Hosts/Stacks, they were able to re-write the ASP.NET Core stack so that it sits on top of the .NET generic host. That means it can truly re-use the same abstractions, resolving the issue described above. This move was also partly motivated by the desire to build additional non-HTTP stacks on top of the generic host, such as the gRPC features introduced in ASP.NET Core 3.0.

But what does it really mean for ASP.NET Core 3 to have been "re-built" or "re-platformed" on top of the generic host? Fundamentally, it means that the Kestrel web server (that handles HTTP requests and calls into your middleware pipeline) now runs as an IHostedService. I've written a lot about creating hosted services on my blog, and Kestrel is now just one more service running in the background when your app starts up.

One point that's worth highlighting - the existing WebHost and WebHostBuilder implementations that you're using in ASP.NET Core 2.x apps are not going away in 3.0. They're no longer the recommended approach, but they're not being removed, or even marked obsolete (yet). I expect they'll be marked obsolete in the next major release however, so it's worth considering the switch.

So that covers the background. We have a generic host, and Kestrel is run as an IHostedService. However, another feature introduced in ASP.NET Core 3.0 is the IHostLifetime interface, which allows for alternative hosting models.

Worker services and the new IHostLifetime interface

ASP.NET Core 3.0 introduced the concept of "worker services" and an associated new application template. Worker services are intended to give you long-running applications that you can install as a Windows Service or as a systemd service. There are two main features to these services:

  • They use IHostedService implementations to do the "work" of the application.
  • They manage the lifetime of the app using an IHostLifetime implementation.

IHostedService has been around for a long time, and allows you to run background services. It is the second point which is the interesting one here. The IHostLifetime interface is new for .NET Core 3.0, and has two methods:

public interface IHostLifetime
{
    Task WaitForStartAsync(CancellationToken cancellationToken);
    Task StopAsync(CancellationToken cancellationToken);
}

We'll be looking in detail at exactly where IHostLifetime comes in to play in later sections, but in summary:

  • WaitForStartAsync is called when the generic host is starting, and can be used to start listening for shutdown events, or to delay the start of the application until some event occurs.
  • StopAsync is called when the generic host is stopping.

There are currently three different IHostLifetime implementations in .NET Core 3.0:

  • ConsoleLifetime – Listens for SIGTERM or Ctrl+C and stops the host application.
  • SystemdLifetime – Listens for SIGTERM and stops the host application, and notifies systemd about state changes (Ready and Stopping)
  • WindowsServiceLifetime – Hooks into the Windows Service events for lifetime management

By default the generic host uses the ConsoleLifetime, which provides the behaviour you're used to in ASP.NET Core 2.x, where the application stops when it receives the SIGTERM signal or a Ctrl+C from the console. When you create a Worker Service (Windows or systemd service) then you're primarily configuring the IHostLifetime for the app.

Understanding application start up

It was while I was digging into this new abstraction that I started to get very confused. When does this get called? How does it relate to the ApplicationLifetime? Who calls the IHostLifetime in the first place? To get things straight in my mind, I spent some time tracing out the interactions between the key players in a default ASP.NET Core 3.0 application.

In this post, we're starting from a default ASP.NET Core 3.0 Program.cs file, such as the one I examined in the first post in this series:

public class Program
{
    public static void Main(string[] args)
    {
        CreateHostBuilder(args).Build().Run();
    }

    public static IHostBuilder CreateHostBuilder(string[] args) =>
        Host.CreateDefaultBuilder(args)
            .ConfigureWebHostDefaults(webBuilder =>
            {
                webBuilder.UseStartup<Startup>();
            });
}

In particular, I'm interested in what that Run() call does, once you've built your generic Host object.

Note that I'm not going to give an exhaustive description of the code - I'll be skipping anything that I consider uninteresting or tangential. My aim is to get an overall feel for the interactions. Luckily, the source code is always available if you want to go deeper!

Run() is an extension method on HostingAbstractionsHostExtensions that calls RunAsync() and blocks until the method exits. When that method exits, the application exits, so everything interesting happens in there! The diagram below gives an overview of what happens in RunAsync(), I'll discuss the details below:

Sequence diagram for program startup

Program.cs invokes the Run() extension method, which invokes the RunAsync() extension method. This in turn calls StartAsync() on the IHost instance. The StartAsync method does a whole bunch of things like starting the IHostingServices (which we'll come to later), but the method returns relatively quickly after being called.

Next, the RunAsync() method calls another extension method called WaitForShutdownAsync(). This extension method does everything else shown in the diagram. The name is pretty descriptive; this method configures itself so that it will pause until the ApplicationStopping cancellation token on IHostApplicationLifetime is triggered (we'll look at how that token gets triggered shortly).

The extension method achieves this using a TaskCompletionSource, and await-ing the associated Task. This isn't a pattern I've needed to use before and it looked interesting, so I've added it below (adapted from HostingAbstractionsHostExtensions)

public static async Task WaitForShutdownAsync(this IHost host)
{
    // Get the lifetime object from the DI container
    var applicationLifetime = host.Services.GetService<IHostApplicationLifetime>();

    // Create a new TaskCompletionSource called waitForStop
    var waitForStop = new TaskCompletionSource<object>(TaskCreationOptions.RunContinuationsAsynchronously);

    // Register a callback with the ApplicationStopping cancellation token
    applicationLifetime.ApplicationStopping.Register(obj =>
    {
        var tcs = (TaskCompletionSource<object>)obj;

        // When the application stopping event is fired, set 
        // the result for the waitForStop task, completing it
        tcs.TrySetResult(null);
    }, waitForStop);

    // Await the Task. This will block until ApplicationStopping is triggered,
    // and TrySetResult(null) is called
    await waitForStop.Task;

    // We're shutting down, so call StopAsync on IHost
    await host.StopAsync();
}

This extension method explains how the application is able to "pause" in a running state, with everything running in background tasks. Lets look in more depth at the IHost.StartAsync() method call at the top of the previous diagram.

The startup process in Host.StartAsync()

In the previous diagram we were looking at the HostingAbstractionsHostExtensions extension methods which operate on the interface IHost. If we want to know what typically happens when we call IHost.StartAsync() then we need to look at a concrete implementation. The diagram below shows the StartAsync() method for the generic Host implementation that is used in practice. Again, we'll walk through the interesting parts below.

Sequence diagram for Host.StartAsync()

As you can see from the diagram above, there's a lot more moving parts here! The call to Host.StartAsync() starts by calling WaitForStartAsync() on the IHostLifetime instance I described earlier in this post. The behaviour at this point depends on which IHostLifetime you're using, but I'm going to assume we're using the ConsoleLifetime for this post, (the default for ASP.NET Core apps).

The SystemdLifetime behaves very similarly to the ConsoleLifetime, with a couple of extra features. The WindowsServiceLifetime is quite different, and derives from System.ServiceProcess.ServiceBase.

The ConsoleLifetime.WaitForStartAsync() method (shown below) does one important thing: it adds event listeners for SIGTERM requests and for Ctrl+C in the console. It is these events that are fired when application shutdown is requested. So it's the IHostLifetime that is typically responsible for controlling when the application shuts down.

public Task WaitForStartAsync(CancellationToken cancellationToken)
{
    // ... logging removed for brevity

    // Attach event handlers for SIGTERM and Ctrl+C
    AppDomain.CurrentDomain.ProcessExit += OnProcessExit;
    Console.CancelKeyPress += OnCancelKeyPress;

    // Console applications start immediately.
    return Task.CompletedTask;
}

As shown in the code above, this method completes immediately and returns control to Host.StartAsync(). At this point, the Host loads all the IHostedService instances and calls StartAsync() on each of them. This includes the GenericWebHostService that starts the Kestrel web server (which is started last, hence my previous post on async startup tasks).

Once all the IHostedServices have been started, Host.StartAsync() calls IHostApplicationLifetime.NotifyStarted() to trigger any registered callbacks (typically just logging) and exits.

Note that IHostLifetime is different to IHostApplicationLifetime. The former contains the logic for controlling when the application starts. The latter (implemented by ApplicationLifetime) contains CancellationTokens against which you can register callbacks to run at various points in the application lifecycle.

At this point the application is in a "running" state, with all background services running, Kestrel handling requests, and the original WaitForShutdownAsync() extension method waiting for the ApplicationStopping event to fire. Finally, let's take a look at what happens when you type Ctrl+C in the console.

The shutdown process

The shutdown process occurs when the ConsoleLifetime receives a SIGTERM signal or a Ctrl+C (cancel key press) from the console. The diagram below shows the interaction between all the key players in the shutdown process:

Sequence diagram for application shut down when Ctrl+C is clicked

When the Ctrl+C termination event is triggered the ConsoleLifetime invokes the IHostApplicationLifetime.StopApplication() method. This triggers all the callbacks that were registered with the ApplicationStopping cancellation token. If you refer back to the program overview, you'll see that trigger is what the original RunAsync() extension method was waiting for, so the awaited task completes, and Host.StopAsync() is invoked.

Host.StopAsync() starts by calling IHostApplicationLifetime.StopApplication() again. This second call is a noop when run for a second time, but is necessary because technically there are other ways Host.StopAsync() could be triggered.

Next, Host shuts down all the IHostedServices in reverse order. Services that started first will be stopped last, so the GenericWebHostedService is shut down first.

After shutting down the services, IHostLifetime.StopAsync is called, which is a noop for the ConsoleLifetime (and also for SystemdLifetime, but does work for WindowsServiceLifetime). Finally, Host.StopAsync() calls IHostApplicationLifetime.NotifyStopped() to run any associated handlers (again, mostly logging) before exiting.

At this point, everything is shutdown, the Program.Main function exits, and the application exits.

Summary

In this post I provided some background on how ASP.NET Core 3.0 has been re-platformed on top of generic host, and introduced the new IHostLifetime interface. I then described in detail the interactions between the various classes and interfaces involved in application startup and shutdown for a typical ASP.NET Core 3.0 application using the generic host.

This was obviously a long one, and goes in to more detail than you'll need generally. Personally I found it useful looking through the code to understand what's going on, so hopefully it'll help someone else too!


New in ASP.NET Core 3.0: structured logging for startup messages: Exploring ASP.NET Core 3.0 - Part 6

$
0
0
New in ASP.NET Core 3.0: structured logging for startup messages

In this post I describe a small change to the way ASP.NET Core logs messages on startup in ASP.NET Core 3.0. Instead of logging messages directly to the console, ASP.NET Core now uses the logging infrastructure properly, producing structured logs.

Annoying unstructured logs in ASP.NET Core 2.x

When you start your application in ASP.NET Core 2.x, by default ASP.NET Core will output some useful information about your application to the console, such as the current environment, the content root path, and the URLs Kestrel is listening on:

Using launch settings from C:\repos\andrewlock\blog-examples\suppress-console-messages\Properties\launchSettings.json...
Hosting environment: Development
Content root path: C:\repos\andrewlock\blog-examples\suppress-console-messages
Now listening on: https://localhost:5001
Now listening on: http://localhost:5000
Application started. Press Ctrl+C to shut down.

This message, written by the WebHostBuilder, gives you a handy overview of your app, but it's written directly to the console, not through the ASP.NET Core Logging infrastructure provided by Microsoft.Extensions.Logging and used by the rest of the application.

This has two main downsides:

  • This useful information is only written to the console, so it won't be written to any of your other logging infrastructure.
  • The messages written to the console are unstructured and they will be in a different format to any other logs written to the console. They don't even have a log level, or a source.

The last point is especially annoying, as it's common when running in Docker to write structured logs to the standard output (Console), and have another process read these logs and send them to a central location, using fluentd for example.

Startup and shutdown messages are unstructured text in otherwise structured output

Luckily, in ASP.NET Core 2.1 there was a way to disable these messages with an environment variable, as I showed in a previous post. The only downside is that the messages are completely disabled, so that handy information isn't logged at all:

The startup messages are suppressed

Luckily, a small change in ASP.NET Core 3.0 gives us the best of both worlds!

Proper logging in ASP.NET Core 3.0

If you start an ASP.NET Core 3.0 application using dotnet run, you'll notice a subtle difference in the log messages written to the console:

info: Microsoft.Hosting.Lifetime[0]
      Now listening on: https://localhost:5001
info: Microsoft.Hosting.Lifetime[0]
      Now listening on: http://localhost:5000
info: Microsoft.Hosting.Lifetime[0]
      Application started. Press Ctrl+C to shut down.
info: Microsoft.Hosting.Lifetime[0]
      Hosting environment: Development
info: Microsoft.Hosting.Lifetime[0]
      Content root path: C:\repos\andrewlock\blog-examples\suppress-console-messages

The startup messages are now written using structured logging! But the change isn't as simple as using Logger instead of Console. In ASP.NET Core 2.x, it was the WebHost that was responsible for logging these messages. In ASP.NET Core 3.0, these messages are logged by the ConsoleLifetime - the default IHostLifetime registered by the generic host.

I described the role of IHostLifetime (and the ConsoleLifetime in particular) in my previous post, but in summary this class is responsible for listening for the Ctrl+C key press in the console, and starting the shutdown procedure.

The ConsoleLifetime also registers callbacks during its WaitForStartAsync() method, that are invoked when the ApplicationLifetime.ApplicationStarted event is triggered, and also when the ApplicationLifetime.ApplicationStopping event is triggered:

public Task WaitForStartAsync(CancellationToken cancellationToken)
{
    if (!Options.SuppressStatusMessages)
    {
        // Register the callbacks for ApplicationStarted
        _applicationStartedRegistration = ApplicationLifetime.ApplicationStarted.Register(state =>
        {
            ((ConsoleLifetime)state).OnApplicationStarted();
        },
        this);

        // Register the callbacks for ApplicationStopping
        _applicationStoppingRegistration = ApplicationLifetime.ApplicationStopping.Register(state =>
        {
            ((ConsoleLifetime)state).OnApplicationStopping();
        },
        this);
    }

    // ...

    return Task.CompletedTask;
}

These callbacks run the OnApplicationStarted() and OnApplicationStopping() methods (shown below) which simply write to the logging infrastructure:

private void OnApplicationStarted()
{
    Logger.LogInformation("Application started. Press Ctrl+C to shut down.");
    Logger.LogInformation("Hosting environment: {envName}", Environment.EnvironmentName);
    Logger.LogInformation("Content root path: {contentRoot}", Environment.ContentRootPath);
}

private void OnApplicationStopping()
{
    Logger.LogInformation("Application is shutting down...");
}

The SystemdLifetime and WindowsServiceLifetime implementations use the same approach to write log files using the standard logging infrastructure, though the exact messages vary slightly.

Suppressing the startup messages with the ConsoleLifetime

One slightly surprising change caused by the startup messages been created by the ConsoleLifetime, is that you can no longer suppress the messages in the ways I described in my previous post. Setting ASPNETCORE_SUPPRESSSTATUSMESSAGES apparently has no effect - the messages will continue to be logged whether the environment variable is set or not!

As I've already pointed out, this isn't really a big issue now, seeing as the messages are logged properly using the Microsoft.Extensions.Logging infrastructure. But if those messages offend you for some reason, and you really want to get rid of them, you can configure the ConsoleLifetimeOptions in Startup.cs:

public class Startup
{
    public void ConfigureServices(IServiceCollection services)
    {
        // ... other configuration
        services.Configure<ConsoleLifetimeOptions>(opts => opts.SuppressStatusMessages = true);
    }
}

You could even set the SuppressStatusMessages field based on the presence of the ASPNETCORE_SUPPRESSSTATUSMESSAGES environment variable if you want:

public class Startup
{
    public IConfiguration Configuration { get; }

    public Startup(IConfiguration configuration) => Configuration = configuration;

    public void ConfigureServices(IServiceCollection services)
    {
        // ... other configuration
        services.Configure<ConsoleLifetimeOptions>(opts 
                => opts.SuppressStatusMessages = Configuration["SuppressStatusMessages"] != null);
    }
}

If you do chose to suppress the messages, note that Kestrel will still log the URLs it's listening on; there's no way to suppress those:

info: Microsoft.Hosting.Lifetime[0]
      Now listening on: http://0.0.0.0:5000
info: Microsoft.Hosting.Lifetime[0]
      Now listening on: https://0.0.0.0:5001

Summary

In this post I showed how the annoyingly-unstructured logs that were written on app startup in ASP.NET Core 2.x apps are now written using structured logging in 3.0. This ensures the logs are written to all your configured loggers, as well as having a standard format when written to the console. I described the role of IHostLifetime in the log messages, and showed how you could configure the ConsoleLifetimeOptions to suppress the status messages if you wish.

Packaging CLI programs into Docker images to avoid dependency hell

$
0
0
Packaging CLI programs into Docker images to avoid dependency hell

In this post, I'm not going to talk about ASP.NET Core for a change. Instead, I'm going to show one way to package CLI tools and their dependencies as Docker images. With a simple helper script, this allows you to run a CLI tool without having to install the dependencies on your host machine. I'll show how to create a Docker image containing your favourite CLI tool, and a helper script for invoking it.

All the commands in this post describe using Linux containers. The same principal can be applied to Windows containers if you update the commands. However the benefits of isolating your environment come with the downside of large Docker image sizes.

If you're looking for a Dockerised version of the AWS CLI specifically, I have an image on Docker hub which is generated from this GitHub repository.

The problem: dependency hell

For example, take the AWS CLI. The suggested way to install the CLI on Linux is to use Python and pip (Pip is the package installer for Python; the equivalent of NuGet for .NET). The recommended version to use is Python 3, but you may have other apps that require Python 2, at which point you're in a world of dependency hell.

Docker containers can completely remove this problem. By packaging all the dependencies of an application into a container (even the operating system) you isolate the apps from both your host machine, and other apps. Each container runs in its own little world, and can have completely different dependencies to every other and the host system.

Diagram of two containers, isolated from he host OS

This is obviously one of the big selling points of containers, and is part of the reason they're seeing such high adoption for production loads. But they can also help with our AWS CLI problem. Instead of installing the CLI on our host machine, we can install it in a Docker container instead, and execute our CLI commands there.

Creating a Docker image for the AWS CLI

So what does it actually take to package up a tool in a Docker container? That depends on the tool in question. Hopefully, the installation instructions include a set of commands for you to run. In most cases, if you're at all familiar with Docker you can take these commands and convert them into a Dockerfile.

For example, let's take the AWS CLI instructions. According to the installation instructions, you need to have Python and pip installed, after which you can run

pip3 install awscli --upgrade --user

to install the CLI.

One of the main difficulties of packaging your app into a Docker container, is establishing all of the dependencies. Python and pip are clearly required, but depending on which operating system you use for your base image, you may find you need to install additional dependencies.

Alpine Linux is a common candidate for a base OS as it's tiny, which keeps your final Docker images as small as possible. However Alpine is kept small by not including much in the box. You may well find you need to add some extra dependencies for your target tool to work correctly.

The example Dockerfile below shows how to install the AWS CLI in an Alpine base image. It's taken from the aws-cli image which is available on Docker Hub:

FROM alpine:3.6
RUN apk -v --no-cache add \
        python \
        py-pip \
        groff \
        less \
        mailcap \
        && \
    pip install --upgrade awscli==1.16.206 s3cmd==2.0.2 python-magic && \
    apk -v --purge del py-pip
VOLUME /root/.aws
VOLUME /project
WORKDIR /project
ENTRYPOINT ["aws"]

This base image uses Alpine 3.6, and starts by installing a bunch of prerequisites:

  • python: the Python (3) environment
  • py-pip: the pip package installer we need to install the AWS CLI
  • groff: used for formatting text
  • less: used for controlling the amount of text displayed on a terminal
  • mailcap: used for controlling how to display non-text

Next, as part of the same RUN command (to keep the final Docker image as small as possible) we install the AWS CLI using pip. We also install the tool s3cmd (which makes it easier to work with S3 data), and python-magic (which helps with mime-type detection).

As the last step of the RUN command, we uninstall the py-pip package. We only needed it to install the AWS CLI and other tools, and now it's just taking up space. Deleting (and purging) it helps keep the size of the final Docker image down.

The next two VOLUME commands define locations known by the Docker container when it runs on your machine. The /root/.aws path is where the AWS CLI will look for credential files. The /project path is where we set the working directory (using WORKDIR), so it's where the AWS CLI commands will be run. We'll bind that at runtime to wherever we want to run the AWS CLI, as you'll see shortly.

Finally we set the ENTRYPOINT for the container. This sets the command that will run when the container is executed. So running the Docker container will execute aws, the AWS CLI.

To build the image, run docker build . in the same directory as Dockerfile, and give it a tag:

docker build -t example/aws-cli .

You will now have a Docker image containing the AWS CLI. The next step is to use it!

Running your packaged tool image as a container

You can create a container from your tool image and run it in the most basic form using:

docker run --rm example/aws-cli

If you run this, Docker creates a container from your image, executes the aws command, and then exists. The --rm option means that the old container is removed afterwards, so it doesn't clutter up your drive. In this example, we didn't provide any command line arguments, so the AWS CLI shows the standard help text:

> docker run --rm example/aws-cli
usage: aws [options] <command> <subcommand> [<subcommand> ...] [parameters]
To see help text, you can run:

  aws help
  aws <command> help
  aws <command> <subcommand> help
aws: error: too few arguments

If you want to do something useful, you'll need to provide some arguments to the CLI. For example, lets try listing the available S3 buckets, by passing the arguments s3 ls:

> docker run --rm example/aws-cli s3 ls
Unable to locate credentials. You can configure credentials by running "aws configure".

This is where things start to get a bit more tricky. To call AWS, you need to provide credentials. There are a variety of ways of doing this, including using credentials files in your profile, or by setting environment variables. The easiest approach is to use environment variables, by exporting them in your host environment:

export AWS_ACCESS_KEY_ID="<id>"
export AWS_SECRET_ACCESS_KEY="<key>"
export AWS_SESSION_TOKEN="<token>" #if using AWS SSO
export AWS_DEFAULT_REGION="<region>"

And passing these to the docker run command:

docker run --rm \
  -e AWS_ACCESS_KEY_ID \
  -e AWS_SECRET_ACCESS_KEY \
  -e AWS_DEFAULT_REGION \
  -e AWS_SESSION_TOKEN \
  example/aws-cli \
  s3 ls

I split the command over multiple lines as it's starting to get a bit unwieldy. If you have your AWS credentials stored in credentials files instead in $HOME/.aws instead of environment variables, you can pass those to the container using:

docker run --rm \
  -v "$HOME/.aws:/root/.aws" \
  example/aws-cli \
  s3 ls

In these examples, we're just listing out our S3 buckets, so we're not interacting with the file system directly. But what if you want to copy a file from a bucket to your local file system? To achieve this, you need to bind your working directory to the /project volume inside the container. For example:

docker run --rm \
  -v "$HOME/.aws:/root/.aws" \
  -v $PWD:/project \
  example/aws-cli \
  s3 cp s3://mybucket/test.txt test2.txt

In this snippet we bind the current directory ($PWD) to the working directory in the container /project. When we use s3 cp to download the test.txt file, it's written to /project/test2.txt in the container, which in turn writes it to your current directory on the host.

By now you might be getting a bit fatigued - having to run such a long command every time you want to use the AWS CLI sucks. Luckily there's easy fixes by using a small script

Using helper scripts to simplify running your containerised tool

Having to pass all those environment variables and volume mounts is a pain. The simplest solution, is to create a basic script that includes all those defaults for you:

#!/bin/bash

docker run --rm \
  -v "$HOME/.aws:/root/.aws" \
  -v $PWD:/project \
  example/aws-cli \
  "$@"

Note that this script is pretty much the same as the final example from the previous section. The difference is that we're using the arguments catch-all "$@" at the end of the script, which means "paste all of the arguments here as quoted string".

If you save this script as aws.sh in your home directory (and give it execute permissions by running chmod +x ~/aws.sh), then copying a file becomes almost identical to using the AWS CLI directly:

# Using the aws cli directly
aws.sh s3 cp s3://mybucket/test.txt test2.txt
# Using dockerised aws cli
~/aws.sh s3 cp s3://mybucket/test.txt test2.txt

Much nicer!

You could even go one step further and create an alias for aws to be the contents of the script:

alias aws='docker run --rm -v "$HOME/.aws:/root/.aws" -v $PWD:/project example/aws-cli'

or alternatively, copy the file into your path:

sudo cp ~/aws.sh /usr/local/bin/aws

As ever with Linux, there's a whole host of extra things you could do. You could create different versions of the aws.sh script which is configured to use alternative credentials or regions. But using a Dockerised tool rather than installing the CLI directly on your host means you can also have scripts that use different versions of the CLI. All the while, you've avoided polluting your host environment with dependencies!

Summary

In this post, I showed how you can Dockerise your CLI tools to avoid having to install dependencies in your host environment. I showed how to pass environment variables and arguments to the Dockerised tool, and how to bind to your host's file system. Finally, I showed how you can use scripts to simplify executing your Docker images.

If you're looking for a Dockerised version of the AWS CLI specifically, I have an image on Docker hub which is generated from this GitHub repository (which is a fork of an original which fell out of maintenance).

Running .NET Core global tools in non-sdk Docker images

$
0
0
Running .NET Core global tools in non-sdk Docker images

.NET Core global tools are great for providing small pieces of functionality. Unfortunately, they have a few limitations which can occasionally cause issues when you run them. In this post I describe how you can avoid these issues by containerising your global tools with Docker.

All the commands in this post describe using Linux containers - the same principal can be applied to Windows containers if you update the commands, but I don't know that the pay-off is worth it in that case, given the large size of Windows containers.

.NET Core global tools and their limitations

.NET Core global tools are handy command-line "tools" that you can install in your system and run from anywhere. They have evolved as the .NET CLI has evolved (and have changed again in .NET Core 3.0), but the current incarnation appeared in .NET Core 2.1.

There are a number of first-party global tools from Microsoft, like the dotnet-user-secrets tool, the dotnet-watch tool, and the EF Core tool, but you can also write your own. In the past I've described creating a tool that uses the TinyPNG API to squash images, and a tool for converting web.config files to appsettings.json format. I also use the Cake global tool, Nate McMaster's dotnet-serve tool, and the Nerdbank.GitVersioning tool nbgv.

Generally speaking, installing these tools is painless - you provide the ID of the associated NuGet package:

dotnet tool install -g nbgv

You can then run the tool using <toolname>:

> nbgv get-version

Version:                      0.0.236.24525
AssemblyVersion:              0.0.0.0
AssemblyInformationalVersion: 0.0.236+cd5f8f6636
NuGet package Version:        0.0.236-cd5f8f6636
NPM package Version:          0.0.236-cd5f8f6636

There are some downsides to the tools though.

  • There's no way to specify global tools that are required to build a project. This was possible before .NET Core 2.1, and will be coming again in 3.0 though. This is possible again in .NET Core 3.0.
  • Global tools are really framework-dependent .NET Core console apps, so they need the right runtime to be installed on your machine. You can't run a global tool compiled for .NET Core 2.2 on a machine that only has the 2.1 runtime installed.
  • When you install a new major or preview version of the .NET Core SDK, you might not be able to run your existing tools, based on the roll-forward rules.
  • They require the .NET Core SDK to install them, even though they only require the .NET Core Runtime to run them

If you are building the tool yourself, you can support multiple runtimes by multi-targeting the global tool for multiple runtimes e.g.

<TargetFrameworks>netcoreapp2.1;netcoreapp2.2;netcoreapp3.0</TargetFrameworks>

However that's only possible if you're the one in control of the code. If not, then an alternative option is package the global tool into a Docker container. Doing so encapsulates the dependencies of the tool away from the host system, so you can install any SDKs on the host you want, without having to worry about your global tools. This is the same philosophy as packaging any other CLI tool into a Docker container, as I described in my previous post.

Creating a Docker image for a .NET Core Global tool

On the face of it, creating a Docker image of a .NET Core global tool is easy. Let's take the nbgv tool for example. You could create a Docker image for the tool using the following Dockerfile:

FROM mcr.microsoft.com/dotnet/core/sdk:2.1

ENV NBGV_VERSION 2.3.38

RUN dotnet tool install --global nbgv --version $NBGV_VERSION     

ENV PATH="/root/.dotnet/tools:${PATH}"    

ENTRYPOINT ["nbgv"]

This file starts from the .NET Core 2.1 SDK image, and uses dotnet tool install to install the global tool. Finally, it sets the nbgv executable as the entry point. You can build and tag the image using:

docker build -t example/nbgv .

Once the image has been built, you can run your global tool using the following command. I mounted the current working directory as a volume in the container, and set the working directory to that volume, passing the command get-version to calculate the version of the git repo in that directory:

> docker run --rm -v $PWD:$PWD -w $PWD example/nbgv get-version

Version:                      0.0.236.24525
AssemblyVersion:              0.0.0.0
AssemblyInformationalVersion: 0.0.236+cd5f8f6636
NuGet package Version:        0.0.236-cd5f8f6636
NPM package Version:          0.0.236-cd5f8f6636

This works perfectly, and you can create helper scripts for running your new containerised tool as I described in my last post.

Unfortunately, there's one big downside to this approach. We're using the SDK image to install the global tool (as you have to), which means the final images are big - 1.8GB! Compare that to the 115MB required for the containerised AWS CLI tool from my last post, and this clearly isn't ideal.

The problem is that we're including the whole .NET Core SDK and all associated packages in our container, when all it really needs is the .NET Core runtime. Luckily we can solve this one by using multi-stage builds.

Optimising the containerised global tool with multi-stage builds

Multi-stage builds allow you to use one Docker base image to build your project, and then copy the output into another Docker image. This is really important for production workloads, as it allows you to have a large builder image, with all the dependencies necessary to build your project, but then to copy your project to a small, lightweight image that only has the dependencies necessary to run your project.

We can apply the same approach to containerising .NET Core global tools. Even though we need to use the SDK to install them, we only need the .NET Core runtime to execute them, as they are simply .NET Core console apps.

The only difficulty with this approach is that it's not well documented. My workmate Mauricio suggested (and implemented) the approach shown below, where we simply copy the global tool's binary files from /root/.dotnet/tools/ to the runtime image:

# Install the .NET Core tool as before
FROM mcr.microsoft.com/dotnet/core/sdk:2.1 as builder

ENV NBGV_VERSION 2.3.38

RUN dotnet tool install --global nbgv --version $NBGV_VERSION     

ENV PATH="/root/.dotnet/tools:${PATH}"

# Use the smaller runtime image
FROM mcr.microsoft.com/dotnet/core/runtime:2.1

# Copy the binaries across, and set the path
COPY --from=builder /root/.dotnet/tools/ /opt/bin
ENV PATH="/opt/bin:${PATH}"

ENTRYPOINT ["nbgv"]

This Docker image has exactly the same behaviour as the previous example, but it's now only 226MB, down from 1.8 GB! That's much more palatable.

Using the Alpine 3.9 runtime image gets the image size down to 132MB, but unfortunately we ran into libgit2 issues that we didn't look into further.

The big advantage of containerising your global tools like this is not having to worry about upgrades to .NET Core breaking anything. Theoretically that shouldn't be a big issue, but using containers guarantees it. That's especially useful in build scripts on CI servers that may be having to build a variety of projects, using a variety of .NET Core SDKs.

In some cases, the effort required to containerise global tools may not be worth it. If the tool needs to access your file system to perform its work, or needs access to the network (like the dotnet-serve tool for example), you'll need to consider how those things are affected by running the tool in a container. For many tools however, I expect there won't be any issues.

Summary

In this post I discussed some of the limitations of .NET Core global tools in relation to .NET Core SDK versions and updates. I described how you can avoid these issues by packaging tools in Docker containers. Finally, I showed an optimised container that significantly reduces the Docker image size by using multi-stage builds.

New in .NET Core 3.0: local tools: Exploring ASP.NET Core 3.0 - Part 7

$
0
0
New in .NET Core 3.0: local tools

In this post I explore the new local tools feature introduced in .NET Core 3.0. I show how to install and run local tools using the dotnet-tools manifest, describe how to work with multiple manifests, and describe how the tools are installed.

Global tools, local-ish tools, and finally, Local tools

.NET Core 2.1 introduced the concept of global tools that are CLI tools (console apps really) that you can install using the .NET Core SDK. These tools are available globally on your machine, so can be used for a wide variety of things.

I've recently migrated to using the Cake global tool for new builds, by installing the global tool into the project folder using the tools-path option, and running the tools from there. Installing into the project folder in this way means you can use a different version of the global tool for each project, rather than being forced to update all your tools at once.

However this "local" use of global tools always felt a bit clumsy, and in .NET Core 3.0 we now have explicit support for "project-specific" local tools. Stuart Lang wrote a nice introductory post on the feature here. This post is very similar, but with a couple of extra details.🙂

Local tools in .NET Core 3.0

In .NET Core 3.0 you can now specify global tools that are required for a specific project by creating a dotnet-tools manifest. This is a JSON file which lives in your repository and is checked-in to source control. You can create a new tool-manifest by running the following in the root of your repository:

dotnet new tool-manifest

By default, this creates the following manifest JSON file dotnet-tools.json inside the .config folder of your repository:

{
  "version": 1,
  "isRoot": true,
  "tools": { }
}

The initial manifest doesn't include any tools, but you can install new ones by running dotnet tool install (i.e. without the -g or --tool-path flag required in .NET Core 2.x). So you can require the Cake global tool for your project by running:

> dotnet tool install Cake.Tool

You can invoke the tool from this directory using the following commands: 'dotnet tool run dotnet-cake' or 'dotnet dotnet-cake'.
Tool 'cake.tool' (version '0.35.0') was successfully installed. Entry is added to the manifest file C:\repos\test\.config\dotnet-tools.json.

This updates the manifest by adding the cake.tool reference to the tools section, including the version required (the current latest version - you can update the version manually as required), and the command you need to run to execute the tool (dotnet-cake):

{
  "version": 1,
  "isRoot": true,
  "tools": {
    "cake.tool": {
      "version": "0.35.0",
      "commands": [
        "dotnet-cake"
      ]
    }
  }
}

When a colleague clones the repository and wants to run the Cake tool, they can run the following commands to first restore the tool, and then run it:

# Restore the tool NuGet packages
dotnet tool restore
# Execute the tool associated with command "dotnet-cake" and pass the arguments: --version
dotnet tool run dotnet-cake --version
# or you can use:
dotnet dotnet-cake --version
# or even shorter:
dotnet cake --version

For build tools like Cake, where you might want or need to have different versions installed for different projects, the .NET Core 3 local tools are great. The "global tools with local tool-path" approach I showed in my earlier post was OK, but you had to do some manual work to ensure the correct version was installed. That all gets simpler with .NET Core 3, as I'll show in a later post.

How are .NET Core local tools implemented?

In this section, I'll dig into a couple of questions I had after giving local tools a try. Namely, where are local tools installed, what are the other properties in the manifest file, and can I put the manifest file somewhere else?

At the time of writing, there's no official documentation for .NET Core local tools, so most of the information below is from this issue, plus my experimentation!

The dotnet-tools.json manifest

When you create a new manifest using dotnet new tool-manifest you get a JSON file like the following:

{
  "version": 1,
  "isRoot": true,
  "tools": { }
}

The version property is specifying the version of the dotnet-tools schema. It's not the file version, it's the schema version, so you'll need to leave that it set to 1. Later versions of the .NET Core SDK may update the schema to add extra/different functionality, and the version number can be used to determine which version of the schema to use.

The isRoot property is related to how the dotnet tool command searches for manifests. I'll get to the details of that shortly, but in summary, isRoot means "stop searching, I'm what you're looking for". It is the "root" manifest, i.e. the top-level manifest.

How does the .NET Core SDK locate local manifests?

The dotnet tool command checks in a number of locations when looking for a dotnet-tools.json manifest:

  1. The .config folder in the current directory (./.config/dotnet-tools.json)
  2. In the current directory (./dotnet-tools.json)
  3. In the parent directory (../dotnet-tools.json)
  4. In each parent directory until you reach the root

As soon as it finds a dotnet-tools.json manifest for which isRoot is true, it stops searching. The local tools available are all those listed in the root manifest, plus all those listed in manifests found while searching for the root.

You can view the local tools available in a given folder by running dotnet tool list.

For example, imagine you have a non-root manifest in the .config folder that requires the Cake global tool. You also have a non-root manifest in the current directory that installs the dotnetsay global tool, and a root manifest in the parent directory that installs the dotnet-tinify tool. Running dotnet tool list shows that all three of these tools are available:

Package Id         Version      Commands           Manifest
-----------------------------------------------------------------------------------------------------
cake.tool          0.35.0       dotnet-cake        C:\repos\test\.config\dotnet-tools.json
dotnetsay          2.1.4        dotnetsay          C:\repos\test\dotnet-tools.json
dotnet-tinify      0.2.0        dotnet-tinify      C:\repos\dotnet-tools.json

Precedence is obviously important here for knowing when to stop searching (due to isRoot), but it also handles the case where different versions of a tool are defined in more than one manifest. In that case, the first manifest found wins. So if version 1.0.0 of the dotnetsay tools was in the .config folder manifest, then dotnet tool list would output the following:

Package Id         Version      Commands           Manifest
-----------------------------------------------------------------------------------------------------
cake.tool          0.35.0       dotnet-cake        C:\repos\test\.config\dotnet-tools.json
dotnetsay          1.0.0        dotnetsay          C:\repos\test\.config\dotnet-tools.json
dotnet-tinify      0.2.0        dotnet-tinify      C:\repos\dotnet-tools.json

Note the Version and the Manifest for the dotnetsay command compared to the previous table.

Of course, you shouldn't really ever have to care about these details. The whole point of local tools is that they're local, checked in with your source control, and don't rely on things already existing (e.g. manifests in parent folders). I strongly suggest using only a single manifest, ensuring isRoot is true, and placing it either in the .config folder or the root of your project.

Where are .NET Core local tools installed?

The short answer is they're installed in the global NuGet package folder. .NET Core global/local tools are just console apps distributed as special NuGet packages. So they're downloaded to the global folder and unpacked as though they're normal NuGet packages. If you install the same version of a tool in multiple manifests, only a single copy of the NuGet package is installed.

When you run a global tool, it runs the app from the NuGet package. So if you install the dotnet-serve global tool for example:

dotnet tool install dotnet-serve

and then run it:

dotnet tool run dotnet-serve
# or you can use:
dotnet dotnet-serve
# or even shorter:
dotnet serve

then looking in process explorer you can see the tool is being run directly from the ~/.nuget/packages folder for the installed version of the tool (1.4.1 in this case)

The Windows process explorer when running 'dotnet tool run dotnet-serve'

Given the tools run from the shared NuGet cache, uninstalling a tool from a manifest (using dotnet tool uninstall <toolname> simply removes the entry from the dotnet-tools.json manifest. The NuGet package remains cached, and so can still be used by other apps. If you completely want to remove the tool from your system, you'll need to clear your NuGet cache.

Summary

In this post I described the new local tools feature introduced in .NET Core 3.0. This feature allows you to include a manifest in your project that lists the .NET Core CLI tools it requires. This allows you to have different tools (and different versions of tools) for different projects. I showed how to install and run local tools, explained the format of the manifest file, and how multiple manifest files can be used if necessary. Finally I described how local tools work, by running the tools from the global NuGet package cache.

Simplifying the Cake global tool bootstrapper scripts with .NET Core 3 local tools

$
0
0
Simplifying the Cake global tool bootstrapper scripts with .NET Core 3 local tools

In this post I show how you can simplify your Cake global tool bootstrapper scripts by taking advantage of local tools, introduced in .NET Core 3.0.

I described the new local tools feature (introduced in .NET Core 3.0) in a recent post. I'm not going to recap the details of local tools here, so if you haven't already, I strongly recommend reading that post. In this post, I'm going to take the scripts I've been using to bootstrap and run Cake on Windows using PowerShell and Linux using bash or sh, and simplify them by taking advantage of the .NET Core local tools.

Prerequisites

For the scripts shown in this post, I make a few assumptions:

  • Your build environment already has the .NET Core 3.0 SDK installed.
  • You have created a dotnet-tools.json manifest in the default location for your repository (as described in my previous post).
  • You have specified version 0.35.0(or higher) of the Cake.Tool global tool in the tool manifest. This version is compatible with .NET Core 3.0.

If you need to install the .NET Core SDK as well, then I suggest either using one of the more comprehensive Cake bootstrapper scripts, or the official dotnet-install scripts.

You can create a dotnet-tools.json manifest in your project and add the latest version of the Cake tool by running the following from your project's root folder:

dotnet new tool-manifest
dotnet tool install Cake.Tool

The dotnet-tools.json manifest should be checked-in to your source code repository.

A Cake bootstrapper script for PowerShell using .NET Core 3.0 local tools

I always like to have a build.ps1 or build.sh script in a project's root directory, to make it easy to run a full build, whether on a CI machine or locally. With the introduction of local tools to .NET Core 3.0 these scripts have become even simpler:

[CmdletBinding()]
Param(
    [string]$Script = "build.cake",
    [string]$Target,
    [Parameter(Position=0,Mandatory=$false,ValueFromRemainingArguments=$true)]
    [string[]]$ScriptArgs
)

# Restore Cake tool
& dotnet tool restore

# Build Cake arguments
$cakeArguments = @("$Script");
if ($Target) { $cakeArguments += "--target=$Target" }
$cakeArguments += $ScriptArgs

& dotnet tool run dotnet-cake -- $cakeArguments
exit $LASTEXITCODE

This script essentially only does four things:

  • Define the arguments for the script, to make it easy to specify a Cake script file or a custom target.
  • Restore the local tools using the dotnet-tools.json manifest, by running dotnet tool restore.
  • Parse the arguments provided to the script into the format required by the Cake global tool
  • Execute the Cake global tool by running dotnet tool run dotnet-cake and passing in the arguments parsed in the previous step

In the previous version of the script (for pre-.NET Core 3.0), I installed global tools "locally", which means you have to faff around making sure you have the correct version installed (as you can only "globally" install a single version of a tool). With local tools you can have multiple versions of a tool available, so that all goes away!

To run the script, run .\build.ps1, or pass in a target to run:

> .\build.ps1 -Target=Clean
Tool 'cake.tool' (version '0.35.0') was restored. Available commands: dotnet-cake

Restore was successful.
Running Target: Clean
...

Obviously the bootstrapper script isn't something you're going to have to look at very often, so some complexity in there isn't a big issue. But then again, the less code you have to look after the better!

The script is arguably so simple now, that it's pretty much unnecessary. I would still include it though, as it makes it obvious to consumers of your project how to run the build.

A Cake bootstrapper script for bash using .NET Core 3.0 local tools

Next in line for trimming is the bash bootstrapper script. Previously we had to make sure we installed the correct version of the Cake global tool, and had to work out the required directories etc. With local tools, that all goes away:

#!/usr/bin/env bash

# Define default arguments.
SCRIPT="build.cake"
CAKE_ARGUMENTS=()

# Parse arguments.
for i in "$@"; do
    case $1 in
        -s|--script) SCRIPT="$2"; shift ;;
        --) shift; CAKE_ARGUMENTS+=("$@"); break ;;
        *) CAKE_ARGUMENTS+=("$1") ;;
    esac
    shift
done

# Restore Cake tool
dotnet tool restore

if [ $? -ne 0 ]; then
    echo "An error occured while installing Cake."
    exit 1
fi

# Start Cake
dotnet tool run dotnet-cake "$SCRIPT" "${CAKE_ARGUMENTS[@]}"

This bash script is only doing three steps:

  • Parse arguments
  • Restore the .NET Core local tools
  • Run the restored Cake global tool

This script will work for environments where you have bash available, such as on Debian or Ubuntu distributions. If you're building on the tiny Alpine distribution, you'll need to use the script from the next section instead.

A Cake bootstrapper shell script for Alpine using .NET Core 3.0 local tools

Alpine uses the Almquist (ash) shell instead of bash, so you can't use "bash-isms" like arrays. The script below is a slight modification of the previous script which uses string concatenation in place of arrays:

#!/bin/sh

# Define default arguments.
SCRIPT="build.cake"
CAKE_ARGUMENTS=""

# Parse arguments.
for i in "$@"; do
    case $1 in
        -s|--script) SCRIPT="$2"; shift ;;
        --) shift; CAKE_ARGUMENTS="${CAKE_ARGUMENTS} $@"; break ;;
        *) CAKE_ARGUMENTS="${CAKE_ARGUMENTS} $1" ;;
    esac
    shift
done
set -- ${CAKE_ARGUMENTS}

# Restore Cake tool
dotnet tool restore

if [ $? -ne 0 ]; then
    echo "An error occured while installing Cake."
    exit 1
fi

# Start Cake

dotnet tool run dotnet-cake  "--" "$SCRIPT" "$@"

This version also addresses the use of eval from my previous version of the script. That's not related to local tools, I just finally came across this StackExchange answer that showed how to use set -- to replace the "$@" pseudo-array. That makes me much happier!

Summary

This post showed how you can use the .NET Core 3 global tools feature to simplify your Cake bootstrapper scripts. With a simple JSON file and two .NET Core CLI commands, you can restore and run any .NET Core global tools you need. If you need to install additional tools for your build, you could include them in your manifest file too, or let Cake manage that for you as described here.

Converting a .NET Standard 2.0 library to .NET Core 3.0: Upgrading to ASP.NET Core 3.0 - Part 1

$
0
0
Converting a .NET Standard 2.0 library to .NET Core 3.0

This is the first post in a new series on upgrading from ASP.NET Core 2.x to ASP.NET Core 3.0. I'm not going to cover big topics like adding Blazor or gRPC to your apps. Instead I'm going to cover the little confusing things like how to upgrade your libraries to target ASP.NET Core 3.0, switching to use the new generic-host-based server, and using endpoint routing.

If you're starting on an upgrade from ASP.NET Core 2.x to 3.0, I strongly suggest following through the migration guide, reading my series on exploring ASP.NET Core 3.0, and checking out Rick Strahl's post on converting an app to ASP.NET Core 3.0. A recent ASP.NET community standup also walked though the bare minimum for upgrading to 3.0. That should give you a good idea of issues you're likely to run into.

In this post I describe some of the steps and issues I ran into when converting .NET Standard 2.0 class libraries to .NET Core 3.0. I'm specifically looking at converting libraries in this post.

For the purposes of this post, I'll assume you have one or more class libraries that you're in control of, and are trying to decide how to support .NET Core 3.0. I consider the following cases, separated based on your library's dependencies:

Upgrading a .NET Standard 2.0 library to .NET Core 3 - is it necessary?

The first question you have to answer is whether you even need to update your library. Unfortunately, there isn't a simple answer to this question due to some of the changes that came with .NET Core 3.0.

Specifically, .NET Core 3.0 introduces the concept of a FrameworkReference. This is similar to the Microsoft.AspNetCore.App metapackage in ASP.NET Core 2.x apps, but instead of being a NuGet package that references other NuGet packages, the framework is installed along with the .NET Core runtime.

This has implications when your class library references packages that used to exist as NuGet packages, but are now pre-installed as part of the shared framework. I'll try to work through the various combinations of target frameworks and NuGet references your library has, to give you an idea of your options around upgrading your library to work with .NET Core 3.0.

Code-only libraries

Lets start with the simplest case - you have a library that has no other dependencies.

Q: My library targets .NET Standard 2.0 only, and has no dependencies on other NuGet packages

In theory, you shouldn't need to change your library at all. .NET Core 3.0 supports .NET Standard 2.1, and by extension, it supports .NET Standard 2.0.

By continuing to target .NET Standard 2.0, you will be able to consume it in .NET Core 3.0 applications, but you'll also continue to be able to consume it in .NET Core 2.x applications, .NET Framework 4.6.1+ applications, and Xamarin apps, among others.

Q: Should I update my library to target .NET Standard 2.1?

By targeting .NET Standard 2.0, you're allowing a large number of frameworks to consume your library. Upgrading to .NET Standard 2.1 will limit that significantly. You'll no longer be able to consume the library in .NET Core 2.x, .NET Framework, Unity, or earlier Mono/Xamarin versions. So no, you shouldn't target .NET Standard 2.1 just because it's there.

That said, .NET Standard 2.1 includes a number of performance-related primitives that you may want to use in your application, as well as features such as IAsyncEnumerable<>. In order to keep the widest audience, you may want to multi-target both 2.0 and 2.1, and use conditional compilation to take advantage of the primitives on platforms that support them. If you're itching to make use of these new features, or you know your library is only going to be used on platforms that support .NET Standard 2.1 then go ahead. It should be as simple as updating the <TargetFramework> element in your .csproj file.

<Project Sdk="Microsoft.NET.Sdk">

  <PropertyGroup>
    <TargetFramework>netstandard2.1</TargetFramework>
    <LangVersion>8.0</LangVersion>
  </PropertyGroup>
</Project>

If you're upgrading to target .NET Standard 2.1 then you may as well update to use C# 8 features. .NET Framework won't support them, but as it doesn't support .NET Standard 2.1 either, that ship has already sailed!

Q: My library targets .NET Core 2.x, and has no dependencies on other NuGet packages

This scenario is essentially the same situation as the previous one. .NET Core 3.0 apps can consume any library that targets .NET Core 3.0 or below, so there's no need to update your library unless you want to. If you're targeting .NET Core 2.x you can use all the features available to the platform (which is more than is in .NET Standard 2.0). If you upgrade to .NET Core 3.0 then you obviously get access to more features again, but you won't be able to consume your library in .NET Core 2.x apps any more.

Q: My library has dependencies on other NuGet packages

Libraries with no dependencies are the easiest to deal with - generally you target the lowest version of .NET Standard you can that gives you all the features you need, and leave it at that. Things get a bit trickier when you have dependencies on other NuGet packages.

However, if your dependencies (and none of your dependencies dependencies, also known as "transitive" dependencies) are not Microsoft.AspNetCore.* or Microsoft.Extensions.* libraries then there's not much to worry about. As long as they support the framework you're trying to target, then you don't need to worry. If you are depending on the Microsoft libraries, then things are more nuanced.

Libraries that depend on Microsoft.Extensions.* NuGet packages

This is where things start to get interesting. The Microsoft.Extensions.* libraries provide generic features such as dependency injection, configuration, logging, and the generic host. Those features are all used by ASP.NET Core apps, but you can also use them without ASP.NET Core for creating all sorts of other services and console apps.

The nice thing about the Microsoft.Extensions.* libraries is they allow you to create libraries that easily hook into the .NET Core ecosystem, making it pretty simple for users to consume your libraries.

In .NET Core 3.0, the Microsoft.Extensions.* libraries all received a major version bump to 3.0.0. They also now multi-target netstandard2.0 and netcoreapp3.0. This poses an interesting question that Brad Wilson recently asked on Twitter:

In other words: Given that .NET Core 2.x apps support .NET Standard 2.0, can you use 3.0.0 Microsoft.Extensions.* libraries in .NET Core 2.x?

Yes! If you're building a console app and are still targeting .NET Core 2.x, you can, if you wish, upgrade your Microsoft.Extension.* library references to 3.0.0. Your app will still work, and you can use the latest abstractions.

OK, what if it's not just a .NET Core app, it's an ASP.NET Core 2.x app?

Well yes, but actually no

The problem is that while you can add a reference to the 3.0.0 library, in ASP.NET Core 2.x apps the core libraries also depend on the Microsoft.Extensions.* libraries. When you try and build your app you'll get an error something like the following:

C:\repos\test\test.csproj : warning NU1608: Detected package version outside of dependency constraint: Microsoft.AspNetCore.App 2.1.1 requires Microsoft.Extensions.Configuration.Abstractions (>= 2.1.1 && < 2.2.0) but version Microsoft.Extensions.Configuration.Abstractions 3.0.0 was 
resolved.
C:\repos\test.csproj : error NU1107: Version conflict detected for Microsoft.Extensions.Primitives. Install/reference Microsoft.Extensions.Primitives 3.0.0 directly to project PwnedPasswords.Sample to resolve this issue.

Trying to solve this issues is a fool's errand. Just accept that you can't use 3.0.0 extension libraries in ASP.NET Core 2.x apps.

Now lets consider the implications to your libraries that depend on the Microsoft.Extensions libraries.

Q: My library uses Microsoft.Extensions.* and will only be used in .NET Core 3.0 apps

If you're building an internal library then you may able to specify that a library is only supported on .NET Core 3.0. In that case, it makes sense to target the 3.0.0 libraries.

Q: My library uses Microsoft.Extensions.* and may be used in both .NET Core 2.x and .NET Core 3.0 apps

This is where things get interesting. In most cases, there's very few differences between the 2.x and 3.0 versions of the Microsoft.Extensions.* libraries. This is especially true if you're using one of the *.Abstractions libraries, such as Microsoft.Extensions.Configuration.Abstractions.

For example for Microsoft.Extensions.Configuration.Abstractions, between versions 2.2.0 and 3.0.0, literally a single API was added:

Comparison of Microsoft.Extensions.Configuration.Abstractions versions using fuget.org

This screenshot was taken from the excellent https://fuget.org using the API diff feature!

That stability means that it may be be possible for you your library to keep targeting the 2.x versions of the libraries. When used in an ASP.NET Core 2.x app, the 2.x.x libraries will be used, just as before. However, when you reference your library in an ASP.NET Core 3.0, the 2.x dependencies of your library will be automatically upgraded to the 3.0.0 versions due to the NuGet package resolution rules.

In general that automatic upgrading is something you want to avoid, as a bump in a major version means breaking changes. You can't guarantee that code compiled against one version of a dependency will run correctly when used against a different major version of the dependency.

However, we've already established that the 3.0.0 version of the libraries are virtually the same, so there's nothing to worry about! To convince you further that this is actually OK, this is the approach used by Serilog's Microsoft.Extensions.Logging integration package. The package keeps targets .NET Standard 2.0 and references the 2.0.0 version of Microsoft.Extensions.Logging, but can happily be used in ASP.NET Core 3.0 apps:

<Project Sdk="Microsoft.NET.Sdk">

  <PropertyGroup>
    <TargetFrameworks>netstandard2.0</TargetFrameworks>
  </PropertyGroup>

  <ItemGroup>
    <PackageReference Include="Serilog" Version="2.8.0" />
    <PackageReference Include="Microsoft.Extensions.Logging" Version="2.0.0" />
  </ItemGroup>

</Project>

It's worth pointing out that for .NET Framework targets, you'll need to use binding redirects for the Microsoft.Extensions.* libraries. This is apparently a real pain if you're building a PowerShell module!

Unfortunately, this might not always work for you…

Q: My library uses Microsoft.Extensions.* and needs to use different versions of those libraries when using in .NET Core 2.x vs 3.0

Not all of the library changes are safe to be silently upgraded in this way. For example, consider the Microsoft.Extensions.Options library. In 3.0.0, the Add, Get and Remove methods were removed from OptionsWrapper<>. If you use these methods in your library, then consuming apps running on ASP.NET Core 3.0 will get a MethodNotFoundException at runtime. Not good!

The above example is a bit contrived (it's unlikely you're using OptionsWrapper<> in your libraries), but I've run into this issue a lot when using the IdentityModel library. You have to be very careful to reference the same major version of this library in all your dependencies, otherwise you're likely to get MethodNotFoundExceptions at runtime.

The issue you're likely to see with IdentityModel after upgrading to .NET Core 3.0 is for the CryptoRandom.CreateUniqueId() method. As you can see in the fuget.org comparison below, the default parameters for the method have changed in version 4.0.0. That avoids compile-time breaking changes, but gives a runtime breaking change instead!

The breaking change to IdentityModel moving from 3.10.10 to 4.0.0

So how can you handle this? The best answer I've found is to multi-target .NET Standard 2.0 and .NET Core 3.0, and conditionally include the correct version of your library using MSBuild conditions.

<Project Sdk="Microsoft.NET.Sdk">

  <PropertyGroup>
    <TargetFrameworks>netstandard2.0;netcoreapp3.0</TargetFrameworks>
  </PropertyGroup>

  <ItemGroup Condition="'$(TargetFramework)' == 'netcoreapp3.0'">
    <PackageReference Include="Microsoft.Extensions.Options" Version="3.0.0" />
    <PackageReference Include="IdentityModel" Version="4.0.0" />
  </ItemGroup>

  <ItemGroup Condition="'$(TargetFramework)' != 'netcoreapp3.0'">
    <PackageReference Include="Microsoft.Extensions.Options" Version="2.2.0" />
    <PackageReference Include="IdentityModel" Version="3.10.10" />
  </ItemGroup>

</Project>

In the above example, I've shown a library that depends on both Microsoft.Extensions.Options and IdentityModel. Even though technically the latest versions of both of these packages support .NET Standard 2.0, the differences are nuanced, as I've discussed.

When an ASP.NET Core 2.x app depends on the library above, it will use the 2.2.0 version of the *.Options library, and the 3.10.10 version of IdentityModel. When an ASP.NET Core 3.0 app depends on the library above, it will use the 3.0.0 version of the *.Options library, and the 4.0.0 version of IdentityModel.

The main downside to this approach is the increased complexity in tooling. You may need to add #ifdefs around your code to cater to the different target frameworks and libraries. You may also need extra tests. Generally speaking though, this approach is probably the "safest".

There is a scenario I haven't addressed here - if you're running a .NET Core 2.x app (non-ASP.NET Core) and are using the 3.0.0 version Microsoft.Extensions.* libraries (or 4.0.0 version of IdentityModel), and are consuming an app built using the approach shown above. In this case it all falls down. The netstandard2.0 version of the library will be selected, and you could be back in MethodNotFound land. 🙁 Luckily, that seems like a pretty niche and generally unsupported scenario…

Patient saying 'Doc, it hurts when I touch my shoulder'. Doctor saying 'Then don't touch it'

Libraries that depend on ASP.NET Core NuGet packages

This brings us to the final section: libraries that depend on ASP.NET Core-specific libraries. That includes pretty much any library that starts Microsoft.AspNetCore.* (see the migration guide for a complete list). These NuGet packages are no longer being produced and pushed to https://nuget.org, so you can't reference them!

Instead, these are installed as part of the ASP.NET Core 3.0 shared framework. Instead of referencing individual packages, you use a <FrameworkReference> element. This makes all of the APIs in ASP.NET Core 3.0 available. A nice feature of the <FrameworkReference> is that it doesn't need to copy any extra libraries to your app's output folder. MSBuild knows those APIs will be available when the app is executed, so you get a nicely trimmed output.

Not all of the libraries that were in the Microsoft.AspNetCore.App meta package have been moved to the framework. The packages listed in this section of the migration document do still need to be referenced directly, in addition (or instead of) the <FrameworkReference> element. This includes things like EF Core, JSON.NET MVC support, and the Identity UI.

Q: My library only needs to target ASP.NET Core 3.0

This is the simplest scenario, as described in this StackOverflow question - you have a library that uses ASP.NET Core specific features, and you want to upgrade it from 2.x to 3.0.

The solution, as described above, is to remove the obsolete packages, and use a FrameworkReference instead:

<Project Sdk="Microsoft.NET.Sdk">

  <PropertyGroup>
    <TargetFramework>netcoreapp3.0</TargetFramework>
  </PropertyGroup>

  <ItemGroup>
    <FrameworkReference Include="Microsoft.AspNetCore.App" />
  </ItemGroup>

</Project>

This is actually pretty nice for libraries. All the ASP.NET Core APIs are available to IntelliSense, and you don't have to worry about trying to hunt down the APIs you need in individual packages.

Where things get more complicated again is if you need to support .NET Core 2.x as well.

Q: My library needs to support both ASP.NET Core 2.x and ASP.NET Core 3.0

The only real way to handle this scenario is with the multi-targeting approach we used previously for the Microsoft.Extensions.* (and IdentityModel) libraries. Continue to target .NET Standard 2.0 (to support .NET Core 2.x and .NET Framework 4.6.1+) and also target .NET Core 3.0. Conditionally include either the individual packages for ASP.NET Core 2.x, or the Framework Reference for ASP.NET Core 3.0:

<Project Sdk="Microsoft.NET.Sdk">

  <PropertyGroup>
    <TargetFrameworks>netstandard2.0;netcoreapp3.0</TargetFrameworks>
  </PropertyGroup>

  <ItemGroup Condition="'$(TargetFramework)' == 'netcoreapp3.0'">
    <FrameworkReference Include="Microsoft.AspNetCore.App" />
  </ItemGroup>

  <ItemGroup Condition=" '$(TargetFramework)' != 'netcoreapp3.0'">
    <PackageReference Include="Microsoft.AspNetCore.Mvc.Cors" Version="2.1.3" />
    <PackageReference Include="Microsoft.AspNetCore.Mvc.Formatters.Json" Version="2.1.3" />
    <PackageReference Include="Microsoft.Extensions.Configuration" Version="2.1.1" />
  </ItemGroup>

</Project>

That pretty much covers all the scenarios you should run into. Supporting older versions of the libraries is frustratingly complex, so whether the pay off is worth it, is up to you. But with ASP.NET Core 2.1 being an LTS release for .NET Core (and being supported "forever" on .NET Framework), I suspect many people will be stuck in this situation for a while.

Rather than targeting .NET Standard 2.0, you can also explicitly target .NET Core 2.1 and .NET Framework 4.6.1 as Damian Edwards does in his TagHelperPack. The end result is pretty much the same.

Summary

In this post I tried to break down all the different approaches to upgrading your libraries to support .NET Core 3.0, based on their dependencies. If you don't have any dependencies, or they're isolated from the ASP.NET Core/Microsoft.Extensions.* ecosystem, then you shouldn't have any problems upgrading. If you have Microsoft.Extensions.* dependencies, then you may get away without upgrading your package references, but you might have to conditionally include libraries based on target framework. If you have ASP.NET Core dependencies and need to support for 2.x and 3.0 then you'll almost certainly need to add MSBuild conditionals to your .csproj files.

IHostingEnvironment vs IHostEnvironment - obsolete types in .NET Core 3.0: Upgrading to ASP.NET Core 3.0 - Part 2

$
0
0
IHostingEnvironment vs IHostEnvironment - obsolete types in .NET Core 3.0

In this post I describe the differences between various ASP.NET Core types that have been marked as obsolete in .NET Core 3.0. I describe why things have changed, where the replacement types are, and when you should use them.

ASP.NET Core merges with the generic host

ASP.NET Core 2.1 introduced the GenericHost as a way of building non-HTTP apps using the Microsoft.Extensions.* primitives for configuration, dependency injection, and logging. While this was a really nice idea, the hosting abstractions introduced were fundamentally incompatible with the HTTP hosting infrastructure used by ASP.NET Core. This led to various namespace clashes and incompatibilities that mostly caused me to avoid using the generic host.

In ASP.NET Core 3.0 a big effort went into converting the web hosting infrastructure to be compatible with the generic host. Instead of having duplicate abstractions - one for ASP.NET Core and one for the generic host - the ASP.NET Core web hosting infrastructure could run on top of the generic host as an IHostedService.

This isn't the whole story though. ASP.NET Core 3 doesn't force you to convert to the new generic-host-based infrastructure immediately when upgrading from 2.x to 3.0. You can continue to use the WebHostBuilder instead of HostBuilder if you wish. The migration documentation implies it's required, but in reality it's optional at this stage if you need or want to keep using it for some reason.

I'd suggest converting to HostBuilder as part of your upgrade if possible. I suspect the WebHostBuilder will be removed completely at some point, even though it hasn't been marked [Obsolete] yet.

As part of the re-platforming on top of the generic host, some of the types that were duplicated previously have been marked obsolete, and new types have been introduced. The best example of this is IHostingEnvironment.

IHostingEnvironment vs IHostEnvironment vs IWebHostEnviornment

IHostingEnvironment is one of the most annoying interfaces in .NET Core 2.x, because it exists in two different namespaces, Microsoft.AspNetCore.Hosting and Microsoft.Extensions.Hosting. These are slightly different and are incompatible - one does not inherit from the other.

namespace Microsoft.AspNetCore.Hosting
{
    public interface IHostingEnvironment
    {
        string EnvironmentName { get; set; }
        string ApplicationName { get; set; }
        string WebRootPath { get; set; }
        IFileProvider WebRootFileProvider { get; set; }
        string ContentRootPath { get; set; }
        IFileProvider ContentRootFileProvider { get; set; }
    }
}

namespace Microsoft.Extensions.Hosting
{
    public interface IHostingEnvironment
    {
        string EnvironmentName { get; set; }
        string ApplicationName { get; set; }
        string ContentRootPath { get; set; }
        IFileProvider ContentRootFileProvider { get; set; }
    }
}

The reason there are two is basically historical - the AspNetCore version existed, and the Extensions version was introduced with the generic host in ASP.NET Core 2.1. The Extensions version has no notion of the wwwroot folder for serving static files (as it's for hosting non-HTTP services), so it lacks the WebRootFileProvider and WebRootPath properties.

A separate abstraction was necessary for backwards-compatibility reasons. But one of the really annoying consequences of this was the inability to write extension methods that worked for both the generic-host and for ASP.NET Core.

In ASP.NET Core 3.0, both of these interfaces are marked obsolete. You can still use them, but you'll get warnings at build time. Instead, two new interfaces have been introduced: IHostEnvironment and IWebHostEnvironment. While they are still in separate namespaces, they now have different names, and one inherits from the other!

namespace Microsoft.Extensions.Hosting
{
    public interface IHostEnvironment
    {
        string EnvironmentName { get; set; }
        string ApplicationName { get; set; }
        string ContentRootPath { get; set; }
        IFileProvider ContentRootFileProvider { get; set; }
    }
}

namespace Microsoft.AspNetCore.Hosting
{
    public interface IWebHostEnvironment : IHostEnvironment
    {
        string WebRootPath { get; set; }
        IFileProvider WebRootFileProvider { get; set; }
    }
}

This hierarchy makes much more sense, avoids duplication, and means methods that can accept the generic-host version of the host environment abstraction (IHostEnvironment) will now work with the web version too (IWebHostEnvironment). Under the hood, the implementations of IHostEnvironment and IWebHostEnvironment are still the same - they just implement the new interfaces in addition to the old ones. For example, the ASP.NET Core implementation:

namespace Microsoft.AspNetCore.Hosting
{
    internal class HostingEnvironment : IHostingEnvironment, Extensions.Hosting.IHostingEnvironment, IWebHostEnvironment
    {
        public string EnvironmentName { get; set; } = Extensions.Hosting.Environments.Production;
        public string ApplicationName { get; set; }
        public string WebRootPath { get; set; }
        public IFileProvider WebRootFileProvider { get; set; }
        public string ContentRootPath { get; set; }
        public IFileProvider ContentRootFileProvider { get; set; }
    }
}

So which interface should you use? The short answer is "use IHostEnvironment wherever possible", but the details may vary…

If you're building ASP.NET Core 3.0 apps

Use IHostEnvironment where possible, and use IWebHostEnvironment when you need access to the WebRootPath or WebRootFileProvider properties.

If you're building a library to be used with the generic host and .NET Core 3.0

Use IHostEnvironment. Your library will still work with ASP.NET Core 3.0 apps.

If you're building a library to be used with ASP.NET Core 3.0 apps

As before, it's best to use IHostEnvironment as then your library can potentially be used by other generic host applications, not just ASP.NET Core applications. However, if you need access to the extra properties on IWebHostEnvironment then you'll have to update your library to target netcoreapp3.0 instead of netstandard2.0 and add a <FrameworkReference> element, as described in my previous post.

If you're building a library to be used with both ASP.NET Core 2.x and 3.0

This is a pain. You basically have two choices:

  • Continue to use the Microsoft.AspNetCore version of IHostingEnvironment. It will work in both 2.x and 3.0 apps without any issues, you'll just likely have to stop using it in later versions.
  • Use #ifdef to conditionally compile using the IHostEnvironment in ASP.NET Core 3.0 and IHostingEnvironment in ASP.NET Core 2.0.

IApplicationLifetime vs IHostApplicationLifetime

A very similar issue of namespace clashes is present for the IApplicationLifetime interface. As with the previous example, this exists in both Microsoft.Extensions.Hosting and Microsoft.AspNetCore.Hosting. In this case however, the interface in both cases is identical:

// identical to Microsoft.AspNetCore.Hosting definition
namespace Microsoft.Extensions.Hosting
{
    public interface IApplicationLifetime
    {
        CancellationToken ApplicationStarted { get; }
        CancellationToken ApplicationStopped { get; }
        CancellationToken ApplicationStopping { get; }
        void StopApplication();
    }
}

As you might expect by now, this duplication was a symptom of backwards-compatibility. .NET Core 3.0 introduces a new interface, IHostApplicationLifetime that is defined only in the Microsoft.Extensions.Hosting namespace, but is available both in the generic host and ASP.NET Core apps:

namespace Microsoft.Extensions.Hosting
{
    public interface IHostApplicationLifetime
    {
        CancellationToken ApplicationStarted { get; }
        CancellationToken ApplicationStopping { get; }
        CancellationToken ApplicationStopped { get; }
        void StopApplication();
    }
}

Again, this interface is identical to the previous version, and the .NET Core 3.0 implementation implements both versions as ApplicationLifetime. As I discussed in my previous post on the startup process, the ApplicationLifetime type plays a key role in generic-host startup and shutdown. Interestingly, there is no real equivalent in Microsoft.AspNetCore.Hosting - the Extensions version handles it all. The only implementation in the AspNetCore namespace is a simple wrapper type that delegates to the ApplicationLifetime added as part of the generic host:

namespace Microsoft.AspNetCore.Hosting
{
    internal class GenericWebHostApplicationLifetime : IApplicationLifetime
    {
        private readonly IHostApplicationLifetime _applicationLifetime;
        public GenericWebHostApplicationLifetime(IHostApplicationLifetime applicationLifetime)
        {
            _applicationLifetime = applicationLifetime;
        }

        public CancellationToken ApplicationStarted => _applicationLifetime.ApplicationStarted;
        public CancellationToken ApplicationStopping => _applicationLifetime.ApplicationStopping;
        public CancellationToken ApplicationStopped => _applicationLifetime.ApplicationStopped;
        public void StopApplication() => _applicationLifetime.StopApplication();
    }
}

The decision of which interface to use is, thankfully, much easier for application lifetime rather than hosting environment:

If you're building .NET Core 3.0, or ASP.NET Core 3.0 apps or libraries

Use IHostApplicationLifetime. It only requires a reference to Microsoft.Extensions.Hosting.Abstractions, and is usable in all applications

If you're building a library to be used with both ASP.NET Core 2.x and 3.0

Now you're stuck again:

  • Use the Microsoft.Extensions version of IApplicationLifetime. It will work in both 2.x and 3.0 apps without any issues, you'll just likely have to stop using it in later versions.
  • Use #ifdef to conditionally compile using the IHostApplicationLifetime in ASP.NET Core 3.0 and IApplicationLifetime in ASP.NET Core 2.0.

Luckily IApplicationLifetime is generally used much less often than IHostingEnvironment, so you probably won't have too much difficulty with this one.

IWebHost vs IHost

One thing that may surprise you is that the IWebHost interface hasn't been updated to inherit from IHost in ASP.NET Core 3.0. Similarly IWebHostBuilder doesn't inherit from IHostBulider. They are still completely separate interfaces - one for ASP.NET Core, and one for the generic host.

Luckily, that doesn't matter. Now that ASP.NET Core 3.0 has been rebuilt to use the generic host abstractions, you get the best of both worlds. You can write methods that use the generic host IHostBuilder abstractions and share them between your ASP.NET Core and generic host apps. If you need to do something ASP.NET Core specific, you can still use the IWebHostBuilder interface.

For example, consider the two extension methods below, one for IHostBuilder, and one for IWebHostBuilder:

public static class ExampleExtensions
{
    public static IHostBuilder DoSomethingGeneric(this IHostBuilder builder)
    {
        // ... add generic host configuration
        return builder;
    }

    public static IWebHostBuilder DoSomethingWeb(this IWebHostBuilder builder)
    {
        // ... add web host configuration
        return builder;
    }
}

One of the methods does some sort of configuration on the generic host (maybe it registers some services with DI for example), and the other does some configuration on the IWebHostBuilder. Perhaps it sets some defaults for the Kestrel server for example.

If you create a brand-new ASP.NET Core 3.0 application, your Program.cs will look something like this:

public class Program
{
    public static void Main(string[] args) => CreateHostBuilder(args).Build().Run();

    public static IHostBuilder CreateHostBuilder(string[] args) =>
        Host.CreateDefaultBuilder(args)
            .ConfigureWebHostDefaults(webBuilder =>
            {
                webBuilder
                    .UseStartup<Startup>();
            });
}

You can add calls to both your extension methods by adding one call on the generic IHostBuilder, and the other inside ConfigureWebHostDefaults(), on the IWebHostBuilder:

public class Program
{
    public static void Main(string[] args) => CreateHostBuilder(args).Build().Run();

    public static IHostBuilder CreateHostBuilder(string[] args) =>
        Host.CreateDefaultBuilder(args)
            .DoSomethingGeneric() // IHostBuilder extension method
            .ConfigureWebHostDefaults(webBuilder =>
            {
                webBuilder
                    .DoSomethingWeb() // IWebHostBuilder extension method
                    .UseStartup<Startup>();
            });
}

The fact you can make calls on both builder types in ASP.NET Core 3.0 means you can now build libraries that rely solely on generic-host abstractions, and can reuse them in ASP.NET Core apps. You can then layer on the ASP.NET Core-specific behaviour on top, without having to duplicate methods like you did in 2.x.

Summary

In this post I discussed some of the types that have been made obsolete in ASP.NET Core 3.0, where they've moved to, and why. If you're updating an application to ASP.NET Core 3.0 you don't have to replace them, as they will still behave the same for now. But they'll be replaced in a future version, so it makes sense to update them if you can. In some cases it also makes it easier to share code between your apps, so it's worth looking in to.


Avoiding Startup service injection in ASP.NET Core 3: Upgrading to ASP.NET Core 3.0 - Part 3

$
0
0
Avoiding Startup service injection in ASP.NET Core 3

In this post I describe one of the changes to Startup when moving from an ASP.NET Core 2.x app to .NET Core 3; you can not longer inject arbitrary services into the Startup constructor.

Migrating to the generic host in ASP.NET Core 3.0

In .NET Core 3.0 the ASP.NET Core 3.0 hosting infrastructure has been redesigned to build on top of the generic host infrastructure, instead of running in parallel to it. But what does that mean for the average developer that has an ASP.NET Core 2.x app, and wants to update to 3.0? I've migrated several apps at this stage, and it's gone pretty smoothly so far. The migration guide document does a good job of walking you through the required steps, so I strongly suggest working your way through that document.

For the most part I only had to address two issues:

  • The canonical way to configure middleware in ASP.NET Core 3.0 is to use endpoint routing
  • The generic host does not allow injecting services into the Startup class.

The first point has been pretty well publicised. Endpoint routing was introduced in ASP.NET Core 2.2, but was restricted to MVC only. In ASP.NET Core 3.0, endpoint routing is the suggested approach for terminal middleware (also called "endpoints") as it provides a few benefits. Most importantly, it allows middleware to know which endpoint will ultimately be executed, and can retrieve metadata about that endpoint. This allows you to apply authorization to health check endpoints for example.

Endpoint routing is very particular about the order of middleware. I suggest reading this section of the migration document carefully when upgrading your apps. In a later post I'll show how to convert a terminal middleware to an endpoint.

The second point, injecting services into the Startup class has been mentioned, but it's not been very highly publicised. I'm not sure if that's because not many people are doing it, or because in many cases it's easy to work around. In this post I'll show the problem, and some ways to handle it.

Injecting services into Startup in ASP.NET Core 2.x

A little known feature in ASP.NET core 2.x was that you could partially configure your dependency injection container in Program.cs, and inject the configured classes into Startup.cs. I used this approach to configure strongly typed settings, and then use those settings when configuring the remainder of the dependency injection container.

Lets take the following ASP.NET Core 2.x example:

 public class Program
{
    public static void Main(string[] args)
    {
        CreateHostBuilder(args).Build().Run();
    }

    public static IWebHostBuilder CreateWebHostBuilder(string[] args) =>
        WebHost.CreateDefaultBuilder(args)
            .UseStartup<Startup>()
            .ConfigureSettings(); // <- Configure services we'll inject into Startup later
}

Notice the ConfigureSettings() call in CreateWebHostBuilder? That's an extension method that I use to configure the application's strongly-typed settings. For example:

public static class SettingsinstallerExtensions
{
    public static IWebHostBuilder ConfigureSettings(this IWebHostBuilder builder)
    {
        return builder.ConfigureServices((context, services) =>
        {
            var config = context.Configuration;

            services.Configure<ConnectionStrings>(config.GetSection("ConnectionStrings"));
            services.AddSingleton<ConnectionStrings>(
                ctx => ctx.GetService<IOptions<ConnectionStrings>>().Value)
        });
    }
}

So the ConfigureSettings() method calls ConfigureServices() on the IWebHostBuilder instance, and configures some settings. As these services are configured in the DI container before Startup is instantiated, they can be injected into the Startup constructor:

public static class Startup
{
    public class Startup
    {
        public Startup(
            IConfiguration configuration, 
            ConnectionStrings ConnectionStrings) // Inject pre-configured service
        {
            Configuration = configuration;
            ConnectionStrings = ConnectionStrings;
        }

        public IConfiguration Configuration { get; }
        public ConnectionStrings ConnectionStrings { get; }

        public void ConfigureServices(IServiceCollection services)
        {
            services.AddControllers();

            // Use ConnectionStrings in configuration
            services.AddDbContext<BloggingContext>(options =>
                options.UseSqlServer(ConnectionStrings.BloggingDatabase));
        }

        public void Configure(IApplicationBuilder app)
        {

        }
    }
}

I found this pattern useful when I wanted to use strongly-typed configuration objects inside ConfigureServices for configuring other services. In the example above the ConnectionStrings object is a strongly-typed settings object, and the properties are validated on startup to ensure they're not null (indicating a configuration error). It's not a fundamental technique, but it's proven handy.

However if you try and take this approach after you switch to using the generic host in ASP.NET Core 3.0, you'll get an error at runtime:

Unhandled exception. System.InvalidOperationException: Unable to resolve service for type 'ExampleProject.ConnectionStrings' while attempting to activate 'ExampleProject.Startup'.
   at Microsoft.Extensions.DependencyInjection.ActivatorUtilities.ConstructorMatcher.CreateInstance(IServiceProvider provider)
   at Microsoft.Extensions.DependencyInjection.ActivatorUtilities.CreateInstance(IServiceProvider provider, Type instanceType, Object[] parameters)
   at Microsoft.AspNetCore.Hosting.GenericWebHostBuilder.UseStartup(Type startupType, HostBuilderContext context, IServiceCollection services)
   at Microsoft.AspNetCore.Hosting.GenericWebHostBuilder.<>c__DisplayClass12_0.<UseStartup>b__0(HostBuilderContext context, IServiceCollection services)
   at Microsoft.Extensions.Hosting.HostBuilder.CreateServiceProvider()
   at Microsoft.Extensions.Hosting.HostBuilder.Build()
   at ExampleProject.Program.Main(String[] args) in C:\repos\ExampleProject\Program.cs:line 21

This approach is no longer supported in ASP.NET Core 3.0. You can inject IHostEnvironment and IConfiguration into the Startup constructor, but that's it. And for a good reason - the previous approach has several issues, as I'll describe below.

Note that you can actually keep using this approach if you stick to using IWebHostBuilder in ASP.NET Core 3.0, instead of the new generic host. I strongly suggest you don't though, and attempt to migrate where possible!

Two singletons?

The fundamental problem with injecting services into Startup is that it requires building the dependency injection container twice. In the example shown previously ASP.NET Core knows you need an ConnectionStrings object, but the only way for it to know how to create one is to build an IServiceProvider based on the "partial" configuration (that we supplied in the ConfigureSettings() extension method).

But why is this a problem? The problem is that the service provider is a temporary "root" service provider. It creates the services and injects them into Startup. The remainder of the dependency injection container configuration then runs as part of ConfigureServices, and the temporary service provider is thrown away. A new service provider is then created which now contains the "full" configuration for the application.

The upshot of this is that even if a service is configured with a Singleton lifetime, it will be created twice:

  • Once using the "partial" service provider, to inject into Startup
  • Once using the "full" service provider, for use more generally in the application

For my use case, strongly typed settings, that really didn't matter. It's not essential that there's only one instance of the settings, it's just preferable. But that might not always be the case. This "leaking" of services seems to be the main reason for changing the behaviour with the generic host - it makes things safer.

But what if I need the service inside ConfigureServices?

Knowing that you can't do this anymore is one thing, but you also need to work around it! One use case for injecting services into Startup is to be able to conditionally control how you register other services in Startup.ConfigureServices. For example, the following is a very rudimentary example:

public class Startup
{
    public Startup(IdentitySettings identitySettings)
    {
        IdentitySettings = identitySettings;
    }

    public IdentitySettings IdentitySettings { get; }

    public void ConfigureServices(IServiceCollection services)
    {
        if(IdentitySettings.UseFakeIdentity)
        {
            services.AddScoped<IIdentityService, FakeIdentityService>();
        }
        else
        {
            services.AddScoped<IIdentityService, RealIdentityService>();
        }
    }

    public void Configure(IApplicationBuilder app)
    {
        // ...
    }
}

This (obviously contrived) example checks a boolean property on the injected IdentitySettings to decide which IIdentityService implementation to register: either the Fake service or the Real service.

This approach, which requires injecting IdentitySettings, can be made compatible with the generic host by converting the static service registrations to use a factory function instead. For example:

public class Startup
{
    public Startup(IConfiguration configuration)
    {
        Configuration = configuration;
    }

    public IConfiguration Configuration { get; }

    public void ConfigureServices(IServiceCollection services)
    {
        // configure the IdentitySettings for the DI container
        services.Configure<IdentitySettings>(Configuration.GetSection("Identity")); 

        // Register the implementations using their implementation name
        services.AddScoped<FakeIdentityService>();
        services.AddScoped<RealIdentityService>();

        // Retrieve the IdentitySettings at runtime, and return the correct implementation
        services.AddScoped<IIdentityService>(ctx => 
        {
            var identitySettings = ctx.GetRequiredService<IdentitySettings>();
            return identitySettings.UseFakeIdentity
                ? ctx.GetRequiredService<FakeIdentityService>()
                : ctx.GetRequiredService<RealIdentityService>();
            }
        });
    }

    public void Configure(IApplicationBuilder app)
    {
        // ...
    }
}

This approach is obviously a lot more complicated than the previous version, but it's at least compatible with the generic host!

In reality, if it's only strongly typed settings that are needed (as in this case), then this approach is somewhat overkill. Instead, I'd probably just "rebind" the settings instead:

public class Startup
{
    public Startup(IConfiguration configuration)
    {
        Configuration = configuration;
    }

    public IConfiguration Configuration { get; }

    public void ConfigureServices(IServiceCollection services)
    {
        // configure the IdentitySettings for the DI container
        services.Configure<IdentitySettings>(Configuration.GetSection("Identity")); 

        // "recreate" the strongly typed settings and manually bind them
        var identitySettings = new IdentitySettings();
        Configuration.GetSection("Identity").Bind(identitySettings)

        // conditionally register the correct service
        if(identitySettings.UseFakeIdentity)
        {
            services.AddScoped<IIdentityService, FakeIdentityService>();
        }
        else
        {
            services.AddScoped<IIdentityService, RealIdentityService>();
        }
    }

    public void Configure(IApplicationBuilder app)
    {
        // ...
    }
}

Alternatively, I might not bother with the strongly-typed aspect at all, especially if the required setting is a string. That's the approach used in the default .NET Core templates for configuring ASP.NET Core identity - the connection string is retrieved directly from the IConfiguration instance:

public class Startup
{
    public Startup(IConfiguration configuration)
    {
        Configuration = configuration;
    }

    public IConfiguration Configuration { get; }

    public void ConfigureServices(IServiceCollection services)
    {
        // configure the ConnectionStrings for the DI container
        services.Configure<ConnectionStrings>(Configuration.GetSection("ConnectionStrings")); 

        // directly retrieve setting instead of using strongly-typed options
        var connectionString = Configuration["ConnectionString:BloggingDatabase"];

        services.AddDbContext<ApplicationDbContext>(options =>
                options.UseSqlite(connectionString));
    }

    public void Configure(IApplicationBuilder app)
    {
        // ...
    }
}

These approaches aren't the nicest, but they get the job done, and they will probably be fine for most cases. If you didn't know about the Startup injection feature, then you're probably using one of these approaches already anyway!

Sometimes I was injecting services into Startup to configure other strongly typed option objects. For these cases there's a better approach, using IConfigureOptions.

Using IConfigureOptions to configure options for IdentityServer

A common case where I used injected settings was in configuring IdentityServer authentication, as described in their documentation:

public class Startup
{
    public Startup(IdentitySettings identitySettings)
    {
        IdentitySettings = identitySettings;
    }

    public IdentitySettings IdentitySettings { get; }

    public void ConfigureServices(IServiceCollection services)
    {
        // Configure IdentityServer Auth
        services
            .AddAuthentication(IdentityServerAuthenticationDefaults.AuthenticationScheme)
            .AddIdentityServerAuthentication(options =>
            {
                // Configure the authentication handler settings using strongly typed options
                options.Authority = identitySettings.ServerFullPath;
                options.ApiName = identitySettings.ApiName;
            });
    }

    public void Configure(IApplicationBuilder app)
    {
        // ...
    }
}

In this example, the base-address of our IdentityServer instance and the name of the API resource are set based on the strongly typed configuration object, IdentitySettings. This setup doesn't work in .NET Core 3.0, so we need an alternative. We could re-bind the strongly-typed configuration as I showed previously. Or we could use the IConfiguration object directly to retrieve the settings.

A third option involves looking under the hood of the AddIdentityServerAuthentication method, and making use of IConfigureOptions.

As it turns out, the AddIdentityServerAuthentication() method does a few different things. Primarily, it configures JWT bearer authentication, and configures some strongly-typed settings for the specified authentication scheme (IdentityServerAuthenticationDefaults.AuthenticationScheme). We can use that fact to delay configuring the named options and use an IConfigureOptions instance instead.

The IConfigureOptions interface allows you to "late-configure" a strongly-typed options object using other dependencies from the service provider. For example, if to configure my TestSettings I needed to call a method on TestService, I could create an IConfigureOptions implementation like the following:

public class MyTestSettingsConfigureOptions : IConfigureOptions<TestSettings>
{
    private readonly TestService _testService;
    public MyTestSettingsConfigureOptions(TestService testService)
    {
        _testService = testService;
    }

    public void Configure(TestSettings options)
    {
        options.MyTestValue = _testService.GetValue();
    }
}

The TestService and IConfigureOptions<TestSettings> are configured in DI at the same time inside Startup.ConfigureServices:

public void ConfigureServices(IServiceCollection services)
{
    services.AddScoped<TestService>();
    services.ConfigureOptions<MyTestSettingsConfigureOptions>();
}

The important point is you can use standard constructor dependency injection with IOptions<TestSettings>. There's no need to "partially build" the service provider inside ConfigureServices just to configure the TestSettings. Instead we register the intent to configure TestSettings, and delay the configuration until the settings object is required.

So how does this help us configuring IdentityServer?

The AddIdentityServerAuthentication uses a variant of strongly-typed settings called named options (I've discussed these several times before). They're most commonly used for configuring authentication, as they are in this example.

To cut a long story short, you can use the IConfigureOptions approach to delay configuring the named options IdentityServerAuthenticationOptions used by the authentication handler until after we've already configured the strongly-typed IdentitySettings object. So you can create an ConfigureIdentityServerOptions object that takes the IdentitySettings as a constructor parameter:

public class ConfigureIdentityServerOptions : IConfigureNamedOptions<IdentityServerAuthenticationOptions>
{
    readonly IdentitySettings _identitySettings;
    public ConfigureIdentityServerOptions(IdentitySettings identitySettings)
    {
        _identitySettings = identitySettings;
        _hostingEnvironment = hostingEnvironment;
    }

    public void Configure(string name, IdentityServerAuthenticationOptions options)
    { 
        // Only configure the options if this is the correct instance
        if (name == IdentityServerAuthenticationDefaults.AuthenticationScheme)
        {
            // Use the values from strongly-typed IdentitySettings object
            options.Authority = _identitySettings.ServerFullPath; 
            options.ApiName = _identitySettings.ApiName;
        }
    }

    // This won't be called, but is required for the IConfigureNamedOptions interface
    public void Configure(IdentityServerAuthenticationOptions options) => Configure(Options.DefaultName, options);
}

In Startup.cs you configure the strongly-typed IdentitySettings object, add the required IdentityServer services, and register the ConfigureIdentityServerOptions class so that it can configure the IdentityServerAuthenticationOptions when required:

public void ConfigureServices(IServiceCollection services)
{
    // Configure strongly-typed IdentitySettings object
    services.Configure<IdentitySettings>(Configuration.GetSection("Identity"));

    // Configure IdentityServer Auth
    services
        .AddAuthentication(IdentityServerAuthenticationDefaults.AuthenticationScheme)
        .AddIdentityServerAuthentication();

    // Add the extra configuration;
    services.ConfigureOptions<ConfigureIdentityServerOptions>();
}

No need to inject anything into Startup, but you still get the benefits of strongly-typed settings. Win-win!

Summary

In this post I described some of the changes you may need to make to Startup.cs when upgrading to ASP.NET Core 3.0. I described the problem in ASP.NET Core 2.x with injecting services into your Startup class, and how this feature has been removed in ASP.NET Core 3.0. I then showed how to work around some of the reasons that you may have been using this approach in the first place.

Converting a terminal middleware to endpoint routing in ASP.NET Core 3.0: Upgrading to ASP.NET Core 3.0 - Part 4

$
0
0
Converting a terminal middleware to endpoint routing in ASP.NET Core 3.0

In this post I provide an overview of the new endpoint routing system, and show how you can use it to create "endpoints" that run in response to a given request URL path. I show how to take a terminal middleware used in ASP.NET Core 2.x, and convert it to the new ASP.NET Core 3.0 approach.

The evolution of routing

Routing in ASP.NET Core is the process of mapping a request URL path such as /Orders/1 to some handler that generates a response. This is primarily used with the MVC middleware for mapping requests to controllers and actions, but it is used in other areas too. It also includes functionality for the reverse process: generating URLs that will invoke a specific handler with a given set of parameters.

In ASP.NET Core 2.1 and below, routing was handled by implementing the IRouter interface to map incoming URLs to handlers. Rather than implementing the interface directly, you would typically rely on the MvcMiddleware implementation added to the end of your middleware pipeline. Once a request reached the MvcMiddleware, routing was applied to determine which controller and action the incoming request URL path corresponded to.

The request then went through various MVC filters before executing the handler. These filters formed another "pipeline", reminiscent of the middleware pipeline, and in some cases had to duplicate the behaviour of certain middleware. The canonical example of this is CORS policies. In order to enforce different CORS policies per MVC action, as well as other "branches" of your middleware pipeline, a certain amount of duplication was required internally.

The MVC filter pipeline is so similar to the middleware pipeline you've been able to use middleware as filters since ASP.NET Core 1.1.

"Branching" the middleware pipeline was often used for "pseudo-routing". Using extension methods like Map() in your middleware pipeline, would allow you to conditionally execute some middleware when the incoming path had a given prefix.

For example, the following Configure() method from a Startup.cs class branches the pipeline so that when the incoming path is /ping, the terminal middleware executes (written inline using Run()):

public void Configure(IApplicationBuilder app)
{
    app.UseStaticFiles();

    app.UseCors();

    app.Map("/ping", 
        app2 => app2.Run(async context =>
        {
            await context.Response.WriteAsync("Pong");
        });

    app.UseMvcWithDefaultRoute();
}

In this case, the Run() method is a "terminal" middleware, because it returns a response. But in a sense, the whole Map branch corresponds to an "endpoint" of the application, especially as we're not doing anything else in the app2 branch of the pipeline.

Image of a branching middleware pipeline

The problem is that this "endpoint" is a bit of a second-class citizen when compared to the endpoints in the MvcMiddleware (i.e. controller actions). Extracting values from the incoming route are a pain and you have to manually implement any authorization requirements yourself.

Another problem is that there's no way to know which branch will be run until you're already on it. For example, when the request reaches the UseCors() middleware from the above example it would be useful to know which branch/endpoint is going to be executed - maybe the /ping endpoint allows cross-origin requests, while the MVC middleware doesn't.

In ASP.NET Core 2.2, Microsoft introduced the endpoint routing as the new routing mechanism for MVC controllers. This implementation was essentially internal to the MvcMiddleware, so on the face of it, it wouldn't solve the issues described above. However, the intention was always to trial the implementation there and to expand it to be the primary routing mechanism in ASP.NET Core 3.0.

And that's what we have now. Endpoint routing separates the routing of a request (selecting which handler to run) from the actual execution of the handler. This means you can know ahead of time which handler will execute, and your middleware can react accordingly. This is aided by the new ability to attach extra metadata to your endpoints, such as authorization requirements or CORS policies.

Image of endpoint routing

So the question is, how should you map the ping-pong pipeline shown previously to the new endpoint-routing style? Luckily, there's not many steps.

A concrete middleware using Map() in ASP.NET Core 2.x

To make things a little more concrete, lets imaging you have a custom middleware that returns the FileVersion of your application. This is a very basic custom middleware that is a "terminal" middleware – i.e. it always writes a response and doesn't invoke the _next delegate.

public class VersionMiddleware
{
    readonly RequestDelegate _next;
    static readonly Assembly _entryAssembly = System.Reflection.Assembly.GetEntryAssembly();
    static readonly string _version = FileVersionInfo.GetVersionInfo(_entryAssembly.Location).FileVersion;

    public VersionMiddleware(RequestDelegate next)
    {
        _next = next;
    }

    public async Task Invoke(HttpContext context)
    {
        context.Response.StatusCode = 200;
        await context.Response.WriteAsync(_version);

        //we're all done, so don't invoke next middleware
    }
}

In ASP.NET Core 2.x, you might include this in your middleware pipeline in Startup.cs by using the Map() extension method to choose the URL to expose the middleware at:

public void Configure(IApplicationBuilder app)
{
    app.UseStaticFiles();

    app.UseCors();

    app.Map("/version", versionApp => versionApp.UseMiddleware<VersionMiddleware>()); 

    app.UseMvcWithDefaultRoute();
}

When you call the app with the a path prefixed with /version (e.g. /version or /version/test) you'll always get the same response, the version of the app:

1.0.0

When you send a request with any other path (that is not handled by static files), the MvcMiddleware will be invoked, and will handle the request. But with this configuration the CORS middleware (added using UseCors()) can't know which endpoint will ultimately be executed.

Converting the middleware to endpoint routing

In ASP.NET Core 3.0, we use endpoint routing, so the routing step is separate from the invocation of the endpoint. In practical terms that means we have two pieces of middleware:

  • EndpointRoutingMiddleware that does the actual routing i.e. calculating which endpoint will be invoked for a given request URL path.
  • EndpointMiddleware that invokes the endpoint.

These are added at two distinct points in the middleware pipeline, as they serve two distinct roles. Generally speaking, you want the routing middleware to be early in the pipeline, so that subsequent middleware has access to the information about the endpoint that will be executed. The invocation of the endpoint should happen at the end of the pipeline. For example:

public void Configure(IApplicationBuilder app)
{
    app.UseStaticFiles();

    // Add the EndpointRoutingMiddleware
    app.UseRouting();

    // All middleware from here onwards know which endpoint will be invoked
    app.UseCors();

    // Execute the endpoint selected by the routing middleware
    app.UseEndpoints(endpoints =>
    {
        endpoints.MapDefaultControllerRoute();
    });
}

The UseRouting() extension method adds the EndpointRoutingMiddleware to the pipeline, while the UseEndpoints() extension method adds the EndpointMiddleware to the pipeline. UseEndpoints() is also where you actually register all the endpoints for your application (in the example above, we register our MVC controllers only).

Note: As in the example above, it is generally best practice to place the static files middleware before the Routing middleware. This avoids the overhead of routing when requesting static files. It's also important you place Authentication and Authorization controllers between the two routing middleware as described in the migration document.

So how do we map our VersionMiddleware using endpoint routing?

Conceptually, we move our registration of the "version" endpoint into the UseEndpoints() call, using the /version URL as the path to match:

public void Configure(IApplicationBuilder app)
{
    app.UseStaticFiles();

    app.UseRouting();

    app.UseCors();

    app.UseEndpoints(endpoints =>
    {
        // Add a new endpoint that uses the VersionMiddleware
        endpoints.Map("/version", endpoints.CreateApplicationBuilder()
            .UseMiddleware<VersionMiddleware>()
            .Build())
            .WithDisplayName("Version number");

        endpoints.MapDefaultControllerRoute();
    });
}

There's a few things to note, which I'll discuss below.

  • We are building a RequestDelegate using the IApplicationBuilder()
  • We no longer match based on a route prefix, but on the complete route
  • You can set an informational name for the endpoint ("Version number")
  • You can attach additional metadata to the endpoint (not shown in the example above)

The syntax for adding the middleware as an endpoint is rather more verbose than the previous version in 2.x. The Map method here requires a RequestDelegate instead of an Action<IApplicationBuilder>. The downside to this is that visually it's much harder to see what's going on. You can work around this pretty easily by creating a small extension method:

public static class VersionEndpointRouteBuilderExtensions
{
    public static IEndpointConventionBuilder MapVersion(this IEndpointRouteBuilder endpoints, string pattern)
    {
        var pipeline = endpoints.CreateApplicationBuilder()
            .UseMiddleware<VersionMiddleware>()
            .Build();

        return endpoints.Map(pattern, pipeline).WithDisplayName("Version number");
    }
}

With this extension, Configure() looks like the following:

public void Configure(IApplicationBuilder app)
{
    app.UseStaticFiles();

    app.UseRouting();

    app.UseCors();

    // Execute the endpoint selected by the routing middleware
    app.UseEndpoints(endpoints =>
    {
        endpoints.MapVersion("/version");
        endpoints.MapDefaultControllerRoute();
    });
}

The difference in behaviour with regard to routing is an important one. In our previous implementation for ASP.NET Core 2.x, our version middleware branch would execute for any requests that have a /version segment prefix. So we would match /version, /version/123, /version/test/oops etc. With endpoint routing, we're not specifying a prefix for the URL, we're specifying the whole pattern. That means you can have route parameters in all of your endpoint routes. For example:

endpoints.MapVersion("/version/{id:int?}");

This would match both /version and /version/123 URLs, but not /version/test/oops. This is far more powerful than the previous version, but you need to be aware of it.

Another feature of endpoints is the ability to attach metadata to them. In the previous example we provided a display name (primarily for debugging purposes), but you can attach more interesting information like authorization policies or CORS policies, which other middleware can interrogate. For example:

public void Configure(IApplicationBuilder app)
{
    app.UseStaticFiles();

    app.UseRouting();

    app.UseCors();
    app.UseAuthentication();
    app.UseAuthorization();

    app.UseEndpoints(endpoints =>
    {
        endpoints.MapVersion("/version")
            .RequireCors("AllowAllHosts")
            .RequireAuthorization("AdminOnly");

        endpoints.MapDefaultControllerRoute();
    });
}

In this example we've added a CORS policy (AllowAllHosts) and an authorization policy (AdminOnly) to the version endpoint. When a request to the endpoint arrives, the routing middleware selects the version endpoint, and makes its metadata available for subsequent middleware in the pipeline. The authorization and CORS middleware can see that there are associated policies and act accordingly, before the endpoint is executed.

Do I have to convert my middleware to endpoint routing?

No. The whole concept of the middleware pipeline hasn't changed, and you can still branch or early-return from middleware exactly as you have been able to since ASP.NET Core 1.0. Endpoint routing doesn't have to replace your current approaches, and in some cases it shouldn't.

There's three main benefits to endpoint routing that I see:

  • You can attach metadata to endpoints so intermediate middleware (e.g. Authorization, CORS) can know what will be eventually executed
  • You can use routing templates in your non-MVC endpoints, so you get route-token parsing features that were previously limited to MVC
  • You can more easily generate URLs to non-MVC endpoints

If these features are useful to you, then endpoint routing is a good fit. The ASP.NET Core HealthCheck feature was converted to endpoint routing for example, which allows you to add authorization requirements to the health check.

However if these features aren't useful to you, there's no reason you have to convert to endpoint routing. For example, even though the static file middleware is "terminal" in the sense that it often returns a response, it hasn't been converted to endpoint routing. That's because you generally don't need to apply authorization or CORS to static files, so there would be no benefit (and a performance hit) to doing so.

On top of that you should generally place the static file middleware before the routing middleware. That ensures the routing middleware doesn't try and "choose" an endpoint for every request: it would ultimately be wrong anyway for static file paths, as the static file middleware would return before the endpoint is executed!

Overall, endpoint routing adds a lot of features to the previous routing approach but you need to be aware of the differences when upgrading. If you haven't already, be sure to check out the migration guide which details many of these changes.

Summary

In this post I gave an overview of routing in ASP.NET Core and how it's evolved. In particular, I discussed some of the advantages endpoint routing brings, in terms of separating the routing of a request from the execution of a handler.

I also showed of the changes required to convert a simple terminal middleware used in an ASP.NET Core 2.x app to act as an endpoint in ASP.NET Core 3.0. Generally speaking the changes required should be relatively minimal, but it's important to be aware of the change from "prefix-based routing" to the more fully-featured routing approach.

Converting integration tests to .NET Core 3.0: Upgrading to ASP.NET Core 3.0 - Part 5

$
0
0
Converting integration tests to .NET Core 3.0

In this post I discuss some of the changes you might need to make in integration test code that uses WebApplicationFactory<> or TestServer when upgrading to ASP.NET Core 3.0.

One of the biggest changes in ASP.NET Core 3.0 was converting it to run on top of the Generic Host infrastructure, instead of the WebHost. I've addressed that change a couple of times in this series, as well is in my series on exploring ASP.NET Core 3.0. This change also impacts other peripheral infrastructure like the TestServer used for integration testing.

Integration testing with the Test Host and TestServer

ASP.NET Core includes a library Microsoft.AspNetCore.TestHost which contains an in-memory web host. This lets you send HTTP requests to your server without the latency or hassle of sending requests over the network.

The terminology is a little confusing here - the in-memory host and NuGet package is often referred to as the "TestHost" but the actual class you use in your code is TestServer. The two are often used interchangeably.

In ASP.NET Core 2.x you could create a test server by passing a configured instance of IWebHostBuilder to the TestServer constructor:

public class TestHost2ExampleTests
{
    [Fact]
    public async Task ShouldReturnHelloWorld()
    {
        // Build your "app"
        var webHostBuilder = new WebHostBuilder()
            .Configure(app => app.Run(async ctx => 
                    await ctx.Response.WriteAsync("Hello World!")
            ));

        // Configure the in-memory test server, and create an HttpClient for interacting with it
        var server = new TestServer(webHostBuilder);
        HttpClient client = server.CreateClient();

        // Send requests just as if you were going over the network
        var response = await client.GetAsync("/");

        response.EnsureSuccessStatusCode();
        var responseString = await response.Content.ReadAsStringAsync();
        Assert.Equal("Hello World!", responseString);
    }
}

In the example above, we create a basic WebHostBuilder that returns "Hello World!" to all requests. We then create an in-memory server using TestServer:

var server = new TestServer(webHostBuilder);

Finally, we create an HttpClient that allows us to send HTTP requests to the in-memory server. You can use this HttpClient exactly as you would if you were sending requests to an external API:

var client = server.CreateClient();

var response = await client.GetAsync("/");

In .NET core 3.0, this pattern is still the same generally, but is made slightly more complicated by the move to the generic host.

TestServer in .NET Core 3.0

To convert your .NET Core 2.x test project to .NET Core 3.0, open the test project's .csproj, and change the <TargetFramework> element to netcoreapp3.0. Next, replace the <PackageReference> for Microsoft.AspNetCore.App with a <FrameworkReference>, and update any other package versions to 3.0.0.

If you take the exact code written above, and convert your project to a .NET Core 3.0 project, you'll find it runs without any errors, and the test above will pass. However that code is using the old WebHost rather than the new generic Host-based server. Lets convert the above code to use the generic host instead.

First, instead of creating a WebHostBuilder instance, create a HostBuilder instance:

var hostBuilder = new HostBuilder();

The HostBuilder doesn't have a Configure() method for configuring the middleware pipeline. Instead, you need to call ConfigureWebHost(), and call Configure() on the inner IWebHostBuilder. The equivalent becomes:

var hostBuilder = new HostBuilder()
    .ConfigureWebHost(webHost => 
        webHost.Configure(app => app.Run(async ctx =>
                await ctx.Response.WriteAsync("Hello World!")
    )));

After making that change, you have another problem - the TestServer constructor no longer compiles:

TestServer does not take an IHostBuilder in its constructor

The TestServer constructor takes an IWebHostBuilder instance, but we're using the generic host, so we have an IHostBuilder. It took me a little while to discover the solution to this one, but the answer is to not create a TestServer manually like this at all. Instead you have to:

  • Call UseTestServer() inside ConfigureWebHost to add the TestServer implementation.
  • Build and start an IHost instance by calling StartAsync() on the IHostBuilder
  • Call GetTestClient() on the started IHost to get an HttpClient

That's quite a few additions, so the final converted code is shown below:

public class TestHost3ExampleTests
{
    [Fact]
    public async Task ShouldReturnHelloWorld()
    {
        var hostBuilder = new HostBuilder()
            .ConfigureWebHost(webHost =>
            {
                // Add TestServer
                webHost.UseTestServer();
                webHost.Configure(app => app.Run(async ctx => 
                    await ctx.Response.WriteAsync("Hello World!")));
            });

        // Build and start the IHost
        var host = await hostBuilder.StartAsync();

        // Create an HttpClient to send requests to the TestServer
        var client = host.GetTestClient();

        var response = await client.GetAsync("/");

        response.EnsureSuccessStatusCode();
        var responseString = await response.Content.ReadAsStringAsync();
        Assert.Equal("Hello World!", responseString);
    }
}

If you forget the call to UseTestServer() you'll see an error like the following at runtime: System.InvalidOperationException : Unable to resolve service for type 'Microsoft.AspNetCore.Hosting.Server.IServer' while attempting to activate 'Microsoft.AspNetCore.Hosting.GenericWebHostService'.

Everything else about interacting with the TestServer is the same at this point, so you shouldn't have any other issues.

Integration testing with WebApplicationFactory

Using the TestServer directly like this is very handy for testing "infrastructural" components like middleware, but it's less convenient for integration testing of actual apps. For those situations, the Microsoft.AspNetCore.Mvc.Testing package takes care of some tricky details like setting the ContentRoot path, copying the .deps file to the test project's bin folder, and streamlining TestServer creation with the WebApplicationFactory<> class.

The documentation for using WebApplicationFactory<> is generally very good, and appears to still be valid for .NET Core 3.0. However my uses of WebApplicationFactory were such that I needed to make a few tweaks when I upgraded from ASP.NET Core 2.x to 3.0.

Adding XUnit logging with WebApplicationFactory in ASP.NET Core 2.x

For the examples in the rest of this post, I'm going to assume you have the following setup:

  • A .NET Core Razor Pages app created using dotnet new webapp
  • An integration test project that references the Razor Pages app.

You can find an example of this in the GitHub repo for this post.

If you're not doing anything fancy, you can use the WebApplicationFactory<> class in your tests directly as described in the documentation. Personally I find I virtually always want to customise the WebApplicationFactory<>, either to replace services with test versions, to automatically run database migrations, or to customise the IHostBuilder further.

One example of this is hooking up the xUnit ITestOutputHelper to the fixture's ILogger infrastructure, so that you can see the TestServer's logs inside the test output when an error occurs. Martin Costello has a handy NuGet package, MartinCostello.Logging.XUnit that makes doing this a couple of lines of code.

The following example is for an ASP.NET Core 2.x app:

public class ExampleAppTestFixture : WebApplicationFactory<Program>
{
    // Must be set in each test
    public ITestOutputHelper Output { get; set; }

    protected override IWebHostBuilder CreateWebHostBuilder()
    {
        var builder = base.CreateWebHostBuilder();
        builder.ConfigureLogging(logging =>
        {
            logging.ClearProviders(); // Remove other loggers
            logging.AddXUnit(Output); // Use the ITestOutputHelper instance
        });

        return builder;
    }

    protected override void ConfigureWebHost(IWebHostBuilder builder)
    {
        // Don't run IHostedServices when running as a test
        builder.ConfigureTestServices((services) =>
        {
            services.RemoveAll(typeof(IHostedService));
        });
    }
}

This ExampleAppTestFixture does two things:

  • It removes any configured IHostedServices from the container so they don't run during integration tests. That's often a behaviour I want, where background services are doing things like pinging a monitoring endpoint, or listening/dispatching messages to RabbitMQ/KafKa etc
  • Hook up the xUnit log provider using an ITestOutputHelper property.

To use the ExampleAppTestFixture in a test, you must implement the IClassFixture<T> interface on your test class, inject the ExampleAppTestFixture as a constructor argument, and hook up the Output property.

public class HttpTests: IClassFixture<ExampleAppTestFixture>, IDisposable
{
    readonly ExampleAppTestFixture _fixture;
    readonly HttpClient _client;

    public HttpTests(ExampleAppTestFixture fixture, ITestOutputHelper output)
    {
        _fixture = fixture;
        fixture.Output = output;
        _client = fixture.CreateClient();
    }

    public void Dispose() => _fixture.Output = null;

    [Fact]
    public async Task CanCallApi()
    {
        var result = await _client.GetAsync("/");

        result.EnsureSuccessStatusCode();

        var content = await result.Content.ReadAsStringAsync();
        Assert.Contains("Welcome", content);
    }
}

This test requests the home page for the RazorPages app, and looks for the string "Welcome" in the body (it's in an <h1> tag). The logs generated by the app are all piped to xUnit's output, which makes it easy to understand what's happened when an integration test fails:

[2019-10-29 18:33:23Z] info: Microsoft.Hosting.Lifetime[0]
      Application started. Press Ctrl+C to shut down.
[2019-10-29 18:33:23Z] info: Microsoft.Hosting.Lifetime[0]
      Hosting environment: Development
...
[2019-10-29 18:33:23Z] info: Microsoft.AspNetCore.Routing.EndpointMiddleware[1]
      Executed endpoint '/Index'
[2019-10-29 18:33:23Z] info: Microsoft.AspNetCore.Hosting.Diagnostics[2]
      Request finished in 182.4109ms 200 text/html; charset=utf-8

Using WebApplicationFactory in ASP.NET Core 3.0

On the face of it, it seems like you don't need to make any changes after converting your integration test project to target .NET Core 3.0. However, you may notice something strange - the CreateWebHostBuilder() method in the custom ExampleAppTestFixture is never called!

The reason for this is that WebApplicationFactory supports both the legacy WebHost and the generic Host. If the app you're testing uses a WebHostBuilder in Program.cs, then the factory calls CreateWebHostBuilder() and runs the overridden method. However if the app you're testing uses the generic HostBuilder, then the factory calls a different method, CreateHostBuilder().

To update the factory, rename CreateWebHostBuilder to CreateHostBuilder, change the return type from IWebHostBuilder to IHostBuilder, and change the base method call to use the generic host method. Everything else stays the same:

public class ExampleAppTestFixture : WebApplicationFactory<Program>
{
    public ITestOutputHelper Output { get; set; }

    // Uses the generic host
    protected override IHostBuilder CreatHostBuilder()
    {
        var builder = base.CreateHostBuilder();
        builder.ConfigureLogging(logging =>
        {
            logging.ClearProviders(); // Remove other loggers
            logging.AddXUnit(Output); // Use the ITestOutputHelper instance
        });

        return builder;
    }

    protected override void ConfigureWebHost(IWebHostBuilder builder)
    {
        builder.ConfigureTestServices((services) =>
        {
            services.RemoveAll(typeof(IHostedService));
        });
    }
}

Notice that the ConfigureWebHost method doesn't change - that is invoked in both cases, and still takes an IWebHostBuilder argument.

After updating your fixture you should find your logging is restored, and your integration tests should run as they did before the migration to the generic host.

Summary

In this post I described some of the changes required to your integration tests after moving an application from ASP.NET Core 2.1 to ASP.NET Core 3.0. These changes are only required if you actually migrate to using the generic Host instead of the WebHost. If you are moving to the generic host then you will need to update any code that uses either the TestServer or WebApplicationFactory.

To fix your TestServer code, call UseTestServer() inside the HostBuilder.ConfigureWebHost() method. Then build your Host, and call StartAsync() to start the host. Finally, call IHost.GetTestClient() to retrieve an HttpClient that can call your app.

To fix your custom WebApplicationFactory, make sure you override the correct builder method. If your app uses the WebHost, override the CreateWebHostBuilder method. After moving to the generic Host, override the CreateWebHostBuilder method.

.NET Core, Docker, and Cultures - Solving a culture issue porting a .NET Core app from Windows to Linux

$
0
0
.NET Core, Docker, and Cultures - Solving a culture issue porting a .NET Core app from Windows to Linux

This post is part of the third annual C# Advent. Check out the home page for up to 50 C# blog posts in December 2019!

In this post I describe an issue I found when porting an ASP.NET Windows application to ASP.NET Core on Linux. It took me several attempts to get to the bottom of the issue, and rather than jump straight to the answer, I've detailed my failed attempts to fix it on the way!

A little while ago Steve Gordon wrote about solving a similar issue. I've had this post in draft for quite a while so unfortunately that was too late for me! 😆

Background: Porting an ASP.NET Windows app to ASP.NET Core on Linux

Recently I've been working on porting a large, old (~10 years), ASP.NET app to .NET Core. On the face of it, that sounds like a fools errand, but luckily the app has moved with the times. It uses Web API 2 and OWIN/Katana, with no Razor or WebForms dependencies, or anything like that. Generally speaking, the port actually hasn't been too bad!

Disclaimer: porting from ASP.NET to ASP.NET Core may not be worth it for you. In this case, we're pretty confident it's the right choice!

As well as moving to .NET Core, we're also switching OS from Windows to Linux. We've already ported various smaller applications in a similar way, which again, has been surprisingly hassle-free in most cases.

I initially focused on porting the app on Windows, and subsequently configured builds to use multi-stage Dockerfiles (using Cake). After some inevitable trial-and-error, I eventually got a port of the app running for testing. I fixed some obvious bugs/typos I had introduced, and most things appeared to be working well. 🎉

However, on checking the local log files, I found the following error, hundreds of times:

Culture 4096 (0x1000) is an invalid culture identifier - CultureNotFoundException

The rest of this post details the saga of me trying to understand and fix this error.

The culprit: creating RegionInfo from CultureInfo

I traced the source of the error to the following code:

public static IEnumerable<RegionInfo> AllRegionInfo { get; } = 
    CultureInfo.GetCultures(CultureTypes.SpecificCultures)
        .Select(culture => new RegionInfo(culture.LCID))
        .ToList();

I don't find myself working with globalization constructs like cultures and regions very often, so it took me a little while to figure out exactly what the code was doing, or why it should be failing. Breaking it down:

var cultures = CultureInfo.GetCultures(CultureTypes.SpecificCultures)

The CultureInfo class contains information about various locales, such as language details, formatting for dates and numbers, currency symbols, and so on. CultureInfo.GetCultures() returns all the cultures known to .NET given the current operating system and version, filtered by the provided CultureTypes enum. (We'll be coming back to that emphasised section shortly.)

The CultureTypes enum is a sign of how much legacy cruft is in .NET - of the 8 values described in the docs, 5 of them are deprecated! The remaining three values are:

  • SpecificCultures: Cultures that are specific to a country/region (e.g. en-GB, en-US, es-ES)
  • NeutralCultures: Cultures that are associated with a language but are not specific to a country/region. (e.g. es, en). This also includes the Invariant Culture.
  • AllCultures: All the cultures.

So the code shown above should fetch all the specific cultures, i.e. cultures associated with a country/region. This brings us to the next line:

.Select(culture => new RegionInfo(culture.LCID))

This LINQ expression uses the CultureInfo.LCID property of the specific cultures returned by GetCultures(). This is the culture identifier, which apparently maps to Windows NLS locale identifier. Essentially an integer ID for the culture.

The RegionInfo constructor takes an LCID, and creates the appropriate RegionInfo associated with that culture. The RegionInfo object contains details about the country/region like the region name, the two and three letter ISO names, and ISO currency symbols, for example.

So this code is creating a list of all the RegionInfo objects known to the .NET app. This code was working fine when running under ASP.NET on Windows so, why was it failing with this error?

Culture 4096 (0x1000) is an invalid culture identifier - CultureNotFoundException

The problem: there's a lot of cultures!

As far as I can see, this is actually not a problem specific to .NET Core, or even Linux. Rather, it's a consequence of the fact there are a lot of possible locales! This Stack Overflow post contains a great description (and solution) for the problem:

Almost all of the new locales in Windows are not assigned explicit LCIDs - because there is not enough "room" for the thousands of languages in hundreds of countries problem. They all get assigned 0x1000.

So the problem is that the new locales haven't all been given a new LCID. RegionInfo doesn't know what to do with the "placeholder" 0x1000, so it throws a CultureNotFoundException.

The solution is to use the name of the culture (e.g. en-GB or es-ES) instead of the dummy LCID:

public static IEnumerable<RegionInfo> AllRegionInfo { get; } = 
    CultureInfo.GetCultures(CultureTypes.SpecificCultures)
        .Select(culture => new RegionInfo(culture.Name)) // using Name instead of LCID
        .ToList();

To be honest, I'm not entirely sure why the original code was working previously. I would have expected Windows 10 to have various locales with the placeholder LCID, and to have seen this error before!

With this change the error went away! I focused on deploying the app to the alpine OS Docker images, and carried-on with my testing. Surprise, surprise, another error was waiting for me in the logs.

Problem two: The InvariantCulture appearing in SpecificCultures

In the log files, with the same stack trace as before, I found this error:

ArgumentException: There is no region associated with the Invariant Culture (Culture ID: 0x7F)

The Invariant Culture? But the docs say the Invariant Culture is s a neutral culture, not a specific culture. Why was it in the list? My initial thought was "pfft, who knows, I'll just filter it out":

public static IEnumerable<RegionInfo> AllRegionInfo { get; } = 
    CultureInfo.GetCultures(CultureTypes.SpecificCultures)
        .Where(culture => culture.LCID != 0x7F) // filer invariant culture
        .Select(culture => new RegionInfo(culture.Name)) // using Name instead of LCID
        .ToList();

At this point, I should point out that I had added unit tests around this method, confirming that AllRegionInfo contained regions I expected (e.g. "en-US") and didn't contain nonsense regions ("xx-XX" or the invariant culture). These tests all passed both when running on Windows, and in the build phase of my Dockerfiles.

However, when testing the app, I again found a problem, this time getting an exception almost immediately:

FailFast: Couldn't find a valid ICU package installed on the system. Set the configuration flag System.Globalization.Invariant to true if you want to run with no globalization support.

The heart of the issue: Alpine is small

This finally pointed me in the direction of the real problem. There was no issue running on the build-time Docker images that contain the .NET Core SDK. But on the small, runtime Docker images an error was thrown, seemingly because there were no cultures installed. This was exactly the case, because I was using the Alpine Docker images.

Alpine has a much smaller footprint than a Linux distribution like Debian, so it's generally ideal for using in Docker containers, especially when coupled with multi-stage builds. I've been using it for all my .NET Core apps without any problems for some time. However, a quick bit of googling quickly revealed this issue: alpine images have no cultures installed.

.NET Core takes its list of cultures from the OS. On *nix systems, these come from the ICU library which is typically installed by default. However, in the interest of making the distro as small as possible, Alpine doesn't include the ICU libraries.

To account for this, .NET Core 2.0 introduced a Globalization Invariant Mode. You can read about everything it does in the linked document, but the important point for this discussion is:

When enabling the invariant mode, all cultures behave like the invariant culture.

also

All cultures LCID will have value 0x1000 (which means Custom Locale ID). The exception is the invariant cultures which will still have 0x7F.

Which explains the behaviour I was seeing! You can see this mode being enabled with the DOTNET_SYSTEM_GLOBALIZATION_INVARIANT environment variable in the Alpine runtime-deps Dockerfile that serves as the base image for all the other .NET Core Alpine Docker images.

The fix: install the ICU cultures and disable Globalization Invariant Mode

All of which brings us to a solution: install the ICU libraries in the Alpine runtime images, and disable the Globalization Invariant Mode. You can actually see how to do this in the Alpine SDK Docker images.

Yes, you read that correctly. The Alpine SDK image does have cultures installed. The runtime images don't have cultures installed. That meant my culture unit tests were completely failing to spot the issue, as they were essentially running with .NET Core in a different mode!

You can install the ICU libraries in Alpine using apk add icu-libs. Your runtime Dockerfile will need to start with something like this:

FROM mcr.microsoft.com/dotnet/core/aspnet:2.1.11-alpine3.9

# Install cultures (same approach as Alpine SDK image)
RUN apk add --no-cache icu-libs

# Disable the invariant mode (set in base image)
ENV DOTNET_SYSTEM_GLOBALIZATION_INVARIANT=false

# ... other setup

With this change, everything was back working correctly, but I retained creating the RegionInfo using Name instead of LCID as the better approach:

public static IEnumerable<RegionInfo> AllRegionInfo { get; } = 
    CultureInfo.GetCultures(CultureTypes.SpecificCultures)
        .Select(culture => new RegionInfo(culture.Name))
        .ToList();

As a side note, another way to "spot" you're running in Globalization Invariant Mode is that all your currency symbols have turned into ¤ symbols, as in this issue.

Summary

In this post I described an issue with cultures I found when porting an application from Windows to Linux. The problem was that the Alpine Docker images I was using didn't have any cultures installed, so was running in the Globalization Invariant Mode. To fix the issue, I installed the ICU libraries, and disabled invariant mode.

.NET Core works great cross platform, but when you're moving between Windows and Linux, it's not just the Windows-specific features you have to keep an eye-out for. There's the common issues like file-path-separators and line endings, but also more subtle differences like the one in this post. If you've been bitten by anything else moving to Linux I'd be interested to hear about it in the comments!

A Quantum Random Number Generator for .NET: The quantum measurement problem and many-worlds approach

$
0
0
A Quantum Random Number Generator for .NET: The quantum measurement problem and many-worlds approach

I've been listening to a lot of Sean Carroll's Mindscape podcast recently, and in a recent episode with Rob Reid he discussed the Everettian or "many-worlds" approach to explaining the measurement problem in quantum mechanics.

Towards the end of the episode they discussed an iPhone app that uses a quantum device connected to an HTTP API to "split the universe" by triggering a quantum measurement. Whether you believe the many-worlds theory or not, there's something very cool about having a quantum device just an HTTP call away… So I threw together an HttpClient to call the HTTP API to generate truly random numbers.

And voila: you have a quantum random generator! And as an added bonus, you've split the universe multiple times to get it. The focus of this post isn't the HttpClient itself - that's a toy to scratch an itch more than anything else. Instead, I'm trying to put down my (exceedingly-basic) understanding of the quantum measurement problem, and the many-worlds approach.

This is obviously a departure from my usual posts. I've always been casually interested in physics but I'm absolutely not a physicist, so I strongly suggest taking everything I say with a pinch of salt and imprecision! It's also a very brief consideration of the subject matter - I've added some podcast references at the end of the post from where I gleaned most of my understanding in this area!

Quantum mechanics and the wave equation

So what is quantum mechanics?

Quantum mechanics is the single most successful theory we have to explain the world. There's no evidence from experimental physics that suggests there's a flaw in its description of the way the world works. It seems to be the way nature works.

At its heart is the wave equation that describes the "quantum state" of the system. In classic Newtonian mechanics, the "state" of a system (e.g. a particle) is its location and its velocity - if you know those two properties, then you can completely determine the behaviour of the system by following Newton's laws. The wave equation is the quantum state, and it evolves according to the Schrödinger equation.

A wave function corresponding to a particle traveling freely through empty space

You can think of the wave equation as a cloud of possibilities. As Sean puts it:

The wave function you should think of as a sort of a machine. You ask it a question, “Where is the electron?” For example. And it will say, “With a certain probability you will find the following answers to your question.” If all you care about is the position of one electron, then the wave function at every point in space has a value, and that value tells you the probability of seeing the electron there.

One of the big questions is: what actually _is_ the wave function? Is it describing a behaviour we observe, or is it something more fundamental?

One of the biggest shifts for me was understanding that electrons aren't little balls. You can't think of it as a little ball that has a 90% chance to be in one place, and a 10% chance in the other place. That implies that the ball is always somewhere we just don't know where. The answer is that it's not really a ball. It's a weird wave thing that's everywhere at once (with varying possibilities).

2d cross sections of the probability density of various states of the hydrogen atom

But how can that be so? We have huge amounts of technology that rely on our ability to manipulate electrons and other particles just as though they are little balls. How can both descriptions be correct?

That brings us to the measurement problem.

The measurement problem in quantum mechanics

The wave equation isn't just a fancy way of thinking about probabilities – the implication is that the electron actually is in both places at once. It's in a "superposition" of all the possible states. But it's never possible for us to "see" an electron in that superposition state. When you measure or observe the electron, you only ever see it in a single place. You only ever see it as a particle.

It seems then, that the act of looking at an electron causes it to behave differently, it "collapses the wave function". It's like a game of musical statues - everything is different (people are moving / the electron is behaving like a wave) until you look at it, and suddenly everyone acts casual (people freeze / the electron behaves like a particle).

Wayne acting casual

One of the big problems with this is it makes an "observer" a first-class citizen in physics. But what are the requirements to be an observer? Does it have to be a person? Is a camera an observer? What about a cat, or an amoeba? It's weird…

The question of how (of if) the wave function collapses when you measure a quantum system is termed the measurement problem. There are a number of different approaches that attempt to address this problem, for example:

  • The Copenhagen interpretation which appears to say "it doesn't matter, the math works, stop complaining and do some real work" 🤷‍♂️.
  • Bohmian mechanics suggests the wave function is only part of the solution - there's extra hidden variables we don't know about.
  • Dynamical collapse theories suggest that wave function collapse happens spontaneously, but that the collapse of a single particle initiates the collapse of the entire measurement apparatus.
  • Hugh Everett's many-worlds interpretation suggests the wave function never collapses, rather that the universe "splits in two" - one in which the electron is in position A, one in which the electron is in position B.

This many-worlds approach is the one favoured by Sean Carroll, and is the one of interest here.

The many-worlds approach by Everett

The many-worlds approach is in many ways the most mind-bending option. Don't be surprised if your gut reaction is that it's prosperous mumbo-jumbo! I'll try and explain as I best I understand it.

The many-worlds approach suggests that when you see the wave function appear to collapse (due to an observation) it is actually the universe "splitting" into two branches. One in which the electron was in position A and one in which it was in position B.

So what is an observation in the many-worlds approach? Everett said that the universe splits when a system becomes entangled with its environment (it decoheres). Any interaction between two systems will cause decoherance, and hence will cause the universe to split.

But seeing as we're part of this universe, we (and our measuring equipment) are inherently quantum too! So any interaction we have with fundamental particles will inevitably be a quantum interaction, and the universe splits in two. In this universe, you observe the electron in position A for example, but in the other branch of the universe you observe it in position B. So in summary an "observation" is any time you cause a quantum interaction Or to use the famous Schrödinger's cat thought experiment, in one universe the cat is alive, in the other it's asleep (no cats are harmed in my thought experiments).

Schrödinger's Cat, many worlds interpretation, with universe branching

I haven't succeeded in getting my head fully around this yet. Both of the universes are "here" in some sense. The theory is not suggesting the universes are spatially distant (as in some multiverse theories), or that they're "wrapped up" in some higher dimensions (as in string theory). They're in the same "place" but evolving separately, and can't contact each other. Technically, they're two different vectors in Hilbert space, but that doesn't mean a lot to me conceptually!

There's a lot more to the theory that is way beyond my capabilities, but the interesting notion is that every time you have a quantum interaction, you branch the wave function and the universe "splits in two".

This is the principle that the Universe Splitter iPhone app relies on.

Splitting the universe with a quantum measurement

The Universe Splitter app is essentially a front-end to a "Quantis" brand quantum device made by ID Quantique. This device sends a photon towards a semi-reflective mirror, so that 50% of the time the photon passes through the mirror, and 50% of the time it is reflected.

QRNG based on a Polarising Beam Splitter (PBS)
QRNG based on a Polarising Beam Splitter (PBS). Figure from arXiv:1311.4547 [quant-ph].

Since this is a quantum observation, then every time the device fires the universe splits in two – one branch in which the photon was reflected, and one in which it passed through! That's the premise of the Universe Splitter app. If you commit to doing action A if the photon is reflected, and action B if it transmits, then you have created two separate universes: one in which you did action A, and one in which you did action B!

This is quite a cute concept, but quantum randomness has a "real life" use too. It is the best (and only) source of true randomness. Radioactive decay is another source of randomness that can be traced back to the same quantum origin.

So I got thinking - why don't we have a quantum random generator in .NET? Sure, you can purchase a quantum random generator, and communicate with it over USB etc. But I want a web service! After a bit of hunting, I found (what I assume) is the back-end the universe splitter app is using - an API provided by ETH Zürich.

Creating a quantum random generator for .NET

The "quantum random numbers as a service, QRNGaaS" allows you to call a very simple rest API and obtain random numbers generated using a Quantis random number generator.

The API is very simple - you send a GET request, and you get back random numbers. For example, you can request 10 numbers between 0 and 9 (inclusive)

curl http://random.openqu.org/api/randint?size=10&min=0&max=9

And you'll get JSON similar to the following

{
  "result":
      [ 1, 3, 9, 8, 0, 4, 3, 6, 6, 3, 1]
}

There's also an API for returning floating point numbers, and base64 encoded bytes. Unfortunately, I couldn't get the bytes API to work (500 Internal Server Error).

Creating a .NET API to call this endpoint is pretty trivial. The code below is very much thrown together - it doesn't have any error checking, it creates its own HttpClient instead of having one injected via the constructor, it assumes the content will always be the expected format etc. But it works!

using System;
using System.Linq;
using System.Net.Http;
using System.Text.Json;
using System.Threading.Tasks;

public class QuantumRandomNumberGenerator
{
    private readonly HttpClient _httpClient;
    public QuantumRandomNumberGenerator()
    {
        _httpClient = new HttpClient
        {
            BaseAddress = new Uri("http://random.openqu.org/api/")
        };
    }

    public async Task<int[]> GetIntegers(int min, int max, int size)
    {
        var url = $"randint?size={size}&min={min}&max={max}";
        var stream = await _httpClient.GetStreamAsync(url);

        using(var document = await JsonDocument.ParseAsync(stream))
        {
          return document
              .RootElement
              .GetProperty("result")
              .EnumerateArray()
              .Select(x => x.GetInt32())
              .ToArray();
        }
    }
}

This example uses the new System.Text.Json library in .NET Core 3.0 to efficiently parse the JSON response and return the array of integers. If you want to learn more about System.Text.Json I suggest reading the intro blog post. I also liked Stuart Lang's introduction.

With our new QuantumRandomNumberGenerator defined, we can now generate truly random numbers:

var qrng = new QuantumRandomNumberGenerator();

var values = await qrng.GetIntegers(0, 255, 10);

Console.WriteLine(string.Join(", ", values));
// 32, 133, 183, 249, 208, 112, 76, 178, 44, 184

So, should you replace all your calls to RandomNumberGenerator with your shiny new QuantumRandomNumberGenerator. No, please don't. You really don't need true randomness in most places + the cost of calling an HTTP API for every new random number is clearly an issue. Add in the fact that it's a free service, no doubt exposed as a curiosity rather than providing any sorts of guarantees. Plus the fact you can only call the API over HTTP, not HTTPS. So please, don't put this into production. 😉

But do have fun thinking about all those universes you're creating. In one of them, the random list of numbers I generated above is all 0s, and in another, they're all 255s! 🤯

Resources

Viewing all 743 articles
Browse latest View live