Quantcast
Channel: Andrew Lock | .NET Escapades
Viewing all 743 articles
Browse latest View live

Reducing log verbosity with Serilog RequestLogging: Using Serilog.AspNetCore in ASP.NET Core 3.0 - Part 1

$
0
0
Reducing log verbosity with Serilog RequestLogging

One of the great aspects of ASP.NET Core is that logging is built-in to the framework. That means you can (if you want to) get access to all the deep infrastructural logs from your own standard logging infrastructure. The down side to this is that sometimes you can get too many logs.

In this short series I describe how to use Serilog's ASP.NET Core request logging feature. In this first post I describe how to add the the Serilog RequestLoggingMiddleware to your application, and the benefits it provides. In subsequent posts I'll describe how to customise the behaviour further.

I've had these posts in draft for a while. Since then, Nicholas Blumhardt, creator of Serilog, has written a comprehensive blog post on using Serilog with ASP.NET Core 3.0. It's a very detailed (and opinionated) piece, that I strongly recommend reading. You'll find most of what I talk about in this series in his post, so check it out!

Request logging without Serilog

For this post we'll start with a basic ASP.NET Core 3.0 Razor pages app, created using dotnet new webapp. This creates a standard Program.cs that look like this:

public class Program
{
    public static void Main(string[] args)
    {
        CreateHostBuilder(args).Build().Run();
    }

    public static IHostBuilder CreateHostBuilder(string[] args) =>
        Host.CreateDefaultBuilder(args)
            .ConfigureWebHostDefaults(webBuilder =>
            {
                webBuilder.UseStartup<Startup>();
            });
}

And a Startup.cs that configures the middleware pipeline in Configure as the following:

public void Configure(IApplicationBuilder app, IWebHostEnvironment env)
{
    if (env.IsDevelopment())
    {
        app.UseDeveloperExceptionPage();
    }
    else
    {
        app.UseExceptionHandler("/Error");
        app.UseHsts();
    }

    app.UseHttpsRedirection();
    app.UseStaticFiles();
    app.UseRouting();
    app.UseAuthorization();
    app.UseEndpoints(endpoints =>
    {
        endpoints.MapRazorPages();
    });
}

If you run the application and navigate to the home page, by default you'll see a number of logs in the Console for each request. The logs below are generated for a single request to the home page (there are additional requests for CSS and JS files after this that I've not included):

info: Microsoft.AspNetCore.Hosting.Diagnostics[1]
      Request starting HTTP/2 GET https://localhost:5001/
info: Microsoft.AspNetCore.Routing.EndpointMiddleware[0]
      Executing endpoint '/Index'
info: Microsoft.AspNetCore.Mvc.RazorPages.Infrastructure.PageActionInvoker[3]
      Route matched with {page = "/Index"}. Executing page /Index
info: Microsoft.AspNetCore.Mvc.RazorPages.Infrastructure.PageActionInvoker[101]
      Executing handler method SerilogRequestLogging.Pages.IndexModel.OnGet - ModelState is Valid
info: Microsoft.AspNetCore.Mvc.RazorPages.Infrastructure.PageActionInvoker[102]
      Executed handler method OnGet, returned result .
info: Microsoft.AspNetCore.Mvc.RazorPages.Infrastructure.PageActionInvoker[103]
      Executing an implicit handler method - ModelState is Valid
info: Microsoft.AspNetCore.Mvc.RazorPages.Infrastructure.PageActionInvoker[104]
      Executed an implicit handler method, returned result Microsoft.AspNetCore.Mvc.RazorPages.PageResult.
info: Microsoft.AspNetCore.Mvc.RazorPages.Infrastructure.PageActionInvoker[4]
      Executed page /Index in 221.07510000000002ms
info: Microsoft.AspNetCore.Routing.EndpointMiddleware[1]
      Executed endpoint '/Index'
info: Microsoft.AspNetCore.Hosting.Diagnostics[2]
      Request finished in 430.9383ms 200 text/html; charset=utf-8

That's 10 logs for a single request. Now, to be clear, this was running in the Development environment, which by default logs everything in the Microsoft namespace of level "Information" or above. If we switch to the Production environment, the default template filters the logs to "Warning" for the Microsoft namespace. Navigating to the default home page now generates the following logs:


That's right, no logs at all! All of the logs generated in the previous run are in the Microsoft namespaces, and are "Information" level, so they're all filtered out. Personally I feel like that's a bit heavy handed. It would be nice if the production version logged something, for correlation with other logs if nothing else.

One possible solution is to customise the filters applied to each namespace. For example, you could limit the Microsoft.AspNetCore.Mvc.RazorPages namespace to "Warning", while leaving the more general Microsoft namespace as "Information". Now you get a reduced set of logs:

info: Microsoft.AspNetCore.Hosting.Diagnostics[1]
      Request starting HTTP/2 GET https://localhost:5001/
info: Microsoft.AspNetCore.Routing.EndpointMiddleware[0]
      Executing endpoint '/Index'
info: Microsoft.AspNetCore.Routing.EndpointMiddleware[1]
      Executed endpoint '/Index'
info: Microsoft.AspNetCore.Hosting.Diagnostics[2]
      Request finished in 184.788ms 200 text/html; charset=utf-8

These logs have some useful information in them - the URL, HTTP method, timing information, endpoint etc. - and there's not too much redundancy. But it's still slightly annoying they're four separate log messages.

This is the issue Serilog's RequestLoggingMiddleware aims to deal with - instead of creating separate logs for each step in the request, create a single "Summary" log message containing all the pertinent information.

Adding Serilog to the application

The one dependency for using Serilog's RequestLoggingMiddleware is that you're using Serilog! In this section I'll describe the basics for adding Serilog to your ASP.NET Core app. If you already have Serilog installed, skip to the next section.

I described how to add Serilog to a generic host application over a year ago, and with ASP.NET Core now re-platformed on top of the generic host infrastructure the setup for ASP.NET Core 3.0 is very similar. The approach described in this post follows the suggestions + advice of the Serilog.AspNetCore GitHub repository (and the advice from Nicholas Blumhardt's post too).

Start by installing the Serilog.AspNetCore NuGet package, plus the Console and Seq Sinks, so that we can view the logs. You can do this from the command line by running:

dotnet add package Serilog.AspNetCore
dotnet add package Serilog.Sinks.Console
dotnet add package Serilog.Sinks.Seq

Now it's time to replace the default logging with Serilog. There's a number of ways you can do this, but the suggested approach is to configure your logger in Program.Main before you do anything else. This goes against the approach used by ASP.NET Core in general, but is the approach suggested for Serilog. The result is that your Program.cs file becomes rather longer:

// Additional required namespaces
using Serilog;
using Serilog.Events;

public class Program
{
    public static int Main(string[] args)
    {
        // Create the Serilog logger, and configure the sinks
        Log.Logger = new LoggerConfiguration()
            .MinimumLevel.Debug()
            .MinimumLevel.Override("Microsoft", LogEventLevel.Information)
            .Enrich.FromLogContext()
            .WriteTo.Console()
            .WriteTo.Seq("http://localhost:5341")
            .CreateLogger();

        // Wrap creating and running the host in a try-catch block
        try
        {
            Log.Information("Starting host");
            CreateHostBuilder(args).Build().Run();
            return 0;
        }
        catch (Exception ex)
        {
            Log.Fatal(ex, "Host terminated unexpectedly");
            return 1;
        }
        finally
        {
            Log.CloseAndFlush();
        }
    }

    public static IHostBuilder CreateHostBuilder(string[] args) =>
        Host.CreateDefaultBuilder(args)
            .UseSerilog() // <- Add this line
            .ConfigureWebHostDefaults(webBuilder =>
            {
                webBuilder.UseStartup<Startup>();
            });
}

While more complex, this setup ensures that you will still get logs if your appsettings.json file is formatted incorrectly, or configuration files are missing, for example. If you run your application now you'll see the same 10 logs we did originally, just formatted slightly differently:

[13:30:27 INF] Request starting HTTP/2 GET https://localhost:5001/  
[13:30:27 INF] Executing endpoint '/Index'
[13:30:27 INF] Route matched with {page = "/Index"}. Executing page /Index
[13:30:27 INF] Executing handler method SerilogRequestLogging.Pages.IndexModel.OnGet - ModelState is Valid
[13:30:27 INF] Executed handler method OnGet, returned result .
[13:30:27 INF] Executing an implicit handler method - ModelState is Valid
[13:30:27 INF] Executed an implicit handler method, returned result Microsoft.AspNetCore.Mvc.RazorPages.PageResult.
[13:30:27 INF] Executed page /Index in 168.28470000000002ms
[13:30:27 INF] Executed endpoint '/Index'
[13:30:27 INF] Request finished in 297.0663ms 200 text/html; charset=utf-8

We seem to have taken 2 steps forward and one step back here. Our logging configuration is more robust now by configuring it earlier in the application lifecycle, but we haven't actually solved the problem we set out to yet. To do that we'll add the RequestLoggingMiddleware.

Switching to Serilog's RequestLoggingMiddleware

The RequestLoggingMiddleware is included in the Serilog.AspNetCore package and can be used to add a single "summary" log message for each request. If you've already gone through the steps in the previous section, adding the middleware is simple. In your Startup class, call UseSerilogRequestLogging() at the point where you would like to record the logs:

// Additional required namespace
using Serilog;

public void Configure(IApplicationBuilder app, IWebHostEnvironment env)
{
    // ... Error handling/HTTPS middleware
    app.UseStaticFiles();

    app.UseSerilogRequestLogging(); // <-- Add this line

    app.UseRouting();
    app.UseAuthorization();
    app.UseEndpoints(endpoints =>
    {
        endpoints.MapRazorPages();
    });
}

As always with the ASP.NET Core middleware pipeline, order is important. When a request reaches the RequestLoggingMiddleware the middleware starts a timer, and passes the request on for handling by subsequent middleware. When a later middleware eventually generates a response (or throws an exception), the response passes back through the middleware pipeline to the request logger, which records the result and writes a summary log message.

Serilog can only log requests that reach the middleware. In the example above, I've added the RequestLoggingMiddleware after the StaticFilesMiddleware. Requests that are handled by UseStaticFiles will short-circuit the pipeline, and won't be logged. Given the static files middleware is quite noisy that will often be the desired behaviour, but if you wish to log requests for static files too, you can move the serilog middleware earlier in the pipeline.

If we run the application one more time, you'll still see the original 10 log messages, but you'll see an additional log message from the Serilog RequestLoggingMiddleware, the penultimate message:

# Standard logging from ASP.NET Core infrastructure
[14:15:44 INF] Request starting HTTP/2 GET https://localhost:5001/  
[14:15:44 INF] Executing endpoint '/Index'
[14:15:45 INF] Route matched with {page = "/Index"}. Executing page /Index
[14:15:45 INF] Executing handler method SerilogRequestLogging.Pages.IndexModel.OnGet - ModelState is Valid
[14:15:45 INF] Executed handler method OnGet, returned result .
[14:15:45 INF] Executing an implicit handler method - ModelState is Valid
[14:15:45 INF] Executed an implicit handler method, returned result Microsoft.AspNetCore.Mvc.RazorPages.PageResult.
[14:15:45 INF] Executed page /Index in 124.7462ms
[14:15:45 INF] Executed endpoint '/Index'

# Additional Log from Serilog
[14:15:45 INF] HTTP GET / responded 200 in 249.6985 ms

# Standard logging from ASP.NET Core infrastructure
[14:15:45 INF] Request finished in 274.283ms 200 text/html; charset=utf-8

There's a couple of things to note about this log:

  • It includes most of the pertinent information you'd want in a single message - HTTP method, URL Path, Status Code, duration.
  • The duration shown is slightly shorter than the value logged by Kestrel on the subsequent message. That's to be expected, as Serilog only starts timing when the request reaches its middleware, and stops timing when it returns (after generating a response).
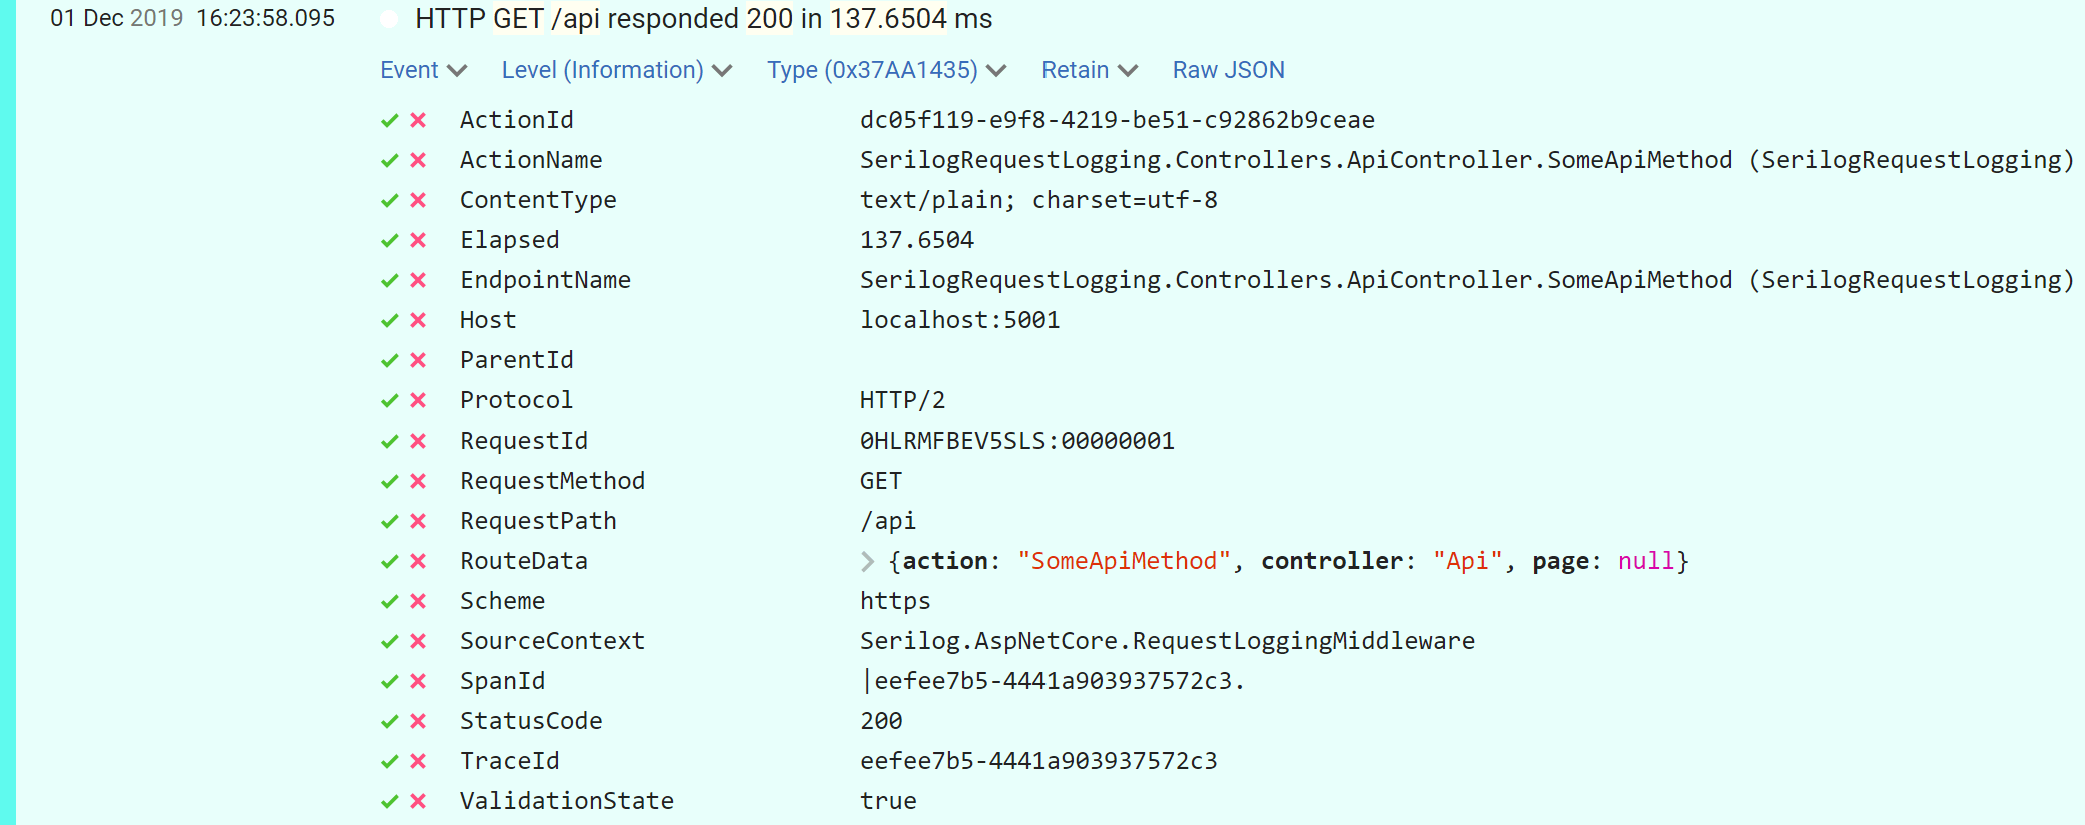
  • In both cases, additional values are logged when you use structural logging. For example, the RequestId and SpanId (used for tracing capabilities) are logged as they are part of the logging scope. You can see this in the following image of the request logged to seq.
  • We do lose some information by default. For example, the endpoint name and Razor page handler are no longer logged. In subsequent posts I'll show how to add these to the summary log.

RequestLoggingMiddleware logs to Seq showing structured logging includes additional properties

All that remains to finish tidying things up is to filter out the Information-level log messages we're currently logging. Update your Serilog configuration in Program.cs to add the extra filter:

Log.Logger = new LoggerConfiguration()
    .MinimumLevel.Debug()
    .MinimumLevel.Override("Microsoft", LogEventLevel.Information)
    // Filter out ASP.NET Core infrastructre logs that are Information and below
    .MinimumLevel.Override("Microsoft.AspNetCore", LogEventLevel.Warning) 
    .Enrich.FromLogContext()
    .WriteTo.Console()
    .WriteTo.Seq("http://localhost:5341")
    .CreateLogger();

With this final change, you'll now get a clean set of request logs containing summary data for each request:

[14:29:53 INF] HTTP GET / responded 200 in 129.9509 ms
[14:29:56 INF] HTTP GET /Privacy responded 200 in 10.0724 ms
[14:29:57 INF] HTTP GET / responded 200 in 3.3341 ms
[14:30:54 INF] HTTP GET /Missing responded 404 in 16.7119 ms

In the next post I'll look at how we can enhance this log by recording additional data.

Summary

In this post I described how you can use Serilog.AspNetCore's request logging middleware to reduce the number of logs generated for each ASP.NET Core request, while still recording summary data. If you're already using Serilog, this is very easy to enable. Simply call UseSerilogRequestLogging() in your Startup.cs file.

When a request reaches this middleware it will start a timer. When subsequent middleware generates a response (or throws an exception) the response passes back through the request logger, which records the result and writes a summary log message.

After adding the request logging middleware you can filter out more of the infrastructural logs generated by default in ASP.NET Core 3.0, without losing useful information.


Logging the selected Endpoint Name with Serilog: Using Serilog.AspNetCore in ASP.NET Core 3.0 - Part 2

$
0
0
Logging the selected Endpoint Name with Serilog

In my previous post I described how to configure Serilog's RequestLogging middleware to create "summary" logs for each request, to replace the 10 or more logs you get from ASP.NET Core by default.

In this post I show how you can add additional metadata to Serilog's summary request log, such as the Request's hostname, the Response's content-type, or the selected Endpoint Name from the endpoint routing middleware used in ASP.NET Core 3.0.

ASP.NET Core infrastructure logs are verbose, but have more details by default

As I showed in my previous post, in the Development environment the ASP.NET Core infrastructure generates 10 log messages for a request to a RazorPage handler:

Image of many infrastructure logs without using Serilog request logging

By switching to Serilog's RequestLoggingMiddleware that comes with the Serilog.AspNetCore NuGet package you can reduce this to a single log message:

Image of the summary log generated by Serilog's request logging

All the images of logs used in this post are taken using Seq, which is an excellent tool for viewing structured logs

Clearly the original set of logs are more verbose, and a large part of that is not especially useful information. However, if you take the original 10 logs as a whole, they do record some additional fields in the structure log template when compared to the Serilog summary log.

Additional fields logged by the ASP.NET Core infrastructure which are not logged by Serilog include:

  • Host (localhost:5001)
  • Scheme (https)
  • Protocol (HTTP/2)
  • QueryString (test=true)
  • EndpointName (/Index)
  • HandlerName (OnGet/SerilogRequestLogging.Pages.IndexModel.OnGet)
  • ActionId (1fbc88fa-42db-424f-b32b-c2d0994463f1)
  • ActionName (/Index)
  • RouteData ({page = "/Index"})
  • ValidationState (True/False)
  • ActionResult (PageResult)
  • ContentType (text/html; charset=utf-8)

I'd argue that some of these points would definitely be useful to include in the summary log message. For example, if your app is bound to multiple host names then Host is definitely important to log. QueryString is potentially another useful field. EndpointName/HandlerName, ActionId, and ActionName seem slightly less critical, given that you should be able to deduce those given the request path, but logging them explicitly will help you catch bugs, as well as make it easier to filter all requests to a specific action.

Broadly speaking, you can separate these properties into two categories:

  • Request/Response properties e.g. Host, Scheme, ContentType, QueryString, EndpointName
  • MVC/RazorPages-related properties e.g. HandlerName, ActionId, ActionResult etc

In this post i'll show how you can add the first of these categories, properties related to the Request/Response, and in the next post I'll show how you can add MVC/RazorPages-based properties.

Adding additional data to the Serilog request log

I showed how to add Serilog request logging to your application in my previous post, so I'm not going to cover that again here. For now, I'll assume you've already set that up, and you have a Startup.Configure method that looks something like this:

public void Configure(IApplicationBuilder app, IWebHostEnvironment env)
{
    // ... Error handling/HTTPS middleware
    app.UseStaticFiles();

    app.UseSerilogRequestLogging(); // <-- Add this line

    app.UseRouting();
    app.UseAuthorization();
    app.UseEndpoints(endpoints =>
    {
        endpoints.MapRazorPages();
    });
}

The UseSerilogRequestLogging() extension method adds the Serilog RequestLoggingMiddleware to the pipeline. You can also call an overload to configure an instance of RequestLoggingOptions. This class has several properties that let you customise how the request logger generates the log statements:

public class RequestLoggingOptions
{
    public string MessageTemplate { get; set; }
    public Func<HttpContext, double, Exception, LogEventLevel> GetLevel { get; set; }
    public Action<IDiagnosticContext, HttpContext> EnrichDiagnosticContext { get; set; }
}

The MessageTemplate property controls how the log is rendered to a string and GetLevel lets you control whether a given log should be level Debug/Info/Warning etc. The property we're interested in here is the EnrichDiagnosticContext property.

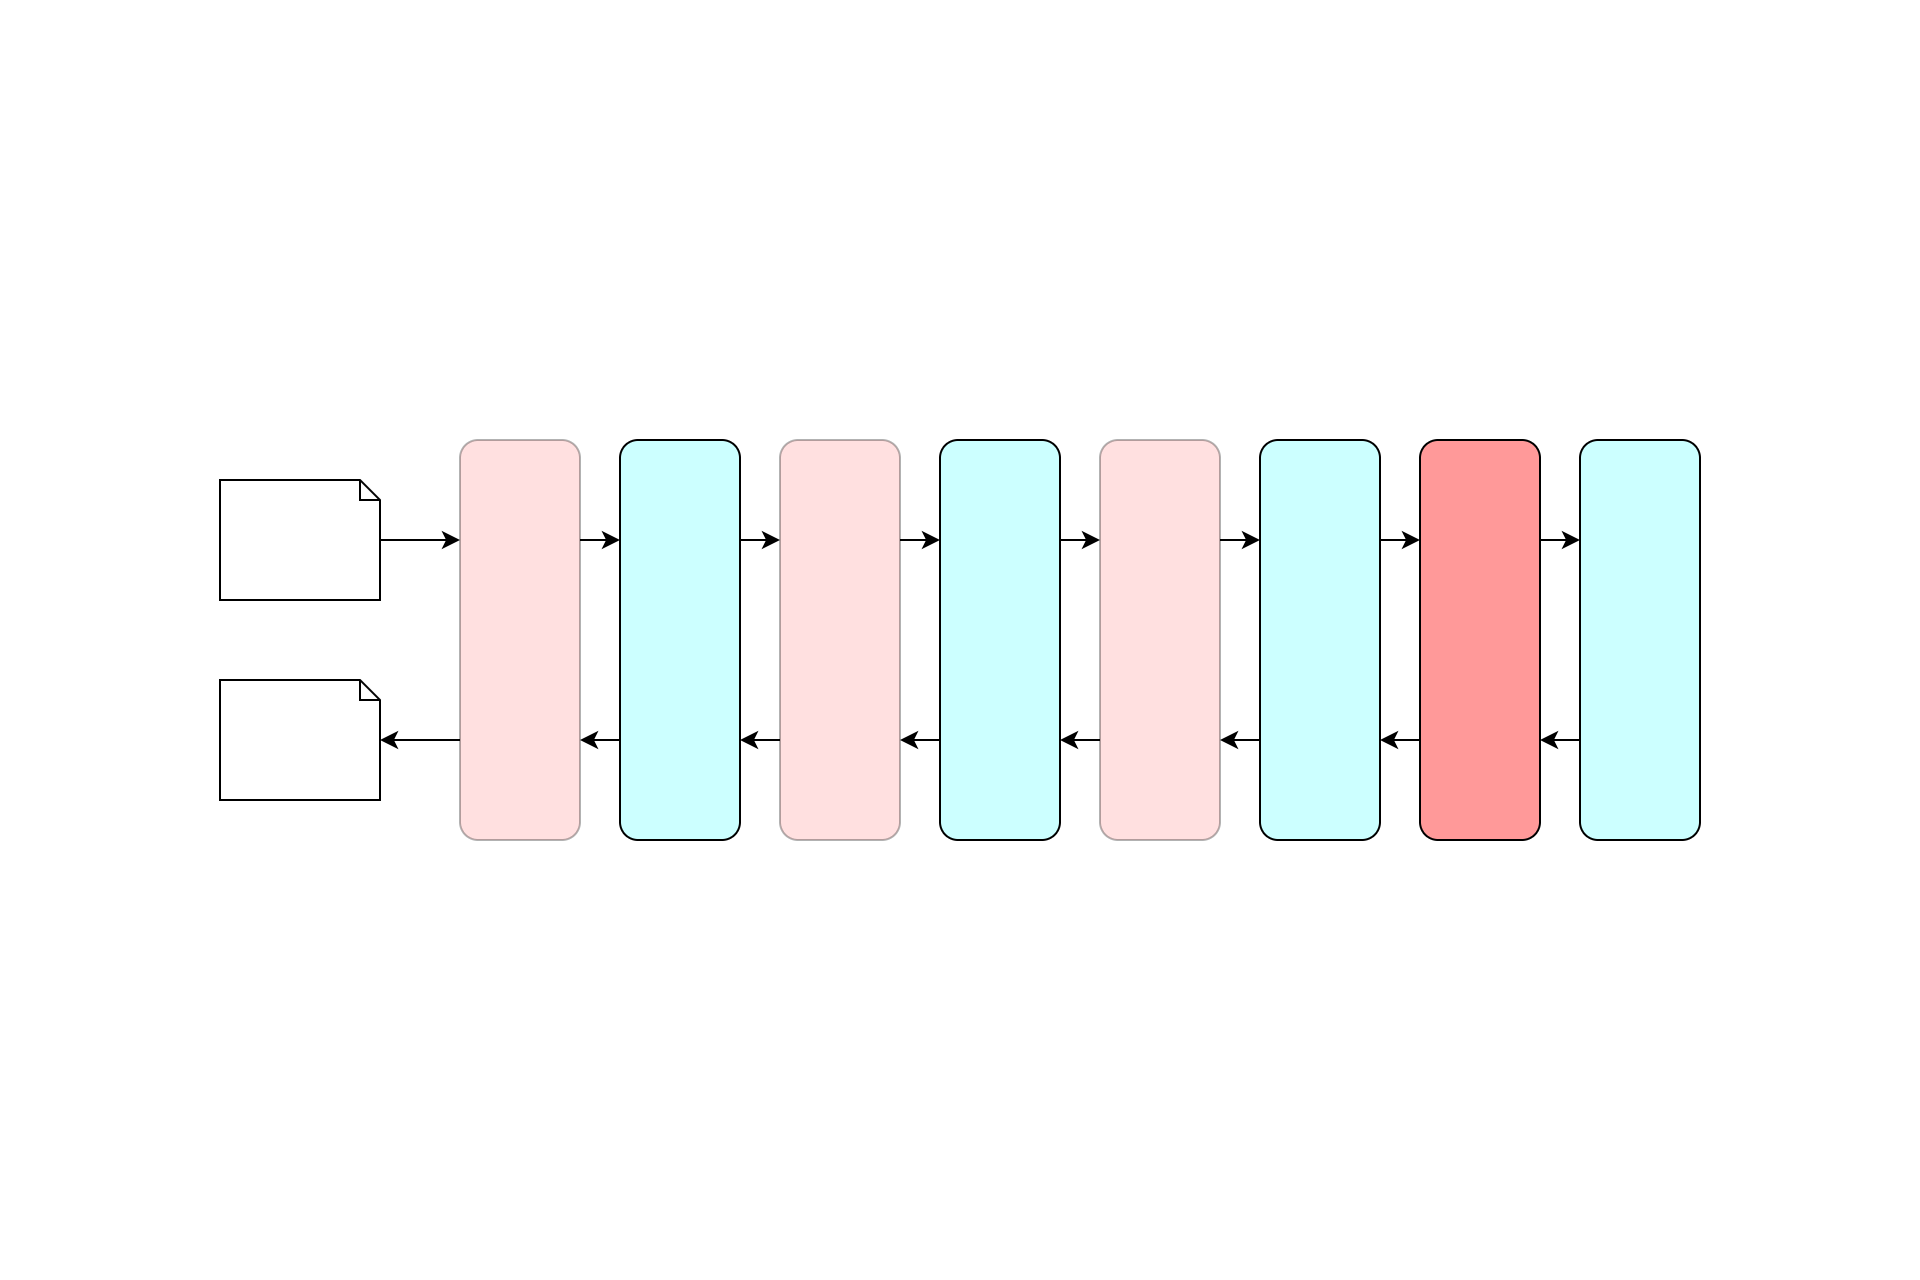
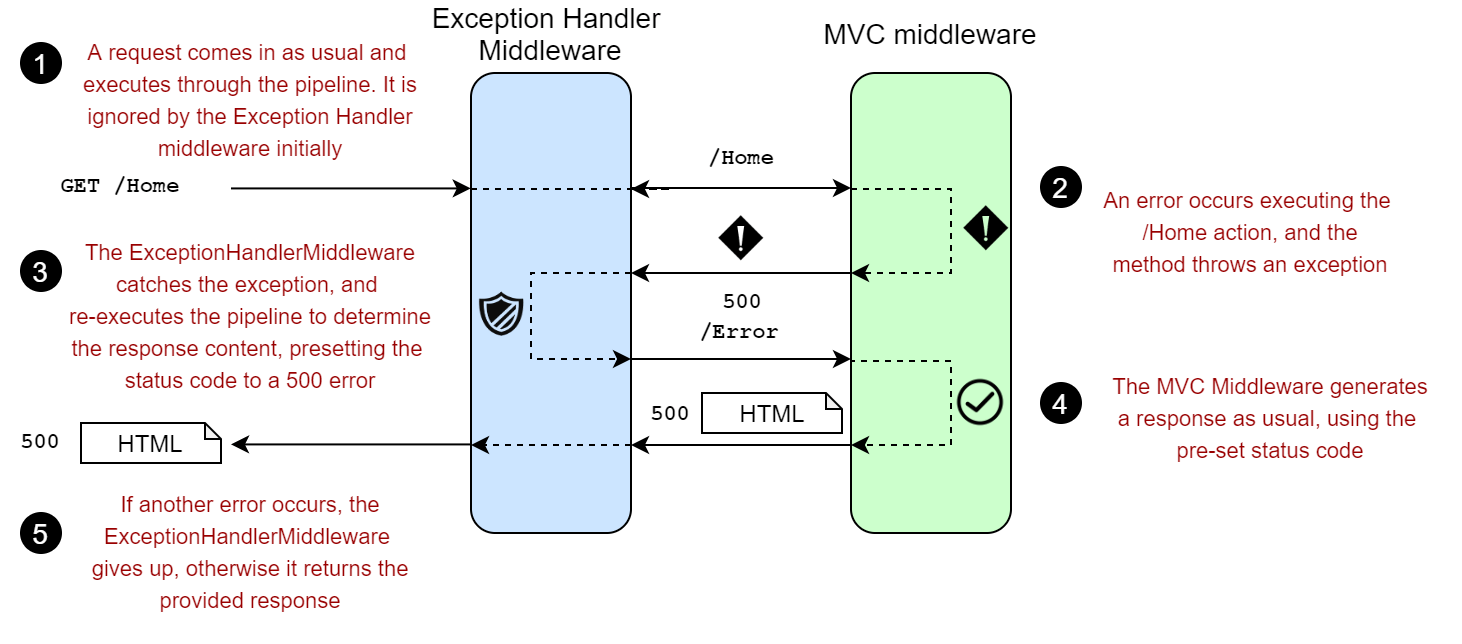
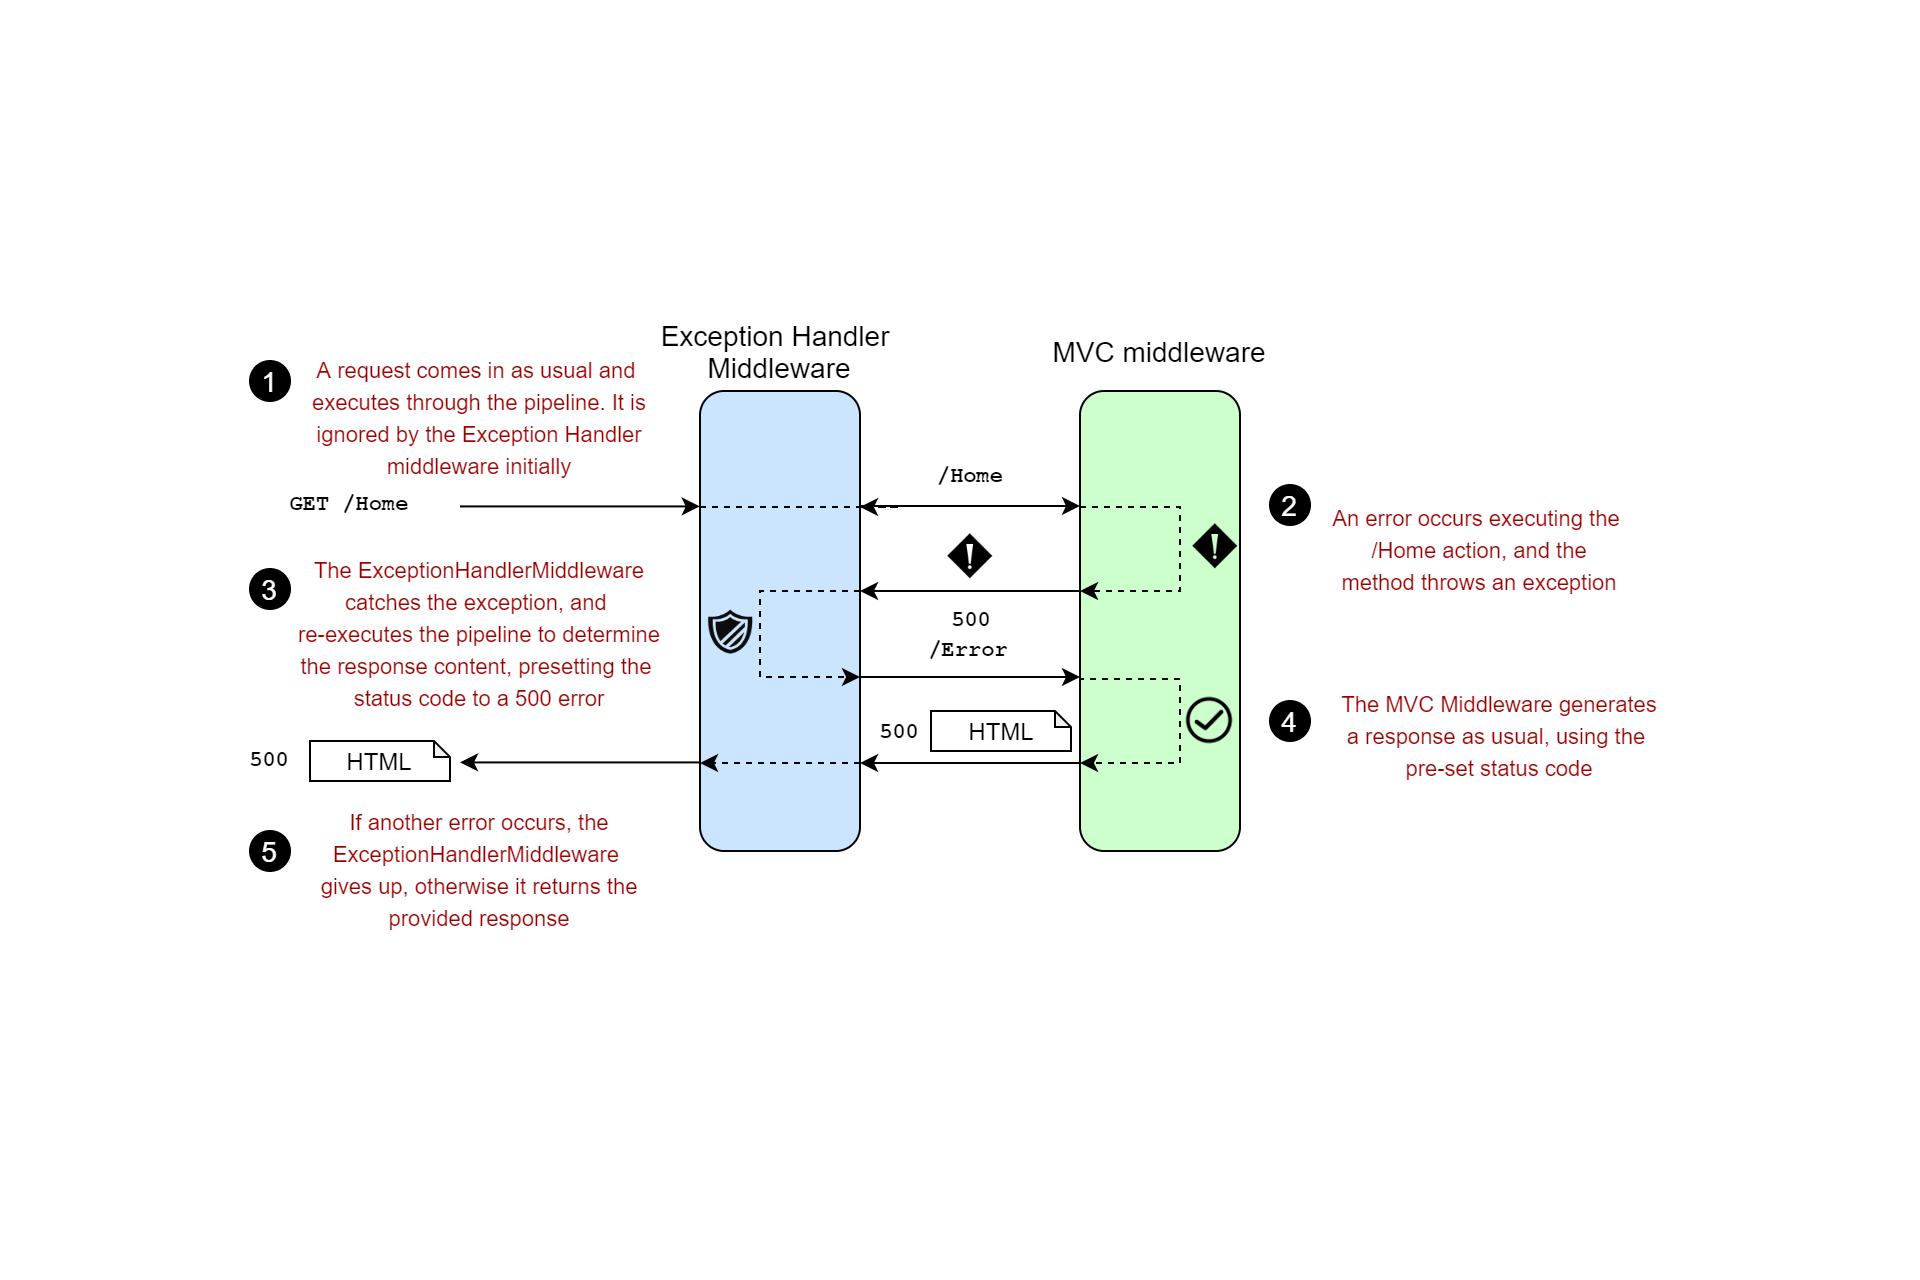
When set, this Action<> is executed by Serilog's middleware when it generates a log message. It's run just before the log is written, which means it runs after the middleware pipeline has executed. For example, in the image below (taken from my book ASP.NET Core in Action) the log is written at step 5, when the response "passes back through" the middleware pipeline:

Example of a middleware pipeline

The fact that the log is written after the pipeline has processed means a couple of things:

  • We can access properties of the Response, such as the status code, elapsed time, or the content type
  • We can access Features that are set by middleware later in the pipeline, for example the IEndpointFeature set by the EndpointRoutingMiddleware (added via UseRouting()).

In the next section, I provide a helper function that adds all the "missing" properties to the Serilog request log message.

Setting values in IDiagnosticContext

Serilog.AspNetCore adds the interface IDiagnosticContext to the DI container as a singleton, so you can access it from any of your classes. You can then use it to attach additional properties to the request log message by calling Set().

For example, as shown in the documentation, you can add arbitrary values from an action method:

public class HomeController : Controller
{
    readonly IDiagnosticContext _diagnosticContext;
    public HomeController(IDiagnosticContext diagnosticContext)
    {
        _diagnosticContext = diagnosticContext;
    }

    public IActionResult Index()
    {
        // The request completion event will carry this property
        _diagnosticContext.Set("CatalogLoadTime", 1423);
        return View();
    }
}

The resulting summary log will then include the property CatalogLoadTime.

We essentially use exactly the same approach to customise the RequestLoggingOptions used by the middleware, by setting values on the provided IDiagnosticContext instance. The static helper class below retrieves values from the current HttpContext and sets them if they're available.

public static class LogHelper 
{
    public static void EnrichFromRequest(IDiagnosticContext diagnosticContext, HttpContext httpContext)
    {
        var request = httpContext.Request;

        // Set all the common properties available for every request
        diagnosticContext.Set("Host", request.Host);
        diagnosticContext.Set("Protocol", request.Protocol);
        diagnosticContext.Set("Scheme", request.Scheme);

        // Only set it if available. You're not sending sensitive data in a querystring right?!
        if(request.QueryString.HasValue)
        {
            diagnosticContext.Set("QueryString", request.QueryString.Value);
        }

        // Set the content-type of the Response at this point
        diagnosticContext.Set("ContentType", httpContext.Response.ContentType);

        // Retrieve the IEndpointFeature selected for the request
        var endpoint = httpContext.GetEndpoint();
        if (endpoint is object) // endpoint != null
        {
            diagnosticContext.Set("EndpointName", endpoint.DisplayName);
        }
    }
}

The helper function above retrieves values from the Request, from the Response, and from features set by other middleware (Endpoint Name). You could extend this to add other values from the request as appropriate.

You can register the helper by setting the EnrichDiagnosticContext property when you call UseSerilogRequestLogging in your Startup.Configure() method:

public void Configure(IApplicationBuilder app, IWebHostEnvironment env)
{
    // ... Other middleware

    app.UseSerilogRequestLogging(opts
        => opts.EnrichDiagnosticContext = LogHelper.EnrichFromRequest);

    // ... Other middleware
}

Now when you make requests, you will see all the extra properties added to your Serilog structured logs:

Log message from Seq showing the additional properties

You can use this approach whenever you have values that are generally available to the middleware pipeline via the current HttpContext. The exception to that is MVC-specific features which are "internal" to the MVC middleware, like action names, or RazorPage handler names. In the next post I'll show how you can also add those to your Serilog request log.

Summary

By default, when you replace the ASP.NET Core infrastructure logging with Serilog's request logging middleware, you lose some information compared to the default logging configuration for Development environments. In this post I show how you can customise Serilog's RequestLoggingOptions to add these additional properties back in.

The method for doing so is very simple - you have access to the HttpContext so you can retrieve any values it has available and can set them as properties on the provided IDiagnosticContext. These are added as extra properties to the structured log generated by Serilog. In the next post I'll show how you can add MVC-specific values to the request log.

Logging MVC properties with Serilog.AspNetCore: Using Serilog.AspNetCore in ASP.NET Core 3.0 - Part 3

$
0
0
Logging MVC properties with Serilog.AspNetCore

In my previous post I described how to configure Serilog's RequestLogging middleware to add additional properties (such as the request hostname or the selected endpoint name) to Serilog's request log summary. These properties are available from HttpContext so can be added directly by the middleware itself.

Other properties, such as MVC-specific features like the action method ID, RazorPages Handler name, or the ModelValidationState are only available in an MVC context, so can't be directly accessed by Serilog's middleware.

In this post I show how you can create action/page filters to record these properties for you, which the middleware can access later when creating the log.

Nicholas Blumhardt, creator of Serilog, has addressed this topic before. The solutions are very similar, though in his example he creates an attribute that you can use to decorate on actions/controllers. I skip that approach in this post, and require it be applied globally, which I expect will be the common use case. Be sure to check out his previous comprehensive post on Serilog in ASP.NET Core 3.0 as well!

Recording additional information from MVC

A common thread in ASP.NET Core as it stands is that there's a lot of behaviour "locked-up" inside the MVC "infrastructure". Endpoint routing was one of the first efforts to take an MVC-feature and move it down into the core framework. There's an ongoing effort in the ASP.NET Core team to push more MVC specific features (for example model binding or action results) out of MVC and "down" into the core framework. See Ryan Nowak's discussion of Project Houdini at NDC for more on this).

However, as it stands, there are still some things inside MVC that aren't easy to get to from other parts of the application. When we consider that in terms of Serilog's request logging middleware, that means there are some things that we can't easily log. For example:

  • HandlerName (OnGet)
  • ActionId (1fbc88fa-42db-424f-b32b-c2d0994463f1)
  • ActionName (MyController.SomeApiMethod (MyTestApp))
  • RouteData ({action = "SomeApiMethod", controller = "My", page = ""})
  • ValidationState (True/False)

In the previous post I showed how you can use the IDiagnosticContext to write additional values to Serilog's request log using an extension of the RequestLogging middleware. This only works for values that are available in HttpContext. In this post I show how you can use the IDiagnosticContext in an action filter to add MVC-specific values to the log as well. I also show how you can add RazorPages-specific values (like HandlerName) by using a page filter.

Logging MVC properties with a custom action filter

Filters are the MVC equivalent of a mini middleware pipeline that runs for every request. There are multiple types of filter, each running at a different point in the MVC filter pipeline (see this post for more details). We're going to be using one of the most common filters in this post, an action filter.

Action filters run just before, and just after, an MVC action method is executed. They have access to lots of MVC-specific values like the Action being executed and the parameters that it will be called with.

The action filter below directly implements IActionFilter. The OnActionExecuting method is called just before the action method is invoked, and adds the extra MVC-specific properties to the IDiagnosticContext passed in to the constructor.

public class SerilogLoggingActionFilter : IActionFilter
{
    private readonly IDiagnosticContext _diagnosticContext;
    public SerilogLoggingActionFilter(IDiagnosticContext diagnosticContext)
    {
        _diagnosticContext = diagnosticContext;
    }

    public void OnActionExecuting(ActionExecutingContext context)
    {
        _diagnosticContext.Set("RouteData", context.ActionDescriptor.RouteValues);
        _diagnosticContext.Set("ActionName", context.ActionDescriptor.DisplayName);
        _diagnosticContext.Set("ActionId", context.ActionDescriptor.Id);
        _diagnosticContext.Set("ValidationState", context.ModelState.IsValid);
    }

    // Required by the interface
    public void OnActionExecuted(ActionExecutedContext context){}
}

You can register the filter globally when you add the MVC services to your application in Startup.ConfigureServices():

public void ConfigureServices(IServiceCollection services)
{
    services.AddControllers(opts =>
    {
        opts.Filters.Add<SerilogLoggingPageFilter>();
    });
    // ... other service registration
}

You can add the filter globally in the same way whether you're using AddControllers, AddControllersWithViews, AddMvc, or AddMvcCore.

With this configuration complete, if you call an MVC controller, you'll see the extra data (ActionName, ActionId, and RouteData, ValidationState) recorded on the Serilog request log message:

Image of extra MVC properties being recorded on Serilog request log

You can add any additional data you require to your logs here. Just be careful about logging parameter values - you don't want to accidentally log sensitive or personally identifiable information!

The action filter that Nicholas Blumhardt suggests in his post derives from ActionFilterAttribute, so it can be applied directly as an attribute to controllers and actions. Unfortunately that means you have to use service location to retrieve the singleton IDiagnosticContext from the HttpContext for every request. My approach can use constructor injection instead, but it can't be applied as an attribute, so it must be used globally as shown above. Also, MVC will use a scoped lifetime for my implementation rather than a singleton, so it creates a new instance each request.

If you want to log values from other points in the MVC filter pipeline, you can always implement other filters in similar ways, such as a resource filter, result filter, or authorization filter.

Logging RazorPages properties with a custom page filter

The IActionFilter above runs for both MVC and API controllers, but it won't run for RazorPages. If you want to log the HandlerName that was selected for a given Razor Page, you'll need to create a custom IPageFilter instead.

Page filters are directly analogous to action filters, but they only run for Razor Pages. The example below retrieves the handler name from the PageHandlerSelectedContext and logs it as the property RazorPageHandler. There's a bit more boiler-plate code required in this case but the meat of the filter is again very basic - call IDiagnosticContext.Set() to record a property.

public class SerilogLoggingPageFilter : IPageFilter
{
    private readonly IDiagnosticContext _diagnosticContext;
    public SerilogLoggingPageFilter(IDiagnosticContext diagnosticContext)
    {
        _diagnosticContext = diagnosticContext;
    }

    public void OnPageHandlerSelected(PageHandlerSelectedContext context)
    {
        var name = context.HandlerMethod?.Name ?? context.HandlerMethod?.MethodInfo.Name;
        if (name != null)
        {
            _diagnosticContext.Set("RazorPageHandler", name);
        }
    }

    // Required by the interface
    public void OnPageHandlerExecuted(PageHandlerExecutedContext context){}
    public void OnPageHandlerExecuting(PageHandlerExecutingContext context) {}
}

Note that the IActionFilter we wrote previously won't run for Razor Pages, so if you want to record additional details like RouteData or ValidationState for RazorPages too, then you'll need to add that here too. The context property contains most of the properties you could want, like the ModelState and ActionDescriptor.

Next you need to register the page filter in your Startup.ConfigureServices() method. The docs show an approach that requires creating the filter up-front, but that doesn't work when your filter uses constructor injection parameters (as in this case). Instead, you can register the page filter in the standard MVC filters list exposed in AddMvcCore():

public void ConfigureServices(IServiceCollection services)
{
    services.AddMvcCore(opts =>
    {
        opts.Filters.Add<SerilogLoggingPageFilter>();
    });
    services.AddRazorPages();
}

This feels a bit naff, but it works. 🤷‍♂️

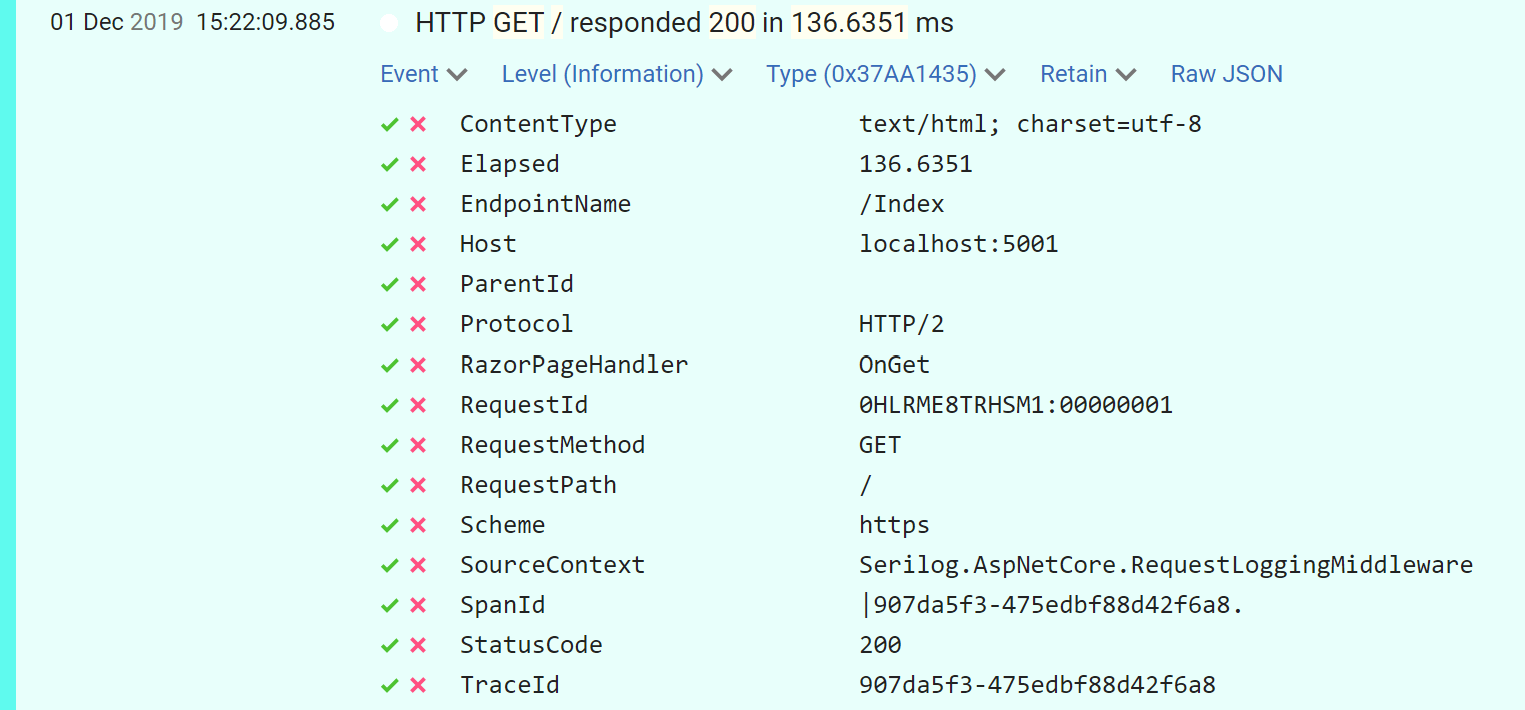
With the filter added, requests to your Razor Pages can now add additional properties the the IDiagnosticContext which are added to the Serilog request log. See the RazorPageHandler property in the image below:

Image of extra Razor Page properties being recorded on Serilog request log

Summary

By default, when you replace the ASP.NET Core infrastructure logging with Serilog's request logging middleware, you lose some information (compared to the default configuration for Development environments). In this post I show how you can customise Serilog's RequestLoggingOptions to add the MVC-specific additional properties back in.

To add MVC-related properties to the Serilog request log, create an IActionFilter and add the properties using IDiagnosticContext.Set(). To add Razor Page-related properties to the Serilog request log, create an IPageFilter and add properties using IDiagnosticContext in the same way.

Excluding health check endpoints from Serilog request logging: Using Serilog.AspNetCore in ASP.NET Core 3.0 - Part 4

$
0
0
Excluding health check endpoints from Serilog request logging

In previous posts in this series I have described how to configure Serilog's RequestLogging middleware to add additional properties to Serilog's request log summary such as the request hostname or the selected endpoint name. I have also showed how to add MVC or RazorPage-specific properties to the summary log using Filters.

In this post I show how to skip adding the summary log message completely for specific requests. This can be useful when you have an endpoint that is hit a lot, where logging every request is of little value.

Health checks are called a lot

The motivation for this post comes from behaviour we've seen when running applications in Kubernetes. Kubernetes uses two types of "health checks" (or "probes") for checking applications are running correctly - liveness probes and readiness probes. You can configure a probe to make an HTTP request to your application as an indicator that your application is running correctly.

As of Kubernetes version 1.16 there is a third type of probe, startup probes.

The Health Check endpoints available in ASP.NET Core 2.2+ are ideally suited for these probes. You can set up a simple, dumb, health check that returns a 200 OK response to every request, to let Kubernetes know your app hasn't crashed.

In ASP.NET Core 3.x, you can configure your health checks using endpoint routing. You must add the required services in Startup.cs by calling AddHealthChecks(), and add a health check endpoint using MapHealthChecks():

public class Startup
{
    public void ConfigureServices(IServiceCollection services)
    {
        // ..other service configuration

        services.AddHealthChecks(); // Add health check services
    }

    public void Configure(IApplicationBuilder app, IWebHostEnvironment env)
        {
            // .. other middleware
            app.UseRouting();
            app.UseAuthorization();
            app.UseEndpoints(endpoints =>
            {
                endpoints.MapHealthChecks("/healthz"); //Add health check endpoint
                endpoints.MapControllers();
            });
        }
}

In the example above, sending a request to /healthz will invoke the health check endpoint. As I didn't configure any health checks to run, the endpoint will always return a 200 response, as long as the app is running:

Health check response

The only problem with this is that Kubernetes will call this endpoint a lot. The exact frequency is up to you, but every 10s is common. You want a relatively high frequency so Kubernetes can restart faulty pods quickly.

That's not a problem in of itself; Kestrel can handle millions of requests a second, so it's not a performance concern. More irritating is the number of logs generated by each request. It's not as many as I showed for a request to the MVC infrastructure, but even 1 log per request (as we get with Serilog.AspNetCore) can get irritating.

The main problem is that the logs for successful health check requests don't actually tell us anything useful. They're not related to any business activities, they're purely infrastructural. It would be nice to be able to skip the Serilog request summary logs for these. In the next section I introduce the approach I came up with that relies on the changes from the previous posts in this series.

Customising the log level used for Serilog request logs

In a previous post I showed how to include the selected endpoint in your Serilog request logs. My approach was to provide a custom function to the RequestLoggingOptions.EnrichDiagnosticContext property when registering the Serilog middleware:

public void Configure(IApplicationBuilder app, IWebHostEnvironment env)
{
    // ... Other middleware

    app.UseSerilogRequestLogging(opts
        // EnrichFromRequest helper function is shown in the previous post
        => opts.EnrichDiagnosticContext = LogHelper.EnrichFromRequest); 

    app.UseRouting();
    app.UseAuthorization();
    app.UseEndpoints(endpoints =>
    {
        endpoints.MapHealthChecks("/healthz"); //Add health check endpoint
        endpoints.MapControllers();
    });
}

RequestLoggingOptions has another property, GetLevel, which is a Func<> used to decide the logging level that should be used for a given request log. By default, it's set to the following function:

public static class SerilogApplicationBuilderExtensions
{
    static LogEventLevel DefaultGetLevel(HttpContext ctx, double _, Exception ex) =>
        ex != null
            ? LogEventLevel.Error 
            : ctx.Response.StatusCode > 499 
                ? LogEventLevel.Error 
                : LogEventLevel.Information;
}

This function checks if an exception was thrown for the request, or if the response code is a 5xx error. If so, it create an Error level summary log, otherwise it creates an Information level log.

Lets say you wanted the summary logs to be logged as Debug instead of Information. First, you would create a helper function like the following which has the required logic:
public static class LogHelper
{
    public static LogEventLevel CustomGetLevel(HttpContext ctx, double _, Exception ex) =>
        ex != null
            ? LogEventLevel.Error 
            : ctx.Response.StatusCode > 499 
                ? LogEventLevel.Error 
                : LogEventLevel.Debug; //Debug instead of Information
}

Then you can set the level function when you call UseSerilogRequestLogging():

public void Configure(IApplicationBuilder app, IWebHostEnvironment env)
{
    // ... Other middleware

    app.UseSerilogRequestLogging(opts => {
        opts.EnrichDiagnosticContext = LogHelper.EnrichFromRequest;
        opts.GetLevel = LogHelper.CustomGetLevel; // Use custom level function
    });

    //... other middleware
}

Now your request summary logs will all be logged as Debug, except when an error occurs (screenshot from Seq):

Seq showing debug request logs

But how does this help our verbosity problem?

When you configure Serilog, you typically define the minimum request level. For example, the following simple configuration sets the default level to Debug(), and writes to a console Sink:

Log.Logger = new LoggerConfiguration()
    .MinimumLevel.Debug()
    .WriteTo.Console()
    .CreateLogger();

So the simple way for a log to be filtered is for the log level to be lower than the MinimumLevel specified in the logger configuration. Generally speaking, if you use the lowest level available, Verbose, it will pretty much always be filtered out.

The difficulty is that we don't want to always use Verbose as the log level for our summary logs. If we do that, we won't get any request logs for non-errors, and the Serilog middleware becomes a bit pointless!

Instead, we want to set the log level to Verbose only for requests that hit the health check endpoint. In the next section I'll show how to identify those requests while leaving other requests unaffected.

Using a custom log level for Health Check endpoint requests

The key thing we need is the ability to identify a health-check request at the point the log is written. As shown previously, the GetLevel() method takes the current HttpContext as a parameter, so theoretically there's a few options. The most obvious choices to me are:

  • Compare the HttpContext.Request path to a known list of health-check paths
  • Use the selected Endpoint metadata to identify when a health-check endpoint was called

The first option is the most obvious, but it's not really worth the hassle. Once you get into the weeds of it, you find you have to start duplicating request paths around and handling various edge cases, so I'm going to skip over that one here.

The second option uses a similar approach to the one in my previous post where we obtain the IEndpointFeature that was selected by the EndpointRoutingMiddleware for a given request. This feature (if present) provides details such as the display name and route data for the selected Endpoint.

If we assume that health checks are registered using their default Display Name of "Health checks", then we can identify a "health check" request using the HttpContext as follows:

public static class LogHelper
{
    private static bool IsHealthCheckEndpoint(HttpContext ctx)
    {
        var endpoint = ctx.GetEndpoint();
        if (endpoint is object) // same as !(endpoint is null)
        {
            return string.Equals(
                endpoint.DisplayName, 
                "Health checks",
                StringComparison.Ordinal);
        }
        // No endpoint, so not a health check endpoint
        return false;
    }
}

We can use this function, combined with a custom version of the default GetLevel function to ensure that summary logs for health check requests use a Verbose level, while errors use Error and other requests use Information:

public static class LogHelper
{
    public static LogEventLevel ExcludeHealthChecks(HttpContext ctx, double _, Exception ex) => 
        ex != null
            ? LogEventLevel.Error 
            : ctx.Response.StatusCode > 499 
                ? LogEventLevel.Error 
                : IsHealthCheckEndpoint(ctx) // Not an error, check if it was a health check
                    ? LogEventLevel.Verbose // Was a health check, use Verbose
                    : LogEventLevel.Information;
        }
}

This nested ternary has an extra level to it - for non-errors we check if an endpoint with the display name "Health check" was selected, and if it was, we use the level Verbose, otherwise we use Information.
You could generalise this code further, to allow passing in other display names, or customising the log levels used. I didn't do that here for simplicity, but the associated sample code on GitHub shows how you could do this.

All that remains is to update the Serilog middleware RequestLoggingOptions to use your new function:

public void Configure(IApplicationBuilder app, IWebHostEnvironment env)
{
    // ... Other middleware

    app.UseSerilogRequestLogging(opts => {
        opts.EnrichDiagnosticContext = LogHelper.EnrichFromRequest;
        opts.GetLevel = LogHelper.ExcludeHealthChecks; // Use the custom level
    });

    //... other middleware
}

When you check your logs after running your application you'll see your normal request logs for standard requests, but no sign of your health checks (unless an error occurs!). In the following screenshot I configured Serilog to also record Verbose logs so you can see the health check requests - normally they will be filtered out!

Seq screenshot showing Health Check requests using Verbose level

Summary

In this post I showed how to provide a custom function to the Serilog middleware's RequestLoggingOptions that defines what LogEventLevel to use for a given request's log. I showed how this can be used to change the default level to Debug for example. If the level you choose is lower than the minimum level, it will be filtered out completely and not logged.

I showed that you could use this approach to filter out the common (but low-interest) request logs generated by calling health check endpoints. Generally speaking these requests are only interesting if they indicate a problem, but they will typically generate a request log when they succeed as well. As these endpoints are called very frequently they can significantly increase the number of logs written.

The approach in this post is to check the selected IEndpointFeature and check if it has the display name "Health checks". If it does, the request log is written with the Verbose level, which is commonly filtered out. For more flexibility you could customise the logs shown in this post to handle multiple endpoint names, or any other criteria you have.

Inserting middleware between UseRouting() and UseEndpoints() as a library author - Part 1

$
0
0
Inserting middleware between UseRouting() and UseEndpoints() as a library author - Part 1

This post is in response to a question from a reader about how library authors can ensure consumers of their library insert the library's middleware at the right point in the app's middleware pipeline. Unfortunately there's not really a great solution to that (with a couple of exceptions), but this post highlights one possible approach.

Introduction: ordering is important for middleware

One of the big changes I discussed in my recent series on ASP.NET Core 3.0 is that routing now uses Endpoint Routing by default. This manifests most visibly in your ASP.NET Core apps as two separate calls in the Startup.Configure method that configures the middleware pipeline for your app:

public void Configure(IApplicationBuilder app)
{
    // ... middleware

    app.UseRouting();

    // ... other middleware

    app.UseEndpoints(endpoints =>
    {
        // ... endpoint configuration
    });
}

As shown above, there are two separate calls related to routing in a typical .NET Core 3.0 middleware pipeline: UseRouting() and UseEndpoints(). In addition, middleware can be be placed before, or between these calls. One thing that often trips people up in general is that where you place your middleware is very important. It's important you understand what each piece of middleware is doing so that you can put it in the right point in the pipeline.

For example, in ASP.NET Core 3.0 it's important that you place the AuthenticationMiddleware and AuthorizationMiddleware between the two routing middleware calls (and that you place authentication middleware before the authorization middleware):

public void Configure(IApplicationBuilder app)
{
    // ... middleware

    app.UseRouting();

    app.UseAuthentication(); // Must be after UseRouting()
    app.UseAuthorization(); // Must be after UseAuthentication()

    app.UseEndpoints(endpoints =>
    {
        // ... endpoint configuration
    });
}

This requirement is mentioned in the documentation, but it's not very obvious. For example, an issue Rick Strahl ran into when upgrading his Album Viewer sample to .NET Core 3.0 was related to exactly this - middleware added in the wrong order.

ASP.NET Core now does some checks to try and warn you at runtime when you have configured your pipeline incorrectly, as in the case described above. However it only catches a couple of cases, so you still need to be careful when building your pipeline.

This leads us to the heart of the question I received - if you're a library author, how can you ensure your middleware is added at the correct point in a consumer's middleware pipeline?

Using IStartupFilter

The simplest scenario is where you need to add middleware to a user's app and you can add it near the start of the middleware pipeline. For this use-case, there's IStartupFilter. I discussed IStartupFilter in a previous post (over 3 years ago now, doesn't time fly!) but nothing has really changed about it since then, so I'll only describe it briefly here - check out that previous post for a more detailed explanation.
IStartupFilter provides a mechanism for adding middleware to an app's pipeline by adding a service to the DI container. When building an app's middleware pipeline, the ASP.NET Core infrastructure looks for any registered IStartupFilters and runs them, essentially providing a mechanism for tacking middleware onto the beginning of an app's pipeline.

For example, the ForwardedHeadersStartupFilter automatically adds the ForwardedHeadersMiddleware to the start of a middleware pipeline. This IStartupFilter is (conditionally) added to the DI container by the WebHost on app startup, so you don't have to remember explicitly add it as part of your app's middleware configuration.
This approach is very useful in many cases, but has one significant limitation - you can only add middleware at the start (or end) of the pipeline defined in Startup.Configure. There's no simple way to add middleware in the middle.

Unfortunately, that requirement has likely become more common in ASP.NET Core 3.0 with endpoint routing and the separate UseRouting() and UseEndpoints() calls. IStartupFilter doesn't provide an easy mechanism for adding middleware at an arbitrary location in the pipeline, so you have to get inventive.

Taking a lead from the AnalysisMiddleware

After initially dismissing the task as impossible, I had a small flashback to some posts I wrote about the Microsoft.AspNetCore.MiddlewareAnalysis package. This package can be used to log all the middleware that is executed as part of the middleware pipeline.

I explored how to use the package in a previous post, and looked at how it was implemented in another. Given we're going to use a similar approach to insert middleware between the calls to UseRouting() and UseEndpoints(), I'll give an overview of the approach here. For a more detailed understanding, check out my previous posts.

The MiddlewareAnalysis package uses an IStartupFilter to hook into the middleware configuration process of an app. But instead of just adding middleware to the start (or end) of the pipeline, it wraps the IApplicationBuilder instance in a new type, the AnalysisBuilder:

public class AnalysisStartupFilter : IStartupFilter
{
    public Action<IApplicationBuilder> Configure(Action<IApplicationBuilder> next)
    {
        return builder =>
        {
            var wrappedBuilder = new AnalysisBuilder(builder);
            next(wrappedBuilder);

            // There's a couple of other bits here I'll gloss over for now
        };
    }
}

The AnalysisBuilder implements IApplicationBuilder, and its purpose is to intercept any calls to Use() that add middleware to the pipeline. If you follow the method calls far enough down, all calls to IApplicationBuilder that modify the pipeline call Use(), whether it's UseStaticFiles(), UseAuthentication(), or UseMiddleware<MyCustomMiddleware>().

When the app calls Use on the AnalysisBuilder, the builder adds it to the pipeline as normal, but it first adds an extra piece of middleware, the AnalysisMiddleware:

public class AnalysisBuilder : IApplicationBuilder
{
    private IApplicationBuilder InnerBuilder { get; }
    public AnalysisBuilder(IApplicationBuilder inner)
    {
        InnerBuilder = inner;
    }

    public IApplicationBuilder Use(Func<RequestDelegate, RequestDelegate> middleware)
    {
        return InnerBuilder
            .UseMiddleware<AnalysisMiddleware>()
            .Use(middleware);
    }
}

The end result is that an instance of AnalysisMiddleware is interleaved between all the other middleware in your pipeline:

A middleware pipeline where the AnalysisMiddleware is added before every other middleware

The AnalysisMiddleware itself determines the name of the next middleware in the pipeline in its constructor by interrogating the provided RequestDelegate:

public class AnalysisMiddleware
{
    private readonly string _middlewareName
    public AnalysisMiddleware(RequestDelegate next)
    {
        _middlewareName = next.Target.GetType().FullName;
    }
    // ...
}

After looking through the code, I gleaned a few key points:

  • We can create an IStartupFilter/IApplicationBuilder that can "bookend" each middleware added with an extra piece of middleware
  • The Type of the next middleware in the pipeline can be retrieved when the middleware is processing, but not when it's being constructed. i.e. you can get the name of the next middleware in the pipeline from AnalysisMiddleware, but not from the AnalysisBuilder.
  • You can't easily get the name of the previous middleware in the pipeline.

With this in mind, I set about finding a solution to the original problem, inserting middleware between the UseRouting() and UseEndpoints() from a class library.

Inserting middleware before UseEndpoints

Given the final point raised in the previous section - it's not possible to check which middleware executed previously to the current one, I decided the easiest location to insert middleware would be just before the UseEndpoints() call which adds the EndpointMiddleware to the pipeline.

The overall approach is very similar to that used in the MiddlewareAnalysis package. For this example I named the middleware ConditionalMiddleware, as it only runs under a single condition - when the next middleware is of a given type:

  • Create an IStartupFilter that replaces the default IApplicationBuilder with a custom one, ConditionalMiddlewareBuilder, that intercepts calls to Use(...)
  • Every time middleware is added to the pipeline, add an instance of the ConditionalMiddleware first.
  • When the ConditionalMiddleware executes, check if the next middleware is the one we're looking for. If it is, run the additional logic before invoking the next middleware in the pipeline.

I'll start with the easy bit, the ConditionalMiddleware itself. For this example the "extra logic" we're going to execute is just to write out a log message. In practice you might use it to set a request feature or do some sort of request-specific check.

internal class ConditionalMiddleware
{
    private readonly RequestDelegate _next;
    private readonly ILogger<ConditionalMiddleware> _logger;
    private readonly string _runBefore;
    private readonly bool _runMiddleware;

    public ConditionalMiddleware(RequestDelegate next, ILogger<ConditionalMiddleware> logger, string runBefore)
    {
        // Check if the next middleware is of the required type
        _runMiddleware = next.Target.GetType().FullName == runBefore;

        _next = next;
        _logger = logger;
        _runBefore = runBefore;
    }

    public async Task Invoke(HttpContext httpContext)
    {
        // if the next middleware is the required type, run the exta logic
        if (_runMiddleware)
        {
            _logger.LogInformation("Running conditional middleware before {NextMiddleware}", _runBefore);
        }

        // either way, call the next middleware in the pipeline
        await _next(httpContext);
    }
}

In this example I'm passing in the name of the middleware that we want to run our custom logic before (i.e."EndpointMiddleware" for my original example). We then check whether the next middleware is the one we're looking for. We can do the check in the constructor, as the middleware pipeline is fixed after it's built - the check ensures that the additional functionality is only run where we need it to be:

Conditional middleware is added between all the other middleware, but only executes its logic in one location

Next up is the ConditionalMiddlewareBuilder. This is the wrapper class that we use to inject our ConditionalMiddleware between each "real" middleware in the pipeline. It's mostly just a wrapper around the InnerBuilder provided in the constructor:

internal class ConditionalMiddlewareBuilder : IApplicationBuilder
{
    // The middleware we're looking for is provided as a constructor argument
    private readonly string _runBefore;
    public ConditionalMiddlewareBuilder(IApplicationBuilder inner, string runBefore)
    {
        _runBefore = runBefore;
        InnerBuilder = inner;
    }

    private IApplicationBuilder InnerBuilder { get; }

    public IServiceProvider ApplicationServices
    {
        get => InnerBuilder.ApplicationServices;
        set => InnerBuilder.ApplicationServices = value;
    }

    public IDictionary<string, object> Properties => InnerBuilder.Properties;
    public IFeatureCollection ServerFeatures => InnerBuilder.ServerFeatures;
    public RequestDelegate Build() => InnerBuilder.Build();
    public IApplicationBuilder New() => throw new NotImplementedException();

    public IApplicationBuilder Use(Func<RequestDelegate, RequestDelegate> middleware)
    {
        // Add the conditional middleware before each other middleware
        return InnerBuilder
            .UseMiddleware<ConditionalMiddleware>(_runBefore)
            .Use(middleware);
    }
}

The ConditionalMiddlewareBuilder is added to the application using an IStartupFilter that wraps the "original" IApplicationBuilder with our imposter:

public class ConditionalMiddlewareStartupFilter : IStartupFilter
{
    private readonly string _runBefore;
    public ConditionalMiddlewareStartupFilter(string runBefore)
    {
        _runBefore = runBefore;
    }

    public Action<IApplicationBuilder> Configure(Action<IApplicationBuilder> next)
    {
        return builder =>
        {
            // wrap the builder with our interceptor
            var wrappedBuilder = new ConditionalMiddlewareBuilder(builder, _runBefore);
            // build the rest of the pipeline using our wrapped builder
            next(wrappedBuilder);
        };
    }
}

Finally, lets create a couple of extension methods to make adding our new middleware easy:

public static class ConditionalMiddlewareExtensions
{
    // Add ConditionalMiddlware that runs just before the middleware given by "beforeMiddleware"
    public static IServiceCollection AddConditionalMiddleware(this IServiceCollection services, string beforeMiddleware)
    {
        // Add the startup filter to wrap the middleware
        return services.AddTransient<IStartupFilter>(_ => new ConditionalMiddlewareStartupFilter(beforeMiddleware));
    }

    // A helper that runs the conditional middleware just before the call to `UseEndpoints()`
    public static IServiceCollection AddConditionalMiddlewareBeforeEndpoints(this IServiceCollection services)
    {
        return services.AddConditionalMiddleware("Microsoft.AspNetCore.Routing.EndpointMiddleware");
    }
}

With all that configured, the one thing that remains is to add the middleware to our app:

public class Startup
{
    public void ConfigureServices(IServiceCollection services)
    {
        services.AddRazorPages();
        services.AddConditionalMiddlewareBeforeEndpoints(); // <-- Add this line
    }

    public void Configure(IApplicationBuilder app)
    {
        app.UseDeveloperExceptionPage();
        app.UseHttpsRedirection();
        app.UseStaticFiles();

        app.UseRouting();

        app.UseAuthentication();
        app.UseAuthorization();

        // <-- The ConditionalMiddleware will execute here
        app.UseEndpoints(endpoints =>
        {
            endpoints.MapRazorPages();
        });
    }
}

As you can see, we only had to add one line. This is great for library authors, as they don't have to deal with issues arising from users putting the middleware in the wrong place. And it's great for consumers because they don't have to worry about getting it wrong either! Just add the services to your DI container and you're good to go.

Of course, this example is just a proof of concept - it doesn't do anything interesting other than print the following log message just before the EndpointMiddleware, but it demonstrates an interesting technique:

info: MyTestApp.ConditionalMiddleware[0]
      Running conditional middleware before Microsoft.AspNetCore.Routing.EndpointMiddleware

The other good thing is that while this looks complicated, and it adds a lot of extra middleware, the impact at runtime should be minimal. The "next middleware check" is only executed once per middleware instance, and when the evaluation returns false the runtime effect will be very small - a single additional if check per middleware. Still, I haven't found myself needing to do something like this before, so I'd be interested to hear if someone tries it and how they get on!

Summary

In this post I discussed the problem of a library author trying to insert middleware at a precise point in a consuming app's pipeline. You can use IStartupFilter to insert middleware at the start of the pipeline, but it doesn't allow you to insert middleware at an arbitrary location, such as between the UseRouting() and UseEndpoints() calls.

As a potential solution to the problem, I gave a brief overview of the MiddlewareAnalysis package that I've discussed previously, which inserts AnalysisMiddleware between every other middleware in your pipeline.

I then described a similar approach that can be used to insert our ConditionalMiddleware between each middleware in the pipeline. The ConditionalMiddleware can access the name of the next middleware in the pipeline, so that only the middleware instance placed just before the target middleware (EndpointMiddleware) executes its logic. The end result is somewhat convoluted, but achieves the desired goals!

Inserting middleware between UseRouting() and UseEndpoints() as a library author - Part 2

$
0
0
Inserting middleware between UseRouting() and UseEndpoints() as a library author - Part 2

This post follows on from my previous post - if you haven't already, I strongly recommend reading that one first.

These posts are in response to a question from a reader about how library authors can ensure consumers of their library insert the library's middleware at the right point in their app middleware pipeline. In the previous post I showed an approach that allowed you to ensure your middleware runs before a given (named) piece of middleware, for example just before the EndpointMiddleware added via a call to UseEndpoints().

One of the limitations of this approach is that you can only run your middleware before a given named middleware. There's no way to run your middleware after a named middleware. For example, maybe I want my middleware to run immediately after the call to UseRouting().

In my approach from the previous post, there's no way to achieve that - you can only select a middleware to run before. In this post I adapt the approach to allow you to specify which middleware you want to run after. I warn you now though, it's not very pretty…

Kamushek pointed out a significant flaw in the approach taken in these posts - you can only have a single library use this approach to add middleware. That's a shame, but I'm not really sure I would recommend using these approaches anyway: they're more of an intellectual exercise!

The middleware pipeline is built in reverse

In the previous post, I used the RequestDelegate passed in to our custom middleware's constructor to discover what the next middleware is. The middleware pipeline is built up is by creating an instance of middleware, and obtaining a reference to it's Invoke method. This reference is used to create the RequestDelegate for the previous middleware. So each middleware has a reference to the next middleware in the pipeline.

That means the pipeline is built from the end first, working back to the start of the pipeline. Each earlier middleware "wraps" the rest of the pipeline.

Image of how middleware is constructed

This is a problem for us when we want to add middleware after a given named middleware like the EndpointRoutingMiddleware. When the pipeline is being built, there's no way to know what the "previous" middleware in the pipeline will be - we're building the pipeline back-to-front, so it hasn't been created yet!

Of course at runtime the opposite is true. Middleware early in the pipeline can send signals to later middleware, for example by setting values in the HttpContext.Items collection, or via a service in the DI container.

In order to insert middleware at a specific point in your pipeline, we could use these two facts in combination, as I show in the next section.
When in doubt, add moar middleware

I've described two features of the middleware pipeline that we can use to achieve our goal:

  • At build time (and at runtime) a given middleware can inspect the type of the next middleware/RequestDelegate that will run
  • At runtime, middleware can send messages to later middleware

The approach we'll use is:

  • When explicitly adding middleware to the pipeline (in Startup.Configure), intercept the call, and add two extra piece of middleware - one before the target middleware (NameCheckMiddleware), and one after (ConditionalMiddleware). This is similar to the AnalysisMiddleware approach I showed in the previous post.
  • Record the name of the "wrapped" middleware at build time
  • At runtime, pass the name of the wrapped middleware from the "pre-" middleware to the "-post" middleware
  • If the name indicates it's the middleware we're looking for, run the extra functionality.

That's all a bit confusing - hopefully the example below makes more sense. In this example we want to run our middleware immediately after the call to UseRouting().

Name Check and Conditional middleware wraps all the other middleware, but the conditional middleware only executes its logic in one location

Like I said at the start, it's not pretty. But it does work…

Implementing the middleware

Hopefully you have a grasp of what we're trying to achieve here, so lets show some code. There's not really many additional concepts from last time, but I'll provide all the necessary code for completeness.

We'll start with the NameCheckMiddleware. This is the "pre-" middleware that records the name of the middleware being wrapped:

internal class NameCheckerMiddleware
{
    private readonly RequestDelegate _next;
    private readonly string _wrappedMiddlewareName;

    public NameCheckerMiddleware(RequestDelegate next)
    {
        // Store the name of the next middleware once at build time
        _wrappedMiddlewareName = next.Target.GetType().FullName;
        _next = next;
    }

    public Task Invoke(HttpContext httpContext)
    {
        // (Over)write the name of the wrapped middleware, for use by subsequent middleware
        httpContext.Items["WrappedMiddlewareName"] = _wrappedMiddlewareName;

        return _next(httpContext);
    }
}

The name of the RequestDelegate is calculated in the constructor, i.e. only once, when the middleware is constructed. In the Invoke method we set the middleware in the HttpContext.Items dictionary, for use by our "post-" middleware, the ConditionalMiddleware shown below:

internal class ConditionalMiddleware
{
    private readonly RequestDelegate _next;
    private readonly ILogger<ConditionalMiddleware> _logger;
    private readonly string _runAfterMiddlewareTypeName;

    public ConditionalMiddleware(RequestDelegate next, ILogger<ConditionalMiddleware> logger, string runAfterMiddlewareName)
    {
        // Middleware we're looking for provided as constructor argument
        _runAfterMiddlewareTypeName = runAfterMiddlewareName;
        _next = next;
        _logger = logger;
    }

    public async Task Invoke(HttpContext httpContext)
    {
        // Check if we're running after the middleware we want
        if(IsCorrectMiddleware(httpContext, _runAfterMiddlewareTypeName))
        {
            // If so, run the extra code - just logging as an example here
            _logger.LogInformation("Running conditional middleware after {PreviousMiddleware}", _runAfterMiddlewareTypeName);
        }

        // Either way, run the rest of the pipeline
        await _next(httpContext);
    }


    // Try and get the key added by the NameCheckerMiddleware and see if it's the one we need 
    static bool IsCorrectMiddleware(HttpContext httpContext, string requiredMiddleware)
    {
        return httpContext.Items.TryGetValue("WrappedMiddlewareName", out var wrappedMiddlewareName)
            && wrappedMiddlewareName is string name 
            && string.Equals(name, requiredMiddleware, StringComparison.Ordinal);
    }
}

The difference between this ConditionalMiddleware and the version from my previous post is that we don't know at the middleware build-time whether a given ConditionalMiddleware instance is the one we need. Instead, we have to check the HttpContext.Items dictionary to see what the previous middleware was. If it's the one we're looking for, then we run the extra code.

To add these middleware to the pipeline we provide a custom IApplicationBuilder, just as we did in the last post. The code here is almost identical; the only difference is we're adding both the ConditionalMidleware and the NameCheckerMiddleware in the Use() method:

internal class ConditionalMiddlewareBuilder : IApplicationBuilder
{
    // The middleware we're looking for is provided as a constructor argument
    private readonly string _runAfter;
    public ConditionalMiddlewareBuilder(IApplicationBuilder inner, string runAfter)
    {
        _runAfter = runAfter;
        InnerBuilder = inner;
    }

    private IApplicationBuilder InnerBuilder { get; }

    public IServiceProvider ApplicationServices
    {
        get => InnerBuilder.ApplicationServices;
        set => InnerBuilder.ApplicationServices = value;
    }

    public IDictionary<string, object> Properties => InnerBuilder.Properties;
    public IFeatureCollection ServerFeatures => InnerBuilder.ServerFeatures;
    public RequestDelegate Build() => InnerBuilder.Build();
    public IApplicationBuilder New() => throw new NotImplementedException();

    public IApplicationBuilder Use(Func<RequestDelegate, RequestDelegate> middleware)
    {
        // Wrap the provided middleware with a name checker and conditional middleware
        return InnerBuilder
            .UseMiddleware<NameCheckerMiddleware>()
            .Use(middleware)
            .UseMiddleware<ConditionalMiddleware>(_runAfter);
    }
}

In order to use the custom builder, we can use the same IStartupFilter as in the last post:

internal class ConditionalMiddlewareStartupFilter : IStartupFilter
{
    private readonly string _runAfterMiddlewareName;

    public ConditionalMiddlewareStartupFilter(string runAfterMiddlewareName)
    {
        _runAfterMiddlewareName = runAfterMiddlewareName;
    }

    public Action<IApplicationBuilder> Configure(Action<IApplicationBuilder> next)
    {
        return builder =>
        {
            var wrappedBuilder = new ConditionalMiddlewareBuilder(builder, _runAfterMiddlewareName);
            next(wrappedBuilder);
        };
    }
}

Finally, a couple of extension methods to make adding the startup filter easy:

public static class ConditionalMiddlewareExtensions
{
    public static IServiceCollection AddConditionalMiddleware(this IServiceCollection services, string afterMiddleware)
    {
        return services.AddTransient<IStartupFilter>(_ => new ConditionalMiddlewareStartupFilter(afterMiddleware));
    }

    public static IServiceCollection AddConditionalMiddlewareAfterRouting(this IServiceCollection services)
    {
        return services.AddConditionalMiddleware("Microsoft.AspNetCore.Routing.EndpointRoutingMiddleware");
    }
}

The AddConditionalMiddlewareAfterRouting() method looks for the EndpointRoutingMiddleware added by the UseRouting() call. All that remains is to call the method in our app:

public class Startup
{
    public void ConfigureServices(IServiceCollection services)
    {
        services.AddRazorPages();
        services.AddConditionalMiddlewareAfterRouting(); // <-- Add this line
    }

    public void Configure(IApplicationBuilder app)
    {
        app.UseDeveloperExceptionPage();
        app.UseHttpsRedirection();
        app.UseStaticFiles();

        app.UseRouting();
        // <-- The ConditionalMiddleware will execute here

        app.UseAuthentication();
        app.UseAuthorization();

        app.UseEndpoints(endpoints =>
        {
            endpoints.MapRazorPages();
        });
    }
}

Just as in the previous post, we only had to add one line, even though there's a lot going on behind the scenes.

Again, this example is just a proof of concept - it doesn't do anything interesting other than print the following log message just after the EndpointRoutingMiddleware:

info: MyTestApp.ConditionalMiddleware[0]
      Running conditional middleware after Microsoft.AspNetCore.Routing.EndpointRoutingMiddleware

The approach in this post will have slightly more impact at runtime than the approach in the previous post. While we can do the middleware name check up front at pipeline build time, we need to pass this name through the HttpContext.Items dictionary and add a check for every ConditionalMiddleware instance. This is obviously a pretty small penalty in the grand scheme of things, but it's still something I'd be hesitant forcing on consumers of my library.

As in my last post, as highlighted by Kamushek, this technique only works once - you can't add multiple middleware in this way, as they will conflict with each other. That makes the approach of very limited usefulness in my book, but you never know!

Summary

In this post I expanded on the problem posed in my previous post: how can a library author insert middleware at a specific point in a consuming app's middleware pipeline. In the previous post I discussed the approach when you need to place middleware before a specific target middleware. In this post I discuss the slightly trickier task of placing middleware after a target middleware.

The solution in this post requires wrapping each standard piece of middleware in two additional middleware instances. The first, NameCheckerMiddleware records the name of the wrapped middleware, and writes it to the HttpContext.Items dictionary. The subsequent ConditionalMiddleware checks this value to see if the target middleware (e.g. (EndpointRoutingMiddleware) was just executed, and if it was it executes its logic. The end result is definitely not pretty, but it works!

Creating an endpoint from multiple middleware in ASP.NET Core 3.x

$
0
0
Creating an endpoint from multiple middleware in ASP.NET Core 3.x

In a recent post I discussed the changes to routing that come in ASP.NET Core 3.0, and how you can convert a "terminal" middleware to the new "endpoint" design. One question I've received is whether that removes the need for "branching" the pipeline, and if not, how can you achieve the same thing with endpoints?

This short post assumes that you've already read my post on converting a terminal middleware to endpoint routing, so if you haven't already, take a look at that one first! I give a quick recap below, but I won't go into details.

Converting terminal middleware to endpoints

In my previous post on terminal middleware I used a VersionMiddleware class as an example. This middleware always returns a response, which is the FileVersion of the app's assembly:

public class VersionMiddleware
{
    readonly RequestDelegate _next;
    static readonly Assembly _entryAssembly = System.Reflection.Assembly.GetEntryAssembly();
    static readonly string _version = FileVersionInfo.GetVersionInfo(_entryAssembly.Location).FileVersion;

    public VersionMiddleware(RequestDelegate next)
    {
        _next = next;
    }

    public async Task Invoke(HttpContext context)
    {
        context.Response.StatusCode = 200;
        await context.Response.WriteAsync(_version);
    }
}

In ASP.NET Core 2.x, you could include the middleware as a conditional branch in your middleware pipeline, so that it only executes if the app receives a request starting with "/version":

public void Configure(IApplicationBuilder app)
{
    app.UseStaticFiles();

    app.UseCors();

    app.Map("/version", versionApp => 
        versionApp.UseMiddleware<VersionMiddleware>()); 

    app.UseMvcWithDefaultRoute();
}

This approach creates a middleware pipeline that looks something like the following, with the Map() call branching the pipeline based on the incoming request.

Image of the app pipeline branching at Map

In ASP.NET Core 3.x using the Map() function is generally not idiomatic. Instead, it's more natural to use Endpoint Routing. In my previous post on terminal middleware, I showed how you could take middleware like the VersionMiddleware above, and turn it into an "endpoint" that can be used like this:

public void Configure(IApplicationBuilder app)
{
    app.UseStaticFiles();

    app.UseRouting();

    app.UseCors();

    // Execute the endpoint selected by the routing middleware
    app.UseEndpoints(endpoints =>
    {
        endpoints.MapVersion("/version");
        endpoints.MapDefaultControllerRoute();
    });
}

This approach is very similar to the original 2.x version, but with a few benefits:

  • You can declaratively add authorization or CORS requirements to the version endpoint.
  • You benefit from full route-template matching, rather than being a simple "starts-with" check
  • Middleware placed between UseRouting() and UseEndpoints() knows which endpoint is going to be run before it runs.

The end result is a bit like the middleware pipeline still branching, but only branching right at the end when it splits into the various endpoints:

Image of the middleware pipeline splitting at the end of the request

Creating larger middleware branches

One of the nice things about using Map in 2.x (which is the origin of the question that spawned this post) was that you are given a whole new IApplicationBuilder that you can add middleware to.

For example, lets say you had a middleware that resizes an image provided in the body of the request, the ResizeImageMiddleware. You don't have the source code for this middleware - maybe you got it from a NuGet package - but you want to add some logging/caching/metrics around the requests. That's easy to do in 2.x, as you can add those extra features as middleware in the Map branch:

public void Configure(IApplicationBuilder app)
{
    app.UseStaticFiles();

    app.UseCors();

    app.Map("/resizeImage", resizeAppBuilder => 
        resizeAppBuilder
            .UseMiddleware<LoggingMiddleware>() // <- Add extra middleware in the branch.
            .UseMiddleware<CachingMiddleware>() // <- Only runs when ResizeImageMiddleware will be hit
            .UseMiddleware<ResizeImageMiddleware>()); 

    // <- The LoggingMiddleware and CachingMiddleware don't run if a request makes it to the MVC branch
    app.UseMvcWithDefaultRoute();
}

Because these middleware are added to the branch, they'll only execute for requests that ultimately hit the ResizeImageMiddleware, not requests that hit the MVC branch

Image of the app pipeline with extra middleware

On the face of it, you might feel a bit stuck when you try to do the same thing in ASP.NET Core 3.0. The middleware pipeline is effectively linear if you don't use Map(). You can't do the following, as that would execute the LoggingMiddleware and CachingMiddleware for every request:

public void Configure(IApplicationBuilder app)
{
    app.UseStaticFiles();

    app.UseRouting();

    app.UseCors();

    // These will now run for every request - not what we want
    app.UseMiddleware<LoggingMiddleware>();
    app.UseMiddleware<CachingMiddleware>(); 

    app.UseEndpoints(endpoints =>
    {
        endpoints.MapResizeImageEndpoint("/resizeImage"); // <- We only want to run them here 
        endpoints.MapDefaultControllerRoute();
    });
}

Technically you could do this if you customize the LoggingMiddleware and CachingMiddleware to execute based on the endpoint selected inside UseRouting, but there's an easier way.

I showed how you can retrieve the selected endpoint name by calling HttpContext.GetEndpoint() in a recent post on Serilog.

I cheated a little bit in the code above, as I didn't show the implementation of the MapResizeImageEndpoint(). If we look at the implementation shown below, then the better option should be more apparent:

public static class ResizeImageEndpointRouteBuilderExtensions
{
    public static IEndpointConventionBuilder MapResizeImageEndpoint(
        this IEndpointRouteBuilder endpoints, string pattern)
    {
        var pipeline = endpoints.CreateApplicationBuilder()
            .UseMiddleware<ResizeImageMiddleware>()
            .Build();

        return endpoints.Map(pattern, pipeline).WithDisplayName("Resize image");
    }
}

This is the same format of extension method as I showed in my previous post for converting the VersionMiddleware to an endpoint. This code shows that an "endpoint" has its own IApplicationBuilder, which means you're not limited to adding a single piece of middleware, you can add a whole pipeline!

public static class ResizeImageEndpointRouteBuilderExtensions
{
    public static IEndpointConventionBuilder MapResizeImageEndpoint(
        this IEndpointRouteBuilder endpoints, string pattern)
    {
        var pipeline = endpoints.CreateApplicationBuilder()
            .UseMiddleware<LoggingMiddleware>() // <- Add the extra middleware 
            .UseMiddleware<CachingMiddleware>() // <- They will only be executed when the endpoint runs
            .UseMiddleware<ResizeImageMiddleware>()
            .Build();

        return endpoints.Map(pattern, pipeline).WithDisplayName("Resize image");
    }
}

With the updated extension method, our middleware pipeline is again apparently simple:

public void Configure(IApplicationBuilder app)
{
    app.UseStaticFiles();

    app.UseRouting();

    app.UseCors();

    app.UseEndpoints(endpoints =>
    {
        endpoints.MapResizeImageEndpoint("/resizeImage"); // <- runs all our middleware
        endpoints.MapDefaultControllerRoute();
    });
}

We get all the benefits of endpoint routing here - we could add Authorization or CORS policies to the image endpoint for example - but we've also kept all the middleware unchanged from ASP.NET Core 2.x. In effect we've cut the resize image "branch" off at the original Map(), and moved it to the end instead:

Image of the resize image middleware branch in ASP.NET Core 3.x

The solution shown above doesn't work in all situations - as far as I know there's no easy way to add extra middleware to the MVC endpoints added by MapDefaultControllerRoute() (or the other MVC endpoint methods). If that's something you need, you could look at using MVC filters as a way to hook into the pipeline instead.

Summary

In this post I showed how you can create "composite" endpoints in ASP.NET Core 3.x, which consist of multiple middleware. This was commonly achieved in ASP.NET Core 2.x by calling Map() to branch the middleware pipeline, and can be used in ASP.NET Core 3.x in a similar way

Exploring the new rollForward and allowPrerelease settings in global.json: Exploring ASP.NET Core 3.0 - Part 8

$
0
0
Exploring the new rollForward and allowPrerelease settings in global.json

I was listening to the Azure DevOps Podcast with Jeffrey Palermero recently and heard Kathleen Dollard mention that there were some updates to the global.json file and .NET Core SDK in 3.0. This post explores those additions and the effects they have on SDK selection for a machine with multiple SDKs installed.

The official documentation for this behaviour covers everything in this post, but I found it pretty hard to internalise the various rules it describes. This post primarily adds some extra background, a couple of pictures, and explores the rules using examples to make it easier to grok!

The .NET Core Runtime vs the .NET Core SDK.

Before we start, it's important to understand the difference between the .NET Code runtime and the .NET Core SDK:

  • The .NET Core runtime is what runs a .NET application. It has very limited functionality - it literally just runs a compiled application. It's the important piece when you're running your application in production.
  • The .NET Core SDK does everything else: it compiles your application, tests it, downloads NuGet packages, and a whole lot more. This is the important piece when you're developing your application.

Generally speaking, you need to choose the version of the .NET Core runtime you use carefully. Different versions have different support windows (depending if they're LTS or current) and have different features. It's the runtime version that you specify in the <TargetFramework> element of your project file. For example, the project file below specifies that the .NET Core 3.1 runtime should be used:

<Project Sdk="Microsoft.NET.Sdk">

  <PropertyGroup>
    <TargetFramework>netcoreapp3.1</TargetFramework>
  </PropertyGroup>

</Project>

In contrast, you generally don't specify a version of the .NET Core SDK that's needed to build the application. Normally all that matters is that you have a version of the SDK that supports the given runtime version. So to target the 3.1 runtime, you'll need an SDK version that supports building for it, e.g. version SDK 3.1.101 of the SDK.

An important thing to note, is that the .NET Core SDK is supposed to be backwards compatible. So the 3.1.101 SDK can build .NET Core 2.1 applications and 2.2 applications etc as well. In other words, you generally don't need to use a specific version of the .NET Core SDK. Any SDK that is high enough will do.

Specifying a specific SDK version with a global.json

Typically then you shouldn't have to worry about which versions of the SDK you have installed. Backwards compatibility means that the most recent SDK should be able to build everything.

Unfortunately that's not always the case: bugs creep in, features change, and sometimes you need (or want) a specific version of the SDK installed. Some peripheral things change from version-t0-version too, such as the project templates that you use with dotnet new. The templates that come with the .NET Core 1.0 SDK are very different to those that come with the .NET Core 3.1 SDK for example.

For that reason, sometimes you might want to "pin" the version of the .NET Core SDK to a specific version for a particular project or for a particular folder. For example you might want one specific project to use the .NET Core 1.0 SDK, while letting all the other projects on your machine use the latest 3.1 version. To do that, you can use a global.json file.

Whenever you run a dotnet SDK command like dotnet build, dotnet publish, or dotnet new, the dotnet.exe entrypoint looks for a global.json file in the same directory as the command being run. If it doesn't find one, it looks in the parent directory instead. If it still doesn't find one it keeps working up through the parent directories until it finds a global.json file, or until it reaches the root directory.

At this point dotnet.exe will either have the "nearest" global.json file, or no file at all. It then uses the values in the global.json file (or the absence of the file), to decide which SDK version to use to handle the command (dotnet build etc).

The rules governing which version to use depends on four things:

  • Which versions of the .NET Core SDK do you have installed?
  • Which version does the global.json request (if any)
  • What is the current "roll-forward" policy for SDK versions
  • Are pre-release versions allowed to be used?

We'll look at how each of those affect the final version of the SDK selected in the remainder of the post.

How to see which versions of the .NET Core SDK you have installed

The first variable for determining which version of the .NET Core SDK will be used to run a command, is which SDKs are available. Thankfully that's easy to check in .NET Core 3+, as you can use dotnet --list-sdks.

Running the command on my machine, I get:

> dotnet --list-sdks
1.1.14 [C:\Program Files\dotnet\sdk]
2.1.600 [C:\Program Files\dotnet\sdk]
2.1.602 [C:\Program Files\dotnet\sdk]
2.1.604 [C:\Program Files\dotnet\sdk]
2.1.700 [C:\Program Files\dotnet\sdk]
2.1.801 [C:\Program Files\dotnet\sdk]
2.2.203 [C:\Program Files\dotnet\sdk]
3.0.100 [C:\Program Files\dotnet\sdk]
3.1.101 [C:\Program Files\dotnet\sdk]

This shows that I have 9 SDKs currently installed (all in C:\Program Files\dotnet\sdk).

Understanding the .NET Core SDK version numbers

A slightly tricky aspect of the .NET Core SDK, is that it doesn't really use the semantic versioning that you may be familiar with, and which the runtime uses. It kind of does, but it's a bit more complicated than that, (plus it's changed throughout the last few versions of .NET Core).

Currently, the .NET Core SDK version number is broken down into 4 sections. For example, for the 2.1.801 SDK version:

Breakdown of .NET Core SDK version number

Those different sections will become important in the next section, when we look at "roll-forward" policies. Broadly speaking, the major and minor version numbers align with the major and minor version of .NET Core, e.g. 2.2 or 3.1. The feature version is the complicated one, where it gets incremented when new features are added to the SDK (potentially without any changes in the runtime). The patch version is for patches to a given feature version.

The global.json schema in .NET Core 1/2 is very limited

The global.json file has been available since .NET Core 1.0, and up until the recent changes in .NET Core 3.0, it had a very simple structure:

{
  "sdk": {
    "version": "2.1.600"
  }
}

The version in the global.json would define which version of the SDK you needed. If it was installed, that version of the SDK would be used, otherwise you would get an error message similar to the following:

A compatible installed .NET Core SDK for global.json version [2.1.600] from [C:\repos\globaljsontest\global.json] was not found
Install the [2.1.600] .NET Core SDK or update [C:\repos\globaljsontest\global.json] with an installed .NET Core SDK

To be precise, the legacy behaviour was to use the patch roll-forward policy which we'll discuss shortly.

Specifying a single version was often rather limiting. In many cases the intention of the version number was used to indicate either a minimum SDK that was needed, or alternatively a maximum major version. Unfortunately the version field does not support wildcards, so that wasn't possible, and proved a poor substitute.

For example, if you still had projects stuck on .NET Core 1.0, you might add a global.json to require a 1.x SDK, like 1.1.14. In reality, you likely wouldn't need a specific version of the 1.x SDK (1.0.1 or 1.1.13 would work just fine), but the global.json forces you to specify a single version.

That's a pain, as it forces anyone using your project to install a new SDK version, when they may well have one that works just fine already.

Additions to global.json in .NET Core 3.0

In NET Core 3.0, the global.json file got a couple of important updates, the rollForward and allowPrerelease fields:

{
  "sdk": {
    "version": "2.1.600",
    "allowPrerelease": true,
    "rollForward": "patch"
  }
}

The algorithm for determining which version of the SDK to use was relatively simple in .NET Core 1.x/2.x - if a global.json was found and the requested SDK version was installed, that version (or a patched version) was used.

In .NET Core 3.0 the algorithm gets rather more complex, giving you extra controls. The flow chart below shows how values for the version, allowPrerelease, and rollForward values are determined based on the presence of the global.json, whether each field is present in the global.json, and whether or not the command is being run explicitly from the command line, or it's being run implicitly by Visual Studio (VS) (for example when Visual Studio runs a build):

Flowchart for SDK version number selection

At the end of this flow chart, we have values for the following:

  • version: Either a specific version requested by a global.json, or if none was set, the highest installed version.
  • allowPrerelease: Determines whether prerelease/preview SDKs that are installed should be considered when calculating which SDK version to use (e.g. 3.1.100-preview1)
  • rollForward: The roll-forward policy to apply.

This brings us to the most complex section, understanding the roll-forward policy, and how each option controls which version of the SDK is selected.

Understanding the various rollForward policies

The roll-forward policy is used to determine which of the various installed SDKs should be selected when a given version is requested. By changing the roll-forward policy, you can relax or tighten the selection criteria. That's a bit vague, but we'll looks at some examples soon.

In .NET Core 3.x, there are now nine different values for the rollForward policy, which can broadly be separated into three different categories:

First we have the disable policy:

  • disable: If the requested version doesn't exist, then fail outright. Don't ever use an SDK version other than the specific version requested.

Next we have the conservative roll-forward policies, which get progressively more lenient in looking for suitable SDK versions:

  • patch: If the requested version doesn't exist, use the highest installed SDK version with the same major, minor, and feature value e.g. 2.1.6xx
  • feature: Use the highest installed SDK version with the same major, minor, and feature value e.g. 2.1.6xx. If no such version exists, uses the next installed SDK version with the same major and minor value e.g. 2.1.7xx, otherwise fails.
  • minor: Apply the feature policy. If no suitable SDK version is found, use the highest installed SDK version with the same major value e.g. 2.x.xxx
  • major: Apply the minor policy. If no suitable SDK version is found, use the highest installed SDK version, e.g. x.x.xxx

Finally we have the "latest" roll-forward policies, which always try and use the latest versions of suitable SDKs:

  • latestPatch : Always use the highest installed SDK version with the same major, minor, and feature value e.g. 2.1.6xx
  • latestFeature : Uses highest installed SDK version with the same major and minor value e.g. 2.1.xxx
  • latestMinor : Uses highest installed SDK version with the same major value e.g. 2.x.xxx
  • latestMajor : Uses highest installed SDK version

I'm aware that's a lot of information to digest! The conservative policies in particular are quite confusing, as the patch policy works subtly differently to the others. I think it's easiest to understand the differences by looking at examples, so the next few sections run through various scenarios, and describe the results in each case.

In each of these scenarios, I'm building a project on a system with the following SDKs installed (listed using dotnet --list-sdks):

1.1.14
2.1.600
2.1.602
2.1.604
2.1.700
2.1.801
2.2.203
3.0.100
3.1.101

You can view the SDK version that was selected based on a given global.json by running dotnet --version in the same folder. When there is no global.json in the folder (or in any parent folders) you should see the latest SDK installed on your machine:

> dotnet --version
3.1.101

Note that I'm ignoring the allowPrerelease flag in these tests. It doesn't have any impact if you don't have preview SDK versions installed. If you do have preview SDKs installed, the results will follow the same patterns shown below.

When the requested SDK version is available

Lets start first by selecting an SDK version that does exist on the system, 2.1.600, and see which SDK version is selected for all the different rollForward values. I create a global.json (by running dotnet new global.json) and change the rollForward property to test each policy:

{
  "sdk": {
    "version": "2.1.600",
    "rollForward": "xxx"
  }
}

Running dotnet --version after applying each of the roll-forward policies in turn gives the following results:

rollForward policy Selected SDK Version Notes
disable 2.1.600 Uses requested SDK
patch 2.1.600 Uses requested SDK
feature 2.1.604 Rolls forward patch
minor 2.1.604 Rolls forward patch
major 2.1.604 Rolls forward patch
latestPatch 2.1.604 Rolls forward patch
latestFeature 2.1.801 Rolls forward feature
latestMinor 2.2.203 Rolls forward minor
latestMajor 3.1.101 Rolls forward to latest major

Note that even though we have the exact requested version available, 2.1.600, only the disable and patch policies use the actual SDK. Everything else uses at least a patched version of the SDK. Also note that the "conservative" policies, only use the patched version, even though we have additional minor and major versions available.

When the requested SDK version is not available

Now lets try requesting an SDK version that doesn't exist on our machine, 2.1.601. Other than that, we have the same global.json and the same SDKs installed.

{
  "sdk": {
    "version": "2.1.601",
    "rollForward": "xxx"
  }
}

Running dotnet --version after applying each of the roll-forward policies in turn gives the following results:

rollForward policy Selected SDK Version Notes
disable FAIL You'll get an error when trying to run SDK commands
patch 2.1.604 Rolls forward to latest patch
feature 2.1.604
minor 2.1.604
major 2.1.604
latestPatch 2.1.604
latestFeature 2.1.801
latestMinor 2.2.203
latestMajor 3.1.101

The results are almost identical to the previous case, with the following exceptions:

  • The disable policy causes all SDK commands to fail.
  • The patch policy skips the next-highest patch version, 2.1.602, and uses the latest patch 2.1.604 instead.

When no higher patch version exists

Finally, let's imagine that we've requested the 2.1.605 SDK, which has a higher patch version than any of the 2.1.6xx SDKs installed on the machine. Let's see what happens in this case:

rollForward policy Selected SDK Version Notes
disable FAIL
patch FAIL No 2.1.6xx SDKs equal or higher than 2.1.605
feature 2.1.700 Only rolls forward to 2.1.700, not 2.1.801
minor 2.1.700 Same as feature
major 2.1.700 Same as minor
latestPatch FAIL No 2.1.6xx SDKs equal or higher than 2.1.605
latestFeature 2.1.801
latestMinor 2.2.203
latestMajor 3.1.101

Now we have some interesting results:

  • With no high enough SDK versions matching the 2.1.6xx pattern the disable, patch, and latestPatch policies all fail.
  • The other latest* policies use the same versions they have in all other experiments.
  • The conservative policies (feature, minor, and major) all roll-forward to the next available SDK, 2.1.700, which is different to the previous experiments. Note that they don't use the highest feature version available, 2.1.801, they only roll forward to the next feature version, 2.1.700.

You could take these experiments further, but I think they demonstrate the patterns pretty well. That leaves just one final question…

Which roll-forward policy should you use?

In general, I suggest you don't use a global.json if you can help it. This effectively gives you the latestMajor policy by default, which uses the latest version of the .NET Core SDK, ensuring you get any associated bug fixes and performance improvements.

If you have to use a global.json and specify an SDK version for some reason, then I suggest you specify the lowest SDK version that works, and apply the latestMinor or latestFeature policy as appropriate. That will ensure your project can be built by the widest number of people (while still allowing you to control the range of SDK versions that are compatible).

Note that the flow charts and matching rules I've described above are specific to the .NET Core 3.x SDK. However, the matching rules for the highest SDK installed on your machine are used, so as long as you have any .NET Core 3.x SDK installed, they will apply to you.

Summary

In this post I looked in some depth at the new allowPrerelease and rollForward fields added to the global.json file in .NET Core 3.0. I described the algorithm used to determine which version, allowPrerelease, and rollForward values would be used, based on the presence of a global.json and whether or not you were running from Visual Studio. I then showed how each of the roll-forward policies affects the final selected SDK version.

Having the additional flexibility to define ranges of SDK versions is definitely useful, but should be used sparingly where possible. It can be easy to add accidental onerous requirements on people trying to build your project. Only add a global.json where it is necessary, and try to use permissive roll-forward policies like latestMajor or latestMinor where possible.


When ASP.NET Core can't find your controller: debugging application parts

$
0
0
When ASP.NET Core can't find your controller: debugging application parts

In this post I describe application parts and how ASP.NET Core uses them to find the controllers in your app. I then show how you can retrieve the list at runtime for debugging purposes.

Debugging a missing controller

A while ago I was converting an ASP.NET application to ASP.NET Core. The solution had many class library projects, where each project represented a module or vertical slice of the application. These modules contained everything for that feature: the database code, the domain, and the Web API controllers. There was then a "top level" application that referenced all these modules and served the requests.

As the whole solution was based on Katana/Owin and used Web API controllers exclusively, it wasn't too hard to convert it to ASP.NET Core. But, of course, there were bugs in the conversion process. One thing that had me stumped for a while was why the controllers from some of the modules didn't seem to be working. All of the requests to certain modules were returning 404s.

There were a few possibilities in my mind for what was going wrong:

  1. There was a routing issue, so requests meant for the controllers were not reaching them
  2. There was a problem with the controllers themselves, meaning they were generating 404s
  3. The ASP.NET Core app wasn't aware of the controllers in the module at all.

My gut feeling was the problem was either 1 or 3, but I needed a way to check. The solution I present in this post let me rule out point 3, by listing all the ApplicationParts and controllers the app was aware of.

What are application parts?

According the documentation:

An Application Part is an abstraction over the resources of an MVC app. Application Parts allow ASP.NET Core to discover controllers, view components, tag helpers, Razor Pages, razor compilation sources, and more

Application Parts allow you to share the same resources (controllers, Razor Pages etc) between multiple apps. If you're familiar with Razor Class Libraries, then think of application parts as being the abstraction behind it.

Image of application parts added to an application

One application part implementation is an AssemblyPart which is an application part associated with an assembly. This is the situation I had in the app I described previously - each of the module projects was compiled into a separate Assembly, and then added to the application as application parts.

You can add application parts in ConfigureServices when you configure MVC. The current assembly is added automatically, but you can add additional application parts too. The example below adds the assembly that contains TestController (which resides in a different project) as an application part.

public void ConfigureServices(IServiceCollection services)
{
    services
        .AddControllers()
        .AddApplicationPart(typeof(TestController).Assembly);
}

Note that in ASP.NET Core 3.x, when you compile an assembly that references ASP.NET Core, an assembly attribute is added to the output, [ApplicationPart]. ASP.NET Core 3.x apps look for this attribute on referenced assemblies and registers them as application parts automatically, so the code above isn't necessary.

We've covered how you register application parts, but how do we debug when things go wrong?

Providing features with the ApplicationPartManager

When you add an application part (or when ASP.NET Core adds it automatically), it's added to the ApplicationPartManager. This class is responsible for keeping track of all the application parts in the app, and for populating various features based on the registered parts, in conjunction with registered feature providers.

There are a variety of features used in MVC, such as the ControllerFeature and ViewsFeature for example. The ControllerFeature (shown below) contains a list of all the controllers available to an application, across all of the registered application parts.

public class ControllerFeature
{
    public IList<TypeInfo> Controllers { get; } = new List<TypeInfo>();
}

The list of controllers is obtained by using the ControllerFeatureProvider. This class implements the IApplicationFeatureProvider<T> interface, which, when given a list of application parts, populates an instance of ControllerFeature with all the controllers it finds.

public class ControllerFeatureProvider : IApplicationFeatureProvider<ControllerFeature>
{
    public void PopulateFeature(IEnumerable<ApplicationPart> parts, ControllerFeature feature)
    {
        // Loop through all the application parts
        foreach (var part in parts.OfType<IApplicationPartTypeProvider>())
        {
            // Loop through all the types in the application part
            foreach (var type in part.Types)
            {
                // If the type is a controller (and isn't already added) add it to the list
                if (IsController(type) && !feature.Controllers.Contains(type))
                {
                    feature.Controllers.Add(type);
                }
            }
        }
    }

    protected virtual bool IsController(TypeInfo typeInfo) => { /* Elided for brevity*/ }
}

The ApplicationPartManager exposes a PopulateFeature method which calls all the appropriate feature providers for a given feature:

public class ApplicationPartManager
{
    // The list of application parts
    public IList<ApplicationPart> ApplicationParts { get; } = new List<ApplicationPart>();

    // The list of feature providers for the various possible features
    public IList<IApplicationFeatureProvider> FeatureProviders { get; } =
            new List<IApplicationFeatureProvider>();


    // Populate the feature of type TFeature
    public void PopulateFeature<TFeature>(TFeature feature)
    {
        foreach (var provider in FeatureProviders.OfType<IApplicationFeatureProvider<TFeature>>())
        {
            provider.PopulateFeature(ApplicationParts, feature);
        }
    }

That covers all the background for ApplicationPartManager and features.

Listing all the Application parts and controllers added to an application

To quickly work out whether my 404 problem was due to routing or missing controllers, I needed to interrogate the ApplicationPartManager. If the application parts and controllers for the problematic modules were missing, then that was the problem; if they were present, then it was probably some sort of routing issue!

To debug the issue I wrote a quick IHostedService that logs the application parts added to an application, along with all of the controllers discovered.

I used an IHostedService because it runs after application part discovery, and only executes once on startup.

The example below takes an ILogger and the ApplicationPartManager as dependencies. It then lists the names of the application parts, populates an instance of the ControllerFeature, and lists all the controllers known to the app. These are written to a log message which can be safely inspected

A similar example in the documentation exposes this information via a Controller, which seems like a bit of a bad idea to me!

public class ApplicationPartsLogger : IHostedService
{
    private readonly ILogger<ApplicationPartsLogger> _logger;
    private readonly ApplicationPartManager _partManager;

    public ApplicationPartsLogger(ILogger<ApplicationPartsLogger> logger, ApplicationPartManager partManager)
    {
        _logger = logger;
        _partManager = partManager;
    }

    public Task StartAsync(CancellationToken cancellationToken)
    {
        // Get the names of all the application parts. This is the short assembly name for AssemblyParts
        var applicationParts = _partManager.ApplicationParts.Select(x => x.Name);

        // Create a controller feature, and populate it from the application parts
        var controllerFeature = new ControllerFeature();
        _partManager.PopulateFeature(controllerFeature);

        // Get the names of all of the controllers
        var controllers = controllerFeature.Controllers.Select(x => x.Name);

        // Log the application parts and controllers
        _logger.LogInformation("Found the following application parts: '{ApplicationParts}' with the following controllers: '{Controllers}'",
            string.Join(", ", applicationParts), string.Join(", ", controllers));

        return Task.CompletedTask;
    }

    // Required by the interface
    public Task StopAsync(CancellationToken cancellationToken) => Task.CompletedTask;
}

All that remains is to register the hosted service in Startup.ConfigureServices:

public void ConfigureServices(IServiceCollection services)
{
    services.AddControllers();
    services.AddHostedService<ApplicationPartsLogger>();
}

The example log message below is taken from the sample code, in which an API project (ApplicationPartsDebugging.Api) references a class library (ApplicationPartsDebugging.Controllers) which contains a controller, TestController.

info: ApplicationPartsDebugging.Api.ApplicationPartsLogger[0]
      Found the following application parts: 'ApplicationPartsDebugging.Api, ApplicationPartsDebugging.Controllers' 
      with the following controllers: 'WeatherForecastController, TestController'

Both the API app and the class library are referenced as application parts, and controllers from both application parts are available.

And yes, this was exactly the problem I had during my conversion, I'd failed to register one of the modules as an application part, shown by it's absence from my log message!

Summary

In this post I described a problem I faced when converting an application to ASP.NET Core - the controllers from a referenced project could not be found. ASP.NET Core looks for controllers, views, and other features in application parts that it knows about. You can add additional application parts to an ASP.NET Core manually, though ASP.NET Core 3.x will generally handle this for you automatically. To debug my problem I created an ApplicationPartsLogger that lists all the registered application parts for an app. This allows you to easily spot when an expected assembly is missing.

Creating a custom ErrorHandlerMiddleware function

$
0
0
Creating a custom ErrorHandlerMiddleware function

In this post I show how to customise the ExceptionHandlerMiddleware to create custom responses when an error occurs in your middleware pipeline, instead of providing a path to "re-execute" the pipeline.

Exception handling in Razor Pages

All .NET applications generate errors, and unfortunately throw exceptions, and it's important you handle those in your ASP.NET middleware pipeline. Server-side rendered applications like Razor Pages typically want to catch those exceptions and redirect to an error page.

For example, if you create a new web application that uses Razor Pages (dotnet new webapp), you'll see the following middleware configuration in Startup.Configure:

public void Configure(IApplicationBuilder app, IWebHostEnvironment env)
{
    if (env.IsDevelopment())
    {
        app.UseDeveloperExceptionPage();
    }
    else
    {
        app.UseExceptionHandler("/Error");
    }

    // .. other middleware not shown
}

When running in the Development environment, the application will catch any exceptions thrown when handling a request, and display them as a web page using the very useful DeveloperExceptionMiddleware:

The developer exception page

This is incredibly useful during local development, as it lets you quickly examine the stack trace, request Headers, routing details, and other things.

Of course that's all sensitive information that you don't want to expose in production. So when not in development, we use a different exception handler, the ExceptionHandlerMiddleware. This middleware allows you to provide a request path, "/Error" by default, and uses it to "re-execute" the middleware pipeline, to generate the final response:

Re-executing the pipeline using

The end result for a Razor Pages app is that the Error.cshtml Razor Page is returned whenever an exception occurs in production:

The exception page in production

That covers the exception handling for razor pages, but what about for Web APIs?

Exception handling for Web APIs

The default exception handling in the web API template (dotnet new webapi) is similar to that used by Razor Pages, with an important difference:

public void Configure(IApplicationBuilder app, IWebHostEnvironment env)
{
    if (env.IsDevelopment())
    {
        app.UseDeveloperExceptionPage();
    }

    // .. other middleware not shown
}

As you can see the DeveloperExceptionMiddleware is still added when in the Development environment, but there's no error handling added at all in production! That's not as bad as it sounds: even though there's no exception handling middleware, ASP.NET Core will catch the exception in its infrastructure, log it, and return a blank 500 response to clients:

An exception

If you're using the [ApiController] attribute (you probably should be), and the error comes from your Web API controller, then you'll get a ProblemDetails result by default, or you can customize it further.

That's actually not too bad for Web API clients. Consumers of your API should be able to handle error responses, so end users won't be seeing the "broken" page above. However, it's often not as simple as that.

For example, maybe you are using a standard format for your errors, such as the ProblemDetails format. If your client is expecting all errors to have that format, then the empty response generated in some cases may well cause the client to break. Similarly, in the Development environment, returning an HTML developer exception page when the client is expecting JSON will likely cause issues!

One solution to this is described in the official documentation, in which it's suggested you create an ErrorController with two endpoints:

[ApiController]
public class ErrorController : ControllerBase
{
    [Route("/error-local-development")]
    public IActionResult ErrorLocalDevelopment() => Problem(); // Add extra details here

    [Route("/error")]
    public IActionResult Error() => Problem();
}

And then use the same "re-execute" functionality used in the Razor Pages app to generate the response:

public void Configure(IApplicationBuilder app, IWebHostEnvironment env)
{
    if (env.IsDevelopment())
    {
        app.UseExceptionHandler("/error-local-development");
    }
    else
    {
        app.UseExceptionHandler("/error");
    }

    // .. other middleware
}

This works fine, but there's something that's always bugged me about using the same infrastructure that generated an exception (e.g. Razor Pages or MVC) to generate the exception message. Too many times I've been bitten by a failure to generate the error response due to the exception being thrown a second time! For that reason I like to take a slightly different approach.

Using ExceptionHandler instead of ExceptionHandlingPath

When I first started using ASP.NET Core, my approach to tackling this problem was to write my own custom ExceptionHandler middleware to generate the responses directly. "It can't be that hard to handle an exception, right"?

Turns out it's a bit more complicated than that (shocking, I know). There's various edge cases you need to handle like:

  • If the response had already started sending when the exception occurred, you can't intercept it.
  • If the EndpointMiddleware had executed when the exception occurred, you need to do some juggling with the selected endpoints
  • You don't want to cache the error response

The ExceptionHandlerMiddleware handles all these cases, so re-writing your own version is not the way to go. Luckily, although providing a path for the middleware to re-execute is the commonly shown approach, there's another option - provide a handling function directly.

The ExceptionHandlerMiddleware takes an ExceptionHandlerOptions as a parameter. This option object has two properties:

public class ExceptionHandlerOptions
{
    public PathString ExceptionHandlingPath { get; set; }
    public RequestDelegate ExceptionHandler { get; set; }
}

When you provide the re-execute path to the UseExceptionHandler(path) method, you're actually setting the ExceptionHandlingPath on the options object. Instead, you can set the ExceptionHandler property and pass an instance of ExceptionHandlerOptions in directly to the middleware using UseExceptionHandler() if you wish:

public void Configure(IApplicationBuilder app, IWebHostEnvironment env)
{
    app.UseExceptionHandler(new ExceptionHandlerOptions
    {
        ExceptionHandler = // .. to implement
    });

    // .. othe middleware
}

Alternatively, you can use a different overload of UseExceptionHandler() and configure a mini middleware pipeline to generate your response:

public void Configure(IApplicationBuilder app, IWebHostEnvironment env)
{
    app.UseExceptionHandler(err => err.UseCustomErrors(env)); // .. to implement

    // .. othe middleware
}

Both approaches are equivalent so it's more a question of taste. In this post I'm going to use the second approach, and implement the UseCustomErrors() function.

Creating a custom exception handler function

For this example, I'm going to assume that we want to generate a ProblemDetails object when we get an exception in the middleware pipeline. I'm also going to assume that our API only supports JSON. That avoids us having to worry about XML content negotiation and the like. In development, the ProblemDetails response will contain the full exception stack trace, and in production it will just show a generic error message.

ProblemDetails is an industry standard way of returning machine-readable details of errors in a HTTP response. It's the generally supported way of return error messages from Web APIs in ASP.NET Core 3.x (and to an extent, in version 2.2).

We'll start by defining the UseCustomErrors function in a static helper class. This helper class adds a single piece of response-generating middleware to the provided IApplicationBuilder. In development, it ultimately calls the WriteResponse method, and sets includeDetails: true. In other environments, includeDetails is set to false.

using System;
using System.Diagnostics;
using System.Text.Json;
using System.Threading.Tasks;
using Microsoft.AspNetCore.Builder;
using Microsoft.AspNetCore.Diagnostics;
using Microsoft.AspNetCore.Hosting;
using Microsoft.AspNetCore.Http;
using Microsoft.AspNetCore.Mvc;
using Microsoft.Extensions.Hosting;

public static class CustomErrorHandlerHelper
{
    public static void UseCustomErrors(this IApplicationBuilder app, IHostEnvironment environment)
    {
        if (environment.IsDevelopment())
        {
            app.Use(WriteDevelopmentResponse);
        }
        else
        {
            app.Use(WriteProductionResponse);
        }
    }

    private static Task WriteDevelopmentResponse(HttpContext httpContext, Func<Task> next)
        => WriteResponse(httpContext, includeDetails: true);

    private static Task WriteProductionResponse(HttpContext httpContext, Func<Task> next)
        => WriteResponse(httpContext, includeDetails: false);

    private static async Task WriteResponse(HttpContext httpContext, bool includeDetails)
    {
        // .. to implement
    }
}

All that remains is to implement the WriteResponse function to generate our response. This retrieves the exception from the ExceptionHandlerMiddleware (via the IExceptionHandlerFeature) and builds a ProblemDetails object containing the details to display. It then uses the System.Text.Json serializer to write the object to the Response stream.

private static async Task WriteResponse(HttpContext httpContext, bool includeDetails)
{
    // Try and retrieve the error from the ExceptionHandler middleware
    var exceptionDetails = httpContext.Features.Get<IExceptionHandlerFeature>();
    var ex = exceptionDetails?.Error;

    // Should always exist, but best to be safe!
    if (ex != null)
    {
        // ProblemDetails has it's own content type
        httpContext.Response.ContentType = "application/problem+json";

        // Get the details to display, depending on whether we want to expose the raw exception
        var title = includeDetails ? "An error occured: " + ex.Message : "An error occured";
        var details = includeDetails ? ex.ToString() : null;

        var problem = new ProblemDetails
        {
            Status = 500,
            Title = title,
            Detail = details
        };

        // This is often very handy information for tracing the specific request
        var traceId = Activity.Current?.Id ?? httpContext?.TraceIdentifier;
        if (traceId != null)
        {
            problem.Extensions["traceId"] = traceId;
        }

        //Serialize the problem details object to the Response as JSON (using System.Text.Json)
        var stream = httpContext.Response.Body;
        await JsonSerializer.SerializeAsync(stream, problem);
    }
}

You can record any other values you like on the ProblemDetails object that an be retrieved from the HttpContext before it's serialized

Be aware that the ExceptionHandlerMiddleware clears out the route values before calling your exception handler method so those are not available.

If your application now throws an exception in the Development environment, you'll get the full exception returned as JSON in the response:

ProblemDetails response in Development

While in production, you'll still get a ProblemDetails response, but with the details elided:

ProblemDetails response in Production

This approach obviously has some limitations compared to the MVC/re-execute path approach, namely that you don't easily get model binding, content-negotiation, easy serialization, or localization (depending on your approach).

If you need any of these (e.g. maybe you serialize from MVC using PascalCase instead of camelCase), then using this approach may be more hassle than its worth. If so, then the Controller approach described is probably the sensible route to take.

If none of that is a concern for you, then the simple handler approach shown in this post may be the better option. Either way, don't try and implement your own version of the ExceptionHandlerMiddleware - use the extension points available! 🙂

Summary

In this post I described the default exception handling middleware approach for Razor Pages and for Web APIs. I highlighted a problem with the default Web API template configuration, especially if clients are expecting valid JSON, even for errors.

I then showed the suggested approach from the official documentation that uses an MVC controller to generate a ProblemDetails response for APIs. This approach works well, except if the problem was an issue with your MVC configuration itself, in which trying to execute the ErrorController will fail.

As an alternative, I showed how you could provide a custom exception handling function to the ExceptionHandlerMiddleware that is used to generate a response instead. I finally showed an example handler that serializes a ProblemDetails object to JSON, including details in the Development environment, and excluding them in other environments.

How to fix the order of commits in GitHub Pull Requests

$
0
0
How to fix the order of commits in GitHub Pull Requests

In this post I show how to ensure your commits in a GitHub pull request (PR) are in the order you expect for reviewers - i.e. the logical order of the commits to a branch, not the date order.

Warning: this post uses rebasing to rewrite the history of a Git branch. You should only ever do that to a branch if you're sure other users aren't basing their own work on it!

The setup: cleaning up a local branch using rebasing

Let's imagine you're working on a feature in a branch, and you've made several commits. In the image below, we have a branch called test based off the master branch that has 3 commits:

  • "Commit 1" is the first commit
  • "Commit 2" is the second commit
  • "Commit 3" is the *drum roll* third commit

Image of the Test branch containing three commits

At this point you've just about finished the feature, but to make things easier for your colleagues, you decide to clean-up your local branch before creating a Pull Request.

Looking at your commits, you decide that it makes sense for "Commit 3" to be the first one on the branch, coming before the others.

Likely you would do extra work here, like squashing some commits, splitting others etc. into something that makes a logical story. The example here of rearranging commits is just the simplest case. Of course, if you squash everything into a single commit, then this whole post is moot!

You can easily rearrange commits using interactive rebase by running

git rebase origin/master -i

This pops up an editor listing the current commits on the branch, and lets you rearrange, edit or squash them for example

pick 68f39b8 commit 1
pick d605e5a commit 2
pick f3b9e40 commit 3

# Rebase 82df143..d605e5a onto 82df143 (3 commands)

By rearranging the commits in the file, git will rearrange the commits in the test branch. Now it will look the following:

  • "Commit 3" is now the first commit
  • "Commit 1" is the second commit
  • "Commit 2" is the third commit

Image of the Test branch containing rearranged commits

An important point here is that while rearranging the commits changes the git history, the date associated with the commit doesn't change (on the right hand side of the image above). We'll come back to that later…

With the branch all cleaned up, it's time to push your work to the server. You push the branch to GitHub, and create a pull request for viewing by your colleagues.

I like to create pull request from the command line using the hub command line tool. I wrote about hub in a previous post.

Everything probably looks OK initially, but if you look a little closer, there's something not quite right…

The problem: GitHub doesn't preserve commit order

The problem is that the order of commits shown in the Pull Request do not reflect the actual order of the commits in the branch:

Image of a Pull Request on GitHub showing commits

The image above shows the original commit order of 1, 2, 3 instead of the revised order of 3, 1, 2. That's not very helpful, given that we specifically reordered the commits in the branch to make more sense to reviewers who are reviewing commits in sequence.

Not that GitHub displays commit in ascending order of date, whereas the gitk tool I used in the first two screenshot display commits in descending order of the branch.

This is a known issue in GitHub, with a page dedicated to it on their help pages. Unfortunately, their solution isn't entirely useful:

"If you always want to see commits in order, we recommend not using git rebase."

As someone who uses rebasing as a standard part of their workflow, that's not very helpful.

The problem is that GitHub orders the commits shown in the pull request by the author date, not by their logical position in the branch. If you think back to the image of our branch prior to pushing, you'll remember the dates on the commits didn't change when we rebased. That's what GitHub uses, and is the root of the problem.

It's worth mentioning that there are actually two dates associated with each commit: the author date, and the committer date. GitHub uses the author date to control ordering, which is not changed when you reorder commits using rebasing.

After spending a while rebasing a branch recently, only to have GitHub randomly scatter the commits in the PR, I went looking for a solution.

The solution: changing the dates on commits

The only solution I could come up with was to rewrite the commit dates to be in the same order as the commits. I looked for a few automated ways of doing this using git filter-branch and similar that I won't show here. The main problem I had was that these were too fast. The commits all ended up having the same date. That made things even worse in the pull request - now the commits were ordered completely randomly!

Instead, I opted for a slightly more manual approach. The approach I took was:

  • Interactively rebase the branch
  • Mark each commit as requiring editing
  • For each commit, edit the commit date to be the current time

In 30 seconds, a moderately sized branch can be updated to ensure all the commit dates match their position in the branch.

The first command is

git rebase origin/master -i

This starts an interactive rebase as before. For each commit in the editor that pops up, change pick to edit (before the SHA1 hash and title of the commit):

edit f3b9e40 commit 3
edit 68f39b8 commit 1
edit d605e5a commit 2

# Rebase 82df143..d605e5a onto 82df143 (3 commands)

Multi-cursor editing can really speed up this process - I use VS code as my git editor, which has built-in support for multi-cursor editing.

When you close the editor, git will start the rebase process. It will apply a single commit, and then wait, allowing you to make any changes. Rather than change any files, run the command below, which updates the dates on the commit without changing anything else:

git commit --amend --no-edit --date=now

Next, run the following command to move to the next one:

git rebase --continue

Keep running those two commands until the rebase is complete. At this point you're all done, and your commit dates should be in ascending order, nicely matching the commit order in the branch:

Image of the commits on the Test branch with updated dates to match their position on the branch

If you push this branch to the server and create a pull-request (I used --force-with-lease to push over the top of the original branch) then the commits in the pull request will now have the same order as the commits in your local branch:

Image of the commits in the pull request matching the real commit order

So the final question is: should you actually do this? As someone who frequently heavily rebases branches before creating a PR, I will. But I absolutely wouldn't recommend rebasing a branch like this if other people are (or might be) basing work of your commits. Changing the commit dates changes the SHA hash of the commit, and can be a good way to make yourself very unpopular with your colleagues!

Summary

In this post I discussed the problem that GitHub pull requests don't show commits in the order they are found in a branch. Instead, it shows them ordered by author date. If you have rebased your branch, it's possible you will have rearranged some commits, and edited others, so that the author date no longer reflects the logical order of commits. This can sometimes be confusing for reviewers, if they're viewing commits one-by-one.

To fix the problem, I restored to brute-force. I edited each commit in the branch and updated the time. By stepping through and editing each commit after performing all other rebasing, the date order now matches the logical commit order of the branch so the GitHub pull request commit order will now match the logical commit order too!

Converting a .NET Standard 2.0 library to .NET Core 3.0: Upgrading to ASP.NET Core 3.0 - Part 1

$
0
0
Converting a .NET Standard 2.0 library to .NET Core 3.0

This is the first post in a new series on upgrading from ASP.NET Core 2.x to ASP.NET Core 3.0. I'm not going to cover big topics like adding Blazor or gRPC to your apps. Instead I'm going to cover the little confusing things like how to upgrade your libraries to target ASP.NET Core 3.0, switching to use the new generic-host-based server, and using endpoint routing.

If you're starting on an upgrade from ASP.NET Core 2.x to 3.0, I strongly suggest following through the migration guide, reading my series on exploring ASP.NET Core 3.0, and checking out Rick Strahl's post on converting an app to ASP.NET Core 3.0. A recent ASP.NET community standup also walked though the bare minimum for upgrading to 3.0. That should give you a good idea of issues you're likely to run into.

In this post I describe some of the steps and issues I ran into when converting .NET Standard 2.0 class libraries to .NET Core 3.0. I'm specifically looking at converting libraries in this post.

For the purposes of this post, I'll assume you have one or more class libraries that you're in control of, and are trying to decide how to support .NET Core 3.0. I consider the following cases, separated based on your library's dependencies:

Upgrading a .NET Standard 2.0 library to .NET Core 3 - is it necessary?

The first question you have to answer is whether you even need to update your library. Unfortunately, there isn't a simple answer to this question due to some of the changes that came with .NET Core 3.0.

Specifically, .NET Core 3.0 introduces the concept of a FrameworkReference. This is similar to the Microsoft.AspNetCore.App metapackage in ASP.NET Core 2.x apps, but instead of being a NuGet package that references other NuGet packages, the framework is installed along with the .NET Core runtime.

This has implications when your class library references packages that used to exist as NuGet packages, but are now pre-installed as part of the shared framework. I'll try to work through the various combinations of target frameworks and NuGet references your library has, to give you an idea of your options around upgrading your library to work with .NET Core 3.0.

Code-only libraries

Lets start with the simplest case - you have a library that has no other dependencies.

Q: My library targets .NET Standard 2.0 only, and has no dependencies on other NuGet packages

In theory, you shouldn't need to change your library at all. .NET Core 3.0 supports .NET Standard 2.1, and by extension, it supports .NET Standard 2.0.

By continuing to target .NET Standard 2.0, you will be able to consume it in .NET Core 3.0 applications, but you'll also continue to be able to consume it in .NET Core 2.x applications, .NET Framework 4.6.1+ applications, and Xamarin apps, among others.

Q: Should I update my library to target .NET Standard 2.1?

By targeting .NET Standard 2.0, you're allowing a large number of frameworks to consume your library. Upgrading to .NET Standard 2.1 will limit that significantly. You'll no longer be able to consume the library in .NET Core 2.x, .NET Framework, Unity, or earlier Mono/Xamarin versions. So no, you shouldn't target .NET Standard 2.1 just because it's there.

That said, .NET Standard 2.1 includes a number of performance-related primitives that you may want to use in your application, as well as features such as IAsyncEnumerable<>. In order to keep the widest audience, you may want to multi-target both 2.0 and 2.1, and use conditional compilation to take advantage of the primitives on platforms that support them. If you're itching to make use of these new features, or you know your library is only going to be used on platforms that support .NET Standard 2.1 then go ahead. It should be as simple as updating the <TargetFramework> element in your .csproj file.

<Project Sdk="Microsoft.NET.Sdk">

  <PropertyGroup>
    <TargetFramework>netstandard2.1</TargetFramework>
    <LangVersion>8.0</LangVersion>
  </PropertyGroup>
</Project>

If you're upgrading to target .NET Standard 2.1 then you may as well update to use C# 8 features. .NET Framework won't support them, but as it doesn't support .NET Standard 2.1 either, that ship has already sailed!

Q: My library targets .NET Core 2.x, and has no dependencies on other NuGet packages

This scenario is essentially the same situation as the previous one. .NET Core 3.0 apps can consume any library that targets .NET Core 3.0 or below, so there's no need to update your library unless you want to. If you're targeting .NET Core 2.x you can use all the features available to the platform (which is more than is in .NET Standard 2.0). If you upgrade to .NET Core 3.0 then you obviously get access to more features again, but you won't be able to consume your library in .NET Core 2.x apps any more.

Q: My library has dependencies on other NuGet packages

Libraries with no dependencies are the easiest to deal with - generally you target the lowest version of .NET Standard you can that gives you all the features you need, and leave it at that. Things get a bit trickier when you have dependencies on other NuGet packages.

However, if your dependencies (and none of your dependencies dependencies, also known as "transitive" dependencies) are not Microsoft.AspNetCore.* or Microsoft.Extensions.* libraries then there's not much to worry about. As long as they support the framework you're trying to target, then you don't need to worry. If you are depending on the Microsoft libraries, then things are more nuanced.

Libraries that depend on Microsoft.Extensions.* NuGet packages

This is where things start to get interesting. The Microsoft.Extensions.* libraries provide generic features such as dependency injection, configuration, logging, and the generic host. Those features are all used by ASP.NET Core apps, but you can also use them without ASP.NET Core for creating all sorts of other services and console apps.

The nice thing about the Microsoft.Extensions.* libraries is they allow you to create libraries that easily hook into the .NET Core ecosystem, making it pretty simple for users to consume your libraries.

In .NET Core 3.0, the Microsoft.Extensions.* libraries all received a major version bump to 3.0.0. They also now multi-target netstandard2.0 and netcoreapp3.0. This poses an interesting question that Brad Wilson recently asked on Twitter:

In other words: Given that .NET Core 2.x apps support .NET Standard 2.0, can you use 3.0.0 Microsoft.Extensions.* libraries in .NET Core 2.x?

Yes! If you're building a console app and are still targeting .NET Core 2.x, you can, if you wish, upgrade your Microsoft.Extension.* library references to 3.0.0. Your app will still work, and you can use the latest abstractions.

OK, what if it's not just a .NET Core app, it's an ASP.NET Core 2.x app?

Well yes, but actually no

The problem is that while you can add a reference to the 3.0.0 library, in ASP.NET Core 2.x apps the core libraries also depend on the Microsoft.Extensions.* libraries. When you try and build your app you'll get an error something like the following:

C:\repos\test\test.csproj : warning NU1608: Detected package version outside of dependency constraint: Microsoft.AspNetCore.App 2.1.1 requires Microsoft.Extensions.Configuration.Abstractions (>= 2.1.1 && < 2.2.0) but version Microsoft.Extensions.Configuration.Abstractions 3.0.0 was 
resolved.
C:\repos\test.csproj : error NU1107: Version conflict detected for Microsoft.Extensions.Primitives. Install/reference Microsoft.Extensions.Primitives 3.0.0 directly to project PwnedPasswords.Sample to resolve this issue.

Trying to solve this issues is a fool's errand. Just accept that you can't use 3.0.0 extension libraries in ASP.NET Core 2.x apps.

Now lets consider the implications to your libraries that depend on the Microsoft.Extensions libraries.

Q: My library uses Microsoft.Extensions.* and will only be used in .NET Core 3.0 apps

If you're building an internal library then you may able to specify that a library is only supported on .NET Core 3.0. In that case, it makes sense to target the 3.0.0 libraries.

Q: My library uses Microsoft.Extensions.* and may be used in both .NET Core 2.x and .NET Core 3.0 apps

This is where things get interesting. In most cases, there's very few differences between the 2.x and 3.0 versions of the Microsoft.Extensions.* libraries. This is especially true if you're using one of the *.Abstractions libraries, such as Microsoft.Extensions.Configuration.Abstractions.

For example for Microsoft.Extensions.Configuration.Abstractions, between versions 2.2.0 and 3.0.0, literally a single API was added:

Comparison of Microsoft.Extensions.Configuration.Abstractions versions using fuget.org

This screenshot was taken from the excellent https://fuget.org using the API diff feature!

That stability means that it may be be possible for you your library to keep targeting the 2.x versions of the libraries. When used in an ASP.NET Core 2.x app, the 2.x.x libraries will be used, just as before. However, when you reference your library in an ASP.NET Core 3.0, the 2.x dependencies of your library will be automatically upgraded to the 3.0.0 versions due to the NuGet package resolution rules.

In general that automatic upgrading is something you want to avoid, as a bump in a major version means breaking changes. You can't guarantee that code compiled against one version of a dependency will run correctly when used against a different major version of the dependency.

However, we've already established that the 3.0.0 version of the libraries are virtually the same, so there's nothing to worry about! To convince you further that this is actually OK, this is the approach used by Serilog's Microsoft.Extensions.Logging integration package. The package keeps targets .NET Standard 2.0 and references the 2.0.0 version of Microsoft.Extensions.Logging, but can happily be used in ASP.NET Core 3.0 apps:

<Project Sdk="Microsoft.NET.Sdk">

  <PropertyGroup>
    <TargetFrameworks>netstandard2.0</TargetFrameworks>
  </PropertyGroup>

  <ItemGroup>
    <PackageReference Include="Serilog" Version="2.8.0" />
    <PackageReference Include="Microsoft.Extensions.Logging" Version="2.0.0" />
  </ItemGroup>

</Project>

It's worth pointing out that for .NET Framework targets, you'll need to use binding redirects for the Microsoft.Extensions.* libraries. This is apparently a real pain if you're building a PowerShell module!

Unfortunately, this might not always work for you…

Q: My library uses Microsoft.Extensions.* and needs to use different versions of those libraries when using in .NET Core 2.x vs 3.0

Not all of the library changes are safe to be silently upgraded in this way. For example, consider the Microsoft.Extensions.Options library. In 3.0.0, the Add, Get and Remove methods were removed from OptionsWrapper<>. If you use these methods in your library, then consuming apps running on ASP.NET Core 3.0 will get a MethodNotFoundException at runtime. Not good!

The above example is a bit contrived (it's unlikely you're using OptionsWrapper<> in your libraries), but I've run into this issue a lot when using the IdentityModel library. You have to be very careful to reference the same major version of this library in all your dependencies, otherwise you're likely to get MethodNotFoundExceptions at runtime.

The issue you're likely to see with IdentityModel after upgrading to .NET Core 3.0 is for the CryptoRandom.CreateUniqueId() method. As you can see in the fuget.org comparison below, the default parameters for the method have changed in version 4.0.0. That avoids compile-time breaking changes, but gives a runtime breaking change instead!

The breaking change to IdentityModel moving from 3.10.10 to 4.0.0

So how can you handle this? The best answer I've found is to multi-target .NET Standard 2.0 and .NET Core 3.0, and conditionally include the correct version of your library using MSBuild conditions.

<Project Sdk="Microsoft.NET.Sdk">

  <PropertyGroup>
    <TargetFrameworks>netstandard2.0;netcoreapp3.0</TargetFrameworks>
  </PropertyGroup>

  <ItemGroup Condition="'$(TargetFramework)' == 'netcoreapp3.0'">
    <PackageReference Include="Microsoft.Extensions.Options" Version="3.0.0" />
    <PackageReference Include="IdentityModel" Version="4.0.0" />
  </ItemGroup>

  <ItemGroup Condition="'$(TargetFramework)' != 'netcoreapp3.0'">
    <PackageReference Include="Microsoft.Extensions.Options" Version="2.2.0" />
    <PackageReference Include="IdentityModel" Version="3.10.10" />
  </ItemGroup>

</Project>

In the above example, I've shown a library that depends on both Microsoft.Extensions.Options and IdentityModel. Even though technically the latest versions of both of these packages support .NET Standard 2.0, the differences are nuanced, as I've discussed.

When an ASP.NET Core 2.x app depends on the library above, it will use the 2.2.0 version of the *.Options library, and the 3.10.10 version of IdentityModel. When an ASP.NET Core 3.0 app depends on the library above, it will use the 3.0.0 version of the *.Options library, and the 4.0.0 version of IdentityModel.

The main downside to this approach is the increased complexity in tooling. You may need to add #ifdefs around your code to cater to the different target frameworks and libraries. You may also need extra tests. Generally speaking though, this approach is probably the "safest".

There is a scenario I haven't addressed here - if you're running a .NET Core 2.x app (non-ASP.NET Core) and are using the 3.0.0 version Microsoft.Extensions.* libraries (or 4.0.0 version of IdentityModel), and are consuming an app built using the approach shown above. In this case it all falls down. The netstandard2.0 version of the library will be selected, and you could be back in MethodNotFound land. 🙁 Luckily, that seems like a pretty niche and generally unsupported scenario…

Patient saying 'Doc, it hurts when I touch my shoulder'. Doctor saying 'Then don't touch it'

Libraries that depend on ASP.NET Core NuGet packages

This brings us to the final section: libraries that depend on ASP.NET Core-specific libraries. That includes pretty much any library that starts Microsoft.AspNetCore.* (see the migration guide for a complete list). These NuGet packages are no longer being produced and pushed to https://nuget.org, so you can't reference them!

Instead, these are installed as part of the ASP.NET Core 3.0 shared framework. Instead of referencing individual packages, you use a <FrameworkReference> element. This makes all of the APIs in ASP.NET Core 3.0 available. A nice feature of the <FrameworkReference> is that it doesn't need to copy any extra libraries to your app's output folder. MSBuild knows those APIs will be available when the app is executed, so you get a nicely trimmed output.

Not all of the libraries that were in the Microsoft.AspNetCore.App meta package have been moved to the framework. The packages listed in this section of the migration document do still need to be referenced directly, in addition (or instead of) the <FrameworkReference> element. This includes things like EF Core, JSON.NET MVC support, and the Identity UI.

Q: My library only needs to target ASP.NET Core 3.0

This is the simplest scenario, as described in this StackOverflow question - you have a library that uses ASP.NET Core specific features, and you want to upgrade it from 2.x to 3.0.

The solution, as described above, is to remove the obsolete packages, and use a FrameworkReference instead:

<Project Sdk="Microsoft.NET.Sdk">

  <PropertyGroup>
    <TargetFramework>netcoreapp3.0</TargetFramework>
  </PropertyGroup>

  <ItemGroup>
    <FrameworkReference Include="Microsoft.AspNetCore.App" />
  </ItemGroup>

</Project>

This is actually pretty nice for libraries. All the ASP.NET Core APIs are available to IntelliSense, and you don't have to worry about trying to hunt down the APIs you need in individual packages.

Where things get more complicated again is if you need to support .NET Core 2.x as well.

Q: My library needs to support both ASP.NET Core 2.x and ASP.NET Core 3.0

The only real way to handle this scenario is with the multi-targeting approach we used previously for the Microsoft.Extensions.* (and IdentityModel) libraries. Continue to target .NET Standard 2.0 (to support .NET Core 2.x and .NET Framework 4.6.1+) and also target .NET Core 3.0. Conditionally include either the individual packages for ASP.NET Core 2.x, or the Framework Reference for ASP.NET Core 3.0:

<Project Sdk="Microsoft.NET.Sdk">

  <PropertyGroup>
    <TargetFrameworks>netstandard2.0;netcoreapp3.0</TargetFrameworks>
  </PropertyGroup>

  <ItemGroup Condition="'$(TargetFramework)' == 'netcoreapp3.0'">
    <FrameworkReference Include="Microsoft.AspNetCore.App" />
  </ItemGroup>

  <ItemGroup Condition=" '$(TargetFramework)' != 'netcoreapp3.0'">
    <PackageReference Include="Microsoft.AspNetCore.Mvc.Cors" Version="2.1.3" />
    <PackageReference Include="Microsoft.AspNetCore.Mvc.Formatters.Json" Version="2.1.3" />
    <PackageReference Include="Microsoft.Extensions.Configuration" Version="2.1.1" />
  </ItemGroup>

</Project>

That pretty much covers all the scenarios you should run into. Supporting older versions of the libraries is frustratingly complex, so whether the pay off is worth it, is up to you. But with ASP.NET Core 2.1 being an LTS release for .NET Core (and being supported "forever" on .NET Framework), I suspect many people will be stuck in this situation for a while.

Rather than targeting .NET Standard 2.0, you can also explicitly target .NET Core 2.1 and .NET Framework 4.6.1 as Damian Edwards does in his TagHelperPack. The end result is pretty much the same.

Summary

In this post I tried to break down all the different approaches to upgrading your libraries to support .NET Core 3.0, based on their dependencies. If you don't have any dependencies, or they're isolated from the ASP.NET Core/Microsoft.Extensions.* ecosystem, then you shouldn't have any problems upgrading. If you have Microsoft.Extensions.* dependencies, then you may get away without upgrading your package references, but you might have to conditionally include libraries based on target framework. If you have ASP.NET Core dependencies and need to support for 2.x and 3.0 then you'll almost certainly need to add MSBuild conditionals to your .csproj files.

IHostingEnvironment vs IHostEnvironment - obsolete types in .NET Core 3.0: Upgrading to ASP.NET Core 3.0 - Part 2

$
0
0
IHostingEnvironment vs IHostEnvironment - obsolete types in .NET Core 3.0

In this post I describe the differences between various ASP.NET Core types that have been marked as obsolete in .NET Core 3.0. I describe why things have changed, where the replacement types are, and when you should use them.

ASP.NET Core merges with the generic host

ASP.NET Core 2.1 introduced the GenericHost as a way of building non-HTTP apps using the Microsoft.Extensions.* primitives for configuration, dependency injection, and logging. While this was a really nice idea, the hosting abstractions introduced were fundamentally incompatible with the HTTP hosting infrastructure used by ASP.NET Core. This led to various namespace clashes and incompatibilities that mostly caused me to avoid using the generic host.

In ASP.NET Core 3.0 a big effort went into converting the web hosting infrastructure to be compatible with the generic host. Instead of having duplicate abstractions - one for ASP.NET Core and one for the generic host - the ASP.NET Core web hosting infrastructure could run on top of the generic host as an IHostedService.

This isn't the whole story though. ASP.NET Core 3 doesn't force you to convert to the new generic-host-based infrastructure immediately when upgrading from 2.x to 3.0. You can continue to use the WebHostBuilder instead of HostBuilder if you wish. The migration documentation implies it's required, but in reality it's optional at this stage if you need or want to keep using it for some reason.

I'd suggest converting to HostBuilder as part of your upgrade if possible. I suspect the WebHostBuilder will be removed completely at some point, even though it hasn't been marked [Obsolete] yet.

As part of the re-platforming on top of the generic host, some of the types that were duplicated previously have been marked obsolete, and new types have been introduced. The best example of this is IHostingEnvironment.

IHostingEnvironment vs IHostEnvironment vs IWebHostEnviornment

IHostingEnvironment is one of the most annoying interfaces in .NET Core 2.x, because it exists in two different namespaces, Microsoft.AspNetCore.Hosting and Microsoft.Extensions.Hosting. These are slightly different and are incompatible - one does not inherit from the other.

namespace Microsoft.AspNetCore.Hosting
{
    public interface IHostingEnvironment
    {
        string EnvironmentName { get; set; }
        string ApplicationName { get; set; }
        string WebRootPath { get; set; }
        IFileProvider WebRootFileProvider { get; set; }
        string ContentRootPath { get; set; }
        IFileProvider ContentRootFileProvider { get; set; }
    }
}

namespace Microsoft.Extensions.Hosting
{
    public interface IHostingEnvironment
    {
        string EnvironmentName { get; set; }
        string ApplicationName { get; set; }
        string ContentRootPath { get; set; }
        IFileProvider ContentRootFileProvider { get; set; }
    }
}

The reason there are two is basically historical - the AspNetCore version existed, and the Extensions version was introduced with the generic host in ASP.NET Core 2.1. The Extensions version has no notion of the wwwroot folder for serving static files (as it's for hosting non-HTTP services), so it lacks the WebRootFileProvider and WebRootPath properties.

A separate abstraction was necessary for backwards-compatibility reasons. But one of the really annoying consequences of this was the inability to write extension methods that worked for both the generic-host and for ASP.NET Core.

In ASP.NET Core 3.0, both of these interfaces are marked obsolete. You can still use them, but you'll get warnings at build time. Instead, two new interfaces have been introduced: IHostEnvironment and IWebHostEnvironment. While they are still in separate namespaces, they now have different names, and one inherits from the other!

namespace Microsoft.Extensions.Hosting
{
    public interface IHostEnvironment
    {
        string EnvironmentName { get; set; }
        string ApplicationName { get; set; }
        string ContentRootPath { get; set; }
        IFileProvider ContentRootFileProvider { get; set; }
    }
}

namespace Microsoft.AspNetCore.Hosting
{
    public interface IWebHostEnvironment : IHostEnvironment
    {
        string WebRootPath { get; set; }
        IFileProvider WebRootFileProvider { get; set; }
    }
}

This hierarchy makes much more sense, avoids duplication, and means methods that can accept the generic-host version of the host environment abstraction (IHostEnvironment) will now work with the web version too (IWebHostEnvironment). Under the hood, the implementations of IHostEnvironment and IWebHostEnvironment are still the same - they just implement the new interfaces in addition to the old ones. For example, the ASP.NET Core implementation:

namespace Microsoft.AspNetCore.Hosting
{
    internal class HostingEnvironment : IHostingEnvironment, Extensions.Hosting.IHostingEnvironment, IWebHostEnvironment
    {
        public string EnvironmentName { get; set; } = Extensions.Hosting.Environments.Production;
        public string ApplicationName { get; set; }
        public string WebRootPath { get; set; }
        public IFileProvider WebRootFileProvider { get; set; }
        public string ContentRootPath { get; set; }
        public IFileProvider ContentRootFileProvider { get; set; }
    }
}

So which interface should you use? The short answer is "use IHostEnvironment wherever possible", but the details may vary…

If you're building ASP.NET Core 3.0 apps

Use IHostEnvironment where possible, and use IWebHostEnvironment when you need access to the WebRootPath or WebRootFileProvider properties.

If you're building a library to be used with the generic host and .NET Core 3.0

Use IHostEnvironment. Your library will still work with ASP.NET Core 3.0 apps.

If you're building a library to be used with ASP.NET Core 3.0 apps

As before, it's best to use IHostEnvironment as then your library can potentially be used by other generic host applications, not just ASP.NET Core applications. However, if you need access to the extra properties on IWebHostEnvironment then you'll have to update your library to target netcoreapp3.0 instead of netstandard2.0 and add a <FrameworkReference> element, as described in my previous post.

If you're building a library to be used with both ASP.NET Core 2.x and 3.0

This is a pain. You basically have two choices:

  • Continue to use the Microsoft.AspNetCore version of IHostingEnvironment. It will work in both 2.x and 3.0 apps without any issues, you'll just likely have to stop using it in later versions.
  • Use #ifdef to conditionally compile using the IHostEnvironment in ASP.NET Core 3.0 and IHostingEnvironment in ASP.NET Core 2.0.

IApplicationLifetime vs IHostApplicationLifetime

A very similar issue of namespace clashes is present for the IApplicationLifetime interface. As with the previous example, this exists in both Microsoft.Extensions.Hosting and Microsoft.AspNetCore.Hosting. In this case however, the interface in both cases is identical:

// identical to Microsoft.AspNetCore.Hosting definition
namespace Microsoft.Extensions.Hosting
{
    public interface IApplicationLifetime
    {
        CancellationToken ApplicationStarted { get; }
        CancellationToken ApplicationStopped { get; }
        CancellationToken ApplicationStopping { get; }
        void StopApplication();
    }
}

As you might expect by now, this duplication was a symptom of backwards-compatibility. .NET Core 3.0 introduces a new interface, IHostApplicationLifetime that is defined only in the Microsoft.Extensions.Hosting namespace, but is available both in the generic host and ASP.NET Core apps:

namespace Microsoft.Extensions.Hosting
{
    public interface IHostApplicationLifetime
    {
        CancellationToken ApplicationStarted { get; }
        CancellationToken ApplicationStopping { get; }
        CancellationToken ApplicationStopped { get; }
        void StopApplication();
    }
}

Again, this interface is identical to the previous version, and the .NET Core 3.0 implementation implements both versions as ApplicationLifetime. As I discussed in my previous post on the startup process, the ApplicationLifetime type plays a key role in generic-host startup and shutdown. Interestingly, there is no real equivalent in Microsoft.AspNetCore.Hosting - the Extensions version handles it all. The only implementation in the AspNetCore namespace is a simple wrapper type that delegates to the ApplicationLifetime added as part of the generic host:

namespace Microsoft.AspNetCore.Hosting
{
    internal class GenericWebHostApplicationLifetime : IApplicationLifetime
    {
        private readonly IHostApplicationLifetime _applicationLifetime;
        public GenericWebHostApplicationLifetime(IHostApplicationLifetime applicationLifetime)
        {
            _applicationLifetime = applicationLifetime;
        }

        public CancellationToken ApplicationStarted => _applicationLifetime.ApplicationStarted;
        public CancellationToken ApplicationStopping => _applicationLifetime.ApplicationStopping;
        public CancellationToken ApplicationStopped => _applicationLifetime.ApplicationStopped;
        public void StopApplication() => _applicationLifetime.StopApplication();
    }
}

The decision of which interface to use is, thankfully, much easier for application lifetime rather than hosting environment:

If you're building .NET Core 3.0, or ASP.NET Core 3.0 apps or libraries

Use IHostApplicationLifetime. It only requires a reference to Microsoft.Extensions.Hosting.Abstractions, and is usable in all applications

If you're building a library to be used with both ASP.NET Core 2.x and 3.0

Now you're stuck again:

  • Use the Microsoft.Extensions version of IApplicationLifetime. It will work in both 2.x and 3.0 apps without any issues, you'll just likely have to stop using it in later versions.
  • Use #ifdef to conditionally compile using the IHostApplicationLifetime in ASP.NET Core 3.0 and IApplicationLifetime in ASP.NET Core 2.0.

Luckily IApplicationLifetime is generally used much less often than IHostingEnvironment, so you probably won't have too much difficulty with this one.

IWebHost vs IHost

One thing that may surprise you is that the IWebHost interface hasn't been updated to inherit from IHost in ASP.NET Core 3.0. Similarly IWebHostBuilder doesn't inherit from IHostBulider. They are still completely separate interfaces - one for ASP.NET Core, and one for the generic host.

Luckily, that doesn't matter. Now that ASP.NET Core 3.0 has been rebuilt to use the generic host abstractions, you get the best of both worlds. You can write methods that use the generic host IHostBuilder abstractions and share them between your ASP.NET Core and generic host apps. If you need to do something ASP.NET Core specific, you can still use the IWebHostBuilder interface.

For example, consider the two extension methods below, one for IHostBuilder, and one for IWebHostBuilder:

public static class ExampleExtensions
{
    public static IHostBuilder DoSomethingGeneric(this IHostBuilder builder)
    {
        // ... add generic host configuration
        return builder;
    }

    public static IWebHostBuilder DoSomethingWeb(this IWebHostBuilder builder)
    {
        // ... add web host configuration
        return builder;
    }
}

One of the methods does some sort of configuration on the generic host (maybe it registers some services with DI for example), and the other does some configuration on the IWebHostBuilder. Perhaps it sets some defaults for the Kestrel server for example.

If you create a brand-new ASP.NET Core 3.0 application, your Program.cs will look something like this:

public class Program
{
    public static void Main(string[] args) => CreateHostBuilder(args).Build().Run();

    public static IHostBuilder CreateHostBuilder(string[] args) =>
        Host.CreateDefaultBuilder(args)
            .ConfigureWebHostDefaults(webBuilder =>
            {
                webBuilder
                    .UseStartup<Startup>();
            });
}

You can add calls to both your extension methods by adding one call on the generic IHostBuilder, and the other inside ConfigureWebHostDefaults(), on the IWebHostBuilder:

public class Program
{
    public static void Main(string[] args) => CreateHostBuilder(args).Build().Run();

    public static IHostBuilder CreateHostBuilder(string[] args) =>
        Host.CreateDefaultBuilder(args)
            .DoSomethingGeneric() // IHostBuilder extension method
            .ConfigureWebHostDefaults(webBuilder =>
            {
                webBuilder
                    .DoSomethingWeb() // IWebHostBuilder extension method
                    .UseStartup<Startup>();
            });
}

The fact you can make calls on both builder types in ASP.NET Core 3.0 means you can now build libraries that rely solely on generic-host abstractions, and can reuse them in ASP.NET Core apps. You can then layer on the ASP.NET Core-specific behaviour on top, without having to duplicate methods like you did in 2.x.

Summary

In this post I discussed some of the types that have been made obsolete in ASP.NET Core 3.0, where they've moved to, and why. If you're updating an application to ASP.NET Core 3.0 you don't have to replace them, as they will still behave the same for now. But they'll be replaced in a future version, so it makes sense to update them if you can. In some cases it also makes it easier to share code between your apps, so it's worth looking in to.

Avoiding Startup service injection in ASP.NET Core 3: Upgrading to ASP.NET Core 3.0 - Part 3

$
0
0
Avoiding Startup service injection in ASP.NET Core 3

In this post I describe one of the changes to Startup when moving from an ASP.NET Core 2.x app to .NET Core 3; you can not longer inject arbitrary services into the Startup constructor.

Migrating to the generic host in ASP.NET Core 3.0

In .NET Core 3.0 the ASP.NET Core 3.0 hosting infrastructure has been redesigned to build on top of the generic host infrastructure, instead of running in parallel to it. But what does that mean for the average developer that has an ASP.NET Core 2.x app, and wants to update to 3.0? I've migrated several apps at this stage, and it's gone pretty smoothly so far. The migration guide document does a good job of walking you through the required steps, so I strongly suggest working your way through that document.

For the most part I only had to address two issues:

  • The canonical way to configure middleware in ASP.NET Core 3.0 is to use endpoint routing
  • The generic host does not allow injecting services into the Startup class.

The first point has been pretty well publicised. Endpoint routing was introduced in ASP.NET Core 2.2, but was restricted to MVC only. In ASP.NET Core 3.0, endpoint routing is the suggested approach for terminal middleware (also called "endpoints") as it provides a few benefits. Most importantly, it allows middleware to know which endpoint will ultimately be executed, and can retrieve metadata about that endpoint. This allows you to apply authorization to health check endpoints for example.

Endpoint routing is very particular about the order of middleware. I suggest reading this section of the migration document carefully when upgrading your apps. In a later post I'll show how to convert a terminal middleware to an endpoint.

The second point, injecting services into the Startup class has been mentioned, but it's not been very highly publicised. I'm not sure if that's because not many people are doing it, or because in many cases it's easy to work around. In this post I'll show the problem, and some ways to handle it.

Injecting services into Startup in ASP.NET Core 2.x

A little known feature in ASP.NET core 2.x was that you could partially configure your dependency injection container in Program.cs, and inject the configured classes into Startup.cs. I used this approach to configure strongly typed settings, and then use those settings when configuring the remainder of the dependency injection container.

Lets take the following ASP.NET Core 2.x example:

 public class Program
{
    public static void Main(string[] args)
    {
        CreateWebHostBuilder(args).Build().Run();
    }

    public static IWebHostBuilder CreateWebHostBuilder(string[] args) =>
        WebHost.CreateDefaultBuilder(args)
            .UseStartup<Startup>()
            .ConfigureSettings(); // <- Configure services we'll inject into Startup later
}

Notice the ConfigureSettings() call in CreateWebHostBuilder? That's an extension method that I use to configure the application's strongly-typed settings. For example:

public static class SettingsinstallerExtensions
{
    public static IWebHostBuilder ConfigureSettings(this IWebHostBuilder builder)
    {
        return builder.ConfigureServices((context, services) =>
        {
            var config = context.Configuration;

            services.Configure<ConnectionStrings>(config.GetSection("ConnectionStrings"));
            services.AddSingleton<ConnectionStrings>(
                ctx => ctx.GetService<IOptions<ConnectionStrings>>().Value)
        });
    }
}

So the ConfigureSettings() method calls ConfigureServices() on the IWebHostBuilder instance, and configures some settings. As these services are configured in the DI container before Startup is instantiated, they can be injected into the Startup constructor:

public static class Startup
{
    public class Startup
    {
        public Startup(
            IConfiguration configuration, 
            ConnectionStrings ConnectionStrings) // Inject pre-configured service
        {
            Configuration = configuration;
            ConnectionStrings = ConnectionStrings;
        }

        public IConfiguration Configuration { get; }
        public ConnectionStrings ConnectionStrings { get; }

        public void ConfigureServices(IServiceCollection services)
        {
            services.AddControllers();

            // Use ConnectionStrings in configuration
            services.AddDbContext<BloggingContext>(options =>
                options.UseSqlServer(ConnectionStrings.BloggingDatabase));
        }

        public void Configure(IApplicationBuilder app)
        {

        }
    }
}

I found this pattern useful when I wanted to use strongly-typed configuration objects inside ConfigureServices for configuring other services. In the example above the ConnectionStrings object is a strongly-typed settings object, and the properties are validated on startup to ensure they're not null (indicating a configuration error). It's not a fundamental technique, but it's proven handy.

However if you try and take this approach after you switch to using the generic host in ASP.NET Core 3.0, you'll get an error at runtime:

Unhandled exception. System.InvalidOperationException: Unable to resolve service for type 'ExampleProject.ConnectionStrings' while attempting to activate 'ExampleProject.Startup'.
   at Microsoft.Extensions.DependencyInjection.ActivatorUtilities.ConstructorMatcher.CreateInstance(IServiceProvider provider)
   at Microsoft.Extensions.DependencyInjection.ActivatorUtilities.CreateInstance(IServiceProvider provider, Type instanceType, Object[] parameters)
   at Microsoft.AspNetCore.Hosting.GenericWebHostBuilder.UseStartup(Type startupType, HostBuilderContext context, IServiceCollection services)
   at Microsoft.AspNetCore.Hosting.GenericWebHostBuilder.<>c__DisplayClass12_0.<UseStartup>b__0(HostBuilderContext context, IServiceCollection services)
   at Microsoft.Extensions.Hosting.HostBuilder.CreateServiceProvider()
   at Microsoft.Extensions.Hosting.HostBuilder.Build()
   at ExampleProject.Program.Main(String[] args) in C:\repos\ExampleProject\Program.cs:line 21

This approach is no longer supported in ASP.NET Core 3.0. You can inject IHostEnvironment and IConfiguration into the Startup constructor, but that's it. And for a good reason - the previous approach has several issues, as I'll describe below.

Note that you can actually keep using this approach if you stick to using IWebHostBuilder in ASP.NET Core 3.0, instead of the new generic host. I strongly suggest you don't though, and attempt to migrate where possible!

Two singletons?

The fundamental problem with injecting services into Startup is that it requires building the dependency injection container twice. In the example shown previously ASP.NET Core knows you need an ConnectionStrings object, but the only way for it to know how to create one is to build an IServiceProvider based on the "partial" configuration (that we supplied in the ConfigureSettings() extension method).

But why is this a problem? The problem is that the service provider is a temporary "root" service provider. It creates the services and injects them into Startup. The remainder of the dependency injection container configuration then runs as part of ConfigureServices, and the temporary service provider is thrown away. A new service provider is then created which now contains the "full" configuration for the application.

The upshot of this is that even if a service is configured with a Singleton lifetime, it will be created twice:

  • Once using the "partial" service provider, to inject into Startup
  • Once using the "full" service provider, for use more generally in the application

For my use case, strongly typed settings, that really didn't matter. It's not essential that there's only one instance of the settings, it's just preferable. But that might not always be the case. This "leaking" of services seems to be the main reason for changing the behaviour with the generic host - it makes things safer.

But what if I need the service inside ConfigureServices?

Knowing that you can't do this anymore is one thing, but you also need to work around it! One use case for injecting services into Startup is to be able to conditionally control how you register other services in Startup.ConfigureServices. For example, the following is a very rudimentary example:

public class Startup
{
    public Startup(IdentitySettings identitySettings)
    {
        IdentitySettings = identitySettings;
    }

    public IdentitySettings IdentitySettings { get; }

    public void ConfigureServices(IServiceCollection services)
    {
        if(IdentitySettings.UseFakeIdentity)
        {
            services.AddScoped<IIdentityService, FakeIdentityService>();
        }
        else
        {
            services.AddScoped<IIdentityService, RealIdentityService>();
        }
    }

    public void Configure(IApplicationBuilder app)
    {
        // ...
    }
}

This (obviously contrived) example checks a boolean property on the injected IdentitySettings to decide which IIdentityService implementation to register: either the Fake service or the Real service.

This approach, which requires injecting IdentitySettings, can be made compatible with the generic host by converting the static service registrations to use a factory function instead. For example:

public class Startup
{
    public Startup(IConfiguration configuration)
    {
        Configuration = configuration;
    }

    public IConfiguration Configuration { get; }

    public void ConfigureServices(IServiceCollection services)
    {
        // configure the IdentitySettings for the DI container
        services.Configure<IdentitySettings>(Configuration.GetSection("Identity")); 

        // Register the implementations using their implementation name
        services.AddScoped<FakeIdentityService>();
        services.AddScoped<RealIdentityService>();

        // Retrieve the IdentitySettings at runtime, and return the correct implementation
        services.AddScoped<IIdentityService>(ctx => 
        {
            var identitySettings = ctx.GetRequiredService<IdentitySettings>();
            return identitySettings.UseFakeIdentity
                ? ctx.GetRequiredService<FakeIdentityService>()
                : ctx.GetRequiredService<RealIdentityService>();
            }
        });
    }

    public void Configure(IApplicationBuilder app)
    {
        // ...
    }
}

This approach is obviously a lot more complicated than the previous version, but it's at least compatible with the generic host!

In reality, if it's only strongly typed settings that are needed (as in this case), then this approach is somewhat overkill. Instead, I'd probably just "rebind" the settings instead:

public class Startup
{
    public Startup(IConfiguration configuration)
    {
        Configuration = configuration;
    }

    public IConfiguration Configuration { get; }

    public void ConfigureServices(IServiceCollection services)
    {
        // configure the IdentitySettings for the DI container
        services.Configure<IdentitySettings>(Configuration.GetSection("Identity")); 

        // "recreate" the strongly typed settings and manually bind them
        var identitySettings = new IdentitySettings();
        Configuration.GetSection("Identity").Bind(identitySettings)

        // conditionally register the correct service
        if(identitySettings.UseFakeIdentity)
        {
            services.AddScoped<IIdentityService, FakeIdentityService>();
        }
        else
        {
            services.AddScoped<IIdentityService, RealIdentityService>();
        }
    }

    public void Configure(IApplicationBuilder app)
    {
        // ...
    }
}

Alternatively, I might not bother with the strongly-typed aspect at all, especially if the required setting is a string. That's the approach used in the default .NET Core templates for configuring ASP.NET Core identity - the connection string is retrieved directly from the IConfiguration instance:

public class Startup
{
    public Startup(IConfiguration configuration)
    {
        Configuration = configuration;
    }

    public IConfiguration Configuration { get; }

    public void ConfigureServices(IServiceCollection services)
    {
        // configure the ConnectionStrings for the DI container
        services.Configure<ConnectionStrings>(Configuration.GetSection("ConnectionStrings")); 

        // directly retrieve setting instead of using strongly-typed options
        var connectionString = Configuration["ConnectionString:BloggingDatabase"];

        services.AddDbContext<ApplicationDbContext>(options =>
                options.UseSqlite(connectionString));
    }

    public void Configure(IApplicationBuilder app)
    {
        // ...
    }
}

These approaches aren't the nicest, but they get the job done, and they will probably be fine for most cases. If you didn't know about the Startup injection feature, then you're probably using one of these approaches already anyway!

Sometimes I was injecting services into Startup to configure other strongly typed option objects. For these cases there's a better approach, using IConfigureOptions.

Using IConfigureOptions to configure options for IdentityServer

A common case where I used injected settings was in configuring IdentityServer authentication, as described in their documentation:

public class Startup
{
    public Startup(IdentitySettings identitySettings)
    {
        IdentitySettings = identitySettings;
    }

    public IdentitySettings IdentitySettings { get; }

    public void ConfigureServices(IServiceCollection services)
    {
        // Configure IdentityServer Auth
        services
            .AddAuthentication(IdentityServerAuthenticationDefaults.AuthenticationScheme)
            .AddIdentityServerAuthentication(options =>
            {
                // Configure the authentication handler settings using strongly typed options
                options.Authority = identitySettings.ServerFullPath;
                options.ApiName = identitySettings.ApiName;
            });
    }

    public void Configure(IApplicationBuilder app)
    {
        // ...
    }
}

In this example, the base-address of our IdentityServer instance and the name of the API resource are set based on the strongly typed configuration object, IdentitySettings. This setup doesn't work in .NET Core 3.0, so we need an alternative. We could re-bind the strongly-typed configuration as I showed previously. Or we could use the IConfiguration object directly to retrieve the settings.

A third option involves looking under the hood of the AddIdentityServerAuthentication method, and making use of IConfigureOptions.

As it turns out, the AddIdentityServerAuthentication() method does a few different things. Primarily, it configures JWT bearer authentication, and configures some strongly-typed settings for the specified authentication scheme (IdentityServerAuthenticationDefaults.AuthenticationScheme). We can use that fact to delay configuring the named options and use an IConfigureOptions instance instead.

The IConfigureOptions interface allows you to "late-configure" a strongly-typed options object using other dependencies from the service provider. For example, if to configure my TestSettings I needed to call a method on TestService, I could create an IConfigureOptions implementation like the following:

public class MyTestSettingsConfigureOptions : IConfigureOptions<TestSettings>
{
    private readonly TestService _testService;
    public MyTestSettingsConfigureOptions(TestService testService)
    {
        _testService = testService;
    }

    public void Configure(TestSettings options)
    {
        options.MyTestValue = _testService.GetValue();
    }
}

The TestService and IConfigureOptions<TestSettings> are configured in DI at the same time inside Startup.ConfigureServices:

public void ConfigureServices(IServiceCollection services)
{
    services.AddScoped<TestService>();
    services.ConfigureOptions<MyTestSettingsConfigureOptions>();
}

The important point is you can use standard constructor dependency injection with IOptions<TestSettings>. There's no need to "partially build" the service provider inside ConfigureServices just to configure the TestSettings. Instead we register the intent to configure TestSettings, and delay the configuration until the settings object is required.

So how does this help us configuring IdentityServer?

The AddIdentityServerAuthentication uses a variant of strongly-typed settings called named options (I've discussed these several times before). They're most commonly used for configuring authentication, as they are in this example.

To cut a long story short, you can use the IConfigureOptions approach to delay configuring the named options IdentityServerAuthenticationOptions used by the authentication handler until after we've already configured the strongly-typed IdentitySettings object. So you can create an ConfigureIdentityServerOptions object that takes the IdentitySettings as a constructor parameter:

public class ConfigureIdentityServerOptions : IConfigureNamedOptions<IdentityServerAuthenticationOptions>
{
    readonly IdentitySettings _identitySettings;
    public ConfigureIdentityServerOptions(IdentitySettings identitySettings)
    {
        _identitySettings = identitySettings;
        _hostingEnvironment = hostingEnvironment;
    }

    public void Configure(string name, IdentityServerAuthenticationOptions options)
    { 
        // Only configure the options if this is the correct instance
        if (name == IdentityServerAuthenticationDefaults.AuthenticationScheme)
        {
            // Use the values from strongly-typed IdentitySettings object
            options.Authority = _identitySettings.ServerFullPath; 
            options.ApiName = _identitySettings.ApiName;
        }
    }

    // This won't be called, but is required for the IConfigureNamedOptions interface
    public void Configure(IdentityServerAuthenticationOptions options) => Configure(Options.DefaultName, options);
}

In Startup.cs you configure the strongly-typed IdentitySettings object, add the required IdentityServer services, and register the ConfigureIdentityServerOptions class so that it can configure the IdentityServerAuthenticationOptions when required:

public void ConfigureServices(IServiceCollection services)
{
    // Configure strongly-typed IdentitySettings object
    services.Configure<IdentitySettings>(Configuration.GetSection("Identity"));

    // Configure IdentityServer Auth
    services
        .AddAuthentication(IdentityServerAuthenticationDefaults.AuthenticationScheme)
        .AddIdentityServerAuthentication();

    // Add the extra configuration;
    services.ConfigureOptions<ConfigureIdentityServerOptions>();
}

No need to inject anything into Startup, but you still get the benefits of strongly-typed settings. Win-win!

Summary

In this post I described some of the changes you may need to make to Startup.cs when upgrading to ASP.NET Core 3.0. I described the problem in ASP.NET Core 2.x with injecting services into your Startup class, and how this feature has been removed in ASP.NET Core 3.0. I then showed how to work around some of the reasons that you may have been using this approach in the first place.

When ASP.NET Core can't find your controller: debugging application parts

$
0
0
When ASP.NET Core can't find your controller: debugging application parts

In this post I describe application parts and how ASP.NET Core uses them to find the controllers in your app. I then show how you can retrieve the list at runtime for debugging purposes.

Debugging a missing controller

A while ago I was converting an ASP.NET application to ASP.NET Core. The solution had many class library projects, where each project represented a module or vertical slice of the application. These modules contained everything for that feature: the database code, the domain, and the Web API controllers. There was then a "top level" application that referenced all these modules and served the requests.

As the whole solution was based on Katana/Owin and used Web API controllers exclusively, it wasn't too hard to convert it to ASP.NET Core. But, of course, there were bugs in the conversion process. One thing that had me stumped for a while was why the controllers from some of the modules didn't seem to be working. All of the requests to certain modules were returning 404s.

There were a few possibilities in my mind for what was going wrong:

  1. There was a routing issue, so requests meant for the controllers were not reaching them
  2. There was a problem with the controllers themselves, meaning they were generating 404s
  3. The ASP.NET Core app wasn't aware of the controllers in the module at all.

My gut feeling was the problem was either 1 or 3, but I needed a way to check. The solution I present in this post let me rule out point 3, by listing all the ApplicationParts and controllers the app was aware of.

What are application parts?

According the documentation:

An Application Part is an abstraction over the resources of an MVC app. Application Parts allow ASP.NET Core to discover controllers, view components, tag helpers, Razor Pages, razor compilation sources, and more

Application Parts allow you to share the same resources (controllers, Razor Pages etc) between multiple apps. If you're familiar with Razor Class Libraries, then think of application parts as being the abstraction behind it.

Image of application parts added to an application

One application part implementation is an AssemblyPart which is an application part associated with an assembly. This is the situation I had in the app I described previously - each of the module projects was compiled into a separate Assembly, and then added to the application as application parts.

You can add application parts in ConfigureServices when you configure MVC. The current assembly is added automatically, but you can add additional application parts too. The example below adds the assembly that contains TestController (which resides in a different project) as an application part.

public void ConfigureServices(IServiceCollection services)
{
    services
        .AddControllers()
        .AddApplicationPart(typeof(TestController).Assembly);
}

Note that in ASP.NET Core 3.x, when you compile an assembly that references ASP.NET Core, an assembly attribute is added to the output, [ApplicationPart]. ASP.NET Core 3.x apps look for this attribute on referenced assemblies and registers them as application parts automatically, so the code above isn't necessary.

We've covered how you register application parts, but how do we debug when things go wrong?

Providing features with the ApplicationPartManager

When you add an application part (or when ASP.NET Core adds it automatically), it's added to the ApplicationPartManager. This class is responsible for keeping track of all the application parts in the app, and for populating various features based on the registered parts, in conjunction with registered feature providers.

There are a variety of features used in MVC, such as the ControllerFeature and ViewsFeature for example. The ControllerFeature (shown below) contains a list of all the controllers available to an application, across all of the registered application parts.

public class ControllerFeature
{
    public IList<TypeInfo> Controllers { get; } = new List<TypeInfo>();
}

The list of controllers is obtained by using the ControllerFeatureProvider. This class implements the IApplicationFeatureProvider<T> interface, which, when given a list of application parts, populates an instance of ControllerFeature with all the controllers it finds.

public class ControllerFeatureProvider : IApplicationFeatureProvider<ControllerFeature>
{
    public void PopulateFeature(IEnumerable<ApplicationPart> parts, ControllerFeature feature)
    {
        // Loop through all the application parts
        foreach (var part in parts.OfType<IApplicationPartTypeProvider>())
        {
            // Loop through all the types in the application part
            foreach (var type in part.Types)
            {
                // If the type is a controller (and isn't already added) add it to the list
                if (IsController(type) && !feature.Controllers.Contains(type))
                {
                    feature.Controllers.Add(type);
                }
            }
        }
    }

    protected virtual bool IsController(TypeInfo typeInfo) => { /* Elided for brevity*/ }
}

The ApplicationPartManager exposes a PopulateFeature method which calls all the appropriate feature providers for a given feature:

public class ApplicationPartManager
{
    // The list of application parts
    public IList<ApplicationPart> ApplicationParts { get; } = new List<ApplicationPart>();

    // The list of feature providers for the various possible features
    public IList<IApplicationFeatureProvider> FeatureProviders { get; } =
            new List<IApplicationFeatureProvider>();


    // Populate the feature of type TFeature
    public void PopulateFeature<TFeature>(TFeature feature)
    {
        foreach (var provider in FeatureProviders.OfType<IApplicationFeatureProvider<TFeature>>())
        {
            provider.PopulateFeature(ApplicationParts, feature);
        }
    }

That covers all the background for ApplicationPartManager and features.

Listing all the Application parts and controllers added to an application

To quickly work out whether my 404 problem was due to routing or missing controllers, I needed to interrogate the ApplicationPartManager. If the application parts and controllers for the problematic modules were missing, then that was the problem; if they were present, then it was probably some sort of routing issue!

To debug the issue I wrote a quick IHostedService that logs the application parts added to an application, along with all of the controllers discovered.

I used an IHostedService because it runs after application part discovery, and only executes once on startup.

The example below takes an ILogger and the ApplicationPartManager as dependencies. It then lists the names of the application parts, populates an instance of the ControllerFeature, and lists all the controllers known to the app. These are written to a log message which can be safely inspected

A similar example in the documentation exposes this information via a Controller, which seems like a bit of a bad idea to me!

public class ApplicationPartsLogger : IHostedService
{
    private readonly ILogger<ApplicationPartsLogger> _logger;
    private readonly ApplicationPartManager _partManager;

    public ApplicationPartsLogger(ILogger<ApplicationPartsLogger> logger, ApplicationPartManager partManager)
    {
        _logger = logger;
        _partManager = partManager;
    }

    public Task StartAsync(CancellationToken cancellationToken)
    {
        // Get the names of all the application parts. This is the short assembly name for AssemblyParts
        var applicationParts = _partManager.ApplicationParts.Select(x => x.Name);

        // Create a controller feature, and populate it from the application parts
        var controllerFeature = new ControllerFeature();
        _partManager.PopulateFeature(controllerFeature);

        // Get the names of all of the controllers
        var controllers = controllerFeature.Controllers.Select(x => x.Name);

        // Log the application parts and controllers
        _logger.LogInformation("Found the following application parts: '{ApplicationParts}' with the following controllers: '{Controllers}'",
            string.Join(", ", applicationParts), string.Join(", ", controllers));

        return Task.CompletedTask;
    }

    // Required by the interface
    public Task StopAsync(CancellationToken cancellationToken) => Task.CompletedTask;
}

All that remains is to register the hosted service in Startup.ConfigureServices:

public void ConfigureServices(IServiceCollection services)
{
    services.AddControllers();
    services.AddHostedService<ApplicationPartsLogger>();
}

The example log message below is taken from the sample code, in which an API project (ApplicationPartsDebugging.Api) references a class library (ApplicationPartsDebugging.Controllers) which contains a controller, TestController.

info: ApplicationPartsDebugging.Api.ApplicationPartsLogger[0]
      Found the following application parts: 'ApplicationPartsDebugging.Api, ApplicationPartsDebugging.Controllers' 
      with the following controllers: 'WeatherForecastController, TestController'

Both the API app and the class library are referenced as application parts, and controllers from both application parts are available.

And yes, this was exactly the problem I had during my conversion, I'd failed to register one of the modules as an application part, shown by it's absence from my log message!

Summary

In this post I described a problem I faced when converting an application to ASP.NET Core - the controllers from a referenced project could not be found. ASP.NET Core looks for controllers, views, and other features in application parts that it knows about. You can add additional application parts to an ASP.NET Core manually, though ASP.NET Core 3.x will generally handle this for you automatically. To debug my problem I created an ApplicationPartsLogger that lists all the registered application parts for an app. This allows you to easily spot when an expected assembly is missing.


Creating a custom ErrorHandlerMiddleware function

$
0
0
Creating a custom ErrorHandlerMiddleware function

In this post I show how to customise the ExceptionHandlerMiddleware to create custom responses when an error occurs in your middleware pipeline, instead of providing a path to "re-execute" the pipeline.

Exception handling in Razor Pages

All .NET applications generate errors, and unfortunately throw exceptions, and it's important you handle those in your ASP.NET middleware pipeline. Server-side rendered applications like Razor Pages typically want to catch those exceptions and redirect to an error page.

For example, if you create a new web application that uses Razor Pages (dotnet new webapp), you'll see the following middleware configuration in Startup.Configure:

public void Configure(IApplicationBuilder app, IWebHostEnvironment env)
{
    if (env.IsDevelopment())
    {
        app.UseDeveloperExceptionPage();
    }
    else
    {
        app.UseExceptionHandler("/Error");
    }

    // .. other middleware not shown
}

When running in the Development environment, the application will catch any exceptions thrown when handling a request, and display them as a web page using the very useful DeveloperExceptionMiddleware:

The developer exception page

This is incredibly useful during local development, as it lets you quickly examine the stack trace, request Headers, routing details, and other things.

Of course that's all sensitive information that you don't want to expose in production. So when not in development, we use a different exception handler, the ExceptionHandlerMiddleware. This middleware allows you to provide a request path, "/Error" by default, and uses it to "re-execute" the middleware pipeline, to generate the final response:

Re-executing the pipeline using

The end result for a Razor Pages app is that the Error.cshtml Razor Page is returned whenever an exception occurs in production:

The exception page in production

That covers the exception handling for razor pages, but what about for Web APIs?

Exception handling for Web APIs

The default exception handling in the web API template (dotnet new webapi) is similar to that used by Razor Pages, with an important difference:

public void Configure(IApplicationBuilder app, IWebHostEnvironment env)
{
    if (env.IsDevelopment())
    {
        app.UseDeveloperExceptionPage();
    }

    // .. other middleware not shown
}

As you can see the DeveloperExceptionMiddleware is still added when in the Development environment, but there's no error handling added at all in production! That's not as bad as it sounds: even though there's no exception handling middleware, ASP.NET Core will catch the exception in its infrastructure, log it, and return a blank 500 response to clients:

An exception

If you're using the [ApiController] attribute (you probably should be), and the error comes from your Web API controller, then you'll get a ProblemDetails result by default, or you can customize it further.

That's actually not too bad for Web API clients. Consumers of your API should be able to handle error responses, so end users won't be seeing the "broken" page above. However, it's often not as simple as that.

For example, maybe you are using a standard format for your errors, such as the ProblemDetails format. If your client is expecting all errors to have that format, then the empty response generated in some cases may well cause the client to break. Similarly, in the Development environment, returning an HTML developer exception page when the client is expecting JSON will likely cause issues!

One solution to this is described in the official documentation, in which it's suggested you create an ErrorController with two endpoints:

[ApiController]
public class ErrorController : ControllerBase
{
    [Route("/error-local-development")]
    public IActionResult ErrorLocalDevelopment() => Problem(); // Add extra details here

    [Route("/error")]
    public IActionResult Error() => Problem();
}

And then use the same "re-execute" functionality used in the Razor Pages app to generate the response:

public void Configure(IApplicationBuilder app, IWebHostEnvironment env)
{
    if (env.IsDevelopment())
    {
        app.UseExceptionHandler("/error-local-development");
    }
    else
    {
        app.UseExceptionHandler("/error");
    }

    // .. other middleware
}

This works fine, but there's something that's always bugged me about using the same infrastructure that generated an exception (e.g. Razor Pages or MVC) to generate the exception message. Too many times I've been bitten by a failure to generate the error response due to the exception being thrown a second time! For that reason I like to take a slightly different approach.

Using ExceptionHandler instead of ExceptionHandlingPath

When I first started using ASP.NET Core, my approach to tackling this problem was to write my own custom ExceptionHandler middleware to generate the responses directly. "It can't be that hard to handle an exception, right"?

Turns out it's a bit more complicated than that (shocking, I know). There's various edge cases you need to handle like:

  • If the response had already started sending when the exception occurred, you can't intercept it.
  • If the EndpointMiddleware had executed when the exception occurred, you need to do some juggling with the selected endpoints
  • You don't want to cache the error response

The ExceptionHandlerMiddleware handles all these cases, so re-writing your own version is not the way to go. Luckily, although providing a path for the middleware to re-execute is the commonly shown approach, there's another option - provide a handling function directly.

The ExceptionHandlerMiddleware takes an ExceptionHandlerOptions as a parameter. This option object has two properties:

public class ExceptionHandlerOptions
{
    public PathString ExceptionHandlingPath { get; set; }
    public RequestDelegate ExceptionHandler { get; set; }
}

When you provide the re-execute path to the UseExceptionHandler(path) method, you're actually setting the ExceptionHandlingPath on the options object. Instead, you can set the ExceptionHandler property and pass an instance of ExceptionHandlerOptions in directly to the middleware using UseExceptionHandler() if you wish:

public void Configure(IApplicationBuilder app, IWebHostEnvironment env)
{
    app.UseExceptionHandler(new ExceptionHandlerOptions
    {
        ExceptionHandler = // .. to implement
    });

    // .. othe middleware
}

Alternatively, you can use a different overload of UseExceptionHandler() and configure a mini middleware pipeline to generate your response:

public void Configure(IApplicationBuilder app, IWebHostEnvironment env)
{
    app.UseExceptionHandler(err => err.UseCustomErrors(env)); // .. to implement

    // .. othe middleware
}

Both approaches are equivalent so it's more a question of taste. In this post I'm going to use the second approach, and implement the UseCustomErrors() function.

Creating a custom exception handler function

For this example, I'm going to assume that we want to generate a ProblemDetails object when we get an exception in the middleware pipeline. I'm also going to assume that our API only supports JSON. That avoids us having to worry about XML content negotiation and the like. In development, the ProblemDetails response will contain the full exception stack trace, and in production it will just show a generic error message.

ProblemDetails is an industry standard way of returning machine-readable details of errors in a HTTP response. It's the generally supported way of return error messages from Web APIs in ASP.NET Core 3.x (and to an extent, in version 2.2).

We'll start by defining the UseCustomErrors function in a static helper class. This helper class adds a single piece of response-generating middleware to the provided IApplicationBuilder. In development, it ultimately calls the WriteResponse method, and sets includeDetails: true. In other environments, includeDetails is set to false.

using System;
using System.Diagnostics;
using System.Text.Json;
using System.Threading.Tasks;
using Microsoft.AspNetCore.Builder;
using Microsoft.AspNetCore.Diagnostics;
using Microsoft.AspNetCore.Hosting;
using Microsoft.AspNetCore.Http;
using Microsoft.AspNetCore.Mvc;
using Microsoft.Extensions.Hosting;

public static class CustomErrorHandlerHelper
{
    public static void UseCustomErrors(this IApplicationBuilder app, IHostEnvironment environment)
    {
        if (environment.IsDevelopment())
        {
            app.Use(WriteDevelopmentResponse);
        }
        else
        {
            app.Use(WriteProductionResponse);
        }
    }

    private static Task WriteDevelopmentResponse(HttpContext httpContext, Func<Task> next)
        => WriteResponse(httpContext, includeDetails: true);

    private static Task WriteProductionResponse(HttpContext httpContext, Func<Task> next)
        => WriteResponse(httpContext, includeDetails: false);

    private static async Task WriteResponse(HttpContext httpContext, bool includeDetails)
    {
        // .. to implement
    }
}

All that remains is to implement the WriteResponse function to generate our response. This retrieves the exception from the ExceptionHandlerMiddleware (via the IExceptionHandlerFeature) and builds a ProblemDetails object containing the details to display. It then uses the System.Text.Json serializer to write the object to the Response stream.

private static async Task WriteResponse(HttpContext httpContext, bool includeDetails)
{
    // Try and retrieve the error from the ExceptionHandler middleware
    var exceptionDetails = httpContext.Features.Get<IExceptionHandlerFeature>();
    var ex = exceptionDetails?.Error;

    // Should always exist, but best to be safe!
    if (ex != null)
    {
        // ProblemDetails has it's own content type
        httpContext.Response.ContentType = "application/problem+json";

        // Get the details to display, depending on whether we want to expose the raw exception
        var title = includeDetails ? "An error occured: " + ex.Message : "An error occured";
        var details = includeDetails ? ex.ToString() : null;

        var problem = new ProblemDetails
        {
            Status = 500,
            Title = title,
            Detail = details
        };

        // This is often very handy information for tracing the specific request
        var traceId = Activity.Current?.Id ?? httpContext?.TraceIdentifier;
        if (traceId != null)
        {
            problem.Extensions["traceId"] = traceId;
        }

        //Serialize the problem details object to the Response as JSON (using System.Text.Json)
        var stream = httpContext.Response.Body;
        await JsonSerializer.SerializeAsync(stream, problem);
    }
}

You can record any other values you like on the ProblemDetails object that an be retrieved from the HttpContext before it's serialized

Be aware that the ExceptionHandlerMiddleware clears out the route values before calling your exception handler method so those are not available.

If your application now throws an exception in the Development environment, you'll get the full exception returned as JSON in the response:

ProblemDetails response in Development

While in production, you'll still get a ProblemDetails response, but with the details elided:

ProblemDetails response in Production

This approach obviously has some limitations compared to the MVC/re-execute path approach, namely that you don't easily get model binding, content-negotiation, easy serialization, or localization (depending on your approach).

If you need any of these (e.g. maybe you serialize from MVC using PascalCase instead of camelCase), then using this approach may be more hassle than its worth. If so, then the Controller approach described is probably the sensible route to take.

If none of that is a concern for you, then the simple handler approach shown in this post may be the better option. Either way, don't try and implement your own version of the ExceptionHandlerMiddleware - use the extension points available! 🙂

Summary

In this post I described the default exception handling middleware approach for Razor Pages and for Web APIs. I highlighted a problem with the default Web API template configuration, especially if clients are expecting valid JSON, even for errors.

I then showed the suggested approach from the official documentation that uses an MVC controller to generate a ProblemDetails response for APIs. This approach works well, except if the problem was an issue with your MVC configuration itself, in which trying to execute the ErrorController will fail.

As an alternative, I showed how you could provide a custom exception handling function to the ExceptionHandlerMiddleware that is used to generate a response instead. I finally showed an example handler that serializes a ProblemDetails object to JSON, including details in the Development environment, and excluding them in other environments.

How to fix the order of commits in GitHub Pull Requests

$
0
0
How to fix the order of commits in GitHub Pull Requests

In this post I show how to ensure your commits in a GitHub pull request (PR) are in the order you expect for reviewers - i.e. the logical order of the commits to a branch, not the date order.

Warning: this post uses rebasing to rewrite the history of a Git branch. You should only ever do that to a branch if you're sure other users aren't basing their own work on it!

The setup: cleaning up a local branch using rebasing

Let's imagine you're working on a feature in a branch, and you've made several commits. In the image below, we have a branch called test based off the master branch that has 3 commits:

  • "Commit 1" is the first commit
  • "Commit 2" is the second commit
  • "Commit 3" is the *drum roll* third commit

Image of the Test branch containing three commits

At this point you've just about finished the feature, but to make things easier for your colleagues, you decide to clean-up your local branch before creating a Pull Request.

Looking at your commits, you decide that it makes sense for "Commit 3" to be the first one on the branch, coming before the others.

Likely you would do extra work here, like squashing some commits, splitting others etc. into something that makes a logical story. The example here of rearranging commits is just the simplest case. Of course, if you squash everything into a single commit, then this whole post is moot!

You can easily rearrange commits using interactive rebase by running

git rebase origin/master -i

This pops up an editor listing the current commits on the branch, and lets you rearrange, edit or squash them for example

pick 68f39b8 commit 1
pick d605e5a commit 2
pick f3b9e40 commit 3

# Rebase 82df143..d605e5a onto 82df143 (3 commands)

By rearranging the commits in the file, git will rearrange the commits in the test branch. Now it will look the following:

  • "Commit 3" is now the first commit
  • "Commit 1" is the second commit
  • "Commit 2" is the third commit

Image of the Test branch containing rearranged commits

An important point here is that while rearranging the commits changes the git history, the date associated with the commit doesn't change (on the right hand side of the image above). We'll come back to that later…

With the branch all cleaned up, it's time to push your work to the server. You push the branch to GitHub, and create a pull request for viewing by your colleagues.

I like to create pull request from the command line using the hub command line tool. I wrote about hub in a previous post.

Everything probably looks OK initially, but if you look a little closer, there's something not quite right…

The problem: GitHub doesn't preserve commit order

The problem is that the order of commits shown in the Pull Request do not reflect the actual order of the commits in the branch:

Image of a Pull Request on GitHub showing commits

The image above shows the original commit order of 1, 2, 3 instead of the revised order of 3, 1, 2. That's not very helpful, given that we specifically reordered the commits in the branch to make more sense to reviewers who are reviewing commits in sequence.

Not that GitHub displays commit in ascending order of date, whereas the gitk tool I used in the first two screenshot display commits in descending order of the branch.

This is a known issue in GitHub, with a page dedicated to it on their help pages. Unfortunately, their solution isn't entirely useful:

"If you always want to see commits in order, we recommend not using git rebase."

As someone who uses rebasing as a standard part of their workflow, that's not very helpful.

The problem is that GitHub orders the commits shown in the pull request by the author date, not by their logical position in the branch. If you think back to the image of our branch prior to pushing, you'll remember the dates on the commits didn't change when we rebased. That's what GitHub uses, and is the root of the problem.

It's worth mentioning that there are actually two dates associated with each commit: the author date, and the committer date. GitHub uses the author date to control ordering, which is not changed when you reorder commits using rebasing.

After spending a while rebasing a branch recently, only to have GitHub randomly scatter the commits in the PR, I went looking for a solution.

The solution: changing the dates on commits

The only solution I could come up with was to rewrite the commit dates to be in the same order as the commits. I looked for a few automated ways of doing this using git filter-branch and similar that I won't show here. The main problem I had was that these were too fast. The commits all ended up having the same date. That made things even worse in the pull request - now the commits were ordered completely randomly!

Instead, I opted for a slightly more manual approach. The approach I took was:

  • Interactively rebase the branch
  • Mark each commit as requiring editing
  • For each commit, edit the commit date to be the current time

In 30 seconds, a moderately sized branch can be updated to ensure all the commit dates match their position in the branch.

The first command is

git rebase origin/master -i

This starts an interactive rebase as before. For each commit in the editor that pops up, change pick to edit (before the SHA1 hash and title of the commit):

edit f3b9e40 commit 3
edit 68f39b8 commit 1
edit d605e5a commit 2

# Rebase 82df143..d605e5a onto 82df143 (3 commands)

Multi-cursor editing can really speed up this process - I use VS code as my git editor, which has built-in support for multi-cursor editing.

When you close the editor, git will start the rebase process. It will apply a single commit, and then wait, allowing you to make any changes. Rather than change any files, run the command below, which updates the dates on the commit without changing anything else:

git commit --amend --no-edit --date=now

Next, run the following command to move to the next one:

git rebase --continue

Keep running those two commands until the rebase is complete. At this point you're all done, and your commit dates should be in ascending order, nicely matching the commit order in the branch:

Image of the commits on the Test branch with updated dates to match their position on the branch

If you push this branch to the server and create a pull-request (I used --force-with-lease to push over the top of the original branch) then the commits in the pull request will now have the same order as the commits in your local branch:

Image of the commits in the pull request matching the real commit order

So the final question is: should you actually do this? As someone who frequently heavily rebases branches before creating a PR, I will. But I absolutely wouldn't recommend rebasing a branch like this if other people are (or might be) basing work of your commits. Changing the commit dates changes the SHA hash of the commit, and can be a good way to make yourself very unpopular with your colleagues!

Summary

In this post I discussed the problem that GitHub pull requests don't show commits in the order they are found in a branch. Instead, it shows them ordered by author date. If you have rebased your branch, it's possible you will have rearranged some commits, and edited others, so that the author date no longer reflects the logical order of commits. This can sometimes be confusing for reviewers, if they're viewing commits one-by-one.

To fix the problem, I restored to brute-force. I edited each commit in the branch and updated the time. By stepping through and editing each commit after performing all other rebasing, the date order now matches the logical commit order of the branch so the GitHub pull request commit order will now match the logical commit order too!

Don't replace your View Components with Razor Components

$
0
0
Don't replace your View Components with Razor Components

In this post I take a brief look at Razor Components, and whether you should consider using them instead of View Components. I'm sure you can guess my conclusion from the title, but I admit that's pretty click-baity, and the conclusions are a bit more subtle.

I start by taking a brief look at View Components and what they can be used for. I then compare them to Razor Components highlighting the similarities and differences, and describing their relation to Blazor. Finally, I walk through converting a Razor partial view into a Razor Component rendered using the static mode, and decide whether or not it's worth doing!

tl;dr; Razor Components are cool, but I can't see a reason to use the static rendering mode. It doesn't give you the client interactivity of Blazor and there's a bit of an impedance mis-match with Razor Pages, so it doesn't seem worth the hassle over using Razor partials or View Components in a Razor Pages app.

What are View Components?

I wrote an introduction to View Components a few years ago, and nothing much has changed with them since then. The following section is taken from that post:

View Components are one of the potentially less well known features of ASP.NET Core Razor views. Unlike Tag Helpers which have the pretty much direct equivalent of Html Helpers from "classic" ASP.NET, View Components are a bit different.

In spirit they fit somewhere between a partial view and a full controller - approximately like a ChildAction. However whereas actions and controllers have full model binding semantics and the MVC filter pipeline etc, View Components are invoked directly with explicit parameters. They are more powerful than a partial view however, as they can contain business logic, and separate the UI generation from the underlying behaviour.

View Components seem to fit best in situations where you would ordinarily want to use a Razor partial, but where the rendering logic is complicated and may need to be tested.

In my introductory post I used the example of the classic "login status" component used in a typical ASP.NET Core app, where you want to render something different depending on whether the current user is logged in.

A typical web app showing a login widget

While this is definitely at the low-end complexity-wise for View Components, it gives the general idea - a small section of UI that has some somewhat-complex rending requirements. They can also be useful where it is rendering data unrelated to the main body of the page. For example, take a typical eStore:

A product page from Amazon.co.uk

With a traditional MVC/Razor Page app, the ViewModel used to render the product page would typically contain all the data required to render the bulk of the page body. But what about the "frequently bought together" section, or the wish list? If every View Model has to include that data too, your View Models and controllers would become cluttered. Theses are good candidates for View Components.

Razor Components

View Components seem to have their place then. But if you look at the official documentation for View Components, you'll find this interesting paragraph:

When considering if View Components meet an app's specifications, consider using Razor Components instead. Razor Components also combine markup with C# code to produce reusable UI units. Razor Components are designed for developer productivity when providing client-side UI logic and composition.

When I read that initially, I read it as View Components essentially being deprecated in favour of Razor Components. After re-reading it, and playing with Razor Components, I realised that's not really the case. Consider Razor Components, yes, but as you'll see, they're not a direct replacement.

Razor Components - do you mean Blazor?

This is where things start to get a bit fuzzy. I'm not going to dive very far into Blazor in this post, as it's a big topic, and one that has a lot of people excited, but the brief summary for those unacquainted is:

Blazor is a framework for building interactive client-side web UI with .NET

  • Create rich interactive UIs using C# instead of JavaScript.
  • Share server-side and client-side app logic written in .NET.
  • Render the UI as HTML and CSS for wide browser support, including mobile browsers.

The important point in here is that Blazor is for building client-side interactivity. Traditional MVC and Razor Pages is all about rendering HTML server-side — any client-side interactivity has to be added with JavaScript. With Blazor, you can now use C# (mostly) to add that interactivity.

I won't get into Blazor Server vs Blazor WebAssembly here, as it's not important for the purposes of this post.

The key thing is that Blazor apps are built using components - Razor Components. These are very closely related to Razor views, but with some important syntactic and stylistic differences. The most superficial changes are they use a .razor file extension instead of .cshtml, and @code{} blocks in place of @functions{}, but the changes go a lot deeper than that.

The interesting point for this post is that you can actually use Razor Components in your MVC/Razor Pages app without using Blazor!

Razor Components without the Blazor

First off, it's absolutely possible to use Blazor for adding client-side interactivity in your traditional MVC/Razor Pages app. You can add Razor Components to your Razor Pages, and they can form a little island of client-side interactivity within your otherwise server-side rendered app.

Blazor being used inside a Razor Pages app

The thing to be aware though is that you're now running a Blazor app.

If you're using Blazor Server, that means you now need to worry about all the state being stored in memory on the server (in case of restarts), you need to be aware that you're using SignalR behind the scenes, that you need to make changes to your project to support the new functionality, and that your app won't work in a disconnected scenario.

If you're using Blazor WebAssembly, you need to be aware that it's currently in preview only, that you have a large payload to download (the .NET interpreter running in Web Assembly), and that you can't support legacy clients (e.g. Internet Explorer).

What if you don't want all those extra trade-offs? Maybe you just want traditional server-side rendered HTML, but want to use the Razor component model?

You're in luck, that's possible too. Razor Components have three render modes:

  • ServerPrerendered: The component is rendered to HTML in the response, and then connects back to the server when run in the browser to provide the interactivity.
  • Server: The component isn't rendered in the HTML, instead a marker is rendered that connects back to your app when run in the browser.
  • Static: The component is rendered to static HTML in the response, and that's it, done.

So by rendering components using the Static mode, you don't need the extra Blazor overhead, but you can still use Razor Components. So, what does that actually look like in practice?

Converting the login partial view to Razor Components

As an experiment, I decided to convert the _LoginPartial.Identity.chtml file included in the default Razor Pages template to a Razor Component.

The partial looks like this:

@using Microsoft.AspNetCore.Identity
@inject SignInManager<IdentityUser> SignInManager
@inject UserManager<IdentityUser> UserManager

<ul class="navbar-nav">
@if (SignInManager.IsSignedIn(User))
{
    <li class="nav-item">
        <a  class="nav-link text-dark" asp-area="Identity" asp-page="/Account/Manage/Index" title="Manage">Hello @User.Identity.Name!</a>
    </li>
    <li class="nav-item">
        <form class="form-inline" asp-area="Identity" asp-page="/Account/Logout" asp-route-returnUrl="@Url.Page("/", new { area = "" })" method="post" >
            <button  type="submit" class="nav-link btn btn-link text-dark">Logout</button>
        </form>
    </li>
}
else
{
    <li class="nav-item">
        <a class="nav-link text-dark" asp-area="Identity" asp-page="/Account/Register">Register</a>
    </li>
    <li class="nav-item">
        <a class="nav-link text-dark" asp-area="Identity" asp-page="/Account/Login">Login</a>
    </li>
}
</ul>

This partial only has a small amount of logic in it, but it uses some injected services, has links to other pages, and has a form (for logout). Lots of bits to play with!

Creating the stub component

I'm actually going to cheat a bit to start with. Instead of injecting the services used in the partial to determine the current user, I'm going to use an existing pre-built Razor component, the AuthorizeView component. This component is designed exactly for this purpose - it lets you display different content depending on whether you're logged in or not.

I'll start by creating a component called LoginDisplay.razor in the Pages/Shared folder of the project, and add the following content:

<CascadingAuthenticationState>
    <AuthorizeView>
        <Authorized>
            <h1>Hello, @context.User.Identity.Name!</h1>
        </Authorized>
        <NotAuthorized>
            <h1>Not Logged in</h1>
        </NotAuthorized>
    </AuthorizeView>
</CascadingAuthenticationState>

There's a few more things we need to add before we can test our component.

Update your Startup.ConfigureServices method by adding the following method:

public void ConfigureServices(IServiceCollection services)
{
    // ... existing services

    services.AddServerSideBlazor();
}

Now, just to be clear, we're adding Blazor because we need some of the services it uses, but we're not actually going to run it as a Blazor app. There'll be no connection from the component to the server, or any client-side interaction.

Next, we'll add an _Imports.razor file in Pages/Shared and add the following:

@using System.Net.Http
@using Microsoft.AspNetCore.Authorization
@using Microsoft.AspNetCore.Components.Authorization
@using Microsoft.AspNetCore.Components.Forms
@using Microsoft.AspNetCore.Components.Routing
@using Microsoft.AspNetCore.Components.Web
@using Microsoft.JSInterop
@using RazorComponentsIntro // The project's namespace

That will put all the namespaces we need in scope.

Finally, we update _Layout.cshtml and replace the reference to the login partial:

<partial name="_LoginPartial" />

with a reference to our new Razor component. Note that this is where we specify the render mode of the component to be Static:

<component type="typeof(LoginDisplay)" render-mode="Static" />

If we run the app now, we'll see our component rendered! It's ugly currently, but it works 🙂

Razor page rendering Razor component

Now we have something that works, we can see about fleshing it out!

Some teething problems

My first attempt at restoring the functionality involved copying the Razor from the _LoginPartial.Identity.chtml file to the appropriate section of the new component. After all, Razor Components use Razor right?

The end result looked fine initially:

Razor page rendering Razor component

but on closer inspection there were some problems. The "Register" and "Log In" links were missing their typical "hover" behaviour (mouse cursor change) and clicking them did nothing!

Inspecting the HTML rendered in the browser for the Register button revealed the problem:

<a class="nav-link text-dark" asp-area="Identity" asp-page="/Account/Register">Register</a>

The problem is that the Razor markup I added hadn't been transformed to generate the href attribute, as you'd expect in Razor views or Razor Pages. Specifically, the Tag Helpers asp-area and asp-page are being ignored, and just rendered as normal attributes. That explains the behaviour in the browser, but why is it happening?

Well it turns out that you can't use tag helpers in Razor Components:

Tag Helpers aren't supported in Razor Components (.razor files). To provide Tag Helper-like functionality in Blazor, create a component with the same functionality as the Tag Helper and use the component instead.

That's a bit of a pain, but as we're just generating href attributes with the tag helpers, we can just hard code them in for now. We could also pass the URLs to use in as parameters to the component, and I guess that's the sort of thing you'd likely do in a real app, but it was a lot easier to just hard code everything.

Unfortunately, while I don't go into it here, passing parameters from Razor Pages to a Razor component is a bit of a pain as you have to use the param-* syntax. I initially started to do this in _Layout.cshtml, using the Url helper to generate the values, but that got old very quickly…

After restoring all the href attributes (and the action attribute of the <form> tag) I was left with something that looked like this:

<CascadingAuthenticationState>
    <ul class="navbar-nav">
        <AuthorizeView>
            <Authorized>
                <li class="nav-item">
                    <a class="nav-link text-dark" href="Identity/Account/Manage">Hello, @context.User.Identity.Name!</a>
                </li>
                <li class="nav-item">
                    <form class="form-inline" method="post" action="Identity/Account/LogOut?returnUrl=/">
                        <button type="submit" class="nav-link btn btn-link text-dark">Log out</button>
                    </form>
                </li>
            </Authorized>
            <NotAuthorized>
                <li class="nav-item">
                    <a class="nav-link text-dark" href="Identity/Account/Register">Register</a>
                </li>
                <li class="nav-item">
                    <a class="nav-link text-dark" href="Identity/Account/Login">Log in</a>
                </li>
            </NotAuthorized>
        </AuthorizeView>
    </ul>
</CascadingAuthenticationState>

What's more, I could register and login, everything worked! As a bonus, the Razor component code is arguably more readable than the Razor view version that relies on large C# if-else blocks.

Razor page rendering Razor component

Almost everything worked… As long as you don't try and log out… 🙁

Error trying to log out

Blazor and CSRF AntiForgeryTokens

A look into the logs for the application revealed that the problem is due to a missing AntiForgeryToken in the form request. Razor Pages automatically adds a hidden field containing an antiforgery token to forms by default. When a form is POSTed, the presence of the token is validated by the Razor Page handler / MVC action. If the field has an invalid value, or is missing, the request is rejected with a 400 Bad Request response.

That's what we're seeing here. As Razor Components don't use Tag Helpers, the antiforgery token isn't added, and the Logout Razor Page rejects the request!

So what's the solution? I found references to the problem in a (now rather old) Gist from Steve Sanderson, that describes exactly this problem. I can't find any other references to the problem (or solution) anywhere else.

There is a possible solution though, and it's the one used by the Blazor project templates that ship with dotnet new/Visual Studio when you add authentication. They turn off the antiforgery verification for the logout endpoint. That's not an especially big problem - the worst an attacker could do with an exploit is force you to logout, so it's not a big problem security-wise.

To achieve this we have to override the LogOut.cshtml Razor Page by placing a similarly named file in the magic path Areas/Identity/Pages/Account/LogOut.cshtml, with the contents:

@page
@using Microsoft.AspNetCore.Identity
@inject SignInManager<IdentityUser> SignInManager

@attribute [IgnoreAntiforgeryToken]

@functions {
    public async Task<IActionResult> OnPost()
    {
        if (SignInManager.IsSignedIn(User))
        {
            await SignInManager.SignOutAsync();
        }

        return Redirect("~/");
    }
}

This removes the antiforgery token check, and means we can log out again! And with that, our mission is complete.

Final thoughts

In my previous post on View Components, I replaced the existing Razor login partial with an equivalent view component. The process was pretty simple and easy, and generally seemed like a good way to extract moderately complex logic out of the view.

The same can't be said for Razor Components. If all you're trying to do is encapsulate some complex logic inside a Razor Pages app, then Razor Components are not the way to go. The fact they can't use Tag Helplers and issues such as the antiforgery example means I can't see any reason you would choose to use the Static render mode in this way. In other words, Razor Components without Blazor don't make a lot of sense to me.

Don't get me wrong, Razor Components (or Blazor) absolutely can have their place within Razor Pages by providing isolated pockets of client interactivity. There's two important phrases there:

  • Isolated pockets: Passing in lots of parameters from Razor Pages into a component is a bit of a pain, and you've already seen the issue going the other way, where Blazor can't easily add the antiforgery token to forms.
  • Client interactivity: The example in this post had nothing to do with client interactivity; we were just rendering static HTML. If we were rendering something that needed a rich client experience then that's an entirely different scenario.

And to be fair, this is exactly the use case for Razor Components. The thing that fooled me was suggesting you should evaluate Razor Components if you're using View Components. The key word there is evaluate; Razor Components and View Components satisfy two different use cases. Make sure you use the right one!

Summary

In this post I gave a brief introduction to View Components. I then described razor components, their relation to Blazor, and their various render-modes. For the second half of the post I worked through converting the Login Razor partial view to an equivalent Razor Component. I ran into a few issues in the conversion, such as the lack of Tag Helpers and no antiforgery support.

Those issues and the lack of obvious advantages were enough to convince me that Razor Components aren't generally worth using in a Razor Pages app using their Static render mode. If you have isolated pockets requiring client-interactivity I can absolutely see the case for using Razor Components in combination with Blazor. But for simply encapsulating view rendering logic in a server-side rendered app, stick to View Components and partials!

Replacing AJAX calls in Razor Pages with Razor Components and Blazor

$
0
0
Replacing AJAX calls in Razor Pages with Razor Components and Blazor

In a recent post I looked at whether you should consider using Razor Components in places where you would previously have used View Components. The answer was an emphatic no, but that doesn't mean you shouldn't use Razor Components, just don't use them like View Components!

In this post I look at a different use case, one that is suited to Razor Components, and add some client-side functionality that otherwise would have required rather more effort.

The scenario: cascading dropdowns

The scenario I'm going to use in this post is probably familiar: cascading dropdowns. That is where you have two dropdowns (<select> elements), where changing a value in the first drop down changes the values in the second. In the example below, selecting a country from the drop down changes the states that you can choose from in the second:

Cascading drop downs in action

Please don't be offended USA, I know you have more than 2 states, I'm just lazy 😉

I chose this scenario for a couple of reasons. First, it's a very common scenario. I've personally built similar cascading dropdowns on numerous occasions. Second, it's a common scenario for demonstrating how to use AJAX with Razor Pages:

These posts both explore multiple options for achieving the dynamic client-side behaviour, which inevitably involve some JavaScript (JS) on the client-side (either JQuery or native fetch APIs) along with either additional MVC actions, dedicated Razor Pages, or additional Razor Page handlers for generating the response. Up to now those were pretty much the only options for Razor Pages apps.

Razor Components provide an intriguing alternative. Now you can write C#/Razor code to add an island of interactivity into an otherwise server-side rendered app.

The JS examples in those posts aren't obsolete just because Razor Components exist. They're perfectly valid options, and potentially easier, depending on your perspective and requirements. The approach I show in this post just shows an alternative.

⚠ Disclaimer - you're using Blazor ⚠

Using Razor Components (if they're not statically rendered as in my last post) implies you're using Blazor. Blazor is all the rage in .NET at the moment, and Blazor Server was officially released with .NET Core 3.0 in 2019. Blazor WebAssembly (client side) is planned for release in the first half of 2020.

It's important to realise what you're signing up for when you use Blazor. If you use Blazor Server, you're getting:

  • A stateful web application that communicates between your clients and server via SignalR/web sockets.
  • A small client-side download size.
  • Primarily execution on the server not the client.
  • Clients need a permanent connection to the server to interact. Offline mode is not supported, and latencies will be higher than for client-side frameworks.
  • Applications can directly access resources (e.g. a database, the filesystem) as though they're running on the server (because they are!)

In contrast, with Blazor WebAssembly, you're getting:

  • A (potentially) client-side only application. Essentially equivalent to other JavaScript client-side frameworks like Angular, React, or Vue, so you only need a simple file server to serve the static files.
  • A large client-side download size. Trying to reduce this size is one of the primary focuses for the .NET teams in Microsoft at the moment.
  • Execution occurs on the client, not the server.
  • Clients don't need a connection to the server, and can support offline mode (by using a service worker).
  • Application must access resources via traditional web APIs (the same way other client-side frameworks do today).

Whichever approach you go for, there are trade offs to be made. I've only played with Blazor a little, and there's plenty of more in-depth opinion pieces out, but my gut feeling is:

Blazor Server will be a great choice for enterprise/line of business apps, where a good web connection is practically guaranteed. The biggest gotcha from an operations perspective is that apps are stateful, and you need to consider how to manage the SignalR connections.

On the other hand:

Blazor WebAssembly will be a very interesting "drop in replacement" to current JS client-side frameworks for "consumer" apps (once they tackle technical hurdles like performance). My biggest concern is the fact we either have to reinvent the wheel to match the existing JS library ecosystem, or you're stuck doing JS interop, and in doing so are giving up some of the benefits Blazor promises.

Anyway, that's rather more of a digression than I intended initially, the important thing is that you're aware the samples in this post use Blazor Server, and as such have all the associated operational challenges that come with that.

Time to look at some code.

Adding Blazor to a Razor Pages application.

The first thing we need is a Razor Pages application. I created the default Razor Pages application (without authentication) by running dotnet new webapp. Next, I ran through the steps from the documentation to add Blazor to a Razor Pages app:

  1. Add a <base href="~/"> tag just before the closing </head> in Pages/Shared/_Layout.cshtml.
  2. In the same file, add the following <script> tag, just before the closing </body>. This is the script that bootstraps Blazor on the client side. If you're only running Razor Components on a sub-set of pages, you could conditionally include this in the "Scripts" section, in the same way validation scripts are only included on pages that need them:
<script src="_framework/blazor.server.js"></script>
  1. Add an _Imports.razor file in the project root directory containing the following (and updating the last namespace to match the project name):
@using System.Net.Http
@using Microsoft.AspNetCore.Authorization
@using Microsoft.AspNetCore.Components.Authorization
@using Microsoft.AspNetCore.Components.Forms
@using Microsoft.AspNetCore.Components.Routing
@using Microsoft.AspNetCore.Components.Web
@using Microsoft.JSInterop
@using AjaxRazorComponent // <- update to match your project's namespace
  1. In Startup.ConfigureServices(), add the Blazor services:
public void ConfigureServices(IServiceCollection services)
{
    // .. other configuration
    services.AddRazorPages();
    services.AddServerSideBlazor(); // <-- Add this line
}
  1. Map the Blazor SignalR hub in Startup.Configure():
public void Configure(IApplicationBuilder app, IWebHostEnvironment env)
{
    // .. other configuration

    app.UseEndpoints(endpoints =>
    {
        endpoints.MapRazorPages();
        endpoints.MapBlazorHub(); // <-- Add this line
    });
}

With these steps complete, we now have a Razor Pages/Blazor hybrid application. Hooray!

Now it's time to actually make use of the Blazor features.

Building the form

As this is for demonstration purposes, I'm going to start by creating a very basic form on the home page of the application, Pages/Index.cshtml. This form consists of a single field (currently) and a submit button. Whatever is entered and POSTed to the server is echoed back in the alert (safely).

The initial form demonstrating a basic form

There's nothing particularly special in the Razor markup. We use the standard Razor Page form Tag Helpers (asp-page, asp-validation-summary, asp-for etc) to build the form that contains a single Greeting field:

@page
@model IndexModel

@if (!string.IsNullOrEmpty(Model.Message))
{
    <div class="alert alert-info">
      @Model.Message
    </div>
}

<div class="row">
    <div class="col-md-4">
        <form asp-page="/Index" method="post">
            <div asp-validation-summary="ModelOnly" class="text-danger"></div>
            <div class="form-group">
                <label asp-for="Greeting"></label>
                <input asp-for="Greeting" class="form-control" />
                <span asp-validation-for="Greeting" class="text-danger"></span>
            </div>

            <button id="registerSubmit" type="submit" class="btn btn-primary">Send value</button>
        </form>
    </div>
</div>

The code-behind is similarly uneventful. For now the OnPost handler just copies the model-bound Greeting field to the Message property for display:

public class IndexModel : PageModel
{
    [BindProperty, Required] public string Greeting { get; set; } // Required
    public string Message { get; set; } // Not model bound

    public void OnGet() { }

    public void OnPost()
    {
        if (ModelState.IsValid)
        {
            Message = Greeting; // Only show the message if validation succeeded
        }
    }
}

Now we can start integrating our Razor Components.

Building a Razor components cascading dropdown

The goal of this section is to build a simple cascading drop-down component, where the value selected in the first component changes the values available in the second. Finally, we want the selected values to be POSTed in the Razor Page, just as though we'd used normal drop-downs and traditional AJAX to retrieve the possible values.

Image of the cascading drop downs

Start by adding a new file, CountryDropdown.razor. For simplicity I added it to the Pages folder, but you will probably want to organise your files more carefully than that!

Inside this file add the following:

<div class="form-row">
    <div class="col">
        <select @onchange="CountrySelectionChanged" name="@CountryFieldName" class="form-control">
            <option></option>
            @foreach (var country in Countries)
            {
                <option selected="@(country==SelectedCountry)" value="@country">@country</option>
            }
        </select>
    </div>
    <div class="col">
        @if (!string.IsNullOrEmpty(SelectedCountry))
        {
            <select name="@StateFieldName" class="form-control">
                <option></option>
                @foreach (var state in States[SelectedCountry])
                {
                    <option selected="@(state==SelectedState)" value="@state">@state</option>
                }
            </select>
        }
    </div>
</div>

@code {

    [Parameter] public string SelectedCountry { get; set; }
    [Parameter] public string SelectedState { get; set; }

    [Parameter] public string CountryFieldName { get; set; }
    [Parameter] public string StateFieldName { get; set; }

    private static readonly List<string> Countries = new List<string> {"United Kingdom", "USA" };
    private static readonly Dictionary<string, List<string>> States = new Dictionary<string, List<string>>
    {
        {"United Kingdom", new List<string>{"Devon", "Cornwall", "Somerset" } },
        {"USA", new List<string>{"New York", "Texas" } },
    };

    public void CountrySelectionChanged(ChangeEventArgs args)
    {
        var country = args.Value as string;

        if (!string.IsNullOrEmpty(country) && Countries.Contains(country))
        {
            SelectedCountry = country;
        }
        else
        {
            SelectedCountry = null;
        }
    }
}

That's quite a lot of code in one go (and the code hightlighting for Razor isn't brilliant on my blog), so I'll break it down piece by piece, starting from the bottom @code section.

@code {
    [Parameter] public string SelectedCountry { get; set; }
    [Parameter] public string SelectedState { get; set; }

    [Parameter] public string CountryFieldName { get; set; }
    [Parameter] public string StateFieldName { get; set; }

    // ...
}

First we have the parameters that are passed in from a parent component (which will be our Razor Page). These specify the currently selected values (SelectedCountry and SelectedState) and the names to use for the controls.

We need to provide the names for the controls so that they are bound correctly to our Razor Page model when we POST back to the server. The SelectedCountry and SelectedState are provided so that we can preserve the values across POSTs, or to set an initial value

// ...
private static readonly List<string> Countries = new List<string> {"United Kingdom", "USA" };
private static readonly Dictionary<string, List<string>> States = new Dictionary<string, List<string>>
{
    {"United Kingdom", new List<string>{"Devon", "Cornwall", "Somerset" } },
    {"USA", new List<string>{"New York", "Texas" } },
};

// ...

The next static properties serve as dummy implementations of a country/state lookup. In practice you would probably load these from a service or the database, but that's not important to this implementation. Remember we're using Blazor Server here, so the code is running on the Server, and you can directly access anything you need, rather than having to use a Web API or similar.

public void CountrySelectionChanged(ChangeEventArgs args)
{
    var country = args.Value as string;

    if (!string.IsNullOrEmpty(country) && Countries.Contains(country))
    {
        SelectedCountry = country;
    }
    else
    {
        SelectedCountry = null;
    }
}

Next we have the CountrySelectionChanged function which is invoked every time the Country drop-down changes. We do some basic validation in there to make sure the selected country is actually one that we're allowed and set or clear the SelectedCountry as appropriate.

If we now look at the Razor markup itself, we can see how all these properties hook together. The <select> elements contain all the behaviour. For the first drop down we list out the available Countries, marking the appropriate <option> as selected, and hooking up the onchange handler. The second drop down is only rendered if we have a selected country, and if we do, renders all the States. Note that both <select> elements are using the name attribute values that were passed as [Parameter] values.

<div class="form-row">
    <div class="col">
        <select @onchange="CountrySelectionChanged" name="@CountryFieldName" class="form-control">
            <option></option>
            @foreach (var country in Countries)
            {
                <option selected="@(country==SelectedCountry)" value="@country">@country</option>
            }
        </select>
    </div>
    <div class="col">
        @if (!string.IsNullOrEmpty(SelectedCountry))
        {
            <select name="@StateFieldName" class="form-control">
                <option></option>
                @foreach (var state in States[SelectedCountry])
                {
                    <option selected="@(state==SelectedState)" value="@state">@state</option>
                }
            </select>
        }
    </div>
</div>

As I said, this is a very rudimentary implementation, but it does the basics. In practice you would want to be more careful that the provided SelectedCountry and SelectedState are valid values, and you would probably use different values for the text/key of the drop down; I'm just using the full name for both.

Using the Razor Component from a Razor Page

With the basic component complete, we can drop it into our Razor Pages form. I'll start by adding the extra fields to the IndexModel that we want to be POSTed back when the Submit button is clicked, and adjusting the message displayed in the "OnPost" handler.

public class IndexModel : PageModel
{
    [BindProperty, Required] public string Greeting { get; set; }
    [BindProperty, Required] public string Country { get; set; } // <-- Add this
    [BindProperty, Required] public string State { get; set; } // <-- Add this
    public string Message { get; set; }

    public void OnGet() { }

    public void OnPost()
    {
        if (ModelState.IsValid)
        {
            Message = $"{Greeting} from {State}, {Country}"; // <-- Updated
        }
    }
}

Note that I've marked the Country and State fields as [Required] as well, so we'll only display the message if all three fields have a value.

Next we'll update the Index.cshtml file to render the component. I've only shown the <form> element for simplicity, the rest of the page stays the same:

<form asp-page="/Index" method="post">
    <div asp-validation-summary="ModelOnly" class="text-danger"></div>
    <div class="form-group">
        <label asp-for="Greeting"></label>
        <input asp-for="Greeting" class="form-control" />
        <span asp-validation-for="Greeting" class="text-danger"></span>
    </div>

    <!-- START: New Razor Component -->
    <div class="form-group">
        <label asp-for="Country"></label>
        <component type="typeof(CountryDropdown)"
                    render-mode="ServerPrerendered"
                    param-CountryFieldName="Html.NameFor(x=>x.Country)"
                    param-SelectedCountry="Model.Country"
                    param-StateFieldName="Html.NameFor(x=>x.State)"
                    param-SelectedState="Model.State" />

        <span asp-validation-for="Country" class="text-danger"></span>
        <span asp-validation-for="State" class="text-danger"></span>
    </div>
    <!-- END: New Razor Component -->

    <button id="registerSubmit" type="submit" class="btn btn-primary">Send value</button>
</form>

There's a couple of things to note here

  • I'm using the <label> and validation Tag Helpers inside the Razor Page to render the appropriate HTML. You can't use Tag Helpers from inside Razor Components, so this is the easiest place to use them.
  • To get the correct name for model-binding, I used the Html.NameFor() helper methods.
  • The Razor Component is only used to set the correct values in the <select> element - the actual POST back is done using a standard Razor Page form post.

That's all there is to it. You can now run the application, and you'll have a cascading dropdown, no JavaScript required!

Cascading drop downs in action

Of course, nothing's ever as simple as that…

Limitations and alternatives

One thing that's not entirely obvious in the video above is that although we added the [Required] validation attributes to our model, we're only doing validation on the server currently. That means we POST the values, check validation, and display the validation errors if there were any.

Server validation is always required for security reasons, but you can add client-side validation for an improved user experience - don't let users post something you know is going to fail! Normally you can add the client-side validation scripts to Index.cshtml by adding the following to the bottom of the page:

@section Scripts {
    <partial name="_ValidationScriptsPartial" />
}

Unfortunately, this doesn't work for our Razor Components! The server-side validation works correctly, but there's no client-side validation for the Country/State drop downs (although there is for the Greeting text box). Unfortunately the two approaches are just not compatible as far as I can see, so that's a limitation you'd have to live with.

There is an alternative of course: instead of only making the cascading drop-downs a Razor Component, you could make the whole form a Razor component instead! Razor Components built like this support full client-side and server-side validation using DataAnnotations. The question then is whether you want to go that far or not.

Arguably, if you're using any server-side Blazor, then you may as well expand your usage like this whenever you hit rough edges. You're not really losing anything by doing so, as you've already tied yourself to the stateful application and connection requirements!

In many ways the Blazor development experience is really nice. You get to use a build toolchain that you're already familiar with, the speed of development is refreshing, and you can integrate it with existing solutions like Razor Pages. That's not to say Blazor is a panacea by any means, but it's definitely worth keeping in your back pocket for those occasions where the trade-offs make it worth while.

Summary

In this post I showed how you can easily create cascading dropdowns using Razor Components and Blazor Server, where the selection in the first dropdown changes the options available in the second.

Rather than building a standalone Blazor app, I showed how you can embed this behaviour inside Razor Pages, to avoid having to write AJAX queries for simple enhancements like this. I also showed how to make sure the form elements interoperate properly with your Razor Pages during post back, by setting the correct form names.

The technique isn't completely perfect, you can't easily use client-side validation with this approach. If that's a problem you may want to consider building the whole form using Blazor. If you do try this approach, just be sure you understand the operational implications of using Blazor.

Accessing route values in endpoint middleware in ASP.NET Core 3.0

$
0
0
Accessing route values in endpoint middleware in ASP.NET Core 3.0

In my recent series about upgrading to ASP.NET Core 3.0, I described how the new endpoint routing system can be combined with terminal middleware (i.e. middleware that generates a response). In that post I showed how you can map a path, e.g. /version, to the terminal middleware and create an endpoint.

There are a number of benefits to this, such as removing the duplication of CORS and Authorization logic that is required in ASP.NET Core 2.x. Another benefit is that you now get proper "MVC-style" routing with placeholders and capture groups, instead of the simple "constant-prefix" Map() function that's available in ASP.NET Core 2.0.

In this post I show how you can access the route values exposed by the endpoint routing system in your middleware.

Route values in endpoint routing

Endpoint routing separates the "identify which route was selected" step, from the "execute the endpoint at that route" step of an ASP.NET Core middleware pipeline (see my previous post for a more in depth discussion). By splitting these two steps, which previously were both handled internally by the MVC middleware, we can now use fully featured routing (which was previously an MVC feature) with non-MVC components, such as middleware.

There is a general push in this direction among the ASP.NET Core team currently. Project Houdini is attempting to turn more MVC features into "core" ASP.NET Core features.

Lets imagine you want to have a simple endpoint that generates random numbers (I know, it's a silly example). The caveat is that the request must also contain a max and min value for the range of numbers. For example, /random/50/100 should return a random value between 50 and 100.

In ASP.NET Core 2.x, handling dynamic routes like this is a bit of a pain for middleware. In fact, generally speaking, it probably wouldn't be worth the hassle at all - you'd be better off just using the routing and model binding features built in to MVC instead. Nevertheless, for comparison purposes (and to show the benefits of 3.0) I show how you might do this below.

The basic random number middleware

Whichever approach we're going to be using - either the manual 2.x approach or the 3.0 endpoint routing approach, we need our random number generating middleware. The basic outline of the middleware is shown below

public class RandomNumberMiddleware
{
    private static readonly Random _random = new Random();
    public RandomNumberMiddleware(RequestDelegate next) { } // Required

    public async Task InvokeAsync(HttpContext context)
    {
        // Try and get the max and min values from the route/path
        var maybeValues = ParseMaxMin(context);

        if (!maybeValues.HasValue)
        {
            context.Response.StatusCode = 400; //couldn't parse route values
            return;
        }

        // deconstruct the tuple
        var (min, max) = maybeValues.Value; 

        // Get the random number using the extracted limits
        var value = GetRandomValue(min, max);

        // Write the response as plain text
        context.Response.ContentType = "text/plain";
        await context.Response.WriteAsync(value.ToString());
    }

    private static int GetRandomValue(int min, int max)
    {
        // Get a random number (swapping max and min if necessary)
        return min < max
            ? _random.Next(min, max)
            : _random.Next(max, min);
    }

    private static (int min, int max)? ParseMaxMin(HttpContext context)
    {
        /* Parse the values from the HttpContext, shown below*/
    }
}

The middleware shown above is pretty much the same both in the "legacy" version and in the endpoint routing version, it's only the ParseMaxMin function that will change. Follow through the InvokeAsync function to make sure you understand what's happening. First we try and extract the max and min values from the request (we'll come to that shortly), and if that fails, we return a 400 Bad Request response. If the values were extracted successfully, we generate a random number and return it in a plain text response.

Hopefully that's all relatively easy to follow. Which brings us to the ParseMaxMin function. This function needs to grab the max and min values from the incoming request, i.e. the 10 and 50 from /random/10/50.

Parsing the path in ASP.NET Core 2.0

Unfortunately, without endpoint routing we're stuck with plain ol' string manipulation, splitting segments on / and trying to parse out numbers:

private static (int min, int max)? ParseMaxMin(HttpContext context)
{
    var path = context.Request.Path;
    if (!path.HasValue) return null; // e.g. /random, /random/

    var segments = path.Value.Split('/');

    if (segments.Length != 3) return null; // e.g. /random/12, /random/blah, /random/123/12/tada
    System.Diagnostics.Debug.Assert(string.IsNullOrEmpty(segments[0])); // first segment is always empty
    if (!int.TryParse(segments[1], out var min)) return null; // e.g. /random/blah/123
    if (!int.TryParse(segments[2], out var max)) return null; // e.g. /random/123/blah

    return (min, max);
}

This isn't a huge amount of code, but it's the gnarly sort of stuff I hate writing, just to grab a couple of values from the path. I added a bunch of the error checking to catch all the mal-formed URLs where the user doesn't provide two integers as well, and we'll return a 400 response for those. It's not awful, but you can easily see how the code for this could balloon with more complex requirements.

To use the middleware we create a branch using the Map extension method in Startup.Configure().

public class Startup
{
    public void Configure(IApplicationBuilder app)
    {
        app.UseRouting();

        app.Map("/random", // branch the pipeline
            random => random.UseMiddleware<RandomNumberMiddleware>()); // run the middleware

        app.UseEndpoints(endpoints =>
        {
            endpoints.MapGet("/", async context =>
            {
                await context.Response.WriteAsync("Hello World!");
            });
        });
    }
}

Now if you hit a valid URL prefixed with /random you'll get a random number. If you hit the root home page at / you'll get the Hello World response, and if you hit an invalid URL prefix with /random you'll get a 400 Bad Request response.

Image of the different responses possible when using manual parsing of route parameters

Accessing route values from middleware

Now lets look at the alternative approach, using endpoint routing. I'm going to work backwords in this case. To start with, I'll create an extension method to make it easy to register the middleware as an endpoint. This code is straight out of my previous post, so be sure to check that one if the code below doesn't make sense.

public static class RandomNumberRouteBuilderExtensions
{
    public static IEndpointConventionBuilder MapRandomNumberEndpoint(
        this IEndpointRouteBuilder endpoints, string pattern)
    {
        var pipeline = endpoints.CreateApplicationBuilder()
            .UseMiddleware<RandomNumberMiddleware>()
            .Build();

        return endpoints.Map(pattern, pipeline).WithDisplayName("Random Number");
    }
}

With this extension method available, we can register our middleware with a route pattern. This is the same routing used by MVC so you can use all the same features - optional and default values, constraints, catch-all parameters. In this case, I've added constraints to the min and max route values to ensure that the values provided are convertible to int. More on that shortly.

public void Configure(IApplicationBuilder app, IWebHostEnvironment env)
{
    app.UseRouting();

    app.UseEndpoints(endpoints =>
    {
        endpoints.MapRandomNumberEndpoint("/random/{min:int}/{max:int}"); // <-- Add this line
        endpoints.MapGet("/", async context =>
        {
            await context.Response.WriteAsync("Hello World!");
        });
    });
}

We're nearly there. All that remains is to implement ParseMaxMin for our middleware. Now, to be clear, we could still manually parse the values out of Request.Path as we did previously, but we don't have to. Endpoint routing takes care of all that itself - all we need to do is to access the route values by name, and convert them to ints:

private static (int min, int max)? ParseMaxMin(HttpContext context)
{
    // Retrieve the RouteData, and access the route values
    var routeValues = context.GetRouteData().Values;

    // Extract the values
    var minValue = routeValues["min"] as string;
    var maxValue = routeValues["max"] as string;

    // Alternatively, grab the values directly
    // var minValue = context.GetRouteValue("min") as string;
    // var maxValue = context.GetRouteValue("max") as string;

    // The route values are strings, but will always be parseable as int 
    var min = int.Parse(minValue);
    var max = int.Parse(maxValue);

    // The values must be valid, so no error cases
    return (min, max);
}

There's a couple of things to note with this approach:

  • The route value constraint ensures we can only get valid int values for the min and max routes values, so there's no need for error checking in the ParseMaxMin function.
  • The route values are stored as strings, not ints, so we still need to convert them. We have routing but not model binding.
  • GetRouteData() gives access to the whole RouteData object, so we can also access other data like data tokens. Alternatively, you can use GetRouteValue() to access a single route value at a time.

The code here is much simpler than before, and isn't messing around with string manipulation. It's much more obvious what's going on! The behaviour is the same as before in the happy cases, but if you enter values for max and min that can't be parsed as integers, you'll get a 404 Not Found response, rather than a 400 Bad Request.

Image of the different responses possible when using endpoint routing

The code in ParseMaxMin is definitely nicer than before, but there's a couple of problems with this approach:

  • Getting a 404 when you have a typo in the min or max values is not a good user experience. It happens because we're using the route constraints for validation, which is generally not a good idea. A better approach would be to remove the constraints, and handle invalid values in the ParseMaxMin function instead, returning a 400 to the user instead.
  • If you don't specify the route template correctly, such as a typo in max/min (e.g. /random/{maximum}/{min}), or you forgot to include one of them (e.g. /random/{max}), you will get an exception at runtime when the middleware executes!

Clearly we need to be a bit more careful, even when using endpoint routing.

Playing it safe

First of all, lets remove the int constraint from the route path. We can also make the parameters optional, so that requests to /random/123 etc are still handled by the middleware, ensuring we can generate a more meaningful 400 Bad Request instead of a 404.

public void Configure(IApplicationBuilder app, IWebHostEnvironment env)
{
    app.UseRouting();

    app.UseEndpoints(endpoints =>
    {
        endpoints.MapRandomNumberEndpoint("/random/{min?}/{max?}"); // no route value constraints, and optional parameters
        endpoints.MapGet("/", async context =>
        {
            await context.Response.WriteAsync("Hello World!");
        });
    });
}

Next, even though we can easily extract route values from the request, it's wise to be defensive in the middleware. Using int.TryParse is a simple way to add some safety, and ensures we return a 400 Bad Request response when the user enters gibberish, or misses parameters entirely.

private static (int min, int max)? ParseMaxMin(HttpContext context)
{
    var routeValues = context.GetRouteData().Values;
    var minValue = routeValues["min"] as string;
    var maxValue = routeValues["max"] as string;

    if (!int.TryParse(minValue, out var min)) return null; // e.g. /random/blah/123
    if (!int.TryParse(maxValue, out var max)) return null; // e.g. /random/123/blah

    return (min, max);
}

Running the application again, gives us the best of both worlds. A simple ParseMaxMin function, and the application behaviour we're after.

Image of returning a 400 response instead of a 404 response when an invalid request is made

Endpoint routing certainly makes things easier for these sorts of cases, but I think things will really get interesting if Project Houdini ends up allowing things like model binding to be used to simplify some of this mapping code (without bloating the simple approach if that's all you need). Either way, it's good to know accessing routing information is just a GetRouteData() away if you need it!

Summary

In this post I showed how you could access route values from terminal middleware when used with endpoint routing. I showed how endpoint routing removes a lot of the previous boilerplate that would be required when branching the middleware with Map. Instead, you can rely on endpoint routing to parse the request's path for you.

As a follow up, I described the behaviour if you go a bit too far with routing, and use route constraints for validation. While tempting (because it's so easy!) it's better to perform validation of route parameters in your middleware, so you can return an appropriate (400) response if necessary.

Viewing all 743 articles
Browse latest View live