Quantcast
Channel: Andrew Lock | .NET Escapades
Viewing all 743 articles
Browse latest View live

Using strongly-typed entity IDs to avoid primitive obsession (Part 2)

$
0
0
Using strongly-typed entity IDs to avoid primitive obsession (Part 2)

In my previous post, I described a common problem in which primitive arguments (e.g. System.Guid or string) are passed in the wrong order to a method, resulting in bugs. This problem is a symptom of primitive obsession; using primitive types to represent higher-level concepts.

This post directly follow on from my previous post, so I strongly recommend reading that one first.

In my previous post I described a strongly-typed ID that could be used to represent the ID of an object, for example an OrderId or a UserId. As a reminder, the implementation looked something like this:

public readonly struct OrderId : IComparable<OrderId>, IEquatable<OrderId>
{
    public Guid Value { get; }

    public OrderId(Guid value)
    {
        Value = value;
    }

    public static OrderId New() => new OrderId(Guid.NewGuid());

    // various overloads, overrides, and implementations
}

One of the common complaints when fighting primitive obsession like this, is that it makes things more complex at the "edges" of the system, when converting between Guid and OrderId for example. The best answer to this is to try to use the strongly-typed IDs everywhere.

With the implementation described so far, this is easier said than done, so in this post I'll describe some helper classes you can use with strongly-typed IDs to make working with ASP.NET Core APIs simpler.

tl;dr; You can skip to a complete example implementation including all the converters or a Visual Studio snippet if you wish.

Strongly-typed IDs make for ugly JSON APIs

Lets imagine that you have a standard eCommerce app, as in the previous post. You have an MVC API controller for your Orders, containing a single Post action for creating Orders.

[ApiController]
public class OrderController : ControllerBase
{
    [HttpPost]
    public IActionResult Post(Order order);
}

As we have a strongly-typed IDs Orders and Users, the Order object now looks something like the following (instead of using Guids for IDs):

public class Order
{
    public OrderId Id { get; set; }
    public UserId UserId { get; set; }
    public decimal Total { get; set; }
}

The problem is that our strongly-typed IDs mean that for MVC Model Binding to work as we expect, the posted JSON body would have to look something like this:

{
    "Id": {
        "Value": "da63f7a0-a4a6-4dbe-a9a4-4bb72dde30dd"
    },
    "UserId": {
        "Value": "4bb20f98-f6d4-43bc-9fdf-5b74ce4ef751"
    },
    "Total": 123.45
}

Reading over this again, I actually don't think model binding would work at all in this case, though I haven't tested it since.

Urgh, that's a bit of a mess. Luckily, we can simplify this using a custom JsonConverter.

Creating a custom JsonConverter

JsonConverter in Newtonsoft.Json can be used to customise how types are converted to and from JSON. in ASP.NET Core 2.x that also allows you to customize how types are serialised and deserialised during model binding.

Note that in ASP.NET Core 3.0 JSON serialization will be changing. See this GitHub issue for details.

The following example shows how to create a JsonConverter as a nested class of the strongly-typed ID. I've hidden the bulk of the OrderId class for brevity, but make sure to decorate the main strongly-typed ID class with the [JsonConverter] attribute:

[JsonConverter(typeof(OrderIdJsonConverter))]
public readonly struct OrderId : IComparable<OrderId>, IEquatable<OrderId>
{
    // Strongly-typed ID implementation elided 

    class OrderIdJsonConverter : JsonConverter
    {
        public override bool CanConvert(Type objectType)
        {
            return objectType == typeof(OrderId);
        }

        public override void WriteJson(JsonWriter writer, object value, JsonSerializer serializer)
        {
            var id = (OrderId)value;
            serializer.Serialize(writer, id.Value);
        }

        public override object ReadJson(JsonReader reader, Type objectType, object existingValue, JsonSerializer serializer)
        {
            var guid = serializer.Deserialize<Guid>(reader);
            return new OrderId(guid);
        }
    }
}

Implementing the custom JsonConverter is relatively simple, and relies on the fact Newtonsoft.Json already knows how to serialize and deserialize Guids:

  • Override CanConvert: This converter can only convert OrderId types.
  • Override WriteJson: To serialize an OrderId, extract the Guid Value, and serialize that.
  • Override ReadJson: Start by deserializing a Guid, and create an OrderId from that.

By using a custom JsonConverter, the serialized Order looks much cleaner and easier to work with:

{
    "Id": "da63f7a0-a4a6-4dbe-a9a4-4bb72dde30dd",
    "UserId": "4bb20f98-f6d4-43bc-9fdf-5b74ce4ef751",
    "Total": 123.45
}

In fact, it's exactly the same as the original Order object was before we converted to strongly-typed IDs.

So that's the JSON support working, lets move on to looking at another API method, a GET method.

Using strongly-typed IDs in route constraints

A common pattern with REST APIs is to include the ID of a resource in the URL. For example:

[ApiController]
public class OrderController : ControllerBase
{
    [HttpGet("{id}")]
    public ActionResult<Order> Get(OrderId id);
}

In this example, you'd expect to be able to retrieve an Order object from the API by sending a GET request to /Order/7b-46-0c4, where 7b-46-0c4 is the ID of the order (shortened for brevity). Unfortunately, if you try this, you'll get a slightly confusing 415 Unsupported Media Type response:

{"type":"https://tools.ietf.org/html/rfc7231#section-6.5.13","title":"Unsupported Media Type","status":415,"traceId":"0HLLI5VFOFT3C:00000003"}

Unsupported Media Type response

The problem is that the MVC framework doesn't know how to convert the string route segment "7b-46-0c4" into your OrderId type. We have a JSON converter that can convert strings to the OrderId type, but we're not converting from a JSON body in this case.

Creating a custom type converter

There's a couple of different ways you could solve this problem:

Creating a custom model binder is a relatively involved affair, but it gives you complete control over the binding process. In our case, we just need a simple string to OrderId conversion, and the documentation suggests you should use a type converter in this case.

Type converters provide "a unified way of converting types of values to other types". In our case, all we need to support is converting from a string to OrderId.

[JsonConverter(typeof(OrderIdJsonConverter))]
[TypeConverter(typeof(OrderIdTypeConverter))]
public readonly struct OrderId : IComparable<OrderId>, IEquatable<OrderId>
{
    // Strongly-typed ID implementation elided 

    class OrderIdTypeConverter : TypeConverter
    {
        public override bool CanConvertFrom(ITypeDescriptorContext context, Type sourceType)
        {
            return sourceType == typeof(string) || base.CanConvertFrom(context, sourceType);
        }

        public override object ConvertFrom(ITypeDescriptorContext context, CultureInfo culture, object value)
        {
            var stringValue = value as string;
            if (!string.IsNullOrEmpty(stringValue)
                && Guid.TryParse(stringValue, out var guid))
            {
                return new OrderId(guid);
            }

            return base.ConvertFrom(context, culture, value);

        }
    }
}

Derive from the base TypeConverter class, and override the CanConvertFrom method to indicate that you can handle strings. I've created the implementation as a nested class of OrderId for tidiness.

In the ConvertFrom method override, cast the provided value to a string, and try to parse it into a Guid. If all goes well, you can return a new OrderId, otherwise, just delegate to the base implementation.

Finally, decorate your strongly-typed ID with the [TypeConverter] attribute, and reference your implementation.

That's all you need to fix your issues - no extra types to register with the MVC framework and no messing with custom model binding or providers. I was actually surprised how simple this approach was, having never used TypeConverters before!

Example of the request working

Other type converters for interfacing with the world.

With the two converters described above, you should be able to work seamlessly with your ASP.NET Core APIs, so there's no excuse for passing on using strongly-typed IDs there!

At the other end of the application, at the database, you may want to create similar converters. Given the number of possible ORMs and micro-ORMs, I won't go into the details here, but most will provide this functionality. For example, you can create a custom TypeHandler<T> for Dapper which would look something like the following:

class OrderIdTypeHandler : SqlMapper.TypeHandler<OrderId>
{
    public override void SetValue(IDbDataParameter parameter, OrderId value)
    {
        parameter.Value = value.Value;
    }

    public override OrderId Parse(object value)
    {
        return new OrderId((Guid)value);
    }
}

You would just need to register the custom handler with Dapper using SqlMapper.AddTypeHandler(new OrderIdTypeHandler());

A full example implementation

I've been dribbling bits of implementation out in this post, so below is a full example implementation for an imaginary FooId type, including custom JsonConverter and a custom TypeConverter:

[JsonConverter(typeof(FooIdJsonConverter))]
[TypeConverter(typeof(FooIdTypeConverter))]
public readonly struct FooId : IComparable<FooId>, IEquatable<FooId>
{
    public Guid Value { get; }

    public FooId(Guid value)
    {
        Value = value;
    }

    public static FooId New() => new FooId(Guid.NewGuid());
    public static FooId Empty { get; } = new FooId(Guid.Empty);

    public bool Equals(FooId other) => this.Value.Equals(other.Value);
    public int CompareTo(FooId other) => Value.CompareTo(other.Value);

    public override bool Equals(object obj)
    {
        if (ReferenceEquals(null, obj)) return false;
        return obj is FooId other && Equals(other);
    }

    public override int GetHashCode() => Value.GetHashCode();

    public override string ToString() => Value.ToString();
    public static bool operator ==(FooId a, FooId b) => a.CompareTo(b) == 0;
    public static bool operator !=(FooId a, FooId b) => !(a == b);

    class FooIdJsonConverter : JsonConverter
    {
        public override void WriteJson(JsonWriter writer, object value, JsonSerializer serializer)
        {
            var id = (FooId)value;
            serializer.Serialize(writer, id.Value);
        }

        public override object ReadJson(JsonReader reader, Type objectType, object existingValue, JsonSerializer serializer)
        {
            var guid = serializer.Deserialize<Guid>(reader);
            return new FooId(guid);
        }

        public override bool CanConvert(Type objectType)
        {
            return objectType == typeof(FooId);
        }
    }

    class FooIdTypeConverter : TypeConverter
    {
        public override bool CanConvertFrom(ITypeDescriptorContext context, Type sourceType)
        {
            return sourceType == typeof(string) || base.CanConvertFrom(context, sourceType);
        }

        public override object ConvertFrom(ITypeDescriptorContext context, CultureInfo culture, object value)
        {
            var stringValue = value as string;
            if (!string.IsNullOrEmpty(stringValue)
                && Guid.TryParse(stringValue, out var guid))
            {
                return new FooId(guid);
            }

            return base.ConvertFrom(context, culture, value);

        }
    }
}

That's a lot of boilerplate code!

Yes, I know. That's a lot of code for a simple ID type. I still think it's worth it, but there's no denying it's verbose…

All the F# devs shouting at the screen right now…

To try and counteract that somewhat, I've created a Visual Studio Snippet as described in the docs. Copy the XML below into a file (or download the snippet from here) and import it into your IDE.

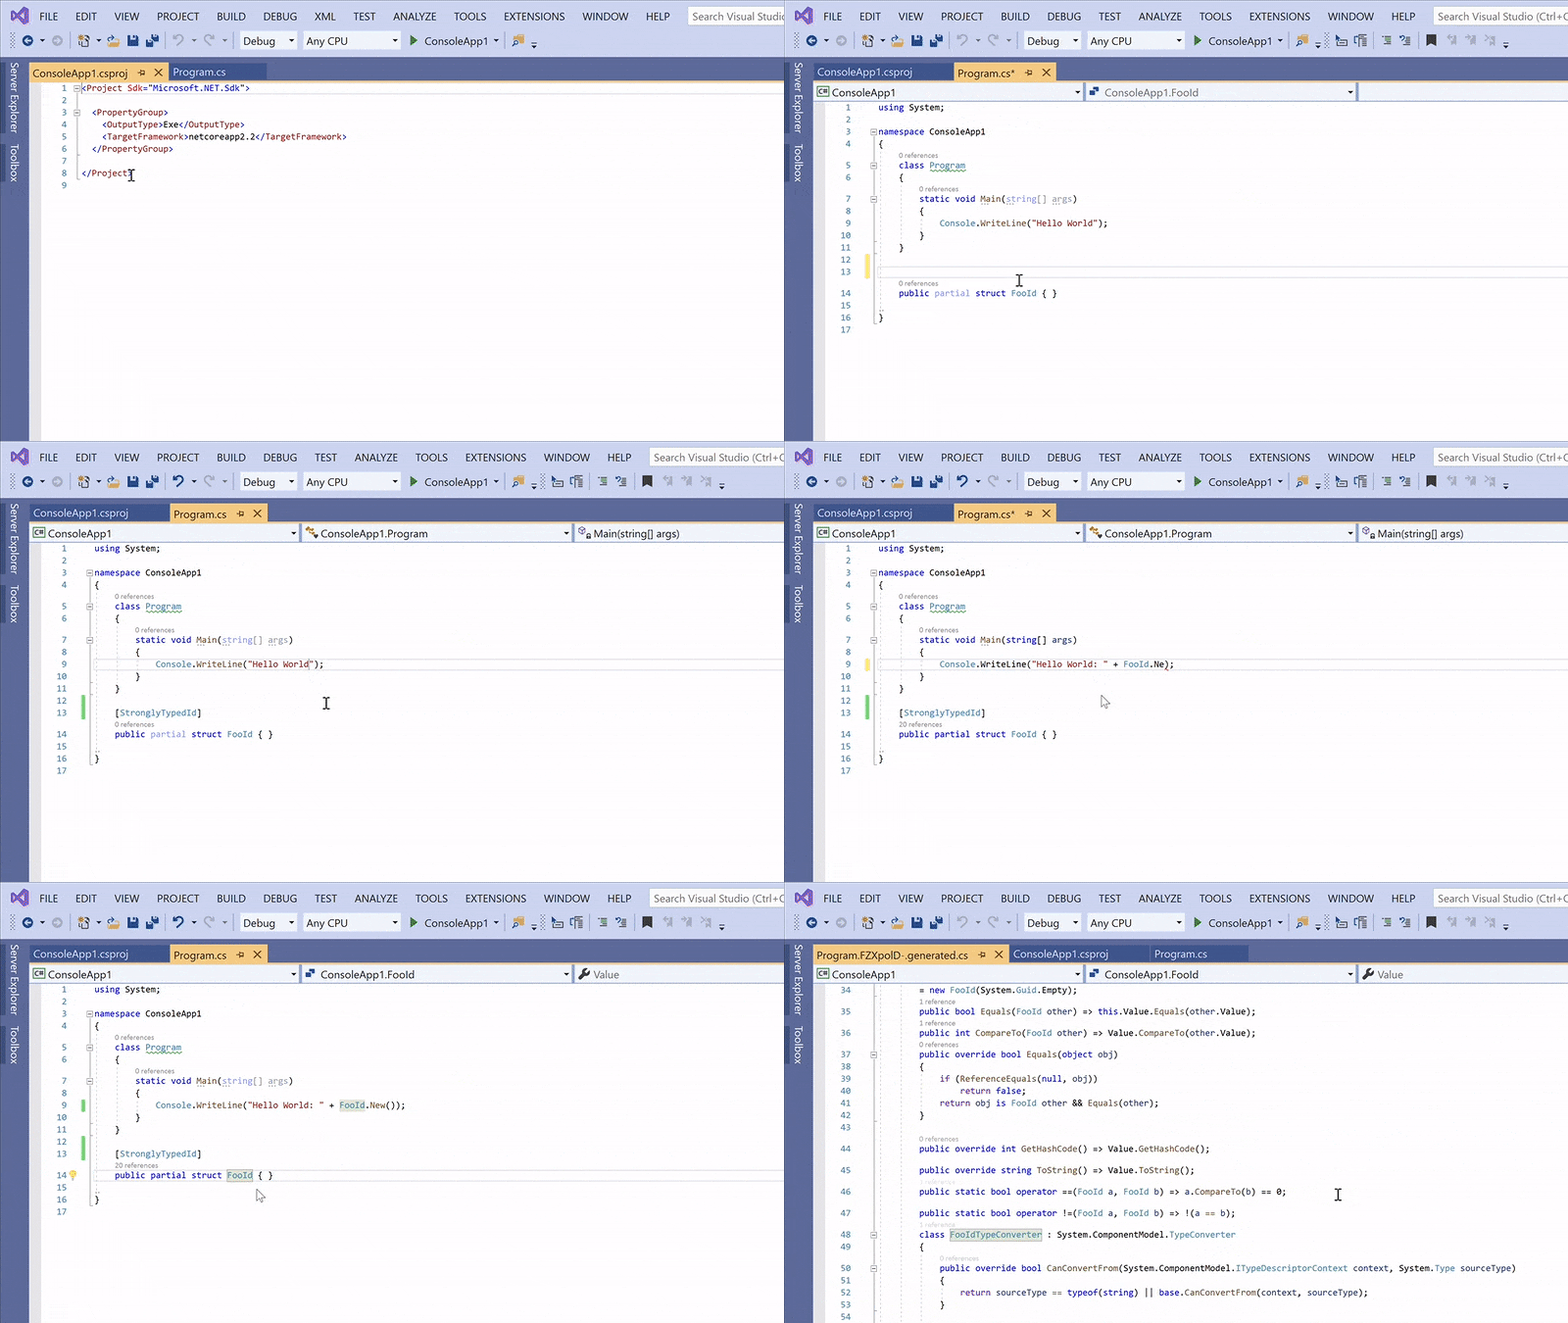
Once it's imported, you can type typedid, hit Tab twice, type a new name for the ID and auto-generate all of that code! Note that you may need to add Newtonsoft.Json as a NuGet reference to your project if it's not already referenced.

Screencast of the snippet in action

The snippet - feel free to customize as you see fit!

<?xml version="1.0" encoding="utf-8"?>
<CodeSnippets xmlns="http://schemas.microsoft.com/VisualStudio/2005/CodeSnippet">
  <CodeSnippet Format="1.0.0">
    <Header>
      <Title>Strongly Typed ID</Title>
      <Description>Create a strongly typed ID struct</Description>
      <Shortcut>typedid</Shortcut>
      <HelpUrl>https://andrewlock.net/using-strongly-typed-entity-ids-to-avoid-primitive-obsession-part-2/</HelpUrl>
    </Header>
    <Snippet>
      <Declarations>
        <Literal>
          <ID>TypedId</ID>
          <ToolTip>Replace with the name of your type</ToolTip>
          <Default>TypedId</Default>
        </Literal>
      </Declarations>
      <Code Language="csharp"><![CDATA[[JsonConverter(typeof($TypedId$JsonConverter))]
    [TypeConverter(typeof($TypedId$TypeConverter))]
    public readonly struct $TypedId$ : IComparable<$TypedId$>, IEquatable<$TypedId$>
    {
        public Guid Value { get; }

        public $TypedId$(Guid value)
        {
            Value = value;
        }

        public static $TypedId$ New() => new $TypedId$(Guid.NewGuid());
        public static $TypedId$ Empty { get; } = new $TypedId$(Guid.Empty);

        public bool Equals($TypedId$ other) => this.Value.Equals(other.Value);
        public int CompareTo($TypedId$ other) => Value.CompareTo(other.Value);

        public override bool Equals(object obj)
        {
            if (ReferenceEquals(null, obj)) return false;
            return obj is $TypedId$ other && Equals(other);
        }

        public override int GetHashCode() => Value.GetHashCode();

        public override string ToString() => Value.ToString();
        public static bool operator ==($TypedId$ a, $TypedId$ b) => a.CompareTo(b) == 0;
        public static bool operator !=($TypedId$ a, $TypedId$ b) => !(a == b);

        class $TypedId$JsonConverter : JsonConverter
        {
            public override void WriteJson(JsonWriter writer, object value, JsonSerializer serializer)
            {
                var id = ($TypedId$)value;
                serializer.Serialize(writer, id.Value);
            }

            public override object ReadJson(JsonReader reader, Type objectType, object existingValue, JsonSerializer serializer)
            {
                var guid = serializer.Deserialize<Guid>(reader);
                return new $TypedId$(guid);
            }

            public override bool CanConvert(Type objectType)
            {
                return objectType == typeof($TypedId$);
            }
        }

        class $TypedId$TypeConverter : TypeConverter
        {
            public override bool CanConvertFrom(ITypeDescriptorContext context, Type sourceType)
            {
                return sourceType == typeof(string) || base.CanConvertFrom(context, sourceType);
            }

            public override object ConvertFrom(ITypeDescriptorContext context, CultureInfo culture, object value)
            {
                var stringValue = value as string;
                if (!string.IsNullOrEmpty(stringValue)
                    && Guid.TryParse(stringValue, out var guid))
                {
                    return new $TypedId$(guid);
                }

                return base.ConvertFrom(context, culture, value);

            }
        }
    }]]>
      </Code>
      <Imports>
        <Import>
          <Namespace>System</Namespace>
        </Import>
        <Import>
          <Namespace>System.ComponentModel</Namespace>
        </Import>
        <Import>
          <Namespace>System.Globalization</Namespace>
        </Import>
        <Import>
          <Namespace>Newtonsoft.Json</Namespace>
        </Import>
      </Imports>
    </Snippet>
  </CodeSnippet>
</CodeSnippets>

Summary

Strongly-typed IDs can help avoid simple, but hard-to-spot, argumentation transposition errors. By using the types defined in this post, you can get all the benefits of the C# type system, without making your APIs clumsy to use, or adding translation code back-and-forth between Guids and your strongly-typed IDs. In this post I showed how to create a custom TypeConverter and a custom JsonConverter for your types. Finally, I provided a complete example implementation, and a Visual Studio snippet for generating strongly-typed IDs in your own project.


Using strongly-typed entity IDs to avoid primitive obsession (Part 3)

$
0
0
Using strongly-typed entity IDs to avoid primitive obsession (Part 3)

In a previous post, I described a common problem in which primitive arguments (e.g. System.Guid or string) are passed in the wrong order to a method, resulting in bugs. This problem is a symptom of primitive obsession: using primitive types to represent higher-level concepts. In my second post, I showed how to create a JsonConverter and TypeConverter to make using the strongly-typed IDs easier with ASP.NET Core.

Martin Liversage noted that JSON.NET will use a TypeConverter where one exists, so you generally don't need the custom JsonConverter I provided in the previous post!

In this post, I discuss using strongly-typed IDs with EF Core. I personally don't use EF Core a huge amount, but after a little playing I came up with something that I thought worked pretty well. Unfortunately, there's one huge flaw which puts a cloud over the whole approach, as I'll describe later 🙁.

Interfacing with external system using strongly typed IDs

As a very quick reminder, strongly-typed IDs are types that can be used to represent the ID of an object, for example an OrderId or a UserId. A basic implementation (ignoring the overloads and converters etc.) looks something like this:

public readonly struct OrderId : IComparable<OrderId>, IEquatable<OrderId>
{
    public Guid Value { get; }
    public OrderId(Guid value)
    {
        Value = value;
    }

    // various helpers, overloads, overrides, implementations, and converters
}

You only get the full benefit of strongly-typed IDs if you can use them throughout your application. That includes at the "edges" of the app, where you interact with external systems. In the previous post I described the interaction at the public-facing end of your app, in ASP.NET Core MVC controllers.

The other main external system you will likely need to interface with is the database. At the end of the last post, I very briefly described a converter for using strongly-typed IDs with Dapper by creating a custom TypeHandler:

class OrderIdTypeHandler : SqlMapper.TypeHandler<OrderId>
{
    public override void SetValue(IDbDataParameter parameter, OrderId value)
    {
        parameter.Value = value.Value;
    }

    public override OrderId Parse(object value)
    {
        return new OrderId((Guid)value);
    }
}

This needs to be registered globally using SqlMapper.AddTypeHandler(new OrderIdTypeHandler()); to be used directly in your Dapper database queries.

Dapper is the ORM that I use the most in my day job, but EF Core is possibly going to be the most common ORM in ASP.NET Core apps. Making EF Core play nicely with the strongly-typed IDs is possible, but requires a bit more work.

Building an EF Core data model using strongly typed IDs

We'll start by creating a very simple data model that uses strongly-typed IDs. The classic ecommerce Order/OrderLine example contains everything we need:

public class Order
{
    public OrderId OrderId { get; set; }
    public string Name { get; set; }

    public ICollection<OrderLine> OrderLines { get; set; }
}

public class OrderLine
{
    public OrderId OrderId { get; set; }
    public OrderLineId OrderLineId { get; set; }
    public string ProductName { get; set; }
}

We have two entities:

  • Order which has an OrderId, and has a collection of OrderLines.
  • OrderLine which has as OrderLineId and an OrderId. All of the IDs are strongly-typed.

After creating these entities, we need to add them to the EF Core DbContext. We create a DbSet<Order> for the collection of Orders, and let EF Core discover the OrderLine entity itself:

 public class ApplicationDbContext : DbContext
{
    public ApplicationDbContext(DbContextOptions<ApplicationDbContext> options)
        : base(options)
    {
    }

    public DbSet<Order> Orders { get; set; }
}

Unfortunately, if we try and generate a new migration for updated model using the dotnet ef tool, we'll get an error:

> dotnet ef migrations add OrderSchema

System.InvalidOperationException: The property 'Order.OrderId' could not be mapped, 
because it is of type 'OrderId' which is not a supported primitive type or a valid 
entity type. Either explicitly map this property, or ignore it using the 
'[NotMapped]' attribute or by using 'EntityTypeBuilder.Ignore' in 'OnModelCreating'.

EF Core complains that it doesn't know how to map our strongly-typed IDs (OrderId) to a database type. Luckily, there's a mechanism we can use to control this as of EF Core 2.1: value converters.

Creating a custom ValueConverter for EF Core

As described in the EF Core documentation:

Value converters allow property values to be converted when reading from or writing to the database. This conversion can be from one value to another of the same type (for example, encrypting strings) or from a value of one type to a value of another type (for example, converting enum values to and from strings in the database.)

The latter conversion, converting from one type to another, is what we need for the strongly-typed IDs. By using a value converter, we can convert our IDs into a Guid, just before they're written to the database. When reading a value, we convert the Guid value from the database into a strongly typed ID.

EF Core allows you to configure value converters manually for each property in your modelling code using lambdas. Alternatively, you can create reusable, standalone, custom value converters for each type. That's the approach I show here.

To implement a custom value converter you create an instance of a ValueConverter<TModel, TProvider>. TModel is the type being converted (the strongly-typed ID in our case), while TProvider is the database type. To create the converter you provide two lambda functions in the constructor arguments:

  • convertToProviderExpression: an expression that is used to convert the strongly-typed ID to the database value (a Guid)
  • convertFromProviderExpression: an expression that is used to convert the database value (a Guid) into an instance of the strongly-typed ID.

You can create an instance of the generic ValueConverter<> directly, but I chose to create a derived converter to simplify instantiating a new converter. Taking the OrderId example, we can create a custom ValueConverter<> using the following:

public class OrderIdValueConverter : ValueConverter<OrderId, Guid>
{
    public OrderIdValueConverter(ConverterMappingHints mappingHints = null)
        : base(
            id => id.Value,
            value => new OrderId(value),
            mappingHints
        ) { }
}

The lambda functions are simple - to obtain a Guid we use the Value property of the ID, and to create a new instance of the ID we pass the Guid to the constructor. The ConverterMappingHints parameter can allow setting things such as Scale and Precision for some database types. We don't need it here but I've included it for completeness in this example.

Registering the custom ValueConverter with EF Core's DB Context

The value converters describe how to store our strongly-typed IDs in the database, but EF Core need's to know when to use each converter. There's no way to do this using attributes, so you need to customise the model in DbContext.OnModelCreating. That makes for some pretty verbose code:

public class ApplicationDbContext : IdentityDbContext
{
    public ApplicationDbContext(DbContextOptions<ApplicationDbContext> options)
        : base(options)
    { }

    public DbSet<Order> Orders { get; set; }

    protected override void OnModelCreating(ModelBuilder builder)
    {
        base.OnModelCreating(builder);

        builder
            .Entity<Order>()
            .Property(o => o.OrderId)
            .HasConversion(new OrderIdValueConverter());

        builder
            .Entity<OrderLine>()
            .Property(o => o.OrderLineId)
            .HasConversion(new OrderLineIdValueConverter());

        builder
            .Entity<Order>()
            .Property(o => o.OrderId)
            .HasConversion(new OrderIdValueConverter());
    }
}

It's clearly not optimal having to add a manual mapping for each usage of a strongly-typed ID in your entities. Luckily we can simplify this code somewhat.

Automatically using a value converter for all properties of a given type.

Ideally our custom value converters would be used automatically by EF Core every time a given strongly-typed ID is used. There's an issue on GitHub for exactly this functionality, but in the meantime, we can emulate the behaviour by looping over all the model entities, as described in a comment on that issue.

In the code below, we loop over every entity in the model, and for each entity, find all those properties that are of the required type (OrderId for the OrderIdValueConverter). For each property we register the ValueConverter, in a process similar to the manual registrations above:

public static class ModelBuilderExtensions
{
    public static ModelBuilder UseValueConverter(
        this ModelBuilder modelBuilder, ValueConverter converter)
    {
        // The-strongly typed ID type
        var type = converter.ModelClrType;

        // For all entities in the data model
        foreach (var entityType in modelBuilder.Model.GetEntityTypes())
        {
            // Find the properties that are our strongly-typed ID
            var properties = entityType
                .ClrType
                .GetProperties()
                .Where(p => p.PropertyType == type);

            foreach (var property in properties)
            {
                // Use the value converter for the property
                modelBuilder
                    .Entity(entityType.Name)
                    .Property(property.Name)
                    .HasConversion(converter);
            }
        }

        return modelBuilder;
    }
}

All that remains is to register the value converter for each strongly-typed ID type in the DbContext:

public class ApplicationDbContext : IdentityDbContext
{
    public ApplicationDbContext(DbContextOptions<ApplicationDbContext> options)
        : base(options)
    { }

    public DbSet<Order> Orders { get; set; }

    protected override void OnModelCreating(ModelBuilder builder)
    {
        base.OnModelCreating(builder);

        builder.UseValueConverter(new OrderIdValueConverter())
        builder.UseValueConverter(new OrderLineIdValueConverter())
    }
}

It's a bit frustrating having to manually register each of these value converters - every time you create a new strongly typed ID you have to remember to register it in the DbContext.

Creating the ValueConverter implementation itself for every strongly-typed ID is not a big deal if you're using snippets to generate your IDs, like I described in the last post.

It would be nice if we were able to generate a new ID, use it in an entity, and not have to remember to update the OnModelCreating method.

Automatically registering value converters for strongly typed IDs

We can achieve this functionality with a little bit of reflection and some attributes. We'll start by creating an attribute that we can use to link each strongly-typed ID to a specific value converter, called EfCoreValueConverterAttribute:

public class EfCoreValueConverterAttribute : Attribute
{
    public EfCoreValueConverterAttribute(Type valueConverter)
    {
        ValueConverter = valueConverter;
    }

    public Type ValueConverter { get; }
}

We'll decorate each strongly typed ID with the attribute as part of the snippet generation, which will give something like the following:

// The attribute links the OrderId to OrderIdValueConverter
[EfCoreValueConverter(typeod(OrderIdValueConverter))]
public readonly struct OrderId : IComparable<OrderId>, IEquatable<OrderId>
{
    public Guid Value { get; }
    public OrderId(Guid value)
    {
        Value = value;
    }

    // The ValueConverter implementation
    public class OrderIdValueConverter : ValueConverter<OrderId, Guid>
    {
        public OrderIdValueConverter()
            : base(
                id => id.Value,
                value => new OrderId(value)
            ) { }
    }
}

Next, we'll add another method to the ModelBuilderExtensions this loops through all the types in an Assembly and finds all those that are decorated with the EfCoreValueConverterAttribute (i.e. the strongly typed IDs). The Type of the value converter is extracted from the custom attribute, and an instance of the value converter is created using the ValueConverter. We can then pass that to the UseValueConverter method we created previously.

public static class ModelBuilderExtensions
    {
        public static ModelBuilder AddStronglyTypedIdValueConverters<T>(
            this ModelBuilder modelBuilder)
        {
            var assembly = typeof(T).Assembly;
            foreach (var type in assembly.GetTypes())
            {
                // Try and get the attribute
                var attribute = type
                    .GetCustomAttributes<EfCoreValueConverterAttribute>()
                    .FirstOrDefault();

                if (attribute is null)
                {
                    continue;
                }

                // The ValueConverter must have a parameterless constructor
                var converter = (ValueConverter) Activator.CreateInstance(attribute.ValueConverter);

                // Register the value converter for all EF Core properties that use the ID
                modelBuilder.UseValueConverter(converter);
            }

            return modelBuilder;
        }

        // This method is the same as shown previously
        public static ModelBuilder UseValueConverter(
            this ModelBuilder modelBuilder, ValueConverter converter)
        {
            var type = converter.ModelClrType;

            foreach (var entityType in modelBuilder.Model.GetEntityTypes())
            {
                var properties = entityType
                    .ClrType
                    .GetProperties()
                    .Where(p => p.PropertyType == type);

                foreach (var property in properties)
                {
                    modelBuilder
                        .Entity(entityType.Name)
                        .Property(property.Name)
                        .HasConversion(converter);
                }
            }

            return modelBuilder;
        }
    }

With this code in place, we can register all our value converters in one fell swoop in the DbContext.OnModelCreating method:

public class ApplicationDbContext : IdentityDbContext
{
    public ApplicationDbContext(DbContextOptions<ApplicationDbContext> options)
        : base(options)
    {
    }

    public DbSet<Order> Orders { get; set; }

    protected override void OnModelCreating(ModelBuilder builder)
    {
        base.OnModelCreating(builder);

        // add all value converters
        builder.AddStronglyTypedIdValueConverters<OrderId>();
    }
}

The type parameter OrderId in the above example is used to identify the Assembly to scan to find the strongly-typed IDs. If required, it would be simple to add another overload to allowing scanning multiple assemblies.

With the code above, we don't have to touch the DbContext when we add a new strongly-typed ID, which is a much better experience for developers. If we run the migrations now, all is well:

> dotnet ef migrations add OrderSchema

Done. To undo this action, use 'ef migrations remove'

If you check the generated migration, you'll see that the OrderId column is created as a non-nullable Guid, and is the primary key, as you'd expect.

public partial class OrderSchema : Migration
{
    protected override void Up(MigrationBuilder migrationBuilder)
    {
        migrationBuilder.CreateTable(
            name: "Orders",
            columns: table => new
            {
                OrderId = table.Column<Guid>(nullable: false),
                Name = table.Column<string>(nullable: true)
            },
            constraints: table =>
            {
                table.PrimaryKey("PK_Orders", x => x.OrderId);
            });
    }
}

This solves most of the problems you'll encounter using strongly typed IDs with EF Core, but there's one place where this doesn't quite work, and unfortunately, it might be a deal breaker.

Custom value converters result in client-side evaluation

Saving entities that use your strongly-typed IDs to the database is no problem for EF Core. However, if you try and load an entity from the database, and filter based on the strongly-typed ID:

var order = _dbContext.Orders
    .Where(order => order.OrderId == orderId)
    .FirstOrDefault();

then you'll see a warning in the logs that the where clause must be evaluated client-side:

warn: Microsoft.EntityFrameworkCore.Query[20500]
      The LINQ expression 'where ([x].OrderId == __orderId_0)' 
      could not be translated and will be evaluated locally.

info: Microsoft.EntityFrameworkCore.Database.Command[20101]
      Executed DbCommand (12ms) [Parameters=[], CommandType='Text', CommandTimeout='30']
      SELECT [x].[OrderId], [x].[Name]
      FROM [Orders] AS [x]

That's terrible. This query has got to be a contender for the most common thing you'll ever do, and the above solution will not be good enough. Fetching an Order by ID with client-side execution involves loading all Orders into memory and filtering in memory!

In fairness the documentation does mention this limitation right at the bottom of the page (emphasis mine):

Use of value conversions may impact the ability of EF Core to translate expressions to SQL. A warning will be logged for such cases. Removal of these limitations is being considered for a future release.

But this value converter is pretty much the most basic you could imagine - if this converter results in client-side evaluation, they all will!

There is an issue to track this problem, but unfortunately there's no easy work around to this one. 🙁

All is not entirely lost. It's not pretty, but after some playing I eventually found something that will let you use strongly-typed IDs in your EF Core models that doesn't force client-side evaluation.

Avoiding client-side evaluation in EF Core with conversion operators

The key is adding implicit or explicit conversion operators to the strongly-typed IDs, such that EF Core doesn't bork on seeing the strongly-typed ID in a query. There's two possible options, an explicit conversion operator, or an implicit conversion operator.

Using an explicit conversion operator with strongly typed IDs

The first approach is to add an explicit conversion operator to your strongly-typed ID to go from the ID type to a Guid:

public readonly struct OrderId
{
    public static explicit operator Guid(OrderId orderId) => orderId.Value;

    // Remainder of OrderId implementation ...
}

Adding this sort of operator means you can cast an OrderId to a Guid, for example:

var orderId = new OrderId(Guid.NewGuid());
var result = (Guid) orderId; // Only compiles with explicit operator

So how does that help? Essentially we can trick EF Core into running the query server-side, by using a construction similar to the following:

Guid orderIdValue = orderId.Value; // extracted for clarity, can be inlined
var order = _dbContext.Orders
    .Where(order => (Guid) order.OrderId == orderIdValue) // explicit conversion to Guid
    .FirstOrDefault();

The key point is the explicit conversion of order.OrderId to a Guid. When EF Core evaluates the query, it no longer sees an OrderId type that it doesn't know what to do with, and instead generates the SQL we wanted in the first place:

info: Microsoft.EntityFrameworkCore.Database.Command[20101]
      Executed DbCommand (7ms) [Parameters=[@__orderId_Value_0='?' (DbType = Guid)], CommandType='Text', CommandTimeout='30']
      SELECT TOP(1) [x].[OrderId], [x].[Name]
      FROM [Orders] AS [x]
      WHERE [x].[OrderId] = @__orderId_Value_0

This shows the where clause being sent to the database, so all is well again. Well, apart from the fact it's an ugly hack. 😕 Implicit operators make the process very slightly less ugly.

Using an implicit conversion operator with strongly typed IDs

The implicit conversion operator implementation is almost identical to the explicit implementation, just with a different keyword:

public readonly struct OrderId
{
    public static implicit operator Guid(OrderId orderId) => orderId.Value;

    // Remainder of OrderId implementation ...
}

With this code, you no longer need an explicit (Guid) cast to convert an OrderId to a Guid, so we can write the query as:

Guid orderIdValue = orderId.Value; // extracted for clarity, can be inlined
var order = _dbContext.Orders
    .Where(order => order.OrderId == orderIdValue) // Implicit conversion to Guid
    .FirstOrDefault();

This query generates identical SQL, so technically you could use either approach. But which should you choose?

Implicit vs Explicit operators

For simple ugliness, the implicit operator seems slightly preferable, as you don't have to add the extra cast, but I'm not sure if that's a bad thing. The trouble is that the implicit conversions apply throughout your code base, so suddenly code like this will compile:

public Order GetOrderForUser(Guid orderId, Guid userId)
{
    // Get the User
}

OrderId orderId = OrderId.New();
UserId userId = UserId.New();

var order = GetOrderForUser(userId, orderId); // arguments reversed, the bug is back!

The GetOrderForUser() method should obviously be using the strongly-typed IDs, but the fact that this is possible without any indication of errors just makes me a little uneasy. For that reason, I think I prefer the explicit operators.

Either way, you should definitely hide away the cast from callers wherever possible:

// with explicit operator
public class OrderService
{
    // public API uses strongly-typed ID
    public Order GetOrder(OrderId orderId) => GetOrder(orderId.Value);

    // private implementation to handle casting
    private Order GetOrder(Guid orderId)
    {
        return _dbContext.Orders
            .Where(x => (Guid) x.OrderId == orderId)
            .FirstOrDefault();
    }
}

// with implicit operator 
public class OrderService
{
    // public API uses strongly-typed ID
    public Order GetOrder(OrderId orderId) => GetOrder(orderId.Value);

    // private implementation to handle casting
    private Order GetOrder(Guid orderId)
    {
        return _dbContext.Orders
            .Where(x => x.OrderId == orderId) // Only change is no cast required here
            .FirstOrDefault();
    }
}

It's probably also worth configuring your DbContext to throw an error when client-side evaluation occurs so you don't get client-side errors creeping in without you noticing. Override the DbContext.OnConfiguring method, and configure the options:

protected override void OnConfiguring(DbContextOptionsBuilder optionsBuilder)
{
    optionsBuilder.ConfigureWarnings(warning => 
            warning.Throw(RelationalEventId.QueryClientEvaluationWarning));
}

Even with all this effort, there's still gotchas. As well as standard IQueryable<T> LINQ syntax, the DbSet<> exposes a Find method which is effectively a shorthand for SingleOrDefault() for querying by an entities primary key. Unfortunately, nothing we do here will work:

var orderId = new OrderId(Guid.NewGuid());
_dbContext.Find(orderId); // using the strongly typed ID directly causes client-side evaluations
_dbContext.Find(order.Value); // passing in a Guid causes an exception : The key value at position 0 of the call to 'DbSet<Order>.Find' was of type 'Guid', which does not match the property type of 'OrderId'.

So close…

This post is plenty long enough, and I haven't quite worked out a final solution but I have a couple of ideas. Check back in a couple of days, and hopefully I'll have it figured out 🙂

Summary

In this post I explored possible solutions that would allow you to use strongly-typed IDs directly in your EF Core entities. The ValueConverter approach described in this post gets you 90% of the way there, but unfortunately the fact that queries will be executed client-side really makes the whole approach more difficult until this issue is resolved. You can get some success by using explicit or implicit conversions, but there are still edge cases. I'm playing with a different approach as we speak, and hope to have something working in a couple of days, so check back soon!

Strongly-typed IDs in EF Core: Using strongly-typed entity IDs to avoid primitive obsession - Part 4

$
0
0
Strongly-typed IDs in EF Core: Using strongly-typed entity IDs to avoid primitive obsession - Part 4

This is another post in my series on strongly-typed IDs. In the first and second posts, I looked at the reasons for using strongly-typed IDs, and how to add converters to interface nicely with ASP.NET Core. In the previous post I looked at ways of using strongly-typed IDs with EF Core. Unfortunately, there was a significant issue with the approach I outlined: querying by a strongly-typed ID could result in client-side evaluation. The workarounds I proposed only partially fixed the problem.

In this post, I show a workaround that seems to solve the issue. EF Core is not my speciality, so it's possible there's some hidden issues, but from my testing so far it works perfectly! 🤞 The secret-sauce is ValueConverterSelector.

Strongly-typed IDs in EF Core

As a quick recap, the solution I proposed in the previous post centred around value converters. As their name suggests, these can be used to convert instances of one type (for example a strongly-typed ID like OrderId) into a type that is supported by a database provider (for example a Guid or an int).

In the last post I showed an example implementation of a custom ValueConverter for an OrderId that is stored in the database as a Guid. The version below is slightly modified to be a nested class of the strongly-typed ID OrderId, which is how we would generate it if using the "snippet" approach from my second post. For this post, we don't need the [StronglyTypedIdEfValueConverter] attribute I previously described.

public readonly struct OrderId 
{
    // Not shown: the OrderId implementation and other converters

    public class StronglyTypedIdEfValueConverter : ValueConverter<OrderId, Guid>
    {
        public StronglyTypedIdEfValueConverter(ConverterMappingHints mappingHints = null)
            : base(id => id.Value, value => new OrderId(value), mappingHints) 
        {
        }
    }
}

You could manually map every use of OrderId in your EF Core model properties to use this converter as before. But as well as being verbose, this would leave you with the client-side evaluation problem from the last post.

Instead, we're going to look at one of the "internal" services of EF Core - the ValueConverterSelector. If you're not interested in why the solution works and just want to see the final code, skip ahead.

A semi-deep dive into ValueConverterSelector - handling built-in conversions

After reaching the conclusion of my last post, I felt like I had hit a brick wall trying to get strongly-typed IDs to work smoothly. There were all sorts of work arounds you could use, but ultimately you were going to get a sub-par experience no matter what.

This got me thinking: EF Core has all sorts of "built-in" value converters that convert between primitive types. These do conversions like Char to string, number to byte[], or string to Guid. Using these value converters doesn't trigger the client-side evaluation problem, and they doesn't require you to register them against each property - they're used automatically.

These converters aren't built into the BCL or anything, so they must be registered somewhere in EF Core. After a bit of searching, I tracked the answer down to the ValueConverterSelector class and the IValueConverterSelector interface.

I've reproduced the interface (from version 2.2.4) below, as the xmldocs describe exactly what this type does:

/// <summary>
/// A registry of ValueConverterInfo that can be used to find
/// the preferred converter to use to convert to and from a given model type
/// to a type that the database provider supports.
/// </summary>
public interface IValueConverterSelector
{
    /// <summary>
    /// Returns the list of ValueConverterInfo instances that can be
    /// used to convert the given model type. Converters nearer the front of
    /// the list should be used in preference to converters nearer the end.
    /// </summary>
    IEnumerable<ValueConverterInfo> Select(Type modelClrType, Type providerClrType = null);
}

EF Core uses an implementation of this interface to find the value converters for built-in types. It appears to use these types early in the query generation pipeline, so they don't cause the client-side evaluation issues you see with custom value converters.

The below code is a snippet taken from the Select() method of the default implementation, ValueConverterSelector. This method is essentially a giant if/else statement that finds all the applicable converters for a given modelClrType (the type used in your EF Core entities) and providerClrType (the type stored in the database).

Given the number of built-in converters, this method is big, so I've only shown a snippet of it below:

private readonly ConcurrentDictionary<(Type ModelClrType, Type ProviderClrType), ValueConverterInfo> _converters
    = new ConcurrentDictionary<(Type ModelClrType, Type ProviderClrType), ValueConverterInfo>();

public virtual IEnumerable<ValueConverterInfo> Select(Type modelClrType, Type providerClrType = null)
{
    // Extract the "real" type T from Nullable<T> if required
    var underlyingModelType = modelClrType.UnwrapNullableType();
    var underlyingProviderType = providerClrType?.UnwrapNullableType();

    // lots of code...

    if (underlyingModelType == typeof(Guid))
    {
        if (underlyingProviderType == null
            || underlyingProviderType == typeof(byte[]))
        {
            yield return _converters.GetOrAdd(
                (underlyingModelType, typeof(byte[])),
                k => GuidToBytesConverter.DefaultInfo);
        }

        if (underlyingProviderType == null
            || underlyingProviderType == typeof(string))
        {
            yield return _converters.GetOrAdd(
                (underlyingModelType, typeof(string)),
                k => GuidToStringConverter.DefaultInfo);
        }
    }

    // lots more code...
}

So what is this code doing? First, the method "unwraps" any nullable types - so if the type is a Guid?, it returns a Guid and so on. If the type is not nullable, this is a no-op. It's worth noting that the providerClrType can be null: null here means "give me all the value converters for the modelClrType".

After unwrapping the types, we enter the nested if/else statements - I've shown the if statement for Guid above. There are two built-in converters for Guid: the GuidToBytesConverter, and the GuidToStringConverter. If the underlyingProviderType is null or the correct type, the method uses yield return to return a default instance of ValueConverterInfo.

The implementation uses a ConcurrentDictionary to avoid creating multiple ValueConverterInfo objects, keyed on the underlyingModelType and underlyingProviderType.

The ValueConverterInfo object is a simple DTO that contains a factory method for creating a ValueConverter instance:

public readonly struct ValueConverterInfo
{
    private readonly Func<ValueConverterInfo, ValueConverter> _factory;

    public Type ModelClrType { get; }
    public Type ProviderClrType { get; }
    public ConverterMappingHints MappingHints { get; }
    public ValueConverter Create() => _factory(this);
}

If we look at one of the built-in value converters GuidToStringConverter for example, we see the DefaultInfo property that returns a ValueConverterInfo object:

public class GuidToStringConverter : StringGuidConverter<Guid, string>
{
    public GuidToStringConverter(ConverterMappingHints mappingHints = null)
        : base(ToString(), ToGuid(), _defaultHints.With(mappingHints))
    { }

    public static ValueConverterInfo DefaultInfo { get; }
        = new ValueConverterInfo(
            typeof(Guid), 
            typeof(string), 
            i => new GuidToStringConverter(i.MappingHints), 
            _defaultHints);
}

I haven't shown the base classes involved, so the code above isn't entirely complete, but the DefaultInfo property implementation is pretty simple. It creates a new ValueConverterInfo object, providing the ModelClrType (Guid) the ProviderClrType (string), a function for creating a new GuidToStringConverter given the current ValueConverterInfo instance (i.e. call the constructor), and the default mapping hints to use (for controlling the size of the string column in the database etc).

That's as far as I went digging into the ValueConverterSelector. I haven't worked out quite how it fits in to the overall EF Core query translation system (other than it's used in the ITypeMappingSource implementations), but I know enough now to be dangerous - lets get back to fixing the original problem, strongly-typed IDs.

Creating a custom ValueConverterSelector for strongly-typed IDs

To recap, we have a number of strongly-typed IDs that are used in our EF Core entities. For each strongly-typed ID we have a nested ValueConverter implementation. In this section, we're going to create a custom ValueConverterSelector to automatically register our value converters so they're used in the same way as the built-in value converters.

Luckily, the ValueConverterSelector implementation isn't sealed, and the Select() method is even virtual, so we can easily create our own implementation, while preserving the existing behaviour for built-in converters. The following code is the entire StronglyTypedIdValueConverterSelector - I'll walk through and explain it afterwards.

public class StronglyTypedIdValueConverterSelector : ValueConverterSelector
{
    // The dictionary in the base type is private, so we need our own one here.
    private readonly ConcurrentDictionary<(Type ModelClrType, Type ProviderClrType), ValueConverterInfo> _converters
        = new ConcurrentDictionary<(Type ModelClrType, Type ProviderClrType), ValueConverterInfo>();

    public StronglyTypedIdValueConverterSelector(ValueConverterSelectorDependencies dependencies) : base(dependencies)
    { }

    public override IEnumerable<ValueConverterInfo> Select(Type modelClrType, Type providerClrType = null)
    {
        var baseConverters = base.Select(modelClrType, providerClrType);
        foreach (var converter in baseConverters)
        {
            yield return converter;
        }

        // Extract the "real" type T from Nullable<T> if required
        var underlyingModelType = UnwrapNullableType(modelClrType);
        var underlyingProviderType = UnwrapNullableType(providerClrType);

        // 'null' means 'get any value converters for the modelClrType'
        if (underlyingProviderType is null || underlyingProviderType == typeof(Guid))
        {
            // Try and get a nested class with the expected name. 
            var converterType = underlyingModelType.GetNestedType("StronglyTypedIdEfValueConverter");

            if (converterType != null)
            {
                yield return _converters.GetOrAdd(
                    (underlyingModelType, typeof(Guid)),
                    k =>
                    {
                        // Create an instance of the converter whenever it's requested.
                        Func<ValueConverterInfo, ValueConverter> factory =
                            info => (ValueConverter) Activator.CreateInstance(converterType, info.MappingHints);

                        // Build the info for our strongly-typed ID => Guid converter
                        return new ValueConverterInfo(modelClrType, typeof(Guid), factory);
                    }
                );
            }
        }
    }

    private static Type UnwrapNullableType(Type type)
    {
        if (type is null) { return null; }

        return Nullable.GetUnderlyingType(type) ?? type;
    }
}

The StronglyTypedIdValueConverterSelector is written to follow the same patterns as the ValueConverterSelector it overrides, so I've created a ConcurrentDictionary<> for tracking the value converters in the same way the base class does. The dictionary in the base class is private so we have to create a new instance of it here, but that's not a big deal. The constructor passes through the required ValueConverterSelectorDependencies object to the base class.

The meat of the implementation is in the Select method. We start by fetching all of the applicable built-in value converters by calling base.Select(), and yield return on all of the returned implementations. That preserves existing behaviour.

Next, we have to "unwrap" nullable types, just as the base class did. We call the simple static UnwrapNullableType() method defined at the end of the class. If the provider type is either null or Guid, then we try and create a converter, otherwise we're done.

When testing the converter, I found that the method was only ever called with providerClrType=null. That's likely due to something specific about my models, I just thought I'd point it out.

Assuming the if() branch returns true, we now need to see if the modelClrType is a strongly-typed ID type with a value converter implementation. This is where the change to the value converter implementation at the start of this post makes sense:

public readonly struct OrderId 
{
    public class StronglyTypedIdEfValueConverter : ValueConverter<OrderId, Guid> { }
}

By creating the value converter as a nested class, and using the same name across all strongly-typed ID types (StronglyTypedIdEfValueConverter), we can both fetch the converter type and test for a strongly-typed ID at the same time with a small bit of reflection:

var converterType = underlyingModelType.GetNestedType("StronglyTypedIdEfValueConverter");
if (converterType != null)
{
    // we have a Type for the converter
}

At this point we know we have a value converter for the modelClrType, so we need to create the correct ValueConverterInfo and yield return it. The base class simplifies this code by using a static DefaultInfo property, but we'd have to invoke a similar method using reflection, and it all gets a bit more hassle than it's worth. Instead, I opted for creating a factory function that creates an instance of the converter by calling Activator.CreateInstance(), passing in the required ConverterMappingHints argument:

Func<ValueConverterInfo, ValueConverter> factory =
    info => (ValueConverter) Activator.CreateInstance(converterType, info.MappingHints);

Don't be fooled by the fact that the StronglyTypedIdEfValueConverter mappingHints parameter has a default value of null. Even though you don't need to provide this value when invoking the constructor normally, you must provide it when invoking the method using reflection (and Activator.CreateInstance())

Finally, we can create an instance of ValueConverterInfo, add it to the dictionary, and yield return it.

This implementation looks a bit complicated because of the reflection required, but I'm pretty confident there's nothing untoward going on there. All that remains is for us to replace the default instance of IValueConverterSelector with our custom class.

Replacing the default IValueConverterSelector with a custom implementation

Replacing "framework" EF Core services is relatively painless thanks to the ReplaceService method exposed by DbContextOptionsBuilder. You can call this method as part of your EF Core configuration in Startup.ConfigureServices, in the AddDbContext<> configuration method:

public void ConfigureServices(IServiceCollection services)
{
    services.AddDbContext<ApplicationDbContext>(options =>
        options
            .ReplaceService<IValueConverterSelector, StronglyTypedIdEfValueConverter>() // add this line
            .UseSqlServer(
                Configuration.GetConnectionString("DefaultConnection")));
}

That's it.

No more custom DbContext.OnModelCreating code.

No marker attributes.

No more implicit/explicit conversions to force use of the value converter.

And most importantly, no more client-side evaluation.

I'm actually kind of surprised by how well it works, but it all does seem to work. Even the following code (which was broken in the implementation from my last post), works:

public Order GetOrder(OrderId orderId)
{
    return _dbContext.Orders
                .Where(order => order.Id == orderId)
                .FirstOrDefault();
}

public Order GetOrderUsingFind(OrderId orderId)
{
    return _dbContext.Orders
                .Find(orderId);
}

Both of these usages generate the same SQL, which has a server-side where clause:

info: Microsoft.EntityFrameworkCore.Database.Command[20101]
      Executed DbCommand (6ms) [Parameters=[@__get_Item_0='?' (DbType = Guid)], CommandType='Text', CommandTimeout='30']

      SELECT TOP(1) [e].[OrderId], [e].[Name]
      FROM [Orders] AS [e]
      WHERE [e].[OrderId] = @__get_Item_0

Success! One more reason to use strongly-typed IDs in your next ASP.NET Core app 😃.

Summary

In this post I describe a solution to using strongly-typed IDs in your EF Core entities by using value converters and a custom IValueConverterSelector. The base ValueConverterSelector in the EF Core framework is used to register all built-in value conversions between primitive types. By deriving from this class, we can add our strongly-typed ID converters to this list, and get seamless conversion throughout our EF Core queries. As well as reducing the configuration required, this solves the client-side evaluation problem that plagued the previous implementation.

Validating phone numbers with Twilio using ASP.NET Core Identity and Razor Pages

$
0
0
Validating phone numbers with Twilio using ASP.NET Core Identity and Razor Pages

ASP.NET Core Identity is a membership system that adds login and user functionality to ASP.NET Core apps. It includes many features out of the box and has basic support for storing a phone number for a user. You can improve the robustness of ASP.NET Core’s phone number validation and provide a better user experience by integrating Twilio’s telephony features in your application.

By default the phone number in ASP.NET Core Identity is validated with a regular expression, but that's too basic to confirm whether the number is really valid, whether it includes the country dialling code, or whether it can receive SMS messages. You could implement improved validation using the library libphonenumber-csharp, as described in a previous Twilio blog post. Alternatively you could use various Twilio APIs to thoroughly validate the phone number, lookup details about the number (such as carrier or type), and prove ownership of the phone with a text or voice verification message.

Multiple stages of validation are required to determine if a phone number can be associated with an application user for a specific purpose, but I'll only be looking at the first step in this post: ensuring a number is valid for a specific country and determining if it is likely to be able to receive text messages. Twilio's Lookup API can provide this functionality in a Razor Pages app that uses ASP.NET Core Identity for user management.

Prerequisites

To follow along with this post you'll need

You can find the complete code for this post on GitHub.

Data validation in ASP.NET Core Razor Pages

Razor Pages is a new aspect of ASP.NET Core MVC that was introduced in ASP.NET Core 2.0. It's very similar to the traditional Model-View-controller (MVC) pattern commonly used in ASP.NET Core, but uses a "page-based" approach. See my previous post for an introduction on Razor Pages, and how they differ from ASP.NET Core MVC.

Razor Pages uses the same model binding and model validation processes as MVC, but applies them to a "Page Model" instead of action method parameters. For example, [Required], and [EmailAddress] are validation attributes that check the value of the InputModel.Email property is correct.

public partial class IndexModel : PageModel
{
    [BindProperty]
    public InputModel Input { get; set; }

    public class InputModel
    {
        [Required]
        [EmailAddress]
        public string Email { get; set; }
    }
}

These attributes are found in the System.ComponentModel.DataAnnotations namespace, which includes a [Phone] attribute for validating phone numbers. Unfortunately, this attribute is simplistic and doesn't take into account the highly complex set of rules and exceptions that apply to phone numbers.

For better validation you could use the open source library that Google created and uses for validating phone numbers: libphonenumber. There's a C# port of the library, libphonenumber-csharp, that you can install in your application using the NuGet package. This post on the Twilio blog shows how to use it in your applications.

Alternatively, you could use the Twilio Lookup API to validate phone numbers. This uses the same libphonenumber validation library behind the scenes, but it can also provide extra details such as carrier information (in the US), the type of the phone number (landline/mobile/VOIP), or details of suspected fraud associated with the number.

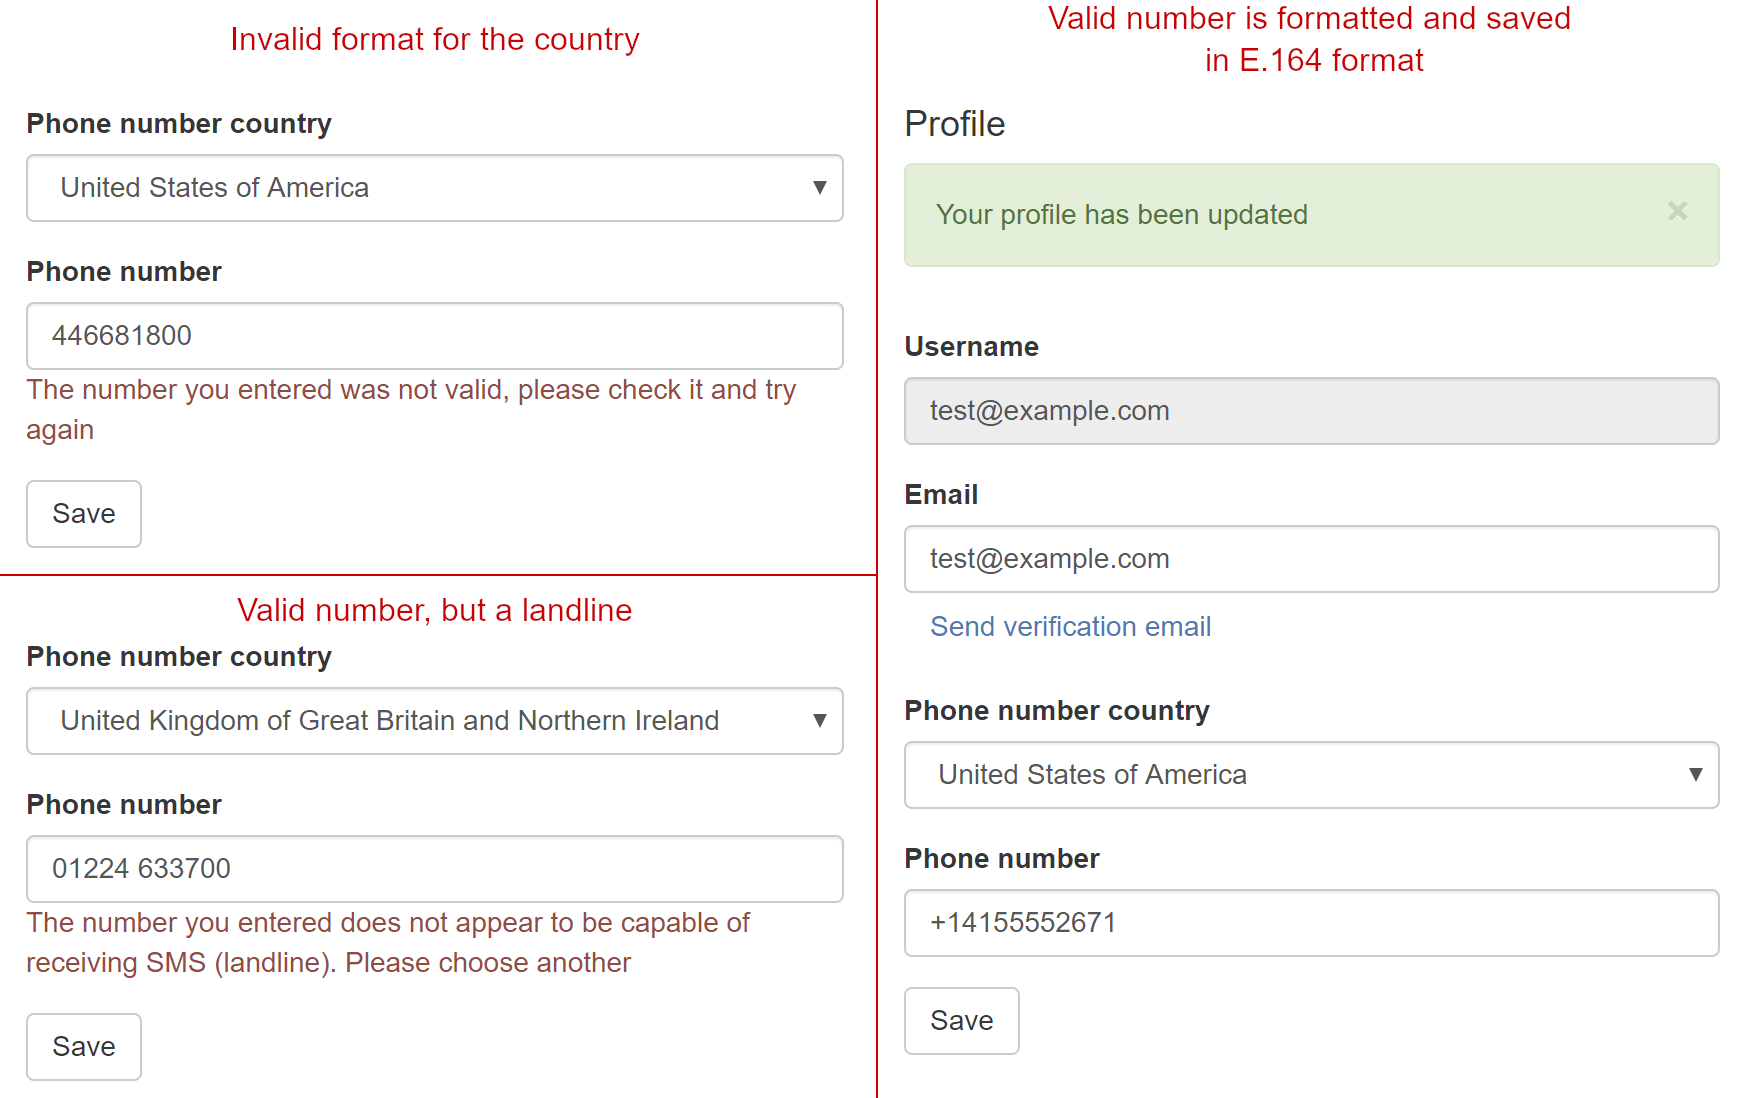
In this post I'll show how you can use the Twilio Lookup API in a new Razor Pages app to validate the optional phone number provided by users. We'll validate that the number the user entered is valid for their selected country, that it can likely receive SMS messages, and, if so, we'll save the number in the standard E.164 format.

Customizing ASP.NET Core Identity Razor Pages

In older versions of ASP.NET Core, creating a new MVC or Razor Pages app using the ASP.NET Core Identity templates would dump thousands of lines of code into your app. That changed in ASP.NET Core 2.1 with the introduction of Razor Class Libraries.

Razor Class Libraries allow you to bundle views, Razor Pages, and View Components into a NuGet package. To include the UI elements in an app, you simply reference the NuGet package. All of the Razor Pages from the library will then be available in your app with no additional work required on your side.

This is how ASP.NET Core Identity ships now. When you create a new ASP.NET Core app with Identity, your project directory will be virtually empty instead of having thousands of files. That's generally a good thing—you don't have to manage the infrastructure code or keep it up to date.

The obvious downside is that if you want to customize the default experience, for example to improve phone validation like we are, you can't just start updating the code. Luckily, Razor Class Libraries let you override any of the included views or Razor Pages by placing a Page at the same path in your application.

ASP.NET Core provides tools for scaffolding these "override" files for ASP.NET Core Identity. The Identity scaffolder is built into Visual Studio 2017, or there is a cross-platform global tool dotnet-aspnet-codegenerator you can run from the command line. I'll show how to use the global tool to scaffold the /Identity/Account/Manage page that we need to customize.

Creating the case study project

Using Visual Studio 2017+ or the .NET CLI, create a new solution and project with the following characteristics:

  • Type: ASP.NET Core 2.2 Web Application (not MVC) with Visual C#
  • Name: ValidatePhoneNumberDemo
  • Solution directory
  • Git repository
  • https
  • Authentication: Individual user accounts, Store user accounts in-app

ASP.NET Core Identity uses Entity Framework Core to store the users in the database, so be sure to run the database migrations after building your app:

dotnet ef database update

Using the .NET CLI to scaffold Identity pages

Install the aspnet-codegenerator global tool. Note that there is a bug in the latest version of the tool at the time of writing (2.2.0), so the following installs the last known good version (2.1.6).

dotnet tool install -g dotnet-aspnet-codegenerator --version 2.1.6

The Microsoft.VisualStudio.Web.CodeGeneration.Design NuGet is required by the aspnet-codegenerator global tool so, install it in to into your project using the NuGet Package Manager, Package Manager Console CLI, or by editing the the ValidatePhoneNumberDemo.csproj file. Be sure to set the PrivateAssets attribute to All, so that the package is used only during development.

<PackageReference Include="Microsoft.VisualStudio.Web.CodeGeneration.Design" Version="2.2.1" PrivateAssets="All" />

Open a console window inside your app's project folder (not the solution folder). Run the scaffolding tool to generate the Account.Manage.Index Razor Page. As well as listing the files to generate, you need to specify the full name of the EF Core DB Context for your project.
dotnet aspnet-codegenerator identity --files Account.Manage.Index -dc ValidatePhoneNumberDemo.Data.ApplicationDbContext 

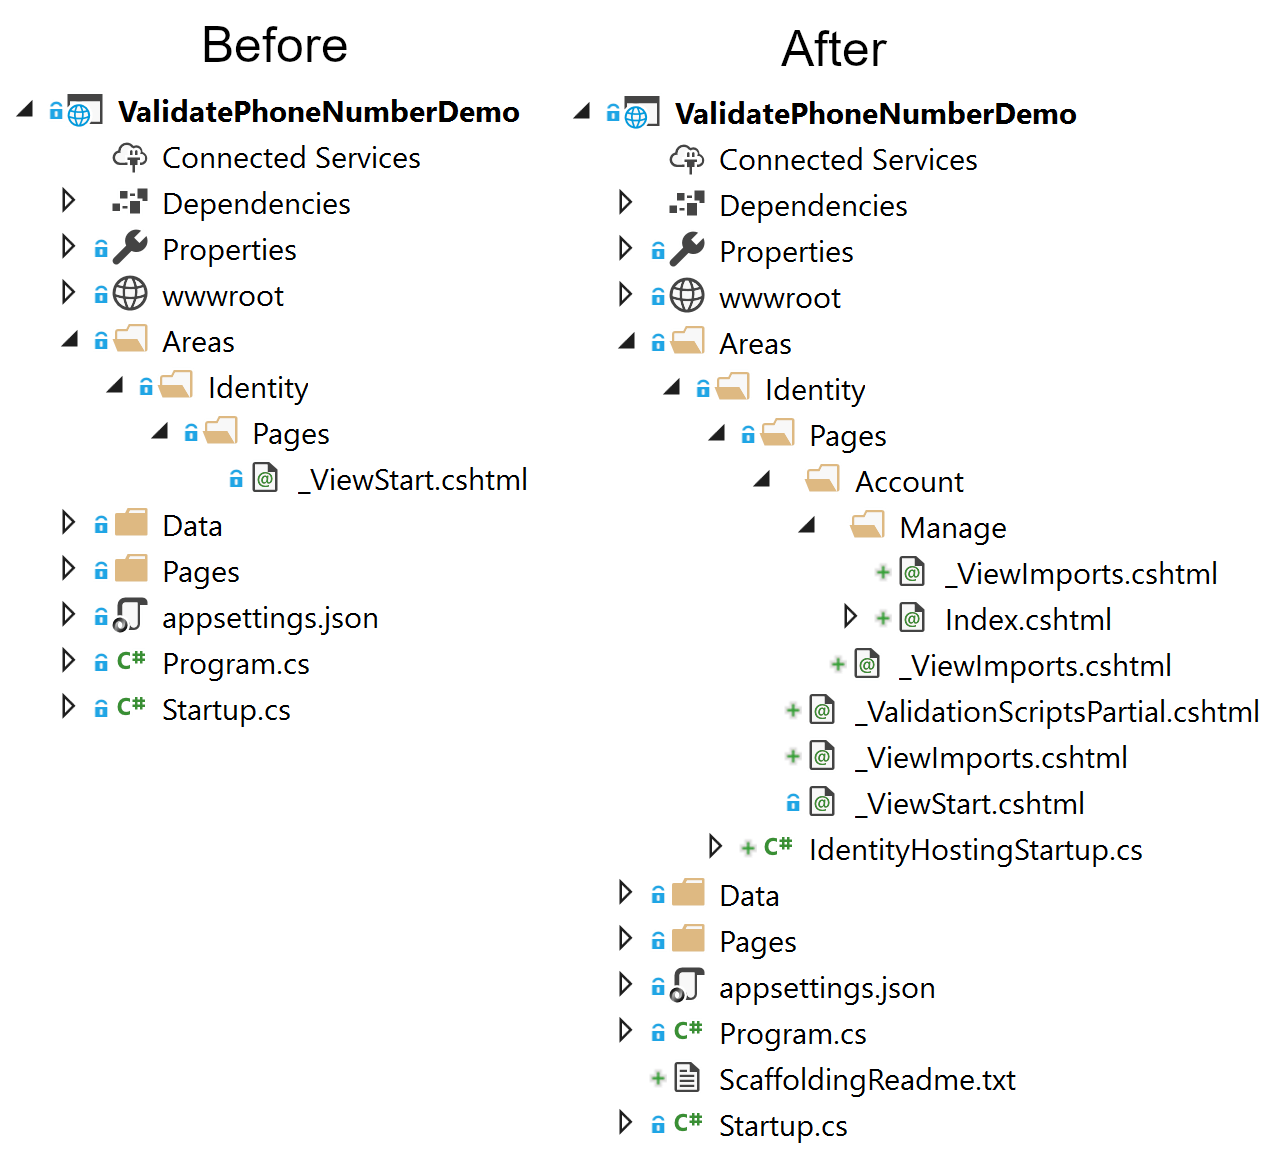
The scaffolder should complete in a few seconds, and afterwards you'll see new files in your project. The scaffolder generates the requested file, plus layout view files and partials.

Image of files generated using the scaffolder

You can view a list of all possible pages to generate using dotnet aspnet-codegenerator identity --listFiles.

Once your app is running, explore the existing phone number validation for users in ASP.NET Core Identity

  • Register a new user by clicking Register from the menu bar
  • Enter an email and password
  • Click Hello <email>! from the menu bar to see the profile/manage account page, or navigate to /Account/Manage
  • Try saving various phone numbers to see what's valid. Hint: 0 is apparently a valid phone number!

Initializing the Twilio API

We'll be using the Twilio helper library to simplify calling the Twilio HTTP API. Install the Twilio NuGet package (version 5.22.0 or later) using the NuGet Package Manager, Package Manager Console CLI, or by editing the ValidatePhoneNumberDemo.csproj file. After using any of these methods the <ItemGroup> section of the project file should look like this (version numbers may be higher):

<ItemGroup>
  <PackageReference Include="Microsoft.AspNetCore.App"/>
  <PackageReference Include="Microsoft.AspNetCore.Razor.Design" Version="2.2.0" PrivateAssets="All" />
  <PackageReference Include="Microsoft.VisualStudio.Web.CodeGeneration.Design" Version="2.2.1" PrivateAssets="All" />
  <PackageReference Include="Twilio" Version="5.22.0" />
</ItemGroup>

To call the Twilio API you'll need your Twilio Account Sid and Auth Token (found in the Twilio Dashboard). When developing locally these should be stored using the Secrets Manager so they don't get accidentally committed to your source code repository. You can read about how and why to do that in this post on the Twilio Blog. Your resulting Secrets.json should look something like this:

"TwilioAccountDetails": {
  "AccountSID": "ACxxxxxxxxxxxxxxxxxxxxxxxxxxxxxxxx",
  "AuthToken": "your_auth_token"
}

The Twilio helper libraries use a singleton instance of the Twilio client, which means you only need to set it up once in your app. The best place to configure things like this are in the Startup.cs file. Add using Twilio; at the top of Startup.cs, and add the following at the end of ConfigureServices:

public void ConfigureServices(IServiceCollection services)
{
    // existing configuration

    var accountSid = Configuration["TwilioAccountDetails:AccountSID"];
    var authToken = Configuration["TwilioAccountDetails:AuthToken"];
    TwilioClient.Init(accountSid, authToken);
}

This sets up the static Twilio client using your credentials using the ASP.NET Core configuration system. If you need to customize the requests made to Twilio (e.g. using a proxy server), or want to make use of HttpClientFactory features introduced in ASP.NET Core 2.1, see my previous post on the Twilio blog for an alternative approach.

An inconvenient truth: phone numbers are hard

As any developer who has had the (dis-)pleasure of working with time zones will know; time zones are hard. Unfortunately, phone numbers are hard too! There's a great number of misconceptions that developers have to tackle when they really start working with phone numbers. This document from the libphonenumber library on Falsehoods Programmers Believe About Phone Numbers is a great introduction.

One such problem is that different countries have different rules about what constitutes a valid phone number. So to unambiguously validate a phone number you need to know the country in which it was issued. See the falsehoods document linked above for some examples of why that's necessary.

In order to correctly validate the provided phone number, we need users to choose the issuing country at the same time. That means when we validate the phone number with Twilio we can include the 2-digit ISO 3166 country code, and confirm whether the phone number is valid specifically for that country.

Adding a country code dropdown

We'll add a dropdown of countries to the ASP.NET Core Identity management page to make it easy for users to choose the appropriate country code.

To build the dropdown, we'll load this list of countries from a JSON file countries.json stored in the project folder. A snippet of the file is shown below; you can find a complete file in the sample here.

Ellipsis (“...”) in code blocks represents a section redacted for brevity.

[
    {
        "Text": "United States of America",
        "Value": "US"
    },
    {
        "Text": "United Kingdom of Great Britain and Northern Ireland",
        "Value": "GB"
    },
    {
        "Text": "Canada",
        "Value": "CA"
    },
...
]

Next, we'll create a service to load the JSON file, and convert it into a List<SelectListItem>. Create the CountryService.cs file in the root of your project and add the following code:

using System;
using System.Collections.Generic;
using System.IO;
using Microsoft.AspNetCore.Hosting;
using Microsoft.AspNetCore.Mvc.Rendering;
using Newtonsoft.Json;

namespace ValidatePhoneNumberDemo
{
    public class CountryService
    {
        private readonly IHostingEnvironment _environment;
        private readonly Lazy<List<SelectListItem>> _countries;

        public CountryService(IHostingEnvironment environment)
        {
            _environment = environment;
            _countries = new Lazy<List<SelectListItem>>(LoadCountries);
        }

        public List<SelectListItem> GetCountries()
        {
            return _countries.Value;
        }

        private List<SelectListItem> LoadCountries()
        {
            var fileInfo = _environment.ContentRootFileProvider.GetFileInfo("countries.json");

            using (var stream = fileInfo.CreateReadStream())
            using (var streamReader = new StreamReader(stream))
            using (var jsonTextReader = new JsonTextReader(streamReader))
            {
                var serializer = new JsonSerializer();
                return serializer.Deserialize<List<SelectListItem>>(jsonTextReader);
            }
        }
    }
}

This service uses Lazy<> to provide lazy initialization, an optimization that only loads the countries from the JSON file once, when they’re needed, in a thread-safe manner. It also uses the streaming support of Newtonsoft.Json to deserialize the contents directly to a List<SelectListItem>, instead of loading it as a string first. The deserialized list of countries is exposed via the GetCountries() method.

In order to use the CountryService you must register it with the app's dependency injection (DI) container. Open up Startup.cs and add the following line at the end of the ConfigureServices method:

services.AddSingleton<CountryService>();

This registers the service with the DI container as a singleton so we can inject it into our Razor Page. Open the code behind for the account management Razor Page at Areas\Identity\Pages\Account\Manage\Index.cshtml.cs, add using Microsoft.AspNetCore.Mvc.Rendering; at the top of the file, and inject an instance of CountryService into the constructor. Create a new property AvailableCountries on your page model and use the injected CountryService to assign the list of countries. Note that if you're using Visual Studio, you need to expand the Index.cshtml file node in Solution Explorer to see the code-behind file, Index.cshtml.cs.

namespace ValidatePhoneNumberDemo.Areas.Identity.Pages.Account.Manage
{
    public partial class IndexModel : PageModel
    {
        public IndexModel(
            UserManager<IdentityUser> userManager,
            SignInManager<IdentityUser> signInManager,
            IEmailSender emailSender,
            CountryService countryService)
        {
            _userManager = userManager;
            _signInManager = signInManager;
            _emailSender = emailSender;
            // Load the countries from the service
            AvailableCountries = countryService.GetCountries();
        }

        public List<SelectListItem> AvailableCountries { get; }
        ...
    }
}

Our page model now has the list of available countries so we can populate the dropdown, but we also need somewhere to store the user's selection. Update the nested InputModel and add the PhoneNumberCountryCode property:

namespace ValidatePhoneNumberDemo.Areas.Identity.Pages.Account.Manage
{
    public partial class IndexModel : PageModel
    {
        public class InputModel
        {
            [Required]
            [EmailAddress]
            public string Email { get; set; }

            [Phone]
            [Display(Name = "Phone number")]
            public string PhoneNumber { get; set; }

            // The country selected by the user.
            [Display(Name = "Phone number country")]
            public string PhoneNumberCountryCode { get; set; }
        }
    }
}

Finally, add the following Razor to Areas\Identity\Pages\Account\Manage\Index.cshtml, just above the Razor code for the phone number input.

<div class="form-group">
    <label asp-for="Input.PhoneNumberCountryCode"></label>
    <select asp-for="Input.PhoneNumberCountryCode" asp-items="Model.AvailableCountries" class="form-control"></select>
    <span asp-validation-for="Input.PhoneNumberCountryCode" class="text-danger"></span>
</div>

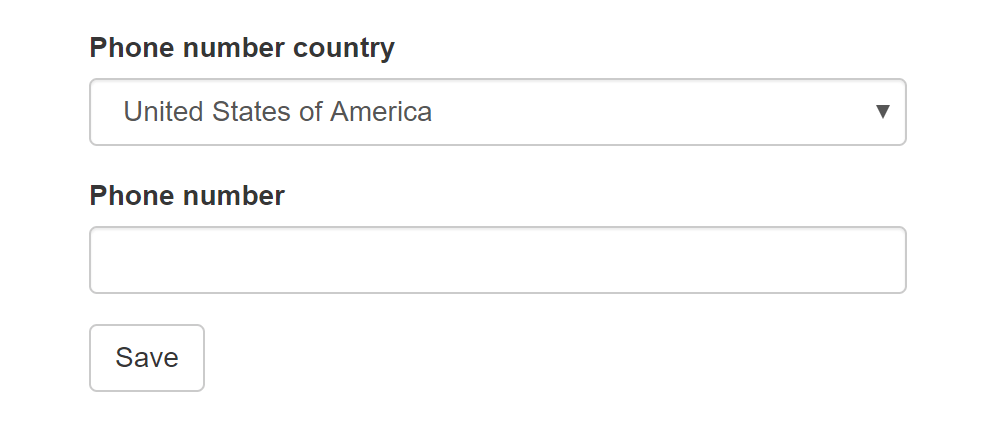
This Razor uses the Select Tag Helper to generate a <select> element populated with the values in the AvailableCountries property, which binds to the Input.PhoneNumberCountryCode property on form POST. If you run your app now and navigate to the account management page, you should see the country dropdown displayed above the phone number option.

Phone number country code dropdown

In this example, we don't have a "none" or "unselected" option in the <select> element. Consequently, the first item is selected and sent back to the user. That's OK for our purposes, but a more comprehensive approach might be to select the default country based on the user's location.

Adding phone number validation using the Twilio Lookup API

At this point we have everything in place to add our extra validation; we have the Twilio client configured, the CountryService loading our list of country codes, and our dropdown for the user to select their country. Now we'll add the validation call to the Twilio API.

Open Index.chstml.cs and add the following namespace using statements:

using Twilio.Exceptions;
using Twilio.Rest.Lookups.V1;

Now replace the following code found inside OnPostAsync:

...
var phoneNumber = await _userManager.GetPhoneNumberAsync(user);
if (Input.PhoneNumber != phoneNumber)
{
    var setPhoneResult = await _userManager.SetPhoneNumberAsync(user, Input.PhoneNumber);
    if (!setPhoneResult.Succeeded)
    {
        var userId = await _userManager.GetUserIdAsync(user);
        throw new InvalidOperationException($"Unexpected error occurred setting phone number for user with ID '{userId}'.");
    }
}
...

with our updated validation code. Take care to preserve the code both above and below the snippet that you're replacing:

...
var phoneNumber = await _userManager.GetPhoneNumberAsync(user);
if (Input.PhoneNumber != phoneNumber)
{
    try
    {
        var numberDetails = await PhoneNumberResource.FetchAsync(
            pathPhoneNumber: new Twilio.Types.PhoneNumber(Input.PhoneNumber),
            countryCode: Input.PhoneNumberCountryCode,
            type: new List<string> { "carrier" });

        // only allow user to set phone number if capable of receiving SMS
        var phoneNumberType = numberDetails.GetPhoneNumberType();
        if (phoneNumberType != null 
            && phoneNumberType == PhoneNumberResource.TypeEnum.Landline)
        {
            ModelState.AddModelError($"{nameof(Input)}.{nameof(Input.PhoneNumber)}",
                $"The number you entered does not appear to be capable of receiving SMS ({phoneNumberType}). Please enter a different value and try again");
            return Page();
        }

        var numberToSave = numberDetails.PhoneNumber.ToString();
        var setPhoneResult = await _userManager.SetPhoneNumberAsync(user, numberToSave);
        if (!setPhoneResult.Succeeded)
        {
            var userId = await _userManager.GetUserIdAsync(user);
            throw new InvalidOperationException($"Unexpected error occurred setting phone number for user with ID '{userId}'.");
        }
    }
    catch (ApiException ex)
    {
        ModelState.AddModelError($"{nameof(Input)}.{nameof(Input.PhoneNumber)}",
            $"The number you entered was not valid (Twilio code {ex.Code}), please check it and try again");
        return Page();
    }
}
...

That's a lot of code to digest, so I'll walk through it below.

Before we do anything with the phone number, we load the existing number for the Identity user and check whether it's changed. If the number hasn't changed, there's no need to validate it, call the Twilio API, or update the value.

var phoneNumber = await _userManager.GetPhoneNumberAsync(user);
if (Input.PhoneNumber != phoneNumber)
{
    // Phone number has changed, so validate and save it
}

If the number has changed, we need to validate the value using the Twilio Lookup API. We use the PhoneNumberResource helper to make an asynchronous call to the Twilio API, passing in the PhoneNumber and PhoneNumberCountryCode from the InputModel. We wrap the call in a try-catch block, as it will throw an exception if it's invalid. In that case we display a generic error and redisplay the form. You could also log the exception, but be wary of storing personally identifiable information (PII) in log messages.

try
{
    var numberDetails = await PhoneNumberResource.FetchAsync(
        pathPhoneNumber: new Twilio.Types.PhoneNumber(Input.PhoneNumber),
        countryCode: Input.PhoneNumberCountryCode,
        type: new List<string> { "carrier" });

    // validation successful
}
catch (ApiException ex)
{
    ModelState.AddModelError($"{nameof(Input)}.{nameof(Input.PhoneNumber)}",
            $"The number you entered was not valid (Twilio code {ex.Code}), please check it and try again");
    return Page();
}

Note that we've added the error as a property error by including the field name in the call to AddModelError(). That means the error will be shown next to the phone number field, as well as in the Validation Summary Tag Helper by default. I've also included the Twilio code in the error message for demonstration purposes. In practice you probably won't want to expose that to users, but you may well want to use it for logging and metric purposes.

As well as validating the number, in this example we also requested the carrier information for the number by passing "carrier" to the type parameter of FetchAsync(). This is not necessary for the validation itself, but it can provide some useful additional information for some business use-cases. Including the "carrier" also returns the likely phone number type of the number.

We extract the phone number type from the response, taking care to handle nulls and missing values. The phone number type has one of three string values: landline, mobile, or voip. We use that value to try and determine if the number can receive SMS. If it can't, we redisplay the form and make the user enter a different value.

// only allow user to set phone number if capable of receiving SMS
var phoneNumberType = numberDetails.GetPhoneNumberType();
if (phoneNumberType != null 
    && phoneNumberType == PhoneNumberResource.TypeEnum.Landline)
{
    ModelState.AddModelError($"{nameof(Input)}.{nameof(Input.PhoneNumber)}",
        $"The number you entered does not appear to be capable of receiving SMS ({phoneNumberType}). Please enter a different value and try again");
    return Page();
}

This behavior may be undesirable in many cases; a better approach might be to return a warning, but still save the number. In any case, the only way to be sure whether the number can receive SMS or voice is to try to message or call it, using the Twilio Verify API for example.

Once we've validated the phone number with Twilio's API and confirmed it's not a landline number, we save the phone number to the Identity user. This code is essentially the same as before we added our customizations with one exception—instead of saving the number as it was entered by the user, we store the number formatted in E.164 format. This has the benefit of not requiring us to store the country code (as it's contained in the formatted number).

var numberToSave = numberDetails.PhoneNumber.ToString();
var setPhoneResult = await _userManager.SetPhoneNumberAsync(user, numberToSave);
if (!setPhoneResult.Succeeded)
{
    var userId = await _userManager.GetUserIdAsync(user);
    throw new InvalidOperationException($"Unexpected error occurred setting phone number for user with ID '{userId}'.");
}

With this code in place you can test out the validation in your own app. When a number fails Twilio's validation, you will see the error message shown below on the top left. When it passes validation but is a landline, you'll see the error message on the bottom left. Finally, when it passes all validation and is not a landline, you'll see the number is updated to the E.164 format (the +1 format) as shown on the right.

Testing out the phone number validation

The extension method for extracting the phone number type from the PhoneResource object is shown below. It handles nulls, as well as cases where you may not have requested the type using the "carrier" argument.

using Twilio.Rest.Lookups.V1;

namespace ValidatePhoneNumberDemo
{
    public static class PhoneNumberResourceExtensions
    {
        public static PhoneNumberResource.TypeEnum GetPhoneNumberType(this PhoneNumberResource phoneNumber)
        {
            if (phoneNumber?.Carrier != null 
                && phoneNumber.Carrier.TryGetValue("type", out string rawType))
            {
                // implicitly convert from string to PhoneNumberResource.TypeEnum
                return rawType;
            }

            return null;
        }
    }
}

It's important to remember that validating a number using libphonenumber or the Twilio Lookup API (as we did in this post) is typically only the first step in a multi stage process to verify a user controls a phone number. Before using the phone number for business purposes you should confirm the user has access to the device either by sending a verification message/phone call, using the Twilio Verify API for example.

Summary

In this post I showed how you can improve the phone number validation in ASP.NET Core Identity by using the Twilio Lookup API. I showed how to scaffold ASP.NET Core Identity pages so they can be customized using the dotnet-aspnet-codegenerator global tool, and how to load countries for a dropdown list from a JSON file. It's important to include the country when validating phone numbers as different countries have different rules.

The Twilio Lookup API uses the libphonenumber library to check the phone number is valid, but it can also return additional information like the carrier, phone number type, or fraud details. For thorough verification that the user has control of the phone number, you should consider using the Twilio Verify API to send a message/call to the phone number.

Additional Resources

For an introduction to Razor Pages, see my previous post, or the excellent resource, https://www.learnrazorpages.com/. For more information on phone numbers and why they're difficult, see The Falsehoods Programmers Believe About Phone Numbers. For a post on using the libphonenumber directly in your ASP.NET Core application, see this post on the Twilio blog.

Safely migrating passwords in ASP.NET Core Identity with a custom PasswordHasher

$
0
0
Safely migrating passwords in ASP.NET Core Identity with a custom PasswordHasher

Some time ago I wrote a post on the default ASP.NET Core Identity PasswordHasher<> implementation, and how it enables backwards compatibility between password hashing algorithms. In a follow up post, I showed how to create a custom IPasswordHasher<> to slowly migrate existing BCrypt password hashes to the default ASP.NET Core Identity hashing format.

Unfortunately, the implementation in that post is no good for migrating weak password hashes to something more secure. If you are migrating from a weak hashing strategy, you'll end up with some of your passwords continually stored using the weak strategy. Passwords are only stored securely for users that had logged in recently. In this post I'll show a better implementation that solves that problem by taking a hash of a hash.

Disclaimer: You should always think carefully before replacing security-related components, as a lot of effort goes into making the default components secure by default. This article solves a specific problem, but you should only use it if you need it!

The code I'm going to show is based on the ASP.NET Core 2.2 release, but it should work with any 2.x version of ASP.NET Core Identity.

Background

As I discussed in the previous post, the IPasswordHasher<> interface has two responsibilities:

  • Hash a password so it can be stored in a database
  • Verify a provided plain-text password matches a previously stored hash

In this post I'm focusing on the scenario where you want to add ASP.NET Core Identity to an existing app, and you already have a database that contains usernames and password hashes.

The problem is that your password hashes are stored using a hash format that isn't compatible with ASP.NET Core Identity and is generally insecure (e.g. SHA1 or MD5). In this example, I'm going to assume your passwords are hashed using MD5, but you could easily apply it to other hashing algorithms. The Md5PasswordHasher<> we will create allows you to verify existing password MD5 hashes, while allowing you to create new hashes using the default ASP.NET Core Identity hashing algorithm.

In my previous implementation, I achieved this by creating a custom IPasswordHasher<> implementation that used existing password hashes (BCrypt in that case) to verify the password, and then re-hashed the password on successful login. The downside with that approach is that the IdentityUser.PasswordHash column ends up with a mixture of different hashes stored in it: ASP.NET Core Identity v3 (PBKDF2) hashes for users that have logged in recently, and BCrypt for those that haven't.

Diagram showing how previous implementation gave mixure of hashes stored in PasswordHash column

From a technical point of view, this isn't a big issue - the format marker byte allows the IPasswordHasher<> implementation to interpret and handle the different hash formats.

However this approach is problematic if your "old" hash format is weak or obsolete, e.g. MD5. If that's the case, you'll have a mix of secure (ASP.NET Core Identity PBKDF2) hashes and thoroughly insecure MD5 hashes stored in your database. If your app ends up having a data breach and appearing on HaveIBeenPwned, those MD5 hashes will be cracked very quickly. 😟

So how can you handle this if your current passwords are stored as MD5 hashes? You can't just "convert" them to a secure format, as that requires knowing the plaintext password for every user.

The correct approach is to apply the new hash algorithm to the MD5 hashes themselves, not the plaintext password. This gives you a "hash-inside-a-hash", so in the event of a data breach your users' passwords have much better protection. As users sign in, you can slowly re-hash their passwords to the un-nested form, but in the mean time you're not exposing insecure MD5 hashes.

Diagram showing how new implementation stores a hash of a hash in the PasswordHash column

When a user logs in and verifies their password, you can re-hash the password using the ASP.NET Core Identity default hash function. That way, hashes will slowly migrate from the legacy hash-inside-a-hash format to the default hash format.

Using a format byte to distinguish hash implementations

As discussed in a previous post, the default PasswordHasher<> implementation already handles multiple hashing formats, namely two different versions of PBKDF2. It does this by storing a single-byte "format-marker" along with the password hash. The whole combination is then Base64 encoded and stored in the database as a string.

When a password needs to be verified and compared to a stored hash, the hash is read from the database, decoded from Base64 to bytes, and the first byte is inspected. If the byte is 0x00, the password hash was created using v2 of the hashing algorithm. If the byte is 0x01, then v3 was used.

Using format byte to identify hashing algorithm

We can maintain compatibility with the base PasswordHasher algorithm by storing our own custom format marker in the first byte of the password hash in a similar way. 0x00 and 0x01 are already taken, so I chose 0xF0 for this case as it seems like it should be safe for a while!

Using format byte to identify nested has-of-hash algorithm

A slightly abbreviated version of the Md5PasswordHasher implementation is shown below (you can find the complete source code on GitHub). When a password hash and plain-text password are provided for verification, we follow a similar approach to the default PasswordHasher<>. We convert the password from Base64 into bytes, and examine the first byte. If the hash starts with 0xF0 then we have a hash-inside-a-hash. If it starts with something else, then we pass the original stored hashed and provided plain-text password to the base PasswordHasher<> implementation.

If we find we are working with a hash-inside-a-hash, then we replace the 0xF0 format-marker with 0x01, and convert it back to a Base64 string for use with the base PasswordHasher<> implementation. We also take the provided password and create an MD5 hash of it. We then pass the MD5 hash as the "provided password" to the base VerifyHashedPassword method. This then hashes it using the Identity v3 PBKDF2 format (thanks to the 0x01 format marker we added) and compares the result with storedPassword.

public class Md5PasswordHasher<TUser> : PasswordHasher<TUser> where TUser : class
{
    public override PasswordVerificationResult VerifyHashedPassword(TUser user, string hashedPassword, string providedPassword)
    {
        byte[] decodedHashedPassword = Convert.FromBase64String(hashedPassword);

        // read the format marker from the hashed password
        if (decodedHashedPassword.Length == 0)
        {
            return PasswordVerificationResult.Failed;
        }

        // ASP.NET Core uses 0x00 and 0x01 for v2 and v3
        if (decodedHashedPassword[0] == 0xF0)
        {
            // replace the 0xF0 prefix in the stored password with 0x01 (ASP.NET Core Identity V3) and convert back to Base64
            decodedHashedPassword[0] = 0x01;
            var storedPassword = Convert.ToBase64String(decodedHashedPassword);

            // md5 hash the provided password
            var md5ProvidedPassword = GetM5Hash(providedPassword);

            // call the base implementation with the new values
            var result = base.VerifyHashedPassword(user, storedPassword, md5ProvidedPassword);

            return result == PasswordVerificationResult.Success
                ? PasswordVerificationResult.SuccessRehashNeeded
                : result;
        }

        return base.VerifyHashedPassword(user, hashedPassword, providedPassword);
    }

    public static string GetM5Hash(string input)
    {
        using (MD5 md5Hash = MD5.Create())
        {
            var bytes = md5Hash.ComputeHash(Encoding.UTF8.GetBytes(input));

            return Convert.ToBase64String(bytes);
        }
    }
}

If the provided password was correct (the base implementation returned PasswordVerificationResult.Success) then we force the ASP.NET Core Identity system to re-hash the password. This strips out the MD5 layer from the hash, leaving you with a "raw" ASP.NET Core Identity v3 PBKDF2 format hash stored in the database.

New passwords will always be created with the default v3 PBKDF2 format anyway, as we don't override the HashPassword method.

You can replace the default PasswordHasher<> implementation in your application by registering the Md5PasswordHasher in Startup.ConfigureServices(). There's a number of ways to do this, but I show how you can use the Replace() extension method below. Make sure to add this line after calling AddDefaultIdentity<>() or AddIdentity<>():

public void ConfigureServices(IServiceCollection services)
{
    // ...
    services.AddDefaultIdentity<IdentityUser>()
        .AddDefaultUI(UIFramework.Bootstrap4)
        .AddEntityFrameworkStores<ApplicationDbContext>();
    // ...

    // Replace the existing scoped IPasswordHasher<> implementation
    services.Replace(new ServiceDescriptor(
        serviceType: typeof(IPasswordHasher<IdentityUser>),
        implementationType: typeof(Md5PasswordHasher<IdentityUser>),
        ServiceLifetime.Scoped));

}

This is all you need in the normal operation of your application, but before you can run your app you need to create your hash-inside-a-hash values.

Converting stored MD5 passwords to support the Md5PasswordHasher

The approach of extending the default PasswordHasher<> implementation shown in this post requires you to have already stored your passwords against each IdentityUser using the hash-inside-a-hash mechanism and the 0xF0 format-marker. That means you'll need to re-hash your existing MD5 hashes with the ASP.NET Core Identity password hasher.

How you do this is highly dependent on how and where your passwords are stored. I've provided a basic extension method below that takes an IdentityUser and an existing MD5 hash string and produces a string in a format compatible with the Md5PasswordHasher.

public static class UserManagerExtensions
{
    public static async Task<IdentityResult> SetMd5PasswordForUser(
        this UserManager<IdentityUser> userManager, 
        IdentityUser user, 
        string md5Password)
    {
        // Performs v3 PBKDF2 hash of provided MD5 hash
        var reHashedPassword = userManager.PasswordHasher.HashPassword(user, md5Password);

        // Replace the format marker so we know to MD5 hash 
        // provided passwords during password verification
        var passwordToStore = ReplaceFormatMarker(reHashedPassword, 0xF0);

        // Replace the old hash with the "updated marker" hash
        user.PasswordHash = passwordToStore;

        // Roll the security stamp for the user (invalidates security-related tokens)
        await userManager.UpdateSecurityStampAsync(user);

        // Save the changes to the DB and return the result
        return await userManager.UpdateAsync(user);
    }

    // Replace the fomat marker in Base64 encoded string 
    // Not the most efficient but does the job
    private static string ReplaceFormatMarker(string passwordHash, byte formatMarker)
    {
        var bytes = Convert.FromBase64String(passwordHash);
        bytes[0] = formatMarker;
        return Convert.ToBase64String(bytes);
    }
}

During your migration to ASP.NET Core Identity you would create a new IdentityUser for each of your existing users, and then call SetMd5PasswordForUser, passing in the md5 formatted password.

_userManager.SetMd5PasswordForUser(user, md5Password);

I have a basic proof of concept for this in the sample app on GitHub. It's a little contrived, but you can register as a new user in the sample (which stores the password hash as v3 PBKDF2). The home page then lets you enter a new password which is MD5 hashed and saved to the current IdentityUser using the SetMd5PasswordForUser extension method.

If you log out, and then sign back in with the new password, the nested hash-within-a-hash will automatically be re-hashed to strip out the MD5 layer again, leaving the "raw" v3 PBKDF2 format hash (as per the Md5PasswordHasher implementation).

Summary

In this post I showed how you could extend the default ASP.NET Core Identity PasswordHasher<> implementation to allow migrating from insecure hash formats. This lets you verify hashes created using a legacy format (MD5 in this example), and update them to use the default Identity password hashing algorithm so the vulnerable hashes are protected in the event of a data breach.

Verifying phone number ownership with Twilio using ASP.NET Core Identity and Razor Pages

$
0
0
Verifying phone number ownership with Twilio using ASP.NET Core Identity and Razor Pages

ASP.NET Core Identity is a membership system that adds user sign in and user management functionality to ASP.NET Core apps. It includes many features out of the box and has basic support for storing a phone number for a user. By default, ASP.NET Core Identity doesn't try to verify ownership of phone numbers, but you can add that functionality yourself by integrating Twilio’s identity verification features into your application.

In this post you'll learn how you can prove ownership of a phone number provided by a user using Twilio Verify in an ASP.NET Core application using Razor Pages. This involves sending a code in an SMS message to the provided phone number. The user enters the code received and Twilio confirms whether it is correct. If so, you can be confident the user has control of the provided phone number.

You typically only confirm phone number ownership once for a user. This is in contrast to two-factor authentication (2FA) where you might send an SMS code to the user every time they login. Twilio has a separate Authy API for performing 2FA checks at login, but it won't be covered in this post.

Note that this post uses version 1 of the Twilio Verify API. Version 2.x of the API is currently in Beta.

Prerequisites

To follow along with this post you'll need:

You can find the complete code for this post on GitHub.

Creating the case study project

Using Visual Studio 2017+ or the .NET CLI, create a new solution and project with the following characteristics:

  • Type: ASP.NET Core 2.2 Web Application (not MVC) with Visual C#
  • Name: SendVerificationSmsDemo
  • Solution directory
  • Git repository
  • https
  • Authentication: Individual user accounts, Store user accounts in-app

ASP.NET Core Identity uses Entity Framework Core to store the users in the database, so be sure to run the database migrations in the project folder after building your app. Execute one of the following command line instructions to build the database:

.NET CLI

dotnet ef database update

Package Manager Console

update-database

The Twilio C# SDK and the Twilio Verify API

The Twilio API is a typical REST API, but to make it easier to work with Twilio provides helper SDK libraries in a variety of languages. Previous posts have shown how to use the C# SDK to validate phone numbers, and how to customize it to work with the ASP.NET Core dependency injection container.

Unfortunately, the C# SDK doesn't support the current version of the Twilio Verify API (v1.x), so you have to fall back to making "raw" HTTP requests with an HttpClient. The basic code required to do so is described in the documentation, but for conciseness it uses a bad practice: it creates an HttpClient manually in the code.

In ASP.NET Core 2.1 and above, you should use HttpClientFactory wherever possible. This class manages the lifetime of the underlying handlers and sockets for you, and so avoids performance issues you can hit at times of high load. You can learn about using HttpClientFactory with the Twilio SDK in a previous post on the Twilio blog.

Creating a Typed client for the Twilio Verify API

To make it easier to work with the Verify API, and to support HttpClientFactory, you will create a small Typed client. Create the TwilioVerifyClient.cs file in the root of your project, and replace the contents with the following code:

using System;
using System.Collections.Generic;
using System.Net.Http;
using System.Threading.Tasks;
using Microsoft.AspNetCore.WebUtilities;
using Newtonsoft.Json;

namespace SendVerificationSmsDemo
{
    public class TwilioVerifyClient
    {
        private readonly HttpClient _client;
        public TwilioVerifyClient(HttpClient client)
        {
            _client = client;
        }

        public async Task<TwilioSendVerificationCodeResponse> StartVerification(int countryCode, string phoneNumber)
        {
            var requestContent = new FormUrlEncodedContent(new[] {
                new KeyValuePair<string, string>("via", "sms"),
                new KeyValuePair<string, string>("country_code", countryCode.ToString()),
                new KeyValuePair<string, string>("phone_number", phoneNumber),
            });

            var response = await _client.PostAsync("protected/json/phones/verification/start", requestContent);

            var content = await response.Content.ReadAsStringAsync();

            // this will throw if the response is not valid
            return JsonConvert.DeserializeObject<TwilioSendVerificationCodeResponse>(content);
        }

        public async Task<TwilioCheckCodeResponse> CheckVerificationCode(int countryCode, string phoneNumber, string verificationCode)
        {
            var queryParams = new Dictionary<string, string>()
            {
                {"country_code", countryCode.ToString()},
                {"phone_number", phoneNumber},
                {"verification_code", verificationCode },
            };

            var url = QueryHelpers.AddQueryString("protected/json/phones/verification/check", queryParams);

            var response = await _client.GetAsync(url);

            var content = await response.Content.ReadAsStringAsync();

            // this will throw if the response is not valid
            return JsonConvert.DeserializeObject<TwilioCheckCodeResponse>(content);
        }

        public class TwilioCheckCodeResponse
        {
            public string Message { get; set; }
            public bool Success { get; set; }
        }

        public class TwilioSendVerificationCodeResponse
        {
            public string Carrier { get; set; }
            public bool IsCellphone { get; set; }
            public string Message { get; set; }
            public string SecondsToExpire { get; set; }
            public Guid Uuid { get; set; }
            public bool Success { get; set; }
        }
    }
}

The TwilioVerifyClient has two methods, StartVerification() and CheckVerificationCode(), which handle creating HTTP requests with the correct format and calling the Twilio Verify API. The typed client accepts an HttpClient in its constructor, which will be created by the HttpClientFactory automatically for you.

The responses for the method are implemented as simple POCO objects that match the response returned by the Twilio Verify API. For simplicity, these are implemented here as nested classes of the TwilioVerifyClient, but you can move these to another file if you prefer.

Configuring authentication for the typed client

HttpClientFactory is not part of the base ASP.NET Core libraries, so you need to install the Microsoft.Extensions.Http NuGet package (version 2.2.0 or later). You can use the NuGet Package Manager, Package Manager Console CLI, or edit the SendVerificationSmsDemo.csproj file. After using any of these methods the <ItemGroup> section of the project file should look like this (version numbers may be higher):

<ItemGroup>
  <PackageReference Include="Microsoft.AspNetCore.App" />
  <PackageReference Include="Microsoft.AspNetCore.Razor.Design" Version="2.2.0" PrivateAssets="All" />
  <PackageReference Include="Microsoft.Extensions.Http" Version="2.2.0" />
</ItemGroup>

To call the Twilio Verify API you'll need the Authy API Key for your Verify application (found in the Twilio Dashboard). When developing locally you should store this using the Secrets Manager so it doesn't get accidentally committed to your source code repository. You can read about how and why to do that in this post on the Twilio Blog. Your resulting secrets.json should look something like this:

{
  "Twilio": {
    "VerifyApiKey": "DBxxxxxxxxxxxxxxxxxxxxxxxxxxxxxxxx"
}

Finally, configure your TwilioVerifyClient with the correct BaseAddress and your API key by adding the following at the end of ConfigureServices in Startup.cs:

public void ConfigureServices(IServiceCollection services)
{
    // existing configuration

    var apiKey = Configuration["Twilio:VerifyApiKey"];

    services.AddHttpClient<TwilioVerifyClient>(client =>
    {
        client.BaseAddress = new Uri("https://api.authy.com/");
        client.DefaultRequestHeaders.Add("X-Authy-API-Key", apiKey);
    });
}

Don't let the authy base URL confuse you: version 1 of the Verify API followed an interface structure that preceded the creation of Verify as a separate product. The version 2 Verify API normalizes the URI.

With the typed client configuration complete, you can start adding the phone verification functionality to your ASP.NET Core Identity application.

Adding the required scaffolding files

In this post we're going to be adding some additional pages to the Identity area. Typically when you're adding or editing Identity pages in ASP.NET Core you should use the built-in scaffolding tools to generate the pages, as shown in this post. If you've already done that, you can skip this section.

Rather than adding all the Identity scaffolding, all you need for this post is a single file. Create the file __ViewImports.cshtml_ in the Areas/Identity/Pages folder and add the following code:

@using Microsoft.AspNetCore.Identity
@using SendVerificationSmsDemo.Areas.Identity
@namespace SendVerificationSmsDemo.Areas.Identity.Pages
@addTagHelper *, Microsoft.AspNetCore.Mvc.TagHelpers

This adds all the required namespaces and tag helpers required by your Razor Pages. It will also light up the IntelliSense in Visual Studio. If you've already scaffolded Identity pages you'll already have this file!

Sending a verification code to a phone number

The default ASP.NET Core Identity templates provide the functionality for storing a phone number for a user, but don't provide the capability to verify ownership of the number. In the post Validating Phone Numbers in ASP.NET Core Identity Razor Pages with Twilio Lookup you can learn how to validate a phone number by using the Twilio Lookup API. As noted in the post it’s a good idea to store the result formatted as an E.164 number.

In version 1 of the Verify API you must provide the country dialing code and phone number as separate parameters. Consequently, if you're using version 1 of the Verify API it may be best to store these values separately for the IdentityUser user, instead of (or as well as) storing an E.164 number.

For simplicity, this post will gloss over storing the values separately. You’ll create a form that lets the user enter the values separately. In practice, you would automatically use the values attached to the user, rather than allowing them to enter in a new number.

Create a new Razor Page in the Areas/Identity/Pages/Account folder called VerifyPhone.cshtml. In the code-behind file VerifyPhone.cshtml.cs add the following using statements to the top of the file:

using System.ComponentModel.DataAnnotations;
using Microsoft.AspNetCore.Authorization;

Next, replace the VerifyPhoneModel class with the following:

[Authorize]
public class VerifyPhoneModel : PageModel
{
    private readonly TwilioVerifyClient _client;

    public VerifyPhoneModel(TwilioVerifyClient client)
    {
        _client = client;
    }

    [BindProperty]
    public InputModel Input { get; set; }

    public class InputModel
    {
        [Required]
        [Display(Name = "Country dialing code")]
        public int DialingCode { get; set; }

        [Required]
        [Phone]
        [Display(Name = "Phone number")]
        public string PhoneNumber { get; set; }
    }

    public async Task<IActionResult> OnPostAsync()
    {
        if (!ModelState.IsValid)
        {
            return Page();
        }

        try
        {
            var result = await _client.StartVerification(Input.DialingCode, Input.PhoneNumber);
            if (result.Success)
            {
                return RedirectToPage("ConfirmPhone", new {Input.DialingCode, Input.PhoneNumber});
            }

            ModelState.AddModelError("", $"There was an error sending the verification code: {result.Message}");
        }
        catch (Exception)
        {
            ModelState.AddModelError("", 
                "There was an error sending the verification code, please check the phone number is correct and try again");
        }

        return Page();
    }
}

The InputModel for the page is used to bind a simple form (screenshot below) for collecting the country dialing code and phone number to verify. The code doesn’t include an OnGet handler as the framework provides one implicitly. The OnPost handler is where the verification process begins.

The code provides some basic validation using DataAnnotation attributes (see the post Validating Phone Numbers in ASP.NET Core Identity Razor Pages with Twilio Lookup to learn about performing robust validation) and, if successful, it uses the injected TwilioVerifyClient to start verification. If the Verify API call is successful, the user is redirected to the ConfirmPhone page, which you'll create shortly. If the Verify API indicates the request failed, or if an exception is thrown, an error is added to the ModelState, and the page is re-displayed to the user.

The form itself consists of two text boxes and a submit button. Replace the contents of VerifyPhone.cshtml with the following Razor markup:

@page
@model VerifyPhoneModel
@{
    ViewData["Title"] = "Verify phone number";
}

<h4>@ViewData["Title"]</h4>
<div class="row">
    <div class="col-md-8">
        <form method="post">
            <div asp-validation-summary="ModelOnly" class="text-danger"></div>
            <div class="form-row">
                <div class="form-group col-md-4">
                    <label asp-for="Input.DialingCode"></label>
                    <input asp-for="Input.DialingCode" class="form-control" />
                    <span asp-validation-for="Input.DialingCode" class="text-danger"></span>
                </div>
                <div class="form-group col-md-8">
                    <label asp-for="Input.PhoneNumber"></label>
                    <input asp-for="Input.PhoneNumber" class="form-control" />
                    <span asp-validation-for="Input.PhoneNumber" class="text-danger"></span>
                </div>
            </div>
            <button type="submit" class="btn btn-primary">Send verification code</button>
        </form>
    </div>
</div>

@section Scripts {
    <partial name="_ValidationScriptsPartial" />
}

When rendered, the form looks like the following:

The verify phone form

To test the form, run your app, and navigate to /Identity/Account/VerifyPhone. Enter your country code and phone number and click Send verification code. If the phone number is valid, you’ll receive an SMS similar to the message shown below. Note that you can customize this message, including the language, terminology, and code length: see the Verify API documentation for details.

Your Twilio Verify API demo verification code is: 2933

Now you need to create the page where the user enters the code they receive.

Checking the verification code

The check verification code page contains a single text box where the user enters the code they receive. Create a new Razor Page in the Areas/Identity/Pages/Account folder called ConfirmPhone.cshtml. In the code-behind file ConfirmPhone.cshtml.cs add the following using statements to the top of the file:

using System.ComponentModel.DataAnnotations;
using Microsoft.AspNetCore.Authorization;
using Microsoft.AspNetCore.Identity;

Next replace the ConfirmPhoneModel class with the following:

[Authorize]
public class ConfirmPhoneModel : PageModel
{
    private readonly TwilioVerifyClient _client;
    private readonly UserManager<IdentityUser> _userManager;

    public ConfirmPhoneModel(TwilioVerifyClient client, UserManager<IdentityUser> userManager)
    {
        _client = client;
        _userManager = userManager;
    }

    [BindProperty(SupportsGet = true)]
    public InputModel Input { get; set; }

    public class InputModel
    {
        [Required]
        [Display(Name = "Country dialing code")]
        public int DialingCode { get; set; }

        [Required]
        [Phone]
        [Display(Name = "Phone number")]
        public string PhoneNumber { get; set; }

        [Required]
        [Display(Name = "Code")]
        public string VerificationCode { get; set; }
    }

    public async Task<IActionResult> OnPostAsync()
    {
        if (!ModelState.IsValid)
        {
            return Page();
        }

        try
        {
            var result = await _client.CheckVerificationCode(Input.DialingCode, Input.PhoneNumber, Input.VerificationCode);
            if (result.Success)
            {
                var identityUser = await _userManager.GetUserAsync(User);
                identityUser.PhoneNumberConfirmed = true;
                var updateResult =  await _userManager.UpdateAsync(identityUser);

                if (updateResult.Succeeded)
                {
                    return RedirectToPage("ConfirmPhoneSuccess");
                }
                else
                {
                    ModelState.AddModelError("", "There was an error confirming the verification code, please try again");
                }
            }
            else
            {
                ModelState.AddModelError("", $"There was an error confirming the verification code: {result.Message}");
            }
        }
        catch (Exception)
        {
            ModelState.AddModelError("",
                "There was an error confirming the code, please check the verification code is correct and try again");
        }

        return Page();
    }
}

As before, we can skip the OnGet handler, as that's provided implicitly by the framework. The InputModel has three parameters 1) the dialing code, 2) the phone number provided in the previous step, and 3) the verification code entered by the user.

For simplicity, the code passed the phone number and country code from the previous step to this page via the querystring. In practice, you would load these from the IdentityUser itself, as described earlier.

Calling the Twilio Verify API is simple thanks to the typed client. The dialing code and phone number from the previous step and the authentication code entered by the user are passed to the API. If the check is successful, the Verify API will returnresult.Success=true. You can store the confirmation result on the IdentityUser object directly by setting the PhoneNumberConfirmed property and saving the changes.

If everything completes successfully, you redirect the user to a simple ConfirmPhoneSuccess page (that you'll create shortly). If there are any errors or exceptions, an error is added to the ModelState and the page is redisplayed.

Replace the contents of ConfirmPhone.cshtml with the Razor markup below. For usability, the provided phone number is redisplayed in the page.

@page
@model ConfirmPhoneModel
@{
    ViewData["Title"] = "Confirm phone number";
}

<h4>@ViewData["Title"]</h4>
<div class="row">
    <div class="col-md-6">
        <form method="post">
            <p>
                We have sent a confirmation code to (@Model.Input.DialingCode) @Model.Input.PhoneNumber
                Enter the code you receive to confirm your phone number.
            </p>
            <div asp-validation-summary="All" class="text-danger"></div>
            <input asp-for="Input.DialingCode" type="hidden" />
            <input asp-for="Input.PhoneNumber" type="hidden" />

            <div class="form-group">
                <label asp-for="Input.VerificationCode"></label>
                <input asp-for="Input.VerificationCode" class="form-control" type="number" />
                <span asp-validation-for="Input.VerificationCode" class="text-danger"></span>
            </div>
            <button type="submit" class="btn btn-primary">Confirm</button>
        </form>
    </div>
</div>

@section Scripts {
    <partial name="_ValidationScriptsPartial" />
}

When rendered, this looks like the following:

The confirm phone form

Once the user successfully confirms their phone number you can be confident they have access to it and you can use it in other parts of your application with confidence.

Showing a confirmation success page

To create a simple "congratulations" page for the user, create a new Razor Page in the Areas/Identity/Pages/Account folder called ConfirmPhoneSuccess.cshtml. You don't need to change the code-behind for this page, just add the following markup to ConfirmPhoneSuccess.cshtml:

@page
@model ConfirmPhoneSuccessModel
@{
    ViewData["Title"] = "Phone number confirmed";
}

<h1>@ViewData["Title"]</h1>
<div>
    <p>
        Thank you for confirming your phone number.
    </p>
    <a asp-page="/Index">Back to home</a>
</div>

After entering a correct verification code, users will be redirected to this page. From here, they can return to the home page.

The confirm phone form

Trying out the Twilio Verify functionality

Try out what you’ve just built by running the app. Follow these steps to validate a user’s ownership of a phone number with Verify:

Navigate to https://localhost:44348/Identity/Account/VerifyPhone in your browser. Because this page is protected by ASP.NET Core Identity authorization, you’ll be redirected to the account log in page.

Register as a new user. You will be redirected to the /Identity/Account/VerifyPhone route and will see the rendered VerifyPhone.cshtml Razor page. At this point you can see the record for the user you created in the dbo.AspNetUsers table of the database aspnet-SendVerificationSmsDemo-<GUID>. Note that the phone number is null.

Enter a valid country code and phone number capable of receiving SMS text messages. Click Send verification code. You should be routed to a URI similar to /Identity/Account/ConfirmPhone?DialingCode=44&PhoneNumber=07123456789, where the DialingCode and PhoneNumber reflect the values you entered.

In a matter of moments you should receive an SMS message with a verification code. Note that the message reflects the name of the application you created in Twilio Verify.

At this point you can go to the Verify console at https://www.twilio.com/console/verify/applications. You should see a value of 1 in the SMS VERIFICATION STARTED column. Select the application matching the SMS message you received.

Enter the numeric code from the SMS message in the Code box on the Confirm phone number page and click Confirm. (Validation codes expire, so you need to do this within 10 minutes of receiving the code.)

If everything worked correctly you should be redirected to the /Identity/Account/ConfirmPhoneSuccess page. If you refresh the Verify Insights for your application in the Twilio Console you should see the successful validation reflected in statistics for the application.

Good work! You've successfully integrated Twilio Verify with ASP.NET Core 2.2 Identity.

Possible improvements

This post showed the basic approach for using version 1 of the Verify API with ASP.NET Core Identity, but there are many improvements you could make:

  • Store the country dialing code and phone number on the IdentityUser. This would be required for practical implementations, as you want to be sure that the phone number stored against the user is the one you are verifying! This would also simplify the code somewhat, as described previously.
  • Include a link the VerifyPhone page. Currently you have to navigate manually to Identity/Account/VerifyPhone, but in practice you would want to add a link to it somewhere in your app.
  • Show the verification status of the phone number in the app. By default, ASP.NET Core Identity doesn't display the IdentityUser.PhoneNumberConfirmed property anywhere in the app.
  • Only verify unconfirmed numbers. Related to the previous improvement, you probably only want to verify phone numbers once, so you should check for PhoneNumberConfirmed=true in the VerifyPhone page, as well as hide any verification links.
  • Allow re-sending the code. In some cases, users might find the verification code doesn't arrive. For a smoother user experience, you could add functionality to allow re-sending a confirmation code to the ConfirmPhone page.

Summary

In this post you saw how to use version 1 of the Twilio Verify API to confirm phone number ownership in an ASP.NET Core Identity application. You learned how to create a typed client for calling the API that uses best practices like HttpClientFactory, and how to use it from Razor Pages. This example took the simplistic route of asking users to re-enter their country dialing code and phone number, but in real applications you should store these in the IdentityUser directly.

You can find the complete sample code for this post on GitHub.

Creating a Quartz.NET hosted service with ASP.NET Core

$
0
0
Creating a Quartz.NET hosted service with ASP.NET Core

In this post I describe how to run Quartz.NET jobs using an ASP.NET Core hosted service. I show how to create a simple IJob, a custom IJobFactory, and a QuartzHostedService that runs jobs while your application is running. I'll also touch on some of the issues to aware of, namely of using scoped services inside singleton classes.

Introduction - what is Quartz.NET?

As per their website:

Quartz.NET is a full-featured, open source job scheduling system that can be used from smallest apps to large scale enterprise systems.

It's an old staple of many ASP.NET developers, used as a way of running background tasks on a timer, in a reliable, clustered, way. Using Quartz.NET with ASP.NET Core is pretty similar - Quartz.NET supports .NET Standard 2.0, so you can easily use it in your applications.

Quartz.NET has two main concepts:

  • A job. This is the background tasks that you want to run on some sort of schedule.
  • A scheduler. This is responsible for running jobs based on triggers, on a time-based schedule.

ASP.NET Core has good support for running "background tasks" via way of hosted services. Hosted services are started when your ASP.NET Core app starts, and run in the background for the lifetime of the application. By creating a Quartz.NET hosted service, you can use a standard ASP.NET Core application for running your tasks in the background.

This sort of non-HTTP scenario is also possible with the "generic host", but for various reasons I generally don't use those at the moment. This should hopefully improve in ASP.NET Core 3.0 with the extra investment going into these non-HTTP scenarios.

While it's possible to create a "timed" background service, (that runs a tasks every 10 minutes, for example), Quartz.NET provides a far more robust solution. You can ensure tasks only run at specific times of the day (e.g. 2:30am), or only on specific days, or any combination by using a Cron trigger. It also allows you to run multiple instances of your application in a clustered fashion, so that only a single instance can run a given task at any one time.

In this post I'll show the basics of creating a Quartz.NET job and scheduling it to run on a timer in a hosted service.

Installing Quartz.NET

Quartz.NET is a .NET Standard 2.0 NuGet package, so it should be easy to install in your application. For this test I created an ASP.NET Core project and chose the Empty template. You can install the Quartz.NET package using dotnet add package Quartz. If you view the .csproj for the project, it should look something like this:

<Project Sdk="Microsoft.NET.Sdk.Web">

  <PropertyGroup>
    <TargetFramework>netcoreapp2.2</TargetFramework>
    <AspNetCoreHostingModel>InProcess</AspNetCoreHostingModel>
  </PropertyGroup>

  <ItemGroup>
    <PackageReference Include="Microsoft.AspNetCore.App" />
    <PackageReference Include="Quartz" Version="3.0.7" />
  </ItemGroup>

</Project>

Creating an IJob

For the actual background work we are scheduling, we're just going to use a "hello world" implementation that writes to an ILogger<> (and hence to the console). You should implement the Quartz interface IJob which contains a single asynchronous Execute() method. Note that we're using dependency injection here to inject the logger into the constructor.

using Microsoft.Extensions.Logging;
using Quartz;
using System.Threading.Tasks;

[DisallowConcurrentExecution]
public class HelloWorldJob : IJob
{
    private readonly ILogger<HelloWorldJob> _logger;
    public HelloWorldJob(ILogger<HelloWorldJob> logger)
    {
        _logger = logger;
    }

    public Task Execute(IJobExecutionContext context)
    {
        _logger.LogInformation("Hello world!");
        return Task.CompletedTask;
    }
}

I also decorated the job with the [DisallowConcurrentExecution] attribute. This attribute prevents Quartz.NET from trying to run the same job concurrently.

Creating an IJobFactory

Next, we need to tell Quartz how it should create instances of IJob. By default, Quartz will try and "new-up" instances of the job using Activator.CreateInstance, effectively calling new HelloWorldJob(). Unfortunately, as we're using constructor injection, that won't work. Instead, we can provide a custom IJobFactory that hooks into the ASP.NET Core dependency injection container (IServiceProvider):

using Microsoft.Extensions.DependencyInjection;
using Quartz;
using Quartz.Spi;
using System;

public class SingletonJobFactory : IJobFactory
{
    private readonly IServiceProvider _serviceProvider;
    public SingletonJobFactory(IServiceProvider serviceProvider)
    {
        _serviceProvider = serviceProvider;
    }

    public IJob NewJob(TriggerFiredBundle bundle, IScheduler scheduler)
    {
        return _serviceProvider.GetRequiredService(bundle.JobDetail.JobType) as IJob;
    }

    public void ReturnJob(IJob job) { }
}

This factory takes an IServiceProvider in the constructor, and implements the IJobFactory interface. The important method is the NewJob() method, in which the factory has to return the IJob requested by the Quartz scheduler. In this implementation we delegate directly to the IServiceProvider, and let the DI container find the required instance. The cast to IJob at the end is required because the non-generic version of GetRequiredService returns an object.

The ReturnJob method is where the scheduler tries to return (i.e. destroy) a job that was created by the factory. Unfortunately, there's no mechanism for doing so with the built-in IServiceProvider. We can't create a new IScopeService that fits into the required Quartz API, so we're stuck only being able to create singleton jobs.

This is important. With the above implementation, it is only safe to create IJob implementations that are Singletons.

Configuring the Job

I'm only showing a single IJob implementation here, but we want the Quartz hosted service to be a generic implementation that works for any number of jobs. To help with that, we create a simple DTO called JobSchedule that we'll use to define the timer schedule for a given job type:

using System;

public class JobSchedule
{
    public JobSchedule(Type jobType, string cronExpression)
    {
        JobType = jobType;
        CronExpression = cronExpression;
    }

    public Type JobType { get; }
    public string CronExpression { get; }
}

The JobType is the .NET type of the job (HelloWorldJob for our example), and CronExpression is a Quartz.NET Cron expression. Cron expressions allow complex timer scheduling so you can set rules like "fire every half hour between the hours of 8 am and 10 am, on the 5th and 20th of every month". Just be sure to check the documentation for examples as not all Cron expressions used by different systems are interchangeable.

We'll add the job to DI and configure its schedule in Startup.ConfigureServices():

using Microsoft.AspNetCore.Builder;
using Microsoft.AspNetCore.Hosting;
using Microsoft.AspNetCore.Http;
using Microsoft.Extensions.DependencyInjection;
using Quartz;
using Quartz.Impl;
using Quartz.Spi;

public void ConfigureServices(IServiceCollection services)
{
    // Add Quartz services
    services.AddSingleton<IJobFactory, SingletonJobFactory>();
    services.AddSingleton<ISchedulerFactory, StdSchedulerFactory>();

    // Add our job
    services.AddSingleton<HelloWorldJob>();
    services.AddSingleton(new JobSchedule(
        jobType: typeof(HelloWorldJob),
        cronExpression: "0/5 * * * * ?")); // run every 5 seconds
}

This code adds four things as singletons to the DI container:

  • The SingletonJobFactory shown earlier, used for creating the job instances.
  • An implementation of ISchedulerFactory, the built-in StdSchedulerFactory, which handles scheduling and managing jobs
  • The HelloWorldJob job itself
  • An instance of JobSchedule for the HelloWorldJob with a Cron expression to run every 5 seconds.

There's only one piece missing now that brings them all together, the QuartzHostedService.

Creating the QuartzHostedService

The QuartzHostedService is an implementation of IHostedService that sets up the Quartz scheduler, and starts it running in the background. Due to the design of Quartz, we can implement IHostedService directly, instead of the more common approach of deriving from the base BackgroundService class. The full code for the service is listed below, and I'll discuss it afterwards.

using System;
using System.Collections.Generic;
using System.Threading;
using System.Threading.Tasks;
using Microsoft.Extensions.Hosting;
using Quartz;
using Quartz.Spi;

public class QuartzHostedService : IHostedService
{
    private readonly ISchedulerFactory _schedulerFactory;
    private readonly IJobFactory _jobFactory;
    private readonly IEnumerable<JobSchedule> _jobSchedules;

    public QuartzHostedService(
        ISchedulerFactory schedulerFactory,
        IJobFactory jobFactory,
        IEnumerable<JobSchedule> jobSchedules)
    {
        _schedulerFactory = schedulerFactory;
        _jobSchedules = jobSchedules;
        _jobFactory = jobFactory;
    }
    public IScheduler Scheduler { get; set; }

    public async Task StartAsync(CancellationToken cancellationToken)
    {
        Scheduler = await _schedulerFactory.GetScheduler(cancellationToken);
        Scheduler.JobFactory = _jobFactory;

        foreach (var jobSchedule in _jobSchedules)
        {
            var job = CreateJob(jobSchedule);
            var trigger = CreateTrigger(jobSchedule);

            await Scheduler.ScheduleJob(job, trigger, cancellationToken);
        }

        await Scheduler.Start(cancellationToken);
    }

    public async Task StopAsync(CancellationToken cancellationToken)
    {
        await Scheduler?.Shutdown(cancellationToken);
    }

    private static IJobDetail CreateJob(JobSchedule schedule)
    {
        var jobType = schedule.JobType;
        return JobBuilder
            .Create(jobType)
            .WithIdentity(jobType.FullName)
            .WithDescription(jobType.Name)
            .Build();
    }

    private static ITrigger CreateTrigger(JobSchedule schedule)
    {
        return TriggerBuilder
            .Create()
            .WithIdentity($"{schedule.JobType.FullName}.trigger")
            .WithCronSchedule(schedule.CronExpression)
            .WithDescription(schedule.CronExpression)
            .Build();
    }
}

The QuartzHostedService has three dependencies: the ISchedulerFactory and IJobFactory we configured in Startup, and an IEnumerable<JobSchedule>. We only added a single JobSchedule to the DI container (for the HelloWorldJob), but if you register more job schedules with the DI container they'll all be injected here.

StartAsync is called when the application starts up and is where we configure Quartz. We start by creating an instance of IScheduler, assigning it to a property for use later, and setting the JobFactory for the scheduler to the injected instance:

public async Task StartAsync(CancellationToken cancellationToken)
{
    Scheduler = await _schedulerFactory.GetScheduler(cancellationToken);
    Scheduler.JobFactory = _jobFactory;

    // ...
}

Next, we loop through the injected job schedules, and create a Quartz IJobDetail and ITrigger for each one using the CreateJob and CreateTrigger helper methods at the end of the class. If you don't like how this part works, or need more control over the configuration, you can easily customise it by extending the JobSchedule DTO as you see fit.

public async Task StartAsync(CancellationToken cancellationToken)
{
    // ...
    foreach (var jobSchedule in _jobSchedules)
    {
        var job = CreateJob(jobSchedule);
        var trigger = CreateTrigger(jobSchedule);

        await Scheduler.ScheduleJob(job, trigger, cancellationToken);
    }
    // ...
}

private static IJobDetail CreateJob(JobSchedule schedule)
{
    var jobType = schedule.JobType;
    return JobBuilder
        .Create(jobType)
        .WithIdentity(jobType.FullName)
        .WithDescription(jobType.Name)
        .Build();
}

private static ITrigger CreateTrigger(JobSchedule schedule)
{
    return TriggerBuilder
        .Create()
        .WithIdentity($"{schedule.JobType.FullName}.trigger")
        .WithCronSchedule(schedule.CronExpression)
        .WithDescription(schedule.CronExpression)
        .Build();
}

Finally, once all the jobs are scheduled, you call Scheduler.Start() to actually start the Quartz.NET scheduler processing in the background. When the app shuts down, the framework will call StopAsync(), at which point you can call Scheduler.Stop() to safely shut down the scheduler process.

public async Task StopAsync(CancellationToken cancellationToken)
{
    await Scheduler?.Shutdown(cancellationToken);
}

You can register the hosted service using the AddHostedService() extension method in Startup.ConfigureServices:

public void ConfigureServices(IServiceCollection services)
{
    // ...
    services.AddHostedService<QuartzHostedService>();
}

If you run the application, you should see the background task running every 5 seconds and writing to the Console (or wherever you have logging configured)

Background service writing Hello World to console repeatedly

Using scoped services in jobs

There's one big problem with the implementation as described in this post: you can only create Singleton jobs. That means you can't use any dependencies that are registered as Scoped services. For example, you can't inject an EF Core DatabaseContext into your IJob implementation, as you'll have a captive dependency problem.

Working around this isn't a big issue: you can inject an IServiceProvider and create your own scope, similar to the solution for a similar problem in a previous post. For example, if you need to use a scoped service in your HelloWorldJob, you could use something like the following:

public class HelloWorldJob : IJob
{
    // Inject the DI provider
    private readonly IServiceProvider _provider;
    public HelloWorldJob( IServiceProvider provider)
    {
        _provider = provider;
    }

    public Task Execute(IJobExecutionContext context)
    {
        // Create a new scope
        using(var scope = _provider.CreateScope())
        {
            // Resolve the Scoped service
            var service = scope.ServiceProvider.GetService<IScopedService>();
            _logger.LogInformation("Hello world!");
        }

        return Task.CompletedTask;
    }
}

This ensures a new scope is created every time the job runs, so you can retrieve (and dispose) scoped services inside the IJob. Unfortunately things do get a little messy. In the next post I'll show a variation on this approach that is a little cleaner.

Summary

In this post I introduced Quartz.NET and showed how you could use it to schedule background jobs to run in ASP.NET Core using IHostedService. The example shown in this post is best for singleton jobs, which isn't ideal, as consuming scoped services is clumsy. In the next post, I'll show a variation on this approach that makes using scoped services easier.

Using scoped services inside a Quartz.NET hosted service with ASP.NET Core

$
0
0
Using scoped services inside a Quartz.NET hosted service with ASP.NET Core

In my previous post I showed how you can create a Quartz.NET hosted service with ASP.NET Core and use it to run background tasks on a schedule. Unfortunately, due to the way way the Quartz.NET API works, using Scoped dependency injection services in your Quartz jobs is somewhat cumbersome.

In this post I show one way to make it easier to use scoped services in your jobs. You can use the same approach for managing "unit-of-work" patterns with EF Core, and other cross-cutting concerns.

This post follows on directly from the previous post, so I suggest reading that post first, if you haven't already.

Recap - the custom JobFactory and singleton IJob

In the last post, we had a HelloWorldJob implementing IJob that simply wrote to the console.

public class HelloWorldJob : IJob
{
    private readonly ILogger<HelloWorldJob> _logger;
    public HelloWorldJob(ILogger<HelloWorldJob> logger)
    {
        _logger = logger;
    }

    public Task Execute(IJobExecutionContext context)
    {
        _logger.LogInformation("Hello world!");
        return Task.CompletedTask;
    }
}

We also had an IJobFactory implementation that retrieved an instance of the job from the DI container when required:

public class SingletonJobFactory : IJobFactory
{
    private readonly IServiceProvider _serviceProvider;
    public SingletonJobFactory(IServiceProvider serviceProvider)
    {
        _serviceProvider = serviceProvider;
    }

    public IJob NewJob(TriggerFiredBundle bundle, IScheduler scheduler)
    {
        return _serviceProvider.GetRequiredService(bundle.JobDetail.JobType) as IJob;
    }

    public void ReturnJob(IJob job) { }
}

These services were registered in Startup.ConfigureServices() as singletons:

services.AddSingleton<IJobFactory, SingletonJobFactory>();
services.AddSingleton<HelloWorldJob>();

That was fine for this very basic example, but what if you need to use some scoped services inside your IJob? For example, maybe you need to use an EF Core DbContext to loop over all your customers, send them an email, and update the customer record. We'll call that hypothetical task EmailReminderJob.

The stop-gap solution

The solution I showed in the previous post is to inject the IServiceProvider into your IJob, create a scope manually, and retrieve the necessary services from that. For example:

public class EmailReminderJob : IJob
{
    private readonly IServiceProvider _provider;
    public EmailReminderJob( IServiceProvider provider)
    {
        _provider = provider;
    }

    public Task Execute(IJobExecutionContext context)
    {
        using(var scope = _provider.CreateScope())
        {
            var dbContext = scope.ServiceProvider.GetService<AppDbContext>();
            var emailSender = scope.ServiceProvider.GetService<IEmailSender>();
            // fetch customers, send email, update DB
        }

        return Task.CompletedTask;
    }
}

In many cases, this approach is absolutely fine. This is especially true if, instead of putting the implementation directly inside the job (as I did above), you use a mediator pattern to handle cross-cutting concerns like unit-of-work or message dispatching.

If that's not the case, you might benefit from creating a helper job that can manage those things for you.

The QuartzJobRunner

To handle these issues, you can create an "intermediary" IJob implementation, QuartzJobRunner, that sits between the IJobFactory and the IJob you want to run. I'll get to the job implementation shortly, but first lets update the existing IJobFactory implementation to always return an instance of QuartzJobRunner, no matter which job is requested:

using Microsoft.Extensions.DependencyInjection;
using Quartz;
using Quartz.Spi;
using System;

public class JobFactory : IJobFactory
{
    private readonly IServiceProvider _serviceProvider;
    public JobFactory(IServiceProvider serviceProvider)
    {
        _serviceProvider = serviceProvider;
    }

    public IJob NewJob(TriggerFiredBundle bundle, IScheduler scheduler)
    {
        return _serviceProvider.GetRequiredService<QuartzJobRunner>();
    }

    public void ReturnJob(IJob job) { }
}

As you can see, the NewJob() method always returns an instance of QuartzJobRunner. We'll register QuartzJobRunner as a Singleton in Startup.ConfigureServices(), so we don't have to worry about the fact it isn't explicitly disposed.

services.AddSingleton<QuartzJobRunner>();

We'll create the actual required IJob instance inside QuartzJobRunner. The job of QuartzJobRunner is to create a scope, instantiate the requested IJob, and execute it:

using Microsoft.Extensions.DependencyInjection;
using Quartz;
using System;
using System.Threading.Tasks;

public class QuartzJobRunner : IJob
{
    private readonly IServiceProvider _serviceProvider;
    public QuartzJobRunner(IServiceProvider serviceProvider)
    {
        _serviceProvider = serviceProvider;
    }

    public async Task Execute(IJobExecutionContext context)
    {
        using (var scope = _serviceProvider.CreateScope())
        {
            var jobType = context.JobDetail.JobType;
            var job = scope.ServiceProvider.GetRequiredService(jobType) as IJob;

            await job.Execute(context);
        }
    }
}

At this point, you might be wondering what we've gained by adding this extra layer of indirection? There's two main advantages:

  • We can register the EmailReminderJob as a scoped service, and directly inject any dependencies into its constructor
  • We can move other cross-cutting concerns into the QuartzJobRunner class.

Jobs can directly consume scoped services

Due to the fact the job instance is sourced from a scoped IServiceProvder, you can safely consume scoped services in the constructor of your job implementations. This makes the implementation of EmailReminderJob clearer, and follows the typical pattern of constructor injection. DI scoping issues can be tricky to understand if you're not familiar with them, so anything that stops you cutting yourself seems like a good idea to me:

[DisallowConcurrentExecution]
public class EmailReminderJob : IJob
{
    private readonly AppDbContext _dbContext;
    private readonly IEmailSender _emailSender;
    public EmailReminderJob(AppDbContext dbContext, IEmailSender emailSender)
    {
        _dbContext = dbContext;
        _emailSender = emailSender;
    }

    public Task Execute(IJobExecutionContext context)
    {
        // fetch customers, send email, update DB
        return Task.CompletedTask;
    }
}

These IJob implementations can be registered using any lifetime (scoped or transient) in Startup.ConfigureServices() (the JobSchedule can still be a singleton):

services.AddScoped<EmailReminderJob>();
services.AddSingleton(new JobSchedule(
    jobType: typeof(EmailReminderJob),
    cronExpression: "0 0 12 * * ?")); // every day at noon

QuartzJobRunner can handle cross-cutting concerns

QuartzJobRunner handles the whole lifecycle of the IJob being executed: it fetches it from the container, executes it, and disposes of it (when the scope is disposed). Consequently, it is well placed for handling other cross-cutting concerns.

For example, imagine you have a service that needs to update the database, and send events to a message bus. You could handle that all inside each of your individual IJob implementations, or you could move the cross-cutting "commit changes" and "dispatch message" actions to the QuartzJobRunner instead.

This example is obviously very basic. If the code here looks ok to you, I suggest watching Jimmy Bogard's "Six Little Lines of Fail" talk, which describes some of the issues!

public class QuartzJobRunner : IJob
{
    private readonly IServiceProvider _serviceProvider;

    public QuartzJobRunner(IServiceProvider serviceProvider)
    {
        _serviceProvider = serviceProvider;
    }

    public async Task Execute(IJobExecutionContext context)
    {
        using (var scope = _serviceProvider.CreateScope())
        {
            var jobType = context.JobDetail.JobType;
            var job = scope.ServiceProvider.GetRequiredService(jobType) as IJob;

            var dbContext = _serviceProvider.GetRequiredService<AppDbContext>();
            var messageBus = _serviceProvider.GetRequiredService<IBus>();

            await job.Execute(context);

            // job completed, save dbContext changes
            await dbContext.SaveChangesAsync();

            // db transaction succeeded, send messages
            await messageBus.DispatchAsync();
        }
    }
}

This implementation of QuartzJobRunner is very similar to the previous one, but before we execute the requested IJob, we retrieve the message bus and DbContext from the DI container. Once the job has successfully executed (i.e. it didn't throw), we save any uncommitted changes in the DbContext, and dispatch the events on the message bus.

Moving these functions into the QuartzJobRunner should reduce the duplication in your IJob implementations, and will make it easier to move to a more formalised pipeline and other patterns should you wish to later.

Alternative solutions

I like the approach shown in this post (using an intermediate QuartzJobRunner class) for two main reasons:

  • Your other IJob implementations don't need any knowledge of this infrastructure for creating scopes, and can just just bog-standard constructor injection
  • The IJobFactory doesn't have to do anything special to handle disposing jobs. The QuartzJobRunner takes care of that implicitly by creating and disposing of a scope.

But the approach shown here isn't the only way to use scoped services in your jobs. Matthew Abbot demonstrates an approach in this gist that aims to implement the IJobFactory in a way that correctly disposes of jobs after they've been run. It's a little clunky due to the interface API you have to match, but it's arguably much closer to the way you should implement it! Personally I think I'll stick to the QuartzJobRunner approach, but choose whichever works best for you 🙂

Summary

In this post, I showed how you can create an intermediate IJob, QuartzJobRunner, that is created whenever the scheduler needs to execute a job. This runner handles creating a DI scope, instantiating the requested job, and executing it, so the end IJob implementation can consume scoped services in its constructor. You can also use this approach for configuring a basic pipeline in the QuartzJobRunner, although there are better solutions to this, such as decorators, or behaviours in the MediatR library.


Serializing a PascalCase Newtonsoft.Json JObject to camelCase

$
0
0
Serializing a PascalCase Newtonsoft.Json JObject to camelCase

In this post I describe one of the quirks of serializing JSON.NET JObject (contract resolvers are not honoured), and show how to get camelCase names when serializing a JObject that stored its property names in PascalCase.

Background - using JObject for dynamic data

I was working with some code the other day that stored objects in PostgreSQL using the built-in JSON support. The code that used it was deserializing the data to a JSON.NET JObject in code. So the data class looked something like the following, with a JObject property, Details:

public class Animal
{
    public Guid Id { get; set; }
    public string Name { get; set; }
    public string Genus { get; set; }
    public JObject Details { get; set; }
}

In this case, the JObject was a "serialized" version of a data class:

public class SlothDetails 
{
    public int NumberOfToes { get; set; }
    public int NumberOfCervicalVertebrae { get; set; }
}

So an instance of the Animal class was created using code similar to the following:

var sloth = new Animal
{
    Id = Guid.NewGuid(),
    Name = "Three-toed sloth",
    Genus = "Bradypus",
    Details = JObject.FromObject(new SlothDetails
    {
        NumberOfToes = 3,
        NumberOfCervicalVertebrae = 9,
    })
};

In this code we take the strongly-typed SlothDetails and turn it into a JObject. There's nothing very special here - we're using JObject as a pseudo-dynamic type, to allow us to store different types of data in the Details property. For example, we could create an entirely different type and assign it to the Details property:

public class DogDetails 
{
    public bool IsGoodBoy { get; set; }
    public int NumberOfLegs { get; set; }
}

var dog = new Animal 
{
    Id = Guid.NewGuid(),
    Name = "Dog",
    Genus = "Canis",
    Details = JObject.FromObject(new DogDetails
    {
        IsGoodBoy = true,
        NumberOfLegs = 4,
    })
};

We can work with both Animal instances in the same way, even though the Details property contains different data.

So why would you want to do this? The type system is one of the strong points of C#, and if you need truly dynamic data, there's always the dynamic type from C# 4.0? Why not create Animal<T> and make Details a T? Or we could have just made Details a string, and stored a serialized version of the data?

All of those might be valid approaches for your situation. In our case, we know that we're storing JSON in the database, and that the Details object must serialize to JSON, so it made sense to use a type that most accurately represents that data: JObject. LINQ to JSON provides a convenient API to query the data, and we get some type safety from knowing that anything passed to Details is a valid JSON object.

All of this works perfectly, until you try exposing one of these JObject from an ASP.NET Web API.

JSON.NET, serialization, and camelCase

Lets start by seeing what you get if you Serialize the dog instance above, by returning it from an ASP.NET Core controller:

[ApiController, Route("api/[controller]")]
public class AnimalsController
{
    [HttpGet]
    public object Get()
    {
        return new Animal
        {
            Id = Guid.NewGuid(),
            Name = "Dog",
            Genus = "Canis",
            Details = JObject.FromObject(new DogDetails
            {
                IsGoodBoy = true,
                NumberOfLegs = 4,
            })
        };
    }
}

ASP.NET Core uses a camelCase formatter by default (instead of the PascalCase used for C# property names) so the resulting JSON is camelCase:

{
    "id": "96ca7c68-7550-4809-86c5-4d784f3b3f87",
    "name": "Dog",
    "genus": "Canis",
    "details": {
        "IsGoodBoy": true,
        "NumberOfLegs": 4
    }
}

This looks nearly right, but there's a problem - the IsGoodBoy and NumberOfLegs properties of the serialized JObject are all PascalCase - that's a problem!

This all comes down to an early design-decision (since lamented) that means that contract resolvers are ignored by default when serializing JObject as part of an object graph (as we have here).

This is clearly an issue if you're using a JObject in your object graph. I only found a few ways to work around the limitation, depending on your situation.

1. Change the global serialization settings

The first option is to change the global serialization options to use camelCase. This option has been available for a long time (since version 5.0 of JSON.NET), and will globally configure the JSON.NET serializer to use camelCase, even for a JObject created using PasalCase property names:

// Add this somewhere in your project, most likely in Startup.cs
JsonConvert.DefaultSettings = () => new JsonSerializerSettings
{
    ContractResolver = new CamelCasePropertyNamesContractResolver()
};

If you add this code to your project, your JObject will be serialized to camelCase, with no other changes required to your project:

{
    "id": "96ca7c68-7550-4809-86c5-4d784f3b3f87",
    "name": "Dog",
    "genus": "Canis",
    "details": {
        "isGoodBoy": true,
        "numberOfLegs": 4
    }
}

The obvious downside to this approach is that affects all serialization in your app. If you have a new (or small app) that might not be a problem, but for a large, legacy app that might cause issues. Subtle changes in casing in client-side JavaScript apps could cause a multitude of bugs if you have code relying on the existing JObject serialization behaviour.

2. Don't create PascalCase JObjects

The serialization problem we're seeing stems from two things:

  1. JObject serialization doesn't honour contract resolvers (unless you set JsonConvert.DefaultSettings)
  2. We have a PascalCase JObject instead of camelCase.

The first approach (changing the default serializer) addresses point 1., but the other option is to never get ourselves into this situation! This approach is easier to introduce to large apps, as it allows you to change the "stored format" in a single location, instead of affecting a whole large app.

The JObject.FromObject() method takes a second parameter, which allows you to control how the JObject is created from the C# object. We can use that to ensure the JObject we create uses camelCase names already, so we don't have to worry when it comes to serialization.

To do this, create a JsonSerializer with the required settings. You can store this globally and reuse it throughout your app:

static JsonSerializer _camelCaseSerializer = JsonSerializer.Create(
    new JsonSerializerSettings
    {
        ContractResolver = new CamelCasePropertyNamesContractResolver()
    });

Now, when creating the JObject from a .NET object, pass in the _camelCaseSerializer:

var details = JObject.FromObject(new DogDetails
{
    IsGoodBoy = true,
    NumberOfLegs = 4,
}, _camelCaseSerializer) // <- add second parameter

This will use camelCase for the internal names, so when the JObject is serialized, it will give the output we want:

{
    "isGoodBoy": true,
    "numberOfLegs": 4
}

This approach is probably the best in general - it addresses the problem at its source, and doesn't have to impact your app globally. Unfortunately, if you're already storing objects using PascalCase, this approach might not be feasible to adopt. In which case you're left with the following approach.

3. Convert a PascalCase JObject to camelCase

In some cases, you might just be stuck with a PascalCase JObject as part of an object graph, that needs to be serialized using camelCase. The only solution I could find to this is to create a new camelCase JObject from the existing PascalCase JObject.

The following extension method (and helpers) show how to create a new JObject that has camelCase property names, from one that has PascalCase names.

using Newtonsoft.Json.Linq;
using System.Diagnostics.Contracts;
using System.Linq;
public static class JTokenExtensions
{
    // Recursively converts a JObject with PascalCase names to camelCase
    [Pure]
    static JObject ToCamelCase(this JObject original)
    {
        var newObj = new JObject();
        foreach (var property in original.Properties())
        {
            var newPropertyName = property.Name.ToCamelCaseString();
            newObj[newPropertyName] = property.Value.ToCamelCaseJToken();
        }

        return newObj;
    }

    // Recursively converts a JToken with PascalCase names to camelCase
    [Pure]
    static JToken ToCamelCaseJToken(this JToken original)
    {
        switch (original.Type)
        {
            case JTokenType.Object:
                return ((JObject)original).ToCamelCase();
            case JTokenType.Array:
                return new JArray(((JArray)original).Select(x => x.ToCamelCaseJToken()));
            default:
                return original.DeepClone();
        }
    }

    // Convert a string to camelCase
    [Pure]
    static string ToCamelCaseString(this string str)
    {
        if (!string.IsNullOrEmpty(str))
        {
            return char.ToLowerInvariant(str[0]) + str.Substring(1);
        }

        return str;
    }
}

The ToCamelCase() method starts by creating a new (empty) JObject instance. It then loops through the original object, converting each property name to camelCase. It then recursively converts the Value of the property to a camelCase JToken. This is important, as the properties could also contain JObjects, or JArrays of JObjects, and we need to make sure all the properties are converted to camelCase, not just the "top-level" properties.

For objects other than JObject and JArray, (e.g. number, string), I create a copy of the JToken using DeepClone(). I don't believe that's strictly necessary, but decided to play it safe.

You can use the ToCamelCase() extension method at the "edges" of your system, when you need to serialize a JObject that is stored in PascalCase. This creates a clone of the object, but using camelCase properties.

[ApiController, Route("api/[controller]")]
public class AnimalsController
{
    [HttpGet]
    public object Get()
    {
        var details = JObject.FromObject(new DogDetails
        {
            IsGoodBoy = true,
            NumberOfLegs = 4,
        });

        // Create a clone of the object but with camelCase property names
        return details.ToCamelCase();
    }
}

This approach feels pretty hacky, but it gets the job done when the other approaches are no good for you. For completeness, the following set of xUnit Theory tests show the behaviour in action:

using FluentAssertions;
using Newtonsoft.Json;
using Newtonsoft.Json.Linq;
using System;
using System.Collections.Generic;
using System.Linq;
using Xunit;

public class JTokenExtensionTests
{
    [Theory]
    [MemberData(nameof(GetTokenData))]
    public void ToCamelCase_WhenNotJObject_DoesNotChangeOutput(JToken original)
    {
        var newToken = original.ToCamelCase();

        var originalSerialized = JsonConvert.SerializeObject(original);
        var newSerialized = JsonConvert.SerializeObject(newToken);

        newSerialized.Should().Be(originalSerialized);
    }

    [Theory]
    [MemberData(nameof(GetJobjectData))]
    public void ToCamelCase_WhenJObject_ConvertsToCamelCase(JObject original, JObject expected)
    {
        var newObject = original.ToCamelCase();

        var expectedSerialized = JsonConvert.SerializeObject(expected);
        var newSerialized = JsonConvert.SerializeObject(newObject);

        newSerialized.Should().Be(expectedSerialized);
    }

    public static IEnumerable<object[]> GetTokenData()
    {
        return GetTokens().Select(token => new object[] { JToken.FromObject(token) });
    }

    public static IEnumerable<object[]> GetJobjectData()
    {
        return GetJObjects().Select(pair => new object[] { JObject.FromObject(pair.Original), JObject.FromObject(pair.Expected) });
    }

    static IEnumerable<(object Original, object Expected)> GetJObjects()
    {
        yield return (
            new { MyVal = 23 },
            new { myVal = 23 });
        yield return (
            new { MyVal = true },
            new { myVal = true });
        yield return (
            new { MyVal = "this is my string" },
            new { myVal = "this is my string" });
        yield return (
            new { MyVal = new[] { 0, 2, 3 } },
            new { myVal = new[] { 0, 2, 3 } });
        yield return (
            new { MyVal = new { A = new { NESTED = new object[] { new { Another = 123 }, new { EEK = false }, } } } },
            new { myVal = new { a = new { nESTED = new object[] { new { another = 123 }, new { eEK = false }, } } } });
    }

    static IEnumerable<object> GetTokens()
    {
        yield return 0;
        yield return true;
        yield return "this is my string";
        yield return "This is my string";
        yield return new[] { 0, 2, 3 };
        yield return DateTime.Now;
        yield return 23.5;
    }
}

Summary

In this post I described some of the quirks of using JObject, in particular the way it doesn't honour the contract resolver settings used to serialize a given object graph. I described three different ways to work around the behaviour: set the global serializations settings, store the JObject using camelCase property names, or convert from a PascalCase JObject to a camelCase JObject. For the final option, a provided an extension method and unit tests to demonstrate the behaviour.

Introducing Microsoft.FeatureManagement: Adding feature flags to an ASP.NET Core app - Part 1

$
0
0
Introducing Microsoft.FeatureManagement

In a recent .NET Community Standup, a new library was introduced that's being built by the Azure team - Microsoft.FeatureManagement. In this post, I give a brief introduction to the library and how to use it in an ASP.NET Core app. This post just covers the basics - in later posts I'll show some of the ASP.NET Core-specific features, as well as how to create custom feature filters.

Microsoft.FeatureManagement is currently in preview, so some details may change when it's properly released.

Introducing Microsoft.FeatureManagement

If you haven't heard of Microsoft.FeatureManagement, don't feel bad - it's not on GitHub yet, and isn't being developed by the core ASP.NET Core team, so it's definitely flying under the radar. Instead, it's being developed by the Azure team, so you'll find what few docs there are under Azure rather than .NET Core.

Despite being developed by the Azure team, Microsoft.FeatureManagement doesn't have any direct ties to Azure itself. Instead, it's a .NET Standard 2.0 library that you can find on NuGet (in preview). There's also a package Microsoft.FeatureManagement.AspNetCore which adds TagHelper support if you need it.

Microsoft.FeatureManagement is built on top of the Microsoft.Extensions.Configuration configuration system used in ASP.NET Core (but which can also be used in any .NET Standard app). It provides a centralised but extensible way for adding feature flags to your system. This lets you roll out new features to a subset of users, limiting the availability of a feature by time, or performing A/B tests, for example.

As Microsoft.FeatureManagement is built on top of the configuration system, it can be controlled by any of the various configuration providers available. That means you can control features from an appsettings.json file, from environment variables, from a database, or from any number of other providers. Enabling and disabling features simply requires changing values in one of your configuration providers.

If you're building an app of any size, it's very likely you'll already be using feature flags, and you may well be using the configuration system to control it. Microsoft.FeatureManagement mostly just formalises this approach, so if you're not using your own version already, it's worth taking a look.

How it works: simple feature flags

I'll start off demonstrating the Microsoft.FeatureManagement package by adding a simple feature flag to an ASP.NET Core application that controls what welcome message we display on the home page. When the flag is off, we'll display "Welcome"; when the flag is on, we'll display "Welcome to the Beta":

Changing the message displayed on a Razor Page using feature flags

Installing the package

In this example, I'm using an ASP.NET Core Web Application (Razor Pages) with Individual Authentication, but you can use any .NET Standard app that uses the Microsoft.Extensions.Configuration system.

First you need to install the Microsoft.FeatureManagement package. The package is in preview at the time of writing, so you'll need to enable the "previews" checkbox if you're using the NuGet GUI, and use the full version string if you're using the dotnet CLI:

dotnet add package Microsoft.FeatureManagement --version 1.0.0-preview-008560001-910

After adding it, your .csproj file should look something like this:

<Project Sdk="Microsoft.NET.Sdk.Web">

  <PropertyGroup>
    <TargetFramework>netcoreapp2.2</TargetFramework>
    <AspNetCoreHostingModel>InProcess</AspNetCoreHostingModel>
  </PropertyGroup>

  <ItemGroup>
    <PackageReference Include="Microsoft.AspNetCore.App" />
    <PackageReference Include="Microsoft.AspNetCore.Razor.Design" Version="2.2.0" PrivateAssets="All" />
    <PackageReference Include="Microsoft.FeatureManagement" Version="1.0.0-preview-008560001-910" />
  </ItemGroup>

</Project>

Now you can add the required services to your DI container:

using Microsoft.FeatureManagement;

public class Startup 
{
    public void ConfigureServices(IServiceCollection services)
    {
        //...
        services.AddFeatureManagement();
    }
}

That's all the infrastructure out of the way, so it's time to actually add the flags to your application.

Adding simple feature flags

In order for the FeatureManagement library to "discover" your features, you should create a "FeatureManagement" section in your app's configuration. Each sub-key of the section is a separate feature flag. For example, in the following appsettings.json file, we've created a single feature flag, NewWelcomeBanner, and set it's value to false

{
  "Logging": {
    "LogLevel": {
      "Default": "Warning"
    }
  },
  "FeatureManagement": {
    "NewWelcomeBanner": false
  }
}

Remember, this is all driven by the standard ASP.NET configuration providers, so another way to configure the flag would be to create an environment variable FeatureManagement__NewWelcomeBanner and set its value to "false".

You now have a feature flag (currently disabled) available to your application, but we're not using it anywhere yet. Open up the code-behind for the home page of your application, Index.cshtml.cs, and inject the IFeatureManager into your page:

using Microsoft.FeatureManagement;

public class IndexModel : PageModel
{
    private readonly IFeatureManager _featureManager;
    public IndexModel(IFeatureManager featureManager)
    {
        _featureManager = featureManager;
    }

    // ...
}

The IFeatureManager service allows you to interrogate the feature management system to identify whether a feature flag is enabled or not. IFeatureManager exposes a single method, for checking whether a feature flag is enabled:

public interface IFeatureManager
{
    bool IsEnabled(string feature);
}

You'll notice that the feature is a string value, which should match the value you used in your configuration, "NewWelcomeBanner". You can add a property to PageModel, and set it conditionally based on the value of the feature flag:

public class IndexModel : PageModel
{
    private readonly IFeatureManager _featureManager;
    public IndexModel(IFeatureManager featureManager)
    {
        _featureManager = featureManager;
    }

    public string WelcomeMessage { get; set; }

    public void OnGet()
    {
        WelcomeMessage = _featureManager.IsEnabled("NewWelcomeBanner")
            ? "Welcome to the Beta"
            : "Welcome";
    }
}

When you run your app, the feature flag is disabled (as we disabled it in configuration), so you'll see the standard "Welcome" headline:

When the feature flag is disabled, the header says Welcome

However, if you edit your appsettings.json file, set "NewWelcomeBanner": true, and reload the page, you'll see that the feature flag has been enabled, and the new banner is visible.

When the feature flag is enabled, the header says Welcome to the Beta

Thanks to the JSON file configuration provider, you don't have to restart your app - the configuration provider will automatically detect the change and update the feature flags on the fly.

As already pointed out, the Microsoft.FeatureManagement library relies on the underlying configuration system, so if you want to adjust feature flags dynamically like this, you'll need to use a configuration provider that supports dynamic updating of configuration values like the file providers or Azure Key Vault provider.

Reducing magic-strings

Feature flags are identified in code using magic-strings: "NewWelcomeBanner" in the previous example. Instead of scattering these around your code, the docs recommend creating a FeatureFlags enum, and calling nameof() to reference the values, e.g:

// Define your flags in an enum
// Be careful not to refactor/rename any typos, as that will break configuration
public enum FeatureFlags
{
    NewWelcomeBanner
}

// Reference the feature flags using nameof()
var isEnabled = _featureManager.IsEnabled(nameof(FeatureFlags.NewWelcomeBanner));

Personally, I think I'd prefer to just use a static class and string constants, as it reduces the verbosity at the call site. But both approaches are essentially identical:

// Using a static class separates the "name" of the feature flag
// from its string value
public static class FeatureFlags
{
    public const string NewWelcomeBanner = "NewWelcomeBanner";
}

// No need for nameof() at the call site
var isEnabled = _featureManager.IsEnabled(FeatureFlags.NewWelcomeBanner);

The features shown in this post (loading from configuration, IFeatureManager) are all part of the core Microsoft.FeatureManagement library, so you can use them in any .NET Standard 2.0 application. In the next post I'll introduce Microsoft.FeatureManagement.AspNetCore which provides ASP.NET Core-specific features like Tag Helpers and Action Filters that will make working with features easier in many ASP.NET Core apps.

Summary

The Microsoft.FeatureManagement library is a new library being developed by the Azure team to standardise feature management in ASP.NET Core apps. It is currently in preview, and relies on the configuration system for controlling which features are enabled. In this post, I showed how to create simple features, and how to check for them in your apps using the IFeatureManager interface.

Filtering action methods with feature flags: Adding feature flags to an ASP.NET Core app - Part 2

$
0
0
Filtering action methods with feature flags

In the first post in this series, I introduced the Microsoft.FeatureManagement library, and showed how to use it to add feature flags to an ASP.NET Core app.

In this post, I introduce the companion Microsoft.FeatureManagement.AspNetCore library. This library adds ASP.NET Core-specific features for working with feature flags, such as Tag Helpers and Action Filters.

Microsoft.FeatureManagement was introduced in a recent .NET Community Standup and is currently in preview, so some details may change when it's properly released.

ASP.NET Core-specific feature flag integration

As I described in my previous post, the Microsoft.FeatureManagement library is a .NET Standard 2.0 library that builds on top of the Microsoft.Extensions.Configuration. It provides a standardised way of adding feature flags to an application.

There's nothing ASP.NET Core-specific in this base library, so you're free to use it in any .NET Standard 2.0 app. However, there's an additional library, Microsoft.FeatureManagement.AspNetCore, that does depend on ASP.NET Core, which contains various helper functions and extension methods for working with feature flags. These are described in the documentation (the library isn't open-sourced yet), and include some of the following:

In this post, I'll show how to use MVC action filters to conditionally remove MVC actions, the FeatureTagHelper to hide sections of the UI, and an IDisabledFeaturesHandler to provide custom behaviour if a user attempts to access an action hidden behind a feature flag.

Setting up the project

I'm going to start with a simple ASP.NET Core application, the same as in the last post. If you've already tried out the process from that post, you can just replace the reference to Microsoft.FeatureManagement with a reference to Microsoft.FeatureManagement.AspNetCore.

dotnet add package Microsoft.FeatureManagement.AspNetCore --version 1.0.0-preview-008560001-910

After adding it, your .csproj should look something like this:

<Project Sdk="Microsoft.NET.Sdk.Web">

  <PropertyGroup>
    <TargetFramework>netcoreapp2.2</TargetFramework>
    <AspNetCoreHostingModel>InProcess</AspNetCoreHostingModel>
  </PropertyGroup>

  <ItemGroup>
    <PackageReference Include="Microsoft.AspNetCore.App" />
    <PackageReference Include="Microsoft.AspNetCore.Razor.Design" Version="2.2.0" PrivateAssets="All" />
    <PackageReference Include="Microsoft.FeatureManagement.AspNetCore" Version="1.0.0-preview-008560001-910" />
  </ItemGroup>

</Project>

Next, register the required services in Startup.ConfigureServices():

public class Startup 
{
    public void ConfigureServices(IServiceCollection services)
    {
        //...
        services.AddFeatureManagement();
    }
}

And add the necessary configuration for a simple boolean feature flag Beta to appsettings.json

{
  "FeatureManagement": {
    "Beta": false
  }
}

Finally, create a static helper class for referencing your feature in code:

public static class FeatureFlags 
{
    public const string Beta = "Beta";
}

That's the basic project configured, so now we'll use some of the features provided by Microsoft.FeatureManagement.AspNetCore.

Removing an MVC action using the [Feature] attribute

Let's imagine you have a "traditional" MVC controller (as opposed to a Razor Page) that you only want to be available when the Beta feature flag is enabled. You can decorate the controller (or specific actions) with the [Feature] attribute, providing the name of the feature as an argument:

using Microsoft.AspNetCore.Mvc;
using Microsoft.FeatureManagement;

[Feature(FeatureFlags.Beta)] // Beta feature flag must be enabled
public class BetaController : Controller
{
    public IActionResult Index()
    {
        return View();
    }
}

If you try to navigate to this page (/Beta) when the feature is enabled, you'll see the View rendered as expected:

Viewing the beta page

However, if the Beta feature flag is disabled, you'll get a 404 when trying to view the page:

Viewing the beta page when disabled gives a 404

It's as though the controller doesn't exist at all. That's maybe not the best experience from the user's perspective, so we'll customise this shortly.

The [Feature] attribute is a standard action filter, so you can apply it to action methods, controllers, base controllers, or globally. However, there's a couple of things to be aware of:

  • The [Feature] attribute takes an array of feature flags, in its constructor. If any of those features are enabled, the controller is enabled. Put another way, the filter does an OR check of the features, not an AND.
  • The [Feature] attribute is an IActionFilter not an IPageFilter, so it currently doesn't work on Razor Pages. That seems like an oversight that will surely be fixed before the final release.

Custom handling of missing actions

As shown in the previous section, if an action is removed due to a feature being disabled, the default is to generate a 404 response. That may be fine for some applications, especially if you're using error handling middleware to customise error responses to avoid ugly "raw" 404.

However, it's also possible that you may want to generate a different response in this situation. Maybe you want to redirect users to a "stable" page, return a "join the waiting list" view, or simply return a different response, like a 403 Forbidden.

You can achieve any of these approaches by creating a service that implements the IDisabledFeaturesHandler interface. Implementers are invoked as part of the action filter pipeline, when an action method is "removed" due to a feature being disabled. In the example below, I show how to generate a 403 Forbidden response, but you have access to the whole ActionExecutingContext in the method, so you can do anything you can in a standard action filter:

public class RedirectDisabledFeatureHandler : IDisabledFeaturesHandler
{
    public Task HandleDisabledFeatures(IEnumerable<string> features, ActionExecutingContext context)
    {
        context.Result = new ForbidResult(); // generate a 403
        return Task.CompletedTask;
    }
}

To register the handler, update your call to AddFeatureManagement() in Startup.ConfigureServices():

public class Startup 
{
    public void ConfigureServices(IServiceCollection services)
    {
        //...
        services.AddFeatureManagement()
            .UseDisabledFeaturesHandler(new RedirectDisabledFeatureHandler());
    }
}

With the handler registered, if you now try to access a disabled feature, a 403 response is generated, which is intercepted by the error handling middleware, and you're redirected to the "Access Denied" page for the app:

Instead of a 404, you're redirect to a

With these features you can disable action methods based on whether a feature is enabled and have fine control over what happens when a disabled feature is accessed. Ideally however, users shouldn't be attempting to call actions for disabled features.

Generally speaking, you don't want your users to be seeing "Access Denied" pages due to trying to access disabled features. Instead, you should hide the feature-flag-gated functionality in the UI as well.

As with all validation, you can't rely on hiding things client-side. Always use server-side feature flag checks; only hide content in the UI to give a better user experience.

One way to hide sections in Views would be to inject the IFeatureManager service into views using dependency injection. For example, imagine you want to add a link to the BetaController in the navigation bar of your default layout. You could use the @inject directive, and check for the feature manually:

<!-- Inject the service using DI  -->
@inject  Microsoft.FeatureManagement.IFeatureManager _featureManager; 

<nav>
    <ul>
        <!-- Check if the feature is enabled  -->
        @if (_featureManager.IsEnabled(FeatureFlags.Beta))
        {
            <li class="nav-item">
                <a class="nav-link text-dark" asp-controller="Beta" asp-action="Index">Beta</a>
            </li>
        }
    </ul>
</nav>

This approach works fine, but for this example, you could also use the FeatureTagHelper to achieve the same thing but with cleaner markup:

<nav>
    <ul>
        <!-- Check if the feature is enabled using FeatureTagHelper -->
        <feature name="@FeatureFlags.Beta">
            <li class="nav-item">
                <a class="nav-link text-dark" asp-area="" asp-controller="Beta" asp-action="Index">Beta</a>
            </li>
        </feature>
    </ul>
</nav>

The FeatureTagHelper works for this simple use-case, where you have a single feature flag that must be enabled to show some UI. Unfortunately, if you want to do anything more complicated than that (show different UI if the feature is disabled, check for multiple features) then you'll have to fallback to injecting IFeatureManager.

As mentioned in the .NET community Standup, the team are aware of the limitations with the TagHelper - hopefully they'll be addressed before it's fully released. Personally I wish they would just open source it already, as fixing these things would be easy for the community to do pretty quickly.

That covers the main MVC features exposed in the Microsoft.FeatureManagement.AspNetCore library. So far, I've only demonstrated creating simple feature flags that are just boolean values. In the next post I'll show how you can create more complex (and more interesting!) feature flags by using feature filters. These allow you to customise the feature flags based on the current request, which opens the door to more advanced scenarios.

Summary

The Microsoft.FeatureManagement.AspNetCore library builds on the features in Microsoft.FeatureManagement, adding ASP.NET Core helpers for working with features flags. It contains action filters for disabling actions that are behind feature flags, tag helpers for conditionally hiding UI elements, and extension methods for customising the ASP.NET Core pipeline based on the enabled features. In the next post I'll show some of the more powerful features of the library that let you use more complex feature flags.

Creating dynamic feature flags with feature filters: Adding feature flags to an ASP.NET Core app - Part 3

$
0
0
Creating dynamic feature flags with feature filters

In the first post in this series, I introduced the Microsoft.FeatureManagement library, and showed how to use it to add feature flags to an ASP.NET Core app.

In the second post, I introduced the companion library Microsoft.FeatureManagement.AspNetCore, and showed the ASP.NET Core-specific features it adds such as Tag Helpers and Action Filters.

In this post, I introduce feature filters, which are a much more powerful way of working with feature flags. These let you enable a feature based on arbitrary data. For example, you could enable a feature based on headers in an incoming request, based on the current time, or based on the current user's claims.

In this post I'll show how to use the two feature filters included in the Microsoft.FeatureManagement library, PercentageFilter and TimeWindowFilter.

Microsoft.FeatureManagement was introduced in a recent .NET Community Standup and is currently in preview, so some details may change when it's properly released.

Expanding feature flags beyond simple Booleans

So far in this series I've demonstrated using feature flags that are "fixed" in configuration:

{
  "FeatureManagement": {
    "Beta": false
  }
}

With this configuration, the Beta feature flag is always false for all users (until configuration changes). While this will be useful in some cases, you may often want to enable features for only some of your users, or only some of the time.

For example, maybe you're working on a new feature, and you only want a few of your users to be able to see it, in case there are any issues with it. Alternatively, maybe you're running a promotion on an store, and you only want a banner to be enabled for a specific time period. Neither of these options are possible with the simple flags we've seen so far.

Microsoft.FeatureManagement introduces an interface IFeatureFilter which can be used to decide whether a feature is enabled or not based on any logic you require. Two simple implementations are included out of the box, TimeWindowFilter and PercentageFilter, which I'll introduce below.

Enabling a feature flag based on the current time with TimeWindowFilter

The TimeWindowFilter does as its name suggests - it enables a feature for a given time window. You provide the start and ending DateTime, and any calls to IFeatureManager.IsEnabled() for the feature will be true only between those times.

The example below continues from the previous posts, so it assumes you've already installed the NuGet package. The TimeWindowFilter (and PercentageFilter) is available in the .NET Standard Microsoft.FeatureManagement library, so you can use it in any .NET Standard application. I'm going to assume it's an ASP.NET Core app for this post.

Add the feature management services in Startup.ConfigureServices, by calling AddFeatureManagement(), which returns an IFeatureManagementBuilder. You can enable the time window filter by calling AddFeatureFilter<>() on the builder:

using Microsoft.FeatureManagement;
using Microsoft.FeatureManagement.FeatureFilters;

public class Startup 
{
    public void ConfigureServices(IServiceCollection services)
    {
        //...
        services.AddFeatureManagement()
            .AddFeatureFilter<TimeWindowFilter>();
    }
}

This adds the IFeatureFilter to your app, but you need to configure it using the configuration system. Each IFeatureFilter can have an associated "settings" object, depending on the implementation. For the TimeWindowFilter, this looks like:

internal class TimeWindowSettings
{
    public DateTimeOffset? Start { get; set; }
    public DateTimeOffset? End { get; set; }
}

So let's consider a scenario: I want to enable a custom Christmas banner which goes live on boxing day at 2am UTC, and ends three days later at 1am UTC.

We'll start by creating a feature flag for it in code called ChristmasBanner

public static class FeatureFlags
{
    public const string ChristmasBanner = "ChristmasBanner";
}

Now we'll add the configuration. As before, we nest the configuration under the FeatureManagement key and provide the name of the feature. However, instead of using a Boolean for the feature, we use EnabledFor, and specify an array of feature filters.

{
  "FeatureManagement": {
    "ChristmasBanner": {
      "EnabledFor": [
        {
          "Name": "Microsoft.TimeWindow",
          "Parameters": {
            "Start": "26 Dec 2019 02:00:00 +00:00",
            "End": "29 Dec 2019 01:00:00 +00:00"
          }
        }
      ]
    }
  }

It's important you get the configuration correct here. The general pattern is identical for all feature filters:

  • The feature name ("ChristmasBanner") should be the key of an object:
  • This object should contains a single property, EnabledFor, which is an array of objects.
  • Each of the objects in the array represents an IFeatureFilter. For each filter
    • Provide the Name of the filter ("Microsoft.TimeWindow" for the TimeWindowFilter)
    • Optionally provide a Parameters object, which is bound to the settings object of the feature filter (TimeWindowSettings in this case).
  • If any of the feature filters in the array are satisfied for a given request, the feature is enabled. It is only disabled if all IFeatureFilters indicate it should be disabled.

With this configuration, the ChristmasBanner feature flag will return false until DateTime.UtcNow falls between the provided dates:

using Microsoft.FeatureManagement;

public class IndexModel : PageModel
{
    private readonly IFeatureManager _featureManager;
    public IndexModel(IFeatureManager featureManager)
    {
        _featureManager = featureManager;
        // only returns true during provided time window
        var showBanner = _featureManager.IsEnabled(FeatureFlags.ChristmasBanner);
    }
    // ...
}

The real benefit to using IFeatureFilters is that you get dynamic behaviour, but you can still control it from configuration.

Note that TimeWindowSettings has nullable values for Start and End, to give you open-ended time windows e.g. always enable until a given date, or only enable from a given date.

Rolling features out slowly with PercentageFilter

The PercentageFilter also behaves as you might expect - it only enables a feature for x percent of requests, where x is controlled via settings. Enabling the PercentageFilter follows the same procedure as for TimeWindowFilter.

Add the PercentageFilter in ConfigureServices():

using Microsoft.FeatureManagement;
using Microsoft.FeatureManagement.FeatureFilters;

public class Startup 
{
    public void ConfigureServices(IServiceCollection services)
    {
        services.AddFeatureManagement()
            .AddFeatureFilter<PercentageFilter>();
    }
}

Create a feature flag:

public static class FeatureFlags
{
    public const string FancyFonts = "FancyFonts";
}

Configure the feature in configuration:

{
  "FeatureManagement": {
    "FancyFonts": {
      "EnabledFor": [
        {
          "Name": "Microsoft.Percentage",
          "Parameters": {
            "Value": 10
          }
        }
      ]
    }
  }

The PercentageSettings object consists of a single int, which is the percentage of the time the flag should be enabled. In the example above, the flag will be enabled for 10% of calls to IFeatureManager.IsEnabled(FeatureFlags.FancyFonts).

That last sentence may sound a bit off to you. Does that mean that if you call IsEnabled() twice in the same request, the PercentageFilter could give different answers? Yes!

On top of that, subsequent requests would be subject to the same potential flipping back and forth, so users could see features popping in and out as they browse your site.

Luckily, there are solutions to both of these problems built into the library, but I'm going to leave them for a later post.

The two filters shown here are built into Microsoft.FeatureManagement, but you're free to implement your own. In the next post, I'll show how to create a custom IFeatureFilter that enables features based on the currently logged in user.

Summary

Microsoft.FeatureManagement allows you to enable feature flags based on values in configuration. By using IFeatureFilter you can get dynamic behaviour, even though your configuration may be static. The TimeWindowFilter and PercentageFilter are included in the library and provide basic dynamic feature flags. To add them to your app you must enable them by calling AddFeatureFilter<>() in Startup.ConfigureServices(), and adding the appropriate configuration.

Creating a custom feature filter: Adding feature flags to an ASP.NET Core app - Part 4

$
0
0
Creating a custom feature filter

Microsoft.FeatureManagement allows you to add feature flags to an ASP.NET Core app that are controlled by the configuration system. In the previous post I introduced feature filters, and showed how they can be used to create dynamic feature flags. I described two feature filters that are built-in to the library, the TimeWindowFilter and PercentageFilter.

In this post I show how you can create your own custom feature filter. The example in this post looks for a Claim in the currently logged-in user's ClaimsPrincipal and enables a feature flag if it's present. You could use this filter to enable a feature for a subset of your users.

Microsoft.FeatureManagement was introduced in a recent .NET Community Standup and is currently in preview, so some details may change when it's properly released.

Creating a custom IFeatureFilter

This post assumes that you're already familiar with feature filters, and the Microsoft.FeatureManagement in general, so if they're new to you, I suggest reading the previous posts in this series.

Creating a custom feature filter requires two things:

  • Create a class that derives from IFeatureFilter.
  • Optionally create a settings class to control your feature filter.

I'll start with the settings class, as we'll use that inside our custom feature filter.

Creating the filter settings class

For this example, we want to enable a feature for only those users that have a certain set of claims. For simplicity, I'm only going to require the presence of a claim type and ignore the claim's value, but extending the example in this post should be simple enough. The settings object contains an array of claim types:

public class ClaimsFilterSettings
{
    public string[] RequiredClaims { get; set; }
}

There's nothing special about this settings class; it will be bound to your app's configuration, so you're only restricted by the limitations of the standard ASP.NET Core/Microsoft.Extensions configuration binder.

Implementing IFeatureFilter

To create a feature filter, you must implement the IFeatureFilter interface, which consists of a single method:

public interface IFeatureFilter
{
    bool Evaluate(FeatureFilterEvaluationContext context);
}

The FeatureFilterEvaluationContext argument passed in to the method contains the name of the feature requested, and an IConfiguration object that allows you to access the settings for the feature:

public class FeatureFilterEvaluationContext
{
    public string FeatureName { get; set; }
    public IConfiguration Parameters { get; set; }
}

It's worth noting that there's nothing specific to ASP.NET Core here - there's no HttpContext, and no IServiceProvider. Luckily, your class is pulled from the DI container, so you should be able to get everything you need in your feature filter's constructor.

Creating the custom feature filter

In order to implement our custom feature filter, we need to know who the current user is for the request. To do so, we need to access the HttpContext. The correct way to do that (when you don't have direct access to it as you do in MVC controllers etc) is to use the IHttpContextAccessor.

The ClaimsFeatureFilter below takes an IHttpContextAccessor in its constructor and uses the exposed HttpContext to retrieve the current user from the request.

[FilterAlias("Claims")] // How we will refer to the filter in configuration
public class ClaimsFeatureFilter : IFeatureFilter
{
    // Used to access HttpContext
    private readonly IHttpContextAccessor _httpContextAccessor;
    public ClaimsFeatureFilter(IHttpContextAccessor httpContextAccessor)
    {
        _httpContextAccessor = httpContextAccessor;
    }

    public bool Evaluate(FeatureFilterEvaluationContext context)
    {
        // Get the ClaimsFilterSettings from configuration
        var settings = context.Parameters.Get<ClaimsFilterSettings>();

        // Retrieve the current user (ClaimsPrincipal)
        var user = _httpContextAccessor.HttpContext.User;

        // Only enable the feature if the user has ALL the required claims
        var isEnabled = settings.RequiredClaims
            .All(claimType => user.HasClaim(claim => claim.Type == claimType));

        return isEnabled;
    }
}

I named this feature filter "Claims" using the [FilterAlias] attribute. This is the string you need to add in configuration to enable the filter, as you'll see shortly. You can retrieve the ClaimsFilterSettings associated with a given instance of the custom feature filter by calling context.Parameters.Get<>().

The logic of the filter is relatively straightforward - if the ClaimsPrincipal for the request has all of the required claims, the associated feature is enabled, otherwise the feature is disabled.

Using the custom feature filter

To use the custom feature filter, you must explicitly register it with the feature management system in Startup.ConfigureServices(). We also need to make sure the IHttpContextAccessor is available in DI:

using Microsoft.FeatureManagement;

public class Startup 
{
    public void ConfigureServices(IServiceCollection services)
    {
        // Add IHttpContextAccessor if it's not yet added
        services.AddHttpContextAccessor();

        services.AddFeatureManagement()
            .AddFeatureFilter<ClaimsFeatureFilter>(); // add our custom filter
    }
}

Depending on which framework and third-party services you've already added to your app, IHttpContextAccessor may already be available. It's safe to call AddHttpContextAccessor() multiple times though, so worth including just in case.

That's all the custom configuration needed to enable our ClaimsFeatureFilter. To actually use it in an app, we'll add a feature flag called "Beta":

public static class FeatureFlags
{
    public const string Beta = "Beta";
}

and enable the filter in configuration using the format described in the previous post:

{
  "FeatureManagement": {
    "Beta": {
      "EnabledFor": [
        {
          "Name": "Claims",
          "Parameters": {
            "RequiredClaims": [ "Internal" ]
          }
        }
      ]
    }
  }

Notice that I've used the [FilterAlias] value of "Claims" as the filter's Name. The Parameters object corresponds to the ClaimsFilterSettings settings object. With this configuration, user's who have the "Internal" claim will have the Beta feature flag enabled - other user's will find it's disabled.

Testing the ClaimsFeatureFilter

To test out the feature filter, it's easiest to start with an ASP.NET Core app that has individual authentication enabled. For demonstration purposes, I updated the home page Index.cshtml to show a banner when the Beta feature flag is enabled using the FeatureTagHelper:

@page
@model IndexModel
@{
    ViewData["Title"] = "Home page";
}

<!-- Only visible when Beta feature flag is enabled -->
<feature name="@FeatureFlags.Beta">
    <div class="alert alert-primary" role="alert">
        Congratulations - You're in the Beta test!
    </div>
</feature>

<!-- ... -->

Run the database migrations for the application using

dotnet ef database update

and then run your app and register a new user. You should see the standard home page:

The default home page when the feature flag is disabled

The "Beta" banner is hidden because by default. Our ClaimsFeatureFilter checked the user's claims for the required "Internal" claim, which is absent by default, and so returned false for IsEnabled(). To enable the feature we need to add an extra claim to the user.

There are a number of ways to add claims to users - either when the user is created, at a later time, or when they sign in. I'm taking the easy route here and just manually adding the claim in the database.

With ASP.NET Core Identity, arbitrary additional Claims can be added to a user. These are stored in the AspNetUserClaims table (by default). I used VisualStudio server explorer to add a new row in this table associated with my user, using the claim type "Internal"

Adding the Internal claim to the user

If you log out and then sign back in (to ensure the new claim is picked up) the "Beta" banner is now visible - the custom feature filter works!

The default home page when the feature flag is enabled

Limitations with the ClaimsFeatureFilter

The custom feature filter ClaimsFeatureFilter described in this post is only intended as an example of a filter you could use. The reliance on HttpContext gives it a specific limitation: it can't be used outside the context of an HTTP request.

Attempting to access HttpContext outside of an HTTP request can result in a NullReferenceException. You also need to be careful about using it in a background thread, as HttpContext is not thread safe.

One of the slightly dangerous implications of this is that consumers of the feature flags don't necessarily know which features are safe to interrogate in which context. There's nothing in the following code that suggests it could throw when used on a background thread, or in a hosted service.

var isEnabled = _featureManager.IsEnabled(FeatureFlags.Beta); // may throw!

One basic option to avoid this situation is to use naming conventions for your feature flags. For example, you could use a convention where feature flags prefixed with "UI_" are only considered "safe" to access when withan an HTTP request context.

public static class FeatureFlags
{
    // These flags are safe to access in any context
    public const string NewBranding = "NewBranding";
    public const string AlternativeColours = "AlternativeColours";

    // These flags are only safe to access from an HttpContext-safe request
    public static class Ui
    {
      const string _prefix = "UI_";
      public const string Beta = _prefix + "Beta";
      public const string NewOnboardingExperiences = _prefix + "NewOnboardingExperiences";
    }
}

This at least gives an indication to the caller when the flag is used. Obviously it requires you configure the flags correctly, but it's a step in the right direction!

// Flags on the main FeatureFlags class are safe to use everywhere
var isEnabled = _featureManager.IsEnabled(FeatureFlags.NewBranding); 

// Flags on the nested Ui class are only safe when HttpContext is available
var isEnabled = _featureManager.IsEnabled(FeatureFlags.Ui.Beta); 

Summary

Microsoft.FeatureManagement allows using feature filters to add dynamic behaviour to your feature flags. In this post I showed how to implement your own custom IFeatureFilter which uses claims of the current user to decide whether a flag should be enabled. This feature filter works well in the context of a request, but it's important to be aware of the implications of using HttpContext as regards to using feature flags in background threads and outside of an HTTP context.

Ensuring consistent feature flags across requests: Adding feature flags to an ASP.NET Core app - Part 5

$
0
0
Ensuring consistent feature flags across requests

In the first and second posts in this series, I introduced the Microsoft.FeatureManagement, and Microsoft.FeatureManagement.AspNetCore libraries, and showed how to use them to add feature flags to an ASP.NET Core app.

In the third and fourth posts, I showed how to use feature filters, which let you enable a feature flag based on arbitrary data. For example, you could enable a feature based on headers in an incoming request, based on the current time, or for a certain percentage of users.

I touched on a problem with one such filter, the PercentageFilter, in the third post. This filter returns true for IsEnabled() 10% of the time (for example). Unfortunately, if you call the filter multiple times within a single request you could get different results. Not to mention that each request could give a different result for the same user.

In this post I describe two ways to improve the consistency of your feature flags for users. The first approach, using IFeatureManagerSnapshot ensures consistency within a given request. The second approach, using a custom ISessionManager, allows you to extend this consistency between requests.

The problem: different results with every request.

To demonstrate the problem, I'll create a feature flag using the PercentageFilter as described in my previous post. I'll use this filter to set a feature flag called "NewExperience", which is configured to be enabled 50% of the time:

{
  "FeatureManagement": {
    "NewExperience": {
      "EnabledFor": [
        {
          "Name": "Microsoft.Percentage",
          "Parameters": {
            "Value": 50
          }
        }
      ]
    }
  }

On the home page of the app, I'll inject an IFeatureManager into Index.cshtml and request the value of the feature 10 times:

@page
@model IndexModel
@inject Microsoft.FeatureManagement.IFeatureManager FeatureManager
@{
    ViewData["Title"] = "Home page";
}

<ul>
@for (var i = 0; i < 10; i++)
{
    <li>Flag is: @FeatureManager.IsEnabled(FeatureFlags.NewExperience)</li>
}
</ul>

If you run the application, you can see that every time you call IsEnabled, there's a 50% chance the flag will be enabled:

Using IFeatureManager, every call to IsEnabled is independent

This is very unlikely to be desirable in your application. You almost certainly don't want a flag to flip between enabled and disabled within the context of the same request! Depending on the level of consistency you need, there are two main approaches to solving this. The first is to use IFeatureManagerSnapshot.

Maintaining consistency within a request with IFeatureManagerSnapshot

IFeatureManagerSnapshot is registered with the DI container by default when you use feature flags, and acts as a per-request cache for feature flags. It derives from IFeatureManager, so you use it in exactly the same way. You can simply replace the IFeatureManager references with IFeatureManagerSnapshot:

@page
@model IndexModel
@inject Microsoft.FeatureManagement.IFeatureManagerSnapshot SnapshotManager
@{
    ViewData["Title"] = "Home page";
}

<ul>
@for (var i = 0; i < 10; i++)
{
    <li>Flag is: @SnapshotManager.IsEnabled(FeatureFlags.NewExperience)</li>
}
</ul>

If you refresh the page a few times you'll see that within a request, all calls to IsEnabled() return the same value. However, between requests, there's a 50% chance you'll be flipped back and forth between enabled and disabled:

Using IFeatureManagerSnapshot, all calls to IsEnabled within a request return the same value

Depending on what you're using your feature flags for, this may be sufficient for your needs. This approach also has an advantage if you have a feature filter that is expensive to calculate - using IFeatureManagerSnapshot caches the value for the whole request, instead of repeatedly re-evaluating it. In general, I feel like IFeatureManagerSnapshot should be the interface you reach for in nearly all cases.

However, it won't solve all your problems. I expect that for most applications, you'll want a PercentageFilter feature flag to persist for all requests by a given user, so the user doesn't see features flipping on and off. If that's the case, you'll want to take a look at ISessionManager.

Maintaining consistency between requests with ISessionManager

You can think of ISessionManager as a bit like IFeatureManagerSnapshot on steroids - it's a glorified dictionary of feature flag check results, but you can store the data anywhere you like. An obvious choice might be to use the ASP.NET Core Session feature to store the feature flag results. This would ensure that once a user checks a feature flag, the result (enabled or disabled) persists for that user. That prevents the "flipping back and forth" issue described above.

ISessionManager is a small interface to implement, consisting of just two methods:

public interface ISessionManager
{
    void Set(string featureName, bool enabled);
    bool TryGet(string featureName, out bool enabled);
}

Set() is called after the value of a feature flag has been determined for the first time, and is used to store the result. TryGet() is called every time IFeatureManager.IsEnabled() is called, to check if a value for the flag has previously been set. If it has, TryGet() returns true, and enabled contains the feature flag result.

The example implementation below shows an ISessionManager implementation that uses the ASP.NET Core Session to store feature flag results:

public class SessionSessionManager : ISessionManager
{
    private readonly IHttpContextAccessor _contextAccessor;
    public SessionSessionManager(IHttpContextAccessor contextAccessor)
    {
        _contextAccessor = contextAccessor;
    }

    public void Set(string featureName, bool enabled)
    {
        var session = _contextAccessor.HttpContext.Session;
        var sessionKey = $"feature_{featureName}";
        session.Set(sessionKey, new[] {enabled ? (byte) 1 : (byte) 0});
    }

    public bool TryGet(string featureName, out bool enabled)
    {
        var session = _contextAccessor.HttpContext.Session;
        var sessionKey = $"feature_{featureName}";
        if (session.TryGetValue(sessionKey, out var enabledBytes))
        {
            enabled = enabledBytes[0] == 1;
            return true;
        }

        enabled = false;
        return false;
    }
}

As this is using Session (which uses a cookie for setting the session ID), u ou need to access the HttpContext, so you need to use the HttpContextAccessor. The implementation above is a very thin wrapper around Session: you store the flag result as either a 0 or 1, using a different key for each filter, and retrieve the value using the same key.

To enable the ISessionManager you need to add it to the DI container. You also need to add the ASP.NET Core Session services and middleware for this implementation.

Note that ISessionManager and the FeatureManagement library itself has no dependence on ASP.NET Core Session - it's only required because I chose to use it in this implementation.

Register the ISessionManager and dependent services in Startup.ConfigureServices():

public void ConfigureServices(IServiceCollection services)
{
    // ...
    services.AddSession();
    services.AddHttpContextAccessor();
    services.AddTransient<ISessionManager, SessionSessionManager>();

    services.AddFeatureManagement()
        .AddFeatureFilter<PercentageFilter>();
}

Also, add the session middleware to your middleware pipeline in Startup.Configure(), just before the MVC middleware:

public void Configure(IApplicationBuilder app)
{
    // ...
    app.UseSession();
    app.UseMvc();
}

Remember, the ASP.NET session will be empty until after the session middleware has run, so the ISessionManager will also be empty until then. If you're going to be using feature management early in your middleware pipeline, then you'll want to add the session middleware earlier too.

Repeating the same experiment with the ISessionManager in place means you will get consistent feature flags across all requests for the user, until their session ends, or they switch browsers. If you need an even higher degree of consistency (tied to the user's ID rather than their session, so that flags persist browsers, for example) you could implement a different ISessionManager.

Using ISessionManager, all calls to IsEnabled while a session exists return the same value

Overall, ISessionManager is clearly designed to solve the consistency problem, but I think you'll need to be careful how it's used, as the basic implementation shown in this post probably won't cut the mustard.

Limitations with the ISessionManger implementation

The main issue with my implementation of ISessionManager is that it caches the values of all feature flags in Session. That may be fine, but if you have other feature filters then it's almost certainly not.

Take the TimeWindowFilter from my previous post, for example. This filter should return false unless the current time is between the configured values. We don't want the ISessionManager to cache the value for an entire session, otherwise the feature filter may never turn on, even as time progresses!

There is a solution to this - restrict the ISessionManager to caching a single feature. For example:

public class NewExperienceSessionManager : ISessionManager
{
    public void Set(string featureName, bool enabled)
    {
        if(featureName != FeatureFlags.NewExperience) { return; }
        // ... implementation as before
    }

    public bool TryGet(string featureName, out bool enabled)
    {
        if(featureName != FeatureFlags.NewExperience) 
        { 
            enabled = false;
            return false;
        }
        // ... implementation as before
    }
}

This approach would technically deal with the issue. But at this point you're looking at creating an ISessionManager per feature. That may be fine; I'm undecided. Personally I think it would be nice to be able to explicitly configure an ISessionManager for each feature in configuration, rather than have the additional layer of indirection the current design requires.

Note that you can register multiple instances of ISessionManager with the DI container, and the IFeatureManager will call Set() and TryGet() on all of them, hence the ISessionManager-per-feature approach would work ok.

Another possible approach would be to avoid the ISessionManager entirely, and instead create feature filters that return a consistent value based on the current user. For example, you could create a custom PercentageFilter that uses the current user's ID as the seed for the random number generator, so the same user ID always returns the same value. This has its own limitations, but it removes the need for an ISessionManager entirely.

Another important limitation, and one that applies to the whole Microsoft.FeatureManagement library, is that the APIs are all synchronous. No async/await allowed.

This hasn't been a problem in my initial tests with the library, but I could easily imagine a feature filter that requires a database lookup, or an HTTP call - those all become dangerous as you're stuck doing sync-over-async. The library fundamentally isn't designed to handle adhoc async tasks like this, which limits the approaches you can take. Any slow or async tasks must run in the background and update the underlying configuration, which the feature filter can then use.

Summary

In this post I described some of the challenges in maintaining consistent values for your feature flags, especially when using the PecentageFilter, which randomly decides if a flag is enabled every time IsEnabled() is called. I showed how to use IFeatureManagerSnapshot to maintain consistency in feature flag results within a given request. I also introduced ISessionManager which can be used to cache feature flag results between requests. The example implementation I provided uses ASP.NET Core Session to cache the results for a user. This approach has some limitations that are important to bear in mind when implementing in your own projects.

Verifying phone number ownership with Twilio Verify API v2 using ASP.NET Core Identity and Razor Pages

$
0
0
Verifying phone number ownership with Twilio Verify API v2 using ASP.NET Core Identity and Razor Pages

ASP.NET Core Identity is a membership system that adds user sign in and user management functionality to ASP.NET Core apps. It includes many features out of the box and has basic support for storing a phone number for a user. By default, ASP.NET Core Identity doesn't try to verify ownership of phone numbers, but you can add that functionality yourself by integrating Twilio’s identity verification features into your application.

In this post you'll learn how you can prove ownership of a phone number provided by a user using Twilio Verify in an ASP.NET Core application using Razor Pages. This involves sending a code in an SMS message to the provided phone number. The user enters the code received and Twilio confirms whether it is correct. If so, you can be confident the user has control of the provided phone number.

You typically only confirm phone number ownership once for a user. This is in contrast to two-factor authentication (2FA) where you might send an SMS code to the user every time they login. Twilio has a separate Authy API for performing 2FA checks at sign in, but it won't be covered in this post.

Note that this post uses version 2.x of the Twilio Verify API. A previous post on the Twilio blog shows how to use version 1 of the API .

Prerequisites

To follow along with this post you'll need:

You can find the complete code for this post on GitHub.

Creating the case study project

Using Visual Studio 2017+ or the .NET CLI, create a new solution and project with the following characteristics:

  • Type: ASP.NET Core 2.2 Web Application (not MVC) with Visual C#
  • Name: SendVerificationSmsV2Demo
  • Solution directory / uncheck Place solution and project in the same directory
  • Git repository
  • https
  • Authentication: Individual user accounts, Store user accounts in-app

ASP.NET Core Identity uses Entity Framework Core to store the users in the database, so be sure to run the database migrations in the project folder after building your app. Execute one of the following command line instructions to build the database:

.NET CLI

dotnet ef database update

Package Manager Console

update-database

The Twilio C# SDK and the Twilio Verify API

The Twilio API is a typical REST API, but to make it easier to work with Twilio provides helper SDK libraries in a variety of languages. Previous posts have shown how to use the C# SDK to validate phone numbers, and how to customize it to work with the ASP.NET Core dependency injection container.

Version 1.x of the Twilio Verify API was not supported by the C# SDK, so you had to make "raw" HTTP requests with an HttpClient. Luckily the SDK has been updated to work with version 2 of the Verify API, which drastically simplifies interacting with the API. Version 2 of the API also allows working with E.164 formatted numbers.

Initializing the Twilio API

Install the Twilio C# SDK by installing the Twilio NuGet package (version 5.29.1 or later) using the NuGet Package Manager, Package Manager Console CLI, or by editing the SendVerificationSmsV2Demo.csproj file. After using any of these methods the <ItemGroup> section of the project file should look like this (version numbers may be higher):

<ItemGroup>
  <PackageReference Include="Microsoft.AspNetCore.App"/>
  <PackageReference Include="Microsoft.AspNetCore.Razor.Design" Version="2.2.0" PrivateAssets="All" />
  <PackageReference Include="Twilio" Version="5.29.1" />
</ItemGroup>

To call the Twilio API you'll need your Twilio Account SID and Auth Token (found in the Twilio Dashboard). When developing locally these should be stored using the Secrets Manager or as environment variables so they don't get accidentally committed to your source code repository. You can read about how and why to use the Secrets Manager in this post on the Twilio Blog. You'll also need the Service SID for your Twilio Verify Service (found under Settings for the Verify Service you created, in the Verify section of the Twilio Dashboard). Your resulting Secrets.json should look something like this:

{
  "Twilio": {
    "AccountSID": "ACxxxxxxxxxxxxxxxxxxxxxxxxxxxxxxxx",
    "AuthToken": "your_auth_token",
    "VerificationServiceSID": "VAxxxxxxxxxxxxxxxxxxxxxxxxxxxxxxxx"
  }
}

The Twilio helper libraries use a singleton instance of the Twilio client, which means you only need to set it up once in your app. The best place to configure things like this are in the Startup.cs file. Add using Twilio; at the top of Startup.cs, and add the following at the end of ConfigureServices:

public void ConfigureServices(IServiceCollection services)
{
    // existing configuration

    var accountSid = Configuration["Twilio:AccountSID"];
    var authToken = Configuration["Twilio:AuthToken"];
    TwilioClient.Init(accountSid, authToken);
}

This sets up the static Twilio client using your credentials using the ASP.NET Core configuration system. If you need to customize the requests made to Twilio (by using a proxy server, for example), or want to make use of HttpClientFactory features introduced in ASP.NET Core 2.1, see a previous post on the Twilio blog for an alternative approach.

You also need to make the Verify Service ID accessible in the app, so create a strongly-typed Options object and bind the settings to it. Create the file TwilioVerifySettings.cs in the project directory and add the following code:

public class TwilioVerifySettings
{
    public string VerificationServiceSID { get; set; }
}

You can bind this class to the configuration object so it's accessible from everywhere via the dependency injection container. Add the following line to the end of the Startup.ConfigureServices method:

services.Configure<TwilioVerifySettings>(Configuration.GetSection("Twilio"));

With the Twilio SDK configuration complete, you can start adding the phone verification functionality to your ASP.NET Core Identity application.

Adding the required scaffolding files

In this post you're going to be adding some additional pages to the Identity area. Typically when you're adding or editing Identity pages in ASP.NET Core you should use the built-in scaffolding tools to generate the pages, as shown in this post. If you've already done that, you can skip this section.

Rather than adding all the Identity scaffolding, all you need for this post is a single file. Create the file __ViewImports.cshtml_ in the Areas/Identity/Pages folder and add the following code:

@using Microsoft.AspNetCore.Identity
@using SendVerificationSmsV2Demo.Areas.Identity
@namespace SendVerificationSmsV2Demo.Areas.Identity.Pages
@addTagHelper *, Microsoft.AspNetCore.Mvc.TagHelpers

This adds all the namespaces and tag helpers required by your Razor Pages. It will also light up the IntelliSense in Visual Studio. If you've already scaffolded Identity pages you'll already have this file!

Sending a verification code to a phone number

The default ASP.NET Core Identity templates provide the functionality for storing a phone number for a user, but don't provide the capability to verify ownership of the number. In the post Validating Phone Numbers in ASP.NET Core Identity Razor Pages with Twilio Lookup you can learn how to validate a phone number by using the Twilio Lookup API.

As noted in the previous post, it’s a good idea to store the result formatted as an E.164 number. This post assume you've done that. so the PhoneNumber property for an IdentityUser is the E.164 formatted phone number.

Create a new folder Account, under the Areas/Identity/Pages folder, and add a new Razor Page in the folder called VerifyPhone.cshtml. Replace the VerifyPhoneModel class in the code-behind file VerifyPhone.cshtml.cs with the following:

using System;
using System.Threading.Tasks;
using Microsoft.AspNetCore.Authorization;
using Microsoft.AspNetCore.Identity;
using Microsoft.AspNetCore.Mvc;
using Microsoft.AspNetCore.Mvc.RazorPages;
using Microsoft.Extensions.Options;
using Twilio.Rest.Verify.V2.Service;

namespace SendVerificationSmsV2Demo.Areas.Identity.Pages.Account
{
    [Authorize]
    public class VerifyPhoneModel : PageModel
    {
        private readonly TwilioVerifySettings _settings;
        private readonly UserManager<IdentityUser> _userManager;

        public VerifyPhoneModel(IOptions<TwilioVerifySettings> settings, UserManager<IdentityUser> userManager)
        {
            _settings = settings.Value;
            _userManager = userManager;
        }

        public string PhoneNumber { get; set; }

        public async Task<IActionResult> OnGetAsync()
        {
            await LoadPhoneNumber();
            return Page();
        }

        public async Task<IActionResult> OnPostAsync()
        {
            await LoadPhoneNumber();

            try
            {
                var verification = await VerificationResource.CreateAsync(
                    to: PhoneNumber,
                    channel: "sms",
                    pathServiceSid: _settings.VerificationServiceSID
                );

                if (verification.Status == "pending")
                {
                    return RedirectToPage("ConfirmPhone");
                }

                ModelState.AddModelError("", $"There was an error sending the verification code: {verification.Status}");
            }
            catch (Exception)
            {
                ModelState.AddModelError("", 
                    "There was an error sending the verification code, please check the phone number is correct and try again");
            }

            return Page();
        }

        private async Task LoadPhoneNumber()
        {
            var user = await _userManager.GetUserAsync(User);
            if (user == null)
            {
                throw new Exception($"Unable to load user with ID '{_userManager.GetUserId(User)}'.");
            }
            PhoneNumber = user.PhoneNumber;
        }
    }
}

The phone number for the current user is loaded in the OnGetAsync using the LoadPhoneNumber helper method, and is assigned to the PhoneNumber property for display in the UI. The OnPostAsync handler is where the verification process begins.

The phone number is loaded again at the start of the OnPostAsync method and used to send a verification message with the Twilio helper SDK. The VerificationResource.CreateAsync method sends a verification code to the provided number using the Twilio Verify API. When calling this method you also need to provide the Verify Service ID. You retrieve the value from configuration by injecting an IOptions<TwilioVerifySettings> into the page constructor using the Options pattern.

The response from the Twilio Verify API contains a Status field indicating the overall status of the verification process. If the message is sent successfully, the response will return "pending", indicating that a check is waiting to be performed. On success, the user is redirected to the ConfirmPhone page, which you'll create shortly. If the Verify API indicates the request failed, or if an exception is thrown, an error is added to the ModelState, and the page is re-displayed to the user.

The form itself consists of just a message and a submit button. Replace the contents of VerifyPhone.cshtml with the following Razor markup:

@page
@model VerifyPhoneModel
@{
    ViewData["Title"] = "Verify Phone number";
}

<h4>@ViewData["Title"]</h4>
<div class="row">
    <div class="col-md-8">
        <form method="post">
            <p>
                We will verify your phone number by sending a code to @Model.PhoneNumber. 
            </p>
            <div asp-validation-summary="All" class="text-danger"></div>
            <button type="submit" class="btn btn-primary">Send verification code</button>
        </form>
    </div>
</div>

When rendered, the form looks like the following:

The verify phone form

To test the form, sign in to your app, navigate to /Identity/Account/Manage and add your phone number to the account. Remember to use an E.164 formatted number that includes your country code, for example +14155552671, and remember to click Save so the number is written to the database.

Next, navigate to /Identity/Account/VerifyPhone in your browser's address bar and click Send verification code. If your phone number is valid, you’ll receive an SMS similar to the message shown below. Note that you can customize this message, including the service name and code length: see the Verify API documentation for details.

Your Twilio Verify API demo verification code is: 293312

At this point, your app will crash, as it’s trying to redirect to a page that doesn’t exist yet. Now you’ll need to create that page where the user enters the code they receive.

Checking the verification code

The check verification code page contains a single text box where the user enters the code they receive. Create a new Razor Page in the Areas/Identity/Pages/Account folder called ConfirmPhone.cshtml. In the code-behind file, ConfirmPhone.cshtml.cs, replace the ConfirmPhoneModel class with the following code:

using System;
using System.ComponentModel.DataAnnotations;
using System.Threading.Tasks;
using Microsoft.AspNetCore.Authorization;
using Microsoft.AspNetCore.Identity;
using Microsoft.AspNetCore.Mvc;
using Microsoft.AspNetCore.Mvc.RazorPages;
using Microsoft.Extensions.Options;
using Twilio.Rest.Verify.V2.Service;

namespace SendVerificationSmsV2Demo.Areas.Identity.Pages.Account
{
    [Authorize]
    public class ConfirmPhoneModel : PageModel
    {
        private readonly TwilioVerifySettings _settings;
        private readonly UserManager<IdentityUser> _userManager;

        public ConfirmPhoneModel(UserManager<IdentityUser> userManager, IOptions<TwilioVerifySettings> settings)
        {
            _userManager = userManager;
            _settings = settings.Value;
        }

        public string PhoneNumber { get; set; }

        [BindProperty, Required, Display(Name = "Code")]
        public string VerificationCode { get; set; }


        public async Task<IActionResult> OnGetAsync()
        {
            await LoadPhoneNumber();
            return Page();
        }

        public async Task<IActionResult> OnPostAsync()
        {
            await LoadPhoneNumber();
            if (!ModelState.IsValid)
            {
                return Page();
            }

            try
            {
                var verification = await VerificationCheckResource.CreateAsync(
                    to: PhoneNumber,
                    code: VerificationCode,
                    pathServiceSid: _settings.VerificationServiceSID
                );
                if (verification.Status == "approved")
                {
                    var identityUser = await _userManager.GetUserAsync(User);
                    identityUser.PhoneNumberConfirmed = true;
                    var updateResult = await _userManager.UpdateAsync(identityUser);

                    if (updateResult.Succeeded)
                    {
                        return RedirectToPage("ConfirmPhoneSuccess");
                    }
                    else
                    {
                        ModelState.AddModelError("", "There was an error confirming the verification code, please try again");
                    }
                }
                else
                {
                    ModelState.AddModelError("", $"There was an error confirming the verification code: {verification.Status}");
                }
            }
            catch (Exception)
            {
                ModelState.AddModelError("",
                    "There was an error confirming the code, please check the verification code is correct and try again");
            }

            return Page();
        }

        private async Task LoadPhoneNumber()
        {
            var user = await _userManager.GetUserAsync(User);
            if (user == null)
            {
                throw new Exception($"Unable to load user with ID '{_userManager.GetUserId(User)}'.");
            }
            PhoneNumber = user.PhoneNumber;
        }
    }
}

As before, the OnGetAsync handler loads the current user's phone number for display in the UI using the LoadPhoneNumber helper method. The phone number is loaded again in the OnPostAsync handler for calling the verification check API. You verify the user's code by calling VerificationCheckResource.CreateAsync, passing in the phone number, the provided verification code, and the Verify Service ID.

If the code is correct, the Verify API will return result.Status="approved". You can store the confirmation result on the IdentityUser object directly by setting the PhoneNumberConfirmed property and saving the changes.

If everything completes successfully, you redirect the user to a simple ConfirmPhoneSuccess page (that you'll create shortly). If there are any errors or exceptions, an error is added to the ModelState and the page is redisplayed.

Replace the contents of ConfirmPhone.cshtml with the Razor markup below:

@page
@model ConfirmPhoneModel
@{
    ViewData["Title"] = "Confirm Phone number";
}

<h4>@ViewData["Title"]</h4>
<div class="row">
    <div class="col-md-6">
        <form method="post">
            <p>
                We have sent a confirmation code to @Model.PhoneNumber
                Enter the code you receive to confirm your phone number.
            </p>
            <div asp-validation-summary="All" class="text-danger"></div>

            <div class="form-group">
                <label asp-for="VerificationCode"></label>
                <input asp-for="VerificationCode" class="form-control" type="number" />
                <span asp-validation-for="VerificationCode" class="text-danger"></span>
            </div>
            <button type="submit" class="btn btn-primary">Confirm</button>
        </form>
    </div>
</div>

@section Scripts {
    <partial name="_ValidationScriptsPartial" />
}

When rendered, this looks like the following:

The confirm phone form

Once the user successfully confirms their phone number you can be confident they have access to it and you can use it in other parts of your application with confidence.

Showing a confirmation success page

To create a simple "congratulations" page for the user, create a new Razor Page in the Areas/Identity/Pages/Account folder called ConfirmPhoneSuccess.cshtml. You don't need to change the code-behind for this page, just add the following markup to ConfirmPhoneSuccess.cshtml:

@page
@model ConfirmPhoneSuccessModel
@{
    ViewData["Title"] = "Phone number confirmed";
}

<h1>@ViewData["Title"]</h1>
<div>
    <p>
        Thank you for confirming your phone number.
    </p>
    <a asp-page="/Index">Back to home</a>
</div>

After entering a correct verification code, users will be redirected to this page. From here, they can return to the home page.

The confirm phone form

Trying out the Twilio Verify functionality

Try out what you’ve just built by running the app. Follow these steps to validate a user’s ownership of a phone number with Verify:

Navigate to /Identity/Account/Manage in your browser. Because this page is protected by ASP.NET Core authorization, you’ll be redirected to the account sign in page.

Register as a new user. You will be redirected to the account management route where you can enter your phone number, and click Save. Next, navigate to the /Identity/Account/VerifyPhone route and you'll see the rendered VerifyPhone.cshtml Razor page, indicating that a verification code will be sent to the number you just entered.

Click Send verification code and you will be routed to /Identity/Account/ConfirmPhone. In a matter of moments you should receive an SMS message with a verification code. Note that the message reflects the name of the service you created in Twilio Verify.

At this point you can go to the Verify console at https://www.twilio.com/console/verify/services, select your Verify service, and view the logs. You should see a log with a status of "Pending" next to your phone number.

Enter the numeric code from the SMS message in the Code box on the Confirm phone number page and click Confirm. (Validation codes expire, so you need to do this within 10 minutes of receiving the code.)

If everything worked correctly you should be redirected to the /Identity/Account/ConfirmPhoneSuccess page. If you refresh the logs for your Verify service in the Twilio Console you should see the successful validation reflected in the "status" column.

Good work! You've successfully integrated Twilio Verify with ASP.NET Core 2.2 Identity.

Possible improvements

This post showed the basic approach for using version 2 of the Verify API with ASP.NET Core Identity, but there are many improvements you could make:

  • Include a link the VerifyPhone page. Currently you have to navigate manually to /Identity/Account/VerifyPhone, but in practice you would want to add a link to it somewhere in your app.
  • Show the verification status of the phone number in the app. By default, ASP.NET Core Identity doesn't display the IdentityUser.PhoneNumberConfirmed property anywhere in the app.
  • Only verify unconfirmed numbers. Related to the previous improvement, you probably only want to verify phone numbers once, so you should check for PhoneNumberConfirmed=true in the VerifyPhone page, as well as hide any verification links.
  • Allow re-sending the code. In some cases, users might find the verification code doesn't arrive. For a smoother user experience, you could add functionality to allow re-sending a confirmation code to the ConfirmPhone page.

Summary

In this post you saw how to use version 2 of the Twilio Verify API to confirm phone number ownership in an ASP.NET Core Identity application. You learned how to use the Twilio helper SDK to create a verification and a verification check, and how to update the ASP.NET Core Identity user once the phone number is confirmed.

You can find the complete sample code for this post on GitHub.


Exploring Raygun's new application performance monitoring tool for .NET Core

$
0
0
Exploring Raygun's new application performance monitoring tool for .NET Core

Raygun are well known in the error/crash reporting space, especially for .NET applications. They also have a relatively new application performance monitoring (APM) product for measuring server-side performance. In June 2019, Raygun added support for .NET Core to Raygun APM, allowing you to monitor your .NET Core applications in production. In this post I take a first look at Raygun APM, show how to configure the Raygun agent for profiling, and explore the Raygun APM web interface.

This is a sponsored post - Raygun contacted me and asked if I'd be interested in reviewing their new APM, and provided access for me to test it out. That said, everything in the post is my own impressions and opinions.

Introduction: what's an APM and why would I want one?

If you've never used an application performance monitoring tool, you may be thinking "what is it, and why do I care?". The term APM is pretty general, and could range from basic metric collection and network request timings, to deep code inspection where you can see individual method analytics.

Raygun Application Performance Monitoring (APM) falls in the latter group of tools, much like Stackify Retrace or New Relic. These tools are designed to tell you which requests to your application are taking a long time to execute, but also why they were slow. This latter point is one of the key features of APMs. You can tell how long a request takes just by looking at flat log files, but an APM can easily show you exactly which part of your app was causing the problem.

Another point is that APMs are often running continuously in production, in contrast to the manual approach of attaching a profiler ad hoc to debug an issue. To avoid performance problems, they typically use sampling, so only a subset of requests have detailed traces reecorded, though this is normally configurable.

Personally I don't have a huge amount of experience with APM projects. Some of the apps I've written have used an APM, but I've not often been involved in tracking down performance issues. But on the occasions where I have, an APM was invaluable for giving real-world numbers and an indication of where the problem lies. Debugging locally is one thing, but the issues you see in production when multiple users are calling your app can be fundamentally different to what you see (or can reproduce) on a single developer's machine!

For that reason, the best place for trying out an APM is in production. Currently Raygun APM supports .NET Core, but is Windows only (Linux support is coming soon). That is a bit of an issue for me as although I develop on Windows, all my .NET Core workloads in production are running in Docker on Linux!

Consequently, this post looks at the install process for the Raygun APM agent on Windows, and takes an initial look at the tool itself. Once Linux support is released I'll revisit the APM in production, and really dig into the features.

Getting started: sign up and installing the Raygun Agent

To use Raygun APM you'll need a Raygun account. If you don't have one already, you can signup for a 14 day free trial. If you're already using Raygun's crash reporting or real user monitoring services then sign-in to the Raygun dashboard and click "APM" from the side menu. After accepting the free-trial, you're provided with instructions for installing the Raygun agent:

Enabling the Raygun APM at https://app.raygun.com

Installing the agent was simple - head to the download page, and download the latest version. It's a 10MB .msi installer that only has a few steps and nothing really to configure at this stage:

Installing the Raygun Agent on Windows

The installer adds four separate components:

  • The Raygun profilers (32 and 64 bit). This is the profiler that attaches to your .NET Core app.
  • The agent service. This is the Windows service that connects to the Raygun API. It acts as an intermediary between the profiler and the API.
  • The profiler configuration tool. This tool allows you to configure the agent and profiler (to set your API keys) as well as to connect applications to the profiler.

When the installer completes, you're prompted to run the "Raygun profiler configuration tool" to register the newly installed agent service with the Raygun API. You'll need the API key for your Raygun application (which is displayed in the APM section of your Raygun dashboard).

Note that you only need the API key for a single application from your account at this stage. You can still monitor multiple applications (with different API keys) - you just need to pick one at this stage to register the agent.

Registering the Raygun Agent with the profiler configuration tool

After registering the agent (and getting the confirmation green light) you're all set to start profiling your first .NET Core application.

Preparing an application for profiling

In general, you don't need to do anything special to use Raygun's APM with your application. There's no NuGet to install or code changes to make; the hooks are all within the .NET runtime itself!

That said, if you're using Raygun APM, it probably makes sense to use their crash reporting tool as well (so you can correlate events between the services). If you do it's recommended that you update to the latest Raygun4Net package (either for .NET Core or for ASP.NET Core).

To prepare your application for the APM, you'll want to make sure to publish it locally in release mode first, rather than trying to run it using dotnet run. Given that most people will likely only use the APM in production that's probably a given, but I'm only testing it locally for now, so I published my app using:

dotnet publish -c Release

Once your application is published you can register it with the agent using the profiler configuration tool. Click on the ".NET Core" tab and you have two options:

  • Run your app in the background using dotnet MyApp.Api.dll, and then select it from the drop-down box
  • Browse to your app's dll

Registering an application with the profiler configuration tool

Whichever approach you choose, click "Register". You then need to enter the API key for the application, and set the "Startup period" for the app. This API key can be different to the one you used for registering the agent, and controls where the APM traces will end up. The startup period (presumably) delays profiling for the application to ensure that your app's startup times aren't hindered.

Once the app is registered, the configuration tool shows a popup with instructions on how to enable the profiler for your application. The instructions boil-down to "set a bunch of environment variables" but it's nice they have the exact commands laid out (for PowerShell, Command prompt, or IIS web.config). The example commands below are for PowerShell, including the dotnet command to run the app at the end:

$Env:CORECLR_ENABLE_PROFILING = "1"
$Env:CORECLR_PROFILER = "{e2338988-38cc-48cd-a6b6-b441c31f34f1}"
$Env:CORECLR_PROFILER_PATH_32 = "C:\Program Files (x86)\Raygun\RaygunProfiler\1.0.982\x86\RaygunProfiler.dll"
$Env:CORECLR_PROFILER_PATH_64 = "C:\Program Files\Raygun\RaygunProfiler\1.0.982\x64\RaygunProfiler.dll"
$Env:COMPLUS_ProfAPI_ProfilerCompatibilitySetting = "EnableV2Profiler"
$Env:PROTON_STARTUP_PERIOD = "60"

dotnet.exe MyApp.Api.dll

Tip: if you want to see these commands for your own machine later, select a registered application from the profiler configuration tool, and click "Show Config".

If GUI tools aren't your thing, then you can always use the Raygun CLI tool to register the agent and configure your applications. This tool also includes a variety of diagnostic helpers if you run into issues getting the profiler working.

If you've followed this far, you should now have an application sending traces to Raygun APM! I browsed around my app a little to generate some traffic, and explored the results in the dashboard.

Exploring the results on Raygun

As I mentioned previously, I could only test the Raygun APM locally for now, so the screenshots and overview in this section won't necessarily be very similar to a production workload. I was able to get a feel for what's possible, even with this small app, but I'm looking forward to trying it with something more substantial!

The APM Dashboard

The APM dashboard leads with a variety of graphs for showing your apdex, request duration, your requests per minute (RPM), and a breakdown of where the time was spent in the request (external API calls/methods/database queries).

Raygun APM dashboard graphs

I especially like that this doesn't just show the average request speed, but includes the 90th and 99th percentile view too. Those occasional slow requests typically have a bigger impact on users perception of your app's performance than the average. I suspect the average request breakdown will also be useful for spotting times when your database queries are causing delays.

Below the trend graphs, you'll find some counters, and then scrolling lists of the slowest requests, traces, methods, external API calls, and database queries.

Raygun APM slowest request tables

Each of these links is clickable, and lets you explore the request/trace/method further. This is the key feature of an APM, allowing you to dig in and figure out why it was slow. I choose a slow trace and clicked on it to take me to the trace detail page.

Exploring a trace

A trace is a request that has been profiled in detail. You can control how often the profiler should record traces from the Sampling menu in the Raygun dashaboard. As I was only testing locally, I chose to accept 100% of traces, but you would definitely want to pare that down in production. Luckily you can set rules on a per-URL basis, so you could set a low overall sample rate but increase the capture rate for problematic URLs for example.

When viewing a trace, you get a really nice overview for exploring what's going on:

A trace view showing the flame chart

At the top of the page you can see a summary of the request (the URL, timings, status code) but the really interesting point is the flame chart below it. A flame chart shows all the method that were called for a given trace, along with how long each one took - the wider the bar, the longer the method executed for.

At the top of the chart you can see ASP.NET Core (Kestrel) Request Scope which lasts the whole trace (as the trace is for a single request). Within this request you can see there were lots of short method calls, but also some that took a very long time. Two obvious ones that stand out to me are ToString and Debug at the right of the image, which together take up nearly 500ms of time. From this simple view it's easy to pick out troublemakers like this.

A nice part of this is that Raygun explicitly breaks out methods that involve database (e.g. Redis) lookups and external API calls. Interestingly, Raygun didn't seem to be breaking out my database calls (which use Dapper and NpgSql) or elastic search client calls. I'm informed that NpgSQL, SQLServer, MySQL, ES, and Redis should all be detected as database calls though, so I'm in touch with them figuring out why

Raygun APM also includes GitHub integrations (among others) so you can click on methods in the flame chart and get a preview of the code inline! I'm looking forward to trying that out later.

It's easy to spot the obviously slow methods like this, but you also need to look out for those methods that don't take a long time to execute individually, but are called so many times that the delay adds up. On the right hand-side of the flame chart you can see lists of the methods called in the trace. This lets you group them so you can see the total duration of all invocations of a method within the trace:

Viewing the most expensive methods, grouped by signature

I think the flame chart is probably the most useful way to view traces like this, and one of Raygun APM's killer features. It's great to get actionable data by breaking down the metrics to the method level, which is so much more useful than many other APM tools, that only tell you overall code execution metrics. You can also view the same trace data in a more traditional "call tree" view:

Viewing the data as a call tree

Viewing traces like these is where you'll ultimately end up when you're working with APM. It's where you can actually get to the root of performance issues in your app. But an important first step is actually figuring out where to look.

Slicing your data multiple ways

As I showed earlier, the Raygun APM dashboard includes a list of the slowest requests and traces, but the "Discover" tab of the APM adds additional filtering and a more usable space for identifying issues. You can filter and sort by name, average duration, hit count, or total duration (sum of all durations).

Finding issues

Raygun also takes care of aggregating requests with different URLs that go to the same action method, for example where you have an ID in the URL. Instead of treating these as distinct requests, Raygun replaces the id with *. It's a simple thing, but shows that there's definitely some thought gone into it, as I distinctly remember wrestling with this issue back in the day!

It's also worth mentioning that while you will only get the full flame chart trace for requests that have been sampled, you can still get aggregate results and charts for each request. Clicking on a request gives you summary statistics and request durations over time, as well as results from any captured traces that correspond to the request:

Viewing a request's summary statistics

This is just a small section of the data provided, but it hopefully highlights the key features, and the fact that the UI just feels nice and intuitive from my point of view. Once you understand the difference between requests and traces, everything else follows on from there.

Like many things, if you look close enough you're bound to find issues in your app. The question is, are you looking?

Automatically creating issues to investigate

One of Raygun's selling points has been the aggregation of data that happens on their side before presenting it to you as a user. In their crash reporting tool, you can see how many people are affected by a problem, and assign people to investigate the issue.

Raygun APM uses a similar approach, by providing rules that automatically create issues when certain conditions are met. The examples below are created by default, and include common issues like chatty APIs, or slow requests.

Default rules

When one of these rules are hit, Raygun APM automatically creates an issue for follow up later. This should make it easier for your team to keep an eye on potential problems, especially if you use the Slack notification integration

Example of a rule broken

You can edit and remove these default rules, or you can create your own rules using a combination of conditions. For example you could only create an issue if a slow request is due to slow external API call. Ultimately you have control, but I feel like tuning these rules will be key to getting the most value out of the APM.

Conclusion

Overall, I was impressed with what I saw with Raygun APM. The UI was quick and intuitive to use. I found it easy to navigate around, and understand what I was looking at, without having to dig through reams of documentation. So full marks for user experience there!

Unfortunately I can't really comment on how useful the data is at this stage, having only done local testing. From what I've seen though, it looks like it should be a useful tool for identifying problematic areas. I'm looking forward to the Linux support!

I'm sure I'll have some additional thoughts once I start using it in production, but right now there's a couple of areas that feel like they would be nice to add. The flame chart traces look great for identifying methods that need additional attention, but it feels like you may well need to run a traditional profiler on those methods to get to the bottom of why they're slow. It would be great to see memory usage for a trace, or connection leakages and other common performance problems. I'm not sure if that is even technically feasible without a significant performance impact, but a man can dream! Maybe the new runtime hooks coming in .NET Core 3.0 will help.

Summary

In this post I had my first look at the Raygun APM for .NET Core. I showed how to install the Raygun agent, how to register it, and how to register your applications with the profiler. I then explored the Raygun APM using an application I ran locally. Overall, once I was configured and ready, I found the app really easy to use and explore. The flame chart feels like the focus of the application, and for good reason; it's likely where you'll identify any issues in your apps. However, the automatic issue creation also feels like a key feature for getting the most out of the product. I'm looking forward to trying it out properly on Linux soon!

While most of my readers will be interested in the .NET Support, it's worth pointing out that Raygun have more languages on the way (Ruby on Rails, Node.js, and Java). Judging by what I've seen with .NET, they're off to a great start!

Generating strongly-typed IDs at build-time with Roslyn: Using strongly-typed entity IDs to avoid primitive obsession - Part 5

$
0
0
Generating strongly-typed IDs at build-time with Roslyn: Using strongly-typed entity IDs to avoid primitive obsession - Part 5

This is another post in my series on strongly-typed IDs. In the first and second posts, I looked at the reasons for using strongly-typed IDs, and how to add converters to interface nicely with ASP.NET Core. In part 3 and part 4 I looked at ways of using strongly-typed IDs with EF Core. This post deals with the most common argument against strongly-typed IDs - the shear amount of boilerplate code required for each strongly-typed ID.

In this post I introduce the StronglyTypedId NuGet package I've created. It uses build-time code generation to create all the strongly-typed ID boilerplate code for you automatically, simply by decorating your type with an attribute:

[StronglyTypedId]
partial struct MyTypeId { }

When you save this file, a separate partial struct is created that contains all the boilerplate code I included in the snippet in part 2 of this series. No need for snippets, full IntelliSense, but all the benefits of strongly-typed IDs!

Generating a strongly-typed ID using the StronglyTypedId packages

Getting started

If you want to give the strongly-typed ID code generators a try in your application, you need to install the StronglyTypedId package, and also add the .NET Core code generation tool dotnet-codegen, as shown below. If you want to generate a JsonConverter for your ID and aren't already referencing Newtonsoft.Json (you probably are!) then you'll need to add an extra reference.

To add these packages, edit your csproj file so that it looks something like the following. The example below is for a .NET core Console app:

<Project Sdk="Microsoft.NET.Sdk">

  <PropertyGroup>
    <OutputType>Exe</OutputType>
    <TargetFramework>netcoreapp2.2</TargetFramework>
  </PropertyGroup>

  <ItemGroup>
    <PackageReference Include="Newtonsoft.Json" Version="12.0.2" />
    <PackageReference Include="StronglyTypedId" Version="0.1.2" />
    <DotNetCliToolReference Include="dotnet-codegen" Version="0.5.13" />
  </ItemGroup>
</Project>

Note that DotNetCliToolReference tools are being phased out in .NET Core 3, so I suspect this process will be changing soon!

After these tools are restored with dotnet restore, you'll have the [StronglyTypedId] attribute available in the global namespace. You can add it to any struct, and the code shown in previous posts is automatically generated for you.

[StronglyTypedId] // Add this attribute to auto-generate the rest of the type
public partial struct FooId { }

Note that the class must be marked partial, due to the way the boilerplate is generated (shown later).

That's pretty much all there is to it! After adding the attribute and saving the file, Visual Studio will automatically generate the backing code. JetBrains Rider and VS Code aren't quite as nice, as you seem to need to do an explicit build before the IntelliSense catches up, but I don't think that's a very big deal.

One of the really nice things about this approach is that the generated class really is exactly the same as if it was written by hand. There's no extra runtime dependencies in your build output, and even the [StronglyTypedId] attribute is removed as part of the build!

Output dlls showing that there's nothing specific to the code-generation

Extra configuration options

As a little bonus, I added some extra configuration options to the [StronglyTypedId] attribute. By passing in additional arguments to the attribute constructor, you can control whether a custom JsonConverter is generated, and even change the backing Type of the strongly-typed ID from a Guid to an int or a string:

// don't generate the JsonConverter, and use an int as the backing value
[StronglyTypedId(generateJsonConverter: false, backingType: StronglyTypedIdBackingType.Int)] 
partial struct NoJsonIntId { }

The code generated by the above attribute looks similar to the following:

[TypeConverter(typeof(NoJsonIntIdTypeConverter))]
readonly partial struct NoJsonIntId : IComparable<NoJsonIntId>, .IEquatable<NoJsonIntId>
{
    public int Value { get; }

    public NoJsonIntId(int value)
    {
        Value = value;
    }

    public static readonly NoJsonIntId Empty = new NoJsonIntId(0);
    public bool Equals(NoJsonIntId other) => this.Value.Equals(other.Value);
    public int CompareTo(NoJsonIntId other) => Value.CompareTo(other.Value);
    public override bool Equals(object obj)
    {
        if (ReferenceEquals(null, obj)){ return false; }
        return obj is NoJsonIntId other && Equals(other);
    }

    public override int GetHashCode() => Value.GetHashCode();
    public override string ToString() => Value.ToString();
    public static bool operator ==(NoJsonIntId a, NoJsonIntId b) => a.CompareTo(b) == 0;
    public static bool operator !=(NoJsonIntId a, NoJsonIntId b) => !(a == b);

    class NoJsonIntIdTypeConverter : TypeConverter
    {
        public override bool CanConvertFrom(ITypeDescriptorContext context, System.Type sourceType)
        {
            return sourceType == typeof(int) || base.CanConvertFrom(context, sourceType);
        }

        public override object ConvertFrom(ITypeDescriptorContext context, CultureInfo culture, object value)
        {
            if (value is int intValue)
            {
                return new NoJsonIntId(intValue);
            }

            return base.ConvertFrom(context, culture, value);
        }
    }
}

By removing the JsonConverter, you no longer need to take a dependency on Newtonsoft.Json, but obviously JSON serialization is no longer handled directly by the type.

I feel like these configuration options will cover most cases, but if you have other ideas, feel free to raise an issue on the GitHub repository. I think the main thing missing is support for class based IDs, as well as struct based.

How it works: build-time code generation with Roslyn

I'm not going to go into depth about how it all works in this post, but I'll provide an overview, and likely expand on it in later posts.

The StronglyTypedId library relies on the work in AArnott's CodeGeneration.Roslyn library. This provides all the pieces you need to create your own code generators and for them to work at build/design time so you get full IntelliSense. The GitHub README for CodeGeneration.Roslyn describes how to create a code generator in your own project, including all the dependencies you need and requirements on target frameworks and such.

Getting started with the example wasn't too difficult, but you have to make sure to follow along carefully - if you miss a step it can be difficult to understand what's going on when things don't work. I had the most difficulty wrapping up the library in an appropriate NuGet package, as you have to be careful about the format of the NuGet. For that, I followed the example of a very similar project, RecordGenerator.

RecordGenerator works in a very similar way to the StronglyTypedId package, but with even more functionality. It allows you to create immutable Record types, along with appropriate builders, deconstructors, and other helpers

Behind the scenes, the dotnet-codgen tool and the CodeGeneration.Roslyn library add extra MSBuild targets that run generators as part of your app's build. These generators can only add files to the build, and can't change existing code. You can find them in the obj folder for your project.

That's not a problem for StronglyTypedId as long as you mark the type as partial - the generated code is also a partial (in the same namespace) which keeps the compiler happy. You can actually navigate directly to the generated code by pressing F12 on your type:

// ------------------------------------------------------------------------------
// <auto-generated>
//     This code was generated by a tool.
//
//     Changes to this file may cause incorrect behavior and will be lost if
//     the code is regenerated.
// </auto-generated>
// ------------------------------------------------------------------------------

using System;

namespace ConsoleApp1
{
    [System.ComponentModel.TypeConverter(typeof(FooIdTypeConverter))]
    [Newtonsoft.Json.JsonConverter(typeof(FooIdJsonConverter))]
    readonly partial struct FooId : System.IComparable<FooId>, System.IEquatable<FooId>
    {
        public System.Guid Value
        {
            get;
        }

        public FooId(System.Guid value)
        {
            Value = value;
        }

        /// ...
    }

}

That's pretty much all I want to cover in this post, other than a quick shout out to Kirill Osenkov for the excellent https://roslynquoter.azurewebsites.net/ - this site lets you paste in C#, and it spits out the Roslyn syntax for you, super useful!

RoslynQuoter website that generates a Roslyn syntax tree given C#

If you've been holding off on strongly-typed IDs because of the boilerplate code, why not give the attributes a try and see what you think!

Summary

In this post I introduced the StronglyTypedId package. This uses a Roslyn-powered build-time code generation to create the boilerplate required for the strongly-typed IDs I've been describing in this series. By referencing the package (and the required dependencies), you can generate strongly-typed IDs by decorating your struct with a [StronglyTypedId] attribute. You can also configure the code-generation somewhat, by changing the Type of the backing-value, and choosing whether or not to generate a custom JsonConverter.

Alternatives to Microsoft.FeatureManagement: Adding feature flags to an ASP.NET Core app - Part 6

$
0
0
Alternatives to Microsoft.FeatureManagement

In this series I've been looking at the Microsoft.FeatureManagement library (which is now open source on GitHub 🎉). This provides a thin layer over the .NET Core configuration system for adding feature flags to your application. But this library is new, and the feature flag concept is not - so what were people using previously?

I have a strong suspicion that for most people, the answer was one of the following:

  • LaunchDarkly
  • Some in-house, hand-rolled, feature-toggle system

Searching for "feature toggles" on NuGet gives 686 results, and searching for "feature flags" gives 886 results. I confess I've used none of them. I have always fallen squarely in the "roll-your-own" category.

On the face of it, that's not surprising. Basic feature flag functionality is pretty easy to implement, and as virtually every app has either external configuration values or a database connection of some sort, another dependency never felt necessary. That said, there's a big difference between basic on/off functionality, and staged, stable, gradual rollouts of features across your applications.

In this post I take a brief at a few of the alternatives to Microsoft.FeatureManagement, and describe their differences:

LaunchDarkly

LaunchDarkly is the real incumbent when it comes to feature toggles. They're a SaaS product that provide an API and UI for managing your feature flags, and SDKs in multiple languages (there's an open source SDK for .NET which supports .NET Standard 1.4+).

At the heart of LaunchDarkly are a set of feature flags, and a UI for managing them:

Screenshot of LaunchDarkly

However the simplicity of that screenshot belies the multitude of configuration options available to you. Each feature flag:

  • Can be a Boolean value (on/off), or a complex value like an int, string, or JSON, though I'd argue with the latter you're getting more into "general configuration" territory.
  • Can be marked "temporary" or "permanent" to make it easy to filter and remove old temporary flags.
  • Can have rich names and descriptions.
  • Can vary between different environments (dev/staging/production).
  • Can depend on other feature flags being enabled, so feature A is only enabled if feature B is enabled.

The values of the feature flags are all managed in the LaunchDarkly UI, which the SDK contacts to check flag values (caching where appropriate of course). The LaunchDarkly server typically pushes any changes to feature flags from their server to your app, rather than the SDK periodically polling, so you get updates quickly. Your code for checking a Boolean feature flag with the SDK would look something like this:

// Create a LaunchDarkly user for segmentation
var user = User.WithKey(username);

// Use the singleton instance of the LaunchDarkly client _ldClient,
// providing the feature flag name, the user, and a default value incase there's an error
bool showFeature = _ldClient.BoolVariation("your.feature.key", user, false);
if (showFeature) {
  // application code to show the feature 
}
else {
  // the code to run if the feature is off
}

This snippet highlights the user-segment feature - this ensures that feature flags are stable per-user, a problem I described in the previous post of this series. They also provide features for doing A/B/n testing, metrics for which features have been used (and by which users) and various other features. The SDK documentation is also really good.

Which finally brings us to the one downside - it isn't free! They have a free trial, and a basic plan for $25 a month, but prices jump to $325+ per month from there. You'll be paying based on the number of servers you have, the number of developers (UI-users) you have, as well as the number of active customers you have. It really does seem like a great product, but that comes at a cost, so it depends where your priorities lie.

RimDev.AspNetCore.FeatureFlags

RimDev.AspNetCore.FeatureFlags caught my eye as I was looking through NuGet packages, as it's from the team at RIMdev who have various open source projects like Stuntman. This library feels like a perfect example of the case I described at the start of the post - a project that started as in-house solution to a problem.

One of the interesting approaches used in the library is that features are defined using strongly-typed classes, (rather than the magic strings that are often used), and injecting the features objects directly into your services. For example, you might create a feature MyFeature. To check if it's enabled, you inject it into your service, and check feature.Value:

public class MyFeature : Feature
{
    // Optional, displays on UI:
    public override string Description { get; } = "My feature description.";
}

public class MyController : Controller
{
    private readonly MyFeature _feature;
    public MyController(MyFeature myFeature)
    {
        _feature = myFeature;
    }

    [HttpGet]
    public IActionResult OnGet()
    {
        if(_feature.Value)
        {
            // feature is enabled
        }
    }
}

RimDev.FeatureFlags uses an IFeatureProvider interface to get and update Feature instances. The library includes a single implementation, which uses SqlClient to store feature values in a SQL Server database. The library also includes a simple UI for enabling and disabling feature flags:

Enabling and disabling feature flags using the UI

Overall this is a pretty basic library, and lacks some of the dynamic features of other options, but if basic is all you need, then why go for complex!

Moggles

Moggles is a recently open-sourced project that was pointed out to me by Jeremy Bailey, one of the maintainers. Moggles follows a similar architecture to LaunchDarkly, where you have a server component that manages the feature toggles, and a client SDK that looks up the values of feature flags in your application.

Moggles in action

The server component has a UI that allows providing descriptions for feature flags, and supports multiple environments (desv/staging/production). It also includes the LaunchDarkly feature of marking feature flags as temporary vs permanent for filtering purposes. It can similarly integrate with a RabbitMq cluster to ensure updates to feature toggles are pushed out to applications without requiring the apps to poll for changes.

This project also grew out of an internal need, and that's relatively evident in the technologies used. The server currently only supports Microsoft SQL Server, and uses Windows Authentication with role-based authorization. If Moggles looks interesting but you have other requirements, maybe consider contributing, I'm sure they'd love the support.

Esquio

Esquio is an open source project on GitHub from Xabaril (creators of the excellent BeatPulse library). It was suggested to me by one of the maintainers of the project, Unai Zorrila Castro. It looks very interesting, is targeting .NET Core 3.0, and has a lot of nice features.

The basic API for Esquio is similar to the Microsoft.FeatureManagement library, but with a couple of key differences:

  • The API is async, unlike the synchronous API of Microsoft.FeatureManagement. So instead of IsEnabled, you have IsEnabledAsync.
  • You can have multiple stores for your feature flag configuration. IConfiguration is an option, but there's also an EF Core store if you wish to store your feature flag configuration in the database instead. Or you could write your own store implementation!

Esquio provides the same nice hooks into the ASP.NET Core infrastructure as Microsoft.FetureManagagement, like [FeatureFilter] attributes for hiding controllers or actions based on a flag's state; various fall-back options when an action is disabled; and Tag Helpers for conditionally showing sections of UI. As it's built on .NET Core 3.0, Esquio also allows you to attach feature filters directly to an endpoint too.

One interesting feature described in the docs is the ability to use the [FeatureFilter] attribute as an action constraint, so you can conditionally match an action based on whether a feature is enabled:

[ActionName("Detail")] // Same ActionName on both methods
public IActionResult DetailWhenFlagsIsNotActive()
{
    return View();
}

[FeatureFilter(Names = Flags.MinutesRealTime)] // Acts as an action constraint
[ActionName("Detail")]
public IActionResult DetailWhenFlagsIsActive()
{
    return View();
}

Esquio also includes the equivalent of Microsoft.FeatureManagement's feature filters, for dynamically controlling whether features are enabled based on the current user, for example. In Esquio, they're called toggles, but they're a very similar concept. One of the biggest differences is how many toggles Esquio comes with out of the box:

  • OnToggle/OffToggle - fixed Boolean on/off
  • UserNameToggle - enable the feature for a fixed set of users
  • RoleNameToggle - enable the feature for users in one of a set of roles
  • EnvironmentToggle - enable the feature when running in a given environment
  • FromToToggle - a windowing toggle to enable features for fixed time windows
  • ClaimValueToggle - enable the feature if a user has a given claim with one of an allowed set of values
  • GradualRolloutUserNameToggle - rollout to to a percentage of users, using a stable hash function (the Jenkins hash function) based on the username. There are similar gradual rollout toggles based on the value of a particular claim, the value of a header, or the ASP.NET Core Session ID.

As you'd expect, you're free to create your own custom Toggles too.

The gradual rollout toggles in particular are interesting, as they remove the need for the ISessionManager required by Microsoft.FeatureManagement to ensure consistency between requests for the PercentageFilter.

Esquio also includes a similar feature to LaunchDarkly where you can make the feature flag state available to SPA/mobile clients by including an endpoint for querying features:

app.UseEndpoints(routes =>
{
    routes.MapEsquio(pattern: "esquio");
});

On top of that, there's a UI for managing your feature flags! I haven't tried running that yet, but it's next on my list.

But wait! There's more!

There are even docs about how to integrate rolling out your feature flags as part of a release using Azure DevOps. If you integrate feature flags fully into your release pipeline, you can use canary releases that are only used by a few users, before increasing the percentage and enabling the feature across the board.

Enabling a feature as part of an Azure DevOps release

All in all I'm very impressed with the Esquio library. If you're already working with .NET Core 3.0 previews then it's definitely worth taking a look at if you need feature toggle functionality.

Summary

The Microsoft.FeatureManagement is intended to act as a thin layer over the Microsoft.Extensions.Configuration APIs, and as such it has certain limitations. It's always a good idea to look around and see what the other options are before committing to a library, and to try and understand the limitations of your choices. If money is no object, you can't go wrong with LaunchDarkly - they are well known in the space, and have a broad feature set. Personally, I'm very interested in Esquio as a great open-source alternative.

Using the ReferenceAssemblies NuGet package to build .NET Framework libraries on Linux, without installing Mono

$
0
0
Using the ReferenceAssemblies NuGet package to build .NET Framework libraries on Linux, without installing Mono

In this post I show how you can build .NET projects that target .NET Framework versions on Linux, without using Mono. By using the new Microsoft.NETFramework.ReferenceAssemblies NuGet packages from Microsoft you don't need to install anything more than the .NET Core SDK!

tl;dr; To build .NET Framework libraries on Linux, add the following to your project file: <PackageReference Include="Microsoft.NETFramework.ReferenceAssemblies" PrivateAssets="All" Version="1.0.0-preview.2" />

Background: Building full-framework libraries on Linux

If you're building .NET Standard NuGet packages, and you want to provide the best experience for your users (and avoid some dependency hell) then you'll want to check out the advice on cross-platform targeting. There's a lot of DOs and DON'Ts there, but I tend to boil it down to the following: if you're targeting any version of .NET Standard, then you need the following target frameworks at a minimum:

<TargetFrameworks>netstandard2.0;net461;net472</TargetFrameworks>

If you're targeting .NET Standard 1.x too then add that in to the mix, the important point is to include the two .NET Framework targets to avoid issues with the .NET Standard 2.0 shim.

This gives a bit of an issue - the full .NET framework targets mean the library can theoretically only be built on Windows. In a previous post I showed how to work around this for Linux by installing Mono and using the assemblies it provides. In that post I showed that you could actually run a .NET Framework test suite too. This has worked very well for me so far but it has a couple of down sides

  • It requires you install Mono
  • It requires adding a somewhat hacky .props file
  • It's not officially supported, so if it doesn't work, you're on your own

The .props file sets the FrameworkPathOverride MSBuild variable to the Mono reference assemblies which is how we are able to build. But as Jon Skeet points out in this comment, Mono isn't actually required. We just need a way of easily getting the reference assemblies to compile against. This is what Microsoft have provided with the Microsoft.NETFramework.ReferenceAssemblies package.

Retrieving reference assemblies from NuGet with Microsoft.NETFramework.ReferenceAssemblies

I was completely unaware of the Microsoft.NETFramework.ReferenceAssemblies NuGet until I saw this tweet by Muhammad Rehan Saeed:

This is really good news - all you need to build libraries that target full .NET Framework on Linux is the .NET Core SDK!

Let's take an example. You can create a .NET Core class library using dotnet new classlib, which will give a .csproj file that looks something like this:

<Project Sdk="Microsoft.NET.Sdk">

  <PropertyGroup>
    <TargetFramework>netstandard2.0</TargetFramework>
  </PropertyGroup>

</Project>

Rename the TargetFramework element to TargetFrameworks and add the extra targets:

<Project Sdk="Microsoft.NET.Sdk">

  <PropertyGroup>
    <TargetFrameworks>netstandard2.0;net461;net472</TargetFrameworks>
  </PropertyGroup>

</Project>

If you try and build with dotnet build on Linux at this point, you'll see an error something like the following:

/usr/share/dotnet/sdk/2.1.700/Microsoft.Common.CurrentVersion.targets(1175,5): 
error MSB3644: The reference assemblies for framework ".NETFramework,Version=v4.6.1" 
were not found. To resolve this, install the SDK or Targeting Pack for this framework 
version or retarget your application to a version of the framework for which you have 
the SDK or Targeting Pack installed. Note that assemblies will be resolved from the 
Global Assembly Cache (GAC) and will be used in place of reference assemblies. 
Therefore your assembly may not be correctly targeted for the framework you intend.

Now for the magic. Add the Microsoft.NETFramework.ReferenceAssemblies package to your project file:

<Project Sdk="Microsoft.NET.Sdk">

  <PropertyGroup>
    <TargetFrameworks>netstandard2.0;net461;net472</TargetFrameworks>
  </PropertyGroup>

  <!-- Add this reference-->
  <ItemGroup>
    <PackageReference Include="Microsoft.NETFramework.ReferenceAssemblies" PrivateAssets="All" Version="1.0.0-preview.2" />
  </ItemGroup>

</Project>

and suddenly the build succeeds!

Build succeeded.
    0 Warning(s)
    0 Error(s)

Using the PrivateAssets attribute prevents the Microsoft.NETFramework.ReferenceAssemblies package from "leaking" into dependent projects or published NuGet packages; it's a build-time dependency only.

Simply having to add a package to your library is a much better experience than having to explicitly install Mono. On top of that, this will be the supported approach from now on. But it gets better - in the .NET Core 3.0 SDK, the reference assembly packages will be automatically used if necessary, so in theory there's no workarounds required at all!

How it works: a meta-package, a .targets, and lots of dlls

If you're interested in how the package works, I suggest reading the relevant issue, but I'll provide a high-level outline here.

We'll start with the Microsoft.NETFramework.ReferenceAssemblies NuGet package itself. This package is a meta-package that contains no code, but has a dependency on a different NuGet package for each of the supported .NET Framework versions:

The Microsoft.NETFramework.ReferenceAssemblies nuget.org page showing its dependencies

So for example, for the .NET Framework 4.6.1 target, the meta-package depends on Microsoft.NETFramework.ReferenceAssemblies.net461. This approach ensures that you only download the reference assemblies for the framework versions you're actually targeting.

If you open up one of the Framework-specific NuGet packages you'll find two things in the build folder:

  • A .targets file
  • A .NETFramework folder full of the reference assemblies (>100MB!)

The .targets file serves a similar purpose to the .props file in my previous post - it tells MSBuild where to find the framework libraries. The example below is from the .NET 4.6.1 package:

<Project>
  <PropertyGroup Condition=" ('$(TargetFrameworkIdentifier)' == '.NETFramework') And ('$(TargetFrameworkVersion)' == 'v4.6.1') ">
    <TargetFrameworkRootPath>$(MSBuildThisFileDirectory)</TargetFrameworkRootPath>

    <!-- FrameworkPathOverride is typically not set to the correct value, and the common targets include mscorlib from FrameworkPathOverride.
         So disable FrameworkPathOverride, set NoStdLib to true, and explicitly reference mscorlib here. -->
    <EnableFrameworkPathOverride>false</EnableFrameworkPathOverride>
    <NoStdLib>true</NoStdLib>
  </PropertyGroup>

  <ItemGroup Condition=" ('$(TargetFrameworkIdentifier)' == '.NETFramework') And ('$(TargetFrameworkVersion)' == 'v4.6.1') ">
    <Reference Include="mscorlib" Pack="false" />
  </ItemGroup>

</Project>

This sets the TargetFrameworkRootPath parameter to the folder containing the .targets file. MSBuild traverses down the NuGet package's folder structure (.NETFramework\v4.6.1), to find the dlls, and finds the reference assemblies:

The reference assemblies downloaded in the NuGet package

I've tested out the packages using both the .NET Core 2.1 SDK and 2.2 SDK, and it's worked brilliantly both times. Give it a try!

Resources

How to build with Cake on Linux using Cake.CoreCLR or the Cake global tool

$
0
0
How to build with Cake on Linux using Cake.CoreCLR or the Cake global tool

In this post I show two ways to use the Cake build system to build .NET Core projects on Linux: using the Cake.CoreCLR library, or the Cake.Tool .NET Core global tool. This post only deals with bootstrapping Cake, it doesn't describe how to write Cake build scripts themselves. For that, I suggest reading Muhammad Rehan Saeed's post which provides a Cake build script, or my previous post on using Cake in Docker.

Cake, Cake.CoreCLR, and Cake.Tool

In a previous post, I described using Mono to run the full .NET Framework version of Cake on Linux. That was fine for my purposes then, as I was using Mono anyway to build libraries that targeted .NET Framework on Linux, and I wanted to run full framework tests on Linux.

However, if you only need to build (and not run), you can now use the Microsoft.NetFramework.ReferenceAssemblies NuGet packages to build .NET Framework libraries on Linux, without having to explicitly install Mono. For that reason, I think the full .NET Framework version of Cake is no longer the best option for building on Linux.

Luckily, there are currently three different versions of Cake:

  • Cake.Tool: a .NET Core global tool, targeting .NET Core 2.1
  • Cake.CoreCLR: a .NET Core console app targeting .NET Core 2.0
  • Cake: a .NET Framework console app targeting .NET Framework 4.6.1/Mono

Which option is best for you will likely depend on your exact environment. The good thing about these tools is that you should be able to switch between them without having to change your actual build.cake script at all. The difference is primarily in how you acquire and run Cake, i.e. the bootstrapping scripts you use.

Note that in this post I assume you already have the correct version of .NET Core installed. For examples of installing the .NET Core SDK as part of the bootstrapping script, see this example from the Cake project itself.

Building on Linux with Cake.CoreCLR

My first approach in converting away from Mono-based Cake was to use the Cake.CoreCLR library. I felt like this would be an easy drop in replacement, though it took a bit of googling to find some suggested bootstrapping scripts. The bootstrapping scripts effectively took one of two approaches:

  • Use the .NET Core CLI to restore the Cake.CoreCLR package
  • Use curl to download the Cake.CoreCLR package, and manually extract it

The first of these approaches is interesting. The dotnet CLI allows you to restore NuGet packages that have been added to a project, but doesn't allow you to restore arbitrary packages. To work around this, you can do something like the following:

dotnet new classlib -o "$TEMP_DIR" --no-restore
dotnet add "$TEMP_PROJECT" package Cake.CoreCLR --package-directory "$TOOLS_DIR" --version "$CAKE_VERSION"
rm -rf "$TEMP_DIR"

This does four things:

  • Creates a temporary .NET Core project using dotnet new in the $TEMP_DIR directory
  • Adds the Cake.CoreCLR NuGet package to the project
  • Implicitly restores the package to a specific directory, $TOOLS_DIR
  • Deletes the temporary project

After running this script, the Cake.CoreCLR NuGet package has been downloaded and extracted to the tools directory.

The following bash script shows how this fits in to the overall bootstrapping script. This is just the version I came up with; I've listed a variety of example scripts at the end of this post.

#!/usr/bin/env bash

# Define directories.
SCRIPT_DIR=$( cd "$( dirname "${BASH_SOURCE[0]}" )" && pwd )
TOOLS_DIR=$SCRIPT_DIR/tools
TEMP_DIR=$TOOLS_DIR/build
TEMP_PROJECT=$TEMP_DIR/build.csproj

# Define default arguments.
SCRIPT="build.cake"
CAKE_VERSION="0.33.0"
CAKE_ARGUMENTS=()

# Parse arguments.
for i in "$@"; do
    case $1 in
        -s|--script) SCRIPT="$2"; shift ;;
        --cake-version) CAKE_VERSION="$2"; shift ;;
        --) shift; CAKE_ARGUMENTS+=("$@"); break ;;
        *) CAKE_ARGUMENTS+=("$1") ;;
    esac
    shift
done

CAKE_PATH="$TOOLS_DIR/cake.coreclr/$CAKE_VERSION/Cake.dll"

if [ ! -f "$CAKE_PATH" ]; then
    echo "Restoring Cake..."

    # Make sure the tools folder exists
    if [ ! -d "$TOOLS_DIR" ]; then
        mkdir "$TOOLS_DIR"
    fi

    # Build the temp project and restore Cake
    dotnet new classlib -o "$TEMP_DIR" --no-restore
    dotnet add "$TEMP_PROJECT" package Cake.CoreCLR --package-directory "$TOOLS_DIR" --version "$CAKE_VERSION"

    rm -rf "$TEMP_DIR"
fi

# Start Cake
exec dotnet "$CAKE_PATH" "$SCRIPT" "${CAKE_ARGUMENTS[@]}"

The first half of the script is parsing command-line arguments and defining defaults. The path we expect to find Cake.dll is checked, and if it's not found, we use the previous technique to restore it. Finally, we execute cake using the form dotnet Cake.dll.

Notice that I've "pinned" the Cake.CoreCLR version to 0.33.0 in the script, to ensure we get a consistent version of Cake on the build server.

When you run this script, you'll see output similar to the following, showing how the process works:

Restoring Cake...
Getting ready...
The template "Class library" was created successfully.
  Writing /tmp/tmp8yvA9D.tmp
info : Adding PackageReference for package 'Cake.CoreCLR' into project '/sln/tools/build/build.csproj'.
info : Restoring packages for /sln/tools/build/build.csproj...
info :   GET https://api.nuget.org/v3-flatcontainer/cake.coreclr/index.json
info :   OK https://api.nuget.org/v3-flatcontainer/cake.coreclr/index.json 438ms
info :   GET https://api.nuget.org/v3-flatcontainer/cake.coreclr/0.33.0/cake.coreclr.0.33.0.nupkg
info :   OK https://api.nuget.org/v3-flatcontainer/cake.coreclr/0.33.0/cake.coreclr.0.33.0.nupkg 25ms
info : Installing Cake.CoreCLR 0.33.0.
info : Package 'Cake.CoreCLR' is compatible with all the specified frameworks in project '/sln/tools/build/build.csproj'.
info : PackageReference for package 'Cake.CoreCLR' version '0.33.0' added to file '/sln/tools/build/build.csproj'.
info : Committing restore...
info : Generating MSBuild file /sln/tools/build/obj/build.csproj.nuget.g.props.
info : Generating MSBuild file /sln/tools/build/obj/build.csproj.nuget.g.targets.
info : Writing assets file to disk. Path: /sln/tools/build/obj/project.assets.json
log  : Restore completed in 2.95 sec for /sln/tools/build/build.csproj.

This is quite a clever way to fetch the NuGet package, but it's probably a bit overly complicated. Another option is to directly download the NuGet and unzip it. You could replace the dotnet new approach in the above script with the following instead:

curl -Lsfo "$TOOLS_DIR/cake.coreclr.zip" "https://www.nuget.org/api/v2/package/Cake.CoreCLR/$CAKE_VERSION" \
    && unzip -q "$TOOLS_DIR/cake.coreclr.zip" -d "$TOOLS_DIR/cake.coreclr/$CAKE_VERSION" \
    && rm -f "$TOOLS_DIR/cake.coreclr.zip"

if [ $? -ne 0 ]; then
    echo "An error occured while installing Cake."
    exit 1
fi

This directly downloads the NuGet as a .zip file, extracts it, and deletes the zip file.

Note that you must have the unzip command available in your environment - I don't believe it's generally installed by default.

Either of these approaches work, and enable you to download the Cake.CoreCLR NuGet package. The alternative is to install the .NET Core global tool.

Building on Linux with the Cake global tool

.NET Core 2.1 introduced the concept of global tools. These are CLI tools that can be installed globally on your machine, and are effectively just console apps. I described how to create a .NET Core global tool in a previous post. Cake provides a global tool that can be used with .NET Core 2.1+.

Depending on your use case, you may or may not want to actually install the Cake tool globally. Global tools can also be installed to a specific folder by passing the --tool-path argument, in which case you can have multiple instances of the tool installed.

My preference is to install global tool locally for each solution, to remove the dependence on outside tooling. This has the advantage of making each project self contained, and allowing different versions of the tool per-solution. The down-side is that you're using more disk space by installing the tool multiple times.

To install Cake as a global tool, into a local tools folder, you can run

dotnet tool install Cake.Tool --tool-path ./tools --version 0.33.0

You can then invoke the tool using

exec ./tools/dotnet-cake

Note that we installed the tool using --tool-path, so we have to use the path to dotnet-cake directly; if you installed it globally, you could use dotnet-cake (or dotnet cake) from any folder.

Adding those commands to the bootstrapping script gives the following:

#!/usr/bin/env bash

# Define directories.
SCRIPT_DIR=$( cd "$( dirname "${BASH_SOURCE[0]}" )" && pwd )
TOOLS_DIR=$SCRIPT_DIR/tools

# Define default arguments.
SCRIPT="build.cake"
CAKE_VERSION="0.33.0"
CAKE_ARGUMENTS=()

# Parse arguments.
for i in "$@"; do
    case $1 in
        -s|--script) SCRIPT="$2"; shift ;;
        --cake-version) CAKE_VERSION="--version=$2"; shift ;;
        --) shift; CAKE_ARGUMENTS+=("$@"); break ;;
        *) CAKE_ARGUMENTS+=("$1") ;;
    esac
    shift
done

# Make sure the tools folder exists
if [ ! -d "$TOOLS_DIR" ]; then
    mkdir "$TOOLS_DIR"
fi

CAKE_PATH="$TOOLS_DIR/dotnet-cake"
CAKE_INSTALLED_VERSION=$($CAKE_PATH --version 2>&1)

if [ "$CAKE_VERSION" != "$CAKE_INSTALLED_VERSION" ]; then
    if [ -f "$CAKE_PATH" ]; then
        dotnet tool uninstall Cake.Tool --tool-path "$TOOLS_DIR" 
    fi

    echo "Installing Cake $CAKE_VERSION..."
    dotnet tool install Cake.Tool --tool-path "$TOOLS_DIR" --version $CAKE_VERSION

    if [ $? -ne 0 ]; then
        echo "An error occured while installing Cake."
        exit 1
    fi
fi


# Start Cake
exec "$CAKE_PATH" "$SCRIPT" "${CAKE_ARGUMENTS[@]}"

As before, the first half of the script is parsing command line arguments and setting up defaults. We then check to see if the correct version of the Cake global tool is installed. If the wrong version is installed, we uninstall the old version first, otherwise we install the correct version. Finally we execute the script using the path to the global tool.

If you're using this script in Docker containers there's pretty much no chance of there being a different version of the Cake tool installed, so you could remove the version check section if you prefer.

The first time you run the script, you'll see the global tool installed:

Installing Cake 0.33.0...
You can invoke the tool using the following command: dotnet-cake
Tool 'cake.tool' (version '0.33.0') was successfully installed.

Subsequent executions will execute the tool directly, without needing to install the tool.

Personally, I think the global tool is the way to go in all cases where you can use it (.NET Core 2.1+). Global tools are due to be updated in .NET Core 3.0, but I expect that this will remain the canonical way to use Cake on Linux/Mac.

Summary

In this post I showed two ways to run Cake on Linux: using Cake.CoreCLR, or the .NET Core global tool Cake.Tool. Generally speaking I would suggest using the global tool where possible, as it seems to be the preferred approach - even the Cake project itself is built using the .NET Core global tool!

Resources

Viewing all 743 articles
Browse latest View live