Quantcast
Channel: Andrew Lock | .NET Escapades
Viewing all 743 articles
Browse latest View live

Why is string.GetHashCode() different each time I run my program in .NET Core?

$
0
0
Why is string.GetHashCode() different each time I run my program in .NET Core?

This post is part of the second annual C# Advent. Check out the home page for up to 50 C# blog posts in December 2018!

In this post I describe a characteristic about GetHashCode() that was new to me until I was bitten by it recently - that calling GetHashCode() on a string gives a different value each time you run the program in .NET Core!

In this post I show the problem in action, and how the .NET Core GetHashCode() implementation differs from .NET Framework. I then look at why that's the case and why it's a good thing in general. Finally, if you need to ensure GetHashCode() gives the same value every time you run your program (spoiler: generally you don't), then I provide an alternative implementation you can use in place of the built-in GetHashCode().

tl;dr; I strongly suggest reading the whole post, but if you're just here for the deterministic GetHashCode(), then see below. Just remember it's not safe to use in any situations vulnerable to hash-based attacks!

The behaviour: GetHashCode() generates a different random value for every program execution in .NET Core

The easiest way to understand the behaviour I'm describing is to see it in action. Take this very simple program that calls GetHashCode() on a string twice in succession

using System;

static class Program
{
    static void Main(string[] args)
    {
        Console.WriteLine("Hello World!".GetHashCode());
        Console.WriteLine("Hello World!".GetHashCode());
    }
}

If you run this program on .NET Framework then every time you run the program you'll get the same value:

> dotnet run -c Release -f net471
-1989043627
-1989043627

> dotnet run -c Release -f net471
-1989043627
-1989043627

> dotnet run -c Release -f net471
-1989043627
-1989043627

In contrast, if you compile the same program for .NET Core, you get the same value for every call to GetHashCode() within the same program execution, but a different value for different program executions:

> dotnet run -c Release -f netcoreapp2.1
-1105880285
-1105880285

> dotnet run -c Release -f netcoreapp2.1
1569543669
1569543669

> dotnet run -c Release -f netcoreapp2.1
-1477343390
-1477343390

This took me totally by surprise, and was the source of a bug that I couldn't get my head around without this knowledge (I'll come to that later).

Since when was this a thing?!

I was gobsmacked when I discovered this behaviour, so I went rooting around in the docs and on GitHub. Sure enough, right there in the docs, this behaviour is well documented: (emphasis mine)

The hash code itself is not guaranteed to be stable. Hash codes for identical strings can differ across .NET implementations, across .NET versions, and across .NET platforms (such as 32-bit and 64-bit) for a single version of .NET. In some cases, they can even differ by application domain. This implies that two subsequent runs of the same program may return different hash codes.

In many ways, the interesting thing about this behaviour is that I've never run into it before. My first thought was that I must have depended on this behaviour in .NET Framework, but after a bit more consideration, I couldn't think of a single instance where this was the case. As it turns out, I've always used GetHashCode() in the manner for which it was designed. Who would have thought it!

The key point is that the hash codes are deterministic for a given program execution, that means the only time it'll be an issue is if you're saving the hash code outside of a process, and loading it into another one. That explains the subsequent comment in the documentation:

As a result, hash codes should never be used outside of the application domain in which they were created, they should never be used as key fields in a collection, and they should never be persisted.

When I discovered the behaviour I was trying to save the output of string.GetHashCode() to a file, and load the values in another process. This is clearly a no-no given the previous warning!

As a bit of an aside, it's actually possible to enable the randomised hash code behaviour in .NET Framework too. To do so, you enable the <UseRandomizedStringHashAlgorithm> element in the application's app.config:

<?xml version ="1.0"?>  
<configuration>  
   <runtime>  
      <UseRandomizedStringHashAlgorithm enabled="1" />  
   </runtime>  
</configuration>  

This enables the same randomization code used by .NET Core to be used with .NET Framework. In fact, if you look at the .NET Framework 4.7.2 Reference Source for string.cs, you'll see that GetHashCode() looks like the following:

 public override int GetHashCode() {

#if FEATURE_RANDOMIZED_STRING_HASHING
    if(HashHelpers.s_UseRandomizedStringHashing)
    {
        return InternalMarvin32HashString(this, this.Length, 0);
    }
#endif // FEATURE_RANDOMIZED_STRING_HASHING

    // ...deterministic GetHashCode implementation
 }

The call to InternalMarvin32HashString calls into native code to do the randomized hashing. The Marvin algorithm it uses is actually patented, but if you're interested you can see a C# version here (it's part of the Core CLR implementation). I believe the randomized hashing feature was introduced in .NET Framework 4.5 (but don't quote me on that!).

Once I'd figured out that randomized hashing was my concern, I naturally checked to see if it could be disabled. It turns out in .NET Core it's always enabled. But why?

Why is randomizing GetHashCode() a good thing?

The answer to this question was touched on by Stephen Toub in a comment on an issue I discovered while reading around my problem:

Q: Why .NET Core utilize randomized string hashing?
A: Security, prevention against DoS attacks, etc.

This piqued my interest - what were these DoS attacks, and how do they play into GetHashCode()?

As far as I can see, this harks back to a talk given at the end of 2011 at the 28th Chaos Communication Congress (28C3), in which a whole range of languages were shown to be susceptible to a technique known as "hash flooding". If you're interested in the details, I strongly recommend checking out the video of the talk which I was impressed to find on You Tube. It definitely went over my head in places, but I'll try and explain the crux of it here.

Hash tables and hash flooding

Disclaimer: I don't have a Computer Science degree, so I may well be a bit fast and loose with the correct terminology here. Hopefully this description of the vulnerability makes sense either way.

Hash tables are a data structure that allow you to store a value using a key. The hash table itself consists of many buckets. When you want to insert a value in a hash table you use a hash function to calculate which bucket the key corresponds to, and store the key-value pair in there.

Storing a value in a hash bucket

In the best case, inserting a value into a hash table is an O(1) operation, i.e. it takes constant time. Ideally a hash function distributes the keys among the buckets evenly, such that each bucket has at most 1 value stored in it. If so, it doesn't matter how many values you store, it always takes the same amount of time to store a value. Even better, deleting and retrieving a value are also O(1).

Where things fall down is if two different keys hash to the same bucket. This is a relatively common occurrence: typical hash functions used with hash tables are designed to be fast, and to give a fixed output. They try to give a low probability of collisions, but they're not cryptographic hash functions (these provide stronger guarantees. See 7:28 in the YouTube video for more discussion of this).

When you get a hash collision in a hash table, typical implementations store the key-value pairs as a linked list inside the bucket. When you're inserting a new value and you get a collision, the hash table checks each of the elements to see if it already exists in the bucket. If not, then it adds the element to the end of the list.
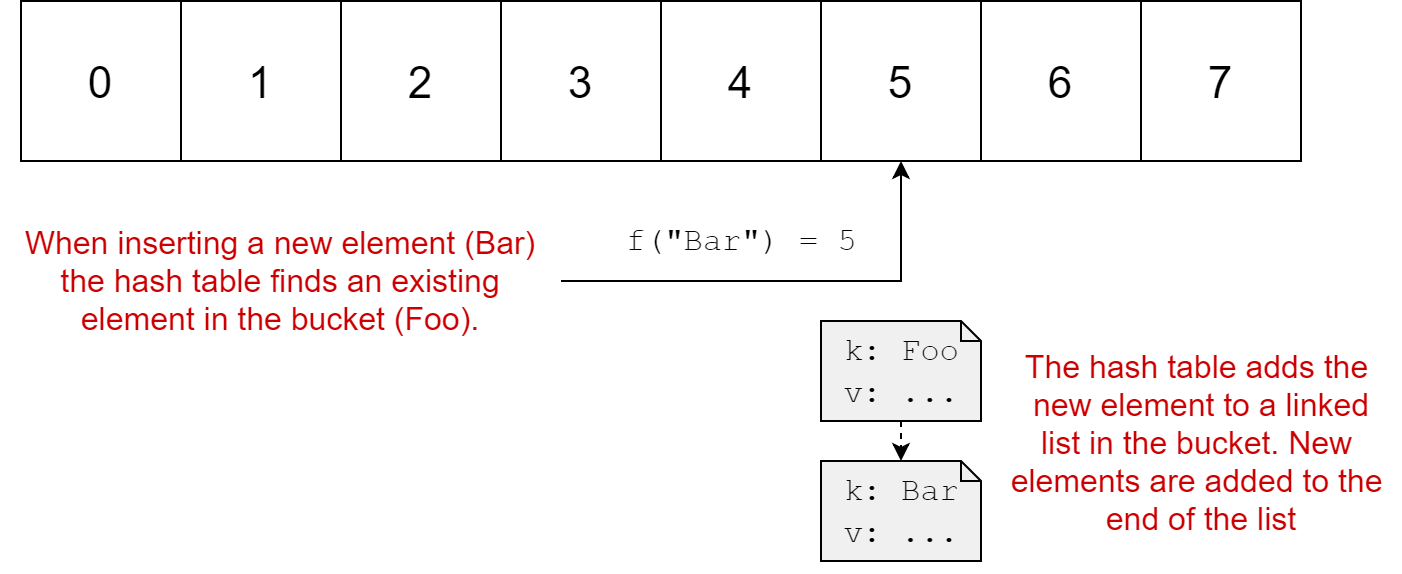
Collisions in a hash table

This is fine when you only get the occasional collision, but what if every lookup results in a collision. Imagine your hash table is asked to insert 10,000 elements, each of which has a different key, but which all hash to the same bucket.

The first element, Foo is inserted quickly, as there's no previous values in the bucket. The second element, Bar takes a little longer as it's first compared to the existing Foo element stored in the bucket's linked list, before being added to the end of the list. The third element Baz takes even longer, as it's compared to each of the previously hashed values before being added to the list.
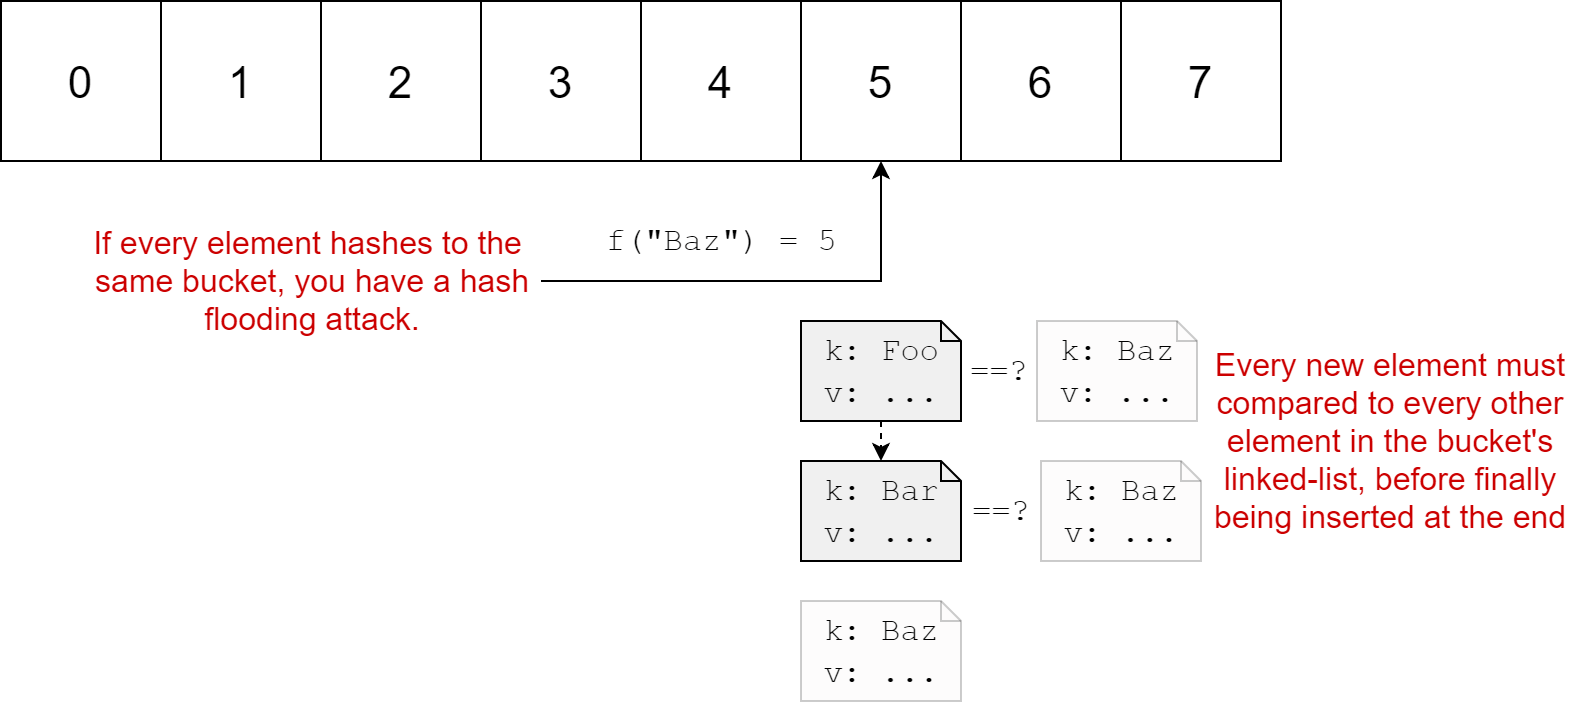
Hash flooding resulting in polynomial slowdown

Each individual insertion takes O(n) time, as it must be compared to every existing value in the linked list. If you can find values Foo, Bar, Baz etc. which all hash to the same value, then the time to insert those n elements is polynomial O(n²) time. That's a far cry from the O(1) assumed-best-case performance, and is the essence of the hash flooding attack.

Hash flooding and web applications

So that explains the attack itself, but why is it an issue? For two main reasons:

In their talk, Alexander Klink and Julian Wälde describe attacks on multiple web application frameworks, including ASP.NET (non-Core - this is 2011 remember!). Most web application frameworks (including ASP.NET) read an HTTP POST's parameters into a hash table. In ASP.NET, the parameters for a request are available as a NameValueCollection (a hash table) on HttpContext.Request.Form.

Using knowledge of the GetHashCode() implementation, it's possible to calculate (or identify using brute force) a wide array of values that will collide. From there you can craft a malicious HTTP POST. For example, if Foo, Bar, Baz all give the same GetHashCode() value, you can create a malicious post that uses all of these parameters in the body:

POST / HTTP/1.1
Host: example.com
Content-Type: application/x-www-form-urlencoded
Content-Length: 9999999

Foo=1&Bar=1&Baz=1.... + Lots more collisions

When the ASP.NET application tries to create the HttpContext object, it dutifully decomposes the body into a NameValueCollection, triggering the hash flooding attack due to the hash collisions.

For a bit of perspective here, when Alexander and Julian tested the attack with 4MB of post data (the limit at the time), it took the CPU ~11 hours to complete the hashing. 😱 O(n²) is a bitch…

Obviously there were built-in mitigations to this sort of runaway, even at the time; IIS would limit you to 90s of CPU time. But it shouldn't be hard to see the potential for denial of service attacks.

So there you have it. It seems Microsoft took this research and vulnerability very seriously (unlike the PhP folks by the sound of it!). They initially limited the number of parameters you can pass in a request, to reduce the impact of the issue. Subsequently they introduced the randomised GetHashCode() behaviour we've been discussing.

What if you need GetHashCode() to be deterministic across program executions?

Which brings me full circle to the problem. I wanted a deterministic GetHashCode() that would work across program executions. If you find yourself in a similar situation, you should maybe stop going down that line.

Do you really need it?

If the GetHashCode() result is going to be exposed to the outside world in a manner that leaves you open to hash flooding, you should probably rethink your approach. In particular, if user input is being added to a hash table (just like the Request.Form property), then you're vulnerable to the attack.

As well as the attack I've discussed here, I strongly suggest reading some of Eric Lippert's posts on GetHashCode(). They're old, but totally relevant. I wish I'd found them earlier in my investigation!

If you're really, really, sure you want a deterministic GetHashCode() for strings then you'll have to do your own thing.

A deterministic GetHashCode() implementation

In my case, I'm Pretty Sure™ that I'm ok to use a deterministic GetHashCode(). Essentially, I'm calculating the hash code for a whole bunch of strings "offline", and persisting these values to disk. In the application itself, I'm comparing a user provided string to the existing hash codes. I'm not inserting these values into a hash table, just comparing them to the already "full" hash table. so I think I'm good.

Please tell me if I'm wrong!

Coming up with a deterministic GetHashCode() implementation was an interesting dive into all sorts of code bases:

In the end, I settled on a version somewhere between all of them. I didn't want to use unsafe code in my little application (like the CoreFX version uses), so I created a managed version instead. The following hash function is what I finally settled on:

static int GetDeterministicHashCode(this string str)
{
    unchecked
    {
        int hash1 = (5381 << 16) + 5381;
        int hash2 = hash1;

        for (int i = 0; i < str.Length; i += 2)
        {
            hash1 = ((hash1 << 5) + hash1) ^ str[i];
            if (i == str.Length - 1)
                break;
            hash2 = ((hash2 << 5) + hash2) ^ str[i + 1];
        }

        return hash1 + (hash2 * 1566083941);
    }
}

This implementation is very similar to the links provided above. I'm not going to try and explain it here. It does some maths y'all. One interesting point for those who haven't seen it before is the unchecked keyword. This disables overflow-checking for the integer arithmetic done inside the function. If the function was executed inside a checked context, and didn't use the unchecked keyword, you might get an OverflowException at runtime:

checked
{
    var max = int.MaxValue;
    var val = max + 1; // throws an OverflowException in checked context
}

We can now update our little test program to use the GetDeterministicHashCode() extension method:

using System;

static class Program
{
    static void Main(string[] args)
    {
        Console.WriteLine("Hello World!".GetDeterministicHashCode());
        Console.WriteLine("Hello World!".GetDeterministicHashCode());
    }
}

And we get the same value for every execution of the program, even when running on .NET Core:

> dotnet run -c Release -f netcoreapp2.1
1726978645
1726978645

> dotnet run -c Release -f netcoreapp2.1
1726978645
1726978645

One thing I'm not 100% on is whether you'd get the same value on architectures other than 64-bit. If anyone knows the answer for sure I'd be very interested, otherwise I need to go and test some!

As I stated previously, generally speaking you shouldn't need to use this code. You should only use it in very specific circumstances where you know you aren't vulnerable to hash-based attacks.

If you're looking to implement GetHashCode() for other types, take a look at Muhammad Rehan Saeed's post. He describes a helper struct for generating hash codes. He also discusses the built-in HashCode struct in .NET Core 2.1.

Summary

This post was representative of my journey into understanding string.GetHashCode() and why different executions of a program will give a different hash code for the same string. Randomized hash codes is a security feature, designed to mitigate hash flooding. This type of attack uses knowledge of the underlying hash function to generate many collisions. Due to typical hash table design, this causes insert performance to drop from O(1) to O(n²), resulting in a denial of service attack.

In some circumstances, where your hash table will not be exposed to hash-based attacks like this, it may be desirable to have a stable/deterministic hash function. In this post I showed one such possible hash function, based on implementations in .NET Framework and CoreFX. This hash function ensures you get the same hash code for a given string, across program executions.

Use it wisely - with great power…

Dark mode now available!

$
0
0
Dark mode now available!

🎵 I am a man who walks alone
And when I'm walking a dark road
At night or strolling through the park

When the light begins to change
I sometimes feel a little strange
A little anxious, when it's dark. 🎵

Dark mode seems to be getting more and more popular these days, especially among developers. I'm not generally a fan (no, I'm not afraid) and I generally use light mode everywhere. The one exception is at night in low light - at those times the blinding white of some websites can be very uncomfortable.

It was one of these situations, in the dark, looking something up on my blog that I decided I finally had to do something about the searing light.

Enabling dark mode

If you want to try out dark mode on this blog, click the ☾ Dark link in the header bar:

Dark link in header bar

If you're on mobile, you won't see the words, just the icon:

Dark link in header bar on mobile

Clicking this will invert the colours for the site, switching to (what I hope is) a pleasant dark mode:

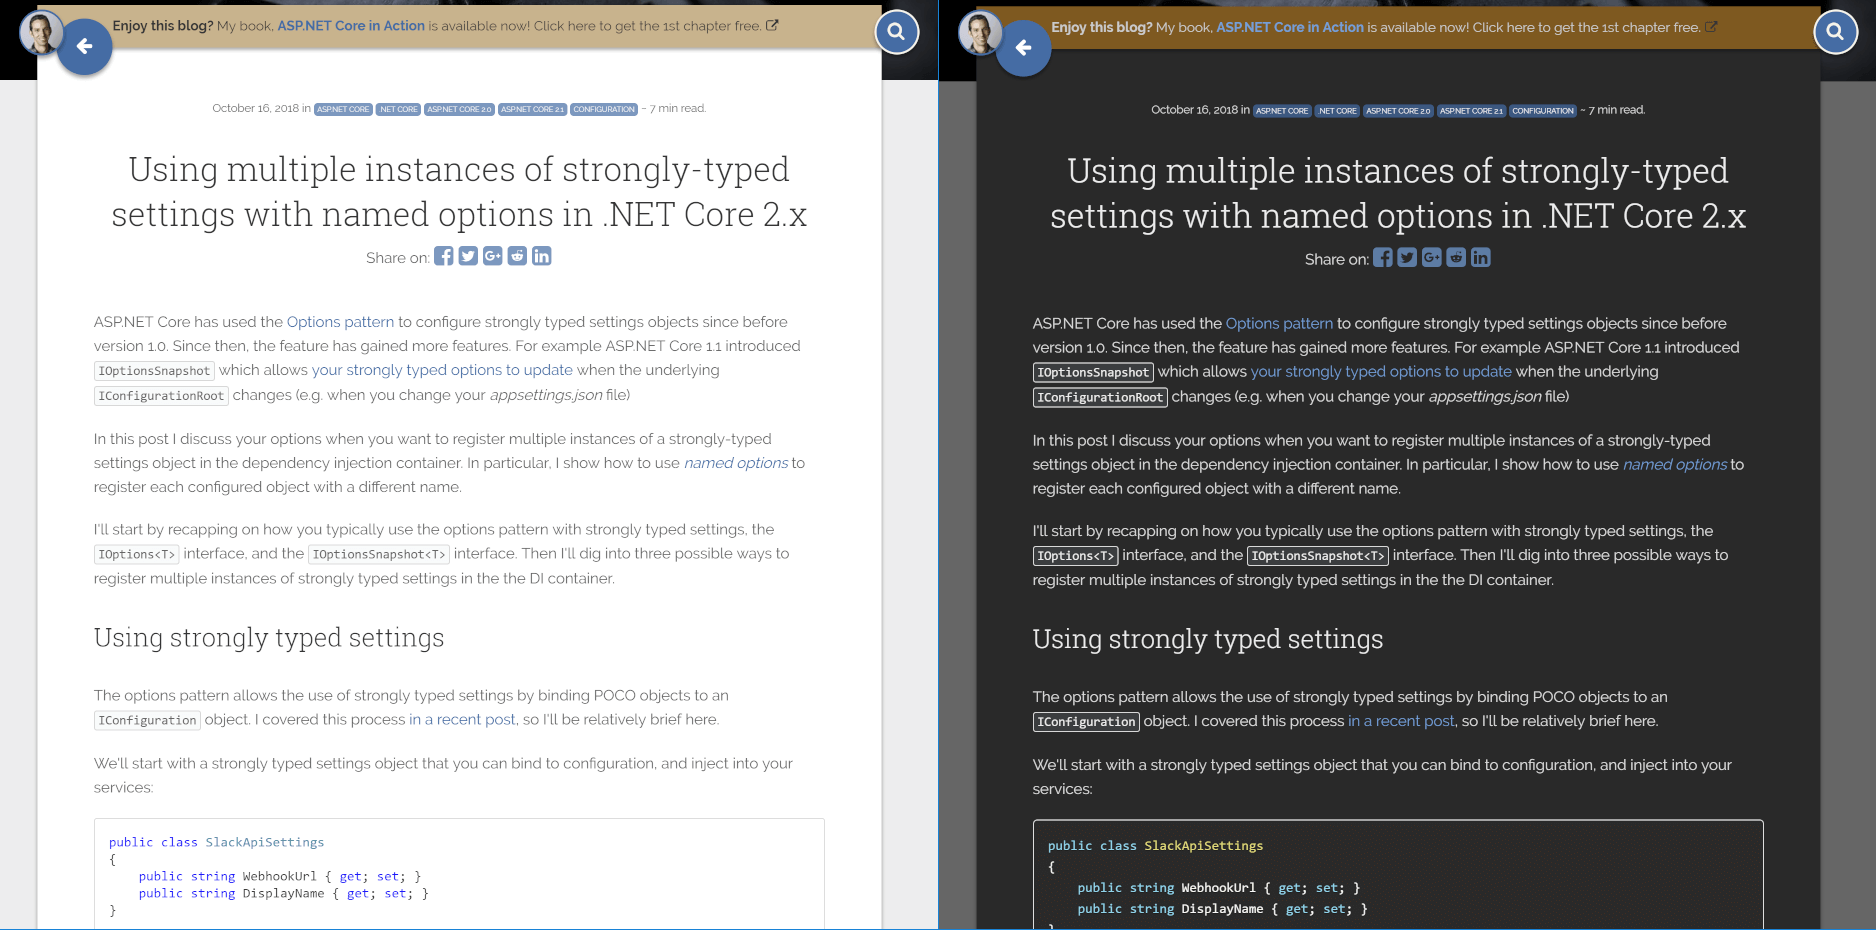
Comparison Light mode and dark mode

It's not perfect, but it does the job I think!

If you decide it's not for you, you can click ☀ Light to switch back to light mode.

How I enabled dark mode for my blog

The actual mechanism for achieving dark mode is pretty simple. Clicking the ☾ Dark or ☀ Light button does two things:

  • It adds a data-theme attribute to the documentElement for the page
  • It stores the selected theme (light or dark) in localStorage with the theme key

When the blog loads again, it checks localStorage.getItem("theme") to see if you've previously set the theme. If you have, then it adds the data-theme attribute immediately, so your selected theme persists across page loads.

That's all that's required on the JavaScript side. As you would probably expect, most of the effort was around updating the CSS to work with the new theme. Luckily, my blog doesn't use that many different colours, and it uses Sass to make updating the CSS more manageable.

One possible way to create a dark mode is to use CSS variables on the client (which I didn't realise, but are actually very well supported). You can calculate the required colours in the browser by doing a blanket inversion of the site's light-mode colours. I decided against that early on, as initial tests just didn't look that nice.

I maybe should have persisted down that route, they worked well for Marcin Wichary in his post Dark mode in a day.

Instead, I decided to base the colour theme on VS Code's dark mode colours. I went digging around on GitHub for the theme files and liberally pinched hex codes. Generally, the process involved finding everywhere in my .sass files that set a colour, and then creating a more-specific version of the rule, underneath the [data-them='dark'] selector. For example:

[data-theme='dark'] {
    .post .post-card {
        background: $dark-post-background-color;
    }

    .card .card-content,
    .card .card-footer {
        background: $dark-post-background-color;
    }

    h1, h2, h3, h4, h5, h6 {
        color: $gray-lighter;
    }

    body { 
        color: $gray-light;
        background: $gray-darker;
    }
}

After a lot of iterating and adding a dark-mode prism.js theme for code-highlighting, I had my very own dark mode!

Missing features

There's a few things that don't work brilliantly. Most notable are any images in the posts. Your eyes are happily adjusted to the dark, when BAM! whiteness overload:

A very white image

I'm in two minds about whether to try and do anything about those. Technically speaking, it would be possible to invert the images in the post with a single CSS rule:

[data-theme='dark'] .post-content p img {
    filter: invert(100%);
}

This has pretty good support, but I don't know that it's something that should be applied everywhere. A lot of the images are screenshots, so they wouldn't actually represent what you would see any more. Also, it makes some images look pretty weird and hard to read…

Comparison Light mode and dark mode

I'm wondering if another button that lets you toggle colour inversion on images is worth it? Is it a big deal? Is it good enough the way it is?

If you feel strongly one way or the other, let me know in the comments, and I'll look into it. Otherwise, enjoy!

Resources

I have to give another shout out to this great article on Medium - Dark theme in a day by Marcin Wichary. In his post he describes how he created a dark theme for a mobile app in a day, using CSS variables. It's a great post, and served as the model for my approach to tackle the problem. He even inverts the images, and gives some techniques to make inverted line diagrams look better, which I may use if I decide to go that route! Either way, a really good read.

The approach I've taken is also heavily inspired by the light / dark toggle in the Microsoft docs menu bar:

Dark mode on docs.microsoft.com

I notice they don't try and invert images either. Probably more hassle than it's worth, especially at their scale.

Finally, I'll mention that it's also possible to detect when a user is running MacOS Mojave in dark-mode, and to automatically switch to a dark colour scheme. Frank Krueger added this feature to fuget.org recently. This uses a media-query to detect whether the user is using dark-mode:

@media (prefers-color-scheme: dark) {
    body, .dropdown-menu, ul.dropdown-menu>li>a {
        background-color: #181818;
        color: #ddd;
    }
}

This seems really nice, it's just a shame you can't detect Windows 10 dark mode in this way… I think if you're going to take this route to dark-mode, then using the media query is great for setting the default experience. But it's probably best to provide a manual override to let users to switch between light and dark as whenever they want to.

Creating a git repo with Azure Repos and trying out Git LFS

$
0
0
Creating a git repo with Azure Repos and trying out Git LFS

I was recently working on a side project that seemed like it would have lots of large, binary assets. Unfortunately, that's just the sort of thing Git struggles with. As an experiment, I decided to try out Git Large File Storage (LFS) as a solution to this problem. While I was trying new things, I decided to also look at Azure Repos for Git hosting.

In this post I talk through the process I took to create a new Azure Repo, how to install Git LFS locally, and how to enable Git LFS in your repository.

Git LFS

I like Git - I'm no master but I can interactively rebase with the best of them. Unfortunately, while Git works great for source control of code and other text files, it can be cumbersome for working with large binary files like audio or video samples. When you change a text file, Git only has to store the difference between the old and new file; for binary files, Git has to store the entire file again, even if only a single byte changed. For large, frequently changing files, that can bloat your repository making simple operations slow and cumbersome.

Git LFS tackles this problem by storing the binary files somewhere else and just storing a pointer to it in the Git repository. That all happens seamlessly behind the scenes - when you checkout you see the actual binary files in your repository, they just aren't stored in the usual Git file structure.

Note that Git LFS is different to Virtual File System (VFS) for Git. VFS is the technology used to allow Microsoft to store the Windows source code in Git. The two technologies aren't compatible as far as I can see.

There are lots of different Git LFS implementations. GitHub, BitBucket, and Azure Repos all support Git LFS, and there's a whole host of open-source options. I decided to give Azure Repos a try.

Creating a new Git repository with Azure Repos

Azure Repos is part of "Azure DevOps" services, so you'll need to signup with a Microsoft account if you haven't already. I described how to setup an account for Azure Pipelines in a previous post, so see that one for how to get started.

Creating a new project with Azure Repos

We'll start by creating a new project. Go to https://dev.azure.com, sign in with your Microsoft account and create a new project. I gave mine the imaginative name: TestRepo.

When I created my project, only Azure Pipelines was enabled (presumably as that's all I've used previously). To add Azure Repos, click Project settings > Overview and scroll to the bottom. Flick the switch, and Azure Repos is enabled for the project:

Enable Azure Repos for a project

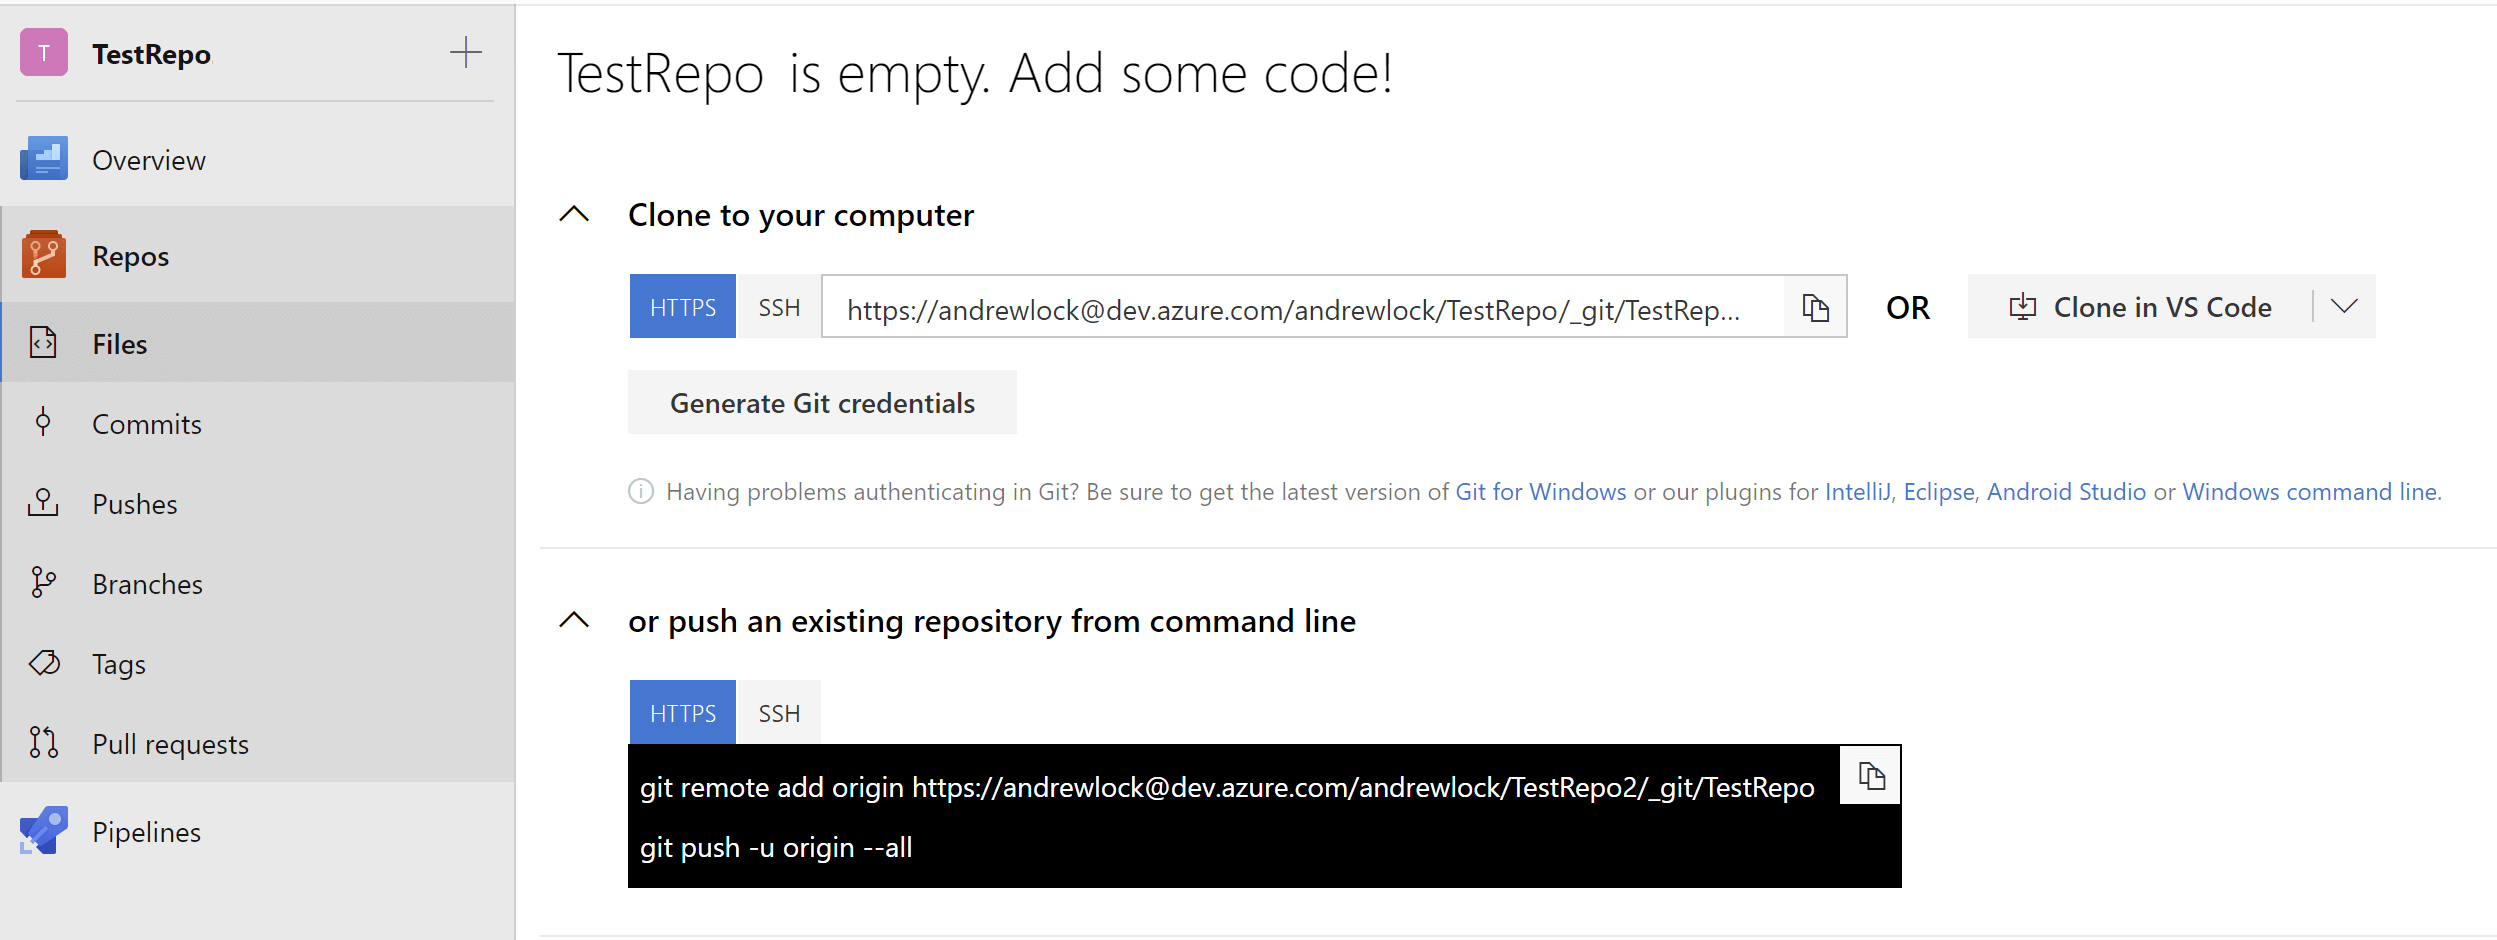
After refreshing the page, you'll see the Azure Repos symbol appear on the left. Click this link and you're presented with a plethora of options for how to connect a local Git repo to Azure Repos

Enable Azure Repos for a project

Connecting a local Git repository to Azure Repos

As it happens I'd already created a new empty Git repo locally, so I added the remote origin using the commands shown in the "push an existing repository from command line" to section:

> git init
Initialized empty Git repository in C:/repos/andrewlock/temp/.git/
> git remote add origin https://andrewlock@dev.azure.com/andrewlock/TestRepo2/_git/TestRepo
> git push -u origin --all
Password for 'https://andrewlock@dev.azure.com':

That last line rather confused me as the username/email isn't one I've seen before. The username is my organisation name (andrewlock), not an email address I have access to. Nevertheless, I tried the password for my Microsoft account, but that didn't work.

Generating Git Credentials for Azure Repos

The slightly confusing solution to this is the "Generate Git credentials button" nestled under the "Clone to your computer" section.

Create Git credentials

In order to push to your Azure Repos repository, you need to generate some new credentials. Clicking "Generate Git credentials" reveals the form shown below, which encourages you to set a password. But watch out, it's a trap!

Create Git credentials

Instead of setting a simple password to use with Git, you should use a personal access token. They're the recommend approach in this case, even according to Azure's own documentation (below), so they should really make it more obvious:

Personal access tokens let you create a password for use with the command line or other Git client without using your Azure DevOps Services username and password directly. An expiration date is set on these tokens when they are created and you can restrict the scope of the data they can access. Use personal access tokens to authenticate if you don't already have SSH keys set up on your system or if you need to restrict the permissions granted by the credential.

You can't use SSH with Git LFS, so a personal access token is definitely the best choice here.

Clicking on "Create a Personal access token" takes you to the Personal Access Tokens section of your user account settings, where you can create and manage your access tokens. Create a new token by clicking the "New Token" button, and configure it with the minimum required scopes - just "Code Read & Write" is sufficient

Create a personal Access Token

Finally, you're provided a password! Enter this value at the command prompt for git push -u origin --all and you'll be authenticated. If you're using Windows, Git-credential manager should take care of renewing and managing the token for you, so you shouldn't have to worry about authenticating again.

After finally getting an Azure Repos Git repository configured, I set about installing Git LFS.

Installing Git LFS

Installing Git LFS took me a couple of goes to get right. I made the mistake first of going to the Git LFS home page and clicking the big "Download" button. After running the brief installer, I ran the initialisation function as instructed, and was presented with a pretty unhelpful error:

> git lfs install
Git: 'lfs' is not a Git command. See 'Git --help'.

First of all, I thought it might be to do with the hub alias I use for creating PRs from the command line, but that had nothing to do with it.

Eventually, I read on a Stack Overflow post that Git LFS is part of the Windows Installer, I'd just never noticed it. As I wasn't running the latest Git at that point, I downloaded the latest installer, and sure enough, there was a checkbox for Git LFS support:

Enabling Git-lfs in the Git installer

Now, running the required git lfs install to initialize Git LFS gives a successful result:

> git lfs install
Updated Git hooks.
Git LFS initialized.

Running git lfs install enables Git LFS support by enabling various required smudge and clean filters in Git that intercept files on checkout and commit, replacing the placeholder and original files as necessary.

If you run git lfs install inside a Git repository (as I did), then it also adds additional hooks. Whenever you commit, checkout, merge, or push your repository, these hooks check that you have Git LFS installed, and will block the action if you don't.

Installed Git hooks

Defining which files should be tracked in Git LFS

Once Git LFS is installed you need to specify which files should be tracked in LFS. You can do this by specifying an entire folder to be tracked:

git lfs track 'images'

or you could specify that all files of a particular type should be tracked:

git lfs track "*.psd"

or a combination:

git lfs track "design/*.psd"

When you set a path to be tracked by Git LFS, a line is added to the .gitattributes file, specifying that the path should be handled by Git LFS. For example, for the git lfs track "design/*.psd" command, the .gitattributes file below would be generated:

design/*.psd filter=lfs diff=lfs merge=lfs -text

In my repo, I set the assets folder to be tracked in Git LFS, and committed the generated .gitattributes file:

> git lfs track 'assets/**/*'
Tracking "assets/"
> git add .gitattributes
> git commit -m "Add Git-lfs tracking of assets folder"

Note I found I needed to add the wildcards to ensure all files in sub directories were added to Git LFS correctly.

Adding and committing files to Git LFS

Now you can add, and commit your files just as you normally would with git. I added a whole bunch of large files to the assets folder:

Added assets

and committed them all as normal:

> git add .
> git commit -m "Add assets"

You can check that the files have been added to git LFS rather than the Git repo itself by running git lfs ls-files:

> git lfs ls-files
d009ed0e59 * assets/2016/05/AllSuccess-1.png
d009ed0e59 * assets/2016/05/AllSuccess.png
4d7879a936 * assets/2016/05/DSC01917.JPG
e05516c082 * assets/2016/05/DotNetCore.jpg
f4d6127dc9 * assets/2016/05/Middleware.png
... (truncated)

This lists all the files currently tracked by Git LFS. With everything committed, you can now push the files to Azure Repos:

> git push origin
fatal: NullReferenceException encountered.
   Object reference not set to an instance of an object.
fatal: NullReferenceException encountered.
   Object reference not set to an instance of an object.
Locking support detected on remote "origin". Consider enabling it with:
  $ Git config lfs.https://andrewlock@dev.azure.com/andrewlock/TestRepo/_Git/TestRepo.Git/info/lfs.locksverify true
Uploading LFS objects: 100% (595/595), 20 MB | 346 KB/s, done
Enumerating objects: 644, done.
Counting objects: 100% (644/644), done.
Delta compression using up to 8 threads
Compressing objects: 100% (633/633), done.
Writing objects: 100% (643/643), 90.75 KiB | 780.00 KiB/s, done.
Total 643 (delta 1), reused 0 (delta 0)
remote: Analyzing objects... (643/643) (103 ms)
remote: Storing packfile... done (43 ms)
remote: Storing index... done (43 ms)
To https://dev.azure.com/andrewlock/TestRepo/_Git/TestRepo
 * [new branch]      master -> master
Branch 'master' set up to track remote branch 'master' from 'origin'.

Note the fatal: NullReferenceException encountered. at the top. Not sure what that's about. I seem to get two of them, every time I push…

Ignoring those slightly strange exceptions, by and large Git LFS just works! You can see that Git uploaded 20MB of files to Git LFS, and just 90.75KB to Git itself. One thing worth commenting on is that uploading to Git LFS was actually slower than uploading to Git. It's not a big deal, was just interesting to notice.

Exploring the files in Azure Repos

If you navigate to your repository in Azure Repos, you can browse the files in your repo just as though they were committed directly. You actually can't tell there's anything different - personally I think it would be nice to have some sort of icon indicating the file is tracked in Git LFS, but for the most part it doesn't really matter:

Added assets

Taking Git LFS further

This post just scratches the surface of Git LFS. I was mostly just interested in the workflow and how it differs from normal git. With the exception of setting up the file paths to track, the answer seems to be - not much!

One issue I ran into initially was failing to set up the tracking properly for some files (by using the wrong combination of wildcards). I thought files were being committed to Git LFS, but they were actually being committed to Git. I strongly recommend running git lfs ls-files after setting up the initial tracking to ensure you're actually tracking the files you think you are.

Another way of checking this is to see what the files look like inside the .git folder. By using git show, you can view the LFS pointer files themselves:

> git show HEAD:assets/cover.jpg
version https://Git-lfs.Github.com/spec/v1
oid sha256:3dda8fd9eecbaf8be909b6d363d15ae66928a9a713f89bc30e6888a0f2192718
size 66825

If the file is not tracked by Git LIFS, then running git show will dump a mass of binary to the console - you'll definitely know when you've got your wildcards wrong!

Another interesting feature for teams (as opposed to solo developers) is the file locking support. Given that merge conflicts on binary files are a disaster, the centrally locked approach makes a lot of sense!

Finally, I'd be remiss if I didn't mention the great tutorial on the Git LFS Wiki page. Unfortunately I only discovered this after muddling my way through, so I strongly recommend reading that first. If you're looking to add Git LFS to a repository that already contains large files, the tutorial covers all that and more.

All in all, Git LFS looks interesting. I don't think I'll have much use for it personally, but I can certainly see the value for people working who like Git but are working with large binary files.

As for Azure Repos, you can't really argue with free private repositories! If you're considering buying into the other Azure DevOps services too, then it makes even more sense to consider them. For open source projects though, GitHub is definitely still the way to go.

Summary

In this post I showed how to create a Git repository with Azure Repos and how to create git credentials for accessing your repo from the command line. I also showed how to install Git LFS by installing Git for Windows, and how to enable LFS tracking in your repositories. Git LFS seems like a great solution if you know you'll get value from it. I don't see myself having to use it often, but it's good to know it's there if I need it!

Creating an AWS policy for calling the SES mailbox simulator from CodeBuild

$
0
0
Creating an AWS policy for calling the SES mailbox simulator from CodeBuild

This isn't a long, or especially interesting post, it just describes something I needed to do the other day, and couldn't explicitly find anywhere that described how to do it. As the title suggests, it shows how to create and AWS IAM policy that allows an IAM role used by CodeBuild for continuous integration to call the AWS Simple Email Service (SES) mailbox simulator. What a mouthful.

tl;dr; Click here to jump to the policy.

The AWS SES mailbox simulator

If you're working with the AWS SES service, then the mailbox simulator is a great tool. It allows you to test sending email without actually sending email. Consequently you get none of the risk of reputation damage due to bounces, being marked as spam, or simply accidentally sending mail when you don't need to.

On top of the safety aspect, the mailbox simulator lets you test out a variety of scenarios. By sending emails to a special email address through SES, you can make SES respond as though the email is rejected, bounced, or marked as spam for example. That lets you test how your application/infrastructure handles these events, without needing the events themselves to occur. The mailbox simulator integrates with your SNS WebHooks and inbound mailboxes to generate events as though emails were really sent.

As an example (and as we'll refer to them later), these are the currently available mailbox addresses, and a brief description of their behaviour:

  • success@​simulator.amazonses.com - accepts the email
  • bounce@​simulator.amazonses.com - generates a hard bounce notification
  • ooto@​simulator.amazonses.com - generates an "out of office" (i.e. soft bounce) notification
  • complaint@​simulator.amazonses.com - generates a complaint notification, as if a user marked your email as spam
  • suppressionlist@​simulator.amazonses.com - rejects the email as though the recipient is on the SES suppression list

I was building out an application that was integrating with SES. To test the various scenarios, I created a number of integration tests which would call the mailbox simulator with each of those emails, and verify that the application responded correctly. Everything was working correctly, so I pushed my code to the build server, and waited for CodeBuild to build the app.

User is not authorized to perform ses:SendEmail

Unfortunately, while the build passed, my integration tests did not. After a bit of trial and error, I finally got the tests to print some useful logs, and found the following AWS SDK error :

MyEmailApp.EmailProvider Error
  Error sending email with AWS SES: Amazon.SimpleEmail.AmazonSimpleEmailServiceException: 
  User  `arn:aws:sts::123456789:assumed-role/codebuild-service-role/AWSCodeBuild-1614d5f-b7d1-adc53-dd94-09ea3b2864ec' is not authorized to perform `ses:SendEmail' on resource `arn:aws:ses:eu-west-1:123456789:identity/example.com' 
  ---> Amazon.Runtime.Internal.HttpErrorResponseException: Exception of type 'Amazon.Runtime.Internal.HttpErrorResponseException' was thrown.

Luckily, although verbose, the error is fairly self-explanatory. The role that the CodeBuild agent is using (defined when you create the CodeBuild job) doesn't have permission to send email with the configured identity.

Configuring SES in general is a mammoth job so check the docs for details. In short, you can have multiple sending identities, and the role assigned to the application must have the ses:SendEmail for that identity to send email with SES.

With the problem identified, the question was how to enable the CodeBuild role to send email to the simulator. The key point was that I only wanted it to be able to send to the simulator. I didn't want our CI build to be able to accidentally start sending real emails out!

Unfortunately, it wasn't easy to find anything about this directly. Luckily, there are example policies for controlling access to SES in general, and one of these got me 90% of the way there.

Enabling ses:SendEmail for the mailbox simulator

As with most of AWS, you can finely control access to all the features of SES based on a user's role by using policies. The SES policies also allow a number of useful conditionals, for controlling when to apply the policy. For example, you can instruct SES to only allow a role to send emails during specific hours.

In our case, it's the ability to restrict the recipient's email address that we need. The following IAM policy allows the user to send emails, but only when the recipient address ends with @​simulator.amazonses.com:

{
    "Version": "2012-10-17",
    "Statement": [
        {
            "Sid": "AllowSendingEmailsToSimulatorWithSES",
            "Effect": "Allow",
            "Action": "ses:SendEmail",
            "Resource": "*",
            "Condition": {
                "ForAllValues:StringLike": {
                    "ses:Recipients": "*@simulator.amazonses.com"
                }
            }
        }
    ]
}

Applying this policy to the CodeBuild role inside IAM meant the integration tests could call the mailbox simulator as part of the build. However, if the integration tests ever try to send to a real recipient, whether by accident or intentionally, it'll get a permission error at runtime.

This could also be useful outside of the continuous integration context I was using it for. For example you may decide you don't want your developers to be able to send real emails with the "production" identity, but you want them to to be able to test against the mailbox simulator. If so, then you could combine this policy with a condition that restricts the ses:FromAddress field, as shown in the documentation samples.

Summary

The mailbox simulator is a really useful tool for testing out the various scenarios your app will face when you're integrating with SES. If you want to call the simulator as part of a continuous integration build, then you'll need to make sure that the IAM user/role that is running the build has permission to send emails with SES. The policy I showed in this post restricts the user to using the simulator only, so there's no chance of accidentally sending real email as part of your build.

Using dependency injection with Twilio SMS and ASP.NET Core 2.1

$
0
0
Using dependency injection with Twilio SMS and ASP.NET Core 2.1

ASP.NET Core is built with first-class support for dependency injection (DI). It's used heavily by the framework, but you can also use it with your own classes. The Twilio C# helper libraries are largely static, so you don't have to use DI, but sometimes you might want to. For example, you might want to create a custom TwilioRestClient that uses the HttpClientFactory features of .NET Core 2.1. In this post, I describe how to create a custom ITwilioRestClient, register it with the ASP.NET Core DI container, and inject it into a web API controller, so you can use it to send an SMS.

Prerequisites

To follow along with this post you'll need

You can find the complete code for this post on GitHub.

The TwilioRestClient and System.Net.HttpClient

Twilio exposes a REST API that you can invoke to send messages, or make phone calls, for example. The C# helper libraries provide convenient, strongly-typed wrappers around the underlying HTTP calls. Typically you configure the Twilio client globally and use static methods to create resources. For example, a typical static method call to create a Twilio SMS message might look like this:

TwilioClient.Init(accountSid, authToken);

var message = MessageResource.Create(
    to: new PhoneNumber("+15558675309"),
    from: new PhoneNumber("+15017250604"),
    body: "Hello from C#");

Behind the scenes, the helper library creates a TwilioRestClient using the Twilio credentials you pass to the Init() method. The MessageResource.Create() method uses this client by default.

But what if you need to customize the requests sent to the Twilio API? Perhaps you need to add a custom HTTP header to outgoing requests (perhaps as required by an upstream proxy server).

The TwilioRestClient uses the standard HttpClient class (in the System.Net.Http namespace) to call the REST API. By customizing the HttpClient you can control all the requests a TwilioRestClient makes. In .NET Core 2.1, the best way to customize an HttpClient is to use the HttpClientFactory feature.

Using HttpClientFactory with .NET Core 2.1

HttpClient has been around for a long time, and is a common tool for .NET developers, but it's easy to misuse. The class implements IDisposable, so some developers use HttpClient with a using statement. Unfortunately, this can lead to "socket exhaustion".

To counteract this, Microsoft's advice is to use the HttpClient as a static or singleton object. But this leads to another problem—a static HttpClient doesn't respect DNS changes.

To address these issues, .NET Core 2.1 introduces HttpClientFactory. Instead of having to micro-manage your HttpClient instances, HttpClientFactory takes care of managing the lifecycle of HttpClient instances for you.

As well as the performance benefits, HttpClientFactory allows you to easily customize each HttpClient, for example by adding automatic transient-fault handling using the Polly library.

Creating the Web API project

To get started, create a new ASP.NET Core 2.1 Web API project, "CustomTwilioRestClientDemo" using Visual Studio or your IDE of choice.

  • If you're using the .NET Core CLI, use dotnet new webapi --no-https.
  • If you use Visual Studio 2017 open the project properties and uncheck Enable SSL.

Disabling SSL/TLS is obviously not a best practice for production applications. For this demonstration, doing so will make testing the API with Postman easier. You can delete the Controllers folder and ValuesController.cs file that are generated, as we'll be replacing them later.

Installing the Twilio NuGet package

Install the Twilio NuGet package (version 5.22.0 or later) using the NuGet Package Manager, Package Manager Console CLI, or by editing the the CustomTwilioRestClient.csproj file. After using any of these methods the <ItemGroup> section of the project file should look like this (version numbers may be higher):

  <ItemGroup>
    <PackageReference Include="Microsoft.AspNetCore.App" />
    <PackageReference Include="Microsoft.AspNetCore.Razor.Design" Version="2.1.2" PrivateAssets="All" />
    <PackageReference Include="Twilio" Version="5.22.0" />
  </ItemGroup>

Creating a custom Twilio client using HttpClientFactory

You can consume an HttpClientFactory-managed HttpClient by injecting it into the constructor of any of your classes. You're then free to customize the headers or make any other necessary changes before using it to make requests.

Create CustomTwilioClient.cs in the project directory and replace the contents with the following code. This creates a custom ITwilioRestClient using an HttpClient injected into the constructor and adds a custom header to all outgoing requests.

using System.Threading.Tasks;
using Microsoft.Extensions.Configuration;
using Twilio.Clients;
using Twilio.Http;

namespace CustomTwilioRestClientDemo
{
    public class CustomTwilioClient : ITwilioRestClient
    {
        private readonly ITwilioRestClient _innerClient;

        public CustomTwilioClient(IConfiguration config, System.Net.Http.HttpClient httpClient)
        {
            // customize the underlying HttpClient
            httpClient.DefaultRequestHeaders.Add("X-Custom-Header", "CustomTwilioRestClient-Demo");

            _innerClient = new TwilioRestClient(
                config["Twilio:AccountSid"],
                config["Twilio:AuthToken"],
                httpClient: new SystemNetHttpClient(httpClient));
        }

        public Response Request(Request request) => _innerClient.Request(request);
        public Task<Response> RequestAsync(Request request) => _innerClient.RequestAsync(request);
        public string AccountSid => _innerClient.AccountSid;
        public string Region => _innerClient.Region;
        public Twilio.Http.HttpClient HttpClient => _innerClient.HttpClient;
    }
}

In this example, we inject and HttpClient into the constructor and customize it by adding a default request header, X-Custom-Header. We pass this HttpClient into the new TwilioRestClient, so all outgoing requests to the Twilio REST API using _innerClient will contain this header.

public CustomTwilioClient(IConfiguration config, System.Net.Http.HttpClient httpClient)
{
    httpClient.DefaultRequestHeaders.Add("X-Custom-Header", "CustomTwilioRestClient-Demo");

    _innerClient = new TwilioRestClient(
        config["Twilio:AccountSid"],
        config["Twilio:AuthToken"],
        httpClient: new SystemNetHttpClient(httpClient));
}

This example uses a decorator pattern, in which we implement the ITwilioRestClient interface by delegating to a private TwilioRestClient _innerClient. For example, all of the following methods and properties call the same property on the _innerClient and return the result.

public Response Request(Request request) => _innerClient.Request(request);
public Task<Response> RequestAsync(Request request) => _innerClient.RequestAsync(request);
public string AccountSid => _innerClient.AccountSid;
public string Region => _innerClient.Region;
public Twilio.Http.HttpClient HttpClient => _innerClient.HttpClient;

The client is created using credentials loaded from the injected IConfiguration config. This includes your Twilio Account Sid and Auth Token (found in the Twilio Dashboard), which can be placed in a file like appsettings.json below or, better yet, using the Secrets Manager tool. You can learn how in another Twilio blog post: User Secrets in a .NET Core Web App. For this demo, add the following section to the appsettings.json file and insert your Twilio SID and Auth Token in place of the placeholders:

"Twilio": {
  "AccountSID": "ACxxxxxxxxxxxxxxxxxxxxxxxxxxxxxxxx",
  "AuthToken": "your_auth_token"
}

Using the IConfiguration object directly in your classes is generally not the best approach. Instead, you should consider using strongly typed settings with the Options pattern. I've used the configuration option here purely for convenience.

With your custom client created, you now need to register it with the DI container.

Registering the CustomTwilioClient with the DI container

You can register your classes with the DI container in Startup.ConfigureServices(). This class and method is created by default when you create a new ASP.NET Core project, and is where you configure your DI container. You need to register any framework services you require as well as your custom classes. Once a class is registered with the DI container you can inject it into the constructor of other classes.

We're using the HttpClientFactory to create the HttpClient required by our CustomTwilioClient so we can use the AddHttpClient<,>() convenience method to register our class as a "typed client". Add the directive using Twilio.Clients; to Startup.cs, then update the ConfigureServices method to the following

public void ConfigureServices(IServiceCollection services)
{
    services.AddMvc()
        .SetCompatibilityVersion(CompatibilityVersion.Version_2_1);

    services.AddHttpClient<ITwilioRestClient, CustomTwilioClient>();
}

AddMvc() is added by default when you create an ASP.NET Core application, and adds all the required framework services for using MVC in your app.

The following line registers your CustomTwilioClient as an implementation of the ITwilioRestClient service, and instructs the HttpClientFactory to inject an HttpClient at runtime.

services.AddHttpClient<ITwilioRestClient, CustomTwilioClient>();

If you wish, you can customize the HttpClient that will be injected into your CustomTwilioClient here. For example, instead of adding custom headers inside your CustomTwilioClient constructor, you could configure it here instead:

services.AddHttpClient<ITwilioRestClient, CustomTwilioClient>(client => 
    client.DefaultRequestHeaders.Add("X-Custom-Header", "HttpClientFactory-Sample"));

The overall result is the same, so it comes down to your preferences whether you prefer this or the constructor approach. In addition, AddHttpClient<,>() returns an IHttpClientBuilder instance that you can use for further customization, for example to add transient HTTP fault handling.

Injecting the CustomTwilioClient into an API Controller

Once your custom client is registered with the DI container you can inject an ITwilioRestClient into any class and the DI container will create a CustomTwilioClient for you. You can use this client to make calls using Twilio helper library methods, such as MessageResource.Create(). Create MessageController.cs and add the following code. This shows an API controller in which we've injected an ITwilioRestClient, and used it to send a message when it receives an HTTP POST.

using Microsoft.AspNetCore.Mvc;
using Twilio.Clients;
using Twilio.Rest.Api.V2010.Account;
using Twilio.Types;

namespace CustomTwilioRestClientDemo
{
    [ApiController]
    public class MessageController : ControllerBase
    {
        private readonly ITwilioRestClient _client;
        public MessageController(ITwilioRestClient client)
        {
            _client = client;
        }

        [HttpPost("api/send-sms")]
        public IActionResult SendSms(MessageModel model)
        {
            var message = MessageResource.Create(
                to: new PhoneNumber(model.To),
                from: new PhoneNumber(model.From),
                body: model.Message,
                client: _client); // pass in the custom client

            return Ok(message.Sid);
        }

        public class MessageModel
        {
            public string To { get; set; }
            public string From { get; set; }
            public string Message { get; set; }
        }
    }
}

You can add any additional arguments to your MessageController constructor, and as long as you've registered the service with the DI container in Startup.ConfigureServices() the framework will inject it for you. In this case we're injecting an ITwilioRestClient and saving it in a readonly field for use by the action method.

private readonly ITwilioRestClient _client;
public MessageController(ITwilioRestClient client)
{
    _client = client;
}

The action method SendSms builds a MessageModel view model from POST requests, which we use to set the to, from, and body, parameters of the MessageResource.Create() call. We also pass in the custom ITwilioRestClient so that the helper library uses this instead of the default TwilioRestClient.

[HttpPost("api/send-sms")]
public IActionResult SendSms(MessageModel model)
{
    var message = MessageResource.Create(
        to: new PhoneNumber(model.To),
        from: new PhoneNumber(model.From),
        body: model.Message,
        client: _client); // pass in the custom client

    return Ok(message.Sid);
}

Note that we've decorated the controller with the [ApiController] attribute, so we don't need to worry about specifying the [FromBody] parameter to bind JSON, or explicitly checking ModelState.IsValid. See the documentation for further details on the [ApiController] attribute.

Testing your API with Postman

You have everything in place to test your app. You'll need to use a tool such as Postman to make requests to your API. When the app starts, choose Create New Request, enter a name for the request such as "CustomTwilioRestClientDemo", and choose a collection to save the Postman request in. Click Save to create the request.

Configure the request to call your API:

  • Change the HTTP Method from GET to POST
  • Set the request URL to http://localhost:5000/api/send-sms (or whichever url your app is running at)
  • Click Body, choose raw , and change the Content-Type from Text to JSON(application/json)
  • Enter a JSON request, like the one below, containing to, from, and body, parameters
  • Replace the value for the from parameter with your Twilio phone number
  • The value for the to parameter must be a phone number you’ve registered with Twilio, typically the number you used when creating your account, and it must be able to receive SMS
{
  "from": "+441123456789",
  "to": "+441123456789",
  "message": "Hello from CustomTwilioClient!"
}

When you send the message, your "create message" request will be sent using the Twilio REST API, with a custom header on the outgoing request. The MessageController then returns a 200 OK response containing the Sid of the message created:

Using PostMan to test the API controller

If you want to try out the code in this post, you can download the source code from GitHub.

What else can this technique be used for?

One of the big advantages of using Dependency Injection in your code, and especially of injecting interfaces instead of concrete classes, is that makes it easier to test your classes. If you were using the global TwilioRestClient and wanted to test your MessageController then you'd be sending a new message with every request. By injecting an ITwilioRestClient instead, you could inject a mock or stub implementation for your tests.

You can extend the CustomTwilioClient further by using the HttpClientFactory features to make it resistant to transient failures using the Polly library, use a proxy server, or add caching, for example. Once your CustomTwilioClient is registered with the DI container, you can inject it anywhere—into API controllers, as in this article, but also into Razor pages, or your own custom services.

Summary

In this post you saw how to create a custom ITwilioRestClient, and use HttpClientFactory to inject a custom HttpClient into the CustomTwilioClient constructor. We used this custom HttpClient to add extra headers to all outgoing requests to the Twilio REST API. By registering the ITwilioRestClient with the DI container you were able to create a simple Web API controller for sending SMSs with Twilio using the CustomTwilioClient. Finally, you saw how to test your controller using Postman by sending a JSON request.

Additional Information

For more information about HttpClientFactory I recommend Steve Gordon’s excellent blog post series: https://www.stevejgordon.co.uk/introduction-to-httpclientfactory-aspnetcore.

Running async tasks on app startup in ASP.NET Core (Part 1)

$
0
0
Running async tasks on app startup in ASP.NET Core (Part 1)

Sometimes you need to perform one-off initialisation logic before your app starts up properly. For example, you might want to validate your configuration is correct, populate a cache, or run database migrations. In this post, I look at the options available and show some simple methods and extension points that I think solve the problem well.

I start by describing the built-in solution to running synchronous tasks with IStartupFilter. I then walk through the various options for running asynchrnous tasks. You could (but possibly shouldn't) use IStartupFilter or IApplicationLifetime events to run asynchronous tasks. You could use the IHostedService interface to run one-off tasks without blocking app startup. However the only real solution is to run the tasks manually in program.cs. In my next post I'll show a suggested proposal that makes this process a little easier.

Why do we need to run tasks on app startup?

It's very common to need to run various sorts of initialisation code before an app is able to start up and begin serving requests. In an ASP.NET Core app there are clearly lots of things that need to happen, for example:

  • Determining the current hosting environment
  • Loading of configuration from appsettings.json and environment variables
  • Configuration of the dependency injection container
  • Building of the dependency injection container
  • Configuration of the middleware pipeline

All of these steps need to occur to bootstrap the application. However there are often one-off tasks you want to perform before the WebHost is run and starts listening for requests. For example:

Sometimes these tasks don't have to be run before your app starts serving requests. The cache priming example for instance - if its a well behaved cache, then it shouldn't matter if the cache is queried before it's primed. On the other hand, you almost certainly want your database to be migrated before your app starts serving requests!

There are some examples of where one-off initialisation tasks are required by the ASP.NET Core framework itself. A good example of this is the Data Protection subsystem, used for transient encryption (cookie values, anti-forgery tokens etc). This subsystem must be initialised before the app can start handling any requests. To handle this, they use a IStartupFilter.

Running tasks synchronously with IStartupFilter

I've written previously about IStartupFilter, as it's a really useful interface to have in your tool belt for customising your apps:

If you're new to the filter, I recommend reading my introductory post, but I'll provide a brief summary here.

IStartupFilters are executed as part of the process of configuring your middleware pipeline (typically done in Startup.Configure()). They allow you to customise the middleware pipeline that's actually created by the app, by inserting extra pieces of middleware, forking it, or doing any number of other things. For example, the AutoRequestServicesStartupFilter shown below inserts a new piece of middleware at the start of your pipeline:

public class AutoRequestServicesStartupFilter : IStartupFilter
{
    public Action<IApplicationBuilder> Configure(Action<IApplicationBuilder> next)
    {
        return builder =>
        {
            builder.UseMiddleware<RequestServicesContainerMiddleware>();
            next(builder);
        };
    }
}

This is useful, but what does it have to do with running one-off tasks on app startup?

The key feature IStartupFilter provides is a hook into the early app startup process, after the configuration is set and the dependency injection container is configured, but before the app is ready to start. That means you can use dependency injection with IStartupFilters and so can run pretty much any code. The DataProtectionStartupFilter for example is used to initialise the Data Protection system. I used a similar IStartupFilter approach to provide eager validation of strongly typed configuration.

The other very useful feature is it allows you to add tasks to be executed by registering a service with the DI container. That means as a library author, you could register a task to be run on app startup, without the app author having to invoke it explicitly.

So why can't we just use IStartupFilter to run asynchronous tasks on startup?

The problem is that the IStartupFilter is fundamentally synchronous. The Configure() method (which you can see in the code above) doesn't return a Task, so it's not a good idea to be trying to do sync over async. I'll discuss this a little later, but for now a quick detour.

Why not use health checks?

ASP.NET Core 2.2 introduces a health checks feature for ASP.NET Core applications, which allows you to query the "health" of an application, exposed via an HTTP endpoint. When deployed, orchestration engines like Kubernetes, or reverse proxies like HAProxy and NGINX can query this endpoint to check if your app is ready to start receiving requests.

You could use the health check feature to ensure your application doesn't start servicing requests (i.e. returning a "healthy" status from the health check endpoint) until all the required one-off tasks are complete. However this has a few downsides:

  • The WebHost and Kestrel itself would startup before the one-off tasks have been executed. While they wouldn't receive "real" requests (only health check requests) that might still be an issue.
  • It introduces extra complexity. As well as adding the code to run the one-task, you need to add a health check to test if the task completed, and synchronise the status of the task.
  • The start of the app would still be delayed until all the tasks have completed, so it's unlikely to reduce startup time.
  • If a task fails, the app would continue to run in a "dead" state, where the health check would never pass. That might be acceptable, but personally I prefer an app to fail immediately.
  • The health checks aspect still doesn't define how to actually run the task, just whether the task completed successfully. You still need to decide on a mechanism to run the tasks on startup.

For me, health checks doesn't seem like the right fit for the one-off tasks scenario. They may well be useful for some of the examples I've described, but I don't think they fit all cases. I really want to be able to run my one-off tasks on app startup, before the WebHost is run

Running asynchronous tasks

I've spent a long time discussing all the ways not to achieve my goal, how about some solutions! In this section I walk through some of the possibilties for running asynchronous tasks (i.e. tasks that return a Task and require await-ing). Some are better than others, and some you should avoid, but I wanted to cover the various options.

To give something concrete to discuss, I'll consider the database migration example. In EF Core, you can migrate a database at runtime by calling myDbContext.Database.MigrateAsync(), where myDbContext is an instance of your application's DbContext.

There's also a synchronous version of the method, Database.Migrate(), but just pretend there isn't for now!

1. Using IStartupFilter

I described earlier how you can use IStartupFilter to run synchronous tasks on app startup. Unfortunately the only way to run asynchronous tasks would be to use a "sync over async" approach, in which we call GetAwaiter().GetResult():

Warning: this code uses bad async practices.

public class MigratorStartupFilter: IStartupFilter
{
    // We need to inject the IServiceProvider so we can create 
    // the scoped service, MyDbContext
    private readonly IServiceProvider _serviceProvider;
    public MigratorStartupFilter(IServiceProvider serviceProvider)
    {
        _serviceProvider = serviceProvider;
    }

    public Action<IApplicationBuilder> Configure(Action<IApplicationBuilder> next)
    {
        // Create a new scope to retrieve scoped services
        using(var scope = _seviceProvider.CreateScope())
        {
            // Get the DbContext instance
            var myDbContext = scope.ServiceProvider.GetRequiredService<MyDbContext>();

            //Do the migration by blocking the async call
            myDbContext.Database.MigrateAsync()
                .GetAwaiter()   // Yuk!
                .GetResult();   // Yuk!
        }

        // don't modify the middleware pipeline
        return next;
    }
}

It's very possible that this won't cause any issues - this code is only running on app startup, before we're serving requests, and so deadlocks seem unlikely. But frankly, I couldn't say for sure and I avoid code like this wherever possible.

David Fowler is putting together some great (work in progress) guidance on doing asynchronous programming correctly. I highly recommend reading it!

2. Using IApplicationLifetime events

I haven't discussed this much before, but you can receive notifications when your app is starting up and shutting down with the IApplicationLifetime interface. I won't go into detail about it here, as it has a few problems for our purposes:

  • IApplicationLifetime uses CancellationTokens for registering callbacks, which means you can only execute callbacks synchronously. This essentially means your stuck with a sync over async pattern, whatever you do.
  • The ApplicationStarted event is only raised after the WebHost is started, so the tasks are run after the app starts accepting requests.

Given they don't solve the sync over async problem of IStartupFilters, and don't block app startup, we'll leave IApplicationLifetime and move on to the next possibility.

3. Using IHostedService to run asynchronous tasks

IHostedService allows ASP.NET Core apps to execute long-running tasks in the background, for the duration of the app's lifetime. They have many different uses - you could use them to run periodic tasks on a timer, to handle other messaging paradigms, such as RabbitMQ messages, or any number of other things. In ASP.NET Core 3.0, even the ASP.NET web host will likely be built on top of IHostedService.

The IHostedService is inherently asynchronous, with both a StartAsync and a StopAsync function. This is great for us, as it means no more sync over async! Implementing a database migrator as a hosted service might look like something like this:

public class MigratorHostedService: IHostedService
{
    // We need to inject the IServiceProvider so we can create 
    // the scoped service, MyDbContext
    private readonly IServiceProvider _serviceProvider;
    public MigratorStartupFilter(IServiceProvider serviceProvider)
    {
        _serviceProvider = serviceProvider;
    }

    public async Task StartAsync(CancellationToken cancellationToken)
    {
        // Create a new scope to retrieve scoped services
        using(var scope = _seviceProvider.CreateScope())
        {
            // Get the DbContext instance
            var myDbContext = scope.ServiceProvider.GetRequiredService<MyDbContext>();

            //Do the migration asynchronously
            await myDbContext.Database.MigrateAsync();
        }
    }

    public Task StopAsync(CancellationToken cancellationToken)
    {
        // noop
        return Task.CompletedTask;
    }
}

Unfortunately, IHostedService isn't the panacea we might hope for. It allows us to write true async code, but it has a couple of problems:

  • The typical implementation for IHostedServices expects the StartAsync function to return relatively quickly. For background services, it's expected that you'll start the service asynchronously, but that the bulk of the work will occur outside of that startup code (see the docs for an example). Migrating the database "inline" isn't a problem as such, but it will block other IHostedServices from starting, which may or may not be expected.
  • IHostedService.StartAsync() is called after the WebHost is started, so you can't use this approach to run tasks before your app starts up.

The biggest problem is the second one - the app will start accepting requests before the IHostedService has run the database migrations, which isn't what we want. Back to the drawing board.

4. Manually running tasks in Program.cs

None of the solutions shown so far offer the complete solution. They either require using sync over async programming, (which while probably ok in the context of application startup, isn't great to encourage), or don't block app startup. There's a simple solution I've ignored so far, and that's to stop trying to use framework mechanisms, and just do the job ourselves.

The default Program.cs used in the ASP.NET Core templates builds and runs an IWebHost in one statement in the Main function:

public class Program
{
    public static void Main(string[] args)
    {
        CreateWebHostBuilder(args).Build().Run();
    }

    public static IWebHostBuilder CreateWebHostBuilder(string[] args) =>
        WebHost.CreateDefaultBuilder(args)
            .UseStartup<Startup>();
}

However, there's nothing stopping you from running code after Build() has created the WebHost, but before you call Run(). Add to that the C# 7.1 feature of allowing your Main function to be async, and we have a reasonable solution:

public class Program
{
    public static async Task Main(string[] args)
    {
        IWebHost webHost = CreateWebHostBuilder(args).Build();

        // Create a new scope
        using (var scope = webHost.Services.CreateScope())
        {
            // Get the DbContext instance
            var myDbContext = scope.ServiceProvider.GetRequiredService<MyDbContext>();

            //Do the migration asynchronously
            await myDbContext.Database.MigrateAsync();
        }

        // Run the WebHost, and start accepting requests
        // There's an async overload, so we may as well use it
        await webHost.RunAsync();
    }

    public static IWebHostBuilder CreateWebHostBuilder(string[] args) =>
        WebHost.CreateDefaultBuilder(args)
            .UseStartup<Startup>();
}

This solution has a number of advantages:

  • We're now doing true async, no sync over async required
  • We can execute the task asynchronously
  • The app doesn't accept requests until after our tasks have executed
  • The DI container has been built at this point, so we can use it to create services.

It's not all good news unfortunately. We're still missing a couple of things:

  • Even though the DI container has been built, the middleware pipeline has not. That doesn't happen until you call Run() or RunAsync() on the IWebHost. At that point the middleware pipeline is built, the IStartupFilters are executed, and the app is started. If your async task requires configuration that happens within any of these steps, you're out of luck
  • We've lost the ability to automatically run tasks by adding a service to the DI container. We have to remember to manually run the task instead.

If those caveats aren't a problem, then I think this final option provides the best solution to the problem. In my next post I'll show a couple of ways we can take this basic example and build on it, to make something a little easier to use.

Summary

In this post I discussed the need to run tasks asynchronously on app startup. I described some of the challenges of doing this. For synchronous tasks, IStartupFilter provides a useful hook into the ASP.NET Core app startup process, but running asynchronous tasks requires doing sync over async programming which is generally a bad idea. I described a number of the possible options for running async tasks, the best of which I found is "manually" running the task in Program.cs, between building the IWebHost and running it. In the next post I'll present some code to make this pattern easier to use.

Running async tasks on app startup in ASP.NET Core (Part 2)

$
0
0
Running async tasks on app startup in ASP.NET Core (Part 2)

In my previous post I described the need to run one-off asynchronous tasks on app start up. This post follows on directly from the last one, so if you haven't already, I suggest you read that one first.

In this post I show a proposed adaptation of the "run the task manually in program.cs" approach from my last post. The implementation uses a few simple interfaces and classes to encapsulate the logic of running tasks on app start up. I also show an alternative approach that uses service decoration of IServer to execute tasks before Kestrel starts.

Running asynchronous tasks on app startup

As a recap, we're trying to find a solution that allows us to execute arbitrary asynchronous tasks on app start up. These tasks should be executed before the app starts accepting requests, but may require configuration and services, so should be executed after DI configuration is complete. Examples include things like database migrations, or populating a cache.

The solution I proposed at the end of my previous post involved running the task "manually" in Program.cs, between the calls to IWebHostBuilder.Build() and IWebHost.Run():

public class Program
{
    public static async Task Main(string[] args)
    {
        IWebHost webHost = CreateWebHostBuilder(args).Build();

        // Create a new scope
        using (var scope = webHost.Services.CreateScope())
        {
            // Get the DbContext instance
            var myDbContext = scope.ServiceProvider.GetRequiredService<MyDbContext>();

            //Do the migration asynchronously
            await myDbContext.Database.MigrateAsync();
        }

        // Run the WebHost, and start listeningaccepting requests
        // There's an async overload, so we may as well use it
        await webHost.RunAsync();
    }

    public static IWebHostBuilder CreateWebHostBuilder(string[] args) =>
        WebHost.CreateDefaultBuilder(args)
            .UseStartup<Startup>();
}

This approach works, but it's a bit messy. We're going to be bloating the Program.cs file with code that probably shouldn't be there, but we could easily extract that to another class. More of an issue is having to remember to invoke the task manually. If you're using the same pattern in multiple apps, then it would be nice to have this handled for you automatically.

Registering startup tasks with the DI container

The solution I'm proposing is based on the patterns used by IStartupFilter and IHostedService. These interfaces allow you to register classes with the dependency injection container which will be executed later.

First, we create a simple interface for the startup tasks:

public interface IStartupTask
{
    Task ExecuteAsync(CancellationToken cancellationToken = default);
}

And a convenience method for registering startup tasks with the DI container:

public static class ServiceCollectionExtensions
{
    public static IServiceCollection AddStartupTask<T>(this IServiceCollection services)
        where T : class, IStartupTask
        => services.AddTransient<IStartupTask, T>();
}

Finally, we add an extension method that finds all the registered IStartupTasks on app startup, runs them in order, and then starts the IWebHost:

public static class StartupTaskWebHostExtensions
{
    public static async Task RunWithTasksAsync(this IWebHost webHost, CancellationToken cancellationToken = default)
    {
        // Load all tasks from DI
        var startupTasks = webHost.Services.GetServices<IStartupTask>();

        // Execute all the tasks
        foreach (var startupTask in startupTasks)
        {
            await startupTask.ExecuteAsync(cancellationToken);
        }

        // Start the tasks as normal
        await webHost.RunAsync(cancellationToken);
    }
}

That's all there is to it!

To see it in action, I'll use the EF Core database migration example from the previous post.

An example - async database migration

Implementing IStartupTask is very similar to implementing IStartupFilter. You can inject services from the DI container, but if you require access to Scoped services, you should inject an IServiceProvider and create a new scope manually.

Side note - this seems like something a lot of people will get wrong, so I considered automatically creating a new scope for every task in the RunWithTasksAsync extension method. That would let you directly inject scoped services into the IStartupTask. I decided against that to keep the behaviour consistent with IStartupFilter and IHostedService - I'd be interested in any thoughts people have in the comments.

The EF Core migration startup task would look something like the following:

public class MigratorStartupFilter: IStartupTask
{
    // We need to inject the IServiceProvider so we can create 
    // the scoped service, MyDbContext
    private readonly IServiceProvider _serviceProvider;
    public MigratorStartupFilter(IServiceProvider serviceProvider)
    {
        _serviceProvider = serviceProvider;
    }

    public Task ExecuteAsync(CancellationToken cancellationToken = default)
    {
        // Create a new scope to retrieve scoped services
        using(var scope = _seviceProvider.CreateScope())
        {
            // Get the DbContext instance
            var myDbContext = scope.ServiceProvider.GetRequiredService<MyDbContext>();

            //Do the migration 
            await myDbContext.Database.MigrateAsync();
        }
    }
}

And we'd add the startup task to the DI container in ConfigureServices():

public void ConfigureServices(IServiceCollection services)
{
    services.MyDbContext<ApplicationDbContext>(options =>
        options.UseSqlServer(Configuration.GetConnectionString("DefaultConnection")));

    services.AddMvc().SetCompatibilityVersion(CompatibilityVersion.Version_2_1);

    // Add migration task
    services.AddStartupTask<MigrationStartupTask>();
}

Finally, we need to update Program.cs to call RunWithTasksAsync() instead of Run()

public class Program
{
    // Change return type from void to async Task
    public static async Task Main(string[] args)
    {
        // CreateWebHostBuilder(args).Build().Run();
        await CreateWebHostBuilder(args).Build().RunWithTasksAsync();
    }

    public static IWebHostBuilder CreateWebHostBuilder(string[] args) =>
        WebHost.CreateDefaultBuilder(args)
            .UseStartup<Startup>();
}

This takes advantage of the async Task Main feature of C# 7.1. Overall this code is functionally equivalent to the "manual" equivalent from my last post and above, but it has a few advantages.

  • It keeps the task implementation code out of Program.cs
  • I think it's easier to understand what's happening in Program.cs - we're running startup tasks and then running the application. Most of that is due to simply moving implementation code out of Program.cs
  • It allows you to easily add extra tasks by adding them to the DI container.
  • If you don't have any tasks, the behaviour is the same as calling RunAsync()

For me, the biggest advantage is that once you have added RunWithTasksAsync(), you can easily add additional tasks by adding them to the DI container, without having to make any other changes.

Thomas Levesque recently wrote a similar post tackling the same problem, and came to a similar solution. He has a NuGet package available for the approach.

It's not entirely sunshine and roses though…

The small print - we haven't quite finished building the app yet

Other than the fact this isn't baked into the framework (so people have to customize their Program.cs classes), there's one tiny caveat I see to the approach shown above. Even though the tasks run after the IConfiguration and DI container configuration has completed, they run before the IStartupFilters have run and the middleware pipeline has been configured.

Personally, this hasn't been a problem for me, and I can't think of any cases where it would be. None of the tasks I've written have a dependency on the IStartupFilters having run. That doesn't mean it won't happen though.

Unfortunately, there's not an easy way round this with the current WebHost code (though that may change in 3.0 when ASP.NET Core runs as an IHostedService). The problem is that the application is bootstrapped (by configuring the middleware pipeline and running IStartupFilters) and started in the same function. When you call WebHost.Run() in Program.Cs, this internally calls WebHost.StartAsync which is shown below with logging and some other minor code removed for brevity:

public virtual async Task StartAsync(CancellationToken cancellationToken = default)
{
    _logger = _applicationServices.GetRequiredService<ILogger<WebHost>>();

    // Build the middleware pipeline and execute IStartupFilters
    var application = BuildApplication();

    _applicationLifetime = _applicationServices.GetRequiredService<IApplicationLifetime>() as ApplicationLifetime;
    _hostedServiceExecutor = _applicationServices.GetRequiredService<HostedServiceExecutor>();
    var diagnosticSource = _applicationServices.GetRequiredService<DiagnosticListener>();
    var httpContextFactory = _applicationServices.GetRequiredService<IHttpContextFactory>();
    var hostingApp = new HostingApplication(application, _logger, diagnosticSource, httpContextFactory);

    // Start Kestrel (and start accepting connections)
    await Server.StartAsync(hostingApp, cancellationToken).ConfigureAwait(false);

    // Fire IApplicationLifetime.Started
    _applicationLifetime?.NotifyStarted();

    // Fire IHostedService.Start
    await _hostedServiceExecutor.StartAsync(cancellationToken).ConfigureAwait(false);
}

The problem is that we want to insert code between the call to BuildApplication() and the call to Server.StartAsync(), but there's no mechanism for doing so.

I'm not sure if the solution I settled on feels hacky or elegant, but it works, and gives an even nicer experience for consumers, as they don't need to modify Program.cs

An alternative approach by decorating IServer

The only way I could see to run async code between BuildApplication() and Server.StartAsync() is to replace the IServer implementation (Kestrel) with our own! This isn't quite as horrendous as it sounds at first - we're not really going to replace the server, we're just going to decorate it:

public class TaskExecutingServer : IServer
{
    // Inject the original IServer implementation (KestrelServer) and
    // the list of IStartupTasks to execute
    private readonly IServer _server;
    private readonly IEnumerable<IStartupTask> _startupTasks;
    public TaskExecutingServer(IServer server, IEnumerable<IStartupTask> startupTasks)
    {
        _server = server;
        _startupTasks = startupTasks;
    }

    public async Task StartAsync<TContext>(IHttpApplication<TContext> application, CancellationToken cancellationToken)
    {
        // Run the tasks first
        foreach (var startupTask in _startupTasks)
        {
            await startupTask.ExecuteAsync(cancellationToken);
        }

        // Now start the Kestrel server properly
        await _server.StartAsync(application, cancellationToken);
    }

    // Delegate implementation to default IServer
    public IFeatureCollection Features => _server.Features;
    public void Dispose() => _server.Dispose();
    public Task StopAsync(CancellationToken cancellationToken) => _server.StopAsync(cancellationToken);
}

The TaskExecutingServer takes an instance of IServer in its constructor - this the original KestrelServer registered by ASP.NET Core. We delegate most of the IServer implementation directly to Kestrel, we just intercept the call to StartAsync and run the injected tasks first.

The difficult part of the implementation is getting the decoration working properly. As I discussed in a previous post, using decoration with the default ASP.NET Core container can be tricky. I typically use Scrutor to create decorators, but you could always do the decoration manually if you don't want to take a dependency on another library. Be sure to look at how Scrutor does it for guidance!

The extension method shown below for adding an IStartupTask does two things - it registers an IStartupTask with the DI container, and it decorates a previously-registered IServer instance (I've left out the Decorate() implementation for brevity) . If it finds that the IServer is already decorated, it skips the second step. That way you can call AddStartupTask<T>() safely any number of times:

public static class ServiceCollectionExtensions
{
    public static IServiceCollection AddStartupTask<TStartupTask>(this IServiceCollection services)
        where TStartupTask : class, IStartupTask
        => services
            .AddTransient<IStartupTask, TStartupTask>()
            .AddTaskExecutingServer();

    private static IServiceCollection AddTaskExecutingServer(this IServiceCollection services)
    {
        var decoratorType = typeof(TaskExecutingServer);
        if (services.Any(service => service.ImplementationType == decoratorType))
        {
            // We've already decorated the IServer
            return services;
        }

        // Decorate the IServer with our TaskExecutingServer
        return services.Decorate<IServer, TaskExecutingServer>();
    }
}

With these two pieces of code we no longer require users to make any changes to their Program.cs file plus we execute our tasks after the application has been fully built, including IStartupFilters and the middleware pipeline.

The sequence diagram of the startup process now looks a bit like this:

Sequence diagram of startup process

That's pretty much all there is to it. It's such a small amount of code that I wasn't sure it was worth making into a library, but it's out on GitHub and NuGet nonetheless!

I decided to only write a package for the latter approach as it's so easier to consume, and Thomas Levesque already has a NuGet package available for the first approach.

In the implementation on GitHub I manually constructed the decoration (heavily borrowing from Scrutor), to avoid forcing a dependency on Scrutor. But the best approach is probably to just copy and paste the code into your own projects 🙂 and go from there!

Summary

In this post I showed two possible ways to run tasks asynchronously on app start up while blocking the actual startup process. The first approach requires modifying your Program.cs slightly, but is "safer" in that it doesn't require messing with internal implementation details like IServer. The second approach, decorating IServer, gives a better user experience, but feels more heavy-handed. I'd be interested in which approach people feel is the better one and why, so do let me know in the comments!

Running async tasks on app startup in ASP.NET Core (Part 3 - Feedback)

$
0
0
Running async tasks on app startup in ASP.NET Core (Part 3 - Feedback)

This post is a short follow-up to my previous two posts on running async tasks in ASP.NET Core. In this post I relay some feedback I've had, both on the examples I used to demonstrate the problem, and the approach I took. The previous posts can be found here and here.

Startup task examples

The most common feedback I've had about the posts is the examples I used to describe the problem. In my first post, I suggested three possible scenarios where you might want to run a task before your app starts up:

  • Checking your strongly-typed configuration is valid.
  • Priming/populating a cache with data from a database or API
  • Running database migrations before starting the app.

The first two options went down ok, but several people have expressed issues with the example of running database migrations. In both posts I pointed out that running database migrations as a startup task for your app may not be a good idea, but then I used it as an example anyway. In hindsight, that was a poor choice on my part…

Database migrations were a poor choice

So what is it about database migrations that make them problematic? After all, you definitely need to have your database migrated before your app starts handling requests! There seem to be three issues:

  1. Only a single process should run database migrations
  2. Migrations often require more permissions than a typical web app should have
  3. People aren't comfortable running EF Core migrations directly

I'll discuss each of those in turn below.

1. Only a single process should run database migrations

One of the most common ways to scale a web application is to scale it out by running multiple instances, and using a load balancer to distribute requests among them.

Load balancing applications in a web farm

This "web farm" approach works well, especially if the application is stateless - requests are distributed among the various apps, and if one app crashes for some reason, the other apps are still available to handle requests.

Unfortunately, if you try to run database migrations as part of the deployment process for your application, you will likely run into issues. If more than one instance of your app starts at approximately the same time, multiple database migration tasks can start at once. It's not guaranteed that this will cause you problems, but unless you're extremely careful about ensuring idempotent updates and error-handling, you're likely to get into a pickle.

Trying to run database migrations concurrently in a web farm

You really don't want to be dealing with the sort of database integrity issues that could arise by using this sort of approach. A much better option is to have a single migration process that runs before the web apps are deployed (or after, depending on your requirements). With a single process performing the database migrations you should be naturally shielded from the worst of the dangers.

Running database migrations safely using an external process

This approach feels like more work than running database migrations as a startup task, but it's much safer and easier to get right.

It's not the only option of course. If you have your heart set on the startup task migration idea, then you could use some sort of distributed locking to ensure only a single app instance runs it's migrations at one time. That doesn't solve the second issue however…
2. Migrations often require more permissions than a typical web app should have

It's best practice to limit your applications so that they only have permission to access and modify the resources that they need to. If a reporting application only needs to read sales figures, then it shouldn't be able to modify them, or change the database schema! Locking down the permissions associated with a given connection string can prevent a whole raft of repercussions in the event that your app has a security issue.

If you're using your web app itself to run database migrations, then naturally that web app will require database permissions to do high-risk activities like modifying the database schema, changing permissions, or updating/deleting data. Do you really want your web application to have the ability to drop your students table (thanks XKCD)?

XKCD comic: Exploits of a Mom (https://xkcd.com/327/)

Again, there are some implementation-specific things you can do, like using different connection strings for the migration compared to the normal database access. But you fundamentally can't lock-down the web-app process like you could if you used an external migration process.

3. People aren't comfortable running EF Core migrations directly

This is a much less obvious point, but quite a few people have expressed that using the EF Core migration tools in production might not be a great idea.

Personally, I haven't tried using EF Core migrations in production for over a year, and the tooling has undoubtedly improved since then. Having said that, I still see a few issues:

  • Using the EF Core global tools for migrations requires installing the .NET Core SDK, which you shouldn't need on your production servers. You don't have to use this of course (I didn't in my posts for example).
  • Running additional SQL scripts as well as the ones generated by EF Core was tricky last time I tried, EF Core would get upset. That could well be improved now though, or I may have been doing something wrong before!
  • If you want to safely update databases, you'll probably have to do some editing of the generated scripts anyway. The database schema after a migration should be compatible with existing (running) applications to avoid down time.
  • The Microsoft docs themselves hint that it's not a good idea to run EF Core migrations on app startup!

Rather than use EF Core migrations, I've personally used DbUp and FluentMigrator, and found them both to work well.

So if a database migration task isn't a good candidate for an app startup task example, what is?

Better examples of startup tasks

I mentioned a couple of other examples in my posts, but I describe them again below. There's also a couple of interesting additions (courtesy of Ruben Bartelink):

  • Checking your strongly-typed configuration is valid. ASP.NET Core 2.2 introduced Options validation, but it only does this on first accessing the IOptions<T> classes. As I described in a previous post, you will probably want to perform eager validation on app startup to confirm your environment and configuration are valid.
  • Populating a cache. Your application might require data from the filesystem or a remote service that it only needs to load once, but that is relatively expensive to load. Loading this data before the app starts prevents a request being burdened with that latency.
  • Pre-connecting to databases and/or external services. In a similar manner, you could populate the database connection pool by connecting to your database or other external services. These are generally relatively expensive operations, so are great use cases.
  • Pre-JITing and loading assemblies by instantiating all the singletons in your application. I think this is a very interesting idea - by loading all the Singletons registered with your DI container on app startup, you can potentially avoid a lot of expensive JIT compiling and assembly loading from happening in the context of a request.

As with all of these examples, the benefits you'll see will be highly dependent on the characteristics of your particular app. That said, the final suggestion, pre-instantiating all the singletons in your application particularly piqued my interest, so I'll show how to achieve that in a later post.

An alternative approach using health checks

I completely agree with the feedback on database migrations. It's somewhat misleading to use them as an example of a startup task when that's not a good idea, especially as I personally don't use the approach I described anyway!

Nevertheless, lots of people agreed with the overall approach I described; that of running startup tasks before starting the Kestrel server, and handling requests.

One exception was Damian Hickey who suggested that his preference is to start Kestrel as soon as possible. He suggested using health check endpoints to signal to a load balancer that the application is ready to start receiving requests once all the startup tasks have completed. In the meantime, all non-health-check traffic (there shouldn't be any if the load-balancer is doing it's job) would receive a 503 Service Unavailable.

The main benefit of this approach is that it avoids network timeouts. Generally speaking, it's better for a request to return quickly with an error code than for it to not respond at all, and cause the client to timeout. This reduces the number of resources required by the client. By starting Kestrel earlier, the application can start responding to requests earlier, even if the response is a "not ready" response.

This is actually pretty similar to an approach described in my first post, but which I discarded as both too complex, and not achieving the goals I set out. Technically in that post I was specifically looking at ways to run tasks before Kestrel starts, which the health-check approach wouldn't do.

However, the fact that Damian specifically prefers to run Kestrel first has made me think again. I can't think of any practical examples of tasks or other reasons that would require tasks to be complete before Kestrel starts; I can only think of tasks that need to be run before regular traffic reaches the app, which is achieved with both approaches.

So, in my next post, I'll show an example of how to take this approach, and use the ASP.NET Core 2.2 health checks to signal to a load balancer when an application has completed all its startup tasks.

Summary

In this post I shared some feedback on my previous posts about running async tasks on app startup. The biggest issue was my choice to use EF Core database migrations as an example of a startup task. Database migrations aren't well suited to running on app startup as they typically need to be run by a single process, and require more database permissions than a normal web app would.

I provided some examples of better startup tasks, as well as a suggestion for a different approach, which starts Kestrel as soon as possible, and uses health checks to signal when the tasks are complete. I'll show an example of this in my next post.

Thanks to everyone that provided feedback on the posts, especially Ruben and Damian.


Running async tasks on app startup in ASP.NET Core (Part 4 - using health checks)

$
0
0
Running async tasks on app startup in ASP.NET Core (Part 4 - using health checks)

In this post, I show an approach to running async tasks on app startup which I discounted in my first post in this series, but which Damian Hickey recently expressed a preference for. This approach runs the startup tasks using the IHostedService abstraction, with a health check to indicate when all startup tasks have completed. Additionally, a small piece of middleware ensures that non-health-check traffic returns a 503 response when the startup tasks have not yet completed.

ASP.NET Core health checks: a brief primer

The approach in this post uses the Health Check functionality that was introduced in ASP.NET Core 2.2. Health checks are a common feature of web apps that are used to indicate whether an app is running correctly. They're often used by orchestrators and process managers to check that an application is functioning correctly, and is able to serve traffic.

The Health Checks functionality in ASP.NET Core is highly extensible. You can register any number of health checks that test some aspect of the "health" of your app. You also add the HealthCheckMiddleware to your app's middleware pipeline. This responds to requests at a path of your choosing (e.g. /healthz) with either a 200 indicating the app is healthy, or a 503 indicating the app is unhealthy. You can customise all of the details, but that's the broad concept.

Damian argued for using health checks to indicate when an app's startup tasks have completed and the app is ready to start handling requests. He expressed a preference for having Kestrel running quickly and responding to health check requests, rather than allowing the health requests to timeout (which is the behaviour you get using either approach I discussed in part 2 of this series). I think that's a valid point, and served as the basis for the approach shown in this post.

There's no reason you have to use the built-in ASP.NET Core 2.2 health check functionality. The actual health check is very simple, and could easily be implemented as a small piece of middleware instead if you prefer.

Changing the requirements for async startup tasks

In my first post in this series, I described the need to run various tasks on app startup. My requirements were the following:

  1. Tasks should be run asynchronously (i.e. using async/await), avoiding sync-over-async.
  2. The DI container (and preferably the middleware pipeline) should be built before the tasks are run.
  3. All tasks should be completed before Kestrel starts serving requests.

In addition, for the examples I provided, all tasks were run in series (as opposed to in parallel), waiting for one task to complete before starting the next one. That wasn't an explicit requirement, just one that simplified things somewhat.

Points 1 and 2 still hold for the approach shown in this post, but point 3 is explicitly dropped and exchanged for the following two points:

  1. Kestrel is started and can start handling requests before the tasks are started, but it should respond to all non-health-check traffic with a 503 response.
  2. Health checks should only return "Healthy" once all startup tasks have completed.

In the next section I'll give an overview of the various moving parts to meet these requirements.

An overview of running async startup tasks using health checks

There are four main components to the solution shown here:

  1. A shared (singleton) context. This keeps track of how many tasks need to be executed, and how many tasks are still running.
  2. One or more startup tasks. These are the tasks that we need to run before the app starts serving traffic.

    • Derived from IHostedService using the standard ASP.NET Core background service functionality.
    • Registered with the shared context when the app starts.
    • Start running just after Kestrel is started (along with other IHostedService implementations)
    • Once complete, marks the task as complete in the shared context
  3. A "startup tasks" health check. An ASP.NET Core health check implementation that checks the shared context to see if the tasks have completed. Returns Unhealthy until all tasks have completed.

  4. A "barrier" middleware. A small piece of middleware that sits just after the standard HealthCheckMiddleware. Blocks all requests by returning a 503 until the shared context indicates that all startup tasks have completed.
Diagram of the overall system

I'll walk through each of those components in the following sections to build up the complete solution.

Keeping track of completed tasks

The key component in this design is the StartupTaskContext. This is a shared/singleton object that is used to keep track of whether all of the startup tasks have finished.

In keeping with typical ASP.NET Core design concepts I haven't used a static class or methods, and instead rely on the DI container to create a singleton instance. This isn't necessary for the functionality; you could just use a shared object if you like. Either way, you need to ensure the methods are thread-safe, as they may be accessed concurrently if multiple startup tasks complete at the same time.

public class StartupTaskContext
{
    private int _outstandingTaskCount = 0;

    public void RegisterTask()
    {
        Interlocked.Increment(ref _outstandingTaskCount);
    }

    public void MarkTaskAsComplete()
    {
        Interlocked.Decrement(ref _outstandingTaskCount);
    }

    public bool IsComplete => _outstandingTaskCount == 0;
}

This is pretty much the most basic implementation that keeps a count of the number of tasks that haven't yet completed. Once _outstandingTaskCount reaches 0, all startup tasks are complete. There's obviously more that could be done here to make the implementation robust, but it will do for most cases.

As well as the shared context, we need some startup tasks to run. We mark services as startup tasks using a marker interface, IStartupTask, which inherits from IHostedService.

public interface IStartupTask : IHostedService { }

I used the built-in IHostedService interface as WebHost handles starting them automatically after Kestrel, and it allows you to use helper classes like BackgroundService which help with writing long-running tasks.

As well as implementing the marker interface, a startup task should call MarkTaskAsComplete() on the shared StartupTaskContext after completing its work.

For simplicity, the example service shown below just waits for 10 seconds before calling MarkTaskAsComplete() on the injected StartupTaskContext:

public class DelayStartupTask : BackgroundService, IStartupTask
{
    private readonly StartupTaskContext _startupTaskContext;
    public DelayStartupTask(StartupTaskContext startupTaskContext)
    {
        _startupTaskContext = startupTaskContext;
    }

    // run the task
    protected override async Task ExecuteAsync(CancellationToken stoppingToken)
    {
        await Task.Delay(10_000, stoppingToken);
        _startupTaskContext.MarkTaskAsComplete();
    }
}

As is common in ASP.NET Core, I created some helper extension methods for registering the shared context and startup tasks with the DI container:

  • AddStartupTasks() registers the shared StartupTaskContext with the DI container, ensuring it's not added more than once.
  • AddStartupTask<T>() is used to add a specific startup task, it
    • Registers the task with the shared context by calling RegisterTask()
    • Adds the shared context to the DI container if it isn't already
    • Adds the task <T> as a hosted service (as IStartupTask implements IHostedService)
public static class StartupTaskExtensions
{
    private static readonly StartupTaskContext _sharedContext = new StartupTaskContext();
    public static IServiceCollection AddStartupTasks(this IServiceCollection services)
    {
        // Don't add StartupTaskContext if we've already added it
        if (services.Any(x => x.ServiceType == typeof(StartupTaskContext)))
        {
            return services;
        }

        return services.AddSingleton(_sharedContext);
    }

    public static IServiceCollection AddStartupTask<T>(this IServiceCollection services) 
        where T : class, IStartupTask
    {
        _sharedContext.RegisterTask();
        return services
            .AddStartupTasks() // in case AddStartupTasks() hasn't been called
            .AddHostedService<T>();
    }
}

Registering the example task DelayStartupTask in Startup.ConfigureServices() is a single method call:

public void ConfigureServices(IServiceCollection services)
{
    // ... Existing configuration
    services.AddStartupTask<DelayHostedServiceStartupTask>();
}

That's the mechanics of the startup task out of the way, now we can add the health check.

Implementing the StartupTasksHealthCheck

In many cases, if you need a custom health check you should checkout the BeatPulse library. It integrates directly with ASP.NET Core 2.2, and currently lists about 20 different checks, including system (disk, memory) and network checks, as well as integration checks like RabbitMQ, SqlServer, or Redis.

Luckily, if you _do_ need to write your own custom health check, implementing IHealthCheck is straightforward. It has a single asynchronous method CheckHealthAsync, from which you return a HealthCheckResult instance with one of three values: Healthy, Degraded, or Unhealthy.

Our custom health check checks the value of StartupTaskContext.IsComplete and returns Healthy or Unhealthy as appropriate.

public class StartupTasksHealthCheck : IHealthCheck
{
    private readonly StartupTaskContext _context;
    public StartupTasksHealthCheck(StartupTaskContext context)
    {
        _context = context;
    }

    public Task<HealthCheckResult> CheckHealthAsync(
        HealthCheckContext context, 
        CancellationToken cancellationToken = new CancellationToken())
    {
        if (_context.IsComplete)
        {
            return Task.FromResult(HealthCheckResult.Healthy("All startup tasks complete"));
        }

        return Task.FromResult(HealthCheckResult.Unhealthy("Startup tasks not complete"));
    }
}

To register the health check in Startup.ConfigureServices(), call the AddHealthChecks() extension method, followed by AddCheck<>(). You can provide a meaningful name for the health check, "Startup tasks" in this case:

public void ConfigureServices(IServiceCollection services)
{
    // ... Existing configuration
    services.AddStartupTask<DelayStartupTask>();

    services
        .AddHealthChecks()
        .AddCheck<StartupTasksHealthCheck>("Startup tasks");
}

Finally, add the health check middleware to the start of your middleware pipeline in Startup.Configure(), defining the path to use for the health check ("/healthz")

public void Configure(IApplicationBuilder app, IHostingEnvironment env)
{
    app.UseHealthChecks("/healthz");

    // ... Other middleware config
}

That's all the pieces you need to achieve the main goal of this post. If you start the app and hit the /healthz endpoint, you'll get a 503 response and see the text Unhealthy. After 10 seconds, once the DelayStartupTask completes, you'll get a 200 response and the Healthy text:

Example of health check failing, and then succeeding

Note that adding this health check doesn't affect any other health checks you might have. The health check endpoint will return unhealthy until all of the health checks pass, including the StartupTasksHealthCheck. Also note that you could implement the above functionality using a small piece of middleware if you don't want to use the built-in ASP.NET Core health check functionality.

The one requirement we haven't satisfied yet is that non-health check traffic shouldn't be able to invoke our regular middleware pipeline / MVC actions until after all the startup tasks have completed. Ideally that wouldn't be possible anyway, as a load balancer should wait for the healthy check to return 200 before routing traffic to your app. But better safe than sorry!

Middleware

The middleware we need is very simple: it needs to return an error response code if the startup tasks have not finished. If the tasks are complete, it does nothing and lets the rest of the middleware pipeline complete.

The following custom middleware does the job, and adds a "Retry-After" header to the response if the StartupTaskContext indicates the tasks aren't complete. You could extract things like the Retry-After value, the plain-text response ("Service Unavailable"), or even the response code to a configuration object, but I kept it simple for this post:

public class StartupTasksMiddleware
{
    private readonly StartupTaskContext _context;
    private readonly RequestDelegate _next;

    public StartupTasksMiddleware(StartupTaskContext context, RequestDelegate next)
    {
        _context = context;
        _next = next;
    }

    public async Task Invoke(HttpContext httpContext)
    {
        if (_context.IsComplete)
        {
            await _next(httpContext);
        }
        else
        {
            var response = httpContext.Response;
            response.StatusCode = 503;
            response.Headers["Retry-After"] = "30";
            await response.WriteAsync("Service Unavailable");
        }
    }
}

Register the middleware just after the health check middleware. Any traffic that makes it past the health check will be stopped if the startup tasks have not completed.

public void Configure(IApplicationBuilder app, IHostingEnvironment env)
{
    app.UseHealthChecks("/healthz");
    app.UseMiddleware<StartupTasksMiddleware>();

    // ... Other middleware config
}

Now if you run your app and hit a non-health-check endpoint you'll get a 503 initially. Normal functionality is restored once your startup tasks have completed.

An example of the home page of the app returning a 503 until the startup tasks have completed

Summary

The approach in this post was suggested to me by Damian Hickey. It uses the health check functionality from ASP.NET Core to indicate to load balancers and orchestrators whether or not an app is ready to run. This ensures Kestrel starts as soon as possible and consequently should reduce the number of network timeouts in load balancers compared to the approaches I described in part 2 of this series. You can find a full example of the code in this post on GitHub.

Reducing initial request latency by pre-building services in a startup task in ASP.NET Core

$
0
0
Reducing initial request latency by pre-building services in a startup task in ASP.NET Core

This post follows on somewhat from my recent posts on running async startup tasks in ASP.NET Core. Rather than discuss a general approach to running startup tasks, this post discusses an example of a startup task that was suggested by Ruben Bartelink. It describes an interesting way to try to reduce the latencies seen by apps when they've just started, by pre-building all the singletons registered with the DI container.

The latency hit on first request

The ASP.NET Core framework is really fast, there's no doubt about that. Throughout its development there's been a huge focus on performance, even driving the development of new high-performance .NET types like Span<T> and System.IO.Pipelines.

However, you can't just have framework code in your applications. Inevitably, developers have to put some actual functionality in their apps, and if performance isn't a primary focus, things can start to slow down. As the app gets bigger, more and more services are registered with the DI container, you pull in data from multiple locations, and you add extra features where they're needed.

The first request after an app starts up is particularly susceptible to slowing down. There's lots of work that has to be done before a response can be sent. However this work often only has to be done once; subsequent requests have much less work to do, so they complete faster.

I decided to do a quick test of a very simple app, to see the difference between that first request and subsequent requests. I created the default ASP.NET Core web template with individual authentication using the .NET Core 2.2 SDK:

dotnet new webapp --auth Individual --name test

For simplicity, I tweaked the logging in appsettings.json to write request durations to the console in the Production environment:

{
  "Logging": {
    "LogLevel": {
      "Default": "Warning",
      "Microsoft.AspNetCore.Hosting.Internal.WebHost": "Information"
    }
  }
}

I then built the app in Release mode, and published it to a local folder. I navigated to the output folder and ran the app:

> dotnet publish -c Release -o ..\..\dist
> cd ..\..\dist
> dotnet test.dll

Hosting environment: Production
Now listening on: http://localhost:5000
Now listening on: https://localhost:5001
Application started. Press Ctrl+C to shut down.

Next I hit the home page of the app https://localhost:5001 and recorded the duration for the first request logged to the console. I hit Ctrl+C to close the app, started it again, and recorded another duration for the "first request".

Obviously this isn't very scientific, It's not a proper benchmark, but I just wanted a feel for it. For those interested, I'm using a Dell XPS 15" 9560, w block has an i7-7700 and 32GB RAM.

I ran the "first request" test 20 times, and got the mean results shown below. I also recorded the times for the second and third requests

Mean duration ± Standard Deviation
1st request 315ms ± 12ms
2nd request 4.3ms ± 0.6ms
3rd request 1.4ms ± 0.3ms

After the 3rd request, all subsequent requests took a similar amount of time.

As you can see, there's a big difference between the first request and the second request. I didn't dive too much into where all this comes from, but some quick tests show that the vast majority of the initial hit is due to rendering Razor. As a quick test, I added a simple API controller to the app:

public class ValuesController : Controller
{
    [HttpGet("/warmup")]
    public string Index() => "OK";
}

Hitting this controller for the first request instead of the default Razor Index page drops the first request time to ~90ms. Removing the MVC middleware entirely (and responding with a 404) drops it to ~45ms.

Pre-creating singleton services before the first request

So where is all this latency coming from for the first request? And is there a way we can reduce it so the first user to hit the site after a deploy isn't penalised as heavily?

To be honest, I didn't dive in too far. For my experiments, I wanted to test one potential mitigation proposed by Ruben Bartelink: instantiating all the singletons registered with the DI container before the first request.

Services registered as singletons are only created once in the lifetime of the app. If they're used by the ASP.NET Core framework to handle a request, then they'll need to be created during the first request. If we create all the possible singletons before the first request then that should reduce the duration of the first request.

To test this theory, I created a startup task that would instantiate most of the singletons registered with the DI container before the app starts handling requests properly. The example below uses the "IServer decorator" approach I described in part 2 of my series on async startup tasks, but that's not important; you could also use the RunWithTasksAsync approach, or the health checks approach I described in part 4.

The WarmupServicesStartupTask is shown below. I'll discuss the code shortly.

public class WarmupServicesStartupTask : IStartupTask
{
    private readonly IServiceCollection _services;
    private readonly IServiceProvider _provider;
    public WarmupServicesStartupTask(IServiceCollection services, IServiceProvider provider)
    {
        _services = services;
        _provider = provider;
    }

    public Task ExecuteAsync(CancellationToken cancellationToken)
    {
        foreach (var singleton in GetSingletons(_services))
        {
            // may be registered more than once, so get all at once
            _provider.GetServices(singleton);
        }

        return Task.CompletedTask;
    }

    static IEnumerable<Type> GetSingletons(IServiceCollection services)
    {
        return services
            .Where(descriptor => descriptor.Lifetime == ServiceLifetime.Singleton)
            .Where(descriptor => descriptor.ImplementationType != typeof(WarmupServicesStartupTask))
            .Where(descriptor => descriptor.ServiceType.ContainsGenericParameters == false)
            .Select(descriptor => descriptor.ServiceType)
            .Distinct();
    }
}

The WarmupServicesStartupTask class implements IStartupTask (from part 2 of my series) which requires that you implement ExecuteAsync(). This fetches all of the singleton registrations out of the injected IServiceCollection, and tries to instantiate them with the IServiceProvider. Note that I call GetServices() (plural) rather than GetService() as each service could have more than one implementation. Once all services have been created, the task is complete.

The IServiceCollection is where you register you register your implementations and factory functions inside Starrup.ConfigureServices. The IServiceProvider is created from the service descriptors in IServiceCollection, and is responsible for actually instantiating services when they're required.

The GetSingletons() method is what identifies the services we're going to instantiate. It loops through all the ServiceDescriptors in the collection, and filters to only singletons. We also exclude the WarmupServicesStartupTask itself to avoid any potential weird recursion. Next we filter out any services that are open generics (like ILogger<T>) - trying to instantiate those would be complicated by having to take into account type constraints, so I chose to just ignore them. Finally, we select the type of the service, and get rid of any duplicates.

By default, the IServiceCollection itself isn't added to the DI container, so we have to add that registration at the same time as registering our WarmupServicesStartupTask:

public void ConfigureServices(IServiceCollection services)
{
    //Other registrations
    services
        .AddStartupTask<WarmupServicesStartupTask>()
        .TryAddSingleton(services);
}

And that's all there is to it. I repeated the test again with the WarmupServicesStartupTask, and compared the results to the previous attempt:

Mean duration ± Standard Deviation
1st request, no warmup 315ms ± 12ms
1st request, with warmup 289ms ± 11ms

I know, right! Almost knocked you off your chair. We shaved 26ms off the first request time.

I have to admit, I was a bit underwhelmed. I didn't expect an enormous difference, but still, it was a tad disappointing. On the positive side, it is close to a 10% reduction of the first request duration and required very little effort, so its not all bad.

Just to make myself feel better about it, I did an unpaired t-test between the two apps and found that there was a statistically significant difference between the two samples.

Value
t 7.1287
degrees of freedom 38
standard error of difference 3.589
p <0.0001

Still, I wondered if we could do better.

Creating all services before the first request

Creating singleton service makes a lot of sense as a way to reduce first request latency. Assuming the services will be required at some point in the lifetime of the app, we may as well take the hit instantiating them before the app starts, instead of in the context of a request. This only gave a marginal improvement for the default template, but larger apps may well see a much bigger improvement.

Instead of just creating the singletons, I wondered if we could just create all of the services our app uses in the startup task; not only the singletons, but the scoped and transient services.

On the face of it, it seems like this shouldn't give any real improvement. Scoped services are created new for each request, and are thrown away at the end (when the scope ends). And transient services are created new every time. But there's always the possibility that creating a scoped service could require additional bootstrapping code that isn't required by singleton services, so I gave it a try.

I updated the WarmupServicesStartupTask to the following:

public class WarmupServicesStartupTask : IStartupTask
{
    private readonly IServiceCollection _services;
    private readonly IServiceProvider _provider;
    public WarmupServicesStartupTask(IServiceCollection services, IServiceProvider provider)
    {
        _services = services;
        _provider = provider;
    }

    public Task ExecuteAsync(CancellationToken cancellationToken)
    {
        using (var scope = _provider.CreateScope())
        {
            foreach (var singleton in GetServices(_services))
            {
                scope.ServiceProvider.GetServices(singleton);
            }
        }

        return Task.CompletedTask;
    }

    static IEnumerable<Type> GetServices(IServiceCollection services)
    {
        return services
            .Where(descriptor => descriptor.ImplementationType != typeof(WarmupServicesStartupTask))
            .Where(descriptor => descriptor.ServiceType.ContainsGenericParameters == false)
            .Select(descriptor => descriptor.ServiceType)
            .Distinct();
    }
}

This implementation makes two changes:

  • GetSingletons() is renamed to GetServices(), and no long filters the services to singletons only.
  • ExecuteAsync() creates a new IServiceScope before requesting the services, so that the scoped services are properly disposed at the end of the task.

I ran the test again, and got some slightly surprising results. The table below shows the first request time without using the startup task (top), when using the startup task to only create singletons (middle), and using the startup task to create all the services (bottom)

Mean duration ± Standard Deviation
1st request, no warmup 315ms ± 12ms
1st request, singleton warmup 289ms ± 11ms
1st request, all services warmup 198ms ± 8ms

Graph of the above results

That's a mean reduction in first request duration of 117ms, or 37%. No need for the t-test to prove significance here! I can only assume that instantiating some of the scoped/transient services triggers some lazy initialization which then doesn't have to be performed when a real request is received. There's possibly JIT times coming in to play too.

Even with the startup task, there's still a big difference between the first request duration, and the second and third requests which are only 4ms and 1ms respectively. It seems very like there's more that could be done here to trigger all the necessary MVC components to initialize themselves, but I couldn't see an obvious way, short of sending a real request to the app.

It's worth remembering that the startup task approach shown here shouldn't only improve the duration of the very first request. As different parts of your app are hit for the firat time, most initialisation should already have happened, hopefully smoothing out the spikes in request duration for your app. But your mileage may vary!

Summary

In this post I showed how to create a startup task that loads all the singletons registered with the DI container on app startup, before the first request is received. I showed that loading all services in particular, not just singletons, gave a large reduction in the duration of the first request. Whether this task will be useful in practice will likely depend on your application, but it's simple to create and add, so it might be worth trying out! Thanks again to Ruben Bartelink for suggesting it.

An introduction to ASP.NET Core Razor Pages

$
0
0
An introduction to ASP.NET Core Razor Pages

Razor pages is a new aspect of ASP.NET Core MVC introduced in ASP.NET Core 2.0. It offers a "page-based" approach for building server-side rendered apps in ASP.NET Core and can coexist with "traditional" MVC or Web API controllers. In this post I provide an introduction to Razor Pages, the basics of getting started, and how Razor Pages differs from MVC.

Razor Pages vs MVC

If you've used ASP.NET Core for building server-side rendered apps, then you'll be familiar with the traditional Model-View-Controller (MVC) pattern. Razor Pages provides an abstraction over the top of MVC, which can make it better suited to some page-based apps.

In MVC, controllers are used to group similar actions together. When a request is received, routing directs the request to a single action method. This method typically performs some processing or business logic, and returns an IActionResult, commonly a ViewResult or a RedirectResult. If a ViewResult is returned, a Razor view is rendered using the provided view model.

MVC provides a lot of flexibility, so the grouping of actions into controllers can be highly discretionary, but you commonly group actions that are related in some way, such as by URL route or by function. For example, you might group by domain components so that in an ecommerce app actions related to "products" would be in the ProductController, while "cart" actions would be in the CartController. Alternatively, actions may be grouped based on technical aspects; for example, where all actions on a controller share a common set of authorization requirements.

A common pattern you'll find is to have pairs of related actions inside a controller. This is especially true where you are using HTML forms, where you would typically have one action to handle the initial GET request, and another action for the POST request. Both of these actions use the same URL route and the same Razor view. From the point of view of a user (or the developer), they're logically two aspects of the same "page".

In some cases, you may find that your controllers are filled with these action method pairs. For example, the default ASP.NET Core Identity AccountController for an MVC app contains many such pairs:

Diagram showing how Identity AccountController in MVC consists of many pairs of actions

The GET and POST pair of actions are highly coupled, as they both return the same view model, may need similar initialization logic, and use the same Razor view. The pair of actions are also related to the overall controller in which they're located (they're all related to identity and accounts), but they're more closely related to each other.

Razor Pages offers much the same functionality as traditional MVC, but using a slightly different model by taking advantage of this pairing. Each route (each pair of actions) becomes a separate Razor Page, instead of grouping many similar actions together under a single controller. That page can have multiple handlers that each respond to a different HTTP verb, but use the same view. The same Identity AccountController from above could therefore be rewritten in Razor Pages as shown below. In fact, as of ASP.NET Core 2.1, the new project templates use Razor Pages for Identity, even in an MVC app.

Diagram showing same Identity controller split into Pages

Razor Pages have the advantage of being highly cohesive. Everything related to a given page in your app is in one place. Contrast that with MVC controllers where some actions are highly correlated, but the controller as a whole is less cohesive.

Another good indicator for using Razor Pages is when your MVC controllers are just returning a Razor view with no significant processing required. A classic example is the HomeController from the ASP.NET Core 2.0 templates, which includes four actions:

public class HomeController : Controller
{
    public IActionResult Index()
    {
        return View();
    }

    public IActionResult About()
    {
        ViewData["Message"] = "Your application description page.";

        return View();
    }

    public IActionResult Contact()
    {
        ViewData["Message"] = "Your contact page.";

        return View();
    }

    public IActionResult Error()
    {
        return View(new ErrorViewModel { RequestId = Activity.Current?.Id ?? HttpContext.TraceIdentifier });
    }
} 

These actions are not really related, but every action needs a controller, and the HomeController is a somewhat convenient location to put them. The Razor Pages equivalent places the Index (Home), About, Contact, and Error pages in the root directory, removing the implicit links between them. As an added bonus, everything related to the About page (for example) can be found in the files About.cshtml and About.cshtml.cs, which are located together on disk and in your solution explorer. That is in contrast to the MVC approach where controllers, view model, and view files are often located in completely different folders.

However, both of these approaches are functionally identical, so which one should you choose?

When should you use Razor Pages?

It's important to realize that you don't have to go all-in with Razor Pages. Razor Pages uses exactly the same infrastructure as traditional MVC, so you can mix Razor Pages with MVC and Web API controllers all in the same app. Razor Pages also uses the same ASP.NET Core primitives as traditional MVC, so you still get model binding, validation, and action results.

From a maintainability point of view, I find the extra cohesion afforded by Razor Pages makes it preferable for new development. Not having to jump back and forth between the controller, view model, and view files is surprisingly refreshing!

Having said that, there are some situations where it may be preferable to stick with traditional MVC controllers:

  • When you have a lot of MVC action filters on your controllers. You can use filters in Razor Pages too, but they generally provide less fine-grained control than for traditional MVC. For example, you can't apply Razor Page filters to individual handlers (for example, GET vs POST handlers) within a Razor Page.
  • When your MVC controllers aren't rendering views. Razor Pages are focused around a "page" model, where you're rending a view for the user. If your controllers are either Web API controllers, or aren't designed to provide pages a user navigates through, then Razor Pages don't really make sense.
  • When your controller is already highly cohesive, and it makes sense to centralise the action methods in one file.

On the other hand, there are some situations where Razor Pages really shines:

  • When your action methods have little or no logic and are just returning views (for example, the HomeController shown previously).
  • When you have HTML forms with pairs of GET and POST actions. Razor Pages makes each pair a cohesive page, which I find requires less cognitive overhead when developing, rather than having to jump between multiple files.
  • When you were previously using ASP.NET Web Pages (WebMatrix). This framework provided a lightweight page-based model, but it was completely separate from ASP.NET. In contrast, Razor Pages has a similar level of simplicity, but also the full power of ASP.NET Core when required.

Now you've seen the high-level differences between MVC and Razor Pages, it's time to dive into the specifics. How do you create a Razor Page, and how does it differ from a traditional Razor View?

The Razor Page Model

Razor Pages are built on top of MVC, but they use a slightly different paradigm than the MVC pattern. With MVC the controller typically provides the logic and behavior for an action, ultimately producing a view model which contains data that is used to render the view. Razor Pages takes a slightly different approach, by using a Page Model.

Compared to MVC, the page model acts as both a mini-controller and the view model for the view. It's responsible for both the behavior of the page and for exposing the data used to generate the view. This pattern is closer to the Model-View-ViewModel (MVVM) pattern used in some desktop and mobile frameworks, especially if the business logic is pushed out of the page model and into your "business" model.

[Diagram of Model, View, View Model, with view model calling into the Model to get the required data, make changes etc, and exposing data to View]

In technical terms a Razor Page is very similar to a Razor view, except it has an @page directive at the top of the file:

@page

<div>The time is @DateTime.Now</div>

As with Razor views, any HTML in the Razor page is rendered to the client, and you can use the @ symbol to render C# values or use C# control structures. See the documentation for a complete reference guide to Razor syntax.

Adding @page is all that's required to expose your page, but this page doesn't use a page model yet. More typically you create a class that derives from PageModel and associate it with your cshtml file. You can include your PageModel and Razor view in the same cshtml file if you wish, but best practice is to keep the PageModel in a "code-behind" file, and only include presentational data in the cshtml file. By convention, if your razor page is called MyPage.cshtml, the code-behind file should be named MyPage.cshtml.cs:

Each Razor page typically consists of a cshtml file and cshtml.cs file

The PageModel class is the page model for the Razor view. When the Razor page is rendered, properties exposed on the PageModel are available in the .cshtml view. For example, you could expose a property for the current time in your Index.cshtml.cs file:

using System;
using Microsoft.AspNetCore.Mvc.RazorPages;

public class IndexModel: PageModel
{
    public DateTime CurrentTime => DateTime.UtcNow;
} 

And render it in your Index.cshtml file using standard Razor syntax:

@page
@model IndexModel

<div>The current time is @Model.CurrentTime.ToShortTimeString()</div>

If you're familiar with Razor views, this should be quite familiar. You declare the type of the model using the @model directive, which is exposed on the Model property. The difference is that instead of your MVC controller passing in a View Model of type IndexModel, the PageModel itself is exposed as the Model property.

Routing in Razor Pages

Razor Pages, like MVC, uses a mixture of conventions, configuration, and declarative directives to control how your app behaves. They use the same routing infrastructure as MVC under the hood; the difference is in how routing is configured.

  • For MVC and Web API, you use either attribute or convention-based routing to match an incoming URL to a controller and action.
  • For Razor Pages, the path to the file on disk is used to calculate the URL at which the page can be reached. By convention, all Razor Pages are nested in the Pages directory.

For example if you create a Razor Page in your app at /Pages/MyFolder/Test.cshtml, it would be exposed at the URL /MyFolder/Test. This is definitely a positive feature for working with Razor Pages—navigating and visualizing the URLs exposed by your app is as easy as viewing the file structure.

Having said that, Razor Page routes are fully customizable, so if you need to expose your page at a route that doesn't correspond to it's path on disk, simply provide a route template in the @page directive. This can also include other route parameters, as shown below:

@page "/customroute/customized/{id?}" 

This page would be exposed at the URL /customroute/customized, and it could also bind an optional id segment in the URL, /customroute/customized/123, for example. The id value can be bound to a PageModel property using model binding.

Model binding in Razor Pages

In MVC the method parameters of an action in a controller are bound to the incoming request by matching values in the URL, query string, or body of the request as appropriate (see the documentation for details). In Razor Pages the incoming request is bound to the properties of the PageModel instead.

For security reasons, you have to explicitly opt-in to the properties to bind, by decorating properties to bind with the [BindProperty] attribute:

using Microsoft.AspNetCore.Mvc.RazorPages;

public class IndexModel : PageModel
{
    [BindProperty]
    public string Search { get;set; }

    public DateTime CurrentTime { get; set; };
}

In this example, the Search property would be bound to the request as it's decorated with [BindProperty], but CurrentTime would not be bound. For GET requests, you have to go one step further and set the SupportsGet property on the attribute:

using Microsoft.AspNetCore.Mvc.RazorPages;

public class IndexModel : PageModel
{
    [BindProperty(SupportsGet = true)]
    public string Search { get;set; }
}

If you're binding complex models, such as a form post-back, then adding the [BindProperty] attribute everywhere could get tedious. Instead I like to create a single property as the "input model" and decorate this with [BindProperty]. This keeps your PageModel public surface area explicit and controlled. A common extension to this approach is to make your input model a nested class. This often makes sense as you commonly don't want to use your UI-layer models elsewhere in your app:

using System.ComponentModel.DataAnnotations;
using Microsoft.AspNetCore.Mvc;
using Microsoft.AspNetCore.Mvc.RazorPages;

public class IndexModel : PageModel
{
    public bool IsEmailConfirmed { get; set; }

    [BindProperty]
    public InputModel Input { get; set; }

    public class InputModel
    {
        [Required, EmailAddress]
        public string Email { get; set; }

        [Required, Phone, Display(Name = "Phone number")]
        public string PhoneNumber { get; set; }
    }
}

In this example only the property Input is bound to the incoming request. This uses the nested InputModel class, to define all the expected values to bind. If you need to bind another value, you can add another property to InputModel.

Handling multiple HTTP verbs with Razor Page Handlers

One of the main selling points of Razor Pages is the extra cohesion they can bring over using MVC controllers. A single Razor Page contains all of the UI code associated with a given Razor view by using page handlers to respond to requests.

Page handlers are analogous to action methods in MVC. When a Razor Page receives a request, a single handler is selected to run, based on the incoming request and the handler names. Handlers are matched via a naming convention, On{Verb}[Async], where {Verb} is the HTTP method, and [async] is optional. For example:

For HTML forms, it's very common to have an OnGet handler that displays the initial empty form, and an OnPost handler which handles the POST back from the client. For example the following form shows the code-behind for a Razor Page that updates a user's display name.

using System.Collections.Generic;
using System.ComponentModel.DataAnnotations;
using System.Threading.Tasks;
using Microsoft.AspNetCore.Mvc;
using Microsoft.AspNetCore.Mvc.RazorPages;
using Microsoft.AspNetCore.Mvc.Rendering;

public class UpdateDisplayNameModel : PageModel
{
    private readonly IUserService _userService;
    public IndexModel(IUserService userService)
    {
        _userService = userService;
    }

    [BindProperty]
    public InputModel Input { get; set; }

    public void OnGet()
    {
        Input.DisplayName = _userService.GetDefaultDisplayName();
    }

    public async Task<IActionResult> OnPostAsync()
    {
        if (!ModelState.IsValid)
        {
            return Page();
        }

        await _userService.UpdateDisplayName(User, Input.DisplayName);
        return RedirectToPage("/Index");
    }

    public class InputModel
    {
        [Required, StringLength(50)]
        public string DisplayName { get; set; }
    }
}

This Razor Page uses a fictional IUserService which is injected into the PageModel constructor. The OnGet page handler runs when the form is initially requested, and sets the default display name to a value obtained from the IUserService. The form is sent to the client, who fills in the details and posts it back.

The OnPostAsync handler runs in response to the POST, and follows a similar pattern to MVC action methods. You should first check that the PageModel passes model validation using ModelState.IsValid, and if not re-display the form using Page(). Page() is semantically equivalent to the View() method in MVC controllers; it's used to render the view and return a response.

If the PageModel is valid, the form uses the provided DisplayName value to update the name of the currently logged in user, User. The PageModel provides access to many of the same properties that the Controller base class does, such as HttpContext, Request, and in this case, User. Finally, the handler redirects to another Razor Page using the RedirectToPage() method. This is functionally equivalent to the MVC RedirectToAction() method.

The OnGet and OnPost pair of handlers are common when a form only has a single possible role, but it's also possible to have a single Razor Page with multiple handlers for the same verb. To create a named handler, use the naming convention On{Verb}{Handler}[Async]. For example, maybe we want to add a handler to the UpdateDisplayName Razor page that allows users to reset their username to the default. We could add the following ResetName handler to the existing Razor page:

public async Task<IActionResult> OnPostResetNameAsync()
{
    await _userService.ResetDisplayName(User);
    return RedirectToPage("/Index");
}

To invoke the handler, you pass the handler name in the query string for the POST, for example ?handler=resetName. This ensures the named handler is invoked instead of the default OnPostAsync handler. If you don't like the use of query strings here, you can use a custom route and include the handler name in a path segment instead.

This section showed handlers for GET and POST but it’s also possible to have page handlers for other HTTP verbs like DELETE, PUT, and PATCH. These verbs are generally not used by HTML forms, so will not commonly be required in a page-oriented Razor Pages app. However they follow the same naming conventions and behaviour as other page handlers should you need them to be called by an API for some reason.

Using tag helpers in Razor Pages

When you're working with MVC actions and views, ASP.NET Core provides various tag helpers such as asp-action and asp-controller for generating links to your actions from Razor views. Razor Pages have equivalent tag helpers, where you can use asp-page to generate the path to a specific Razor page based, and asp-page-handler to set a specific handler.

For example, you could create a "reset name" button in your form using both the asp-page and asp-page-handler tags:

<button asp-page="/Index" asp-page-handler="ResetName" type="submit">Reset Display Name</button>

Summary

Razor Pages are a new aspect of ASP.NET Core MVC that were introduced in ASP.NET Core 2.0. They are built on top of existing ASP.NET Core primitives and provide the same overall functionality as traditional MVC, but with a page-based model. For many apps, the page-based approach using a PageModel can result in more cohesive code than traditional MVC. Razor Pages can be used seamlessly in the same app as traditional MVC or Web API controllers, so you only need to use it where it is a good fit.

If you're creating a new app using Razor, I strongly suggest considering Razor Pages as the default approach. It may feel strange for experienced MVC developers at first, but I've been pleasantly surprised by the improved development experience. For existing MVC apps, adding new Razor Pages is easy—but it's unlikely to be worth migrating a whole MVC app to use them. They're functionally identical to MVC, so the main benefit is a workflow that's more convenient for common development tasks.

Additional Resources

Learn Razor Pages is a tutorial website setup by Microsoft MVP Mike Brind. It's a great resource that I highly recommend in addition to the official documentation.

Creating my first GitHub app with Probot: Part 1 - create-probot-app

$
0
0
Creating my first GitHub app with Probot: Part 1 - create-probot-app

This is the first post in a short series on creating a simple GitHub app with Probot. In this post I describe why I decided to create a GitHub app, and how I built and tested a "Hello World" app using Probot and create-probot-app.

The problem and the plan

I don't have a huge number of open source projects on GitHub, but it's still tricky to keep track of them all sometimes. One thing I've found annoying is "losing" issues. It typically goes something like this:

  1. Someone files an issue against one of my repositories,
  2. I get an email notification on my phone
  3. I think, "hmmm, yes that's valid, I'll address that later"
  4. …many days pass
  5. Doh, totally forgot about that issue!

The problem for me is that there's nowhere to see all of the issues filed against my repos. I can see all the issues I've created from the top-level "issues" menu, or issues I've been assigned, but there's nowhere that lists all the issues I haven't responded to yet.

After (yet again) forgetting to respond to an issue I decided something had to be done. The simplest solution I could come up with was to create a GitHub app that automatically assigns me to any issues raised in my repositories. That way they'll show up by using the assigned filter in the GitHub dashboard.

The assigned issues filter in GitHub

A GitHub app seemed like a good solution, but on the other hand, I've never made one or really have a clue how they work. Luckily there's a handy framework designed for people just like me: Probot.

Building your first GitHub app with Probot and create-probot-app

Probot is a framework for building GitHub apps using Node.js. There's other ways to create a GitHub app, but Probot handles a lot of things for you like validating WebHooks, and authentication. It makes getting started relatively simple. For the rest of this post I'll describe how I created my first app to auto-assign issues to the repository owner.

Generally speaking I just followed the guide from the Probot docs. This post just fills in some of the gaps!

1. Install the prerequisites

Probot apps use Node.js, so the first thing to do is install Node. I'm using version 10.12.0 currently, but be aware that I ran into an issue scaffolding my app. It's not a big deal, but it did threw me off initially, so just be aware there may be issues with versions of Node.

As an extra bonus, I use Node Version Manager (nvm) for Windows to manage my Node installs. I highly recommend it - it lets you do side-by-side installs of Node (though only one version of Node can be active at a time).

Once you have Node installed, create a new folder for your app, and initialise a new (empty) Git repo by running git init.

2. Execute create-probot-app

We're going to be using the create-probot-app tool to scaffold out our GitHub app. This tool lets you select from some pre-defined templates for GitHub apps to get your started quickly.

The create-probot-app tool is an npx package. npx is a package runner for npm. Instead of having to install a tool from npm in order to use it, npx allows you to download and immediately run command line tools. It's useful when you want to run one-off commands.

Execute the create-probot-app tool, and provide the name of the folder to generate the app in. My app is called auto-assign-issues so I typed:

npx create-probot-app auto-assign-issues

You'll have to wait a little while while npm downloads the create-probot-app program and executes it. Once the app executes, You'll be presented with a series of questions, that are used to generate the template. Don't worry if you get anything wrong, you can always do a find-and-replace in your app later if needs be! I left "Homepage" blank for example, as I haven't created a website for the app.

npx: installed 213 in 36.364s

Let's create a Probot app!
Hit enter to accept the suggestion.

? App name: auto-assign-issues
? Description of app: An app to auto-assign any issues raised in a repository to specific users
? Author’s full name: Andrew Lock
? Author’s email address: test@example.com
? Homepage: 
? GitHub user or org name: andrewlock
? Repository name: probot-auto-assign-issues
? Which template would you like to use?
  basic-js
  checks-js
  git-data-js
  deploy-js
> basic-ts

Most of the questions are self explanatory, but the final question threw me a bit. You're asked to pick a template, without being told what any of them do! I did a bit of spelunking through the create-probot-app GitHub repo to figure out what's-what:

  • basic-js: (default). Scaffold an app that runs in response to GitHub WebHooks. When a new issue is created, the app adds a comment saying: Thanks for opening this issue! Built using JavaScript.
  • checks-js: Scaffold an app that runs a GitHub check, for example for checking code quality or running tests. Built using JavaScript.
  • git-data-js: Scaffold an app that uses the GitHub Git data API to create a branch, a file, and a PR. Built using JavaScript.
  • deploy-js: Uses the GitHub Deployments API to allow you to create hooks for external cloud providers. Built using JavaScript.
  • basic-ts: Scaffold an app that runs in response to GitHub WebHooks, with the same functionality as basic-js. Built using TypeScript.

I chose the final option, basic-ts, as I wanted an app that would run in response to WebHooks, and I wanted to use TypeScript because, well, who wouldn't prefer that to JavaScript. 😉

Unfortunately, as I hinted earlier, whenever I ran create-probot-app I found the process would hang without completing. Files were generated, but an npm restore was never run. I filed an issue here - it looks like it's something to do with running on Windows, with different issues on different versions of Node. Yay.

3. Tweaking the templates

The template generated by create-probot-app isn't bad, but it needs a couple of tweaks:

node_modules
npm-debug.log
*.pem
.env
# This file **should** be committed 
# See https://github.com/npm/npm/blob/v5.0.0/doc/files/package-lock.json.md
# package-lock.json
coverage
lib
  • Fix the repository, bugs, and homepage entries in package.json. It misses out the organisation/user name in the GitHub URLs, and added some double //.
  • You might want to add a tslint.json file and tweak the tsconfig.json to your liking.

4. Install the dependencies

The create-probot-app is supposed to automatically install your npm dependencies but I found that it didn't work with any version of npm that I used. Open a terminal in your project directory and install the dependencies by running:

npm i

This might update the dependencies in your package.json, and depending on the version of node you're using, may generate a package.json.lock file, to lock the package versions and give you reproducible builds.

5. Register your app with GitHub

Once you've installed the dependencies, you can test out your app by running

npm run dev

This starts up your app and provides a URL for you to navigate to to view your new GitHub app!

> nodemon --exec "npm start"

[nodemon] 1.18.9
[nodemon] to restart at any time, enter `rs`
[nodemon] watching: *.*
[nodemon] starting `npm start`

> auto-assign-issues@1.0.0 start C:\repos\andrewlock\probot-auto-assign-issues
> probot run ./lib/index.js

19:27:02.013Z  INFO probot: Listening on http://localhost:3000
19:27:02.552Z  INFO probot:

  Welcome to Probot! Go to http://localhost:3000 to get started.

When you navigate to http://localhost:3000, you're presented with a welcome screen that walks you through registering your app with GitHub. Click the "Register GitHub App" button:

The start screen after running your app

Choose a name for your new app. As the prompt says, you can always change it later, so don't agonise too long

Choosing a name for your GitHub app

After providing a name, GitHub will prompt you to install your new app onto your user account or onto an organisation. For obvious reasons I suggest installing into your own account first:

Installing the new app

The next screen lets you choose which repositories to install the app in. You could choose to install in all repositories, but for obvious reasons I suggest installing into a small test repo initially while you're building out your app.

Installing the new app

With your repositories selected, your app is installed and running on your account!

Installing the new app

6. Testing out the app

After you've registered your app, you may notice a new .env in your repository. This file contains the credentials used by GitHub to authenticate your app, and looks something like this:

WEBHOOK_PROXY_URL=https://smee.io/NVq4QGLm5xu3
APP_ID=123456
PRIVATE_KEY="-----BEGIN RSA PRIVATE KEY-----\nMIIEowIBAAKCAQEAqTySmyd+9qLD9KFAKEFAKEFAKE
+HpzKVMFLcy\n-----END RSA PRIVATE KEY-----\n"
WEBHOOK_SECRET=1234567890abcdef16672f16f37131b

It's very important you never commit this file to your repository. If you copied the .gitignore I showed earlier then the .env file is ignored by git, but it's still worth pointing out.

As well as the authentication details, the .env file also includes the details of a https://smee.io/ URL. This acts as a proxy between GitHub and your app when you're testing with npm run dev. That means you receive real WebHook events from any repositories that have installed your app!

As I mentioned earlier, the default GitHub app template adds a comment to all new issues. You can try it out by raising an issue in your test repository (where you installed your app). Sure enough, shortly after creating an issue, you'll see a new WebHook event is recorded in your terminal console (where you executed npm run dev), and a comment is added to the issue!

Testing out the GitHub app

The fact that you get live requests coming from GitHub is pretty cool. It also gives you some sample data for writing tests for your app.

That's it for this post. In the next post I'll update the app so it has the functionally I need - auto-assigning issues to me when they're raised.

Summary

In this post I described how to create a new Node.js GitHub app using Probot and the create-probot-app tool. I found a few bugs and issues generating the template, but once you have the app running locally the process is very smooth. The proxy configuration lets you receive live GitHub WebHooks when developing locally which is particularly nice!

Creating my first GitHub app with Probot: Part 2 - creating the auto-assign-issues bot

$
0
0
Creating my first GitHub app with Probot: Part 2 - creating the auto-assign-issues bot

In my last post I showed how to get started building a GitHub bot using Probot and create-probot-app. In this post we'll take a look at some code; we'll explore the generated template, and then update the bot to provide the functionality described in part 1. At the end of this post we'll have a GitHub app that's able to assign newly created issues to the owner of the repository in which the code is running. We'll also allow you to configure the bot to assign the issues to users other than the owner, or to disable the bot entirely for a repository.

Where we're up to - a quick recap

In my last post I described how to create your first demo GitHub app using the Probot framework and the create-probot-app tool. If that's new to you, I suggest going back and working your way through it.

For this post I'll assume you've created a new app (called auto-assign-issues) and are running it locally using npm run dev. If you follow the prompts provided, you'll have a real live GitHub app that is being proxied to your local running instance. You can install the app on a test repository and try out the functionality in real time!

As a side note, this was one of the most impressive parts of the Probot experience for me. Aside for the initial templating issues I described in the previous post, the ability to hook into GitHub "live" without any manual configuration on my part makes the getting-started process incredibly smooth.

Now we're all up to speed, I'll start by taking a look at the default template you get with create-probot-app.

Looking at the default template

All of the functionality for the default app is found in the file src/index.ts (I used the TypeScript template with create-probot-app). If you open this file, you'll find the following:

import { Application } from 'probot' // eslint-disable-line no-unused-vars

export = (app: Application) => {
  app.on('issues.opened', async (context) => {
    const issueComment = context.issue({ body: 'Thanks for opening this issue!' })
    await context.github.issues.createComment(issueComment)
  })
  // For more information on building apps:
  // https://probot.github.io/docs/

  // To get your app running against GitHub, see:
  // https://probot.github.io/docs/development/
}

Personally, I was surprised and impressed - that's a tiny amount of code required to create a bot! All that is required by you is to define the type of WebHook you're interested in ( "issues.opened" in this case), and a function to run when the hook is raised. The imported probot library does all the hard work for you of registering for the WebHook, validating the parameters GitHub provides, and exposing the WebHook payload to your app.

The Probot documentation contains details about how to handle multiple WebHooks, or multiple "actions" associated with an event type.

The context parameter provided in the method signature includes the payload sent by GitHub, and is used to interact with the GitHub API. It includes a number of helper methods for preparing requests, as well as methods to send them with little ceremony:

async (context) => {
  const issueComment = context.issue({ body: 'Thanks for opening this issue!' })
  await context.github.issues.createComment(issueComment)
}

The context.issue() helper is used for preparing requests related to issues. The object you pass in is merged with values extracted from the WebHook. For example, if the bot runs in response to a new issue (number 23) raised on the repo andrewlock/test-deploy, then issueComment above would look something like this:

{
  "owner": "andrewlock", 
  "repo": "test-deploy", 
  "number": 23, 
  "body": "Thanks for opening this issue!"
}

The context.github property is an instance of the @octokit/rest Node.js module for interacting with the GitHub API. You can use this to make all sorts of requests, as in the default template where a comment is added to new issues using the createComment() method.

Creating a new comment using the GitHub API

That's pretty much all there is to the default template. There's an integration test for testing your app using the nock mocking library and jest, but I won't go into that in this post.

Instead, lets look at how to customise the default template to build the auto-assign-issues bot.

Creating the auto-assign-issues bot

The reason I built this bot was because I wanted every issue created on one of my repositories to be assigned to me. On that basis, I replaced the contents of src/index.ts with the following:

import { Application } from 'probot' // eslint-disable-line no-unused-vars

export = (app: Application) => {
  app.on('issues.opened', async (context) => {

    // create an empty params object as an easy way to get the owner
    const tempParams = context.issue()
    const owner = tempParams.owner

    //build the request, and send it to GitHub
    const addAssigneeParams = context.issue({ assignees: [owner] })
    await context.github.issues.addAssignees(addAssigneeParams);
  })
}

The (possibly) slightly hacky aspect of this code is the way I'm getting the owner of the repository. Instead of diving in to the context.payload to find the owner of the repository on which the issue was created, I'm using the context.issue() helper method to extract it for me:

const tempParams = context.issue()
const owner = tempParams.owner

I then call context.issue() again to actually build the real request, and provide the assignees array required by the addAssignees method:

const addAssigneeParams = context.issue({ assignees: [owner] })

Finally, I use the github property to make the API call and add the owner of the repository to the issue's assignees.

await context.github.issues.addAssignees(addAssigneeParams);

As before, we can test out this code by running the app locally with npm run dev, and creating a new issue on the test repo that has the app installed.

Demonstration of the auto-assign-issues-bot working

As you can see, this seems to work! Obviously we don't have testing, error management, or logging, but it gets the job done for now…
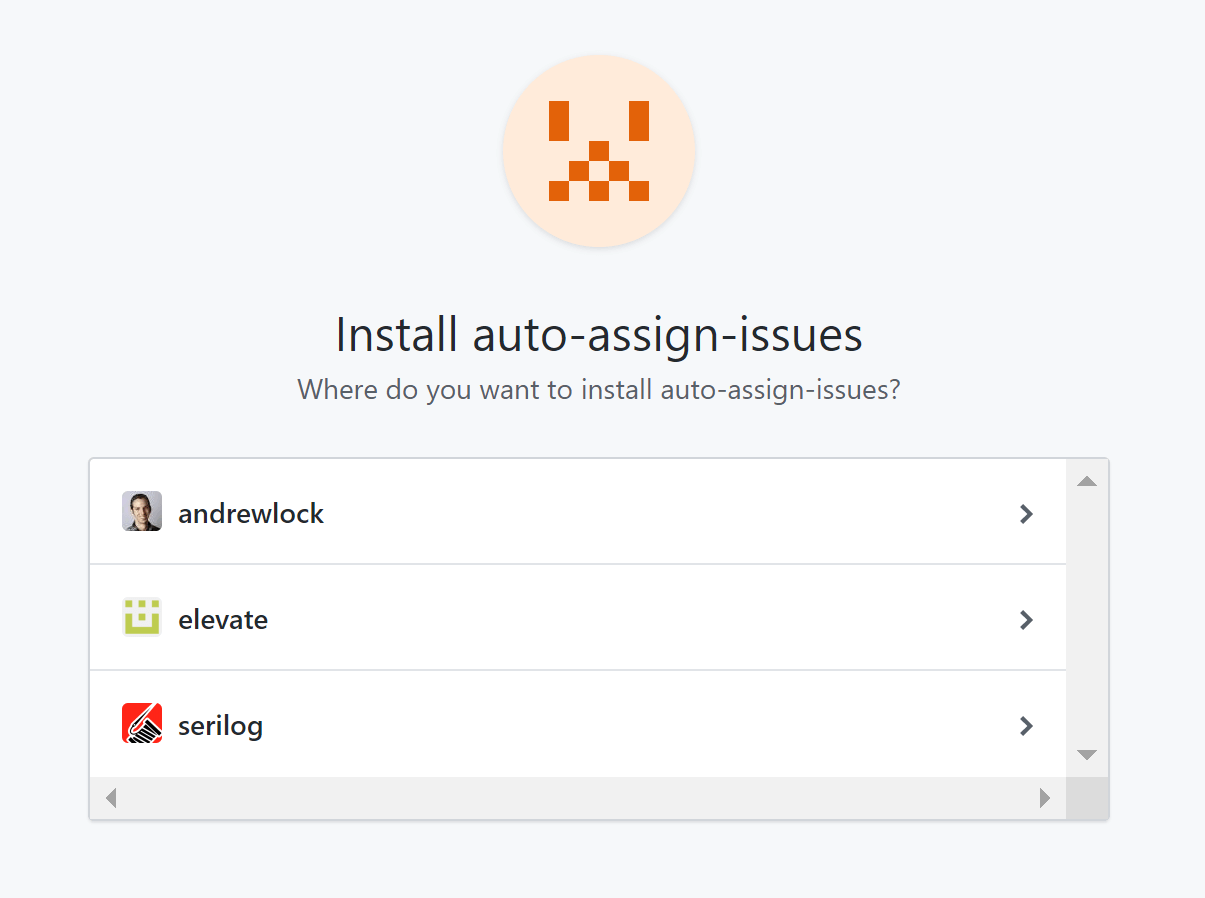
Before we call it a day, there's one problem. What if someone else wants to use the app in a repository owned by an organisation rather than an individual user? In that case, my naïve approach of assigning to the owner won't work.

Adding configuration to the bot

GitHub apps allow you to use per-repository configuration for an app. Users can create a YAML files inside the .github folder in their repository, and apps can read these files when a WebHook is received to configure their behaviour.

I decided to allow users to control the behaviour of the app with a very simple YAML file that has just two properties. For example:

# If enabled, auto-assigns users when a new issue is created. Defaults to true
addAssignees: true

# If enabled, the list of users to assign to new issues. 
# If empty or not provided, the repository owner is assigned
assignees: 
  - user1
  - user2

The first property addAssignees allows you to disable the app for a specific repository. That means you can install it account wide using the "Install in all repositories" option, and then disable it for specific repositories.

The second property assignees provides a list of all the users that should be assigned to new issues. If this property is omitted or left empty then the app uses the previous behaviour, and assigns the issue to the repository owner.

So how can we make use of this config file? The following code shows the updated app; I'll walk through each new section afterwards:

import { Application } from 'probot' // eslint-disable-line no-unused-vars

const ConfigFilename = 'auto-assign-issues.yml'

interface AppConfig {
  addAssignees: boolean;
  assignees?: string[];
}

const DefaultConfig: AppConfig = { addAssignees: true };

export = (app: Application) => {
  app.on('issues.opened', async (context) => {

    const config: AppConfig = await context.config<AppConfig>(ConfigFilename, { addAssignees: true })

    if(!config.addAssignees){
      return;
    }

    // create an empty params object as an easy way to get the owner
    const tempParams = context.issue()
    const owner = tempParams.owner

    const assignees = chooseAssignees(owner, config.assignees || [])

    const addAssigneeParams = context.issue({ assignees: assignees })
    await context.github.issues.addAssignees(addAssigneeParams)
  })
}

function chooseAssignees(owner: string, available: string[]): string[] {
  // if no config, then assume we're assigning the owner
  if (available.length === 0) {
    return [owner]
  }

  // get the unique set of names
  return available.reduce<string[]>((values, current) => {
    if (values.indexOf(current)) {
      values.push(current)
    }
    return values
  }, [])
}

The first thing I define is a constant for the configuration filename. This is the name of the file users must create inside the .github folder in their repository to control the app.

const ConfigFilename = 'auto-assign-issues.yml'

Next I create an interface for the configuration after it's been converted from YAML to JavaScript.

interface AppConfig {
  addAssignees: boolean;
  assignees?: string[];
}

const DefaultConfig: AppConfig = { addAssignees: true };

This isn't strictly necessary, but as we're using TypeScript, we may as well try and create the any to a minimum. I also define a default instance of AppConfig that will be used when the user doesn't provide a YAML file.

Now we move into the callback function itself, and attempt to load the configuration from the user's repository.

const config: AppConfig = await context.config(ConfigFilename, DefaultConfig)

if(!config.addAssignees){
  return;
}

This method attempts to read a YAML file from the user's repository (i.e. .github/auto-assign-issues.yml), and merge it with the DefaultConfig object. If the user has added the file to their repo, we now have those values in the config object.

If the user has disabled the app by setting addAssignees to false, we bail out and just return. If they haven't, then we reads the owner of the repository using the technique I described earlier, and call the chooseAssignees helper method:

function chooseAssignees(owner: string, available: string[]): string[] {
  // if no config, then assume we're assigning the owner
  if (available.length === 0) {
    return [owner]
  }

  // get the unique set of names
  return available.reduce<string[]>((values, current) => {
    if (values.indexOf(current)) {
      values.push(current)
    }
    return values
  }, [])
}

This method encapsulates the logic for choosing who should be assigned the issue. It takes in the owner of the repository and a (potentially empty) list of assignees. If the list is empty,then the issue should be assigned to the owner, and we return an array with a single value: [owner].

If the list of assignees is not empty, then we remove any duplicate values, and return the value back. I'm not 100% sure if this is necessary for the GitHub API, but if nothing else it gave me an exercise in using reduce<>()!🙂

All that's left after choosing the assignees is to send the request to the GitHub API as before:

const assignees = chooseAssignees(owner, config.assignees || [])

const addAssigneeParams = context.issue({ assignees: assignees })
await context.github.issues.addAssignees(addAssigneeParams)

And we're done! Again, it's a simplistic implementation without the logging and error handling I'd normally want to see, but it solved a problem and scratched an itch so I'm happy enough with it.

There's just one problem.

At this point, the code is only running locally on my machine, and WebHooks are being proxied via https://smee.io. That's fine for development, but I certainly don't want to keep the app running on my machine 24-7! Instead, we need to deploy it. In the next post in the series I'll show how you can deploy your app to Glitch. Alternatively, check out the Probot docs for potential deployment options. Of course, it's fundamentally just a node.js app, so you can run your app anywhere node.js runs, which is basically everywhere!

Summary

In this post I walked through the code in the default create-probot-app template to show how a Probot app works. I then described upgrading the app to achieve my required functionality: assigning all new issues on a repo to the repo owner. Finally I showed how you could add configuration to your app so the user can control the behaviour of the bot.

Resources

The Probot documentation is very good so I highly recommend reading them if you're new to GitHub apps. The code in the auto-assign-issues was strongly inspired by the auto-assign GitHub app that automatically adds reviewers and assignees to pull requests.

Creating my first GitHub app with Probot: Part 3 - deploying to Glitch

$
0
0
Creating my first GitHub app with Probot: Part 3 - deploying to Glitch

In the first post in this series, I described creating a GitHub app using Probot and create-probot-app. In my previous post I walked through the default template and customised it to provide the functionality required for my auto-assign-issues bot. In this post, I show how I deployed my app to Glitch to run my app for free.

I'll point out now, that while deploying the app to Glitch was easy, I failed dismally trying to setup CI so that the app is deployed whenever I push a change to GitHub. In the end I gave up as I don't envisage needing to update the bot very often, and I can still sync the code from GitHub to Glitch easily, I just can't get it to happen automatically.

Signing up for Glitch

Glitch is a really interesting site that's designed to make it easy to get started building a project and to get help when you're stuck. Every project that's built on Glitch can be "remixed", which effectively means cloned into your own account. It's a great way to tinker with things and get started really quickly, as it's a whole IDE in the browser.

For my purposes here, Glitch is a way for me to run the GitHub bot for free without much ceremony. It's one of the suggested approaches in the Probot docs so I thought I'd give it a go.

The first step is to sign up for Glitch. Head over to https://glitch.com, and click Sign in in the top right:

Sign in to Glitch

I chose to Sign in with GitHub as I'm going to be importing code from GitHub anyway. If you take this approach you'll get the standard authorization screen

Authorize Glitch to use your GitHub identity

And that's it, you're now signed in to Glitch.

Creating a project on Glitch and importing from GitHub

Now you're signed in, you can create a new project. Click the New Project button and choose any of the sample projects - we're going to be replacing the project with the content from your GitHub repository shortly anyway.

After a short delay, Glitch will create you a new project, and assign it a random name (I got near-pedestrian-1). Click the project name in the top left hand corner, and edit the name and description to something a bit more descriptive:

Editing the default Glitch name and description

Now we're going to import the code for our Probot app from GitHub into Glitch. In the same menu (after clicking the project name) choose Advanced Options near the bottom, and then Import from GitHub:

Editing the default Glitch name and description

At this point you'll get another authorization request for your GitHub account. The first time was just for authentication, so only provided Glitch access to your email address. This time Glitch needs to access your repositories so it can import your app code:

Providing Glitch access to your GitHub repositories

After providing authorization, Glitch will pop up a notification asking you to provide the path to the GitHub repository it should import. This is the name of the repository including the owner, so for https://github.com/andrewlock/auto-assign-issues you would enter andrewlock/auto-assign-issues

Specifying the name of the repository to import

After a short while, Glitch will import everything from your GitHub repository, and you can see, edit and explore your code in the online editor. Be aware though, if you import the code from GitHub into the same project again, all of your changes will be lost.

The auto-assign-issues app imported into GitHub

Configuring your app in Glitch

At this point, your code has been imported but you're missing one key ingredient - the .env file containing the secrets for your app. As I said in part 1 of this series, you should never commit this file to your repository.

Instead, create the .env file manually in your Glitch project. Click the + New File button above your directory listing, enter the name .env and click Add File

Adding a new file in Glitch

You'll see that the .env file has a little lock symbol next to it, indicating that it's safe to store secrets in this file. Also, Glitch won't overwrite the .env file when you re-import your GitHub repo into your Glitch project.

Paste the following into your .env file, we'll fill in the gaps shortly

APP_ID=
Webhook_SECRET=
PRIVATE_KEY=
NODE_ENV=production

If you've been following along, you'll already have registered your app with GitHub when testing locally as I described in part 1 of this series. That means you can use the same App ID, Webhook secret, and private key that Probot setup for you automatically and saved into the .env file in your local environment.

Copy the values from your local .env file into your Glitch .env file. Note that you don't want to copy the Webhook_PROXY_URL line, and you want to add the extra line NODE_ENV=production in your Glitch .env file.

It's worth noting that the Probot docs on deploying to Glitch use PRIVATE_KEY_PATH instead of PRIVATE_KEY and store the data in a file: .data/private-key.pem. The problem with this is that the .data/private-key.pem file is overwritten if you re-import your app from GitHub. As far as I can see, the .env approach is just as safe, and doesn't get clobbered by re-importing from GitHub.

Testing your app

Once you have everything in place, Glitch should build your app in the background and set it live. You should see a little green "Live" badge next to the Show button at the top left of your screen. Clicking this should take you to the Probot "Getting Started" page for your app. For the auto-assign-issues project, the URL is https://auto-assign-issues.glitch.me/probot:

The getting started page for the Glitch app

We've already registered the app (back when it was running locally) so you don't need to click the "Register GitHub App" button. Instead, we'll change the https://smee.io URL associated with the existing app registration to your Glitch app.

On one occasion, Glitch didn't build my app for me automatically. If that happens for you, you can click Logs and then Console to open a bash terminal in your app's container. You can then run npm build to explicitly build your app.

Updating the Webhook URL

The last thing we need to do to get the bot running properly is to update the Webhook URL associated with it, so Webhook events raised by GitHub are sent to the Glitch app, instead of to the https://smee.io URL and to our locally running app.

To edit the URL, login to GitHub, click your Avatar, and choose Settings, Developer Settings (at the bottom of the page), GitHub apps, select your app, and click Edit on your app.

Scroll down until you get to the Webhook URL section and replace the existing https://smee.io URL with your the Glitch URL of your app, for example https://auto-assign-issues.glitch.me.

Make sure you don't include the /probot path, only use the bare domain.

Updating the Webhook URL to point to the Glitch app

That's all that's required. For a final touch, I changed the logo for my bot to use the Probot logo in the "Display Information" section.

Updating the logo for the bot

And that's it! You now have a GitHub app, built using Probot, deployed to Glitch, handling all your Webhooks. Take it for a spin on your test repo by creating a new issue, you should see yourself assigned to the issue.

Testing the bot on your repo

If you make changes to your app and push them to GitHub, then you need to re-import them into Glitch. The import from GitHub is a single-point-in-time action. If you're not updating your app often then that's not a big deal, but my gut reaction was to try and setup CI deployments…

So where is the CI?

I tried. I really did.

The Probot documentation even specifically calls out adding continuous deployment to Glitch using the glitch-deploy tool, but the tool just didn't sit right with me. In the words of the project:

glitch-deploy is using puppeteer to run a headless Chrome browser to sign in to GitHub & Glitch, create a new Glitch app and import the repository form GitHub. Note that glitch-deploy is using undocumented Glitch APIs that might change at any time.

That just doesn't feel right to me. On top of that you need to provide a GitHub username and password so the app can sign in as you. The glitch-deploy repo recommends you "create a separate GitHub user account for the deployment to keep your own account’s credentials safe", but still, it's not for me.

I also tried using a similar tool that uses undocumented Glitch APIs called sync-glitch-cli. That tool re-uses the auth token sent from GitHub to Glitch for doing the sync, but I couldn't get that to work either.

In the end I gave up. CI from GitHub to Glitch just doesn't seem worth the hassle. If that's something you're after, I suggest deploying to one of the multitude of other services that will run a node.js app. For my use case, with infrequent updates to the app, Glitch is working fine!

Summary

In this post I described how to deploy a GitHub app written using Probot to Glitch. I showed how to link your Glitch account to GitHub, how to import a repository, and how to configure the required environment variables. Finally I showed how to update your app registration (from part 1) to point to the newly deployed Glitch app.

Why isn't my session state working in ASP.NET Core? Session state, GDPR, and non-essential cookies

$
0
0
Why isn't my session state working in ASP.NET Core? Session state, GDPR, and non-essential cookies

In this post I describe a problem that I've been asked about several times related to session state. The scenario goes something like this:

  • Scaffold a new ASP.NET Core application
  • Set a string in session state for a user, e.g. HttpContext.Session.SetString("theme", "Dark");
  • On the next request, try to load the value from session using HttpContext.Session.GetString("theme"); but get back null!
  • "Gah, this stupid framework doesn't work" (╯°□°)╯︵ ┻━┻

The cause of this "issue" is the interaction between the GDPR features introduced in ASP.NET Core 2.1 and the fact that session state uses cookies. In this post I describe why you see this behaviour, as well as some ways to handle it.

The GDPR features were introduced in ASP.NET Core 2.1, so if you're using 2.0 or 1.x you won't see these problems. Bear in mind that 1.x are falling out of support on June 27 2019, and 2.0 is already unsupported, so you should consider upgrading your apps to 2.1 where possible.

Session State in ASP.NET Core

As I stated above, if you're using ASP.NET Core 2.0 or earlier, you won't see this problem. I'll demonstrate the old "expected" behaviour using an ASP.NET Core 2.0, to show how people experiencing the issue typically expect session state to behave. Then I'll create the equivalent app in ASP.NET Core 2.1, and show that session state no longer seems to work.

What is session state?

Session state is a feature that harks back to ASP.NET (non-Core) in which you can store and retrieve values server-side for a user browsing your site. Session state was often used quite extensively in ASP.NET apps, but was problematic for various reasons), primarily performance and scalability.

Session state in ASP.NET Core is somewhat dialled back. You should think of it more like a per-user cache. From a technical point of view, session state in ASP.NET Core requires two separate parts:

  • A cookie. Used to assign a unique identifier (the session ID) to a user.
  • A distributed cache. Used to store items associated with a given session ID.

Where possible, I would avoid using session state if you can get away without it. There's a lot of caveats around its usage that can easily bite you if you're not aware of them. For example:

  • Sessions are per-browser, not per logged-in user
  • Session cookies (and so sessions) should be deleted when the browser session ends, but might not be.
  • If a session doesn't have any values in it, it will be deleted, generating a new session ID
  • The GDPR issue described in this post!

That covers what session state is and how it works. In the next section I'll create a small app that tracks which pages you've visited by storing a list in session state, and then displays the list on the home page.

Using session state in an ASP.NET Core 2.0 app

To demonstrate the change in behaviour related to the 2.0 to 2.1 upgrade, I'm going to start by building an ASP.NET Core 2.0 app. As I apparently still have a bazillion .NET Core SDKs installed on my machine, I'm going to use the 2.0 SDK (version number 2.1.202) to scaffold a 2.0 project template.

Start by creating a global.json to pin the SDK version in your app directory:

dotnet new globaljson --sdk-version 2.1.202

Then scaffold a new ASP.NET Core 2.0 MVC app using dotnet new:

dotnet new mvc --framework netcoreapp2.0

Session state is not configured by default, so you need to add the required services. Update ConfigureServices in Startup.cs to add the session services. By default, ASP.NET Core will use an in-memory session store, which is fine for testing purposes, but will need to be updated for a production environment:

public void ConfigureServices(IServiceCollection services)
{
    services.AddMvc();
    services.AddSession(); // add session
}

You also need to add the session middleware to your pipeline. Only middleware added after the session middleware will have a access to session state, so you typically add it just before the MVC middleware in Startup.Configure:

 public void Configure(IApplicationBuilder app, IHostingEnvironment env)
{
    // ...other config
    app.UseSession();
    app.UseMvc(routes =>
    {
        routes.MapRoute(
            name: "default",
            template: "{controller=Home}/{action=Index}/{id?}");
    });
}

For this simple (toy) example I'm going to retrieve and set a string session value with each page view, using the session-key "actions". As you browse between various pages, the session value will expand into a semicolon-separated list of action names. Update your HomeController to use the RecordInSession function, as shown below:

public class HomeController : Controller
{
    public IActionResult Index()
    {
        RecordInSession("Home");
        return View();
    }

    public IActionResult About()
    {
        RecordInSession("About");
        return View();
    }

    private void RecordInSession(string action)
    {
        var paths = HttpContext.Session.GetString("actions") ?? string.Empty;
        HttpContext.Session.SetString("actions", paths + ";" + action);
    }
}

Note: Session.GetString(key) is an extension method in the Microsoft.AspNetCore.Http namespace

Finally, we'll display the current value of the "actions" key in the homepage, Index.chstml:

@using Microsoft.AspNetCore.Http
@{
    ViewData["Title"] = "Home Page";
}

<div>
    @Context.Session.GetString("actions")
</div>

If you run the application and browse around a few times, you'll see the session action-list build up. In the example below I visited the Home page three times, the About page twice, and the Contact page once:

Session working correctly

If you view the cookies associated with the page, you will see the .AspNetCore.Session cookie that holds an encrypted session ID. If you delete this cookie, you'll see the "actions" value is reset, and the list is lost.

AspNetCore.Session cookie used for tracking session id

This is the behaviour most people expect with session state, so no problems there. The difficulties arise when you try the same thing using an ASP.NET Core 2.1 / 2.2 app.

Session state problems in ASP.NET Core 2.1/2.2

To create the ASP.NET Core 2.2 app, I used pretty much the same behaviour, but this time I did not pin the SDK. I have the ASP.NET Core 2.2 SDK installed (2.2.102) so the following generates an ASP.NET Core 2.2 MVC app:

dotnet new mvc

You still need to explicitly install session state, so update Startup as before, by adding services.AddSession() to ConfigureServices and app.UseSession() to Configure.

The newer 2.2 templates have been simplified compared to previous versions, so for consistency I copied across the HomeController from the 2.0 app. I also copied across the Index.chtml, About.chtml, and Contact.cshtml view files. Finally, I updated Layout.cshtml to add links for the About and Contact pages in the header.

These two apps, while running different versions of ASP.NET Core, are pretty much the same. Yet this time, if you click around the app, the home page always shows just a single visit to the home page, and doesn't record any visits to other pages:

Session not working correctly

Don't click the privacy policy banner - you'll see why shortly!

Also, if you check your cookies, you'll find there aren't any! The .AspNetCore.Session cookie is noticeably absent:

No session cookie

Everything is apparently configured correctly, and the session itself appears to be working (as the value set in the HomeController.Index action can be successfully retrieved in Index.cshtml). But it seems like session state isn't being saved between page reloads and navigations.

So why does this happen in ASP.NET Core 2.1 / 2.2 where it worked in ASP.NET Core 2.0?

Why does this happen? GDPR

The answer is due to some new features added in ASP.NET Core 2.1. In order to help developers conform to GDPR regulations that came into force in 2018, ASP.NET Core 2.1 introduced some additional extension points, as well as updates to the templates. The documentation for these changes is excellent so I'll just summarise the pertinent changes here:

  • A cookie consent dialog. By default, ASP.NET Core won't write "non-essential" cookies to the response until a user clicks the consent dialog
  • Cookies can be marked essential or non-essential. Essential cookies are sent to the browser regardless of whether consent is provided, non-essential cookies require consent.
  • Session cookies are considered non-essential, so sessions can't be tracked across navigations or page reloads until the user provides their consent.
  • Temp data is non-essential. The TempData provider stores values in cookies in ASP.NET Core 2.0+, so TempData will not work until the user provides their consent.

So the problem is that we require consent to store cookies from the user. If you click "Accept" on the privacy banner, then ASP.NET Core is able to write the session cookie, and the expected functionality is restored:

Session state working correctly again

So if you need to use session state in your 2.1/2.2 app, what should you do?

Working with session state in ASP.NET Core 2.1+ apps

Depending on the app you're building, you have several options available to you. Which one is best for you will depend on your use case, but be aware that these features were added for a reason - to help developers comply with GDPR.

If you're not in the EU, and so you think "GDPR doesn't apply to me", be sure to read this great post from Troy Hunt - it's likely GDPR still applies to you!

The main options I see are:

  1. Accept that session state may not be available until users provide consent.
  2. Disable features that require session state until consent is provided.
  3. Disable the cookie consent requirement.
  4. Mark the session cookie as essential.

I'll go into a bit more detail for each option below, just remember to consider that your choice might affect your conformance to GDPR!

1. Accept the existing behaviour

The "easiest" option is to just to accept the existing behaviour. Session state in ASP.NET Core should typically only be used for ephemeral data, so your application should be able to handle the case that session state is not available.

Depending on what you're using it for, that may or may not be possible, but it's the easiest way to work with the existing templates, and the least risky in terms of your exposure to GDPR issues.

2. Disable optional features

The second option is very similar to the first, in that you keep the existing behaviour in place. The difference is that option 1 treats session state simply as a cache, so you always assume session values can come and go. Option 2 takes a slightly different approach, in that it segments off areas of your application that require session state, and makes them explicitly unavailable until consent is given.

For example, you might require session state to drive a "theme-chooser" that stores whether a user prefers a "light" or "dark" theme. If consent is not given, then you simply hide the "theme-chooser" until they have given consent.

This feels like an improvement over option 1, primarily because of the improved user experience. If you don't account for features requiring session state, it could be confusing for the user. For example, if you implemented option 1 and so always show the "theme-chooser", the user could keep choosing the dark theme, but it would never remember their choice. That sounds frustrating!

There's just one big caveat for this approach. Always remember that session state could go away at any moment. You should treat it like a cache, so you shouldn't build features assuming a) it'll always be there (even if the user has given consent), or b) that you'll have one session per real user (different browsers will have different session IDs for the same logical user).

If you're sure that you don't need the cookie consent feature, you can easily disable the requirement in your apps. The default template even calls this out explicitly in Startup.ConfigureServices where you configure the CookiePolicyOptions:

public void ConfigureServices(IServiceCollection services)
{
    services.Configure<CookiePolicyOptions>(options =>
    {
        // This lambda determines whether user consent for non-essential cookies is needed for a given request.
        options.CheckConsentNeeded = context => true;
        options.MinimumSameSitePolicy = SameSiteMode.None;
    });

    services.AddSession(); // added to enable session
    services.AddMvc().SetCompatibilityVersion(CompatibilityVersion.Version_2_2);
}

The CheckConsentNeeded property is a predicate that is called by the framework to check whether non-essential cookies should be written to the response. If the function returns true (as above, the default in the template), then non-essential cookies are skipped. Change this to false and session state will work without requiring cookies to be explicitly accepted.

4. Mark session cookies as essential

Disabling the cookie consent feature entirely may be a bit heavy handed for your applications. If that's the case, but you want the session state to be written even before the user accepts cookies, you can mark the session cookie as essential.

Just to reiterate, session state was considered non-essential for good reason. Make sure you can justify your decisions and potentially seek advice before making changes like this or option 3.

There is an overload of services.AddSession() that allows you to configure SessionOptions in your Startup file. You can change various settings such as session timeout, and you can also customise the session cookie. To mark the cookie as essential, set IsEssential to true:

public void ConfigureServices(IServiceCollection services)
{
    services.Configure<CookiePolicyOptions>(options =>
    {
        options.CheckConsentNeeded = context => true; // consent required
        options.MinimumSameSitePolicy = SameSiteMode.None;
    });

    services.AddSession(opts => 
    {
        opts.Cookie.IsEssential = true; // make the session cookie Essential
    });
    services.AddMvc().SetCompatibilityVersion(CompatibilityVersion.Version_2_2);
}

With this approach, the cookie consent banner will still be shown, and non-essential cookies will not be written until it's clicked. But session state will function immediately, before consent is given, as it's considered essential:

Privacy banner plus session state

Summary

In this post I described an issue that I've been asked about several times, where developers find that their session state isn't saving correctly. This is commonly due to the GDPR features introduced in ASP.NET Core 2.1 for cookie consent and non-essential cookies.

I showed an example of the issue in action, and how it differs between a 2.0 app and a 2.2 app. I described how session state relies on a session cookie that is considered non-essential by default, and so is not written to the response until a user provides consent.

Finally, I described four ways to handle this behaviour: do nothing and accept it; disable features that rely on session state until consent is given; remove the consent requirement; and make the session cookie an essential cookie. Which option is best for you will depend on the app you're building, as well as your exposure to GDPR and similar legislation.


Creating a not-empty GUID validation attribute and a not-default validation attribute

$
0
0
Creating a not-empty GUID validation attribute and a not-default validation attribute

In this post I describe a handy validation attribute used during ASP.NET Core model binding for verifying that a GUID doesn't have the default value of Guid.Empty. I always find myself re-creating it in projects, so now I can just copy it from here!

Why do you need a not-empty validation attribute?

You might be wondering why a "not-empty" attribute is necessary. Isn't that the same thing as the Required attribute? Let's say you have an action method on an API controller that updates the name of a user. For example:

[ApiController]
public class UserController: Controller
{
    [HttpPut("/user/name")]
    public IActionResult UpdateName(UpdateNameModel model)
    {
        if(!ModelState.IsValid)
        {
            return BadReques(ModelState);
        }

        _userService.UpdateName(model);

        return Ok();
    }
}

This method binds the body of the request to an UpdateNameModel object which contains the Id of the user to update, and the new name for the user:

public class UpdateNameModel
{
    public Guid Id { get; set; }

    [Required(AllowEmptyStrings = false)]
    [StringLength(100)]
    public string Name { get; set; }
}

As you would expect, The string Name is marked as required using the [Required] attribute, and has a validation attribute for the string length. Now, we know the Id property is also required, but how to achieve that with ValidationAttributes? The obvious answer would be to add the [Required] attribute, but unfortunately that won't work.

The [Required] attribute checks that the decorated property isn't null. But Guid is a struct that will never be null, much like int, DateTime, and other struct values. That means that Id will always have a value, whether the request body includes a value for it or not. If an Id isn't provided, it will have the default value, which for Guid is a value with all zeros (also exposed as Guid.Empty):

00000000-0000-0000-0000-000000000000

Because of this, adding the [Required] attribute to Id achieves nothing; the attribute will always say the Id is valid. Instead, you have a few options:

  • Use BindRequired to ensure a value for Id was provided in the body of the request. Filip has a great description of that approach here.
  • Make the property nullable. If you use a Guid? instead of a Guid then the value can be null, so adding the Required attribute confirms it's not null. This works, but feels clumsy to me.
  • Manually check the Guid is not empty after running other validation, or by using IValidatableObject. This seems messy and overkill for such a simple validation requirement.
  • Create a custom attribute.

The goal of this post is to be able to apply a validation attribute to the Id property of our model to validate it has a not-empty/not-default value. e.g.

public class UpdateNameModel
{
    [NotEmpty]
    public Guid Id { get; set; }
    public string Name { get; set; }
}

The NotEmptyAttribute for Guids

The attribute we need has the following characteristics:

  • For Guid properties: Returns valid for any value except Guid.Empty
  • For Guid? properties: Returns valid for any value except Guid.Empty. Note that it should return valid for null values - if the value should not be null or empty, use two attributes: [Required, NotEmpty]
  • For all other types: All values should be valid, including null, as this attribute doesn't make sense for non-Guid properties. The behaviour here is essentially undefined, so you could have the attribute always return invalid if you prefer.

The following attribute satisfies all those properties:

[AttributeUsage(
    AttributeTargets.Property | AttributeTargets.Field | AttributeTargets.Parameter, 
    AllowMultiple = false)]
public class NotEmptyAttribute : ValidationAttribute
{
    public const string DefaultErrorMessage = "The {0} field must not be empty";
    public NotEmptyAttribute() : base(DefaultErrorMessage) { }

    public override bool IsValid(object value)
    {
        //NotEmpty doesn't necessarily mean required
        if (value is null)
        {
            return true;
        }

        switch (value)
        {
            case Guid guid:
                return guid != Guid.Empty;
            default:
                return true;
        }
    }
}

You can add this attribute to the previously described UpdateNameModel model to guard against empty values in Id. Note that this guards both against the case where the request body contained no value for Id, and also the case where an explicit empty (i.e. all zeros) Guid was provided.

public class UpdateNameModel
{
    [NotEmpty]
    public Guid Id { get; set; }

    [Required(AllowEmptyStrings = false)]
    [StringLength(100)]
    public string Name { get; set; }
}

The NotDefaultAttribute for structs in general

The [NotEmpty] attribute is one I find I need commonly as ID values are often provided as Guids, and Guid.Empty is rarely used. However it's possible that you may want to use a similar approach for other structs. For example, you might want a DateTime to not have the default value DateTime.MinValue.

One option is to create different attributes for each struct you care about, for example a NotMinValueAttribute for the case of DateTime. Alternatively, we could create a more general attribute that can be applied to any struct.

Instead of comparing to a specific value (Guid.Empty or DateTime.MinValue), in the general case we compare a value to the default for that data type. For consistency with other validation attributes, we won't apply the validation to null values - null values will always be valid unless you've also applied the Required attribute.

Note: I haven't extensively tested this attribute, it was just something I thought about when writing up the NotEmpty attribute! It assumes that it's possible to create an instance of the default value, so non-public types or types containing generic-parameters will cause runtime exceptions. It's probably unlikely you're using those types in your public models, but it's something to keep in mind.

 public class NotDefaultAttribute : ValidationAttribute
{
    public const string DefaultErrorMessage = "The {0} field must not have the default value";
    public NotDefaultAttribute() : base(DefaultErrorMessage) { }

    public override bool IsValid(object value)
    {
        //NotDefault doesn't necessarily mean required
        if (value is null)
        {
            return true;
        }

        var type = value.GetType();
        if (type.IsValueType)
        {
            var defaultValue = Activator.CreateInstance(type);
            return !value.Equals(defaultValue);
        }

        // non-null ref type
        return true;
    }
}

The overall structure is very similar to the NotEmpty attribute, as you might expect. We start by checking for null, and returning true if that's the case.

To find the default value, we need to get the runtime Type of the provided value using GetType(). If we have a value-type (like Guid or DateTime) then we can use Activator.CreateInstance() to create the default value of the type. We can then compare the provided value to the defaultValue and return false if they match. If the type is not a value type (therefore it's a reference type), we already know the type doesn't have the default value (null), so we return true.

One interesting point is that due to the various boxing of values used in this method, you must use the Equals() method, not the == and != operators when comparing a value to its default. You can see the result of not doing this in the following test.

public class NotDefaultTests
{
    [Fact]
    public void WhenEmpty_NotValid()
    {
        var validator = new NotDefaultAttribute();

        var isValid = validator.IsValid(Guid.Empty);

        Assert.False(isValid); // Fails if you use != instead of !value.Equals(defaultValue)
    }
}

It's also worth pointing out that if you're using FluentValidation, the built-in NotEmpty() validator already handles checking for default (and null) values.

Summary

In this post I described a [NotEmpty] validation attribute that can be used to detect when a Guid property on a model is bound to the default value Guid.Empty. This can happen either because the value isn't model bound at all, or it's explicitly model bound to the default value. I also showed a more general version of the attribute that validates a struct doesn't have its default value.

Creating my first Azure Functions v2.0 app: a WebHook and a timer

$
0
0
Creating my first Azure Functions v2.0 app: a WebHook and a timer

In this post I show how to create your first Azure Functions app, consisting of a timer that runs on a schedule to trigger a build on Netlify, and a WebHook that runs in response to an HTTP request which clears the cache for a website in Cloudflare.This post covers the background, installing the prerequisites for developing Azure Functions with Visual Studio, building, and testing the app.

Why use Azure functions?

Before getting into the meat of the post, I thought I'd give a quick overview of why I decided to use Azure Functions. Serverless computing is all the rage these days, but I haven't used it much up to this point. However, I recently had a perfect use-case when I converted my blog from Ghost to a statically-generated site. I'll probably write a post in the future as to how and why I made that change, but for now I'll focus on a key feature I needed: post scheduling.

My new static-site blog uses a git-based workflow, and is hosted on Netlify. I write posts as markdown files, which are committed to git and pushed to the remote repository. Each post has YAML frontmatter which defines properties such as the title, tags, and the date the post should be published. Whenever a push to master happens Netlify regenerates the static-site, filtering out posts with a future publish date, and deploys it to production.

This is almost all you need to schedule new posts ahead of time. However, by default, the site is only regenerated when you push to master. That means for a scheduled post to appear, you need to trigger another build after it's scheduled date passes.

Azure Functions provided a way for me to automate that process - I didn't want to be logging in to Netlify to trigger a build every Tuesday and Thursday (I publish a blog post every Tuesday, and sometimes Thursdays as well). Instead, I could use an Azure function that runs on a timer to trigger that build for me.

In addition, I'm still using Cloudflare with Netlify. That's probably unnecessary but I've been using Cloudflare for years, and I just like what they do, so I wanted to keep that in place. That means that every time I publish a new post I need to clear Cloudflare's cache. Luckily Cloudflare has an API that allows you to do this, and Netlify allows you to call a WebHook on successful builds. I used an Azure Function to easily connect these two pieces, so that whenever a Netlify build succeeded, it would clear the cache on Cloudflare.

Using Azure Functions with Netlify and Cloudflare

One of the best pieces about using Azure Functions is that it's essentially free for simple cases like this! Azure Functions uses a "consumption" based model, which means you only get charged when your function is running. You can read the pricing details here, but with a free quota of 1 million executions a month, you can go a long way for free. I strongly recommend reading Troy Hunt's various posts on how he can run a popular website and API extremely cheaply using Azure Functions.

So that's the background for my example, a timer function to trigger a build in Netlify, and a WebHook to listen for completed builds, and trigger Cloudflare to clear its cache. In the next section I'll describe how to get started writing Azure Functions with Visual Studio.

Installing the prerequisites

According to the documentation to get started building Azure Functions locally, you should install the Azure development workload from the Visual Studio 2017 installer:

Azure development workload

Feel free to do that, it's the easiest way to get started, and if you're going to be doing more Azure development other than Functions it likely makes sense. But it actually adds a lot more than you need to just build Azure Functions.

Visual Studio is slow enough starting up as it is, so I didn't want to add more GB to its installation size than necessary. I decided to try and trim it down, by selecting individual components. Unfortunately, there's a lot of inter-dependencies between components, so I'm not sure what the minimum set of components is. Key ones seem to be Azure libraries for .NET, Azure Cloud Services build tools, Azure Storage Emulator, and Microsoft Azure WebJobs Tools, plus their dependencies. I've included a list of some of my installed components below for reference, but don't take that as gospel. Still, I managed to shave off nearly 2GB compared to the Azure development workload.

My installed components

Once you've installed the required components, restarted Visual Studio (and possibly your machine 🙁) you need to install the Azure Functions tools. These provide the templates we're going to use to build the app. From inside Visual Studio, click Tools > Extensions and Updates > Updates, and update the Azure Functions and Web Job Tools. If you don't see an update available, make sure the tools are installed, and if so you're good to go.

Azure Functions and Web Job Tools

As an optional extra, you can install the Microsoft Azure Storage Explorer. It's a cross-platform (Electron) app that lets you inspect your Azure storage (think, filesystem) associated with you Azure subscriptions. It also lets you explore the storage emulator you'll use when developing locally. I've found it handy occasionally, but it's not essential.

That's everything installed, lets start building some functions!

Building your first Azure function app

There's two main ways to create Azure Functions: you can author them directly with an in-browser editor, or you can build them locally as a project, and publish them to Azure. I experimented with both, and I Strongly recommend you go with the latter. Getting the full Visual Studio IntelliSense experience is so valuable when you're not familiar with the APIs. It's clearly the right choice from a long-term / CI / maintainability point of view too.

Start by creating an Azure Functions (v2) app. Azure Functions recently released version 2.0, which seems to add a bunch of new things, though as I haven't used v1, I can't really comment! The introductory blog post explains it all well. The main point that caught my eye was that you can use .NET Core 2.1, with all the associated performance benefits.

To create an Azure Functions app, choose File > New Project > Cloud > Azure Functions and provide a name for your app:

Create a new Azure functions app

After clicking OK, you'll be presented with the New Project screen. We'll start by creating a timer trigger to trigger a build on Netlify. Select the Timer trigger, ensure that you're using the v2 version of functions, and the Storage Emulator for storage. Don't worry about the Schedule for now, we'll configure that later.

Configure the app

After clicking OK, you'll be presented with your Azure Functions app, which contains 3 files (in addition to the usual git, project, and solution files):

  • Function1.cs - The Azure Function timer trigger. We'll update and rename this shortly
  • host.json - contains global configuration options that affect all functions for a function app. For our app, it's pretty sparse:
{
    "version": "2.0"
}
  • local.settings.json - Contains app settings, for things like your storage account ID. This file is not committed to your git repo; at runtime, you'll use Application Settings set in the Azure portal itself to provide configuration.
{
  "IsEncrypted": false,
  "Values": {
    "AzureWebJobsStorage": "UseDevelopmentStorage=true",
    "FUNCTIONS_WORKER_RUNTIME": "dotnet"
  }
}

If you hit F5 and Debug your app, you'll see the Azure functions logo popup in a command window, and your app starts. If you're familiar with ASP.NET Core, then the log output will look remarkably familiar:

Starting the app

The functions app will just sit there now. The app contains a single timer that will run every 5 minutes, and write to the console. In the next section, we'll remove this trigger, and create the function that calls Netlify to trigger a build.

Creating the timer trigger

Azure Functions all have an "input binding" which controls when the function will run. The most basic bindings are the timer and HTTP triggers we're using in this post, which run on a schedule or in response to a web request. There are also bindings for things like Blob storage events, Queue events. You can also have "output bindings" which simplifies things like writing to blob storage, or sending a message with Twilio. They're not necessary for this post however, all we need to do is make a simple HTTP request to Netlify.

Replace the Function1 function with the following:

public static class CallBuildWebhook
{
    // {second=0} {minute=15} {hour=10} {day} {month} {day-of-week=(2=Tuesday)}
    private const string TimerSchedule = "0 15 10 * * 2";
    private static HttpClient _client = new HttpClient();

    [FunctionName("CallBuildWebhook")]
    public static async Task RunAsync([TimerTrigger(TimerSchedule)]TimerInfo myTimer, ILogger log)
    {
        log.LogInformation($"Tiggering Blog rebuild at: {DateTime.Now}");

        var buildHookUrl = Environment.GetEnvironmentVariable("BuildHookUrl");

        await _client.PostAsJsonAsync(buildHookUrl, "{}");

        log.LogInformation($"Blog rebuild triggered successfully at: {DateTime.Now}");
    }
}

If we just look at the body of the function for now, there's not much to this function! We start by logging the function call using the ASP.NET Core ILogger abstraction provided as a method argument. We then retrieve the required "BuildHookUrl" as a string from environment variables. When running locally, the values from local.settings.json are available as Environment Variables. Once you publish your app to Azure, the app's Application Settings will be available instead.

Next, we make a request to the provided URL, using the static HttpClient instance. It's important to use a static HttpClient instance (as Troy Hunt found out recently). Finally, we log the completed request. And that's it!

Now we come to the functions-specific aspects. First the [FunctionName] attribute. The name you provide here is used to globally identify the function in your app, so you have to use a unique name per function. Once deployed, this will control the URL that HTTP functions are exposed at, so you should pick something meaningful.

The [TimerTrigger attribute decorating the TimerInfo parameter defines the "input binding" for this function. It's what makes this a "timer" function. The [TimerTrigger] attribute takes a CRON expression that defines a schedule for when the function should run. CRON expressions are very flexible, but also pretty horrendous to understand if you're not familiar with them.

The example schedule I've used says to trigger the function every Tuesday at 10:15 am. The docs include a more thorough description of the required CRON expression, as well as examples. Jsut be careful when copying CRON expressions randomly from Stack Overflow, as some examples omit the (required) second parameter!

The last thing to do is to add the "BuildHookUrl" to local.settings.json under the Values node, and pass in the required build hook URL.

{
  "IsEncrypted": false,
  "Values": {
    "AzureWebJobsStorage": "UseDevelopmentStorage=true",
    "FUNCTIONS_WORKER_RUNTIME": "dotnet",
    "BuildHookUrl": "https://api.netlify.com/build_hooks/1234567890abcdef"
  }
}

If you're building with Netlify, you need to enable incoming webhooks for your app.

You can now test out your function. Unless you happen to be building the app at 10:15 on a Tuesday, you'll want to temporarily set schedule to something more frequent so you can check the function works, e.g. once every 5 minutes: "0 */5 * * * *". If the functions runs correctly, you should see a build triggered in the console log, and on Netlify:

Triggering a build with Azure Functions

That's the timer trigger complete. On to the HTTP trigger!

Creating the HTTP trigger

We have a timer function triggering a build on Netlify on a set schedule. We now want to create an HTTP trigger that Netlify can call when the build is complete, which will clear Cloudflare's cache for your site. This is slightly more involved as you need to obtain your credentials from Cloudflare to call the API. For now, we'll just look at the function itself:

    public static class ClearCloudflareCache
    {
        private static HttpClient _client = new HttpClient
        {
            BaseAddress = new Uri("https://api.cloudflare.com"),
        };

        [FunctionName("ClearCloudflareCache")]
        public static async Task<IActionResult> Run(
            [HttpTrigger(AuthorizationLevel.Function, "post", "get" Route = null)] HttpRequest req, ILogger log)
        {
            var zoneId = Environment.GetEnvironmentVariable("ZoneId");
            var xAuthEmail = Environment.GetEnvironmentVariable("X-Auth-Email");
            var xAuthKey = Environment.GetEnvironmentVariable("X-Auth-Key");

            var path = $"/client/v4/zones/{zoneId}/purge_cache";
            var body = new { purge_everything = true };

            _client.DefaultRequestHeaders.Accept.Clear();
            _client.DefaultRequestHeaders.Add("X-Auth-Email", xAuthEmail);
            _client.DefaultRequestHeaders.Add("X-Auth-Key", xAuthKey);

            var response = await _client.PostAsJsonAsync(path, body);

            if (response.IsSuccessStatusCode)
            {
                return new OkObjectResult("Cloudflare CDN Cleared");
            }

            return new BadRequestObjectResult("Cloudflare rejected clear-cache request");
        }
    }

There's more code to this function, but there's not actually many moving parts. As before, I'll start with the function body, and we'll come back to the triggers later. We start by fetching settings for accessing the Cloudflare API from EnvironmentVariables. To find these values for your account, follow the instructions at the start of this post to find them from your Cloudflare account.

Once we've retrieved the settings, we construct the necessary URL for purging the cache, and set the authorization headers. I've chosen (for simplicity) to purge the whole cache, by providing the JSON object { purge_everything: true } in the body of the POST. Again, we use a static HttpClient to send the request (this time, pre-configured to use the Cloudflare API base address). We can inspect the response to verify the function call was valid using IsSuccessStatusCode and return an OkObjectResult or BadRequestObjectResult, just as you would in an ASP.NET Core MVC controller;

The [HttpTrigger] attribute applied to an HttpRequest object in the function parameters is what makes this an HTTP trigger. You define three key things about the function in this attribute:

  • AuthorizationLevel - This controls who can invoke the function. See the documentation for details.
  • Methods - The HTTP methods that this function will be triggered by. In this case, a POST or a GET
  • Route - a custom route template for defining the URL used to invoke the function. I've left it null so it uses the name of the function.

For authorization, I've chosen AuthorizationLevel.Function. That means the caller (Netlify) must provide a known key specific to this function for it to be authorized. If the key isn't provided, the function won't run. You can provide the key either in an x-functions-key header, or as a code query parameter.

When you hit F5 to run your app, you're provided with a URL to call the HTTP endpoint. If you hit this endpoint, the function will execute; you don't need to worry about authorization when running locally. Setup the required settings inn your local.settings.json file, and give it a try:

Triggering a build with Azure Functions

Another success!

Summary

Azure Functions is a great mechanism for providing custom integrations with third-party services. In this post I showed the basics of getting started with Azure Functions, including installing the prerequisites and creating a new timer and HTTP trigger using Visual Studio.

Exploring the .NET Core MCR Docker files (updated): runtime vs aspnet vs sdk

$
0
0
Exploring the .NET Core MCR Docker files (updated): runtime vs aspnet vs sdk

This is an update to my previous post explaining the difference between the various Linux .NET docker files. Microsoft recently moved its Docker images to Microsoft Container Regitsry (MCR) instead of hosting them on Docker Hub. This post uses the new image names, and includes a translation from the old image names to the new image names.

When you build and deploy an application in Docker, you define how your image should be built using a Dockerfile. This file lists the steps required to create the image, for example: set an environment variable, copy a file, or run a script. Whenever a step is run, a new layer is created. Your final Docker image consists of all the changes introduced by these layers in your Dockerfile.

Typically, you don't start from an empty image where you need to install an operating system, but from a "base" image that contains an already-configured OS. For .NET Core development, Microsoft provide a number of different images depending on what it is you're trying to achieve.

In this post, I look at the various Docker base images available for .NET Core development, how they differ, and when you should use each of them. I'm only going to look at the Linux amd64 images, but there are Windows container versions and even Linux arm32 images available too. At the time of writing the latest (non-preview) images available are 2.2.3 and 2.2.105 for the various runtime and SDK images respectively.

Note: You should normally be specific about which version of a Docker image you build on in your Dockerfiles (i.e. don't use latest). For that reason, all the images I mention in this post use the current latest version numbers, 2.2.105 and 2.2.3. Microsoft recommends dropping the patch number so you get automatic rolling-forward of builds, without having to remember to update all of your Dockerfiles. The downside to that is you can't easily replicate a previous build, so the choice is yours.

I'll start by briefly discussing the difference between the .NET Core SDK and the .NET Core Runtime, as it's an important factor when deciding which base image you need. I'll then walk through each of the images in turn, using the Dockerfiles for each to explain what they contain, and hence what you should use them for.

tl;dr; This is a pretty long post, so for convenience, here's some links to the relevant sections and a one-liner use case:

Note that all of these images are hosted in the Microsoft Container Registry (MCR), but images that were previously available in Docker Hub will continue to do so. I strongly suggest reading the announcement blog post describing the move.

Updating to the new Microsoft Container Registry .NET Core Docker images

If you've been working with .NET Core and Docker for a while, these changes might be a little disorienting. Luckily, if you're working with .NET Core 2.1 or above there's a clear path to switching to the new image names:

  • If you were previously using microsoft/dotnet:2.1.0-runtime-deps:
    • Use mcr.microsoft.com/dotnet/core/runtime-deps:2.1.0
  • If you were previously using microsoft/dotnet:2.1.0-runtime:
    • Use mcr.microsoft.com/dotnet/core/runtime:2.1.0
  • If you were previously using microsoft/dotnet:2.1.0-aspnetcore-runtime:
    • Use mcr.microsoft.com/dotnet/core/aspnet:2.1.0
  • If you were previously using microsoft/dotnet:2.1.300-sdk:
    • Use mcr.microsoft.com/dotnet/core/sdk:2.1.300

Note that not all of the image tags available on Docker Hub are available on MCR. For example, .NET Core 1.0 and 2.0 images (which are now out of support) will not be available in the new MCR repository. They'll continue to be available on Docker Hub.

You can still find a description of all the available images on Docker Hub by viewing the "old" repository at microsoft/dotnet, which redirects to https://hub.docker.com/_/microsoft-dotnet-core. If you're coming from pre-.NET Core 2.1 images, be aware that the microsoft/aspnetcore and microsoft/aspnetcore-build repositories have both been deprecated. There is no true 2.1+ equivalent to the old microsoft/aspnetcore-build:2.0.3 image which included Node, Bower, and Gulp, or the microsoft/aspnetcore-build:1.0-2.0 image which included multiple .NET Core SDKs. Instead, it's recommended you use MultiStage builds to achieve this instead.

The .NET Core Runtime vs the .NET Core SDK

One of the most often lamented aspects of .NET Core and .NET Core development is around version numbers. There are so many different moving parts, and none of the version numbers match up, so it can be difficult to figure out what you need.

For example, on my dev machine I am building .NET Core 2.2 apps, so I installed the .NET Core 2.2 SDK to allow me to do so. When I look at what I have installed using dotnet --info, I get (a more verbose version) of the following:

> dotnet --info
.NET Core SDK (reflecting any global.json):
 Version:   2.2.102
 Commit:    96ff75a873

Runtime Environment:
 OS Name:     Windows
 OS Version:  10.0.17763

Host (useful for support):
  Version: 2.2.1
  Commit:  878dd11e62

.NET Core SDKs installed:
  1.1.9 [C:\Program Files\dotnet\sdk]
  ...
  2.2.102 [C:\Program Files\dotnet\sdk]

.NET Core runtimes installed:
  Microsoft.AspNetCore.All 2.1.0 [C:\Program Files\dotnet\shared\Microsoft.AspNetCore.All]
  ...
  Microsoft.NETCore.App 2.2.1 [C:\Program Files\dotnet\shared\Microsoft.NETCore.App]

To install additional .NET Core runtimes or SDKs:
  https://aka.ms/dotnet-download

There's a lot of numbers there, but the important ones are 2.2.102 which is the version of the command line tools or SDK I'm currently using, and 2.2.1 which is the version of the .NET Core runtime.

In .NET Core 2.1 and above dotnet --info lists all the runtimes and SDKs you have installed. I haven't shown all 39 I apparently have installed… I really need to claim some space back!

Whether you need the .NET Core SDK or the .NET Core runtime depends on what you're trying to do:

  • The .NET Core SDK - This is what you need to build .NET Core applications.
  • The .NET Core Runtime - This is what you need to run .NET Core applications.

When you install the SDK, you get the runtime as well, so on your dev machines you can just install the SDK. However, when it comes to deployment you need to give it a little more thought. The SDK contains everything you need to build a .NET Core app, so it's much larger than the runtime alone (122MB vs 22MB for the MSI files). If you're just going to be running the app on a machine (or in a Docker container) then you don't need the full SDK, the runtime will suffice, and will keep the image as small as possible.

For the rest of this post, I'll walk through the main Docker images available for .NET Core and ASP.NET Core. I assume you have a working knowledge of Docker - if you're new to Docker I suggest checking out Steve Gordon's excellent series on Docker for .NET developers.

1. mcr.microsoft.com/dotnet/core/runtime-deps:2.2.3

  • Contains native dependencies
  • No .NET Core runtime or .NET Core SDK installed
  • Use for running Self-Contained Deployment apps

The first image we'll look at forms the basis for most of the other .NET Core images. It actually doesn't even have .NET Core installed. Instead, it consists of the base debian:stretch-slim image and has all the low-level native dependencies on which .NET Core depends.

The .NET Core 2.2 Docker images are currently all available in four flavours, depending on the OS image they're based on: debian:stretch-slim, ubuntu:bionic, alpine:3.8, and alpine:3.9. There are also ARM32 versions of the debian and ubuntu images. In this post I'm just going to look at the debian images, as they are the default.

The Dockerfile consists of a single RUN command that apt-get installs the required dependencies on top of the base image, and sets a few environment variables for convenience.

FROM debian:stretch-slim

RUN apt-get update \
    && apt-get install -y --no-install-recommends \
        ca-certificates \
        \
# .NET Core dependencies
        libc6 \
        libgcc1 \
        libgssapi-krb5-2 \
        libicu57 \
        liblttng-ust0 \
        libssl1.0.2 \
        libstdc++6 \
        zlib1g \
    && rm -rf /var/lib/apt/lists/*

# Configure Kestrel web server to bind to port 80 when present
ENV ASPNETCORE_URLS=http://+:80 \
    # Enable detection of running in a container
    DOTNET_RUNNING_IN_CONTAINER=true

What should you use it for?

The mcr.microsoft.com/dotnet/core/runtime-deps:2.2.3 image is the basis for subsequent .NET Core runtime installations. Its main use is for when you are building self-contained deployments (SCDs). SCDs are apps that are packaged with the .NET Core runtime for the specific host, so you don't need to install the .NET Core runtime. You do still need the native dependencies though, so this is the image you need.

Note that you can't build SCDs with this image. For that, you'll need the SDK-based image described later in the post, mcr.microsoft.com/dotnet/core/sdk:2.2.105.

2. mcr.microsoft.com/dotnet/core/runtime:2.2.3

  • Contains .NET Core runtime
  • Use for running .NET Core console apps

The next image is one you'll use a lot if you're running .NET Core console apps in production. mcr.microsoft.com/dotnet/core/runtime:2.2.3 builds on the runtime-deps image, and installs the .NET Core Runtime. It downloads the tar ball using curl, verifies the hash, unpacks it, sets up symlinks and removes the old installer.

You can view the Dockerfile for the image here:

ARG REPO=mcr.microsoft.com/dotnet/core/runtime-deps
FROM $REPO:2.2-stretch-slim

RUN apt-get update \
    && apt-get install -y --no-install-recommends \
        curl \
    && rm -rf /var/lib/apt/lists/*

# Install .NET Core
ENV DOTNET_VERSION 2.2.3

RUN curl -SL --output dotnet.tar.gz https://dotnetcli.blob.core.windows.net/dotnet/Runtime/$DOTNET_VERSION/dotnet-runtime-$DOTNET_VERSION-linux-x64.tar.gz \
    && dotnet_sha512='476df111a1a7786b742b69759da36185720707ad45de0550dea418484a401fbe338adb8d1ba2706abdbb7ed5c489e7d7a76579ca50c60168dbebe52e00f7071f' \
    && echo "$dotnet_sha512 dotnet.tar.gz" | sha512sum -c - \
    && mkdir -p /usr/share/dotnet \
    && tar -zxf dotnet.tar.gz -C /usr/share/dotnet \
    && rm dotnet.tar.gz \
    && ln -s /usr/share/dotnet/dotnet /usr/bin/dotnet

What should you use it for?

The mcr.microsoft.com/dotnet/core/runtime:2.2.3 image contains the .NET Core runtime, so you can use it to run any .NET Core 2.2 app such as a console app. You can't use this image to build your app, only to run it.

If you're running a self-contained app then you would be better served by the runtime-deps image. Similarly, if you're running an ASP.NET Core app, then you should use the mcr.microsoft.com/dotnet/core/aspnet:2.2.3 image instead (up next), as it contains the shared runtime required for most ASP.NET Core apps.

3. mcr.microsoft.com/dotnet/core/aspnet:2.2.3

  • Contains .NET Core runtime and the ASP.NET Core shared framework
  • Use for running ASP.NET Core apps
  • Sets the default URL for apps to http://+:80

.NET Core 2.1+ moves away from the runtime store feature introduced in .NET Core 2.0, and replaces it with a series of shared frameworks. This is a similar concept, but with some subtle benefits (to cloud providers in particular, e.g. Microsoft). I wrote a post about the shared framework and the associated Microsoft.AspNetCore.App metapackage here.

By installing the Microsoft.AspNetCore.App shared framework, all the packages that make up the metapackage are already available, so when your app is published, it can exclude those dlls from the output. This makes your published output smaller, and improves layer caching for Docker images.

The mcr.microsoft.com/dotnet/core/apnet:2.2.3 image is very similar to the mcr.microsoft.com/dotnet/core/runtime:2.2.3 image, but instead of just installing the .NET Core runtime and shared framework, it installs the .NET Core runtime and the ASP.NET Core shared framework, so you can run ASP.NET Core apps, as well as .NET Core console apps.

You can view the Dockerfile for the image here:

ARG REPO=mcr.microsoft.com/dotnet/core/runtime-deps
FROM $REPO:2.2-stretch-slim

RUN apt-get update \
    && apt-get install -y --no-install-recommends \
        curl \
    && rm -rf /var/lib/apt/lists/*

# Install ASP.NET Core
ENV ASPNETCORE_VERSION 2.2.3

RUN curl -SL --output aspnetcore.tar.gz https://dotnetcli.blob.core.windows.net/dotnet/aspnetcore/Runtime/$ASPNETCORE_VERSION/aspnetcore-runtime-$ASPNETCORE_VERSION-linux-x64.tar.gz \
    && aspnetcore_sha512='53be8489aafa132c1a7824339c9a0d25f33e6ab0c42f414a8bda014b60ff82a20144032bd7e887d375dc275bb5dbeb71d38c7f90c39016895df8d3cf3c4b7a95' \
    && echo "$aspnetcore_sha512  aspnetcore.tar.gz" | sha512sum -c - \
    && mkdir -p /usr/share/dotnet \
    && tar -zxf aspnetcore.tar.gz -C /usr/share/dotnet \
    && rm aspnetcore.tar.gz \
    && ln -s /usr/share/dotnet/dotnet /usr/bin/dotnet

What should you use it for?

Fairly obviously, for running ASP.NET Core apps! This is the image to use if you've published an ASP.NET Core app and you need to run it in production. It has the smallest possible footprint but all the necessary framework components and optimisations. You can't use it for building your app though, as it doesn't have the SDK installed. For that, you need the following image.

If you want to go really small, check out the Alpine-based images - 163MB vs 255MB for the base image!

4. mcr.microsoft.com/dotnet/core/sdk:2.2.105

  • Contains .NET Core SDK
  • Use for building .NET Core and ASP.NET Core apps

All of the images shown so far can be used for running apps, but in order to build your app, you need the .NET Core SDK image. Unlike all the runtime images which use debian:stretch-slim as the base, the mcr.microsoft.com/dotnet/core/sdk:2.2.105 image uses the buildpack-deps:stretch-scm image. According to the Docker Hub description, the buildpack image:

…includes a large number of "development header" packages needed by various things like Ruby Gems, PyPI modules, etc.…a majority of arbitrary gem install / npm install / pip install should be successful without additional header/development packages…

The stretch-scm tag also ensures common tools like curl, git, and ca-certificates are installed.

The mcr.microsoft.com/dotnet/core/sdk:2.2.105 image installs the native prerequisites (as you saw in the mcr.microsoft.com/dotnet/core/runtime-deps:2.2.3 image), and then installs the .NET Core SDK. Finally, it sets some environment variables and warms up the NuGet package cache by running dotnet help in an empty folder, which makes subsequent dotnet operations faster.

You can view the Dockerfile for the image here:

FROM buildpack-deps:stretch-scm

# Install .NET CLI dependencies
RUN apt-get update \
    && apt-get install -y --no-install-recommends \
        libc6 \
        libgcc1 \
        libgssapi-krb5-2 \
        libicu57 \
        liblttng-ust0 \
        libssl1.0.2 \
        libstdc++6 \
        zlib1g \
    && rm -rf /var/lib/apt/lists/*

# Install .NET Core SDK
ENV DOTNET_SDK_VERSION 2.2.105

RUN curl -SL --output dotnet.tar.gz https://dotnetcli.blob.core.windows.net/dotnet/Sdk/$DOTNET_SDK_VERSION/dotnet-sdk-$DOTNET_SDK_VERSION-linux-x64.tar.gz \
    && dotnet_sha512='b7ad26b344995de91848adec56bda5dfe5fef0b83abaa3e4376dc790cf9786e945b625de1ae4cecaf5c5bef86284652886ed87696581553aeda89ee2e2e99517' \
    && echo "$dotnet_sha512 dotnet.tar.gz" | sha512sum -c - \
    && mkdir -p /usr/share/dotnet \
    && tar -zxf dotnet.tar.gz -C /usr/share/dotnet \
    && rm dotnet.tar.gz \
    && ln -s /usr/share/dotnet/dotnet /usr/bin/dotnet

# Configure web servers to bind to port 80 when present
ENV ASPNETCORE_URLS=http://+:80 \
    # Enable detection of running in a container
    DOTNET_RUNNING_IN_CONTAINER=true \
    # Enable correct mode for dotnet watch (only mode supported in a container)
    DOTNET_USE_POLLING_FILE_WATCHER=true \
    # Skip extraction of XML docs - generally not useful within an image/container - helps performance
    NUGET_XMLDOC_MODE=skip

# Trigger first run experience by running arbitrary cmd to populate local package cache
RUN dotnet help

What should you use it for?

This image has the .NET Core SDK installed, so you can use it for building your .NET Core and ASP.NET Core apps. Technically you can also use this image for running your apps in production as the SDK includes the runtime, but you shouldn't do that in practice. As discussed at the beginning of this post, optimising your Docker images in production is important for performance reasons, but the mcr.microsoft.com/dotnet/core/sdk:2.2.105 image weighs in at a hefty 1.73GB, compared to the 255MB for the mcr.microsoft.com/dotnet/core/runtime:2.2.3 image.

To get the best of both worlds, you should use the SDK image to build your app, and one of the runtime images to run your app in production. You can see how to do this using Docker multi-stage builds in Scott Hanselman's post here, or in my blog series here.

Summary

In this post I walked through some of the common Docker images used in .NET Core 2.2 development. Each of the images have a set of specific use-cases, and it's important you use the right one for your requirements. These images have changed since I wrote the previous version of this post; if you're using an earlier version (< 2.1) of .NET Core check out that one instead.

Using Lambda@Edge to handle Angular client-side routing with S3 and CloudFront

$
0
0
Using Lambda@Edge to handle Angular client-side routing with S3 and CloudFront

In this post I show how to a handle an issue you get when hosting a SPA on AWS with S3 and CloudFront, where reloading the app gives a 403 or 404 response. I'll show how to use Lambda@Edge to handle this by returning the default document (index.html) for the app instead.

Deploying a SPA as static files - the problem with page reloads

One of the plus-sides of using a SPA framework like Angular is that the app consists of only static files (HTML and JavaScript). These files can be deployed to static file hosting and cached using a CDN. If you're deploying to AWS, the obvious choices are S3 and CloudFront.

There's just one problem with this. Many SPA frameworks (including Angular) use client-side routing. The app itself is loaded when you load the home page (e.g. /, or /index.html)

Image of a sample app loading at the route

As you navigate around the app, the URL bar updates to reflect the client-side routing location, without loading additional files from the server:

Image of client-side routing

Unfortunately, the fact the URL updates in this way can cause problems if you are hosting your app as static files on a service like S3. If you reload the page (by pressing F5 for example), the browser will make a request to the server for the document at the provided URL. For example, reloading the page in the image above would send a request to /detail/13.

Unfortunately, there _is_ no file /detail/13 or /detail/13/index.html on the server, so instead of loading the detail page above, you'll get a 404 Not Found error.

404 when reloading a page

This isn't just a problem for page reloads with F5, you get the same problem when trying to navigate to a page by typing a URL in the address bar directly.

The solution to this problem is to intercept these 404 responses on the server, and return the default document for the app (/index.html) instead. This will bootstrap the app, and then subsequently navigate to the /detail/13 route on the client-side.

Image of the solution returning the default document for unknown requests

Achieving this behaviour requires server-side logic, so your CDN or static file hosting must support it.

The simple solution with S3 and CloudFront

The good news is that if you're hosting your SPA files on S3 and using CloudFront as a CDN, the functionality you need is built in for simple cases. I won't go into details here, as this medium article explains it very well, but in summary:

  • Add a new distribution with the S3 bucket hosting your app's files as an origin.
  • Edit the settings for the distribution.
  • Add CustomErrorResponses for both 403 and 404 errors. Customise the response to return index.html instead, and change the status to 200.

This will work for most cases, where you are hosting a single app within a distribution.

However, it's possible to host multiple apps at different paths in CloudFront, and to have separate behaviours for each:

Multiple behaviours hosting multiple apps in CloudFront

CustomErrorResponses are set at the distribution level, so they're no good in the situation above. Instead you need a different custom error behaviour for each separate app (hosted at /customers.app/ and /admin.app/). You can achieve this using AWS Lambda functions deployed to CloudFront, called Lambda@Edge.

For the remainder of this post I'll describe how to setup Lambda@Edge to handle the 404 (and 403) responses by returning the appropriate index.html for each app, such as /customers.app/index.html.

Using Lambda@Edge to customise error responses

As described in the documentation:

Lambda@Edge lets you run Lambda functions to customize content that CloudFront delivers, executing the functions in AWS locations closer to the viewer. The functions run in response to CloudFront events, without provisioning or managing servers. You can use Lambda functions to change CloudFront requests and responses

The first step is to create a new AWS Lambda function. There's many ways to do this, but I just created one by clicking Create Function in the us-east-1 web console:

Important: Make sure your region is set to us-east-1 (N. Virginia), even if that's not your usual region. Lambda functions for use with Lambda@Edge must use this region!

The functions list in the web console

From the following page, choose Author from scratch, add a name for your function, select the Node.js 8.1.0 runtime environment, and configure (or create) a role that will be used to execute the Lambda function:

Creating a new function using the web console

You can now create your Lambda function. I'll go through the JavaScript in the next section.

The Lambda function

In this section I'll go through the Lambda function logic. First I'll present the whole function and then go through it bit-by-bit:

'use strict';

const http = require('https');

const indexPage = 'index.html';

exports.handler = async (event, context, callback) => {
    const cf = event.Records[0].cf;
    const request = cf.request;
    const response = cf.response;
    const statusCode = response.status;

    // Only replace 403 and 404 requests typically received
    // when loading a page for a SPA that uses client-side routing
    const doReplace = request.method === 'GET'
                    && (statusCode == '403' || statusCode == '404');

    const result = doReplace 
        ? await generateResponseAndLog(cf, request, indexPage)
        : response;

    callback(null, result);
};

async function generateResponseAndLog(cf, request, indexPage){

    const domain = cf.config.distributionDomainName;
    const appPath = getAppPath(request.uri);
    const indexPath = `/${appPath}/${indexPage}`;

    const response = await generateResponse(domain, indexPath);

    console.log('response: ' + JSON.stringify(response));

    return response;
}

async function generateResponse(domain, path){
    try {
        // Load HTML index from the CloudFront cache
        const s3Response = await httpGet({ hostname: domain, path: path });

        const headers = s3Response.headers || 
            {
                'content-type': [{ value: 'text/html;charset=UTF-8' }]
            };

        return {
            status: '200',
            headers: wrapAndFilterHeaders(headers),
            body: s3Response.body
        };
    } catch (error) {
        return {
            status: '500',
            headers:{
                'content-type': [{ value: 'text/plain' }]
            },
            body: 'An error occurred loading the page'
        };
    }
}

function httpGet(params) {
    return new Promise((resolve, reject) => {
        http.get(params, (resp) => {
            console.log(`Fetching ${params.hostname}${params.path}, status code : ${resp.statusCode}`);
            let result = {
                headers: resp.headers,
                body: ''
            };
            resp.on('data', (chunk) => { result.body += chunk; });
            resp.on('end', () => { resolve(result); });
        }).on('error', (err) => {
            console.log(`Couldn't fetch ${params.hostname}${params.path} : ${err.message}`);
            reject(err, null);
        });
    });
}

// Get the app path segment e.g. candidates.app, employers.client etc
function getAppPath(path){
    if(!path){
        return '';
    }

    if(path[0] === '/'){
        path = path.slice(1);
    }

    const segments = path.split('/');

    // will always have at least one segment (may be empty)
    return segments[0];
}

// Cloudfront requires header values to be wrapped in an array
function wrapAndFilterHeaders(headers){
    const allowedHeaders = [
        'content-type',
        'content-length',
        'last-modified',
        'date',
        'etag'
    ];

    const responseHeaders = {};

    if(!headers){
        return responseHeaders;
    }

    for(var propName in headers) {
        // only include allowed headers
        if(allowedHeaders.includes(propName.toLowerCase())){
            var header = headers[propName];

            if (Array.isArray(header)){
                // assume already 'wrapped' format
                responseHeaders[propName] = header;
            } else {
                // fix to required format
                responseHeaders[propName] = [{ value: header }];
            }    
        }

    }

    return responseHeaders;
}

The handler function exported at the top of the file is what CloudFront will call when it gets a response from S3. The first thing the handler does is check if the response is a GET request and a 404 or a 403. If it is, we'll generate a new response by calling generateResponseAndLog, otherwise we use the existing response.

generateResponseAndLog() calculates the path for returning the default document by combining the original request domain, the first segment of the URL (admin.app in /admin.app/detail/13), and the default document.

generateResponse() makes a GET request to S3 for the index.html (from the same CloudFront distribution, as we reused the same domain) and converts it into the correct format. Not all headers are allowed, and they have to be added to an object using the following format, so wrapAndFilterHeaders() handles that

{
  "header-name": [{ "value": "header-value"}]
}

Finally, the response is sent with a 200 Ok status code, including the filtered and wrapped headers, and the body of the index.html file.

Testing the lambda function

The Lambda web console includes facilities for testing your function. You can create a test event and invoke your function with it. For examples of the event structure, see the documentation. For example, the following request represents the Response event received by Lambda@Edge after receiving a 404 from the underlying Origin (S3):

{
  "Records": [
    {
      "cf": {
        "config": {
          "distributionDomainName": "d12345678.cloudfront.net",
          "distributionId": "EXAMPLE"
        },
        "request": {
          "uri": "/admin.app/details/13",
          "method": "GET",
          "clientIp": "2001:cdba::3257:9652",
        },
        "response": {
          "status": "404",
          "statusDescription": "Not Found"
        }
      }
    }
  ]
}

As this event contains a 404 response, the function should convert it into a 200 response:

Function test execution successsful

Once you're happy with the function, you can deploy it to Lambda@Edge.

Deploying the function to Lambda@Edge

To deploy the function to CloudFront, choose Actions, and then Deploy to Lambda@Edge

Creating a new function using the web console

If you don't see Deploy to Lambda@Edge in the drop down, you've probably created the Lambda in the wrong region. Remember, you have to create your functions in the us-east-1 region.

After clicking Deploy… you're presented with the deployment options. Choose the distribution for your apps and select the correct behavior for your app. Make sure to set the CloudFront event to Origin response, i.e. the event after the Origin responds but before it sends the response to the user:

Deploying to Lambda@Edge

When you click Deploy on this page, AWS will publish the lambda as version 1, and everything should be configured and running!

Deploy complete

You can test it by reloading your app on a detail page, and if all is set up right, you'll be presented with a functioning app!

Client-side routing working correctly

Bonus: Updating the Lambda@Edge

When you deploy your Lambda, it's automatically configured inside the CloudFront behaviour. You can see the registration yourself by going to CloudFront Distributions > Distribution > Behaviours > Edit Behaviour > Lambda Function Associations:

Updating the Lambda association manually

This can be useful if you want to update the Lambda function definition. To do so, you need to publish a new version of the Lambda, and then update the ARN in CloudFront. The last number in the ARN is the version:

  • arn:aws:lambda:aws-region:acct-id:function:helloworld - Unversioned ARN
  • arn:aws:lambda:aws-region:acct-id:function:helloworld:3 - Published ARN (version 3)
  • arn:aws:lambda:aws-region:acct-id:function:helloworld:$LATEST - Unpublished ARN

Resources

Using strongly-typed entity IDs to avoid primitive obsession (Part 1)

$
0
0
Using strongly-typed entity IDs to avoid primitive obsession (Part 1)

Have you ever requested an entity from a service (web API / database / generic service) and got a 404 / not found response when you're sure it exists? I've seen it quite a few times, and it sometimes comes down to requesting the entity using the wrong ID. In this post I show one way to avoid these sorts of errors by acknowledging the problem as primitive obsession, and using the C# type system to catch the errors for us.

Lots of people smarter than me have talked about primitive obsession in C#. In particular I found these resources by Jimmy Bogard, Mark Seemann, Steve Smith, and Vladimir Khorikov, as well as Martin Fowler's Refactoring book. I've recently started looking into F#, in which this is considered a solved problem as far as I can tell!

An example of the problem

To give some context, below is a very basic example of the problem. Imagine you have an eCommerce site, in which Users can place an Order. An Order for this example is very basic, just the following few properties:

public class Order
{
    public Guid Id { get; set; }
    public Guid UserId { get; set; }
    public decimal Total { get; set; }
}

You can create and read the Orders for a User using the OrderService:

public class OrderService
{
    private readonly List<Order> _orders = new List<Order>();

    public void AddOrder(Order order)
    {
        _orders.Add(order);
    }

    public Order GetOrderForUser(Guid orderId, Guid userId)
    {
        return _orders.FirstOrDefault(
            order => order.Id == orderId && order.UserId == userId);
    }
}

This trivial implementation stores the Order objects in memory, and has just two methods:

  • AddOrder(): Add a new Order to the collection
  • GetOrderForUser(): Get an Order with the given Id and UserId.

Finally, we have an API controller that can be called to create a new Order or fetch an Order:

[Route("api/[controller]")]
[ApiController, Authorize]
public class OrderController : ControllerBase
{
    private readonly OrderService _service;
    public OrderController(OrderService service)
    {
        _service = service;
    }

    [HttpPost]
    public ActionResult<Order> Post()
    {
        var userId = Guid.Parse(User.FindFirstValue(ClaimTypes.NameIdentifier));
        var order = new Order { Id = Guid.NewGuid(), UserId = userId };

        _service.AddOrder(order);

        return Ok(order);
    }

    [HttpGet("{orderId}")]
    public ActionResult<Order> Get(Guid orderId)
    {
        var userId = Guid.Parse(User.FindFirstValue(ClaimTypes.NameIdentifier));
        var order = _service.GetOrderForUser(userId, orderId);

        if (order == null)
        {
            return NotFound();
        }

        return order;
    }
}

This ApiController is protected with an [Authorize] attribute, so users have to be logged in to call it. It exposes two action methods:

  • Post(): Used to create a new Order. The new Order object is returned in the response body.
  • Get(): Used to fetch an order with the provided ID. If found, the Order is returned in the response body.

Both methods need to know the UserId for the currently logged in user, so they find the ClaimTypes.NameIdentifier from the current User claims and parse it into a Guid.

Unfortunately, the code API controller above has a bug.

Did you spot it?

I don't blame you if not, I doubt I would.

The bug - All GUIDs are interchangeable

The code compiles and you can add a new Order successfully, but calling Get() always returns a 404 Not Found.

The problem is on this line in OrderController.Get(), where we're fetching the Order from the OrderService:

var order = _service.GetOrderForUser(userId, orderId);

The signature for that method is:

public Order GetOrderForUser(Guid orderId, Guid userId);

The userId and orderId arguments are inverted at the call site!

This example might seem a little contrived (requiring the userId to be provided feels a bit redundant) but this general pattern is something you'll probably see in practice many times. Part of the problem is that we're using a primitive object (System.Guid) to represent two different concepts: the unique identifier of a user, and the unique identifier of an order. The problem of using primitive values to represent domain concepts is called primitive obsession.

Primitive obsession

"Primitives" in this case refer to the built-in types in C#, bool, int, Guid, string etc. "Primitive obsession" refers to over-using these types to represent domain concepts that aren't a perfect fit. A common example might be a ZipCode or PhoneNumber field that is represented as a string (or even worse, an int!)

A string might make sense initially, after all, you can represent a Zip Code as a string of characters, but there's a couple of problems with this.

First, by using a built-in type (string), all the logic associated with the "Zip Code" concept must be stored somewhere external to the type. For example, only a limited number of string values are valid Zip Codes, so you will no-doubt have some validation for Zip Codes in your app. If you had a ZipCode type you could encapsulate all this logic in one place. Instead, by using a string, you're forced to keep the logic somewhere else. That means the data (the ZipCode field) and the methods for operating on it are separated, breaking encapsulation.

Secondly, by using primitives for domain concepts, you lose a lot of the benefits of the type system. C# won't let you do something like the following:

int total = 1000;
string name = "Jim";
name = total; // compiler error

But it has no problem with this, even though this would almost certainly be a bug:


string phoneNumber = "+1-555-229-1234";
string zipCode = "1000 AP"

zipCode = phoneNumber; // no problem!

You might think this sort of "mis-assignment" is rare, but a common place to find it is in methods that take multiple primitive objects as parameters. This was the problem in the original GetOrderForUser() method.

So what's the solution to this primitive obsession?

The answer is encapsulation. Instead of using primitives, we can create custom types for each separate domain concept. Instead of a string representing a Zip Code, create a ZipCode class that encapsulates the concept, and use the ZipCode type throughout your domain models and application.

Using strongly-typed IDs

So coming back to the original problem, how do we avoid the transposition error in GetOrderForUser?

var order = _service.GetOrderForUser(userId, orderId);

By using encapsulation! Instead of using a Guid representing the ID of a User or the ID of an Order, we can create strongly-typed IDs for both. So instead of a method signature like this:

public Order GetOrderForUser(Guid orderId, Guid userId);

You have a method like this (note the method argument types):

public Order GetOrderForUser(OrderId orderId, UserId userId);

An OrderId cannot be assigned to a UserId, and vice versa, so there's no way to call the GetOrderForUser method with the arguments in the wrong order - it wouldn't compile!

So what do the OrderId and UserId types look like? That's up to you, but in the following section I show an example of one way you could implement them.

An implementation of OrderId

The following example is an implementation of OrderId.

public readonly struct OrderId : IComparable<OrderId>, IEquatable<OrderId>
{
    public Guid Value { get; }

    public OrderId(Guid value)
    {
        Value = value;
    }

    public static OrderId New() => new OrderId(Guid.NewGuid());

    public bool Equals(OrderId other) => this.Value.Equals(other.Value);
    public int CompareTo(OrderId other) => Value.CompareTo(other.Value);

    public override bool Equals(object obj)
    {
        if (ReferenceEquals(null, obj)) return false;
        return obj is OrderId other && Equals(other);
    }

    public override int GetHashCode() => Value.GetHashCode();
    public override string ToString() => Value.ToString();

    public static bool operator ==(OrderId a, OrderId b) => a.CompareTo(b) == 0;
    public static bool operator !=(OrderId a, OrderId b) => !(a == b);
}

OrderId is implemented as a struct here - it's a simple type that just wraps a Guid, so a class would probably be overkill. That said, if you're using an ORM like EF 6, using a struct might cause you problems, so a class might be easier. That also gives the option of creating a base StronglyTypedId class to avoid some of the boiler plate.

There are some other potential issues with using a stuct, for example implicit parameterless constructors. Vladimir has a discussion about these problems here.

The only data in the type is held in the property, Value, which wraps the original Guid value that we were previously passing around. We have a single constructor that requires you pass in the Guid value.

Most of the functions are overrides of the standard object methods, and implementations of the IEquatable<T> and IComparable<T> methods to make it easier to work with the type. There's also overrides for the equality operators. I've written a few example tests demonstrating the type below.

Note, as Jared Parsons suggests in his recent post, I marked the stuct as readonly for performance reasons.. You need to be using C# 7.2 at least to use readonly struct.

Testing the strongly-typed ID behaviour

The following xUnit tests demonstrate some of the characteristics of the strongly-typed ID OrderId. They also use a (similarly defined) UserId to demonstrate that they are distinct types.

public class StronglyTypedIdTests
{
    [Fact]
    public void SameValuesAreEqual()
    {
        var id = Guid.NewGuid();
        var order1 = new OrderId(id);
        var order2 = new OrderId(id);

        Assert.Equal(order1, order2);
    }

    [Fact]
    public void DifferentValuesAreUnequal()
    {
        var order1 = OrderId.New();
        var order2 = OrderId.New();

        Assert.NotEqual(order1, order2);
    }

    [Fact]
    public void DifferentTypesAreUnequal()
    {
        var userId = UserId.New();
        var orderId = OrderId.New();

        //Assert.NotEqual(userId, orderId); // does not compile
        Assert.NotEqual((object) bar, (object) foo);
    }

    [Fact]
    public void OperatorsWorkCorrectly()
    {
        var id = Guid.NewGuid();
        var same1 = new OrderId(id);
        var same2 = new OrderId(id);
        var different = OrderId.New();

        Assert.True(same1 == same2);
        Assert.True(same1 != different);
        Assert.False(same1 == different);
        Assert.False(same1 != same2);
    }
}

By using strongly-typed IDs like these we can take full advantage of the C# type system to ensure different concepts cannot be accidentally used interchangeably. Using these types in the core of your domain will help prevent simple bugs like incorrect argument order issues, which can be easy to do, and tricky to spot!

Unfortunately, it's not all sunshine and roses. You may be able to use these types in the core of your domain easily enough, but inevitably you'll eventually have to interface with the outside world. These days, that's typically via JSON APIs, often using MVC with ASP.NET Core. In the next post I'll show how to create some simple convertors to make working with your strongly-typed IDs simpler.

Summary

C# has a great type system, so we should use it! Primitive obsession is very common, but you should do your best to fight against it. In this post I showed a way to avoid issues with incorrectly using IDs by using strongly-typed IDs, so the type system can protect you. In the next post I'll extend these types to make them easier to use in an ASP.NET Core app.

Viewing all 743 articles
Browse latest View live