Quantcast
Channel: Andrew Lock | .NET Escapades
Viewing all 743 articles
Browse latest View live

Building .NET Framework ASP.NET Core apps on Linux using Mono and the .NET CLI

$
0
0
Building .NET Framework ASP.NET Core apps on Linux using Mono and the .NET CLI

I've been hitting Docker hard (as regulars will notice from the topic of recent posts!), and thanks to .NET Core, it's all been pretty smooth sailing. However, I had a requirement for building a library that multi-tartgets both full .NET framework and .NET Standard, to try to avoid some of the dependency hell you can get into.

Building full .NET framework apps requires that you have .NET Framework installed on your machine (or at least the reference assemblies), which is fine when I'm building locally, as I'm working on Windows. However, I wanted to build my apps in Docker on the build server, which is running on Linux.

I'd played around before with using Mono as a target, but I'd never got very far. However, I recently stumbled across this open issue which contains a number of workarounds. I gave it a try, and evntually got it working!

In this post I'll describe the steps to get an ASP.NET Core library that targets both .NET Framework and .NET Standard, building, and running tests, on Linux as well as Windows.

tl;dr; Add a .props file to your project and reference it in each project that builds on full framework. You may also need to add explicit references to some Facade assemblies like System.Runtime, System.IO, and System.Threading.Tasks.

Using Mono for running .NET Core tests on Linux

The first point worth making is that I want to be able to run on Linux under the full .NET Framework, not just build. That's an important distinction, as it means I can run unit tests across all target frameworks on both Windows and Linux.

As discussed by John Skeet in the aforementioned issue, if you just want to build on Linux and target .NET Framework, then you shouldn't need to install Mono at all - reference assemblies should be sufficient. However, .NET Core tests are executables, which means you need to actually run them. Which brings me back to Mono.

As I described in a previous post, I typically already have Mono installed in my Linux Docker images, as I'm using the full-framework version of Cake (instead of .NET Core-based Cake.CoreClr). My initial reasons for that are less relevant with the recent Cake releases, but as I already have a working build process, I'm not inclined to switch just yet. Especially if I need to use Mono for running tests anyway!

Adding FrameworkPathOverrides for Linux

Unfortunately, installing Mono is only the first hurdle you'll face if you try and build your multi-targeted .NET Core apps on Linux. If you just try running the build without changing your project, you'll get an error something like the following:

error MSB3644: The reference assemblies for framework ".NETFramework,Version=v4.5.1" were not found. To resolve this, install the SDK or Targeting Pack for this framework version or retarget your application to a version of the framework for which you have the SDK or Targeting Pack installed. Note that assemblies will be resolved from the Global Assembly Cache (GAC) and will be used in place of reference assemblies. Therefore your assembly may not be correctly targeted for the framework you intend.

When MSBuild (which the dotnet CLI uses under-the-hood) compiles an application, it needs to use "reference assemblies" so it knows which APIs are actually available for you to call. When you build on Windows, MSBuild knows the standard locations where these libraries can be found, but for building on Mono, it needs help.

That's where the following .props file comes in. This file (courtesy of this comment on GitHub), when referenced by a project, looks in the common install locations for Mono and sets the FrameworkPathOverride property as appropriate. MSBuild uses this property to locate the Framework libraries required to build your app.

<Project ToolsVersion="4.0" DefaultTargets="Build" xmlns="http://schemas.microsoft.com/developer/msbuild/2003">  
  <PropertyGroup>
    <!-- When compiling .NET SDK 2.0 projects targeting .NET 4.x on Mono using 'dotnet build' you -->
    <!-- have to teach MSBuild where the Mono copy of the reference asssemblies is -->
    <TargetIsMono Condition="$(TargetFramework.StartsWith('net4')) and '$(OS)' == 'Unix'">true</TargetIsMono>

    <!-- Look in the standard install locations -->
    <BaseFrameworkPathOverrideForMono Condition="'$(BaseFrameworkPathOverrideForMono)' == '' AND '$(TargetIsMono)' == 'true' AND EXISTS('/Library/Frameworks/Mono.framework/Versions/Current/lib/mono')">/Library/Frameworks/Mono.framework/Versions/Current/lib/mono</BaseFrameworkPathOverrideForMono>
    <BaseFrameworkPathOverrideForMono Condition="'$(BaseFrameworkPathOverrideForMono)' == '' AND '$(TargetIsMono)' == 'true' AND EXISTS('/usr/lib/mono')">/usr/lib/mono</BaseFrameworkPathOverrideForMono>
    <BaseFrameworkPathOverrideForMono Condition="'$(BaseFrameworkPathOverrideForMono)' == '' AND '$(TargetIsMono)' == 'true' AND EXISTS('/usr/local/lib/mono')">/usr/local/lib/mono</BaseFrameworkPathOverrideForMono>

    <!-- If we found Mono reference assemblies, then use them -->
    <FrameworkPathOverride Condition="'$(BaseFrameworkPathOverrideForMono)' != '' AND '$(TargetFramework)' == 'net45'">$(BaseFrameworkPathOverrideForMono)/4.5-api</FrameworkPathOverride>
    <FrameworkPathOverride Condition="'$(BaseFrameworkPathOverrideForMono)' != '' AND '$(TargetFramework)' == 'net451'">$(BaseFrameworkPathOverrideForMono)/4.5.1-api</FrameworkPathOverride>
    <FrameworkPathOverride Condition="'$(BaseFrameworkPathOverrideForMono)' != '' AND '$(TargetFramework)' == 'net452'">$(BaseFrameworkPathOverrideForMono)/4.5.2-api</FrameworkPathOverride>
    <FrameworkPathOverride Condition="'$(BaseFrameworkPathOverrideForMono)' != '' AND '$(TargetFramework)' == 'net46'">$(BaseFrameworkPathOverrideForMono)/4.6-api</FrameworkPathOverride>
    <FrameworkPathOverride Condition="'$(BaseFrameworkPathOverrideForMono)' != '' AND '$(TargetFramework)' == 'net461'">$(BaseFrameworkPathOverrideForMono)/4.6.1-api</FrameworkPathOverride>
    <FrameworkPathOverride Condition="'$(BaseFrameworkPathOverrideForMono)' != '' AND '$(TargetFramework)' == 'net462'">$(BaseFrameworkPathOverrideForMono)/4.6.2-api</FrameworkPathOverride>
    <FrameworkPathOverride Condition="'$(BaseFrameworkPathOverrideForMono)' != '' AND '$(TargetFramework)' == 'net47'">$(BaseFrameworkPathOverrideForMono)/4.7-api</FrameworkPathOverride>
    <FrameworkPathOverride Condition="'$(BaseFrameworkPathOverrideForMono)' != '' AND '$(TargetFramework)' == 'net471'">$(BaseFrameworkPathOverrideForMono)/4.7.1-api</FrameworkPathOverride>
    <EnableFrameworkPathOverride Condition="'$(BaseFrameworkPathOverrideForMono)' != ''">true</EnableFrameworkPathOverride>

    <!-- Add the Facades directory.  Not sure how else to do this. Necessary at least for .NET 4.5 -->
    <AssemblySearchPaths Condition="'$(BaseFrameworkPathOverrideForMono)' != ''">$(FrameworkPathOverride)/Facades;$(AssemblySearchPaths)</AssemblySearchPaths>
  </PropertyGroup>
</Project>  

You could copy this into each .csproj file, but a better approach is to put it into a file in your root directory, netfx.props for example, and import it into each project file. For example:

<Project Sdk="Microsoft.NET.Sdk">  
  <Import Project="..\netfx.props" />

  <PropertyGroup>
    <TargetFrameworks>net452;netsandard2.0</TargetFrameworks>
  </PropertyGroup>
</Project>  

Note, I tried to use Directory.Build.props to automatically import the file into every project, but I couldn't get it to work. I'm guessing the properties are imported at the wrong time, so I think you'll have to stick to the manual approach.

With the path to the framework libraries overwritten, you're one step closer to running full framework on Linux, but you're not quite there yet.

Adding references to facade libraries

If you try the above solutions in your own projects, you'll likely see a different set of errors, complaining about missing basic types like Attribute, Task, or Stream:

CS0012: The type 'Attribute' is defined in an assembly that is not referenced. You must add a reference to assembly 'System.Runtime, Version=4.0.0.0

To fix these errors, you need to add references to the indicated assemblies to your projects. You can add these libraries using a conditional, so they're only referenced when building full .NET Framework apps, but not .NET Standard or .NET Core apps:

<Project Sdk="Microsoft.NET.Sdk">  
  <Import Project="..\..\netfx.props" />

  <PropertyGroup>
    <TargetFrameworks>net452;netstandard1.5</TargetFrameworks>
  </PropertyGroup>

  <ItemGroup Condition=" '$(TargetFramework)' == 'net452' ">
    <Reference Include="System" />
    <Reference Include="System.IO" />
    <Reference Include="System.Runtime" />
    <Reference Include="System.Threading.Tasks" />
  </ItemGroup>

</Project>  

We're getting closer, the app builds now, but if you're running your tests with xUnit (as I was) then you'll likely see exceptions when running your tests with dotnet test.

Fixing errors in xUnit running on Mono

After adding the required facade assembly references to my test projects, I was seeing the following error in the test phase of my app build, a NullReferenceException in System.Runtime.Remoting:

Catastrophic failure: System.NullReferenceException: Object reference not set to an instance of an object

Server stack trace:  
  at System.Runtime.Remoting.ClientIdentity.get_ClientProxy () [0x00000] in <71d8ad678db34313b7f718a414dfcb25>:0 
  at System.Runtime.Remoting.RemotingServices.GetOrCreateClientIdentity (System.Runtime.Remoting.ObjRef objRef, System.Type proxyType, System.Object& clientProxy) [0x00068] in <71d8ad678db34313b7f718a414dfcb25>:0 
  at System.Runtime.Remoting.RemotingServices.GetRemoteObject (System.Runtime.Remoting.ObjRef objRef, System.Type proxyType) [0x00000] in <71d8ad678db34313b7f718a414dfcb25>:0 

Apparently this is due to some long-standing bugs in Mono related to app domains. The simplest solution was to just disable app domains for my tests.

To disable app domains, add an xunit.runner.json file to your test project, containing the following content. If you already have a xunit.runner.json file, add the appDomain property.

{ "appDomain": "denied" }

Ensure the file is copied to the build output by referencing it in your test project's .csproj file with the CopyToOutputDirectory directory set to PreserveNewest or Always:

<ItemGroup>  
  <Content Include="xunit.runner.json" CopyToOutputDirectory="PreserveNewest" />
</ItemGroup>  

With these changes, I was finally able to get full .NET Framework tests running on Linux, in addition to my .NET Core tests. You can see an example in my NetEscapades.Configuration library, which uses Cake to build the libraries, running on both Windows and Linux using AppVeyor.

Summary

If you want to run tests of your full .NET Framework libraries on Linux, you'll need to install Mono. You must add a .props file to set the FrameworkPathOverride property, which MSBuild uses to find the Mono assemblies. You may also need to add references to certain facade assemblies. You can add them inside a Condition so they don't affect your .NET Core builds.

Adding validation to strongly typed configuration objects in ASP.NET Core

$
0
0
Adding validation to strongly typed configuration objects in ASP.NET Core

In this post I describe an approach you can use to ensure your strongly typed configuration objects have been correctly bound to your configuration when your app starts up. By using an IStartupFilter, you can validate that your configuration objects have expected values early, instead of at some point later when your app is running.

I'll start by giving some background on the configuration system in ASP.NET Core and how to use strongly typed settings. I'll briefly touch on how to remove the dependency on IOptions, and then look at the problem I'm going to address - where your strongly typed settings are not bound correctly. Finally, I'll provide a solution for the issue, so you can detect any problems at app startup.

Strongly typed configuration in ASP.NET Core

The configuration system in ASP.NET Core is very flexible, allowing you to load configuration from a wide range of locations: JSON files, YAML files, environment variables, Azure Key Vault, and may others. The suggested approach to consuming the final IConfiguration object in your app is to use strongly typed configuration.

Strongly typed configuration uses POCO objects to represent a subset of your configuration, instead of the raw key-value pairs stored in the IConfiguration object. For example, maybe you're integrating with Slack, and are using Webhooks to send messages to a channel. You would need the URL for the webhook, and potentially other settings like the display name your app should use when posting to the channel:

public class SlackApiSettings  
{
    public string WebhookUrl { get; set; }
    public string DisplayName { get; set; }
    public bool ShouldNotify { get; set; }
}

You can bind this strongly typed settings object to your configuration in your Startup class by using the Configure<T>() extension method. For example:

public class Startup  
{
    public Startup(IConfiguration configuration) // inject the configuration into the constructor
    {
        Configuration = configuration;
    }

    public IConfiguration Configuration { get; }

    public void ConfigureServices(IServiceCollection services)
    {
        services.AddMvc();

        // bind the configuration to the SlackApi section
        // i.e. SlackApi:WebhookUrl and SlackApi:DisplayName 
        services.Configure<SlackApiSettings>(Configuration.GetSection("SlackApi")); 
    }

    public void Configure(IApplicationBuilder app)
    {
        app.UseMvc();
    }
}

When you need to use the settings object in your app, you can inject an IOptions<SlackApiSettings> into the constructor. For example, to inject the settings into an MVC controller:

public class TestController : Controller  
{
    private readonly SlackApiSettings _slackApiSettings;
    public TestController(IOptions<SlackApiSettings> options)
    {
        _slackApiSettings = options.Value
    }

    public object Get()
    {
        //do something with _slackApiSettings, just return it as an example
        return _slackApiSettings;
    }
}

Behind the scenes, the ASP.NET Core configuration system creates a new instance of the SlackApiSettings class, and attempts to bind each property to the configuration values contained in the IConfiguration section. To retrieve the settings object, you access IOptions<T>.Value, as shown in the constructor of TestController.

Avoiding the IOptions dependency

Some people (myself included) don't like that your classes are now dependent on IOptions rather than just your settings object. You can avoid this dependency by binding the configuration object manually as described here, instead of using the Configure<T> extension method. A simpler approach is to explicitly register the SlackApiSettings object in the container, and delegate its resolution to the IOptions object. For example:

public void ConfigureServices(IServiceCollection services)  
{
    services.AddMvc();

    // Register the IOptions object
    services.Configure<SlackApiSettings>(Configuration.GetSection("SlackApi")); 

    // Explicitly register the settings object by delegating to the IOptions object
    services.AddSingleton(resolver => 
        resolver.GetRequiredService<IOptions<SlackApiSettings>>().Value);
}

You can now inject the "raw" settings object into your classes, without taking a dependency on the Microsoft.Extensions.Options package. I find this preferable as the IOptions<T> interface is largely just noise in this case.

public class TestController : Controller  
{
    private readonly SlackApiSettings _slackApiSettings;
    // Directly inject the SlackApiSettings, no reference to IOptions needed!
    public TestController(SlackApiSettings settings)
    {
        _slackApiSettings = settings;
    }

    public object Get()
    {
        //do something with _slackApiSettings, just return it as an example
        return _slackApiSettings;
    }
}

This generally works very nicely. I'm a big fan of strongly typed settings, and having first-class support for loading configuration from a wide range of locations is nice. But what happens if you mess up our configuration, maybe you have a typo in your JSON file, for example?

A more common scenario that I've run into is due to the need to store secrets outside of your source code repository. In particular, I've expected a secret configuration value to be available in a staging/production environment, but it wasn't set up correctly. Configuration errors like this are tricky, as they're only really reproducible in the environment in which they occur!

In the next section, I'll show how these sorts of errors can manifest in your application.

What happens if binding fails?

There's a number of different things that could go wrong when binding your strongly typed settings to configuration. In this section I'll show a few examples of errors that could occur by looking at the JSON output from the example TestController.Get action above, which just prints out the values stored in the SlackApiSettings object.

1. Typo in the section name

When you bind your configuration, you typically provide the name of the section to bind. If you think in terms of your appsettings.json file, the section is the key name for an object. "Logging" and "SlackApi" are sections in the following .json file:

{
 "Logging": {
    "LogLevel": {
      "Default": "Warning"
    }
  },
  "AllowedHosts": "*",
  "SlackApi": {
    "WebhookUrl": "http://example.com/test/url",
    "DisplayName": "My fancy bot",
    "ShouldNotify": true
  }
}

In order to bind SlackApiSettings to the "SlackApi" section, you would call:

    services.Configure<SlackApiSettings>(Configuration.GetSection("SlackApi")); 

But what if there's a typo in the section name in your JSON file? Instead of SlackApi, it says SlackApiSettings for example. Hitting the TestController API gives:

{"webhookUrl":null,"displayName":null,"shouldNotify":false}

All of the keys have their default values, but there were no errors. The binding happened, it just bound to an empty configuration section. That's probably bad news, as your code is no doubt expecting webhookUrl etc to be a valid Uri!

2. Typo in a property name

In a similar vein, what happens if the section name is correct, but the property name is wrong. For example, what if WebhookUrl appears as Url in the configuration file? Looking at the output of the TestController API:

{"webhookUrl":null,"displayName":"My fancy bot","shouldNotify":true}

As we have the correct section name, the DisplayName and ShouldNotify properties have have bound correctly to the configuration, but WebhookUrl is null due to the typo. Again, there's no indication from the binder that anything went wrong here.

3. Unbindable properties

The next issue is one that I see people running into now and again. If you use getter-only properties on your strongly typed settings object, they won't bind correctly. For example, if we update our settings object to use readonly properties:

public class SlackApiSettings  
{
    public string WebhookUrl { get; }
    public string DisplayName { get; }
    public bool ShouldNotify { get; }
}

and hit the TestController endpoint again, we're back to default values, as the binder treats those properties as unbindable:

{"webhookUrl":null,"displayName":null,"shouldNotify":false}

4. Incompatible type values

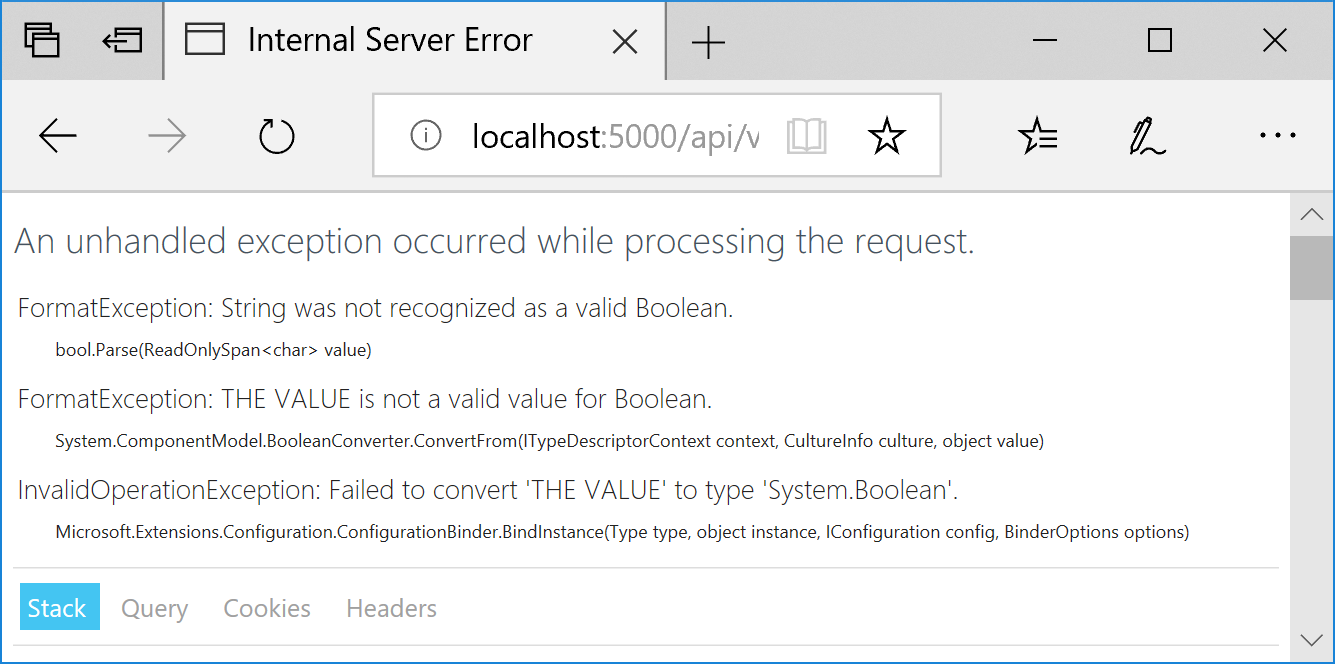
The final error I want to mention is what happens if the binder tries to bind a property with an incompatible type. The configuration is all stored as strings, but the binder can convert to simple types. For example, it will bind "true" or "FALSE" to the bool ShouldNotify property, but if you try to bind something else, "THE VALUE" for example, you'll get an exception when the TestController is loaded, and the binder attempts to create the IOptions<T> object:

Adding validation to strongly typed configuration objects in ASP.NET Core

While not ideal, the fact the binder throws an exception that clearly indicates the problem is actually a good thing. Too many times I've been in a situation trying to figure out why some API call isn't working, only to discover that my connection string or base URL is empty, due to a binding error.

For configuration errors like this, it's preferable to fail as early as possible. Compile time is best, but app startup is a good second-best. The problem currently is that the binding doesn't occur until the IOptions<T> object is requested from the DI container, i.e. when a request arrives for the TestController. If you have a typo error, you don't even get an exception then - you'll have to wait till your code tries to do something invalid with your settings, and then it's often an infuriating NullReferenceException!

To help with this problem, I use a slight re-purposing of the IStartupFilter to create a simple validation step that runs when the app starts up, to ensure your settings are correct.

Creating a settings validation step with an IStartupFilter

The IStartupFilter interface allows you to control the middleware pipeline indirectly, by adding services to your DI container. It's used by the ASP.NET Core framework to do things like add IIS middleware to the start of an app's middleware pipeline, or to add diagnostics middleware.

IStartupFilter is a whole blog post on its own, so I won't go into detail here. Luckily, here's one I made earlier 🙂.

While IStartupFilters can be used to add middleware to the pipeline, they don't have to. Instead, they can simply be used to run some code when the app starts up, after service configuration has happened, but before the app starts handling requests. The DataProtectionStartupFilter takes this approach for example, initialising the key ring just before the app starts handling requests.

This is the approach I suggest to solve the setting validation problem. First, create a simple interface that will be implemented by any settings that require validation:

public interface IValidatable  
{
    void Validate();
}

Next, create an IStartupFilter to call Validate() on all IValidatable objects registered with the DI container:

public class SettingValidationStartupFilter : IStartupFilter  
{
    readonly IEnumerable<IValidatable> _validatableObjects;
    public SettingValidationStartupFilter(IEnumerable<IValidatable> validatableObjects)
    {
        _validatableObjects = validatableObjects;
    }

    public Action<IApplicationBuilder> Configure(Action<IApplicationBuilder> next)
    {
        foreach (var validatableObject in _validatableObjects)
        {
            validatableObject.Validate();
        }

        //don't alter the configuration
        return next;
    }
}

This IStartupFilter doesn't modify the middleware pipeline: it returns next without modifying it. But if any IValidatables throw an exception, then the exception will bubble up, and prevent the app from starting.

You need to register the filter with the DI container, typically in ConfigureServices:

public void ConfigureServices(IServiceCollection services)  
{
    services.AddTransient<IStartupFilter, SettingValidationStartupFilter>()
    // other service configuration
}

Finally, you need to implement the IValidatable interface on your settings that you want to validate at startup. This interface is intentionally very simple. The IStartupFilter needs to execute synchronously, so you cant do anything extravagant here like calling HTTP endpoints or anything. The main idea is to catch issues in the binding process that you otherwise wouldn't catch till runtime, but you could obviously do some more in-depth testing.

To take the SlackApiSettings example, we could implement IValidatable to check that the URL and display name have been bound correctly. On top of that, we can check that the provided URL is actually a valid URL using the Uri class:

public class SlackApiSettings : IValidatable  
{
    public string WebhookUrl { get; set; }
    public string DisplayName { get; set; }
    public bool ShouldNotify { get; set; }

    public void Validate()
    {
        if (string.IsNullOrEmpty(WebhookUrl))
        {
            throw new Exception("SlackApiSettings.WebhookUrl must not be null or empty");
        }

        if (string.IsNullOrEmpty(DisplayName))
        {
            throw new Exception("SlackApiSettings.WebhookUrl must not be null or empty");
        }

        // throws a UriFormatException if not a valid URL
        var uri = new Uri(WebhookUrl);
    }
}

As an alternative to this imperative style, you could use DataAnnotationsAttributes instead, as suggested by Travis Illig in his excellent deep dive on configuration:

public class SlackApiSettings : IValidatable  
{
    [Required, Url]
    public string WebhookUrl { get; set; }
    [Required]
    public string DisplayName { get; set; }
    public bool ShouldNotify { get; set; }

    public void Validate()
    {
        Validator.ValidateObject(this, new ValidationContext(this), validateAllProperties: true);
    }
}

Whichever approach you use, the Validate() method throws an exception if there is a problem with your configuration and binding.

The final step is to register the SlackApiSettings as an IValidatable object in ConfigureServices. We can do this using the same pattern we did to remove the IOptions<> dependency:

public void ConfigureServices(IServiceCollection services)  
{
    services.AddMvc();

    services.AddTransient<IStartupFilter, SettingValidationStartupFilter>()

    // Bind the configuration using IOptions
    services.Configure<SlackApiSettings>(Configuration.GetSection("SlackApi")); 

    // Explicitly register the settings object so IOptions not required (optional)
    services.AddSingleton(resolver => 
        resolver.GetRequiredService<IOptions<SlackApiSettings>>().Value);

    // Register as an IValidatable
    services.AddSingleton<IValidatable>(resolver => 
        resolver.GetRequiredService<IOptions<SlackApiSettings>>().Value);
}

That's all the configuration required, time to put it to the test.

Testing Configuration at app startup

We can test our validator by running any of the failure examples from earlier. For example, if we introduce a typo into the WebhookUrl property, then when we start the app, and before we serve any requests, the app throws an Exception:

Adding validation to strongly typed configuration objects in ASP.NET Core

Now if there's a configuration exception, you'll know about it as soon as possible, instead of only at runtime when you try and use the configuration. The app will never startup - if you're deploying to an environment with rolling deployments, for example Kubernetes, the deployment will never be healthy, which should ensure your previous healthy deployment remains active until you fix the configuration issue.

Using configuration validation in your own projects.

As you've seen, it doesn't take a lot of moving parts to get configuration validation working: you just need an IValidatable interface and an IStartupFilter, and then to wire everything up. Still, for people that want a drop in library to handle this, I've created a small NuGet package called NetEscapades.Configuration.Validation that contains the components, and a couple of helper methods for wiring up the DI container.

If you're using the package, you could rewrite the previous ConfigureServices method as the following:

public void ConfigureServices(IServiceCollection services)  
{
    services.AddMvc();

    services.UseConfigurationValidation();
    services.ConfigureValidatableSetting<SlackApiSettings>(Configuration.GetSection("SlackApi")); 
}

This will register the, IStartupFilter, bind the SlackApiSettings to your configuration, and also register the settings directly in the container (so you don't need to use IOptions<SlackApiSettings>, and as an IValidatable.

It's worth noting that validation only occurs once on app-startup. If you're using validation reloading with IOptionsSnapshot<> then this approach won't work for you.

Summary

The ASP.NET Core configuration system is very flexible and allows you to use strongly typed settings. However, partly due to this flexibility, it's possible to have configuration errors that only appear in certain environments. By default, these errors will only be discovered when your code attempts to use an invalid configuration value (if at all).

In this post, I showed how you could use an IStartupFilter to validate your settings when your app starts up. This ensures you learn about configuration errors as soon as possible, instead of at runtime. The code in this post is available on GitHub, or as the NetEscapades.Configuration.Validation NuGet package.

Converting web.config files to appsettings.json with a .NET Core global tool

$
0
0
Converting web.config files to appsettings.json with a .NET Core global tool

In this post I describe how and why I created a .NET Core global tool to easily convert configuration stored in web.config files to the JSON format more commonly used for configuration in ASP.NET Core.

tl;dr; You can install the tool by running dotnet tool install --global dotnet-config2json. Note that you need to have the .NET Core 2.1 SDK installed.

Background - Converting ASP.NET apps to ASP.NET Core

I've been going through the process of converting a number of ASP.NET projects to ASP.NET Core recently. As these projects are entirely Web APIs and OWIN pipelines, there's a reasonable upgrade path there (I'm not trying to port WebForms to ASP.NET Core)! Some parts are definitely easier to port than others: the MVC controllers work almost out of the box, and where third-party libraries have been upgraded to supported to .NET Standard, everything moves across pretty easily.

One area that's seen a significant change moving from ASP.NET to ASP.NET Core is the configuration system. Whereas ASP.NET largely relied on the static ConfigurationManager reading key-value-pairs from web.config, ASP.NET Core adopts a layered approach that lets you read configuration values from a wide range of sources.

As part of the migrations, I wanted to convert our old web.config-based configuration files to use the more idiomatic appsettings.json and appsettings.Development.json files commonly found in ASP.NET Core projects. I find the JSON files easier to understand, and given that JSON is the defacto standard for this stuff now it made sense to me.

Note: If you really want to, you can continue to store configuration in your .config files, and load the XML directly. There's a sample in the ASP.NET repositories of how to do this.

Before I get into the conversion tool I wrote itself, I'll give an overview of the config files I was working with.

The old config file formats

One of the bonuses with how we were using the .config in our ASP.NET projects, was that it pretty closely matched the concepts in ASP.NET Core. We were using both configuration layers and strongly typed settings.

Layered configuration with .config files

Each configuration file, e.g. global.config, had a sibling file for staging and testing environments, e.g. global.staging.config and global.prod.config. Those files used XML Document transforms which would be applied during deployment to overwrite the earlier values.

For example, the global.config file might look something like this:

<Platform>  
  <add key="SlackApi_WebhookUrl" value="https://hooks.slack.com/services/Some/Url" />
  <add key="SlackApi_DisplayName" value="Slack bot" />
</Platform>  

That would set the SlackApi_WebhookUrl and SlackApi_DisplayName values when running locally. The global.prod.config file might look something like this:

<Platform xmlns:xdt="http://schemas.microsoft.com/XML-Document-Transform">  
  <add key="SlackApi_WebhookUrl" value="https://example.com/something" 
     xdt:Transform="Replace" xdt:Locator="Match(key)" />
</Platform>  

On deployment, the global.prod.config file would be used to transform the global.config file. Where a key matched (as specified by the xdt:Locator attribute), the configuration value would be replaced by the prod equivalent.

While this isn't quite the same as for ASP.NET Core, where the ASP.NET Core app itself overwrites settings with the environment-specific values, it achieves a similar end result.

Note: There should only be non-sensitive settings in these config files. Sensitive values or secrets should be stored externally to the app.

Strongly typed configuration

In ASP.NET Core, the recommended approach to consuming configuration values in code is through strongly typed configuration and the Options pattern. This saves you from using magic strings throughout your code, favouring the ability to inject POCO objects into your services.

We were using a similar pattern in our ASP.NET apps, by using the DictionaryAdapter from Castle. This technique is very similar to the binding operations used to create strongly typed settings in ASP.NET Core. There's a nice write-up of the approach here.

We were also conveniently using a naming convention to map settings from our config files, to their strongly typed equivalent, by using the _ separator in our configuration keys.

For example, the keys SlackApi_WebhookUrl and SlackApi_DisplayName would be mapped to an interface:

public interface ISlackApi  
{
    public string WebhookUrl { get; set; }
    public string DisplayName { get; set; }
}

This is very close to the way ASP.NET Core works. The main difference is that ASP.NET Core requires concrete types (as it instantiates the actual type), rather than the interface required by Castle for generating proxies.

Now you've seen the source material, I'll dive into the requirements of why I wrote a global tool, and what I was trying to achieve.

Requirements for the conversion tool

As you've seen, the config files I've been working with translate well to the new appsettings.json paradigm in ASP.NET Core. But some of our apps have a lot of configuration. I didn't want to manually be copying and pasting, and while I probably could have eventually scripted a conversion with bash or PowerShell, I'm a .NET developer, so I thought I'd write a .NET tool 🙂. Even better, with .NET Core 2.1 I could make a global tool, and use it from any folder.

The tool I was making had just a few requirements:

  • Read the standard <appSettings> and <connectionString> sections of web.config files, as well as the generic <add> style environment-specific .config files shown earlier.
  • Generate nested JSON objects for "configuration sections" demarcated by _, such as the SlackApi show earlier.
  • Be quick to develop - this was just a tool to get other stuff done!

Building the tool

If you're new to global tools, I suggest reading my previous post on building a .NET Core global tool, as well as Nate McMasters blog for a variety of getting started guides and tips. In this post I'm just going to describe the approach I took for solving the problem, rather than focusing on the global tool itself.

.NET Core global tools are just Console apps with <PackAsTool>true</PackAsTool> set in the .csproj. It really is as simple as that!

Parsing the config files

My first task was to read the config files into memory. I didn't want to have to faff with XML parsing myself, so I cribbed judiciously from the sample project in the aspnet/entropy repo. This sample shows how to create a custom ASP.NET Core configuration provider to read from web.config files. Perfect!

I pulled in 4 files from this project (you can view them in the repo):

  • ConfigFileConfigurationProvider
  • ConfigurationAction
  • IConfigurationParser
  • KeyValueParser

If you were going to be using the configuration provider in your app, you'd also need to create an IConfigurationSource, as well as adding some convenience extension methods. For my tool, I manually created a ConfigFileConfigurationProvider instance and passed in the path to the file and the required KeyValueParsers. These two parsers would handle all my use cases, by looking for <add> and <remove> elements with key-value or name-connectionString attributes.

var file = "path/to/config/file/web.config";  
var parsersToUse = new List<IConfigurationParser> {  
    new KeyValueParser(),
    new KeyValueParser("name", "connectionString")
};

// create the provider
var provider = new ConfigFileConfigurationProvider(  
    file, loadFromFile: true, optional: false, parsersToUse);

// Read and parse the file
provider.Load();  

After calling Load(), the provider contains all the key-value pairs in an internal dictionary, so we need to get to them. Unfortunately, that's not as easy as we might like: we can only enumerate all the keys in the Dictionary. To get the KeyValuePairs we need to enumerate the keys and then fetch them from the dictionary one at a time. Obviously this is rubbish performance wise, but it really doesn't matter for this tool! 🙂

const string SectionDelimiter = "_";  
// Get all the keys
var keyValues = provider.GetChildKeys(Enumerable.Empty<string>(), null)  
    .Select(key =>
    {
        // Get the value for the current key
        provider.TryGet(key, out var value);

        // Replace the section delimiter in the key value
        var newKey = string.IsNullOrEmpty(SectionDelimiter)
            ? key
            : key.Replace(SectionDelimiter, ":", StringComparison.OrdinalIgnoreCase);

        // Return the key-value pair
        return new KeyValuePair<string, string>(newKey, value);
    });

We use GetChildKeys to get all the keys from the provider, and then fetch the corresponding values. I'm also transforming the keys if we have a SectionDelimiter string. This will replace all the _ previously used to denote sections, with the ASP.NET Core approach of using :. Why we do this will become clear very shortly!

After this code has run, we'll have a dictionary of values looking something like this:

{
  { "IdentityServer:Host", "local.example.com" },
  { "IdentityServer:ClientId", "MyClientId" },
  { "SlackApi:WebhookUrl",  "https://hooks.slack.com/services/Some/Url" },
  { "SlackApi:DisplayName", "Slack bot" }
}

Converting the flat list into a nested object

At this point we've successfully extracted the files from the the config files into a dictionary. But at the moment it's still a flat dictionary. We want to create a nested JSON structure, something like

{
    "IdentityServer": {
        "Host": "local.example.com",
        "ClientId": "MyClientId
    },
    "SlackApi": {
        "WebhookUrl": "https://hooks.slack.com/services/Some/Url",
        "DisplayName": "Slack bot"
    }
}

I thought about reconstructing this structure myself, but why bother when somebody has already done the work for you? The IConfigurationRoot in ASP.NET Core uses Sections that encapsulate this concept, and allows you to enumerate a section's child keys. By generating an IConfigurationRoot using the keys parsed from the .config files, I could let it generate the internal structure for me, which I could subsequently convert to JSON.

I used the InMemoryConfigurationProvider to pass in my keys to an instance of ConfigurationBuilder, and called Build to get the IConfigurationRoot.

var config = new ConfigurationBuilder()  
    .AddInMemoryCollection(keyValues)
    .Build();

The config object contains all the information about the JSON structure we need, but getting it out in a useful format is not as simple. You can get all the child keys of the configuration, or of a specific section, using GetChildren(), but that includes both the top level sections names (which don't have an associated value), and key-value pairs. Effectively, you have the following key pairs (note the null values)

{ "IdentityServer", null },
{ "IdentityServer:Host", "local.example.com" },
{ "IdentityServer:ClientId", "MyClientId" },
{ "SlackApi", null },
{ "SlackApi:WebhookUrl", "https://hooks.slack.com/services/Some/Url" },
{ "SlackApi:DisplayName", "Slack bot" }

The solution I came up with is this little recursive function to convert the configuration into a JObject

static JObject GetConfigAsJObject(IConfiguration config)  
{
    var root = new JObject();

    foreach (var child in config.GetChildren())
    {
        //not strictly correct, but we'll go with it.
        var isSection = (child.Value == null);
        if (isSection)
        {
            // call the function again, passing in the section-children only
            root.Add(child.Key, GetConfigAsJObject(child));
        }
        else
        {
            root.Add(child.Key, child.Value);
        }
    }

    return root;
}

Calling this function with the config parameter produces the JSON structure we're after. All that remains is to serialize the contents to a file, and the conversion is complete!

var newPath = Path.ChangeExtension(file, "json");  
var contents = JsonConvert.SerializeObject(jsonObject, Formatting.Indented);  
await File.WriteAllTextAsync(newPath, contents);  

I'm sure there must be a function to serialize the JObject directly to the file, rather than in memory first, but I couldn't find it. As I said before, performance isn't something I'm worried about but it's bugging me nevertheless. If you know what I'm after, please let me know in the comments, or send a PR!

Using the global tool

With the console project working as expected, I converted the project to a global tool as described in my previous post and in Nate's posts. If you want to use the tool yourself, first install the .NET Core 2.1 SDK, and then install the tool using

> dotnet tool install --global dotnet-config2json

You can then run the tool and see all the available options using

> dotnet config2json --help

dotnet-config2json

Converts a web.config file to an appsettings.json file

Usage: dotnet config2json [arguments] [options]

Arguments:  
  path          Path to the file or directory to migrate
  delimiter     The character in keys to replace with the section delimiter (:)
  prefix        If provided, an additional namespace to prefix on generated keys

Options:  
  -?|-h|--help  Show help information

Performs basic migration of an xml .config file to  
a JSON file. Uses the 'key' value as the key, and the  
'value' as the value. Can optionally replace a given  
character with the section marker (':').  

I hope you find it useful!

Summary

In this post I described how I went about creating a tool to convert web.config files to .json files when converting ASP.NET apps to ASP.NET Core. I used an existing configuration file parser from the aspnet/entropy repo to load the web.config files into an IConfiguration object, and then used a small recursive function to turn the keys into a JObject. Finally, I turned the tool into a .NET Core 2.1 global tool.

Creating an If Tag Helper to conditionally render content

$
0
0
Creating an If Tag Helper to conditionally render content

One of the best features added to ASP.NET Core Razor is Tag Helpers. These can be added to standard HTML elements, and can participate in their rendering. Alternatively, they can be entirely new elements. Functionally, they are similar to the Html Helpers of previous version of ASP.NET, in that they can be used to easily create forms and other elements.

One of the big advantages of Tag Helpers over Html Helpers is their syntax - they look like standard HTML attributes, so they're easy to edit in a standard HTML editor. Unfortunately there are some C# structures that don't currently have a Tag Helper equivalent.

In this short post, I'll create a simple tag helper to conditionally render content in a Razor page, equivalent to adding an @if statement to standard Razor.

The Razor @if statement

As an example, I am going to create tag helpers for writing the following example razor:

@if(true)
{
    <p>Included</p>
}
@if(false)
{
    <p>Excluded</p>
}

This code renders the first <p> but not the second. Pretty self explanatory, but it can be jarring to read code that switches between C# and markup in this fashion. It's especially obvious here as the syntax highlighter I use doesn't understand Razor, just markup. That's one of the selling points of Tag Helpers - making your Razor pages easier to understand for standard HTML parsers.

The Tag Helper version

The final result we're aiming for is the following:

<if include-if="true">  
    <p>Included</p>
</if>  
<if include-if="false">  
    <p>Excluded</p>
</if>  

As we are are writing a custom Tag Helper we can also easily support the alternative approach, where we can either include or exclude the inner markup based on a variable:

<if include-if="true">  
    <p>Included</p>
</if>  
<if exclude-if="true">  
    <p>Excluded</p>
</if>  

The inner markup will only be rendered if the include-if attribute evaluates to true, and the exclude-if attribute evaluates to false.

Let's take a look at the implementation.

The IfTagHelper

The IfTagHelper implementation is pretty simple. We inherit from the TagHelper class, and expose two properties as attributes on the element - Include and Exclude. We override the Process() function, and conditionally suppress the output content if necessary:

public class IfTagHelper : TagHelper  
{
    public override int Order => -1000;

    [HtmlAttributeName("include-if")]
    public bool Include { get; set; } = true;

    [HtmlAttributeName("exclude-if")]
    public bool Exclude { get; set; } = false;

    public override void Process(TagHelperContext context, TagHelperOutput output)
    {
        // Always strip the outer tag name as we never want <if> to render
        output.TagName = null;

        if (Include && !Exclude)
        {
            return;
        }

        output.SuppressOutput();
    }
}

The Process function is where we control whether to render the inner content or not.

First, whether or not we render the inner content, we want to ensure the <if> attribute is not rendered to the final output. We can achieve this by setting output.TagName = null;.

Next, we check whether we should render the content inside the <if> tag or not. If not, then we just return from the tag handler, as no further processing is required. The inner content will be rendered as normal.

If we don't want to render the contents, then we need to suppress the rendering by calling output.SuppressOutput();. This ensures none of the content within the <if> tag is rendered to the output.

The result

So, finally, lets take a look at how this all plays out - for the following Razor:

<if>  
    <p>Included 1</p>
</if>  
<if include-if="1 == 1">  
    <p>Included 2</p>
</if>  
<if exclude-if="false">  
    <p>Included 3</p>
</if>

<if include-if="false">  
    <p>Excluded 1</p>
</if>  
<if exclude-if="1 == 1">  
    <p>Excluded 2</p>
</if>  

Note that the content inside the include-if or exclude-if attributes is C# - you can include any C# expression there that evaluates to a boolean. The following HTML will be rendered:

<p>Included 1</p>  
<p>Included 2</p>  
<p>Included 3</p>  

An alternative tag helper using attributes

In this example, I created a standalone <if> Tag Helper that you can wrap around content that you want to conditionally show or hide. However, you may prefer to have a Tag Helper that you attach as an attribute to standard HTML elements. For example:

<p include-if="1 == 1">Included</p>  
<p exclude-if="true">Excluded</p>  

This is easy to achieve with a few simple modifications, but I'll leave it as an exercise to the reader. If you just want to see the code, I have an example on GitHub, or you can check out the example in the ASP.NET Core documentation which does exactly this!

Summary

This simple Tag Helper can be used to reduce the amount of C# in your Razor files, making it easier to read and edit with HTML editors. You can find the code for this post on GitHub.

The ASP.NET Core Generic Host: namespace clashes and extension methods

$
0
0
The ASP.NET Core Generic Host: namespace clashes and extension methods

ASP.NET Core 2.1 introduced the ASP.NET Core Generic Host for non-HTTP scenarios. In standard HTTP ASP.NET Core applications, you configure your app using the WebHostBuilder in ASP.NET Core, but for non-HTTP scenarios (e.g. messaging apps, background tasks) you use the generic HostBuilder.

In this post I describe some of the similarities and differences between the standard ASP.NET Core WebHostBuilder used to build HTTP endpoints, and the HostBuilder used to build non-HTTP services. I discuss the fact that they use similar, but completely separate abstractions, and how that fact will impact you if you try and take code written for a standard ASP.NET Core application, and reuse it with a generic host.

If the generic host is new to you, I recommend checking out Steve Gordon's introductory post. For more detail on the nuts-and-bolts, take a look at the documentation.

How does HostBuilder differ from WebHostBuilder?

ASP.NET Core is used primarily to build HTTP endpoints using the Kestrel web server. A WebHostBuilder defines the configuration, logging, and dependency injection (DI) for your application, as well as the actual HTTP endpoint behaviour. By default, the templates use the CreateDefaultBuilder extension method on WebHost in program.cs:

public class Program  
{
    public static void Main(string[] args)
    {
        CreateWebHostBuilder(args).Build().Run();
    }

    public static IWebHostBuilder CreateWebHostBuilder(string[] args) =>
        WebHost.CreateDefaultBuilder(args)
            .UseStartup<Startup>();
}

This extension method sets up the default configuration providers and logging providers for your app. The UseStartup<T>() extension sets the Startup class where you define the DI services and your app's middleware pipeline.

Generic hosted services have some aspects in common with standard ASP.NET Core apps, and some differences.

Hosted services can use the same configuration, logging, and dependency injection infrastructure as HTTP ASP.NET Core apps. That means you can reuse a lot of the same libraries and classes as you do already (with a big caveat, which I'll come to later).

You can also use a similar pattern for configuring an application, though there's no CreateDefaultBuilder as of yet, so you need to use the ConfigureServices extension methods etc. For example, a basic hosted service might look something like the following:

public class Program  
{
    public static int Main(string[] args)
    {
        CreateHostBuilder(args).Build().Run();
    }

    public static IHostBuilder BuildHost(string[] args) =>
        new HostBuilder()
            .ConfigureLogging(logBuilder => logBuilder.AddConsole())
            .ConfigureHostConfiguration(builder => // setup your app's configuration
            {
                builder
                    .SetBasePath(Directory.GetCurrentDirectory())
                    .AddJsonFile("appsettings.json")
                    .AddEnvironmentVariables();
            })
            .ConfigureServices( services => // configure DI, including the actual background services
                services.AddSingleton<IHostedService, PrintTimeService>());
}

There are a number of differences visible in this program.cs file, compared to a standard ASP.NET Core app:

  1. No default builder - As there's no default builder, you'll need to explicitly call each of the logging/configuration etc extension methods. It makes samples more verbose, but in reality I find this to be the common approach for apps of any size anyway.
  2. No Kestrel - Kestrel is the HTTP server, so we don't (and you can't) use it for generic hosted services.
  3. You can't use a Startup class - Notice that I called ConfigureServices directly on the HostBuilder instance. This is possible in a standard ASP.NET Core app, but it's more common to configure your services in a separate Startup class, along with your middleware pipeline. Generic hosted services don't have that capability. Personally, I find that a little frustrating, and would like to see that feature make it's way to HostBuilder.

There's actually one other major difference which isn't visible from these samples. The IHostBuilder abstraction and it's associates are in a completely different namespace and package to the existing IWebHostBuilder. This causes a lot of compatibility headaches, as you'll see.

Same interfaces, different namespaces

When I started using the generic host, I had made a specific (incorrect) assumption about how the IHostBuilder and IWebHostBuilder were related. Given that they provided very similar cross-cutting functionality to an app (configuration, logging, DI), I assumed that they shared a common base interface. Specifically, I assumed the IWebHostBuilder would be derived from the IHostBuilder - it provides the same functionality and adds HTTP on top, so that seemed logical to me. However, the two interfaces are completely unrelated!

The ASP.NET Core HTTP hosting abstractions

The ASP.NET Core hosting abstractions library, which contains the definition of IWebHostBuilder, is Microsoft.AspNetCore.Hosting.Abstractions. This library contains all the basic classes and interfaces for building an ASP.NET Core web host, e.g.

  • IWebHostBuilder
  • IWebHost
  • IHostingEnvironment
  • WebHostBuilderContext

These interfaces all live in the Microsoft.AspNetCore.Hosting namespace. As an example, here's the IWebHostBuilder interface:

public interface IWebHostBuilder  
{
    IWebHost Build();
    IWebHostBuilder ConfigureAppConfiguration(Action<WebHostBuilderContext, IConfigurationBuilder> configureDelegate);
    IWebHostBuilder ConfigureServices(Action<IServiceCollection> configureServices);
    IWebHostBuilder ConfigureServices(Action<WebHostBuilderContext, IServiceCollection> configureServices);
    string GetSetting(string key);
    IWebHostBuilder UseSetting(string key, string value);
}

The ASP.NET Core generic host abstractions

The generic host abstractions can be found in the Microsoft.Extensions.Hosting.Abstractions library (Extensions instead of AspNetCore). This library contains equivalents of most of the abstractions found in the HTTP hosting abstractions library:

  • IHostBuilder
  • IHost
  • IHostingEnvironment
  • HostBuilderContext

These interfaces all live in the Microsoft.Extensions.Hosting namespace (again, Extensions instead of AspNetCore). The IHostBuilder interface looks like this:

public interface IHostBuilder  
{
    IDictionary<object, object> Properties { get; }
    IHost Build();
    IHostBuilder ConfigureAppConfiguration(Action<HostBuilderContext, IConfigurationBuilder> configureDelegate);
    IHostBuilder ConfigureContainer<TContainerBuilder>(Action<HostBuilderContext, TContainerBuilder> configureDelegate);
    IHostBuilder ConfigureHostConfiguration(Action<IConfigurationBuilder> configureDelegate);
    IHostBuilder ConfigureServices(Action<HostBuilderContext, IServiceCollection> configureDelegate);
    IHostBuilder UseServiceProviderFactory<TContainerBuilder>(IServiceProviderFactory<TContainerBuilder> factory);
}

If you compare this interface to the IWebHostBuilder I showed previously, you'll see some similarities, and some differences. On the similarity side:

  • Both interfaces have a Build() function that returns their respective "Host" interface.
  • Both have a ConfigureAppConfiguration method for setting the app configuration. While both interfaces use the same Microsoft.Extensions.Configuration abstraction IConfigurationBuilder, they each use a different context object - HostBuilderContext or WebHostBuilderContext.
  • Both have a ConfigureServices method, though again the type of the context object differs.

There are many more differences between the interfaces. To highlight a few:

  • The IHostBuilder has a ConfigureHostConfiguration method, for setting host configuration rather than app configuration. This is equivalent to the UseConfiguration extension method on IWebHostBuilder (which under the hood calls IWebHostBuilder.UseSetting).
  • The IHostBuilder has explicit methods for configuring the DI container. This is normally handled in the Startup class for IWebHostBuilder. As HostBuilder doesn't use Startup classes, the functionality is exposed here instead.

These changes, and the lack of a common interface, are just enough to make it difficult to move code that was working in a standard ASP.NET Core app to a generic host app. Which is really annoying!

So why all the changes? To be honest, I haven't dug through GitHub issues and commits to find out, but I'm happy to speculate.

It's always about backward compatibility

The easiest way to avoid breaking something, is to not change it! My guess is that's why we're stuck with these two similar-yet-irritatingly-different interfaces. If Microsoft were to introduce a new common interface, they'd have to modify IWebHostBuilder to implement that interface:

public interface IHostBuilderBase  
{
    IWebHost Build();
}

public interface IWebHostBuilder: IHostBuilderBase  
{
    // IWebHost Build();         <- moved up to base interface
    IWebHostBuilder ConfigureAppConfiguration(Action<WebHostBuilderContext, IConfigurationBuilder> configureDelegate);
    IWebHostBuilder ConfigureServices(Action<IServiceCollection> configureServices);
    IWebHostBuilder ConfigureServices(Action<WebHostBuilderContext, IServiceCollection> configureServices);
    string GetSetting(string key);
    IWebHostBuilder UseSetting(string key, string value);
}

On first look that might seem fine - as long as they only moved methods from IWebHostBuilder to the base interface, and made sure the signatures were the same, any classes implementing IWebHostBuilder would still correctly implement it. But what if the interface was implemented explicitly? For example:

public class MyWebHostBuilder : IWebHostBuilder  
{
    IWebHost IWebHostBuilder.Build() // explicitly implement the interface
    {
        // implementation
    }
    // other methods
}

I'm not 100%, but I suspect that would break some things like overload resolution and such, so would be a no-go for a minor release (and likely a major release to be honest).

The other advantage of creating a completely separate set of abstractions, is a clean slate! For example, the addition of the ConfigureHostConfiguration() method to IHostBuilder suggests an acknowledgment that it should have been a first class citizen for the IWebHostBuilder as well. It also leaves the abstractions free to evolve in their own way.

So if creating a new set of abstractions libraries gives us all these advantages, what's the downside, what do we lose?

Code reuse is out the window

The big problem with the approach of creating new abstractions, is that we have new abstractions! Any "reusable" code that was written for use with the Microsoft.AspNetCore.Hosting abstractions, has to be duplicated if you want to use it with the Microsoft.Extensions.Hosting.

Here's a simple example of the problem that I ran into almost immediately. Imagine you're written an extension method on IHostingEnvironment to check if the current environment is Testing:

using System;  
using Microsoft.AspNetCore.Hosting;

public static class HostingEnvironmentExtensions  
{
    const string Testing = "Testing";
    public static bool IsTesting(this IHostingEnvironment env)
    {
        return string.Equals(env.EnvironmentName, Testing, StringComparison.OrdinalIgnoreCase);
    }
}

It's a simple method, you might use it in various places in your app, in the same way the built-in IsProduction() and IsDevelopment() extension methods are.

Unfortunately, this extension method can't be used in generic hosted services. The IHostingEnvironment used by this code is a different IHostingEnvironment to the generic host abstraction (Extensions namespace vs. AspNetCore namespace).

That means if you have common library code you wanted to share between your HTTP and non-HTTP ASP.NET Core apps, you can't use any of the abstractions found in the hosting abstraction libraries. If you do need to use them, you're left copy-pasting code ☹.

Another example of the issue I found is for third-party libraries that are used for configuration, logging, or DI, and that have a dependency on the hosting abstractions.

For example, I commonly use the excellent Serilog library to add logging to my ASP.NET Core apps. The Serilog.AspNetCore library makes it very easy to add an existing Serilog configuration to your app, with a call to UseSerilog() when configuring your WebHostBuilder:

public static IWebHostBuilder CreateWebHostBuilder(string[] args) =>  
        WebHost.CreateDefaultBuilder(args)
            .UseStartup<Startup>()
            .UseSerilog() // <-- Add this line

Unfortunately, even though the underlying configuration libraries are identical between IWebHostBuilder and IHostBuilder, the UseSerilog() extension method is not available. It's an extension method on IWebHostBuilder not IHostBuilder, which means you can't use the Serilog.AspNetCore library with the generic host.

To get round the issue, I've created a similar library for adding Serilog to generic hosts, called Serilog.Hosting.Extensions that you can find on GitHub. Thanks to everyone in the Serilog project for adopting it officially into the fold, and for making the whole process painless and enjoyable! In my next post I'll cover how to use the library in your generic ASP.NET Core apps.

These problems will basically apply to all code written that depends on the hosting abstractions. The only real way around them is to duplicate the code, and tweak some names and namespaces. It all feels like a missed opportunity to create something cleaner, with an easy upgrade path, and is asking for maintainability issues. As I discussed in the previous section, I'm sure the team have their reasons for the approach taken, but for me, it stings a bit.

Summary

In this post I discussed some of the similarities and differences between the hosting abstractions used in the HTTP ASP.NET Core apps and the non-HTTP generic host. Many of the APIs are similar, but the main hosting abstractions exist in different libraries and namespaces, and aren't iteroperable. That means that code written for one set of abstractions can't be used with the other. Unfortunately, that means there's likely going to be duplicate code required if you want to share behaviour between HTTP and non-HTTP apps.

Adding Serilog to the ASP.NET Core Generic Host

$
0
0
Adding Serilog to the ASP.NET Core Generic Host

ASP.NET Core 2.1 introduced the ASP.NET Core Generic Host for non-HTTP scenarios. In standard HTTP ASP.NET Core applications, you configure your app using the WebHostBuilder in ASP.NET Core, but for non-HTTP scenarios (e.g. messaging apps, background tasks) you use the generic HostBuilder.

In my previous post, I discussed some of the similarities and differences between the IWebHostBuilder and IHostBuilder. In this post I introduce the Serilog.Extensions.Hosting package for ASP.NET Core generic hosts, discuss why it's necessary, and describe how you can use it to add logging with Serilog to your non-HTTP aps.

Why do you need Serilog.Extensions.Hosting?

The goal of the ASP.NET Core generic host is to provide the same cross-cutting capabilities found in traditional ASP.NET Core apps, such as configuration, dependency injection (DI), and logging, to non-HTTP apps. However, it does so while also using a whole new set of abstractions, as discussed in my previous post. If you haven't already, I suggest reading that post for a description of the problem.

Serilog already has a good story for adding logging to your traditional HTTP ASP.NET Core apps with the Serilog.AspNetCore library, as well as an extensive list of available sinks. Unfortunately, the abstraction incompatibilities mean that you can't use this library with generic host ASP.NET Core apps.

Instead, you should use the Serilog.Extensions.Hosting library. This is very similar to the Serilog.AspNetCore library, but designed for the Microsoft.Extensions.Hosting abstractions instead of the Microsoft.AspNetCore.Hosting abstractions (Extensions instead of AspNetCore).

In this post I'll give a quick example of how to use the library, and touch on how it works under the hood. Alternatively, check out the code and Readme on GitHub.

Adding Serilog to a generic Host

The Serilog.Extensions.Hosting package contains a custom ILoggerFactory that uses the standard Microsoft.Extensions.Logging infrastructure to log to Serilog. Any messages that are logged using the standard ILogger interface are sent to Serilog. That includes both custom log messages and infrastructure messages, as you'd expect.

If you're new to Serilog, I suggest seeing their website. I've also written about Serilog previously.

Installing the library

You can install the Serilog.Extensions.Hosting NuGet package into your app using the package manager console, the .NET CLI, or by simply editing your app's .csproj file. You'll also need to add at least one "sink" - this is where Serilog will write the log messages. Serilog.Sinks.Console writes messages to the console for example.

Using the package manager:

Install-Package Serilog.Extensions.Hosting -DependencyVersion Highest  
Install-Package Serilog.Sinks.Console  

Using the .NET CLI:

dotnet add package Serilog.Extensions.Hosting  
dotnet add package Serilog.Sinks.Console  

This will install the packages in your app, as you can see from the .csproj file:

<Project Sdk="Microsoft.NET.Sdk">

  <PropertyGroup>
    <TargetFramework>netcoreapp2.1</TargetFramework>
  </PropertyGroup>

  <ItemGroup>
    <PackageReference Include="Microsoft.AspNetCore.App" />
    <PackageReference Include="Serilog.Sinks.Console" Version="3.0.1" />
    <PackageReference Include="Serilog.Extensions.Hosting" Version="2.0.0" />
  </ItemGroup>

</Project>  

Configuring Serilog in your application

Once you've restored the packages (either automatically or by running dotnet restore), you can configure your app to use Serilog. The recommended approach is to configure Serilog's static Log.Logger object first, before configuring your ASP.NET Core application. That way you can use a try/catch block to ensure any start-up issues with your app are appropriately logged.

In the following example, I manually configure Serilog to only log Information level or higher events. Additionally, only events in the Microsoft namespace of Warning or above will be logged.

You can load the Serilog configuration using IConfiguration objects instead using the Serilog configuration library.

public class Program  
{
    public static int Main(string[] args)
    {
        Log.Logger = new LoggerConfiguration()
            .MinimumLevel.Information()
            .MinimumLevel.Override("Microsoft", LogEventLevel.Warning)
            .Enrich.FromLogContext()
            .WriteTo.Console()
            .CreateLogger();

        try
        {
            Log.Information("Starting host");
            CreateHostBuilder(args).Build().Run();
            return 0;
        }
        catch (Exception ex)
        {
            Log.Fatal(ex, "Host terminated unexpectedly");
            return 1;
        }
        finally
        {
            Log.CloseAndFlush();
        }
    }

    public static IHostBuilder CreateHostBuilder(string[] args); //see below
}

Finally, add the Serilog ILoggerFactory to your IHostBuilder with UserSerilog() method in CreateHostBuilder():

    public static IHostBuilder CreateHostBuilder(string[] args) =>
        new HostBuilder()
            .ConfigureHostConfiguration(builder => { /* Host configuration */ })
            .ConfigureAppConfiguration(builder => { /* App configuration */ })
            .ConfigureServices(services =>  { /* Service configuration */})
            .UseSerilog(); // <- Add this line
}

That's it! When you run your application You'll see log output something like the following (depending on the services you have configured!):

[22:10:39 INF] Starting host
[22:10:39 INF] The current time is: 12/05/2018 10:10:39 +00:00

How the library works behind the scenes

On the face of it, completely replacing the default ASP.NET Core logging system to use a different one seems like a big deal. Luckily, thanks to the use of interfaces, loose coupling, and dependency injection, the code is remarkably simple! The whole extension method we used previously is shown below:

public static class SerilogHostBuilderExtensions  
{
    public static IHostBuilder UseSerilog(this IHostBuilder builder, 
        Serilog.ILogger logger = null, bool dispose = false)
    {
        builder.ConfigureServices((context, collection) =>
            collection.AddSingleton<ILoggerFactory>(services => new SerilogLoggerFactory(logger, dispose)));
        return builder;
    }
}

The UseSerilog() extension calls the ConfigureServices method on the IHostBuilder, and adds an instance of the SerilogLoggerFactory as the application's ILoggerFactory. Whenever an ILoggerFactory is required by the app (to create an ILogger), the SerilogLoggerFactory will be used.

The SerilogLoggerFactory is essentially a simple wrapper around the SerilogLoggerProvider provided in the Serilog.Extensions.Logging library. This library implements the necessary adapters so Serilog can hook into the APIs required by the Microsoft.Extensions.Logging framework.

The framework's default LoggerFactory implementation allows multiple providers to be active at once (e.g. a Console provider, a Debug provider, a File provider etc). In contrast, the SerilogLoggerFactory allows only the Serilog provider, and ignores all others.

public class SerilogLoggerFactory : ILoggerFactory  
{
    private readonly SerilogLoggerProvider _provider;

    public SerilogLoggerFactory(ILogger logger = null, bool dispose = false)
    {
        _provider = new SerilogLoggerProvider(logger, dispose);
    }

    public void Dispose() => _provider.Dispose();

    public Microsoft.Extensions.Logging.ILogger CreateLogger(string categoryName)
    {
        return _provider.CreateLogger(categoryName);
    }

    public void AddProvider(ILoggerProvider provider)
    {
        // Only Serilog provider is allowed!
        SelfLog.WriteLine("Ignoring added logger provider {0}", provider);
    }
}

And that's it! The whole library only requires two .cs files, but it makes adding Serilog to an ASP.NET Core generic host that little bit easier. I hope you'll give it a try, and obviously raise an issues you find or comments you have on GitHub!

Summary

ASP.NET Core 2.1 introduced the generic host, for handling non-HTTP scenarios, like messaging or background tasks. The generic host uses the same underlying abstractions for configuration, dependency injection, and logging, but the main interfaces exist in a different namespace: Microsoft.Extensions.Hosting instead of Microsoft.AspNetCore.Hosting.

This difference in namespace means you need to use the Serilog.Extensions.Hosting NuGet package to add Serilog logging to your generic host app (instead of Serilog.AspNetCore). After adding the package to your app, configure your static Serilog logger as usual and call UserSerilog() on your IHostBuilder instance.

Using snake case column names with Dapper and PostgreSQL

$
0
0
Using snake case column names with Dapper and PostgreSQL

This is a follow on to a previous post about customising naming conventions for PostgreSQL and EF Core. In this post I describe one way to use snake case naming conventions when using Dapper, rather than EF Core, by using "Schema" utility classes, the nameof() operator, and a ToSnakeCase() extension method.

PostgreSQL and naming conventions

If you're coming from SQL Server, PostgreSQL can seem very pedantic about column names. In SQL Server, case sensitivity doesn't matter for column names, so if a column is named FirstName, then firstName, firstname, or even FIRSTNAME are all valid. Unfortunately, the only way to query that column in PostgreSQL, is using "FirstName" (including the quotes). Using quotes like this can get tiresome, so it's a common convention to use "snake_case" for columns and tables; that is, all-lowercase with _ to separate words e.g. first_name.

If you'd like a bit more background, or you're working with EF Core, I discuss this in greater depth in my previous post.

In the previous post, I described how you can customise EF Core's naming conventions to use snakecase. This ensures all tables, columns, and indexes are generated using snakecase, and that they map correctly to the EF Core entities. To do so, I created a simple ToSnakeCase() extension method that uses a regex to convert "camelCase" strings to "snake_case".

public static class StringExtensions  
{
    public static string ToSnakeCase(this string input)
    {
        if (string.IsNullOrEmpty(input)) { return input; }

        var startUnderscores = Regex.Match(input, @"^_+");
        return startUnderscores + Regex.Replace(input, @"([a-z0-9])([A-Z])", "$1_$2").ToLower();
    }
}

One of the comments on that post from Alex was interested in how to use this method to achieve the same result for Dapper commands:

I'm using Dapper in many parts of my application and i used to name my table in queryies using nameof(), for example: $"SELECT id FROM {nameof(EntityName)}". That way, i could rename entitie's names without replacing each sql query ...


So the naive approach will be to replace it with "SELECT id FROM {nameof(EntityName).ToSnakeCase()}" but, each time the query is "build", the SnakeCase (and the regexp) will be processed, so it'll not be very good in term of performance. Did you know a better approach to this problem ?

Using the nameof() operator with Dapper

Dapper is a micro-ORM that provides various features for querying a database and mapping the results to C# objects. It's not as feature rich as something like EF Core, but it's much more lightweight, and so usually a lot faster. It uses a fundamentally different paradigm to most ORMs: EF Core lets you interact with a database without needing to know any SQL, whereas you use Dapper by writing hand-crafted SQL queries in your app.

Dapper provides a number of extension methods on IDbConnection that serve as the API surface. So say you wanted to query the details of a user with id=123 from a table in PostgreSQL. You could use something like the following:

IDbConnection connection; // get a connection instance from somewhere  
var sql = "SELECT id, first_name, last_name, email FROM users WHERE id = @id";

var user = connection.Query<User>(sql, new { id = 123}).SingleOrDefault();  

The ability to control exactly what SQL code runs on your database can be extremely useful, especially for performance sensitive code. However there are some obvious disadvantages when compared to a more fully featured ORM like EF Core.

One of the most obvious disadvantages is the possibility for typos in your SQL code. You could have typos in your column and table names, or you could have used the wrong syntax. That's largely just the price you pay for this sort of "lower-level" access, but there's a couple of things you can do to reduce the problem.

A common approach, as described in Alex's comment is to use string interpolation and the nameof() operator to inject a bit of type safety into your SQL statements. This works well when the column and tables names of your database correspond to property and class names in your program.

For example, imagine you have the following User type:

public class User  
{
    public int Id { get; set; }
    public string Email { get; set; }
    public string FirstName { get; set; }
    public string LastName { get; set; }
}

If your column names match the property names of User (for example property Id corresponds to column name Id), then you could query the database using the following:

var id = 123;  
var sql = $@"  
    SELECT {nameof(User.Id)},  {nameof(User.FirstName)}, {nameof(User.LastName)} 
    FROM   {nameof(User)}
    WHERE  {nameof(User.Id)} = @{nameof(id)}";

var user = connection.Query<User>(sql, new { id }).SingleOrDefault();  

That all works well as long as everything matches up between your classes and your database schema. But I started off this post by describing snakecase as a common convention of PostgreSQL. Unless you also name your C# properties and classes using snakecase (please don't) you'll need to use a different approach.

Using static schema classes to avoid typos

As Alex described in his comment, you could just call ToSnakeCase() inline when building up your queries:

var id = 123;  
var sql = $@"  
    SELECT {nameof(User.Id).ToSnakeCase()}, 
           {nameof(User.FirstName).ToSnakeCase()}, 
           {nameof(User.LastName).ToSnakeCase()}
    FROM   {nameof(User).ToSnakeCase()}
    WHERE  {nameof(User.Id).ToSnakeCase()} = @{nameof(id)}";

var user = connection.Query<User>(sql, new { id }).SingleOrDefault();  

Unfortunately, calling a regex for every column in every query is pretty wasteful and unnecessary. Instead, I often like to create "schema" classes that just define the column and table names in a central location, reducing the opportunity for typos:

public static class UserSchema  
{
    public static readonly Table { get; } = "user";

    public static class Columns
    {
        public static string Id { get; } = "id";
        public static string Email { get; } = "email";
        public static string FirstName { get; } = "first_name";
        public static string LastName { get; } = "last_name";
    }
}    

Each property of the User class has a corresponding getter-only static property in the UserSchema.Columns class that contains the associated column name. You can then use this schema class in your Dapper SQL queries without performance issues:

var id = 123;  
var sql = $@"  
    SELECT {UserSchema.Columns.Id)},  
           {UserSchema.Columns.FirstName}, 
           {UserSchema.Columns.LastName}
    FROM   {UserSchema.Table}
    WHERE  {UserSchema.Columns.Id} = @{nameof(id)}";

var user = connection.Query<User>(sql, new { id }).SingleOrDefault();  

I've kind of dodged the question at this point - Alex was specifically looking for a way to avoid having to hard code the strings "first_name", "last_name" etc; all I've done is put them in a central location. But we can use this first step to achieve the end goal, by simply replacing those hard-coded strings with their nameof().ToSnakeCase() equivalents:

public static class UserSchema  
{
    public static readonly Table { get; } = nameof(User).ToSnakeCase();

    public static class Columns
    {
        public static string Id { get; } = nameof(User.Id).ToSnakeCase();
        public static string Email { get; } = nameof(User.Email).ToSnakeCase();
        public static string FirstName { get; } = nameof(User.FirstName).ToSnakeCase();
        public static string LastName { get; } = nameof(User.LastName).ToSnakeCase();
    }
} 

Because we used getter-only properties with an initialiser , the nameof().ToSnakeCase() expression is only executed once per column. No matter how many times you use the UserSchema.Columns.Id property in your SQL queries, you only take the regular expression hit once.

Personally, I feel like this strikes a good balance between convenience, performance, and safety. Clearly creating the *Schema tables involves some duplication compared to using hard-coded column names, but I like the strongly-typed feel to the SQL queries using this approach. And when your column and class names don't match directly, it provides a clear advantage over trying to use the User class directly with nameof().

Configuring Dapper to map snake_case results

The schema classes shown here are only one part of the solution to using snake_case column names with Dapper. The *Schema approach helps avoid typos in your SQL queries, but it doesn't help mapping the query results back to your objects.

By default, Dapper expects the columns returned by a query to match the property names of the type you're mapping to. For our User example, that means Dapper expects a column named FirstName, but the actual column name is first_name. Luckily, fixing this is a simple one-liner:

Dapper.DefaultTypeMap.MatchNamesWithUnderscores = true;  

With this statement added to your application, you'll be able to query your PostgreSQL snake_case columns using the *Schema classes, and map them to your POCO classes.

Summary

This post was in response to a comment I received about using snake_case naming conventions with Dapper. The approach I often use to avoid typos in my SQL queries is to create static "schema" classes, that describe the shape of my tables. These classes can then be used in SQL queries with interpolated strings. The properties of the schema classes can use convenience methods such as nameof() and ToSnakeCase() as they are only executed once, instead of on every reference to a column.

If you're using this approach, don't forget to set Dapper.DefaultTypeMap.MatchNamesWithUnderscores = true so you can map your query objects back to your POCO classes!

Creating NuGet packages in Docker using the .NET Core CLI

$
0
0
Creating NuGet packages in Docker using the .NET Core CLI

This is the next post in a series on building ASP.NET Core apps in Docker. In this post, I discuss how you can create NuGet packages when you build your app in Docker using the .NET Core CLI.

There's nothing particularly different about doing this in Docker compared to another system, but there are a couple of gotchas with versioning you can run into if you're not careful.

Previous posts in this series:

Creating NuGet packages with the .NET CLI

The .NET Core SDK and new "SDK style" .csproj format makes it easy to create NuGet packages from your projects, without having to use NuGet.exe, or mess around with .nuspec files. You can use the dotnet pack command to create a NuGet package by providing the path to a project file.

For example, imagine you have a library in your solution you want to package:

Image of the library you wish to package in the solution folder

You can pack this project by running the following command from the solution directory - the .csproj file is found and a NuGet package is created. I've used the -c switch to ensure we're building in Release mode:

dotnet pack ./src/AspNetCoreInDocker -c Release

By default, this command runs dotnet restore and dotnet build before producing the final NuGet package, in the bin folder of your project:

NuGet package in the bin folder of the project

If you've been following along with my previous posts, you'll know that when you build apps in Docker, you should think carefully about the layers that are created in your image. In previous posts I described how to structure your projects so as to take advantage of this layer caching. In particular, you should ensure the dotnet restore happens early in the Docker layers, so that is is cached for subsequent builds.

You will typically run dotnet pack at the end of a build process, after you've confirmed all the tests for the solution pass. At that point, you will have already run dotnet restore and dotnet build so, running it again is unnecessary. Luckily, dotnet pack includes switches to do just this:

dotnet pack ./src/AspNetCoreInDocker -c Release --no-build --no-restore

If your project has multiple projects that you want to package, you can pass in the path to a solution file, or just call dotnet pack in the solution directory:

dotnet pack -c Release --no-build --no-restore

This will attempt to package all projects in your solution. If you don't want to package a particular project, you can add <IsPackable>false</IsPackable> to the project's .csproj file. For example:

<Project Sdk="Microsoft.NET.Sdk">

  <PropertyGroup>
    <TargetFramework>netstandard2.0</TargetFramework>
    <IsPackable>false</IsPackable>
  </PropertyGroup>

</Project>

That's pretty much all there is to it. You can add this command to the end of your Dockerfile, and NuGet packages will be created for all your packable projects. There's one major point I've left out with regard to creating packages - setting the version number.

Setting the version number for your NuGet packages

Version numbers seem to be a continual bugbear of .NET; ASP.NET Core has gone through so many numbering iterations and mis-aligned versions that it can be hard for newcomers to figure out what's going on.

Sadly, the same is almost true when it comes to versioning of your .NET Project dlls. There are no less than seven different version properties you can apply to your project. Each of these has slightly different rules, and meaning, as I discussed in a previous post.

Luckily, you can typically get away with only worrying about one: Version.

As I discussed in my previous post, the MSBuild Version property is used as the default value for the various version numbers that are embedded in your assembly: AssemblyVersion, FileVersion, and InformationalVersion, as well as the NuGet PackageVersion when you pack your library. When you're building NuGet packages to share with other applications, you will probably want to ensure that these values are all updated.

The version numbers in an assembly

There's two primary ways you can set the Version property for your project

  • Set it in your .csproj file
  • Provide it at the command line when you dotnet build your app.

Which you choose is somewhat a matter of preference - if in your .csproj, then the build number is checked into source code and will picked up automatically by the .NET CLI. However, be aware that if you're building in Docker (and have been following my optimisation series), then updating the .csproj will break your layer cache, so you'll get a slower build immediately after bumping the version number.

<Project Sdk="Microsoft.NET.Sdk">

  <PropertyGroup>
    <TargetFramework>netstandard2.0</TargetFramework>
    <Version>0.1.0</Version>
  </PropertyGroup>

</Project>

One reason to provide the Version number on the command line is if your app version comes from a CI build. If you create a NuGet package in AppVeyor/Travis/Jenkins with every checkin, then you might want your version numbers to be provided by the CI system. In that case, the easiest approach is to set the version at runtime.

In principle, setting the Version just requires passing the correct argument to set the MSBuild property when you call dotnet:

RUN dotnet build /p:Version=0.1.0 -c Release --no-restore
RUN dotnet pack /p:Version=0.1.0 -c Release --no-restore --no-build

However, if you're using a CI system to build your NuGet packages, you need some way of updating the version number in the Dockerfile dynamically. There's several ways you could do this, but one way is to use a Docker build argument.

Build arguments are values passed in when you call docker build. For example, I could pass in a build argument called Version when building my Dockerfile using:

docker build --build-arg Version="0.1.0" .

Note that as you're providing the version number on the command line when you call docker build you can pass in a dynamic value, for example an Environment Variable set by your CI system.

In order for your Dockerfile to use the provided build argument, you need to declare it using the ARG instruction:

ARG Version

To put that into context, the following is a very basic Dockerfile that uses a version provided in --build-args when building the app

FROM microsoft/dotnet:2.0.3-sdk AS builder

ARG Version
WORKDIR /sln

COPY . .

RUN dotnet restore -c Release  
RUN dotnet build /p:Version=$Version -c Release --no-restore  
RUN dotnet pack /p:Version=$Version -c Release --no-restore --no-build  

Warning: This Dockerfile is VERY basic - don't use it for anything other than as an example of using ARG!

After building this Dockerfile you'll have an image that contains the NuGet packages for your application. It's then just a case of using dotnet nuget push to publish your package to a NuGet server. I won't go into details on how to do that in this post, so check the documentation for details.

Summary

Building NuGet packages in Docker is much like building them anywhere else with dotnet pack. The main things you need to take into account are optimising your Dockerfile to take advantage of layer caching, and how to set the version number for the generated packages. In this post I described how to use the --build-args argument to update the Version property at build time, to give the smallest possible effect on your build cache.


Setting ASP.NET Core version numbers for a Docker ONBUILD builder image

$
0
0
Setting ASP.NET Core version numbers for a Docker ONBUILD builder image

In a previous post, I showed how you can create NuGet packages when you build your app in Docker using the .NET Core CLI. As part of that, I showed how to set the version number for the package using MSBuild commandline switches.

That works well when you're directly calling dotnet build and dotnet pack yourself, but what if you want to perform those tasks in a "builder" Dockerfile, like I showed previously. In those cases you need to use a slightly different approach, which I'll describe in this post.

I'll start with a quick recap on using an ONBUILD builder, and how to set the version number of an app, and then I'll show the solution for how to combine the two. In particular, I'll show how to create a builder and a "downstream" app's Dockerfile where

  • Calling docker build with --build-arg Version=0.1.0 on your app's Dockerfile, will set the version number for your app in the builder image
  • You can provide a default version number in your app's Dockerfile, which is used if you don't provide a --build-arg
  • If the downstream image does not set the version, the builder Dockerfile uses a default version number.

Previous posts in this series:

Using ONBUILD to create builder images

The ONBUILD command allows you to specify a command that should be run when a "downstream" image is built. This can be used to create "builder" images that specify all the steps to build an application or library, reducing the boilerplate in your application's Dockerfile.

For example, in a previous post I showed how you could use ONBUILD to create a generic ASP.NET Core builder Dockerfile, reproduced below:

# Build image
FROM microsoft/aspnetcore-build:2.0.7-2.1.105 AS builder  
WORKDIR /sln

ONBUILD COPY ./*.sln ./NuGet.config  ./

# Copy the main source project files
ONBUILD COPY src/*/*.csproj ./  
ONBUILD RUN for file in $(ls *.csproj); do mkdir -p src/${file%.*}/ && mv $file src/${file%.*}/; done

# Copy the test project files
ONBUILD COPY test/*/*.csproj ./  
ONBUILD RUN for file in $(ls *.csproj); do mkdir -p test/${file%.*}/ && mv $file test/${file%.*}/; done 

ONBUILD RUN dotnet restore

ONBUILD COPY ./test ./test  
ONBUILD COPY ./src ./src  
ONBUILD RUN dotnet build -c Release --no-restore

ONBUILD RUN find ./test -name '*.csproj' -print0 | xargs -L1 -0 dotnet test -c Release --no-build --no-restore 

By basing your app Dockerfile on this image (in the FROM statement), your application would be automatically restored, built and tested, without you having to include those steps yourself. Instead, your app image could be very simple, for example:

# Build image
FROM andrewlock/aspnetcore-build:2.0.7-2.1.105 as builder

# Publish
RUN dotnet publish "./AspNetCoreInDocker.Web/AspNetCoreInDocker.Web.csproj" -c Release -o "../dist" --no-restore

#App image
FROM microsoft/aspnetcore:2.0.7  
WORKDIR /app  
ENV ASPNETCORE_ENVIRONMENT Local  
ENTRYPOINT ["dotnet", "AspNetCoreInDocker.Web.dll"]  
COPY --from=builder /sln/dist .  

Setting the version number when building your application

You often want to set the version number of a library or application when you build it - you might want to record the app version in log files when it runs for example. Also, when building NuGet packages you need to be able to set the package version number. There are a variety of different version numbers available to you (as I discussed in a previous post/), all of which can be set from the command line when building your application.

In my last post I described how to set version numbers using MSBuild switches. For example, to set the Version MSBuild property when building (which, when set, updates all the other version numbers of the assembly) you could use the following command

dotnet build /p:Version=0.1.2-beta -c Release --no-restore  

Setting the version in this way is the same whether you're running it from the command line, or in Docker. However, in your Dockerfile, you will typically want to pass the version to set as a build argument. For example, the following command:

docker build --build-arg Version="0.1.0" .

could be used to set the Version property to 0.1.0 by using the ARG command, as shown in the following Dockerfile:

FROM microsoft/dotnet:2.0.3-sdk AS builder

ARG Version
WORKDIR /sln

COPY . .

RUN dotnet restore 
RUN dotnet build /p:Version=$Version -c Release --no-restore  
RUN dotnet pack /p:Version=$Version -c Release --no-restore --no-build  

Using ARGs in a parent Docker image that uses ONBUILD

The two techniques described so far work well in isolation, but getting them to play nicely together requires a little bit more work. The initial problem is to do with the way Docker treats builder images that use ONBUILD.

To explore this, imagine you have the following, simple, builder image, tagged as andrewlock/testbuild:

FROM microsoft/aspnetcore-build:2.0.7-2.1.105 AS builder  
WORKDIR /sln

ONBUILD COPY ./test ./test  
ONBUILD COPY ./src ./src

ONBUILD RUN dotnet build -c Release  

Warning: This Dockerfile has no optimisations, don't use it for production!

As a first attempt, you might try just adding the ARG command to your downstream image, and passing the --build-arg in. The following is a very simple Dockerfile that uses the builder, and accepts an argument.

# Build image
FROM andrewlock/testbuild as builder

ARG Version

# Publish
RUN dotnet publish "./AspNetCoreInDocker.Web/AspNetCoreInDocker.Web.csproj" -c Release -o --no-restore

Calling docker build --build-arg Version="0.1.0" . will build the image, and set the $Version parameter in the downstream dockerfile to 0.1.0, but that won't be used in the builder Dockerfile at all, so it would only be useful if you're running dotnet pack in your downstream image for example.

Instead, you can use a couple of different characteristics about Dockerfiles to pass values _up_ from your downstream app's Dockerfile to the builder Dockerfile.

  • Any ARG defined before the first FROM is "global", so it's not tied to a builder stage. Any stage that wants to use it, still needs to declare its own ARG command
  • You can provide default values to ARG commands using the format ARG value=default
  • You can combine ONBUILD with ARG

Lets combine all these features, and create our new builder image.

A builder image that supports setting the version number

I've cut to the chase a bit here - needless to say I spent a while fumbling around, trying to get the Dockerfiles doing what I wanted. The solution shown in this post is based on the excellent description in this issue.

The annotated builder image is as follows. I've included comments in the file itself, rather than breaking it down afterwards. As before, this is a basic builder image, just to demonstrate the concept. For a Dockerfile with all the optimisations see my builder image on Dockerhub.

FROM microsoft/aspnetcore-build:2.0.7-2.1.105 AS builder  

# This defines the `ARG` inside the build-stage (it will be executed after `FROM`
# in the child image, so it's a new build-stage). Don't set a default value so that
# the value is set to what's currently set for `BUILD_VERSION`
ONBUILD ARG BUILD_VERSION

# If BUILD_VERSION is set/non-empty, use it, otherwise use a default value
ONBUILD ARG VERSION=${BUILD_VERSION:-1.0.0}

WORKDIR /sln

ONBUILD COPY ./test ./test  
ONBUILD COPY ./src ./src

ONBUILD RUN dotnet build -c Release /p:Version=$VERSION

I've actually defined two arguments here, BUILD_VERSION and VERSION. We do this to ensure that we can set a default version in the builder image, while also allowing you to override it from the downstream image or by using --build-arg.

Those two additional ONBUILD ARG lines are all you need in your builder Dockerfile. You need to either update your downstream app's Dockerfile as shown below, or use --build-arg to set the BUILD_VERSION argument for the builder to use.

If you want to set the version number with --build-arg

If you just want to provide the version number as a --build-arg value, then you don't need to change your downstream image. You could use the following:

FROM andrewlock/testbuild as builder
RUN dotnet publish "./AspNetCoreInDocker.Web/AspNetCoreInDocker.Web.csproj" -c Release -o --no-restore  

And then set the version number when you build:

docker build --build-arg BUILD_VERSION="0.3.4-beta" .

That would pass the BUILD_VERSION value up to the builder image, which would in turn pass it to the dotnet build command, setting the Version property to 0.3.4-beta.

If you don't provide the --build-arg argument, the builder image will use its default value (1.0.0) as the build number.

Note that this will overwrite any version number you've set in your csproj files, so this approach is only any good for you if you're relying on a CI process to set your version numbers

If you want to set a default version number in your downstream Dockerfile

If you want to have the version number of your app checked in to source, then you can set a version number in your downstream Dockerfile. Set the BUILD_VERSION argument before the first FROM command in your app's Dockerfile:

ARG BUILD_VERSION=0.2.3
FROM andrewlock/testbuild as builder
RUN dotnet publish "./AspNetCoreInDocker.Web/AspNetCoreInDocker.Web.csproj" -c Release -o --no-restore  

Running docker build . on this file will ensure that the libraries built in the builder file have a version of 0.2.3.

If you wish to overwrite this at runtime you can simply pass in the build argument as before:

docker build --build-arg BUILD_VERSION="0.3.4-beta" .

And there you have it! ONBUILD playing nicely with ARG. If you decide to adopt this pattern in your builder images, just be aware that you will no longer be able to change the version number by setting it in your csproj files.

Summary

In this post I described how you can use ONBUILD and ARG to dynamically set version numbers for your .NET libraries when you're using a generalised builder image. For an alternative description (and the source of this solution), see this issue on GitHub and the provided examples.

Pushing NuGet packages built in Docker by running the container

$
0
0
Pushing NuGet packages built in Docker by running the container

In a previous post I described how you could build NuGet packages in Docker. One of the advantages of building NuGet packages in Docker is that you can don't need any dependencies installed on the build-server itself, you can install all the required dependencies in the Docker container instead. One of the disadvantages of this approach is that getting at the NuGet packages after they've been built is more tricky - you have to run the image to get at the files.

Given that constraint, it's likely that if you're building your apps in Docker, you'll also want to push your NuGet packages to a feed (e.g. nuget.org or myget.org from Docker.

In this post I show how to create a Dockerfile for building your NuGet packages which you can then run as a container to push them to a NuGet feed.

Previous posts in this series:

Building your NuGet packages in Docker

I've had a couple of questions since my posting on building NuGet packages in Docker as to why you would want to do this. Given Docker is for packaging and distributing apps, isn't it the wrong place for building NuGet packages?

While Docker images are a great way for distributing an app, one of their biggest selling points is the ability to isolate the dependencies of the app it contains from the host operating system which runs the container. For example, I can install a specific version of Node in the Docker container, without having to install Node on the build server.

That separation doesn't just apply when you're running your application, but also when building your application. To take an example from the .NET world - if I want to play with some pre-release version of the .NET SDK, I can install it into a Docker image and use that to build my app. If I wasn't using Docker, I would have to install it directly on the build server, which would affect everything it built, not just my test app. If there was a bug in the preview SDK it could potentially compromise the build-process for production apps too.

I could also use a global.json file to control the version of the SDK used to build each application.

The same argument applies to building NuGet packages in Docker as well as apps. By doing so, you isolate the dependencies required to package your libraries from those installed directly on the server.

For example, consider this simple Dockerfile. It uses the .NET Core 2.1 release candidate SDK (as it uses the 2.1.300-rc1-sdk base image), but you don't need to have that installed on your machine to be able to build and produce the required NuGet packages.

FROM microsoft/dotnet:2.1.300-rc1-sdk AS builder

ARG Version  
WORKDIR /sln

COPY . .

RUN dotnet restore 
RUN dotnet build /p:Version=$Version -c Release --no-restore  
RUN dotnet pack /p:Version=$Version -c Release --no-restore --no-build -o /sln/artifacts

This Dockerfile doesn't have any optimisations, but it will restore and build a .NET solution in the root directory. It will then create NuGet packages and output them to the /sln/artifacts directory. You can set the version of the package by providing the Version as a build argument, for example:

docker build --build-arg Version=0.1.0 -t andrewlock/test-app .

If the solution builds successfully, you'll have a Docker image that contains the NuGet .nupkg files, but they're not much good sat there. Instead, you'll typically want to push them to a NuGet feed. There's a couple of ways you could do that, but in the following example I show how to configure your Dockerfile so that it pushes the files when you docker run the image.

Pushing NuGet packages when a container is run

Before I show the code, a quick reminder on terminology:

  • An image is essentially a static file that is built from a Dockerfile. You can think of it as a mini hard-drive, containing all the files necessary to run an application. But nothing is actually running; it's just a file.
  • A container is what you get if you run an image.

The following Dockerfile expands on the previous one, so that when you run the image, it pushes the .nupkgs built in the previous stage to the nuget.org feed.

FROM microsoft/dotnet:2.1.300-rc1-sdk AS builder

ARG Version  
WORKDIR /sln

COPY . .

RUN dotnet restore
RUN dotnet build /p:Version=$Version -c Release --no-restore  
RUN dotnet pack /p:Version=$Version -c Release --no-restore --no-build -o /sln/artifacts 

ENTRYPOINT ["dotnet", "nuget", "push", "/sln/artifacts/*.nupkg"]
CMD ["--source", "https://api.nuget.org/v3/index.json"]

This Dockerfile makes use of both ENTRYPOINT and CMD commands. For an excellent description of the differences between them, and when to use one over the other, see this article. In summary, I've used ENTRYPOINT to define the executable command to run and it's constant arguments, and CMD to specify the optional arguments. When you run the image built using this Dockerfile (andrewlock/test-app for example) it will combine ENTRYPOINT and CMD to give the final command to run.

For example, if you run:

docker run --rm --name push-packages andrewlock/test-app 

then the Docker container will execute the following command in the container:

dotnet nuget push /sln/artifacts/*.nupkg --source https://api.nuget.org/v3/index.json

When pushing files to nuget.org, you will typically need to provide an API key using the --api-key argument, so running the container as it is will give a 401 Unauthorized response. To provide the extra arguments to the dotnet nuget push command, add them at the end of your docker run statement:

docker run --rm --name push-packages andrewlock/test-app --source https://api.nuget.org/v3/index.json --api-key MY-SECRET-KEY

When you pass additional arguments to the docker run command, they replace any arguments embedded in the image with CMD, and are appended to the ENTRYPOINT, to give the final command:

dotnet nuget push /sln/artifacts/*.nupkg --source https://api.nuget.org/v3/index.json --api-key MY-SECRET-KEY

Note that I had to duplicate the --source argument in order to add the additional --api-key argument. When you provide additional arguments to the docker run command, it completely overridees the CMD arguments, so if you need them, you must repeat them when you call docker run.

Why push NuGet packages on run instead of on build?

The example I've shown here, using dotnet run to push NuGet packages to a NuGet feed, is only one way you can achieve the same goal. Another valid approach would be to call dotnet nuget push inside the Dockerfile itself, as part of the build process. For example, you could use the following Dockerfile:

FROM microsoft/dotnet:2.1.300-rc1-sdk AS builder

ARG Version  
ARG NUGET_KEY
ARG NUGET_URL=https://api.nuget.org/v3/index.json
WORKDIR /sln

COPY . .

RUN dotnet restore
RUN dotnet build /p:Version=$Version -c Release --no-restore  
RUN dotnet pack /p:Version=$Version -c Release --no-restore --no-build -o /sln/artifacts 
RUN dotnet nuget push /sln/artifacts/*.nupkg --source NUGET_URL --api-key $NUGET_KEY

In this example, building the image itself would push the artifacts to your NuGet feed:

docker build --build-arg Version=0.1.0 --build arg NUGET_KEY=MY-SECRET-KEY  .

So why choose one approach over the other? It's a matter of preference really.

Oftentimes I have a solution that consists of both libraries to push to NuGet and applications to package and deploy as Dockerfiles. In those cases, my build scripts tend to look like the following:

  1. Restore, build and test the whole solution in a shared Dockerfile
  2. Publish each of the apps to their own images
  3. Pack the libraries in an image
  4. Test the app images
  5. Push the app Docker images to the Docker repository
  6. Push the NuGet packages to the NuGet feed by running the Docker image

Moving the dotnet nuget push out of docker build and into docker run feels conceptually closer to the two-step approach taken for the app images. We don't build and push Docker images all in one step; there's a build phase and a push phase. The setup with NuGet adopts a similar approach. If I wanted to run some checks on the NuGet packages produced (e.g. testing they have been built with required attributes for example) then I could easily do that before they're pushed to NuGet.

Whichever approach you take, there's definitely benefits to building your NuGet packages in Docker.

Summary

In this post I showed how you can build NuGet packages in Docker, and then push them to your NuGet feed when you run the container. By using ENTRYPOINT and CMD you can provide default arguments to make it easier to run the container. You don't have to use this two-stage approach - you could push your NuGet packages as part of the docker build call. I prefer to separate the two processes to more closely mirror the process of building and publishing app Docker images.

Exploring the .NET Core 2.1 Docker files (updated): dotnet:runtime vs aspnetcore-runtime vs sdk

$
0
0
Exploring the .NET Core 2.1 Docker files (updated): dotnet:runtime vs aspnetcore-runtime vs sdk

This is an update to my previous post explaining the difference between the various Linux .NET docker files. Things have changed a lot in .NET Core 2.1, so that post is out of date!

When you build and deploy an application in Docker, you define how your image should be built using a Dockerfile. This file lists the steps required to create the image, for example: set an environment variable, copy a file, or run a script. Whenever a step is run, a new layer is created. Your final Docker image consists of all the changes introduced by these layers in your Dockerfile.

Typically, you don't start from an empty image where you need to install an operating system, but from a "base" image that contains an already configured OS. For .NET development, Microsoft provide a number of different images depending on what it is you're trying to achieve.

In this post, I look at the various Docker base images available for .NET Core development, how they differ, and when you should use each of them. I'm only going to look at the Linux amd64 images, but there are Windows container versions and even Linux arm32 images available too. At the time of writing (just after the .NET Core 2.1 release) the latest images available are 2.1.0 and 2.1.300 for the various runtime and SDK images respectively.

Note: You should normally be specific about exactly which version of a Docker image you build on in your Dockerfiles (e.g. don't use latest). For that reason, all the images I mention in this post use the current latest version numbers, 2.1.300 and 2.1.0

I'll start by briefly discussing the difference between the .NET Core SDK and the .NET Core Runtime, as it's an important factor when deciding which base image you need. I'll then walk through each of the images in turn, using the Dockerfiles for each to explain what they contain, and hence what you should use them for.

tl;dr; This is a pretty long post, so for convenience, here's some links to the relevant sections and a one-liner use case:

Note that all of these images use the microsoft/dotnet repository - the previous microsoft/aspnetcore and microsoft/aspnetcore-build repositories have both been deprecated. There is no true 2.1 equivalent to the old microsoft/aspnetcore-build:2.0.3 image which included Node, Bower, and Gulp, or the microsoft/aspnetcore-build:1.0-2.0 image which included multiple .NET Core SDKs. Instead, it's recommended you use MultiStage builds to achieve this instead.

The .NET Core Runtime vs the .NET Core SDK

One of the most often lamented aspects of .NET Core and .NET Core development, is around version numbers. There are so many different moving parts, and none of the version numbers match up, so it can be difficult to figure out what you need.

For example, on my dev machine I am building .NET Core 2.1 apps, so I installed the .NET Core 2.1 SDK to allow me to do so. When I look at what I have installed using dotnet --info, I get (a more verbose version) of the following:

> dotnet --info
.NET Core SDK (reflecting any global.json):
 Version:   2.1.300
 Commit:    adab45bf0c

Runtime Environment:
 OS Name:     Windows
 OS Version:  10.0.17134

Host (useful for support):
  Version: 2.1.0
  Commit:  caa7b7e2ba

.NET Core SDKs installed:
  1.1.9 [C:\Program Files\dotnet\sdk]
  ...
  2.1.300 [C:\Program Files\dotnet\sdk]

.NET Core runtimes installed:
  Microsoft.AspNetCore.All 2.1.0-preview1-final [C:\Program Files\dotnet\shared\Microsoft.AspNetCore.All]
  Microsoft.NETCore.App 2.1.0 [C:\Program Files\dotnet\shared\Microsoft.NETCore.App]

To install additional .NET Core runtimes or SDKs:
  https://aka.ms/dotnet-download

There's a lot of numbers there, but the important ones are 2.1.300 which is the version of the command line tools or SDK I'm currently using, and 2.1.0 which is the version of the .NET Core runtime.

In .NET Core 2.1, dotnet --info lists all the runtimes and SDKs you have installed. I haven't shown all 20 I apparently have installed… I really need to claim some space back!

Whether you need the .NET Core SDK or the .NET Core runtime depends on what you're trying to do:

  • The .NET Core SDK - This is what you need to build .NET Core applications.
  • The .NET Core Runtime - This is what you need to run .NET Core applications.

When you install the SDK, you get the runtime as well, so on your dev machines you can just install the SDK. However, when it comes to deployment you need to give it a little more thought. The SDK contains everything you need to build a .NET Core app, so it's much larger than the runtime alone (122MB vs 22MB for the MSI files). If you're just going to be running the app on a machine (or in a Docker container) then you don't need the full SDK, the runtime will suffice, and will keep the image as small as possible.

For the rest of this post, I'll walk through the main Docker images available for .NET Core and ASP.NET Core. I assume you have a working knowledge of Docker - if you're new to Docker I suggest checking out Steve Gordon's excellent series on Docker for .NET developers.

1. microsoft/dotnet:2.1.0-runtime-deps

  • Contains native dependencies
  • No .NET Core runtime or .NET Core SDK installed
  • Use for running Self-Contained Deployment apps

The first image we'll look at forms the basis for most of the other .NET Core images. It actually doesn't even have .NET Core installed. Instead, it consists of the base debian:stretch-slim image and has all the low-level native dependencies on which .NET Core depends.

The Docker images are currently all available in three flavours, depending on the OS image they're based on: debian:stretch-slim, ubuntu:bionic, and alpine:3.7. There are also ARM32 versions of the debian and ubuntu images. In this post I'm just going to look at the debian images, as they are the default.

The Dockerfile consists of a single RUN command that apt-get installs the required dependencies on top of the base image, and sets a few environment variables for convenience.

FROM debian:stretch-slim

RUN apt-get update \
    && apt-get install -y --no-install-recommends \
        ca-certificates \
        \
# .NET Core dependencies
        libc6 \
        libgcc1 \
        libgssapi-krb5-2 \
        libicu57 \
        liblttng-ust0 \
        libssl1.0.2 \
        libstdc++6 \
        zlib1g \
    && rm -rf /var/lib/apt/lists/*

# Configure Kestrel web server to bind to port 80 when present
ENV ASPNETCORE_URLS=http://+:80 \
    # Enable detection of running in a container
    DOTNET_RUNNING_IN_CONTAINER=true

What should you use it for?

The microsoft/dotnet:2.1.0-runtime-deps image is the basis for subsequent .NET Core runtime installations. Its main use is for when you are building self-contained deployments (SCDs). SCDs are apps that are packaged with the .NET Core runtime for the specific host, so you don't need to install the .NET Core runtime. You do still need the native dependencies though, so this is the image you need.

Note that you can't build SCDs with this image. For that, you'll need the SDK-based image described later in the post, microsoft/dotnet:2.1.300-sdk.

2. microsoft/dotnet:2.1.0-runtime

  • Contains .NET Core runtime
  • Use for running .NET Core console apps

The next image is one you'll use a lot if you're running .NET Core console apps in production. microsoft/dotnet:2.1.0-runtime builds on the runtime-deps image, and installs the .NET Core Runtime. It downloads the tar ball using curl, verifies the hash, unpacks it, sets up symlinks and removes the old installer.

You can view the Dockerfile for the image here:

FROM microsoft/dotnet:2.1-runtime-deps-stretch-slim

RUN apt-get update \
    && apt-get install -y --no-install-recommends \
        curl \
    && rm -rf /var/lib/apt/lists/*

# Install .NET Core
ENV DOTNET_VERSION 2.1.0

RUN curl -SL --output dotnet.tar.gz https://dotnetcli.blob.core.windows.net/dotnet/Runtime/$DOTNET_VERSION/dotnet-runtime-$DOTNET_VERSION-linux-x64.tar.gz \
    && dotnet_sha512='f93edfc068290347df57fd7b0221d0d9f9c1717257ed3b3a7b4cc6cc3d779d904194854e13eb924c30eaf7a8cc0bd38263c09178bc4d3e16281f552a45511234' \
    && echo "$dotnet_sha512 dotnet.tar.gz" | sha512sum -c - \
    && mkdir -p /usr/share/dotnet \
    && tar -zxf dotnet.tar.gz -C /usr/share/dotnet \
    && rm dotnet.tar.gz \
    && ln -s /usr/share/dotnet/dotnet /usr/bin/dotnet

What should you use it for?

The microsoft/dotnet:2.1.0-runtime image contains the .NET Core runtime, so you can use it to run any .NET Core 2.1 app such as a console app. You can't use this image to build your app, only to run it.

If you're running a self-contained app then you would be better served by the runtime-deps image. Similarly, if you're running an ASP.NET Core app, then you should use the microsoft/dotnet:2.1.0-aspnetcore-runtime image instead (up next), as it contains the shared runtime required for most ASP.NET Core apps.

3. microsoft/dotnet:2.1.0-aspnetcore-runtime

  • Contains .NET Core runtime and the ASP.NET Core shared framework
  • Use for running ASP.NET Core apps
  • Sets the default URL for apps to http://+:80

.NET Core 2.1 moves away from the runtime store feature introduced in .NET Core 2.0, and replaces it with a series of shared frameworks. This is a similar concept, but with some subtle benefits (to cloud providers in particular, e.g. Microsoft). I wrote a post about the shared framework and the associated Microsoft.AspNetCore.App metapackage here.

By installing the Microsoft.AspNetCore.App shared framework, all the packages that make up the metapackage are already available, so when your app is published, it can exclude those dlls from the output. This makes your published output smaller, and improves layer caching for Docker images.

The microsoft/dotnet:2.1.0-aspentcore-runtime image is very similar to the microsoft/dotnet:2.1.0-runtime image, but instead of just installing the .NET Core runtime and shared framework, it installs the .NET Core runtime and the ASP.NET Core shared framework, so you can run ASP.NET Core apps, as well as .NET Core console apps.

You can view the Dockerfile for the image here:

FROM microsoft/dotnet:2.1-runtime-deps-stretch-slim

RUN apt-get update \
    && apt-get install -y --no-install-recommends \
        curl \
    && rm -rf /var/lib/apt/lists/*

# Install ASP.NET Core
ENV ASPNETCORE_VERSION 2.1.0

RUN curl -SL --output aspnetcore.tar.gz https://dotnetcli.blob.core.windows.net/dotnet/aspnetcore/Runtime/$ASPNETCORE_VERSION/aspnetcore-runtime-$ASPNETCORE_VERSION-linux-x64.tar.gz \
    && aspnetcore_sha512='0f37dc0fabf467c36866ceddd37c938f215c57b10c638d9ee572316a33ae66f7479a1717ab8a5dbba5a8d2661f09c09fcdefe1a3f8ea41aef5db489a921ca6f0' \
    && echo "$aspnetcore_sha512  aspnetcore.tar.gz" | sha512sum -c - \
    && mkdir -p /usr/share/dotnet \
    && tar -zxf aspnetcore.tar.gz -C /usr/share/dotnet \
    && rm aspnetcore.tar.gz \
    && ln -s /usr/share/dotnet/dotnet /usr/bin/dotnet

What should you use it for?

Fairly obviously, for running ASP.NET Core apps! This is the image to use if you've published an ASP.NET Core app and you need to run it in production. It has the smallest possible footprint but all the necessary framework components and optimisations. You can't use it for building your app though, as it doesn't have the SDK installed. For that, you need the following image.

If you want to go really small, check out the new Alpine-based images - 163MB vs 255MB for the base image!

4. microsoft/dotnet:2.1.300-sdk

  • Contains .NET Core SDK
  • Use for building .NET Core and ASP.NET Core apps

All of the images shown so far can be used for running apps, but in order to build your app, you need the .NET Core SDK image. Unlike all the runtime images which use debian:stretch-slim as the base, the microsoft/dotnet:2.1.300-sdk image uses the buildpack-deps:stretch-scm image. According to the Docker Hub description, the buildpack image:

…includes a large number of "development header" packages needed by various things like Ruby Gems, PyPI modules, etc.…a majority of arbitrary gem install / npm install / pip install should be successful without additional header/development packages…

The stretch-scm tag also ensures common tools like curl, git, and ca-certificates are installed.

The microsoft/dotnet:2.1.300-sdk image installs the native prerequisites (as you saw in the microsoft/dotnet:2.1.0-runtime-deps image), and then installs the .NET Core SDK. Finally, it sets some environment variables and warms up the NuGet package cache by running dotnet help in an empty folder, which makes subsequent dotnet operations faster.

You can view the Dockerfile for the image here:

FROM buildpack-deps:stretch-scm

# Install .NET CLI dependencies
RUN apt-get update \
    && apt-get install -y --no-install-recommends \
        libc6 \
        libgcc1 \
        libgssapi-krb5-2 \
        libicu57 \
        liblttng-ust0 \
        libssl1.0.2 \
        libstdc++6 \
        zlib1g \
    && rm -rf /var/lib/apt/lists/*

# Install .NET Core SDK
ENV DOTNET_SDK_VERSION 2.1.300

RUN curl -SL --output dotnet.tar.gz https://dotnetcli.blob.core.windows.net/dotnet/Sdk/$DOTNET_SDK_VERSION/dotnet-sdk-$DOTNET_SDK_VERSION-linux-x64.tar.gz \
    && dotnet_sha512='80a6bfb1db5862804e90f819c1adeebe3d624eae0d6147e5d6694333f0458afd7d34ce73623964752971495a310ff7fcc266030ce5aef82d5de7293d94d13770' \
    && echo "$dotnet_sha512 dotnet.tar.gz" | sha512sum -c - \
    && mkdir -p /usr/share/dotnet \
    && tar -zxf dotnet.tar.gz -C /usr/share/dotnet \
    && rm dotnet.tar.gz \
    && ln -s /usr/share/dotnet/dotnet /usr/bin/dotnet

# Configure Kestrel web server to bind to port 80 when present
ENV ASPNETCORE_URLS=http://+:80 \
    # Enable detection of running in a container
    DOTNET_RUNNING_IN_CONTAINER=true \
    # Enable correct mode for dotnet watch (only mode supported in a container)
    DOTNET_USE_POLLING_FILE_WATCHER=true \
    # Skip extraction of XML docs - generally not useful within an image/container - helps perfomance
    NUGET_XMLDOC_MODE=skip

# Trigger first run experience by running arbitrary cmd to populate local package cache
RUN dotnet help

What should you use it for?

This image has the .NET Core SDK installed, so you can use it for building your .NET Core and ASP.NET Core apps. Technically you can also use this image for running your apps in production as the SDK includes the runtime, but you shouldn't do that in practice. As discussed at the beginning of this post, optimising your Docker images in production is important for performance reasons, but the microsoft/dotnet:2.1.300-sdk image weighs in at a hefty 1.73GB, compared to the 255MB for the microsoft/dotnet:2.1.0-runtime image.

To get the best of both worlds, you should use this image (or one of the later images) to build your app, and one of the runtime images to run your app in production. You can see how to do this using Docker multi-stage builds in Scott Hanselman's post here, or in my blog series here.

Summary

In this post I walked through some of the common Docker images used in .NET Core 2.1 development. Each of the images have a set of specific use-cases, and it's important you use the right one for your requirements. These images have changed since I wrote the previous version of this post; if you're using an earlier version of .NET Core check out that one instead.

Suppressing the startup and shutdown messages in ASP.NET Core

$
0
0
Suppressing the startup and shutdown messages in ASP.NET Core

In this post, I show how you can disable the startup message shown in the console when you run an ASP.NET Core application. This extra text can mess up your logs if you're using a collector that reads from the console, so it can be useful to disable in production. A similar approach can be used to disable the startup log messages when you're using the new IHostBuilder in ASP.NET Core 2.1.

This post will be less of a revelation after David Fowler dropped his list of new features in ASP.NET Core 2.1!. If you haven't seen that tweet yet, I recommend you check out this summary post by Scott Hanselman.

ASP.NET Core startup messages

By default, when you startup an ASP.NET Core application, you'll get a message something like the following, indicating the current environment, the content root path, and the URLs Kestrel is listening on:

Using launch settings from C:\repos\andrewlock\blog-examples\suppress-console-messages\Properties\launchSettings.json...
Hosting environment: Development
Content root path: C:\repos\andrewlock\blog-examples\suppress-console-messages
Now listening on: https://localhost:5001
Now listening on: http://localhost:5000
Application started. Press Ctrl+C to shut down.

This message, written by the WebHostBuilder, gives you a handy overview of your app, but it's written directly to the console, not through the ASP.NET Core Logging infrastructure provided by Microsoft.Extensions.Logging and used by the rest of the application.

When you're running in Docker particularly, it's common to write structured logs to the standard output (Console), and have another process read these logs and send them to a central location, using fluentd for example.

Unfortunately, while the startup information written the console can be handy, it's written in an unstructured format. If you're writing logs to the Console in a structured format for fluentd to read, then this extra text can pollute your nicely structured logs.

Startup and shutdown messages are unstructured text in otherwise structured output

The example shown above just uses the default ConsoleLoggingProvider rather than a more structured provider, but it highlights the difference between the messages written by the WebHostBuilder and those written by the logging infrastructure.

Luckily, you can choose to disable the startup messages (and the Application is shutting down... shutdown message).

Disabling the startup and shutdown messages in ASP.NET Core

Whether or not the startup messages are shown is controlled by a setting in your WebHostBuilder configuration. This is different to your app configuration, in that it describes the settings of the WebHost itself. This configuration controls things such as the environment name, the application name, and the ContentRoot path.

By default, these values can be set by using ASPNETCORE_ environment variables to control the values. For example, setting the ASPNETCORE_ENVIRONMENT variable to Staging will set the IHostingEnvironment.EnvironmentName to Staging.

The WebHostBuilder loads a whole number of settings from environment variables if they're available. You can use these to control a wide range of WebHost configuration options.

Disabling the messages using an environment variable

You can override lots of the default host configuration values by setting ASPNETCORE_ environment variables. In this case, the variable to set is ASPNETCORE_SUPPRESSSTATUSMESSAGES. If you set this variable to true on your machine, whether globally, or using launchSettings.json, then both the startup and shutdown messages are suppressed:

The startup messages are suppressed

Annoyingly, the Using launch settings... messages seems to still be shown. However, it's only shown when you use dotnet run. It won't show if you publish your app and use dotnet app.dll.

Disabling the messages using UseSetting

Environment variables aren't the only way to control the WebHostOptions configuration. You can provide your own configuration entirely by passing in a pre-built IConfiguration object for example, as I showed in a previous post using command line arguments.

However, if you only want to change the one setting, then creating a whole new ConfigurationBuilder may seem a bit like overkill. In that case, you could use the UseSetting method on WebHostBuilder.

Under the hood, if you call UseConfiguration() to provide a new IConfiguration object for your WebHostBuilder, you're actually making calls to UseSetting() for each key-value-pair in the provided configuration.

As shown below, you can use the UseSetting() method to set the SuppressStatusMessages value in the WebHost configuration. This will be picked up by the builder when you call Build() and the startup and shutdown messages will be suppressed.

public class Program
{
    public static void Main(string[] args)
    {
        CreateWebHostBuilder(args).Build().Run();
    }

    public static IWebHostBuilder CreateWebHostBuilder(string[] args) =>
        WebHost.CreateDefaultBuilder(args)
            .UseSetting(WebHostDefaults.SuppressStatusMessagesKey, "True") // add this line
            .UseStartup<Startup>();
}

You may notice that I've used a strongly typed property on WebHostDefaults as the key. There are a whole range of other properties you can set directly in this way. You can see the WebHostDefaults class here, and the WebHostOptions class where the values are used here.

There's an even easier way to set this setting however, with the SuppressStatusMessages() extension method on IHostBuilder:

public static IWebHostBuilder CreateWebHostBuilder(string[] args) =>
    WebHost.CreateDefaultBuilder(args)
        .SuppressStatusMessages(true) //disable the status messages
        .UseStartup<Startup>();

Under the hood, this extension method sets the WebHostDefaults.SuppressStatusMessagesKey setting for you, so it's probably the preferable approach to use!

I had missed this approach originally, I only learned about it from this helpful twitter thread from David Fowler.

Disabling messages for HostBuilder in ASP.NET Core 2.1

ASP.NET Core 2.1 introduces the concept of a generic Host and HostBuilder, analogous to the WebHost and WebHostBuilder typically used to build ASP.NET Core applications. Host is designed to be used to build non-HTTP apps. You could use it to build .NET Core services for example. Steve Gordon has an excellent introduction I suggest looking into if HostBuilder is new to you.

The following program is a very basic example of creating a simple service, registering an IHostedService to run in the background for the duration of the app's lifetime, and adding a logger to write to the console. The PrintTextToConsoleService class refers to the service in Steve's post.

public class Program
{
    public static void Main(string[] args)
    {
        // CreateWebHostBuilder(args).Build().Run();
        CreateHostBuilder(args).Build().Run();
    }

    public static IHostBuilder CreateHostBuilder(string[] args) => 
        new HostBuilder()
            .ConfigureLogging((context, builder) => builder.AddConsole())
            .ConfigureServices(services => services.AddSingleton<IHostedService, PrintTextToConsoleService>());
}

When you run this app, you will get similar startup messages written to the console:

Application started. Press Ctrl+C to shut down.
Hosting environment: Production
Content root path: C:\repos\andrewlock\blog-examples\suppress-console-messages\bin\Debug\netcoreapp2.1\
info: suppress_console_messages.PrintTextToConsoleService[0]
      Starting
info: suppress_console_messages.PrintTextToConsoleService[0]
      Background work with text: 14/05/2018 11:27:16 +00:00
info: suppress_console_messages.PrintTextToConsoleService[0]
      Background work with text: 14/05/2018 11:27:21 +00:00

Even though the startup messages look very similar, you have to go about suppressing them in a very different way. Instead of setting environment variables, using a custom IConfiguration object, or the UseSetting() method, you must explicitly configure an instance of the ConsoleLifetimeOptions object.

You can configure the ConsoleLifetimeOptions in the ConfigureServices method using the IOptions pattern, in exactly the same way you'd configure your own strongly-typed options classes. That means you can load the values from configuration if you like, but you could also just configure it directly in code:

public static IHostBuilder CreateHostBuilder(string[] args) =>
    new HostBuilder()
        .ConfigureLogging((context, builder) => builder.AddConsole())
        .ConfigureServices(services =>
        {
            services.Configure<ConsoleLifetimeOptions>(options =>  // configure the options
                options.SuppressStatusMessages = true);            // in code
            services.AddSingleton<IHostedService, PrintTextToConsoleService>();
        });

With the additional configuration above, when you run your service, you'll no longer get the unstructured text written to the console.

Summary

By default, ASP.NET Core writes environment and configuration information to the console on startup. By setting the supressStartupMessages webhost configuration value to true, you can prevent these messages being output. For the HostBuilder available in ASP.NET Core 2.1, you need to configure the ConsoleLifetimeOptions object to set SuppressStatusMessages = true.

Writing logs to Elasticsearch with Fluentd using Serilog in ASP.NET Core

$
0
0
Writing logs to Elasticsearch with Fluentd using Serilog in ASP.NET Core

For apps running in Kubernetes, it's particularly important to be storing log messages in a central location. I'd argue that this is important for all apps, whether or not you're using Kubernetes or docker, but the ephemeral nature of pods and containers make the latter cases particularly important.

If you're not storing logs from your containers centrally, then if a container crashes and is restarted, the logs may be lost forever.

There are lots of ways you can achieve this. You could log to Elasticsearch or Seq directly from your apps, or to an external service like Elmah.io for example. One common approach is to use Fluentd to collect logs from the Console output of your container, and to pipe these to an Elasticsearch cluster.

By default, Console log output in ASP.NET Core is formatted in a human readable format. If you take the Fluentd/Elasticsearch approach, you'll need to make sure your console output is in a structured format that Elasticsearch can understand, i.e. JSON.

In this post, I describe how you can add Serilog to your ASP.NET Core app, and how to customise the output format of the Serilog Console sink so that you can pipe your console output to Elasticsearch using Fluentd.

Note that it's also possible to configure Serilog to write directly to Elasticsearch using the Elasticsearch sink. If you're not using Fluentd, or aren't containerising your apps, that's a great option.

Writing logs to the console output

When you create a new ASP.NET Core application from a template, your program file will looks something like this (in .NET Core 2.1 at least):

public class Program
{
    public static void Main(string[] args)
    {
        CreateWebHostBuilder(args).Build().Run();
    }

    public static IWebHostBuilder CreateWebHostBuilder(string[] args) =>
        WebHost.CreateDefaultBuilder(args)
            .UseStartup<Startup>();
}

The static helper method WebHost.CreateDefaultBuilder(args) creates a WebHostBuilder and wires up a number of standard configuration options. By default, it configures the Console and Debug logger providers:

.ConfigureLogging((hostingContext, logging) =>
{
    logging.AddConfiguration(hostingContext.Configuration.GetSection("Logging"));
    logging.AddConsole();
    logging.AddDebug();
})

If you run your application from the command line using dotnet run, you'll see logs appear in the console for each request. The following shows the logs generated by two requests from a browser - one for the home page, and one for the favicon.ico.

Console output using the default Console logger

Unfortunately, the Console logger doesn't provider much flexibility in how the logs are written. You can optionally include scopes, or disable the colours, but that's about it.

An alternative to the default Microsoft.Extensions.Logging infrastructure in ASP.NET Core is to use Serilog for your logging, and connect it as a standard ASP.NET Core logger.

Adding Serilog to an ASP.NET Core app

Serilog is a mature open source project, that predates all the logging infrastructure in ASP.NET Core. In many ways, the ASP.NET Core logging infrastructure seems modelled after Serilog: Serilog has similar configuration options and pluggable "sinks" to control where logs are written.

The easiest way to get started with Serilog is with the Serilog.AspNetCore NuGet package. Add it to your application with:

dotnet add package Serilog.AspNetCore

You'll also need to add one or more "sink" packages, to control where logs are written. In this case, I'm going to install the Console sink, but you could add others too, if you want to write to multiple destinations at once.

dotnet add package Serilog.Sinks.Console

The Serilog.AspNetCore package provides an extension method, UseSerilog() on the WebHostBuilder instance. This replaces the default ILoggerFactory with an implementation for Serilog. You can pass in an existing Serilog.ILogger instance, or you can configure a logger inline. For example, the following code configures the minimum log level that will be written (info) and registers the console sink:

public static IWebHostBuilder CreateWebHostBuilder(string[] args) =>
    WebHost.CreateDefaultBuilder(args)
        .UseSerilog((ctx, config) =>
        {
            config
                .MinimumLevel.Information()
                .Enrich.FromLogContext()
                .WriteTo.Console();
        })
        .UseStartup<Startup>();
}

Running the app again when you're using Serilog instead of the default loggers gives the following console output:

Console output using Serilog instead of the default Console logger

The output is similar to the default logger, but importantly it's very configurable. You can change the output template however you like. For example, you could show the name of the class that generated the log by including the SourceContext parameter.

For more details and samples for the Serilog.AspNetCore package, see the GitHub repository. For console formatting options, see the Serilog.Sinks.Console repository.

As well as simple changes to the output template, the Console sink allows complete control over how the message is rendered. We'll use that capability to render the logs as JSON for Fluentd, instead of a human-friendly format.

Customising the output format of the Serilog Console Sink to write JSON

To change how the data is rendered, you can add a custom ITextFormatter. Serilog includes a JsonFormatter you can use, but it's suggested that you consider the Serilog.Formatting.Compact package instead:

CompactJsonFormatter significantly reduces the byte count of small log events when compared with Serilog's default JsonFormatter, while remaining human-readable. It achieves this through shorter built-in property names, a leaner format, and by excluding redundant information.”

We're not going to use this package for our Fluentd/Elasticsearch use case, but I'll show how to plug it in here in any case. Add the package using dotnet add package Serilog.Formatting.Compact, create a new instance of the formatter, and pass it to the WriteTo.Console() method in your UseSerilog() call:

.UseSerilog((ctx, config) =>
{
    config
        .MinimumLevel.Information()
        .Enrich.FromLogContext()
        .WriteTo.Console(new CompactJsonFormatter());
})

Now if you run your application, you'll see the logs written to the console as JSON:

Image of logs written to the console as JSON using CompactJsonFormatter

This formatter may be useful to you, but in my case, I wanted the JSON to be written so that Elasticsearch could understand it. You can see that the compact JSON format (pretty-printed below) uses, as promised, compact names for the timestamp (@t), message template (@mt) and the rendered message (@r):

{
  "@t": "2018-05-17T10:23:47.0727764Z",
  "@mt": "{HostingRequestStartingLog:l}",
  "@r": [
    "Request starting HTTP\/1.1 GET http:\/\/localhost:5000\/  "
  ],
  "Protocol": "HTTP\/1.1",
  "Method": "GET",
  "ContentType": null,
  "ContentLength": null,
  "Scheme": "http",
  "Host": "localhost:5000",
  "PathBase": "",
  "Path": "\/",
  "QueryString": "",
  "HostingRequestStartingLog": "Request starting HTTP\/1.1 GET http:\/\/localhost:5000\/  ",
  "EventId": {
    "Id": 1
  },
  "SourceContext": "Microsoft.AspNetCore.Hosting.Internal.WebHost",
  "RequestId": "0HLDRS135F8A6:00000001",
  "RequestPath": "\/",
  "CorrelationId": null,
  "ConnectionId": "0HLDRS135F8A6"
}

For the simplest Fluentd/Elasticsearch integration, I wanted the JSON to be output using standard Elasticsearch names such as @timestamp for the timestamp. Luckily, all that's required is to replace the formatter.

Using an Elasticsearch compatible JSON formatter

The Serilog.Sinks.Elasticsearch package contains exactly the formatter we need, the ElasticsearchJsonFormatter. This renders data using standard Elasticsearch fields like @timestamp and fields.

Unfortunately, currently the only way to add the formatter to your project short of copying and pasting the source code (check the license first!) is to install the whole Serilog.Sinks.Elasticsearch package, which has quite a few dependencies.

Ideally, I'd like to see the formatter as its own independent package, like Serilog.Formatting.Compact is. I've raised an issue and will update this post if there's movement.

If that's not a problem for you (it wasn't for me, as I already had a dependency on Elasticsearch.Net, then adding the Elasticsearch Sink to access the formatter is the easiest solution. Add the sink using dotnet add package Serilog.Sinks.ElasticSearch, and update your Serilog configuration to use the ElasticsearchJsonFormatter:

.UseSerilog((ctx, config) =>
{
    config
        .MinimumLevel.Information()
        .Enrich.FromLogContext()
        .WriteTo.Console(new ElasticsearchJsonFormatter();
})

Once you've connected this formatter, the console output will contain the common Elasticsearch fields like @timestamp, as shown in the following (pretty-printed) output:

{
  "@timestamp": "2018-05-17T22:31:43.9143984+12:00",
  "level": "Information",
  "messageTemplate": "{HostingRequestStartingLog:l}",
  "message": "Request starting HTTP\/1.1 GET http:\/\/localhost:5000\/  ",
  "fields": {
    "Protocol": "HTTP\/1.1",
    "Method": "GET",
    "ContentType": null,
    "ContentLength": null,
    "Scheme": "http",
    "Host": "localhost:5000",
    "PathBase": "",
    "Path": "\/",
    "QueryString": "",
    "HostingRequestStartingLog": "Request starting HTTP\/1.1 GET http:\/\/localhost:5000\/  ",
    "EventId": {
      "Id": 1
    },
    "SourceContext": "Microsoft.AspNetCore.Hosting.Internal.WebHost",
    "RequestId": "0HLDRS5H8TSM4:00000001",
    "RequestPath": "\/",
    "CorrelationId": null,
    "ConnectionId": "0HLDRS5H8TSM4"
  },
  "renderings": {
    "HostingRequestStartingLog": [
      {
        "Format": "l",
        "Rendering": "Request starting HTTP\/1.1 GET http:\/\/localhost:5000\/  "
      }
    ]
  }
}

Now logs are being rendered in a format that can be piped straight from Fluentd into Elasticsearch. We can just write to the console.

Switching between output formatters based on hosting environment

A final tip. What if you want to have human readable console output when developing locally, and only use the JSON formatter in Staging or Production?

This is easy to achieve as the UseSerilog extension provides access to the IHostingEnvironment via the WebHostBuilderContext. For example, in the following snippet I configure the app to use the human-readable console in development, and to use the JSON formatter in other environments.

.UseSerilog((ctx, config) =>
{
    config
        .MinimumLevel.Information()
        .Enrich.FromLogContext();

    if (ctx.HostingEnvironment.IsDevelopment())
    {
        config.WriteTo.Console();
    }
    else
    {
        config.WriteTo.Console(new ElasticsearchJsonFormatter());
    }
})

Instead of environment, you could also switch based on configuration values available via the IConfiguration object at ctx.Configuration.

Summary

Storing logs in a central location is important, especially if you're building containerised apps. One possible solution to this is to output your logs to the console, have Fluentd monitor the console, and pipe the output to an Elasticsearch cluster. In this post I described how to add Serilog logging to your ASP.NET Core application and configure it to write logs to the console in the JSON format that Elasticsearch expects.

Building ASP.NET Core apps on both Windows and Linux using AppVeyor

$
0
0
Building ASP.NET Core apps on both Windows and Linux using AppVeyor

Nearly two years ago I wrote a post about using AppVeyor to build and publish your first .NET Core NuGet package. A lot has changed with ASP.NET Core since then, but by-and-large the process is still the same. I've largely moved to using Cake to build my apps, but I still use AppVeyor, with the appveyor.yml file essentially unchanged, short of updating the image to Visual Studio 2017.

Recently, AppVeyor announced the general availability of AppVeyor for Linux. This is a big step, previously AppVeyor was Windows only so you had to use a different service if you wanted CI on Linux (I have been using Travis). While Travis has been fine for my needs, I find it noticeably slower to start than AppVeyor. It would also be nice to consolidate on a single CI solution.

In this post, I'll take an existing appveyor.yml file, and update it to build on both Windows and Linux with appveyor. For this post I'm only looking at building .NET Core projects, i.e. I'm not targeting the full .NET Framework at all.

The Windows only AppVeyor build script

AppVeyor provides several ways to configure a project for CI builds. The approach I use for projects hosted on GitHub, described in my previous post, is to add an appveyor.yml file in the root of my GitHub repository. This file also disables the automatic detection AppVeyor can perform to try and build your project automatically, and instead provides a build script for it to use.

The build script in this case is very simple. As I said previously, I tend to use Cake for my builds these days, but that's somewhat immaterial. The important point is we have a build script that AppVeyor can run to build the project.

For reference, this is the script I'll be using. The Exec function ensures any errors are bubbled up correctly. Otherwise I'm litteraly just calling dotnet pack in the root directory (which does an implicit dotnet restore and dotnet test)

function Exec  
{
    [CmdletBinding()]
    param(
        [Parameter(Position=0,Mandatory=1)][scriptblock]$cmd,
        [Parameter(Position=1,Mandatory=0)][string]$errorMessage = ($msgs.error_bad_command -f $cmd)
    )
    & $cmd
    if ($lastexitcode -ne 0) {
        throw ("Exec: " + $errorMessage)
    }
}

if(Test-Path .\artifacts) { Remove-Item .\artifacts -Force -Recurse }

$revision = @{ $true = $env:APPVEYOR_BUILD_NUMBER; $false = 1 }[$env:APPVEYOR_BUILD_NUMBER -ne $NULL];
$revision = "beta-{0:D4}" -f [convert]::ToInt32($revision, 10)

exec { & dotnet pack .t -c Release -o .\artifacts --version-suffix=$revision }  

The appveyor.yml file to build the app is shown below. The important points are:

  • We're using the Visual Studio 2017 build image
  • Only building the master branch (and PRs to it)
  • Run Build.ps1 to build the project
  • For tagged commits, deploy the NuGet packages to www.nuget.org
version: '{build}'
image: Visual Studio 2017
pull_requests:
  do_not_increment_build_number: true
branches:
  only:
  - master
nuget:
  disable_publish_on_pr: true
build_script:
- ps: .\Build.ps1
test: off
artifacts:
- path: .\artifacts\**\*.nupkg
  name: NuGet
deploy:
- provider: NuGet
  name: production
  api_key:
    secure: nyE3SEqDxSkfdsyfsdjmfdshjk767fYuUB7NwjOUwDi3jXQItElcp2h
  on:
    branch: master
    appveyor_repo_tag: true

You can see an example of this configuration in a test GitHub repository (tagged 0.1.0-beta)

Updating the appveyor.yml to build on Linux

Now you know what we're starting from, I'l update it to allow building on Linux. The getting started guide on AppVeyor's site is excellent, so it didn't take me long to get up and running.

I've listed the final appveyor.yml at the end of this post, but I'll walk through each of the changes I made to the previous appveyor.yml to get builds working. Applying this to your own appveyor.yml will hopefully just be a case of working through each step in turn.

1. Add the ubuntu image

AppVeyor let you specify multiple images in your appveyor.yml. AppVeyor will run builds against each image; every configuration must pass for the overall build to pass. In the previous configuration, I was using a single image, Visual Studio 2017:

image: Visual Studio 2017  

You can update this to use Ubuntu too, by using a list instead of a single value:

image: 
  - Visual Studio 2017
  - Ubuntu

Remember: YAML is sensitive to both case and white-space, so be careful when updating your appveyor.yml!

2. Update your build script (optional)

The ubuntu image comes pre-installed with a whole host of tools, one of which is PowerShell Core. That means there's a strong possibility that your PowerShell build script (like the one I showed earlier) will work on Linux too!

For me, this example of moving from Windows to Linux and having your build scripts just work, is one of the biggest selling points for PowerShell Core.

However, if your build scripts don't work on Linux, you might need to run a different script on Linux than in Windows. You can achieve this by using different prefixes for each environment: ps for Windows, sh for Linux. You also need to tell AppVeyor not to try and run the PowerShell commands on linux.

Previously, the build_script section looked like this:

build_script:
- ps: .\Build.ps1

Updating to run a bash script on Linux, and setting the APPVEYOR_YML_DISABLE_PS_LINUX environment variable, the whole build section looks like this:

environment:  
  APPVEYOR_YML_DISABLE_PS_LINUX: true

build_script:  
- ps: .\Build.ps1
- sh: ./build.sh

Final tip - remember, paths in Linux are case sensitive, so make sure the name of your build script matches the actual name and casing of the real file path. Windows is much more forgiving in that respect!

3. Conditionally deploy artifacts (optional)

As part of my CI process, I automatically push any NuGet packages to MyGet/NuGet when the build passes if the commit has a tag. That's handled by the deploy section of appveyor.yml.

However, if we're running appveyor builds on both Linux and Windows, I don't want both builds to try and push to NuGet. Instead, I pick just one to do so (in this case Ubuntu - either will do).

To conditionally run sections of appveyor.yml, you must use the slightly-awkward "matrix specialisation" syntax. That turns the deploy section of appveyor.yml from this:

deploy:
- provider: NuGet
  name: production
  api_key:
    secure: nyE3SEqDxSkHrLGAQJBMh2Oo6deEnWCEKoHCVafYuUB7NwjOUwDi3jXQItElcp2h
  on:
    branch: master
    appveyor_repo_tag: true

to this:

for:
-
  matrix:
    only:
      - image: Ubuntu

  deploy:
  - provider: NuGet
    name: production
    api_key:
      secure: nyE3SEqDxSkHrLGAQJBMh2Oo6deEnWCEKoHCVafYuUB7NwjOUwDi3jXQItElcp2h
    on:
      branch: master
      appveyor_repo_tag: true

Important points:

  • Remember, YAML is case and whitespace sensitive
  • Add the for/matrix/only section
  • Indent the whole deploy section so it is level with matrix.

That last point is critical, so here it is in image form, with indent guides:

Indent the whole deploy section so it is level with matrix

And that's all there is to it - you should now have cross-platform builds!

Successful build status in appveyor

The final appveyor.yml for multi-platform builds

For completion sake, a complete, combined appveyor.yml is shown below. This differs slightly from the example in my test repository on GitHub but it highlights all of the features I've talked about.

version: '{build}'  
image: 
  - Visual Studio 2017
  - Ubuntu
pull_requests:  
  do_not_increment_build_number: true
branches:  
  only:
  - master
nuget:  
  disable_publish_on_pr: true

environment:  
  APPVEYOR_YML_DISABLE_PS_LINUX: true
build_script:  
- ps: .\Build.ps1
- sh: ./build.sh

test: off  
artifacts:  
- path: .\artifacts\**\*.nupkg
  name: NuGet

for:
-
  matrix:
    only:
      - image: Ubuntu

  deploy:
  - provider: NuGet
    name: production
    api_key:
      secure: nyE3SEqDxSkHrLGAQJBMh2Oo6deEnWCEKoHCVafYuUB7NwjOUwDi3jXQItElcp2h
    on:
      branch: master
      appveyor_repo_tag: true

Summary

Appveyor recently announced the general availability of Appveyor for Linux. This means you can now run CI builds on AppVeyor, whereas previously you were limited to Windows only. If you wish to run builds on both Windows and Linux, you need to update your appveyor.yml to handle the fact that the configuration is controlling two different builds.

Building .NET Framework ASP.NET Core apps on Linux using Mono and the .NET CLI

$
0
0
Building .NET Framework ASP.NET Core apps on Linux using Mono and the .NET CLI

I've been hitting Docker hard (as regulars will notice from the topic of recent posts!/), and thanks to .NET Core, it's all been pretty smooth sailing. However, I had a requirement for building a library that multi-tartgets both full .NET framework and .NET Standard, to try to avoid some of the dependency hell you can get into.

Building full .NET framework apps requires that you have .NET Framework installed on your machine (or at least the reference assemblies), which is fine when I'm building locally, as I'm working on Windows. However, I wanted to build my apps in Docker on the build server, which is running on Linux.

I'd played around before with using Mono as a target, but I'd never got very far. However, I recently stumbled across this open issue which contains a number of workarounds. I gave it a try, and evntually got it working!

In this post I'll describe the steps to get an ASP.NET Core library that targets both .NET Framework and .NET Standard, building, and running tests, on Linux as well as Windows.

tl;dr; Add a .props file to your project and reference it in each project that builds on full framework. You may also need to add explicit references to some Facade assemblies like System.Runtime, System.IO, and System.Threading.Tasks.

Using Mono for running .NET Core tests on Linux

The first point worth making is that I want to be able to run on Linux under the full .NET Framework, not just build. That's an important distinction, as it means I can run unit tests across all target frameworks on both Windows and Linux.

As discussed by John Skeet in the aforementioned issue, if you just want to build on Linux and target .NET Framework, then you shouldn't need to install Mono at all - reference assemblies should be sufficient. However, .NET Core tests are executables, which means you need to actually run them. Which brings me back to Mono.

As I described in a previous post, I typically already have Mono installed in my Linux Docker images, as I'm using the full-framework version of Cake (instead of .NET Core-based Cake.CoreClr). My initial reasons for that are less relevant with the recent Cake releases, but as I already have a working build process, I'm not inclined to switch just yet. Especially if I need to use Mono for running tests anyway!

Adding FrameworkPathOverrides for Linux

Unfortunately, installing Mono is only the first hurdle you'll face if you try and build your multi-targeted .NET Core apps on Linux. If you just try running the build without changing your project, you'll get an error something like the following:

error MSB3644: The reference assemblies for framework ".NETFramework,Version=v4.5.1" were not found. To resolve this, install the SDK or Targeting Pack for this framework version or retarget your application to a version of the framework for which you have the SDK or Targeting Pack installed. Note that assemblies will be resolved from the Global Assembly Cache (GAC) and will be used in place of reference assemblies. Therefore your assembly may not be correctly targeted for the framework you intend.

When MSBuild (which the dotnet CLI uses under-the-hood) compiles an application, it needs to use "reference assemblies" so it knows which APIs are actually available for you to call. When you build on Windows, MSBuild knows the standard locations where these libraries can be found, but for building on Mono, it needs help.

That's where the following .props file comes in. This file (courtesy of this comment on GitHub), when referenced by a project, looks in the common install locations for Mono and sets the FrameworkPathOverride property as appropriate. MSBuild uses this property to locate the Framework libraries required to build your app.

<Project ToolsVersion="4.0" DefaultTargets="Build" xmlns="http://schemas.microsoft.com/developer/msbuild/2003">
  <PropertyGroup>
    <!-- When compiling .NET SDK 2.0 projects targeting .NET 4.x on Mono using 'dotnet build' you -->
    <!-- have to teach MSBuild where the Mono copy of the reference asssemblies is -->
    <TargetIsMono Condition="$(TargetFramework.StartsWith('net4')) and '$(OS)' == 'Unix'">true</TargetIsMono>

    <!-- Look in the standard install locations -->
    <BaseFrameworkPathOverrideForMono Condition="'$(BaseFrameworkPathOverrideForMono)' == '' AND '$(TargetIsMono)' == 'true' AND EXISTS('/Library/Frameworks/Mono.framework/Versions/Current/lib/mono')">/Library/Frameworks/Mono.framework/Versions/Current/lib/mono</BaseFrameworkPathOverrideForMono>
    <BaseFrameworkPathOverrideForMono Condition="'$(BaseFrameworkPathOverrideForMono)' == '' AND '$(TargetIsMono)' == 'true' AND EXISTS('/usr/lib/mono')">/usr/lib/mono</BaseFrameworkPathOverrideForMono>
    <BaseFrameworkPathOverrideForMono Condition="'$(BaseFrameworkPathOverrideForMono)' == '' AND '$(TargetIsMono)' == 'true' AND EXISTS('/usr/local/lib/mono')">/usr/local/lib/mono</BaseFrameworkPathOverrideForMono>

    <!-- If we found Mono reference assemblies, then use them -->
    <FrameworkPathOverride Condition="'$(BaseFrameworkPathOverrideForMono)' != '' AND '$(TargetFramework)' == 'net45'">$(BaseFrameworkPathOverrideForMono)/4.5-api</FrameworkPathOverride>
    <FrameworkPathOverride Condition="'$(BaseFrameworkPathOverrideForMono)' != '' AND '$(TargetFramework)' == 'net451'">$(BaseFrameworkPathOverrideForMono)/4.5.1-api</FrameworkPathOverride>
    <FrameworkPathOverride Condition="'$(BaseFrameworkPathOverrideForMono)' != '' AND '$(TargetFramework)' == 'net452'">$(BaseFrameworkPathOverrideForMono)/4.5.2-api</FrameworkPathOverride>
    <FrameworkPathOverride Condition="'$(BaseFrameworkPathOverrideForMono)' != '' AND '$(TargetFramework)' == 'net46'">$(BaseFrameworkPathOverrideForMono)/4.6-api</FrameworkPathOverride>
    <FrameworkPathOverride Condition="'$(BaseFrameworkPathOverrideForMono)' != '' AND '$(TargetFramework)' == 'net461'">$(BaseFrameworkPathOverrideForMono)/4.6.1-api</FrameworkPathOverride>
    <FrameworkPathOverride Condition="'$(BaseFrameworkPathOverrideForMono)' != '' AND '$(TargetFramework)' == 'net462'">$(BaseFrameworkPathOverrideForMono)/4.6.2-api</FrameworkPathOverride>
    <FrameworkPathOverride Condition="'$(BaseFrameworkPathOverrideForMono)' != '' AND '$(TargetFramework)' == 'net47'">$(BaseFrameworkPathOverrideForMono)/4.7-api</FrameworkPathOverride>
    <FrameworkPathOverride Condition="'$(BaseFrameworkPathOverrideForMono)' != '' AND '$(TargetFramework)' == 'net471'">$(BaseFrameworkPathOverrideForMono)/4.7.1-api</FrameworkPathOverride>
    <EnableFrameworkPathOverride Condition="'$(BaseFrameworkPathOverrideForMono)' != ''">true</EnableFrameworkPathOverride>

    <!-- Add the Facades directory.  Not sure how else to do this. Necessary at least for .NET 4.5 -->
    <AssemblySearchPaths Condition="'$(BaseFrameworkPathOverrideForMono)' != ''">$(FrameworkPathOverride)/Facades;$(AssemblySearchPaths)</AssemblySearchPaths>
  </PropertyGroup>
</Project>

You could copy this into each .csproj file, but a better approach is to put it into a file in your root directory, netfx.props for example, and import it into each project file. For example:

<Project Sdk="Microsoft.NET.Sdk">
  <Import Project="..\netfx.props" />

  <PropertyGroup>
    <TargetFrameworks>net452;netsandard2.0</TargetFrameworks>
  </PropertyGroup>
</Project>

Note, I tried to use Directory.Build.props to automatically import the file into every project, but I couldn't get it to work. I'm guessing the properties are imported at the wrong time, so I think you'll have to stick to the manual approach.

With the path to the framework libraries overwritten, you're one step closer to running full framework on Linux, but you're not quite there yet.

Adding references to facade libraries

If you try the above solutions in your own projects, you'll likely see a different set of errors, complaining about missing basic types like Attribute, Task, or Stream:

CS0012: The type 'Attribute' is defined in an assembly that is not referenced. You must add a reference to assembly 'System.Runtime, Version=4.0.0.0

To fix these errors, you need to add references to the indicated assemblies to your projects. You can add these libraries using a conditional, so they're only referenced when building full .NET Framework apps, but not .NET Standard or .NET Core apps:

<Project Sdk="Microsoft.NET.Sdk">
  <Import Project="..\..\netfx.props" />

  <PropertyGroup>
    <TargetFrameworks>net452;netstandard1.5</TargetFrameworks>
  </PropertyGroup>

  <ItemGroup Condition=" '$(TargetFramework)' == 'net452' ">
    <Reference Include="System" />
    <Reference Include="System.IO" />
    <Reference Include="System.Runtime" />
    <Reference Include="System.Threading.Tasks" />
  </ItemGroup>

</Project>

We're getting closer, the app builds now, but if you're running your tests with xUnit (as I was) then you'll likely see exceptions when running your tests with dotnet test.

Fixing errors in xUnit running on Mono

After adding the required facade assembly references to my test projects, I was seeing the following error in the test phase of my app build, a NullReferenceException in System.Runtime.Remoting:

Catastrophic failure: System.NullReferenceException: Object reference not set to an instance of an object

Server stack trace: 
  at System.Runtime.Remoting.ClientIdentity.get_ClientProxy () [0x00000] in <71d8ad678db34313b7f718a414dfcb25>:0 
  at System.Runtime.Remoting.RemotingServices.GetOrCreateClientIdentity (System.Runtime.Remoting.ObjRef objRef, System.Type proxyType, System.Object& clientProxy) [0x00068] in <71d8ad678db34313b7f718a414dfcb25>:0 
  at System.Runtime.Remoting.RemotingServices.GetRemoteObject (System.Runtime.Remoting.ObjRef objRef, System.Type proxyType) [0x00000] in <71d8ad678db34313b7f718a414dfcb25>:0 

Apparently this is due to some long-standing bugs in Mono related to app domains. The simplest solution was to just disable app domains for my tests.

To disable app domains, add an xunit.runner.json file to your test project, containing the following content. If you already have a xunit.runner.json file, add the appDomain property.

{ "appDomain": "denied" }

Ensure the file is copied to the build output by referencing it in your test project's .csproj file with the CopyToOutputDirectory directory set to PreserveNewest or Always:

<ItemGroup>
  <Content Include="xunit.runner.json" CopyToOutputDirectory="PreserveNewest" />
</ItemGroup>

With these changes, I was finally able to get full .NET Framework tests running on Linux, in addition to my .NET Core tests. You can see an example in my NetEscapades.Configuration library, which uses Cake to build the libraries, running on both Windows and Linux using AppVeyor.

Summary

If you want to run tests of your full .NET Framework libraries on Linux, you'll need to install Mono. You must add a .props file to set the FrameworkPathOverride property, which MSBuild uses to find the Mono assemblies. You may also need to add references to certain facade assemblies. You can add them inside a Condition so they don't affect your .NET Core builds.

Adding validation to strongly typed configuration objects in ASP.NET Core

$
0
0
Adding validation to strongly typed configuration objects in ASP.NET Core

In this post I describe an approach you can use to ensure your strongly typed configuration objects have been correctly bound to your configuration when your app starts up. By using an IStartupFilter, you can validate that your configuration objects have expected values early, instead of at some point later when your app is running.

I'll start by giving some background on the configuration system in ASP.NET Core and how to use strongly typed settings. I'll briefly touch on how to remove the dependency on IOptions, and then look at the problem I'm going to address - where your strongly typed settings are not bound correctly. Finally, I'll provide a solution for the issue, so you can detect any problems at app startup.

Strongly typed configuration in ASP.NET Core

The configuration system in ASP.NET Core is very flexible, allowing you to load configuration from a wide range of locations: JSON files, YAML files, environment variables, Azure Key Vault, and may others. The suggested approach to consuming the final IConfiguration object in your app is to use strongly typed configuration.

Strongly typed configuration uses POCO objects to represent a subset of your configuration, instead of the raw key-value pairs stored in the IConfiguration object. For example, maybe you're integrating with Slack, and are using Webhooks to send messages to a channel. You would need the URL for the webhook, and potentially other settings like the display name your app should use when posting to the channel:

public class SlackApiSettings
{
    public string WebhookUrl { get; set; }
    public string DisplayName { get; set; }
    public bool ShouldNotify { get; set; }
}

You can bind this strongly typed settings object to your configuration in your Startup class by using the Configure<T>() extension method. For example:

public class Startup
{
    public Startup(IConfiguration configuration) // inject the configuration into the constructor
    {
        Configuration = configuration;
    }

    public IConfiguration Configuration { get; }

    public void ConfigureServices(IServiceCollection services)
    {
        services.AddMvc();

        // bind the configuration to the SlackApi section
        // i.e. SlackApi:WebhookUrl and SlackApi:DisplayName 
        services.Configure<SlackApiSettings>(Configuration.GetSection("SlackApi")); 
    }

    public void Configure(IApplicationBuilder app)
    {
        app.UseMvc();
    }
}

When you need to use the settings object in your app, you can inject an IOptions<SlackApiSettings> into the constructor. For example, to inject the settings into an MVC controller:

public class TestController : Controller
{
    private readonly SlackApiSettings _slackApiSettings;
    public TestController(IOptions<SlackApiSettings> options)
    {
        _slackApiSettings = options.Value
    }

    public object Get()
    {
        //do something with _slackApiSettings, just return it as an example
        return _slackApiSettings;
    }
}

Behind the scenes, the ASP.NET Core configuration system creates a new instance of the SlackApiSettings class, and attempts to bind each property to the configuration values contained in the IConfiguration section. To retrieve the settings object, you access IOptions<T>.Value, as shown in the constructor of TestController.

Avoiding the IOptions dependency

Some people (myself included) don't like that your classes are now dependent on IOptions rather than just your settings object. You can avoid this dependency by binding the configuration object manually as described here, instead of using the Configure<T> extension method. A simpler approach is to explicitly register the SlackApiSettings object in the container, and delegate its resolution to the IOptions object. For example:

public void ConfigureServices(IServiceCollection services)
{
    services.AddMvc();

    // Register the IOptions object
    services.Configure<SlackApiSettings>(Configuration.GetSection("SlackApi")); 

    // Explicitly register the settings object by delegating to the IOptions object
    services.AddSingleton(resolver => 
        resolver.GetRequiredService<IOptions<SlackApiSettings>>().Value);
}

You can now inject the "raw" settings object into your classes, without taking a dependency on the Microsoft.Extensions.Options package. I find this preferable as the IOptions<T> interface is largely just noise in this case.

public class TestController : Controller
{
    private readonly SlackApiSettings _slackApiSettings;
    // Directly inject the SlackApiSettings, no reference to IOptions needed!
    public TestController(SlackApiSettings settings)
    {
        _slackApiSettings = settings;
    }

    public object Get()
    {
        //do something with _slackApiSettings, just return it as an example
        return _slackApiSettings;
    }
}

This generally works very nicely. I'm a big fan of strongly typed settings, and having first-class support for loading configuration from a wide range of locations is nice. But what happens if you mess up our configuration, maybe you have a typo in your JSON file, for example?

A more common scenario that I've run into is due to the need to store secrets outside of your source code repository. In particular, I've expected a secret configuration value to be available in a staging/production environment, but it wasn't set up correctly. Configuration errors like this are tricky, as they're only really reproducible in the environment in which they occur!

In the next section, I'll show how these sorts of errors can manifest in your application.

What happens if binding fails?

There's a number of different things that could go wrong when binding your strongly typed settings to configuration. In this section I'll show a few examples of errors that could occur by looking at the JSON output from the example TestController.Get action above, which just prints out the values stored in the SlackApiSettings object.

1. Typo in the section name

When you bind your configuration, you typically provide the name of the section to bind. If you think in terms of your appsettings.json file, the section is the key name for an object. "Logging" and "SlackApi" are sections in the following .json file:

{
 "Logging": {
    "LogLevel": {
      "Default": "Warning"
    }
  },
  "AllowedHosts": "*",
  "SlackApi": {
    "WebhookUrl": "http://example.com/test/url",
    "DisplayName": "My fancy bot",
    "ShouldNotify": true
  }
}

In order to bind SlackApiSettings to the "SlackApi" section, you would call:

    services.Configure<SlackApiSettings>(Configuration.GetSection("SlackApi")); 

But what if there's a typo in the section name in your JSON file? Instead of SlackApi, it says SlackApiSettings for example. Hitting the TestController API gives:

{"webhookUrl":null,"displayName":null,"shouldNotify":false}

All of the keys have their default values, but there were no errors. The binding happened, it just bound to an empty configuration section. That's probably bad news, as your code is no doubt expecting webhookUrl etc to be a valid Uri!

2. Typo in a property name

In a similar vein, what happens if the section name is correct, but the property name is wrong. For example, what if WebhookUrl appears as Url in the configuration file? Looking at the output of the TestController API:

{"webhookUrl":null,"displayName":"My fancy bot","shouldNotify":true}

As we have the correct section name, the DisplayName and ShouldNotify properties have have bound correctly to the configuration, but WebhookUrl is null due to the typo. Again, there's no indication from the binder that anything went wrong here.

3. Unbindable properties

The next issue is one that I see people running into now and again. If you use getter-only properties on your strongly typed settings object, they won't bind correctly. For example, if we update our settings object to use readonly properties:

public class SlackApiSettings
{
    public string WebhookUrl { get; }
    public string DisplayName { get; }
    public bool ShouldNotify { get; }
}

and hit the TestController endpoint again, we're back to default values, as the binder treats those properties as unbindable:

{"webhookUrl":null,"displayName":null,"shouldNotify":false}

4. Incompatible type values

The final error I want to mention is what happens if the binder tries to bind a property with an incompatible type. The configuration is all stored as strings, but the binder can convert to simple types. For example, it will bind "true" or "FALSE" to the bool ShouldNotify property, but if you try to bind something else, "THE VALUE" for example, you'll get an exception when the TestController is loaded, and the binder attempts to create the IOptions<T> object:

FormatException: THE VALUE is not a valid value for Boolean.

While not ideal, the fact the binder throws an exception that clearly indicates the problem is actually a good thing. Too many times I've been in a situation trying to figure out why some API call isn't working, only to discover that my connection string or base URL is empty, due to a binding error.

For configuration errors like this, it's preferable to fail as early as possible. Compile time is best, but app startup is a good second-best. The problem currently is that the binding doesn't occur until the IOptions<T> object is requested from the DI container, i.e. when a request arrives for the TestController. If you have a typo error, you don't even get an exception then - you'll have to wait till your code tries to do something invalid with your settings, and then it's often an infuriating NullReferenceException!

To help with this problem, I use a slight re-purposing of the IStartupFilter to create a simple validation step that runs when the app starts up, to ensure your settings are correct.

Creating a settings validation step with an IStartupFilter

The IStartupFilter interface allows you to control the middleware pipeline indirectly, by adding services to your DI container. It's used by the ASP.NET Core framework to do things like add IIS middleware to the start of an app's middleware pipeline, or to add diagnostics middleware.

IStartupFilter is a whole blog post on its own, so I won't go into detail here. Luckily, here's one I made earlier 🙂.

While IStartupFilters can be used to add middleware to the pipeline, they don't have to. Instead, they can simply be used to run some code when the app starts up, after service configuration has happened, but before the app starts handling requests. The DataProtectionStartupFilter takes this approach for example, initialising the key ring just before the app starts handling requests.

This is the approach I suggest to solve the setting validation problem. First, create a simple interface that will be implemented by any settings that require validation:

public interface IValidatable
{
    void Validate();
}

Next, create an IStartupFilter to call Validate() on all IValidatable objects registered with the DI container:

public class SettingValidationStartupFilter : IStartupFilter
{
    readonly IEnumerable<IValidatable> _validatableObjects;
    public SettingValidationStartupFilter(IEnumerable<IValidatable> validatableObjects)
    {
        _validatableObjects = validatableObjects;
    }

    public Action<IApplicationBuilder> Configure(Action<IApplicationBuilder> next)
    {
        foreach (var validatableObject in _validatableObjects)
        {
            validatableObject.Validate();
        }

        //don't alter the configuration
        return next;
    }
}

This IStartupFilter doesn't modify the middleware pipeline: it returns next without modifying it. But if any IValidatables throw an exception, then the exception will bubble up, and prevent the app from starting.

You need to register the filter with the DI container, typically in ConfigureServices:

public void ConfigureServices(IServiceCollection services)  
{
    services.AddTransient<IStartupFilter, SettingValidationStartupFilter>()
    // other service configuration
}

Finally, you need to implement the IValidatable interface on your settings that you want to validate at startup. This interface is intentionally very simple. The IStartupFilter needs to execute synchronously, so you cant do anything extravagant here like calling HTTP endpoints or anything. The main idea is to catch issues in the binding process that you otherwise wouldn't catch till runtime, but you could obviously do some more in-depth testing.

To take the SlackApiSettings example, we could implement IValidatable to check that the URL and display name have been bound correctly. On top of that, we can check that the provided URL is actually a valid URL using the Uri class:

public class SlackApiSettings : IValidatable
{
    public string WebhookUrl { get; set; }
    public string DisplayName { get; set; }
    public bool ShouldNotify { get; set; }

    public void Validate()
    {
        if (string.IsNullOrEmpty(WebhookUrl))
        {
            throw new Exception("SlackApiSettings.WebhookUrl must not be null or empty");
        }

        if (string.IsNullOrEmpty(DisplayName))
        {
            throw new Exception("SlackApiSettings.WebhookUrl must not be null or empty");
        }

        // throws a UriFormatException if not a valid URL
        var uri = new Uri(WebhookUrl);
    }
}

As an alternative to this imperative style, you could use DataAnnotationsAttributes instead, as suggested by Travis Illig in his excellent deep dive on configuration:

public class SlackApiSettings : IValidatable
{
    [Required, Url]
    public string WebhookUrl { get; set; }
    [Required]
    public string DisplayName { get; set; }
    public bool ShouldNotify { get; set; }

    public void Validate()
    {
        Validator.ValidateObject(this, new ValidationContext(this), validateAllProperties: true);
    }
}

Whichever approach you use, the Validate() method throws an exception if there is a problem with your configuration and binding.

The final step is to register the SlackApiSettings as an IValidatable object in ConfigureServices. We can do this using the same pattern we did to remove the IOptions<> dependency:

public void ConfigureServices(IServiceCollection services)  
{
    services.AddMvc();

    services.AddTransient<IStartupFilter, SettingValidationStartupFilter>()

    // Bind the configuration using IOptions
    services.Configure<SlackApiSettings>(Configuration.GetSection("SlackApi")); 

    // Explicitly register the settings object so IOptions not required (optional)
    services.AddSingleton(resolver => 
        resolver.GetRequiredService<IOptions<SlackApiSettings>>().Value);

    // Register as an IValidatable
    services.AddSingleton<IValidatable>(resolver => 
        resolver.GetRequiredService<IOptions<SlackApiSettings>>().Value);
}

That's all the configuration required, time to put it to the test.

Testing Configuration at app startup

We can test our validator by running any of the failure examples from earlier. For example, if we introduce a typo into the WebhookUrl property, then when we start the app, and before we serve any requests, the app throws an Exception:

System.Exception: 'SlackApiSettings.WebhookUrl must not be null or empty'

Now if there's a configuration exception, you'll know about it as soon as possible, instead of only at runtime when you try and use the configuration. The app will never startup - if you're deploying to an environment with rolling deployments, for example Kubernetes, the deployment will never be healthy, which should ensure your previous healthy deployment remains active until you fix the configuration issue.

Using configuration validation in your own projects.

As you've seen, it doesn't take a lot of moving parts to get configuration validation working: you just need an IValidatable interface and an IStartupFilter, and then to wire everything up. Still, for people that want a drop in library to handle this, I've created a small NuGet package called NetEscapades.Configuration.Validation that contains the components, and a couple of helper methods for wiring up the DI container.

If you're using the package, you could rewrite the previous ConfigureServices method as the following:

public void ConfigureServices(IServiceCollection services)  
{
    services.AddMvc();

    services.UseConfigurationValidation();
    services.ConfigureValidatableSetting<SlackApiSettings>(Configuration.GetSection("SlackApi")); 
}

This will register the, IStartupFilter, bind the SlackApiSettings to your configuration, and also register the settings directly in the container (so you don't need to use IOptions<SlackApiSettings>, and as an IValidatable.

It's worth noting that validation only occurs once on app-startup. If you're using validation reloading with IOptionsSnapshot<> then this approach won't work for you.

Summary

The ASP.NET Core configuration system is very flexible and allows you to use strongly typed settings. However, partly due to this flexibility, it's possible to have configuration errors that only appear in certain environments. By default, these errors will only be discovered when your code attempts to use an invalid configuration value (if at all).

In this post, I showed how you could use an IStartupFilter to validate your settings when your app starts up. This ensures you learn about configuration errors as soon as possible, instead of at runtime. The code in this post is available on GitHub, or as the NetEscapades.Configuration.Validation NuGet package.

Converting web.config files to appsettings.json with a .NET Core global tool

$
0
0
Converting web.config files to appsettings.json with a .NET Core global tool

In this post I describe how and why I created a .NET Core global tool to easily convert configuration stored in web.config files to the JSON format more commonly used for configuration in ASP.NET Core.

tl;dr; You can install the tool by running dotnet tool install --global dotnet-config2json. Note that you need to have the .NET Core 2.1 SDK installed.

Background - Converting ASP.NET apps to ASP.NET Core

I've been going through the process of converting a number of ASP.NET projects to ASP.NET Core recently. As these projects are entirely Web APIs and OWIN pipelines, there's a reasonable upgrade path there (I'm not trying to port WebForms to ASP.NET Core)! Some parts are definitely easier to port than others: the MVC controllers work almost out of the box, and where third-party libraries have been upgraded to supported to .NET Standard, everything moves across pretty easily.

One area that's seen a significant change moving from ASP.NET to ASP.NET Core is the configuration system. Whereas ASP.NET largely relied on the static ConfigurationManager reading key-value-pairs from web.config, ASP.NET Core adopts a layered approach that lets you read configuration values from a wide range of sources.

As part of the migrations, I wanted to convert our old web.config-based configuration files to use the more idiomatic appsettings.json and appsettings.Development.json files commonly found in ASP.NET Core projects. I find the JSON files easier to understand, and given that JSON is the defacto standard for this stuff now it made sense to me.

Note: If you really want to, you can continue to store configuration in your .config files, and load the XML directly. There's a sample in the ASP.NET repositories of how to do this.

Before I get into the conversion tool I wrote itself, I'll give an overview of the config files I was working with.

The old config file formats

One of the bonuses with how we were using the .config in our ASP.NET projects, was that it pretty closely matched the concepts in ASP.NET Core. We were using both configuration layers and strongly typed settings.

Layered configuration with .config files

Each configuration file, e.g. global.config, had a sibling file for staging and testing environments, e.g. global.staging.config and global.prod.config. Those files used XML Document transforms which would be applied during deployment to overwrite the earlier values.

For example, the global.config file might look something like this:

<Platform>
  <add key="SlackApi_WebhookUrl" value="https://hooks.slack.com/services/Some/Url" />
  <add key="SlackApi_DisplayName" value="Slack bot" />
</Platform>

That would set the SlackApi_WebhookUrl and SlackApi_DisplayName values when running locally. The global.prod.config file might look something like this:

<Platform xmlns:xdt="http://schemas.microsoft.com/XML-Document-Transform">
  <add key="SlackApi_WebhookUrl" value="https://example.com/something" 
     xdt:Transform="Replace" xdt:Locator="Match(key)" />
</Platform>

On deployment, the global.prod.config file would be used to transform the global.config file. Where a key matched (as specified by the xdt:Locator attribute), the configuration value would be replaced by the prod equivalent.

While this isn't quite the same as for ASP.NET Core, where the ASP.NET Core app itself overwrites settings with the environment-specific values, it achieves a similar end result.

Note: There should only be non-sensitive settings in these config files. Sensitive values or secrets should be stored externally to the app.

Strongly typed configuration

In ASP.NET Core, the recommended approach to consuming configuration values in code is through strongly typed configuration and the Options pattern. This saves you from using magic strings throughout your code, favouring the ability to inject POCO objects into your services.

We were using a similar pattern in our ASP.NET apps, by using the DictionaryAdapter from Castle. This technique is very similar to the binding operations used to create strongly typed settings in ASP.NET Core. There's a nice write-up of the approach here.

We were also conveniently using a naming convention to map settings from our config files, to their strongly typed equivalent, by using the _ separator in our configuration keys.

For example, the keys SlackApi_WebhookUrl and SlackApi_DisplayName would be mapped to an interface:

public interface ISlackApi
{
    string WebhookUrl { get; set; }
    string DisplayName { get; set; }
}

This is very close to the way ASP.NET Core works. The main difference is that ASP.NET Core requires concrete types (as it instantiates the actual type), rather than the interface required by Castle for generating proxies.

Now you've seen the source material, I'll dive into the requirements of why I wrote a global tool, and what I was trying to achieve.

Requirements for the conversion tool

As you've seen, the config files I've been working with translate well to the new appsettings.json paradigm in ASP.NET Core. But some of our apps have a lot of configuration. I didn't want to manually be copying and pasting, and while I probably could have eventually scripted a conversion with bash or PowerShell, I'm a .NET developer, so I thought I'd write a .NET tool 🙂. Even better, with .NET Core 2.1 I could make a global tool, and use it from any folder.

The tool I was making had just a few requirements:

  • Read the standard <appSettings> and <connectionString> sections of web.config files, as well as the generic <add> style environment-specific .config files shown earlier.
  • Generate nested JSON objects for "configuration sections" demarcated by _, such as the SlackApi show earlier.
  • Be quick to develop - this was just a tool to get other stuff done!

Building the tool

If you're new to global tools, I suggest reading my previous post on building a .NET Core global tool, as well as Nate McMasters blog for a variety of getting started guides and tips. In this post I'm just going to describe the approach I took for solving the problem, rather than focusing on the global tool itself.

.NET Core global tools are just Console apps with <PackAsTool>true</PackAsTool> set in the .csproj. It really is as simple as that!

Parsing the config files

My first task was to read the config files into memory. I didn't want to have to faff with XML parsing myself, so I cribbed judiciously from the sample project in the aspnet/entropy repo. This sample shows how to create a custom ASP.NET Core configuration provider to read from web.config files. Perfect!

I pulled in 4 files from this project (you can view them in the repo):

  • ConfigFileConfigurationProvider
  • ConfigurationAction
  • IConfigurationParser
  • KeyValueParser

If you were going to be using the configuration provider in your app, you'd also need to create an IConfigurationSource, as well as adding some convenience extension methods. For my tool, I manually created a ConfigFileConfigurationProvider instance and passed in the path to the file and the required KeyValueParsers. These two parsers would handle all my use cases, by looking for <add> and <remove> elements with key-value or name-connectionString attributes.

var file = "path/to/config/file/web.config";
var parsersToUse = new List<IConfigurationParser> {
    new KeyValueParser(),
    new KeyValueParser("name", "connectionString")
};

// create the provider
var provider = new ConfigFileConfigurationProvider(
    file, loadFromFile: true, optional: false, parsersToUse);

// Read and parse the file
provider.Load();

After calling Load(), the provider contains all the key-value pairs in an internal dictionary, so we need to get to them. Unfortunately, that's not as easy as we might like: we can only enumerate all the keys in the Dictionary. To get the KeyValuePairs we need to enumerate the keys and then fetch them from the dictionary one at a time. Obviously this is rubbish performance wise, but it really doesn't matter for this tool! 🙂

const string SectionDelimiter = "_";
// Get all the keys
var keyValues = provider.GetChildKeys(Enumerable.Empty<string>(), null)
    .Select(key =>
    {
        // Get the value for the current key
        provider.TryGet(key, out var value);

        // Replace the section delimiter in the key value
        var newKey = string.IsNullOrEmpty(SectionDelimiter)
            ? key
            : key.Replace(SectionDelimiter, ":", StringComparison.OrdinalIgnoreCase);

        // Return the key-value pair
        return new KeyValuePair<string, string>(newKey, value);
    });

We use GetChildKeys to get all the keys from the provider, and then fetch the corresponding values. I'm also transforming the keys if we have a SectionDelimiter string. This will replace all the _ previously used to denote sections, with the ASP.NET Core approach of using :. Why we do this will become clear very shortly!

After this code has run, we'll have a dictionary of values looking something like this:

{
  { "IdentityServer:Host", "local.example.com" },
  { "IdentityServer:ClientId", "MyClientId" },
  { "SlackApi:WebhookUrl",  "https://hooks.slack.com/services/Some/Url" },
  { "SlackApi:DisplayName", "Slack bot" }
}

Converting the flat list into a nested object

At this point we've successfully extracted the files from the the config files into a dictionary. But at the moment it's still a flat dictionary. We want to create a nested JSON structure, something like

{
    "IdentityServer": {
        "Host": "local.example.com",
        "ClientId": "MyClientId
    },
    "SlackApi": {
        "WebhookUrl": "https://hooks.slack.com/services/Some/Url",
        "DisplayName": "Slack bot"
    }
}

I thought about reconstructing this structure myself, but why bother when somebody has already done the work for you? The IConfigurationRoot in ASP.NET Core uses Sections that encapsulate this concept, and allows you to enumerate a section's child keys. By generating an IConfigurationRoot using the keys parsed from the .config files, I could let it generate the internal structure for me, which I could subsequently convert to JSON.

I used the InMemoryConfigurationProvider to pass in my keys to an instance of ConfigurationBuilder, and called Build to get the IConfigurationRoot.

var config = new ConfigurationBuilder()
    .AddInMemoryCollection(keyValues)
    .Build();

The config object contains all the information about the JSON structure we need, but getting it out in a useful format is not as simple. You can get all the child keys of the configuration, or of a specific section, using GetChildren(), but that includes both the top level sections names (which don't have an associated value), and key-value pairs. Effectively, you have the following key pairs (note the null values)

{ "IdentityServer", null },
{ "IdentityServer:Host", "local.example.com" },
{ "IdentityServer:ClientId", "MyClientId" },
{ "SlackApi", null },
{ "SlackApi:WebhookUrl", "https://hooks.slack.com/services/Some/Url" },
{ "SlackApi:DisplayName", "Slack bot" }

The solution I came up with is this little recursive function to convert the configuration into a JObject

static JObject GetConfigAsJObject(IConfiguration config)
{
    var root = new JObject();

    foreach (var child in config.GetChildren())
    {
        //not strictly correct, but we'll go with it.
        var isSection = (child.Value == null);
        if (isSection)
        {
            // call the function again, passing in the section-children only
            root.Add(child.Key, GetConfigAsJObject(child));
        }
        else
        {
            root.Add(child.Key, child.Value);
        }
    }

    return root;
}

Calling this function with the config parameter produces the JSON structure we're after. All that remains is to serialize the contents to a file, and the conversion is complete!

var newPath = Path.ChangeExtension(file, "json");
var contents = JsonConvert.SerializeObject(jsonObject, Formatting.Indented);
await File.WriteAllTextAsync(newPath, contents);

I'm sure there must be a function to serialize the JObject directly to the file, rather than in memory first, but I couldn't find it. As I said before, performance isn't something I'm worried about but it's bugging me nevertheless. If you know what I'm after, please let me know in the comments, or send a PR!

Using the global tool

With the console project working as expected, I converted the project to a global tool as described in my previous post and in Nate's posts. If you want to use the tool yourself, first install the .NET Core 2.1 SDK, and then install the tool using

> dotnet tool install --global dotnet-config2json

You can then run the tool and see all the available options using

> dotnet config2json --help

dotnet-config2json

Converts a web.config file to an appsettings.json file

Usage: dotnet config2json [arguments] [options]

Arguments:
  path          Path to the file or directory to migrate
  delimiter     The character in keys to replace with the section delimiter (:)
  prefix        If provided, an additional namespace to prefix on generated keys

Options:
  -?|-h|--help  Show help information

Performs basic migration of an xml .config file to
a JSON file. Uses the 'key' value as the key, and the
'value' as the value. Can optionally replace a given
character with the section marker (':').

I hope you find it useful!

Summary

In this post I described how I went about creating a tool to convert web.config files to .json files when converting ASP.NET apps to ASP.NET Core. I used an existing configuration file parser from the aspnet/entropy repo to load the web.config files into an IConfiguration object, and then used a small recursive function to turn the keys into a JObject. Finally, I turned the tool into a .NET Core 2.1 global tool.

Creating an If Tag Helper to conditionally render content

$
0
0
Creating an If Tag Helper to conditionally render content

One of the best features added to ASP.NET Core Razor is Tag Helpers. These can be added to standard HTML elements, and can participate in their rendering. Alternatively, they can be entirely new elements. Functionally, they are similar to the Html Helpers of previous version of ASP.NET, in that they can be used to easily create forms and other elements.

One of the big advantages of Tag Helpers over Html Helpers is their syntax - they look like standard HTML attributes, so they're easy to edit in a standard HTML editor. Unfortunately there are some C# structures that don't currently have a Tag Helper equivalent.

In this short post, I'll create a simple tag helper to conditionally render content in a Razor page, equivalent to adding an @if statement to standard Razor.

The Razor @if statement

As an example, I am going to create tag helpers for writing the following example razor:

@if(true)
{
    <p>Included</p>
}
@if(false)
{
    <p>Excluded</p>
}

This code renders the first <p> but not the second. Pretty self explanatory, but it can be jarring to read code that switches between C# and markup in this fashion. It's especially obvious here as the syntax highlighter I use doesn't understand Razor, just markup. That's one of the selling points of Tag Helpers - making your Razor pages easier to understand for standard HTML parsers.

The Tag Helper version

The final result we're aiming for is the following:

<if include-if="true">
    <p>Included</p>
</if>
<if include-if="false">
    <p>Excluded</p>
</if>

As we are are writing a custom Tag Helper we can also easily support the alternative approach, where we can either include or exclude the inner markup based on a variable:

<if include-if="true">
    <p>Included</p>
</if>
<if exclude-if="true">
    <p>Excluded</p>
</if>

The inner markup will only be rendered if the include-if attribute evaluates to true, and the exclude-if attribute evaluates to false.

Let's take a look at the implementation.

The IfTagHelper

The IfTagHelper implementation is pretty simple. We inherit from the TagHelper class, and expose two properties as attributes on the element - Include and Exclude. We override the Process() function, and conditionally suppress the output content if necessary:

public class IfTagHelper : TagHelper
{
    public override int Order => -1000;

    [HtmlAttributeName("include-if")]
    public bool Include { get; set; } = true;

    [HtmlAttributeName("exclude-if")]
    public bool Exclude { get; set; } = false;

    public override void Process(TagHelperContext context, TagHelperOutput output)
    {
        // Always strip the outer tag name as we never want <if> to render
        output.TagName = null;

        if (Include && !Exclude)
        {
            return;
        }

        output.SuppressOutput();
    }
}

The Process function is where we control whether to render the inner content or not.

First, whether or not we render the inner content, we want to ensure the <if> attribute is not rendered to the final output. We can achieve this by setting output.TagName = null;.

Next, we check whether we should render the content inside the <if> tag or not. If not, then we just return from the tag handler, as no further processing is required. The inner content will be rendered as normal.

If we don't want to render the contents, then we need to suppress the rendering by calling output.SuppressOutput();. This ensures none of the content within the <if> tag is rendered to the output.

The result

So, finally, lets take a look at how this all plays out - for the following Razor:

<if>
    <p>Included 1</p>
</if>
<if include-if="1 == 1">
    <p>Included 2</p>
</if>
<if exclude-if="false">
    <p>Included 3</p>
</if>

<if include-if="false">
    <p>Excluded 1</p>
</if>
<if exclude-if="1 == 1">
    <p>Excluded 2</p>
</if>

Note that the content inside the include-if or exclude-if attributes is C# - you can include any C# expression there that evaluates to a boolean. The following HTML will be rendered:

<p>Included 1</p>
<p>Included 2</p>
<p>Included 3</p>

An alternative tag helper using attributes

In this example, I created a standalone <if> Tag Helper that you can wrap around content that you want to conditionally show or hide. However, you may prefer to have a Tag Helper that you attach as an attribute to standard HTML elements. For example:

<p include-if="1 == 1">Included</p>
<p exclude-if="true">Excluded</p>

This is easy to achieve with a few simple modifications, but I'll leave it as an exercise to the reader. If you just want to see the code, I have an example on GitHub, or you can check out the example in the ASP.NET Core documentation which does exactly this!

Summary

This simple Tag Helper can be used to reduce the amount of C# in your Razor files, making it easier to read and edit with HTML editors. You can find the code for this post on GitHub.

The ASP.NET Core Generic Host: namespace clashes and extension methods

$
0
0
The ASP.NET Core Generic Host: namespace clashes and extension methods

ASP.NET Core 2.1 introduced the ASP.NET Core Generic Host for non-HTTP scenarios. In standard HTTP ASP.NET Core applications, you configure your app using the WebHostBuilder in ASP.NET Core, but for non-HTTP scenarios (e.g. messaging apps, background tasks) you use the generic HostBuilder.

In this post I describe some of the similarities and differences between the standard ASP.NET Core WebHostBuilder used to build HTTP endpoints, and the HostBuilder used to build non-HTTP services. I discuss the fact that they use similar, but completely separate abstractions, and how that fact will impact you if you try and take code written for a standard ASP.NET Core application, and reuse it with a generic host.

If the generic host is new to you, I recommend checking out Steve Gordon's introductory post. For more detail on the nuts-and-bolts, take a look at the documentation.

How does HostBuilder differ from WebHostBuilder?

ASP.NET Core is used primarily to build HTTP endpoints using the Kestrel web server. A WebHostBuilder defines the configuration, logging, and dependency injection (DI) for your application, as well as the actual HTTP endpoint behaviour. By default, the templates use the CreateDefaultBuilder extension method on WebHost in program.cs:

public class Program
{
    public static void Main(string[] args)
    {
        CreateWebHostBuilder(args).Build().Run();
    }

    public static IWebHostBuilder CreateWebHostBuilder(string[] args) =>
        WebHost.CreateDefaultBuilder(args)
            .UseStartup<Startup>();
}

This extension method sets up the default configuration providers and logging providers for your app. The UseStartup<T>() extension sets the Startup class where you define the DI services and your app's middleware pipeline.

Generic hosted services have some aspects in common with standard ASP.NET Core apps, and some differences.

Hosted services can use the same configuration, logging, and dependency injection infrastructure as HTTP ASP.NET Core apps. That means you can reuse a lot of the same libraries and classes as you do already (with a big caveat, which I'll come to later).

You can also use a similar pattern for configuring an application, though there's no CreateDefaultBuilder as of yet, so you need to use the ConfigureServices extension methods etc. For example, a basic hosted service might look something like the following:

public class Program
{
    public static int Main(string[] args)
    {
        CreateHostBuilder(args).Build().Run();
    }

    public static IHostBuilder BuildHost(string[] args) =>
        new HostBuilder()
            .ConfigureLogging(logBuilder => logBuilder.AddConsole())
            .ConfigureHostConfiguration(builder => // setup your app's configuration
            {
                builder
                    .SetBasePath(Directory.GetCurrentDirectory())
                    .AddJsonFile("appsettings.json")
                    .AddEnvironmentVariables();
            })
            .ConfigureServices( services => // configure DI, including the actual background services
                services.AddSingleton<IHostedService, PrintTimeService>());
}

There are a number of differences visible in this program.cs file, compared to a standard ASP.NET Core app:

  1. No default builder - As there's no default builder, you'll need to explicitly call each of the logging/configuration etc extension methods. It makes samples more verbose, but in reality I find this to be the common approach for apps of any size anyway.
  2. No Kestrel - Kestrel is the HTTP server, so we don't (and you can't) use it for generic hosted services.
  3. You can't use a Startup class - Notice that I called ConfigureServices directly on the HostBuilder instance. This is possible in a standard ASP.NET Core app, but it's more common to configure your services in a separate Startup class, along with your middleware pipeline. Generic hosted services don't have that capability. Personally, I find that a little frustrating, and would like to see that feature make it's way to HostBuilder.

There's actually one other major difference which isn't visible from these samples. The IHostBuilder abstraction and it's associates are in a completely different namespace and package to the existing IWebHostBuilder. This causes a lot of compatibility headaches, as you'll see.

Same interfaces, different namespaces

When I started using the generic host, I had made a specific (incorrect) assumption about how the IHostBuilder and IWebHostBuilder were related. Given that they provided very similar cross-cutting functionality to an app (configuration, logging, DI), I assumed that they shared a common base interface. Specifically, I assumed the IWebHostBuilder would be derived from the IHostBuilder - it provides the same functionality and adds HTTP on top, so that seemed logical to me. However, the two interfaces are completely unrelated!

The ASP.NET Core HTTP hosting abstractions

The ASP.NET Core hosting abstractions library, which contains the definition of IWebHostBuilder, is Microsoft.AspNetCore.Hosting.Abstractions. This library contains all the basic classes and interfaces for building an ASP.NET Core web host, e.g.

  • IWebHostBuilder
  • IWebHost
  • IHostingEnvironment
  • WebHostBuilderContext

These interfaces all live in the Microsoft.AspNetCore.Hosting namespace. As an example, here's the IWebHostBuilder interface:

public interface IWebHostBuilder
{
    IWebHost Build();
    IWebHostBuilder ConfigureAppConfiguration(Action<WebHostBuilderContext, IConfigurationBuilder> configureDelegate);
    IWebHostBuilder ConfigureServices(Action<IServiceCollection> configureServices);
    IWebHostBuilder ConfigureServices(Action<WebHostBuilderContext, IServiceCollection> configureServices);
    string GetSetting(string key);
    IWebHostBuilder UseSetting(string key, string value);
}

The ASP.NET Core generic host abstractions

The generic host abstractions can be found in the Microsoft.Extensions.Hosting.Abstractions library (Extensions instead of AspNetCore). This library contains equivalents of most of the abstractions found in the HTTP hosting abstractions library:

  • IHostBuilder
  • IHost
  • IHostingEnvironment
  • HostBuilderContext

These interfaces all live in the Microsoft.Extensions.Hosting namespace (again, Extensions instead of AspNetCore). The IHostBuilder interface looks like this:

public interface IHostBuilder
{
    IDictionary<object, object> Properties { get; }
    IHost Build();
    IHostBuilder ConfigureAppConfiguration(Action<HostBuilderContext, IConfigurationBuilder> configureDelegate);
    IHostBuilder ConfigureContainer<TContainerBuilder>(Action<HostBuilderContext, TContainerBuilder> configureDelegate);
    IHostBuilder ConfigureHostConfiguration(Action<IConfigurationBuilder> configureDelegate);
    IHostBuilder ConfigureServices(Action<HostBuilderContext, IServiceCollection> configureDelegate);
    IHostBuilder UseServiceProviderFactory<TContainerBuilder>(IServiceProviderFactory<TContainerBuilder> factory);
}

If you compare this interface to the IWebHostBuilder I showed previously, you'll see some similarities, and some differences. On the similarity side:

  • Both interfaces have a Build() function that returns their respective "Host" interface.
  • Both have a ConfigureAppConfiguration method for setting the app configuration. While both interfaces use the same Microsoft.Extensions.Configuration abstraction IConfigurationBuilder, they each use a different context object - HostBuilderContext or WebHostBuilderContext.
  • Both have a ConfigureServices method, though again the type of the context object differs.

There are many more differences between the interfaces. To highlight a few:

  • The IHostBuilder has a ConfigureHostConfiguration method, for setting host configuration rather than app configuration. This is equivalent to the UseConfiguration extension method on IWebHostBuilder (which under the hood calls IWebHostBuilder.UseSetting).
  • The IHostBuilder has explicit methods for configuring the DI container. This is normally handled in the Startup class for IWebHostBuilder. As HostBuilder doesn't use Startup classes, the functionality is exposed here instead.

These changes, and the lack of a common interface, are just enough to make it difficult to move code that was working in a standard ASP.NET Core app to a generic host app. Which is really annoying!

So why all the changes? To be honest, I haven't dug through GitHub issues and commits to find out, but I'm happy to speculate.

It's always about backward compatibility

The easiest way to avoid breaking something, is to not change it! My guess is that's why we're stuck with these two similar-yet-irritatingly-different interfaces. If Microsoft were to introduce a new common interface, they'd have to modify IWebHostBuilder to implement that interface:

public interface IHostBuilderBase
{
    IWebHost Build();
}

public interface IWebHostBuilder: IHostBuilderBase
{
    // IWebHost Build();         <- moved up to base interface
    IWebHostBuilder ConfigureAppConfiguration(Action<WebHostBuilderContext, IConfigurationBuilder> configureDelegate);
    IWebHostBuilder ConfigureServices(Action<IServiceCollection> configureServices);
    IWebHostBuilder ConfigureServices(Action<WebHostBuilderContext, IServiceCollection> configureServices);
    string GetSetting(string key);
    IWebHostBuilder UseSetting(string key, string value);
}

On first look that might seem fine - as long as they only moved methods from IWebHostBuilder to the base interface, and made sure the signatures were the same, any classes implementing IWebHostBuilder would still correctly implement it. But what if the interface was implemented explicitly? For example:

public class MyWebHostBuilder : IWebHostBuilder
{
    IWebHost IWebHostBuilder.Build() // explicitly implement the interface
    {
        // implementation
    }
    // other methods
}

I'm not 100%, but I suspect that would break some things like overload resolution and such, so would be a no-go for a minor release (and likely a major release to be honest).

The other advantage of creating a completely separate set of abstractions, is a clean slate! For example, the addition of the ConfigureHostConfiguration() method to IHostBuilder suggests an acknowledgment that it should have been a first class citizen for the IWebHostBuilder as well. It also leaves the abstractions free to evolve in their own way.

So if creating a new set of abstractions libraries gives us all these advantages, what's the downside, what do we lose?

Code reuse is out the window

The big problem with the approach of creating new abstractions, is that we have new abstractions! Any "reusable" code that was written for use with the Microsoft.AspNetCore.Hosting abstractions, has to be duplicated if you want to use it with the Microsoft.Extensions.Hosting.

Here's a simple example of the problem that I ran into almost immediately. Imagine you're written an extension method on IHostingEnvironment to check if the current environment is Testing:

using System;
using Microsoft.AspNetCore.Hosting;

public static class HostingEnvironmentExtensions
{
    const string Testing = "Testing";
    public static bool IsTesting(this IHostingEnvironment env)
    {
        return string.Equals(env.EnvironmentName, Testing, StringComparison.OrdinalIgnoreCase);
    }
}

It's a simple method, you might use it in various places in your app, in the same way the built-in IsProduction() and IsDevelopment() extension methods are.

Unfortunately, this extension method can't be used in generic hosted services. The IHostingEnvironment used by this code is a different IHostingEnvironment to the generic host abstraction (Extensions namespace vs. AspNetCore namespace).

That means if you have common library code you wanted to share between your HTTP and non-HTTP ASP.NET Core apps, you can't use any of the abstractions found in the hosting abstraction libraries. If you _do_ need to use them, you're left copy-pasting code ☹.

Another example of the issue I found is for third-party libraries that are used for configuration, logging, or DI, and that have a dependency on the hosting abstractions.

For example, I commonly use the excellent Serilog library to add logging to my ASP.NET Core apps. The Serilog.AspNetCore library makes it very easy to add an existing Serilog configuration to your app, with a call to UseSerilog() when configuring your WebHostBuilder:

public static IWebHostBuilder CreateWebHostBuilder(string[] args) =>
        WebHost.CreateDefaultBuilder(args)
            .UseStartup<Startup>()
            .UseSerilog() // <-- Add this line

Unfortunately, even though the underlying configuration libraries are identical between IWebHostBuilder and IHostBuilder, the UseSerilog() extension method is not available. It's an extension method on IWebHostBuilder not IHostBuilder, which means you can't use the Serilog.AspNetCore library with the generic host.

To get round the issue, I've created a similar library for adding Serilog to generic hosts, called Serilog.Hosting.Extensions that you can find on GitHub. Thanks to everyone in the Serilog project for adopting it officially into the fold, and for making the whole process painless and enjoyable! In my next post I'll cover how to use the library in your generic ASP.NET Core apps.

These problems will basically apply to all code written that depends on the hosting abstractions. The only real way around them is to duplicate the code, and tweak some names and namespaces. It all feels like a missed opportunity to create something cleaner, with an easy upgrade path, and is asking for maintainability issues. As I discussed in the previous section, I'm sure the team have their reasons for the approach taken, but for me, it stings a bit.

Summary

In this post I discussed some of the similarities and differences between the hosting abstractions used in the HTTP ASP.NET Core apps and the non-HTTP generic host. Many of the APIs are similar, but the main hosting abstractions exist in different libraries and namespaces, and aren't iteroperable. That means that code written for one set of abstractions can't be used with the other. Unfortunately, that means there's likely going to be duplicate code required if you want to share behaviour between HTTP and non-HTTP apps.

Adding Serilog to the ASP.NET Core Generic Host

$
0
0
Adding Serilog to the ASP.NET Core Generic Host

ASP.NET Core 2.1 introduced the ASP.NET Core Generic Host for non-HTTP scenarios. In standard HTTP ASP.NET Core applications, you configure your app using the WebHostBuilder in ASP.NET Core, but for non-HTTP scenarios (e.g. messaging apps, background tasks) you use the generic HostBuilder.

In my previous post, I discussed some of the similarities and differences between the IWebHostBuilder and IHostBuilder. In this post I introduce the Serilog.Extensions.Hosting package for ASP.NET Core generic hosts, discuss why it's necessary, and describe how you can use it to add logging with Serilog to your non-HTTP aps.

Why do you need Serilog.Extensions.Hosting?

The goal of the ASP.NET Core generic host is to provide the same cross-cutting capabilities found in traditional ASP.NET Core apps, such as configuration, dependency injection (DI), and logging, to non-HTTP apps. However, it does so while also using a whole new set of abstractions, as discussed in my previous post. If you haven't already, I suggest reading that post for a description of the problem.

Serilog already has a good story for adding logging to your traditional HTTP ASP.NET Core apps with the Serilog.AspNetCore library, as well as an extensive list of available sinks. Unfortunately, the abstraction incompatibilities mean that you can't use this library with generic host ASP.NET Core apps.

Instead, you should use the Serilog.Extensions.Hosting library. This is very similar to the Serilog.AspNetCore library, but designed for the Microsoft.Extensions.Hosting abstractions instead of the Microsoft.AspNetCore.Hosting abstractions (Extensions instead of AspNetCore).

In this post I'll give a quick example of how to use the library, and touch on how it works under the hood. Alternatively, check out the code and Readme on GitHub.

Adding Serilog to a generic Host

The Serilog.Extensions.Hosting package contains a custom ILoggerFactory that uses the standard Microsoft.Extensions.Logging infrastructure to log to Serilog. Any messages that are logged using the standard ILogger interface are sent to Serilog. That includes both custom log messages and infrastructure messages, as you'd expect.

If you're new to Serilog, I suggest seeing their website. I've also written about Serilog previously.

Installing the library

You can install the Serilog.Extensions.Hosting NuGet package into your app using the package manager console, the .NET CLI, or by simply editing your app's .csproj file. You'll also need to add at least one "sink" - this is where Serilog will write the log messages. Serilog.Sinks.Console writes messages to the console for example.

Using the package manager:

Install-Package Serilog.Extensions.Hosting -DependencyVersion Highest
Install-Package Serilog.Sinks.Console

Using the .NET CLI:

dotnet add package Serilog.Extensions.Hosting
dotnet add package Serilog.Sinks.Console

This will install the packages in your app, as you can see from the .csproj file:

<Project Sdk="Microsoft.NET.Sdk">

  <PropertyGroup>
    <TargetFramework>netcoreapp2.1</TargetFramework>
  </PropertyGroup>

  <ItemGroup>
    <PackageReference Include="Microsoft.AspNetCore.App" />
    <PackageReference Include="Serilog.Sinks.Console" Version="3.0.1" />
    <PackageReference Include="Serilog.Extensions.Hosting" Version="2.0.0" />
  </ItemGroup>

</Project>

Configuring Serilog in your application

Once you've restored the packages (either automatically or by running dotnet restore), you can configure your app to use Serilog. The recommended approach is to configure Serilog's static Log.Logger object first, before configuring your ASP.NET Core application. That way you can use a try/catch block to ensure any start-up issues with your app are appropriately logged.

In the following example, I manually configure Serilog to only log Information level or higher events. Additionally, only events in the Microsoft namespace of Warning or above will be logged.

You can load the Serilog configuration using IConfiguration objects instead using the Serilog configuration library.

public class Program
{
    public static int Main(string[] args)
    {
        Log.Logger = new LoggerConfiguration()
            .MinimumLevel.Information()
            .MinimumLevel.Override("Microsoft", LogEventLevel.Warning)
            .Enrich.FromLogContext()
            .WriteTo.Console()
            .CreateLogger();

        try
        {
            Log.Information("Starting host");
            CreateHostBuilder(args).Build().Run();
            return 0;
        }
        catch (Exception ex)
        {
            Log.Fatal(ex, "Host terminated unexpectedly");
            return 1;
        }
        finally
        {
            Log.CloseAndFlush();
        }
    }

    public static IHostBuilder CreateHostBuilder(string[] args); //see below
}

Finally, add the Serilog ILoggerFactory to your IHostBuilder with UserSerilog() method in CreateHostBuilder():

    public static IHostBuilder CreateHostBuilder(string[] args) =>
        new HostBuilder()
            .ConfigureHostConfiguration(builder => { /* Host configuration */ })
            .ConfigureAppConfiguration(builder => { /* App configuration */ })
            .ConfigureServices(services =>  { /* Service configuration */})
            .UseSerilog(); // <- Add this line
}

That's it! When you run your application You'll see log output something like the following (depending on the services you have configured!):

[22:10:39 INF] Starting host
[22:10:39 INF] The current time is: 12/05/2018 10:10:39 +00:00

How the library works behind the scenes

On the face of it, completely replacing the default ASP.NET Core logging system to use a different one seems like a big deal. Luckily, thanks to the use of interfaces, loose coupling, and dependency injection, the code is remarkably simple! The whole extension method we used previously is shown below:

public static class SerilogHostBuilderExtensions
{
    public static IHostBuilder UseSerilog(this IHostBuilder builder, 
        Serilog.ILogger logger = null, bool dispose = false)
    {
        builder.ConfigureServices((context, collection) =>
            collection.AddSingleton<ILoggerFactory>(services => new SerilogLoggerFactory(logger, dispose)));
        return builder;
    }
}

The UseSerilog() extension calls the ConfigureServices method on the IHostBuilder, and adds an instance of the SerilogLoggerFactory as the application's ILoggerFactory. Whenever an ILoggerFactory is required by the app (to create an ILogger), the SerilogLoggerFactory will be used.

The SerilogLoggerFactory is essentially a simple wrapper around the SerilogLoggerProvider provided in the Serilog.Extensions.Logging library. This library implements the necessary adapters so Serilog can hook into the APIs required by the Microsoft.Extensions.Logging framework.

The framework's default LoggerFactory implementation allows multiple providers to be active at once (e.g. a Console provider, a Debug provider, a File provider etc). In contrast, the SerilogLoggerFactory allows only the Serilog provider, and ignores all others.

public class SerilogLoggerFactory : ILoggerFactory
{
    private readonly SerilogLoggerProvider _provider;

    public SerilogLoggerFactory(ILogger logger = null, bool dispose = false)
    {
        _provider = new SerilogLoggerProvider(logger, dispose);
    }

    public void Dispose() => _provider.Dispose();

    public Microsoft.Extensions.Logging.ILogger CreateLogger(string categoryName)
    {
        return _provider.CreateLogger(categoryName);
    }

    public void AddProvider(ILoggerProvider provider)
    {
        // Only Serilog provider is allowed!
        SelfLog.WriteLine("Ignoring added logger provider {0}", provider);
    }
}

And that's it! The whole library only requires two .cs files, but it makes adding Serilog to an ASP.NET Core generic host that little bit easier. I hope you'll give it a try, and obviously raise an issues you find or comments you have on GitHub!

Summary

ASP.NET Core 2.1 introduced the generic host, for handling non-HTTP scenarios, like messaging or background tasks. The generic host uses the same underlying abstractions for configuration, dependency injection, and logging, but the main interfaces exist in a different namespace: Microsoft.Extensions.Hosting instead of Microsoft.AspNetCore.Hosting.

This difference in namespace means you need to use the Serilog.Extensions.Hosting NuGet package to add Serilog logging to your generic host app (instead of Serilog.AspNetCore). After adding the package to your app, configure your static Serilog logger as usual and call UserSerilog() on your IHostBuilder instance.

Viewing all 743 articles
Browse latest View live