Quantcast
Channel: Andrew Lock | .NET Escapades
Viewing all 743 articles
Browse latest View live

Adding Cache-Control headers to Static Files in ASP.NET Core

$
0
0
Adding Cache-Control headers to Static Files in ASP.NET Core

Thanks to the ASP.NET Core middleware pipeline, it is relatively simple to add additional HTTP headers to your application by using custom middleware. One common use case for this is to add caching headers.

Allowing clients and CDNs to cache your content can have a massive effect on your application's performance. By allowing caching, your application never sees these additional requests and never has to allocate resources to process them, so it is more available for requests that cannot be cached.

In most cases you will find that a significant proportion of the requests to your site can be cached. A typical site serves both dynamically generated content (e.g. in ASP.NET Core, the HTML generated by your Razor templates) and static files (CSS stylesheets, JS, images etc). The static files are typically fixed at the time of publish, and so are perfect candidates for caching.

In this post I'll show how you can add headers to the files served by the StaticFileMiddleware to increase your site's performance. I'll also show how you can add a version tag to your file links, to ensure you don't inadvertently serve stale data.

Note that this is not the only way to add cache headers to your site. You can also use the ResponseCacheAttribute in MVC to decorate Controllers and Actions if you are returning data which is safe to cache.

You could also consider adding caching at the reverse proxy level (e.g. in IIS or Nginx), or use a third party provider like CloudFlare.

Adding Caching to the StaticFileMiddleware

When you create a new ASP.NET Core project from the default template, you will find the StaticFileMiddleware is added early in the middleware pipeline, with a call to AddStaticFiles() in Startup.Configure():

public void Configure(IApplicationBuilder app)  
{
    // looging and exception handler removed for clarity

    app.UseStaticFiles();

    app.UseMvc(routes =>
    {
        routes.MapRoute(
            name: "default",
            template: "{controller=Home}/{action=Index}/{id?}");
    });
}

This enables serving files from the wwwroot folder in your application. The default template contains a number of static files (site.css, bootstrap.css, banner1.svg) which are all served by the middleware when running in development mode. It is these we wish to cache.

Don't we get caching by default?

Before we get to adding caching, lets investigate the default behaviour. The first time you load your application, your browser will fetch the default page, and will download all the linked assets. Assuming everything is configured correctly, these should all return a 200 - OK response with the file data:
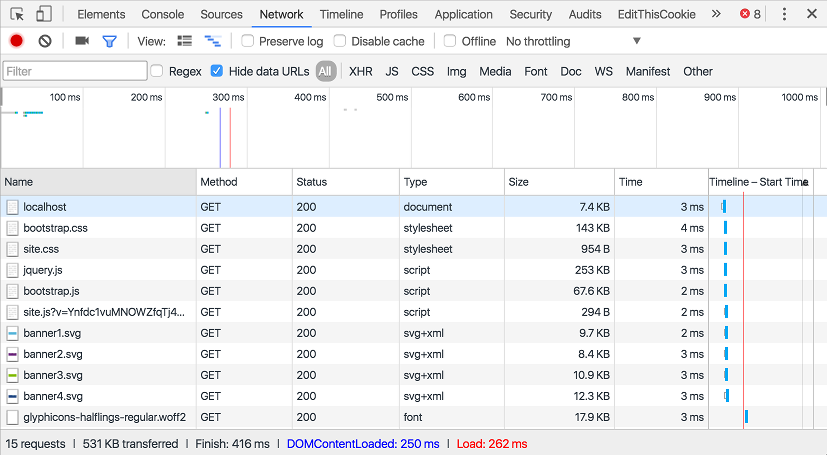
Adding Cache-Control headers to Static Files in ASP.NET Core

As well as the file data, by default the response header will contain ETag and Last-Modified values:

HTTP/1.1 200 OK  
Date: Sat, 15 Oct 2016 14:15:52 GMT  
Content-Type: image/svg+xml  
Last-Modified: Sat, 15 Oct 2016 13:43:34 GMT  
Accept-Ranges: bytes  
ETag: "1d226ea1f827703"  
Server: Kestrel  

The second time a resource is requested from your site, your browser will send this ETag and Last-Modified value in the header as If-None-Match and If-Modified-Since. This tells the server that it doesn't need to send the data again if the file hasn't changed. If it hasn't changed, the server will send a 304 - Not Modified response, and the browser will use the data it received previously instead.

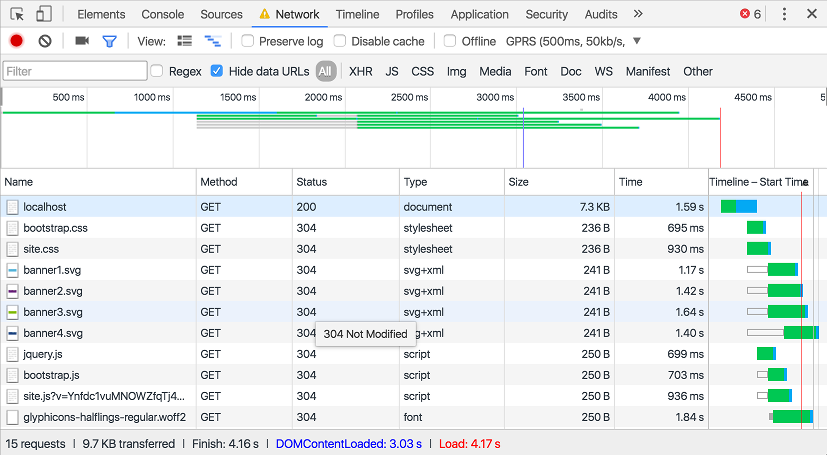
This level of caching comes out-of-the-box with the StaticFileMiddleware, and gives improved performance by reducing the amount of bandwidth required. However it is important to note that the client is still sending a request to your server - the response has just been optimised. This becomes particularly noticeable with high latency connections or pages with many files - the browser still has to wait for the response to come back as 304:
Adding Cache-Control headers to Static Files in ASP.NET Core

The image above uses Chrome's built in network throttling to emulate a GPRS connection with a very large latency of 500ms. You can see that the first Index page loads in 1.59s, after which the remaining static files are requested. Even though they all return 304 responses using only 250 bytes, the page doesn't actually finish loading until and additional 2.5s have passed!

Adding cache headers to static files

Rather than requiring the browser to always check if a file has changed, we now want it to assume that the file is the same, for a predetermined length of time. This is the purpose of the Cache-Control header.

In ASP.NET Core, you can easily add this this header when you configure the StaticfileMiddleware:

using Microsoft.Net.Http.Headers;

app.UseStaticFiles(new StaticFileOptions  
{
    OnPrepareResponse = ctx =>
    {
        const int durationInSeconds = 60 * 60 * 24;
        ctx.Context.Response.Headers[HeaderNames.CacheControl] =
            "public,max-age=" + durationInSeconds;
    }
});

One of the overloads of UseStaticFiles takes a StaticFileOptions parameter, which contains the property OnPrepareResponse. This action can be used to specify any additional processing that should occur before a response is sent. It is passed a single parameter, a StaticFileResponseContext, which contains the current HttpContext and also an IFileInfo property representing the current file.

If set, the Action<StaticFileResponseContext> is called before each successful response, whether a 200 or 304 response, but it won't be called if the file was not found (and instead returns a 404).

In the example provided above, we are setting the Cache-Control header (using the constant values defined in Microsoft.Net.Http.Headers) to cache our files for 24 hours. You can read up on the details of the various associated cache headers here. In this case, we marked the response as public as we want intermediate caches between our server and the user to store the cached file too.

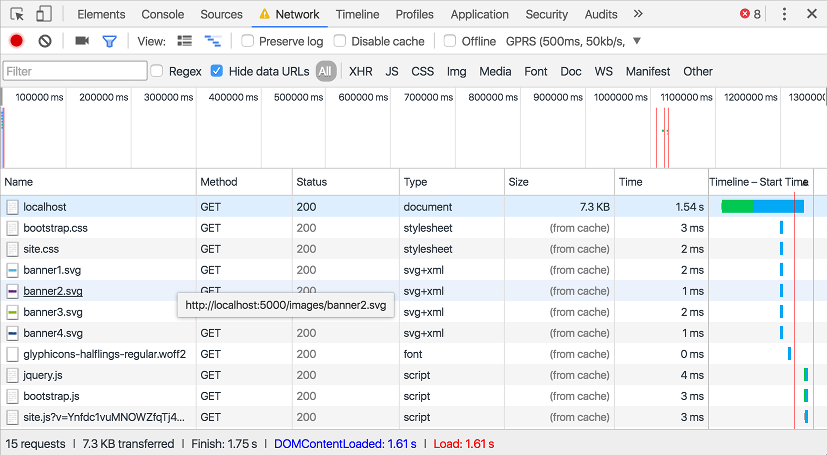
If we run our high-latency scenario again, we can see our results in action:
Adding Cache-Control headers to Static Files in ASP.NET Core

Our index page still takes 1.58s to load, but as you can see, all our static files are loaded from the cache, which means no requests to our server, and consequently no latency! We're all done in 1.61s instead of the 4.17s we had previously.

Once the max-age duration we specified has expired, or after the browser evicts the files from its cache, we'll be back to making requests to the server, but until then we can see a massive improvement. What's more, if we use a CDN or there are intermediate cache servers between the user's browser and our server, then they will also be able to serve the cached content, rather than the request having to make it all the way to your server.

Note: Chrome is a bit funny with respect to cache behaviour - if you reload a page using F5 or the Reload button, it will generally not use cached assets. Instead it will pull them down fresh from the server. If you are struggling to see the fruits of your labour, navigate to a different page by clicking a link - you should see the correct caching behaviour then.

Cache busting for file changes

Before we added caching we saw that we return an ETag whenever we serve a static file. This is calculated based on the properties of the file such that if the file changes, the ETag will change. For those interested, this is the snippet of code that is used in ASP.NET Core:

_length = _fileInfo.Length;

DateTimeOffset last = _fileInfo.LastModified;  
// Truncate to the second.
_lastModified = new DateTimeOffset(last.Year, last.Month, last.Day, last.Hour, last.Minute, last.Second, last.Offset).ToUniversalTime();

long etagHash = _lastModified.ToFileTime() ^ _length;  
_etag = new EntityTagHeaderValue('\"' + Convert.ToString(etagHash, 16) + '\"');  

This works great before we add caching - if the ETag hasn't changed we return a 304, otherwise we return a 200 response with the new data.

Unfortunately, once we add caching, we are no longer making a request to the server. The file could have completely changed or have been deleted entirely, but if the browser doesn't ask, the server can't tell them!

One common solution around this is to append a querystring to the url when you reference the static file in your markup. As the browser determines uniqueness of requests including the querystring, it treats https://localhost/css/site.css?v=1 as a different file to https://localhost/css/site.css?v=2. You can use this approach by updating any references to the file in your markup whenever you change the file.

While this works, it requires you to find every reference to your static file anywhere on your site whenever you change the file, so it can be a burden to manage. A simpler technique is to have the querystring be calculated based on the content of the file itself, much like an ETag. That way, when the file changes, the querystring will automatically change.

This is not a new technique - Mads Kristensen describes one method of achieving it with ASP.NET 4.X here but with ASP.NET Core we can use the link, script and image Tag Helpers to do the work for us.

It is highly likely that you are actually already using these tag helpers, as they are used in the default templates for exactly this purpose! For example, in _Layout.cshtml, you will find the following link:

<script src="~/js/site.js" asp-append-version="true"></script>  

The Tag Helper is added with the markup asp-append-version="true" and ensures that when rendered, the link will be rendered with a hash of the file as a querysting:

<script src="/js/site.js?v=Ynfdc1vuMNOWZfqTj4N3SPcebazoGXiIPgtfE-b2TO4"></script>  

If the file changes, the SHA256 hash will also change, and the cache will be automatically bypassed! You can add this Tag Helper to img, script and link elements, though there is obviously a degree of overhead as a hash of the file has to be calculated on first request. For files which are very unlikely to ever change (e.g. some images) it may not be worth the overhead to add the helper, but for others it will no doubt prevent quirky behaviour once you add caching!

Summary

In this post we saw the built in caching using ETags provided out of the box with the StaticFileMiddleware. I then showed how to add caching to the requests to prevent unnecessary requests to the server. Finally, I showed how to break out of the cache when the file changes, by using Tag Helpers to add a version querystring to the file request.


Using dependency injection in a .Net Core console application

$
0
0
Using dependency injection in a .Net Core console application

One of the key features of ASP.NET Core is baked in dependency injection. There may be various disagreements on the way that is implemented, but in general encouraging a good practice by default seems like a win to me.

Whether you choose to use the built in container or a third party container will likely come down to whether the built in container is powerful enough for your given project. For small projects it may be fine, but if you need convention based registration, logging/debugging tools, or more esoteric approaches like property injection, then you'll need to look elsewhere. Luckily, third party container are pretty easy to integrate, and are going to be getting easier.

Why use the built-in container?

One question that's come up a few times, is whether you can use the built-in provider in a .NET Core console application? The short answer is not out-of-the-box, but adding it in is pretty simple. Having said that, whether it is worth using in this case is another question.

One of the advantage of the built-in container in ASP.NET Core is that the framework libraries themselves register their dependencies with it. When you call the AddMvc() extension method in your Startup.ConfigureServices method, the framework registers a whole plethora of services with the container. If you later add a third-party container, those dependencies are passed across to be re-registered, so they are available when resolved via the third-party.

If you are writing a console app, then you likely don't need MVC or other ASP.NET Core specific services. In that case, it may be just as easy to start right off the bat using StructureMap or AutoFac instead of the limited built-in provider.

Having said that, most common services designed for use with ASP.NET Core will have extensions for registering with the built in container via IServiceCollection, so if you are using services such as logging, or the Options pattern, then it is certainly easier to use the provided extensions, and plug a third party on top of that if required.

Adding DI to a console app

If you decide the built-in container is the right approach, then adding it to your application is very simple using the Microsoft.Extensions.DependencyInjection package. To demonstrate the approach, I'm going to create a simple
application that has two services:

public interface IFooService  
{
    void DoThing(int number);
}

public interface IBarService  
{
    void DoSomeRealWork();
}

Each of these services will have a single implementation. The BarService depends on an IFooService, and the FooService uses an ILoggerFactory to log some work:

public class BarService  
{
    private readonly IFooService _fooService;
    public BarService(IFooService fooService)
    {
        _fooService = fooService;
    }

    public void DoSomeRealWork()
    {
        for (int i = 0; i < 10; i++)
        {
            _fooService.DoThing(i);
        }
    }
}

public class FooService : IFooService  
{
    private readonly ILogger<FooService> _logger;
    public FooService(ILoggerFactory loggerFactory)
    {
        _logger = loggerFactory.CreateLogger<FooService>();
    }

    public void DoThing(int number)
    {
        _logger.LogInformation($"Doing the thing {number}");
    }
}

As you could see above, I'm using the new logging infrastructure in my app, so I will need to add the appropriate package to my project.json. I'll also add the DependencyInjection package and the Microsoft.Extensions.Logging.Console package so I can see the results of my logging:

{
  "dependencies": {
    "Microsoft.Extensions.Logging": "1.0.0",
    "Microsoft.Extensions.Logging.Console": "1.0.0",
    "Microsoft.Extensions.DependencyInjection": "1.0.0"
  }
}

Finally, I'll update my static void main to put all the pieces together. We'll walk through through it in a second.

using Microsoft.Extensions.DependencyInjection;  
using Microsoft.Extensions.Logging;

public class Program  
{
    public static void Main(string[] args)
    {
        //setup our DI
        var serviceProvider = new ServiceCollection()
            .AddLogging()
            .AddSingleton<IFooService, FooService>()
            .AddSingleton<IBarService, BarService>()
            .BuildServiceProvider();

        //configure console logging
        serviceProvider
            .GetService<ILoggerFactory>()
            .AddConsole(LogLevel.Debug);

        var logger = serviceProvider.GetService<ILoggerFactory>>()
            .CreateLogger<Program>();
        logger.LogDebug("Starting application");

        //do the actual work here
        var bar = serviceProvider.GetService<IBarService>();
        bar.DoSomeRealWork();

        logger.LogDebug("All done!");

    }
}

The first thing we do is configure the dependency injection container by creating a ServiceCollection, adding our dependencies, and finally building an IServiceProvider. This process is equivalent to the ConfigureServices method in an ASP.NET Core project, and is pretty much what happens behind the scenes. You can see we are using the IServiceCollection extension method to add the logging services to our application, and then registering our own services. The serivceProvider is our container we can use to resolve services in our application.

In the next step, we need to configure the logging infrastructure with a provider, so the results are output somewhere. We first fetch an instance of ILoggerFactory from our newly constructed serivceProvider, and add a console logger.

The remainder of the program shows more dependency-injection in progress. We first fetch an ILogger<T> from the container, and then fetch an instance of IBarService. As per our registrations, the IBarService is an instance of BarService, which will have an instance of FooService injected in it.

If can then run our application and see all our beautifully resolved dependencies!

Using dependency injection in a .Net Core console application

Adding StructureMap to your console app

As described previously, the built-in container is useful for adding framework libraries using the extension methods, like we saw with AddLogging above. However it is much less fully featured than many third-party containers.

For completeness, I'll show how easy it is to update the application to use a hybrid approach, using the built in container to easily add any framework dependencies, and using StructureMap for your own code. If you want a more detailed description of adding StructureMap to and ASP.NET Core application, see the post here.

First you need to add StructureMap to your project.json dependencies:

{
  "dependencies": {
    "StructureMap.Microsoft.DependencyInjection": "1.2.0"
  }
}

Now we'll update our static void main to use StructureMap for registering our custom dependencies:

public static void Main(string[] args)  
{
    // add the framework services
    var services = new ServiceCollection()
        .AddLogging();

    // add StructureMap
    var container = new Container();
    container.Configure(config =>
    {
        // Register stuff in container, using the StructureMap APIs...
        config.Scan(_ =>
                    {
                        _.AssemblyContainingType(typeof(Program));
                        _.WithDefaultConventions();
                    });
        // Populate the container using the service collection
        config.Populate(services);
    });

    var serviceProvider = container.GetInstance<IServiceProvider>();

    // rest of method as before
}

At first glance this may seem more complicated than the previous version, and it is, but it is also far more powerful. In the StructureMap example, we didn't have to explicitly register our IFooService or IBarService services - they were automatically registered by convention. When your apps start to grow, this sort of convention-based registration becomes enormously powerful, especially when couple with the error handling and debugging capabilities available to you.

In this example I showed how to use StructureMap with the adapter to work with the IServiceCollection extension methods, but there's obviously no requirement to do that. Using StructureMap as your only registration source is perfectly valid, you'll just have to manually register any services added as part of the AddPLUGIN extension methods directly.

Summary

In this post I discussed why you might want to use the built-in container for dependency injection in a .NET Core application. I showed how you could add a new ServiceCollection to your project, register and configure the logging framework, and retrieve configured instances of services from it.

Finally, I showed how you could use a third-party container in combination with the built-in container to allow you to use more powerful registration features, such as convention based registration.

Fixing a bug: when concatenated strings turn into numbers in JavaScript

$
0
0
Fixing a bug: when concatenated strings turn into numbers in JavaScript

This is a very quick post about trying to fix a JavaScript bug that plagued me for an hour this morning.

tl;dr I was tripped up by a rogue unary operator and slap-dash copy-pasting.

The setup

On an existing web page, there was some JavaScript that builds up a string to insert into the DOM:

function GetTemplate(url, html)  
{
   // other details removed
   var template = '<div class="something"><a href="'
                  + url
                  + '" target="_blank"><strong>Details: </strong><span>'
                  + html
                  + '</span></a></div>';
  return template;
}

Ignore for now whether this code is an abomination and the vulnerabilities etc - it is what it is.

The requirement was simple: insert an optional additional <span> tag before the <strong>, only if the value of a variable provided is 'truthy'. Seems pretty easy right? It should have been.

The first attempt

I set about quickly rolling out the fix and came up with code something like this:

function GetTemplate(url, html, summary) {  
   // other details removed
   var template = '<div class="something"><a href="'
                  + url
                  + '" target="_blank">';

   if(summary) {
       template += '<span class="summary">' 
           + summary 
           + '</span>';
   }

   template +=
       +'<strong>Details: </strong><span>'
       + html
       + '</span></a></div>';

  return template;
}

All looked ok to me, F5 to reload the page, and… oh dear, that doesn't look right…

Fixing a bug: when concatenated strings turn into numbers in JavaScript

Can you spot what I did wrong?

The HTML that was generated looked like this:

<div class="something"><a href="https://thewebsite.com" target="blank">  
    <span class="summary">The summary</span>NaNThis is the inner message</span></a>
</div>  

Spotted it yet?

Concatenation vs addition

Looking at the generated HTML, there appears to be a Rogue "NaN" string that has found it's way into the generated HTML and there's also no sign of the <strong> tag in the output. The presence of the NaN was a pretty clear indicator that there was some conversion to numbers going on here, but I couldn't for the life of me see where!

As I'm sure you all know, in JavaScript the + symbol can be used both for numeric addition and string concatenation, depending on the variables either side. For example,

console.log('value:' + 3);           // 'value:3'  
console.log(3 + 1);                   // 4  
console.log('value:' + 3 + '+' + 1); // 'value:3+1'  
console.log('value:' + 3 + 1);       // 'value:31'  
console.log('value:' + (3 + 1));     // 'value:4'  
console.log(3 + ' is the value');    // '3 is the value'  

In these examples, when either the left or right operands of the + symbol are a string, the other operand is coerced to a string and a concatenation is performed. Otherwise the operator is treated as an addition.

The presence of the NaN in the output string indicated there must be some something going on where a string was trying to be used as a number. But given the concatenation rules above, and the fact we weren't using parseInt() or similar anywhere, it just didn't make any sense!

The culprit

Narrowing the problem down, the issue appeared to be in the third block of string concatenation, in which the strong tag is added:

template +=  
       +'<strong>Details: </strong><span>'
       + html
       + '</span></a></div>';

If you still haven't spotted it, writing it all one line may do the trick for you:

template += +'<strong>Details: </strong><span>' + html + '</span></a></div>';  

Right at the beginning of that statement I am calling 'string' += +'string'. See the extra + that's crept in through copying and pasting errors? That's the source of all my woes - a unary operation. To quote the You Don't Know JS book by Kyle Simpson:

+c here is showing the unary operator form (operator with only one operand) of the + operator. Instead of performing mathematic addition (or string concatenation -- see below), the unary + explicitly coerces its operand (c) to a number value.This has an interesting effect on the subsequent string in that it tries to convert it to a number.

This was the exact problem I had. The rogue + was attempting to convert the string <strong>Details: </strong><span> to a number, was failing and returning NaN. This was then coerced to a string as a result of the subsequent concatenations, and broke my HTML! Removing that + fixed everything.

Bonus

As an interesting side point to this, I was using gulp-uglify to minify the resulting javascript as part of the build. As part of that minification, the 'unary operator plus value' combination (+'<strong>Details: </strong><span>') was actually being stored in the minified javascript as an explicit NaN. Gulp had seen my error and set it in stone for me!

I'm sure there's a lesson to be learnt here about not rushing and copying and pasting, but my immediate thought was for a small gulp plugin that warns you about unexpected NaNs in your minified code! I wouldn't be surprised if that already exists…

Making ConcurrentDictionary GetOrAdd thread safe using Lazy

$
0
0
Making ConcurrentDictionary GetOrAdd thread safe using Lazy

I was browsing the ASP.NET Core MVC GitHub repo the other day, checking out the new 1.1.0 Preview 1 code, when I spotted a usage of ConcurrentDictionary that I thought was interesting. This post explores the GetOrAdd function, the level of thread safety it provides, and ways to add additional threading constraints.

I was looking at the code that enables using middleware as MVC filters where they are building up a filter pipeline. This needs to be thread-safe, so they sensibly use a ConcurrentDictionary<>, but instead of a dictionary of RequestDelegate, they are using a dictionary of Lazy<RequestDelegate>. Along with the initialisation is this comment:

// 'GetOrAdd' call on the dictionary is not thread safe and we might end up creating the pipeline more
// once. To prevent this Lazy<> is used. In the worst case multiple Lazy<> objects are created for multiple
// threads but only one of the objects succeeds in creating a pipeline.
private readonly ConcurrentDictionary<Type, Lazy<RequestDelegate>> _pipelinesCache  
    = new ConcurrentDictionary<Type, Lazy<RequestDelegate>>();

This post will explore the pattern they are using and why you might want to use it in your code.

The GetOrAdd function

The ConcurrentDictionary is a dictionary that allows you to add, fetch and remove items in a thread-safe way. If you're going to be accessing a dictionary from multiple threads, then it should be your go-to class.

The vast majority of methods it exposes are thread safe, with the notable exception of one of the GetOrAdd overloads:

TValue GetOrAdd(TKey key, Func<TKey, TValue> valueFactory);  

This overload takes a key value, and checks whether the key already exists in the database. If the key already exists, then the associated value is returned; if the key does not exist, the provided delegate is run, the value is stored in the dictionary, and then returned to the caller.

For example, consider the following little program.

public static void Main(string[] args)  
{
    var dictionary = new ConcurrentDictionary<string, string>();

    var value = dictionary.GetOrAdd("key", x => "The first value");
    Console.WriteLine(value);

    value = dictionary.GetOrAdd("key", x => "The second value");
    Console.WriteLine(value);
}

The first time GetOrAdd is called, the dictionary is empty, so the value factory runs and returns the string "The first value", storing it against the key. On the second call, GetOrAdd finds the saved value and uses that instead of calling the factory. The output gives:

The first value  
The first value  

GetOrAdd and thread safety.

Internally, the ConcurrentDictionary uses locking to make it thread safe for most methods, but GetOrAdd does not lock while valueFactory is running. This is done to prevent unknown code from blocking all the threads, but it means that valueFactory might run more than once if it is called simultaneously from multiple threads. Thread safety kicks in when saving the returned value to the dictionary and when returning the generated value back to the caller however, so you will always get the same value back from each call.

For example, consider the program below, which uses tasks to run threads simultaneously. It works very similarly to before, but runs the GetOrAdd function on two separate threads. It also increments a counter every time the valueFactory is run.

public class Program  
{
    private static int _runCount = 0;
    private static readonly ConcurrentDictionary<string, string> _dictionary
        = new ConcurrentDictionary<string, string>();

    public static void Main(string[] args)
    {
        var task1 = Task.Run(() => PrintValue("The first value"));
        var task2 = Task.Run(() => PrintValue("The second value"));
        Task.WaitAll(task1, task2);

        PrintValue("The third value")

        Console.WriteLine($"Run count: {_runCount}");
    }

    public static void PrintValue(string valueToPrint)
    {
        var valueFound = _dictionary.GetOrAdd("key",
                    x =>
                    {
                        Interlocked.Increment(ref _runCount);
                        Thread.Sleep(100);
                        return valueToPrint;
                    });
        Console.WriteLine(valueFound);
    }
}

The PrintValue function again calls GetOrAdd on the ConcurrentDictionary, passing in a Func<> that increments the counter and returns a string. Running this program produces one of two outputs, depending on the order the threads are scheduled; either

The first value  
The first value  
The first value  
Run count: 2  

or

The second value  
The second value  
The second value  
Run count: 2  

As you can see, you will always get the same value when calling GetOrAdd, depending on which thread returns first. However the delegate is being run on both asynchronous calls, as shown by _runCount=2, as the value had not been stored from the first call before the second call runs. Stepping through, the interactions could look something like this:

  1. Thread A calls GetOrAdd on the dictionary for the key "key" but does not find it, so starts to invoke the valueFactory.

  2. Thread B also calls GetOrAdd on the dictionary for the key "key". Thread A has not yet completed, so no existing value is found, and Thread B also starts to invoke the valueFactory.

  3. Thread A completes its invocation, and returns the value "The first value" back to the concurrent dictionary. The dictionary checks there is still no value for "key", and inserts the new KeyValuePair. Finally, it returns "The first value" to the caller.

  4. Thread B completes its invocation and returns the value "The second value" back to the concurrent dictionary. The dictionary sees the value for "key" stored by Thread A, so it discards the value it created and uses that one instead, returning the value back to the caller.

  5. Thread C calls GetOrAdd and finds the value already exists for "key", so returns the value, without having to invoke valueFactory

In this case, running the delegate more than once has no adverse effects - all we care about is that the same value is returned from each call to GetOrAdd. But what if the delegate has side effects such that we need to ensure it is only run once?

Ensuring the delegate only runs once with Lazy

As we've seen, there are no guarantees made by ConcurrentDictionary about the number of times the Func<> will be called. When building a middleware pipeline, however, we need to be sure that the middleware is only built once, as it could be doing some bootstrapping that is expensive or not thread safe. The solution that the ASP.NET Core team used is to use Lazy<> initialisation.

The output we are aiming for is

The first value  
The first value  
The first value  
Run count: 1  

or similarly for "The second value" - it doesn't matter which wins out, the important points are that the same value is returned every time, and that _runCount is always 1.

Looking back at our previous example, instead of using a ConcurrentDictionary<string, string>, we create a ConcurrentDictionary<string, Lazy<string>>, and we update the PrintValue() method to create a lazy object instead:

public static void PrintValueLazy(string valueToPrint)  
{
    var valueFound = _lazyDictionary.GetOrAdd("key",
                x => new Lazy<string>(
                    () =>
                        {
                            Interlocked.Increment(ref _runCount);
                            Thread.Sleep(100);
                            return valueToPrint;
                        }));
    Console.WriteLine(valueFound.Value);
}

There are only two changes we have made here. We have updated the GetOrAdd call to return a Lazy<string> rather than a string directly, and we are calling valueFound.Value to get the actual string value to write to the console. To see why this solves the problem, lets step through the example to see an example of what happens when we run the whole program.

  1. Thread A calls GetOrAdd on the dictionary for the key "key" but does not find it, so starts to invoke the valueFactory.

  2. Thread B also calls GetOrAdd on the dictionary for the key "key". Thread A has not yet completed, so no existing value is found, and Thread B also starts to invoke the valueFactory.

  3. Thread A completes its invocation, returning an uninitialised Lazy<string> object. The delegate inside the Lazy<string> has not been run at this point, we've just created the Lazy<string> container. The dictionary checks there is still no value for "key", and so inserts the Lazy<string> against it, and finally, returns the Lazy<string> back to the caller.

  4. Thread B completes its invocation, similarly returning an uninitialised Lazy<string> object. As before, the dictionary sees the Lazy<string> object for "key" stored by Thread A, so it discards the Lazy<string> it just created and uses that one instead, returning it back to the caller.

  5. Thread A calls Lazy<string>.Value. This invokes the provided delegate in a thread safe way, such that if it is called simultaneously by two threads, it will only run the delegate once.

  6. Thread B calls Lazy<string>.Value. This is the same Lazy<string> object that Thread A just initialised (remember the dictionary ensures you always get the same value back.) If Thread A is still running the initialisation delegate, then Thread B just blocks until it finishes and it can access the result. We just get the final return string, without invoking the delegate for a second time. This is what gives us the run-once behaviour we need.

  7. Thread C calls GetOrAdd and finds the Lazy<string> object already exists for "key", so returns the value, without having to invoke valueFactory. The Lazy<string> has already been initialised, so the resulting value is returned directly.

We still get the same behaviour from the ConcurrentDictionary in that we might run the valueFactory more than once, but now we are just calling new Lazy<>() inside the factory. In the worst case, we create multiple Lazy<> objects, which get discarded by the ConcurrentDictionary when consolidating inside the GetOrAdd method.

It is the Lazy<> object which enforces that we only run our expensive delegate once. By calling Lazy<>.Value we trigger the delegate to run in a thread safe way, such that we can be sure it will only be run by one thread at a time. Other threads which call Lazy<>.Value simultaneously will be blocked until the first call completes, and then will use the same result.

Summary

When using GetOrAdd , if your valueFactory is idempotent and not expensive, then there is no need for this trick. You can be sure you will always get the same value with each call, but you need to be aware the valueFactory may run multiple times.

If you have an expensive operation that must be run only once as part of a call to GetOrAdd, then using Lazy<> is a great solution. The only caveat to be aware of is that Lazy<>.Value will block other threads trying to access the value until the first call completes. Depending on your use case, this may or may not be a problem, and is the reason GetOrAdd does not have these semantics by default.

Troubleshooting ASP.NET Core 1.1.0 install problems

$
0
0
Troubleshooting ASP.NET Core 1.1.0 install problems

I was planning on playing with the latest .NET Core 1.1.0 preview recently, but I ran into a few issues getting it working on my Mac. As I suspected, this was entirely down to my mistakes and my machine's setup, but I'm documenting it here in case any one else runs into similar problem!

Note that as of yesterday the RTM release of 1.1.0 is out, so while not strictly applicable, I would probably have run into the same problems! I've updated the post to reflect the latest version numbers.

TL;DR; There were two issues I ran into. First, the global.json file I used specified an older version of the tooling. Second, I had an older version of the tooling installed that was, according to SemVer, newer than the version I had just installed!

Installing ASP.NET Core 1.1.0

I began by downloading the .NET Core 1.1.0 installer for macOS from the downloads page, following the instructions from the announcement blog post. The installation was quick and went smoothly, installing side-by side with the existing .NET Core 1.0 RTM install.

Troubleshooting ASP.NET Core 1.1.0 install problems

Creating a new 1.1.0 project

According to the blog post, once you've run the installer you should be able to start creating 1.1.0 applications. Running donet new with the .NET CLI should create a new 1.1.0 application, with a project.json that contains an updated Microsoft.NETCore.App dependency, looking something like:

"frameworks": {
  "netcoreapp1.0": {
    "dependencies": {
      "Microsoft.NETCore.App": {
        "type": "platform",
        "version": "1.1.0"
      }
    },
    "imports": "dnxcore50"
  }
}

So I created a sub folder for a test project, ran dotnet new and eagerly checked the project.json:

"frameworks": {
  "netcoreapp1.0": {
    "dependencies": {
      "Microsoft.NETCore.App": {
        "type": "platform",
        "version": "1.0.0"
      }
    },
    "imports": "dnxcore50"
  }
}

Hmmm, that doesn't look right, we still seem to be getting a 1.0.0 project instead of 1.1.0…

Check the global.json

My first thought was that the install hadn't worked correctly - it is a preview after all (it was when i originally tried it!) so wouldn't be completely unheard of. Running dotnet --version to check the version of the CLI being run returned

$ dotnet --version
1.0.0-preview2-003121  

So the preview 2 tooling is being used, which corresponds to the .NET Core 1.0 RTM release, definitely the wrong version.

It was then I remembered a similar issue I had when moving from RC2 to the RTM release - check the global.json! When I had created my sub folder for testing dotnet new, I had automatically copied across a global.json from a previous project. Looking inside, this was what I found:

{
  "projects": [ "src", "test" ],
  "sdk": {
    "version": "1.0.0-preview2-003121"
  }
}

Bingo! If an SDK version is specified in global.json then it will be used preferentially over the latest tooling. Updating the sdk section with the appropriate value, or removing the SDK section means the latest tooling should be used, which should let me create my 1.1.0 project.

Take two - preview fun

After removing the sdk section of the global.json, I ran dotnet new again, and checked the project.json:

"frameworks": {
  "netcoreapp1.0": {
    "dependencies": {
      "Microsoft.NETCore.App": {
        "type": "platform",
        "version": "1.0.0"
      }
    },
    "imports": "dnxcore50"
  }
}

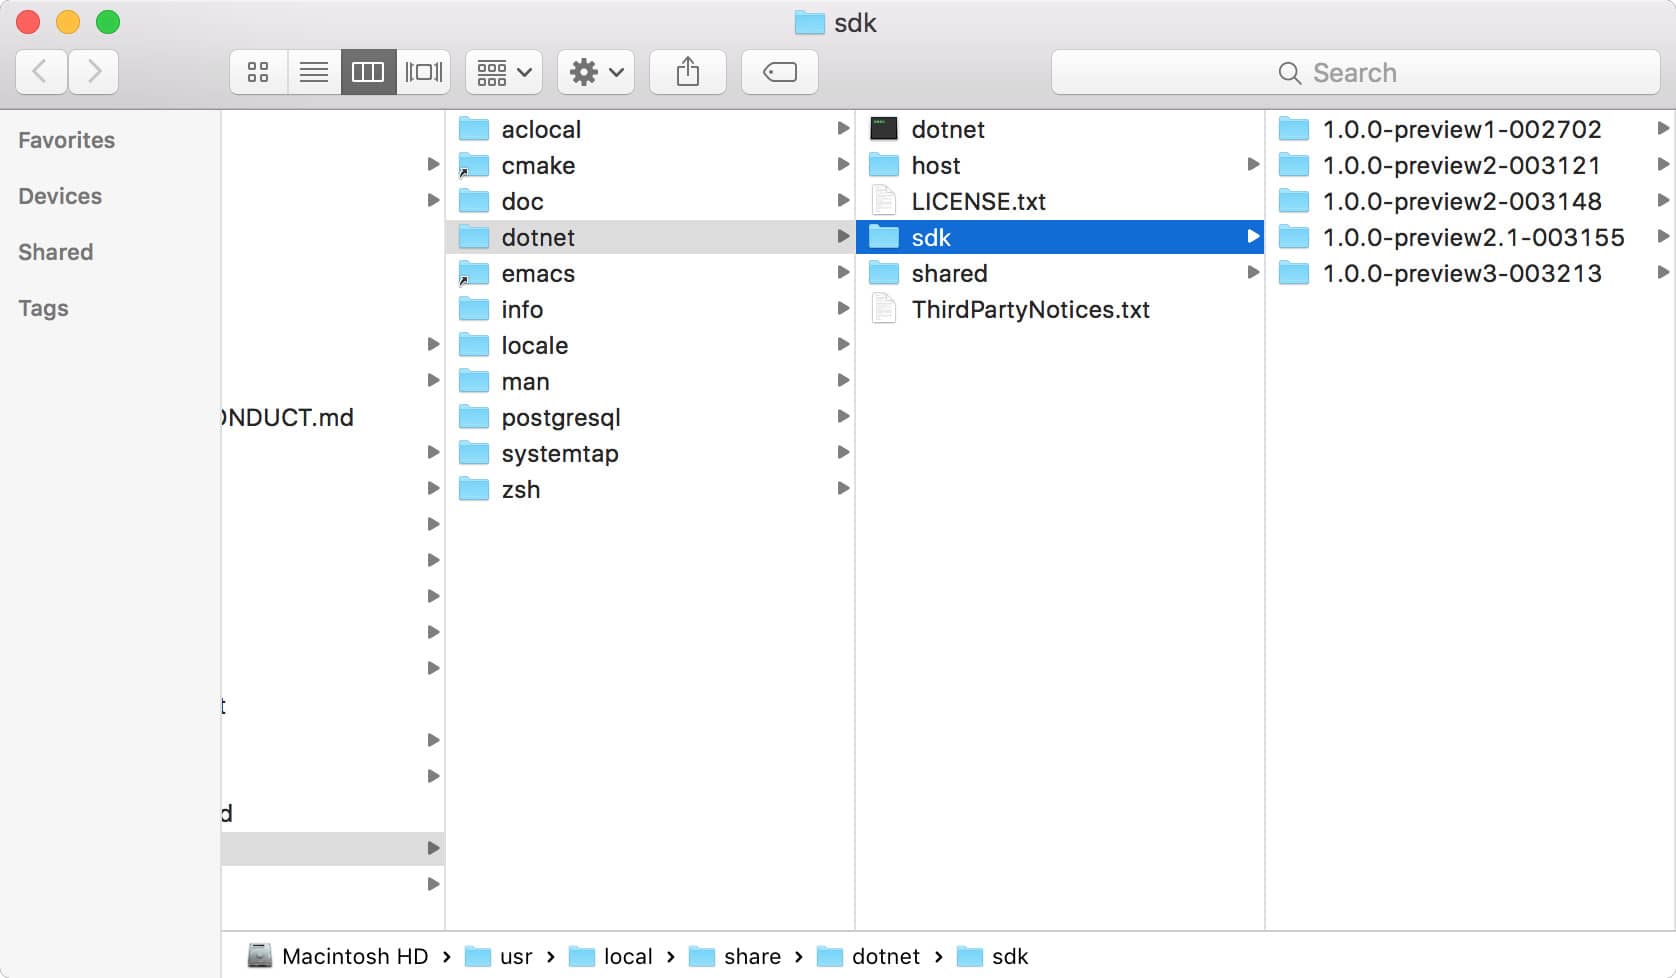
D'oh, that's still not right! At this point, I started to think something must have gone wrong with the installation, as I couldn't think of any other explanation. Luckily, it's easy to see which versions of the SDK are installed by checking the file system. On a Mac, you can see them at:

/usr/local/share/dotnet/sdk/

Checking the folder, this is what I saw, notice anything odd?

Troubleshooting ASP.NET Core 1.1.0 install problems

There's quite a few different versions of the SDK in there, including the 1.0.0 RTM version (1.0.0-preview2-003121) and also the 1.1.0 Preview 1 version (1.0.0-preview2.1-003155). However there's also a slightly odd one that stands out - 1.0.0-preview3-003213. (Note, with the 1.1 RTM there is a whole new version, 1.0.0-preview2-1-003177)

Most people installing the .NET Core SDK will not run into this issue, as they likely won't have this additional preview3 version. I only have it installed (I think) because I created a couple of pull requests to the ASP.NET Core repositories recently. The way versioning works in the ASP.NET Core repositories for development versions means that although there is a preview3 version of the tooling, it is actually older that the preview2.1 version of the tooling just released, and generates 1.0.0 projects.

When you run dotnet new, and in the absence of a global.json with an sdk section, the CLI will use the most recent version of the tooling as determined by SemVer. Consequently, it had been using the preview3 version and generating 1.0.0 projects!

The simple solution was to delete the 1.0.0-preview3-003213 folder, and re-run dotnet new:

"frameworks": {
  "netcoreapp1.0": {
    "dependencies": {
      "Microsoft.NETCore.App": {
        "type": "platform",
        "version": "1.1.0-preview1-001100-00"
      }
    },
    "imports": "dnxcore50"
  }
}

Lo and behold, a 1.1.0 project!

Summary

The final issue I ran into is not something that general users have to worry about. The only reason it was a problem for me was due to working directly with the GitHub repo, and the slightly screwy SemVer versions when using development packages.

The global.json issue is one that you might run into when upgrading projects. It's well documented that you need to update it when upgrading, but it's easy to overlook.

Anyway, the issues I experienced were entirely down to my setup and stupidity rather than the installer or documentation, so hopefully things go smoother for you. Now time to play with new features!

Exploring Middleware as MVC Filters in ASP.NET Core 1.1

$
0
0
Exploring Middleware as MVC Filters in ASP.NET Core 1.1

One of the new features released in ASP.NET Core 1.1 is the ability to use middleware as an MVC Filter. In this post I'll take a look at how the feature is implemented by peering into the source code, rather than focusing on how you can use it. In the next post I'll look at how you can use the feature to allow greater code reuse.

Middleware vs Filters

The first step is to consider why you would choose to use middleware over filters, or vice versa. Both are designed to handle cross-cutting concerns of your application and both are used in a 'pipeline', so in some cases you could choose either successfully.

The main difference between them is their scope. Filters are a part of MVC, so they are scoped entirely to the MVC middleware. Middleware only has access to the HttpContext and anything added by preceding middleware. In contrast, filters have access to the wider MVC context, so can access routing data and model binding information for example.

Generally speaking, if you have a cross cutting concern that is independent of MVC then using middleware makes sense, if your cross cutting concern relies on MVC concepts, or must run midway through the MVC pipeline, then filters make sense.

Exploring Middleware as MVC Filters in ASP.NET Core 1.1

So why would you want to use middleware as filters then? A couple of reasons come to mind for me.

First, you have some middleware that already does what you want, but you now need the behaviour to occur midway through the MVC middleware. You could rewrite your middleware as a filter, but it would be nicer to just be able to plug it in as-is. This is especially true if you are using a piece of third-party middleware and you don't have access to the source code.

Second, you have functionality that needs to logically run as both middleware and a filter. In that case you can just have the one implementation that is used in both places.

Using the MiddlewareFilterAttribute

On the announcement post, you will find an example of how to use Middleware as filters. Here I'll show a cut down example, in which I want to run MyCustomMiddleware when a specific MVC action is called.

There are two parts to the process, the first is to create a middleware pipeline object:

public class MyPipeline  
{
    public void Configure(IApplicationBuilder applicationBuilder) 
    {
        var options = // any additional configuration

        applicationBuilder.UseMyCustomMiddleware(options);
    }
}

and the second is to use an instance of the MiddlewareFilterAttribute on an action or a controller, wherever it is needed.

[MiddlewareFilter(typeof(MyPipeline))]
public IActionResult ActionThatNeedsCustomfilter()  
{
    return View();
}

With this setup, MyCustomMiddleware will run each time the action method ActionThatNeedsCustomfilter is called.

It's worth noting that the MiddlewareFilterAttribute on the action method does not take a type of the middleware component itself (MyCustomMiddleware), it actually takes a pipeline object which configures the middleware itself. Don't worry about this too much as we'll come back to it again later.

For the rest of this post, I'll dip into the MVC repository and show how the feature is implemented.

The MiddlewareFilterAttribute

As we've already seen, the middleware filter feature starts with the MiddlewareFilterAttribute applied to a controller or method. This attribute implements the IFilterFactory interface which is useful for injecting services into MVC filters. The implementation of this interface just requires one method, CreateInstance(IServiceProvider provider):

public class MiddlewareFilterAttribute : Attribute, IFilterFactory, IOrderedFilter  
{
    public MiddlewareFilterAttribute(Type configurationType)
    {
        ConfigurationType = configurationType;
    }

    public Type ConfigurationType { get; }

    public IFilterMetadata CreateInstance(IServiceProvider serviceProvider)
    {
        var middlewarePipelineService = serviceProvider.GetRequiredService<MiddlewareFilterBuilder>();
        var pipeline = middlewarePipelineService.GetPipeline(ConfigurationType);

        return new MiddlewareFilter(pipeline);
    }
}

The implementation of the attribute is fairly self explanatory. First a MiddlewareFilterBuilder object is obtained from the dependency injection container. Next, GetPipeline is called on the builder, passing in the ConfigurationType that was supplied when creating the attribute (MyPipeline in the previous example).

GetPipeline returns a RequestDelegate which represents a middleware pipeline which takes in an HttpContext and returns a Task:

public delegate Task RequestDelegate(HttpContext context);  

Finally, the delegate is used to create a new MiddlewareFilter, which is returned by the method. This pattern of using an IFilterFactory attribute to create an actual filter instance is very common in the MVC code base, and works around the problems of service injection into attributes, as well as ensuring each component sticks to the single responsibility principle.

Building the pipeline with the MiddlewareFilterBuilder

In the last snippet we saw the MiddlewareFilterBuilder being used to turn our MyPipeline type into an actual, runnable piece of middleware. Taking a look inside the MiddlewareFilterBuilder, you will see an interesting use case of a Lazy<> with a ConcurrentDictionary, to ensure that each pipeline Type passed in to the service is only ever created once. This was the usage I wrote about in my last post.

The call to GetPipeline initialises a pipeline for the provided type using the BuildPipeline method, shown below in abbreviated form:

private RequestDelegate BuildPipeline(Type middlewarePipelineProviderType)  
{
    var nestedAppBuilder = ApplicationBuilder.New();

    // Get the 'Configure' method from the user provided type.
    var configureDelegate = _configurationProvider.CreateConfigureDelegate(middlewarePipelineProviderType);
    configureDelegate(nestedAppBuilder);

    nestedAppBuilder.Run(async (httpContext) =>
    {
        // additional end-middleware, covered later
    });

    return nestedAppBuilder.Build();
}

This method creates a new IApplicationBuilder, and uses it to configure a middleware pipeline, using the custom pipeline supplied earlier (MyPipeline'). It then adds an additional piece of 'end-middleware' at the end of the pipeline which I'll come back to later, and builds the pipeline into a RequestDelegate.

Creating the pipeline from MyPipeline is performed by a MiddlewareFilterConfigurationProvider, which attempts to find an appropriate Configure method on it.

You can think of the MyPipeline class as a mini-Startup class. Just like the Startup class you need a Configure method to add middleware to an IApplicationBuilder, and just like in Startup, you can inject additional services into the method. One of the big differences is that you can't have environment-specific Configure methods like ConfigureDevelopment here - your class must have one, and only one, configuration method called Configure.

The MiddlewareFilter

So just to recap, you add a MiddlewareFilterAttribute to one of your action methods or controllers, passing in a pipeline to use as a filter, e.g. MyPipeline. This uses a MiddlewareFilterBuilder to create a RequestDelegate, which in turn is used to create a MiddlewareFilter. This is the object actually added to the MVC filter pipeline.

The MiddlewareFilter implements IAsyncResourceFilter, so it runs early in the filter pipeline - after AuthorizationFilters have run, but before Model Binding and Action filters. This allows you to potentially short-circuit requests completely should you need to.

The MiddlewareFilter implements the single required method OnResourceExecutionAsync. The execution is very simple. First it records the MVC ResourceExecutingContext context of the filter, as well as the next filter to execute ResourceExecutionDelegate, as a new MiddlewareFilterFeature. This feature is then stored against the HttpContext itself, so it can be accessed elsewhere. The middleware pipeline we created previously is then invoked using the HttpContext.

public class MiddlewareFilter : IAsyncResourceFilter  
{
    private readonly RequestDelegate _middlewarePipeline;
    public MiddlewareFilter(RequestDelegate middlewarePipeline)
    {
        _middlewarePipeline = middlewarePipeline;
    }

    public Task OnResourceExecutionAsync(ResourceExecutingContext context, ResourceExecutionDelegate next)
    {
        var httpContext = context.HttpContext;

        var feature = new MiddlewareFilterFeature()
        {
            ResourceExecutionDelegate = next,
            ResourceExecutingContext = context
        };
        httpContext.Features.Set<IMiddlewareFilterFeature>(feature);

        return _middlewarePipeline(httpContext);
    }

From the point of view of the middleware pipeline we created, it is as though it was called as part of the normal pipline; it just receives an HttpContext to work with. If needs be though, it can access the MVC context by accessing the MiddlewareFilterFeature.

If you have written any filters previously, something may seem a bit off with this code. Normally, you would call await next() to execute the next filter in the pipeline before returning, but we are just returning the Task from our RequestDelegate invocation. How does the pipeline continue? To see how, we'll skip back to the 'end-middleware' I glossed over in BuildPipeline

Using the end-middleware to continue the filter pipeline

The middleware added at the end of the BuildPipeline method is responsible for continuing the execution of the filter pipeline. An abbreviated form looks like this:

nestedAppBuilder.Run(async (httpContext) =>  
{
    var feature = httpContext.Features.Get<IMiddlewareFilterFeature>();

    var resourceExecutionDelegate = feature.ResourceExecutionDelegate;
    var resourceExecutedContext = await resourceExecutionDelegate();

    if (!resourceExecutedContext.ExceptionHandled && resourceExecutedContext.Exception != null)
    {
        throw resourceExecutedContext.Exception;
    }
});

There are two main functions of this middleware. The primary goal is ensuring the filter pipeline is continued after the MiddlewareFilter has executed. This is achieved by loading the IMiddlewareFeatureFeature which was saved to the HttpContext when the filter began executing. It can then access the next filter via the ResourceExecutionDelegate and await its execution as usual.

The second goal, is to behave like a middleware pipeline rather than a filter pipeline when exceptions are thrown. That is, if a later filter or action method throws an exception, and no filter handles the exception, then the end-middleware re-throws it, so that the middleware pipeline used in the filter can handle it as middleware normally would (with a try-catch).

Note that Get<IMiddlewareFilterFeature>() will be called before the end of each MiddlewareFilter. If you have multiple MiddlewareFilters in the pipeline, each one will set a new instance of IMiddlewareFilterFeature, overwriting the values saved earlier. I haven't dug into it, but that could potentially cause an issue if you have middleware in your MyCustomMiddleware that both operates on the response being sent back through the pipeline after other middleware has executed, and also tries to load the IMiddlewareFilterFeature. In that case, it will get the IMiddlewareFilterFeature associated with a different MiddlewareFilter. It's a pretty unlikely scenario I suspect, but still, just watch out for it.

Wrapping up

That brings us to the end of this look under the covers of middleware filters. hopefully you found it interesting, personally, I just enjoy looking at the repos as a source of inspiration should I ever need to implement something similar in the future. Hope you enjoyed it!

Url culture provider using middleware as filters in ASP.NET Core 1.1.0

$
0
0
Url culture provider using middleware as filters in ASP.NET Core 1.1.0

In this post, I show how you can use the 'middleware as filters' feature of ASP.NET Core 1.1.0 to easily add request localisation based on url segments.

The end goal we are aiming for is to easily specify the culture in the url, similar to the way Microsoft handle it on their public website. If you navigate to https://microsoft.com, then you'll be redirected to https://www.microsoft.com/en-gb/ (or similar for your culture)

Url culture provider using middleware as filters in ASP.NET Core 1.1.0

Using URL parameters is one of the approaches to localisation Google suggests as it is more user and SEO friendly than some of the other options.

Localisation in ASP.NET Core 1.0.0

The first step to localising your application is to associate the current request with a culture. Once you have that, you can customise the strings in your request to match the culture as required.

Localisation is already perfectly possible in ASP.NET Core 1.0.0 (and the subsequent patch versions). You can localise your application using the RequestLocalizationMiddleware, and you can use a variety of providers to obtain the culture from cookies, querystrings or the Accept-Language header out of the box.

It is also perfectly possible to write your own provider to obtain the culture from somewhere else, from the url for example. You could use the RoutingMiddleware to fork the pipeline, and extract a culture segment from it, and then run your MVC pipeline inside that fork, but you would still need to be sure to handle the other fork, where the cultured url pattern is not matched and a culture can't be extracted.

While possible, this is a little bit messy, and doesn't necessarily correspond to the desired behaviour. Luckily, in ASP.NET Core 1.1.0, Microsoft have added two features that make the process far simpler: middleware as filters, and the RouteDataRequestCultureProvider.

In my previous post, I looked at the middleware as filters feature in detail, showing how it is implemented; in this post I'll show how you can put the feature to use.

The other piece of the puzzle, the RouteDataRequestCultureProvider, does exactly what you would expect - it attempts to identify the current culture based on RouteData segments. You can use this as a drop-in provider if you are using the RoutingMiddleware approach mentioned previously, but I will show how to use it in the MVC pipeline in combination with the middleware as filters feature. To see how the provider can be used in a normal middleware pipeline, check out the tests in the localisation repository on GitHub.

Setting up the project

As I mentioned, these features are all available in the ASP.NET Core 1.1.0 release, so you will need to install the preview version of the .NET core framework. Just follow the instructions in the announcement blog post.

After installing (and fighting with a couple of issues), I started by scaffolding a new web project using

dotnet new -t web  

which creates a new MVC web application. For simplicity I stripped out most of the web pieces and added a single ValuesController, That would simply write out the current culture when you hit /Values/ShowMeTheCulture:

public class ValuesController : Controller  
{
    [Route("ShowMeTheCulture")]
    public string GetCulture()
    {
        return $"CurrentCulture:{CultureInfo.CurrentCulture.Name}, CurrentUICulture:{CultureInfo.CurrentUICulture.Name}";
    }
}

Adding localisation

The next step was to add the necessary localisation services and options to the project. This is the same as for version 1.0.0 so you can follow the same steps from the docs or my previous posts. The only difference is that we will add a new RequestCultureProvider.

First, add the Microsoft.AspNetCore.Localization.Routing package to your project.json. You may need to update some other packages too to ensure the versions align. Note that not all the packages will necessarily be 1.1.0, it depends on the latest versions of the packages that shipped.

{
  "dependencies": {
    "Microsoft.NETCore.App": {
      "version": "1.1.0",
      "type": "platform"
    },
    "Microsoft.AspNetCore.Mvc": "1.1.0",
    "Microsoft.AspNetCore.Routing": "1.1.0",
    "Microsoft.AspNetCore.Server.Kestrel": "1.0.1",
    "Microsoft.Extensions.Configuration.EnvironmentVariables": "1.0.0",
    "Microsoft.Extensions.Configuration.Json": "1.0.0",
    "Microsoft.Extensions.Options": "1.1.0",
    "Microsoft.Extensions.Logging": "1.0.0",
    "Microsoft.Extensions.Logging.Console": "1.0.0",
    "Microsoft.Extensions.Logging.Debug": "1.0.0",
    "Microsoft.AspNetCore.Localization.Routing": "1.1.0"
  },

You can now configure the RequestLocalizationOptions in the ConfigureServices method of your Startup class:

public void ConfigureServices(IServiceCollection services)  
{
    // Add framework services.
    services.AddMvc();

    var supportedCultures = new[]
    {
        new CultureInfo("en-US"),
        new CultureInfo("en-GB"),
        new CultureInfo("de"),
        new CultureInfo("fr-FR"),
    };

    var options = new RequestLocalizationOptions()
    {
        DefaultRequestCulture = new RequestCulture(culture: "en-GB", uiCulture: "en-GB"),
        SupportedCultures = supportedCultures,
        SupportedUICultures = supportedCultures
    };
    options.RequestCultureProviders = new[] 
    { 
         new RouteDataRequestCultureProvider() { Options = options } 
    };

    services.AddSingleton(options);
}

This is all pretty standard up to this point. I have added the cultures I support, and defined the default culture to be en-GB. Finally, I have added the RouteDataRequestCultureProvider as the only provider I will support at this point, and registered the options in the DI container.

Adding localisation to the urls

Now we've setup our localisation options, we just need to actually try and extract the culture from the url. As a reminder, we are trying to add a culture prefix to our urls, so that /controller/action becomes /en-gb/controller/action or /fr/controller/action. There are a number of ways to achieve this, but if your are using attribute routing, one possibility is to add a {culture} routing parameter to your route:

[Route("{culture}/[controller]")]
public class ValuesController : Controller  
{
    [Route("ShowMeTheCulture")]
    public string GetCulture()
    {
        return $"CurrentCulture:{CultureInfo.CurrentCulture.Name}, CurrentUICulture:{CultureInfo.CurrentUICulture.Name}";
    }
}

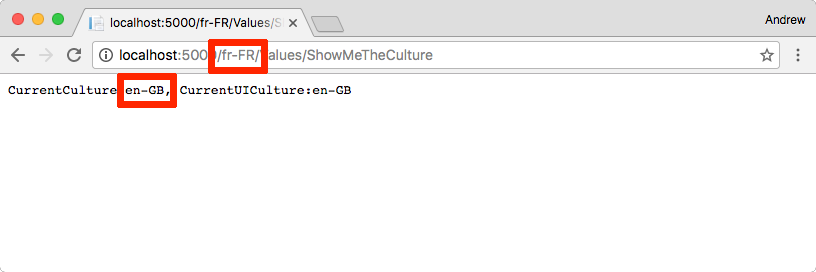
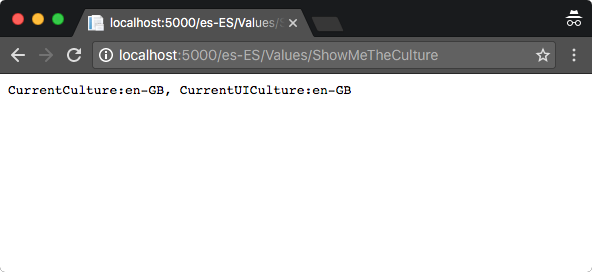
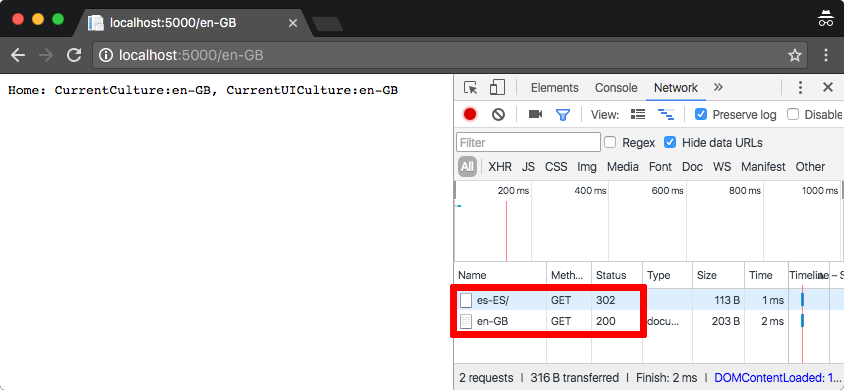
With the addition of this route, we can now hit the urls defined above, but we're not yet doing anything with the {culture} segment, so all our requests use the default culture:

Url culture provider using middleware as filters in ASP.NET Core 1.1.0

To actually convert that value to a culture we need the middleware as filters feature.

Adding localisation using a MiddlewareFilter

In order to extract the culture from the RouteData we need to run the RequestLocalisationMiddleware, which will use the RouteDataRequestCultureProvider. However, in this case, we can't run it as part of the normal middleware pipeline.

Middleware can only use data that has been added by preceding components in the pipeline, but we need access to routing information (the RouteData segments). Routing doesn't happen till the MVC middleware runs, which we need to run to extract the RouteData segments from the url. Therefore, we need request localisation to happen after action selection, but before the action executes; in other words, in the MVC filter pipeline.

To use a MiddlewareFilter, use first need to create a pipeline. This is like a mini Startup file in which you Configure an IApplicationBuilder to define the middleware that should run as part of the pipeline. You can configure several middleware to run in this way.

In this case, the pipeline is very simple, as we literally just need to run the RequestLocalisationMiddleware:

public class LocalizationPipeline  
{
    public void Configure(IApplicationBuilder app, RequestLocalizationOptions options)
    {
        app.UseRequestLocalization(options);
    }
}

We can then apply this pipeline using a MiddlewareFilterAttribute to our ValuesController:

[Route("{culture}/[controller]")]
[MiddlewareFilter(typeof(LocalizationPipeline))]
public class ValuesController : Controller  
{
    [Route("ShowMeTheCulture")]
    public string GetCulture()
    {
        return $"CurrentCulture:{CultureInfo.CurrentCulture.Name}, CurrentUICulture:{CultureInfo.CurrentUICulture.Name}";
    }
}

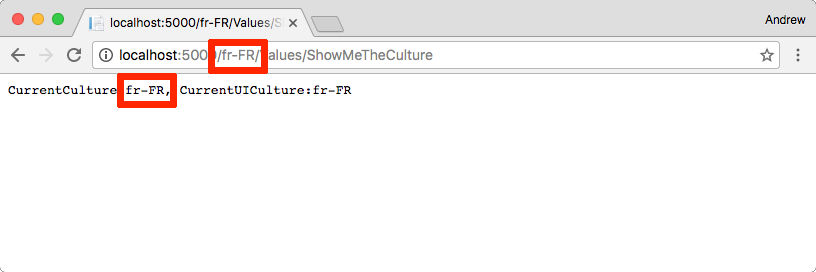
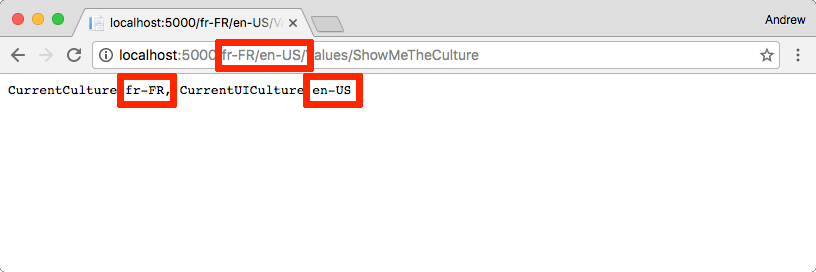
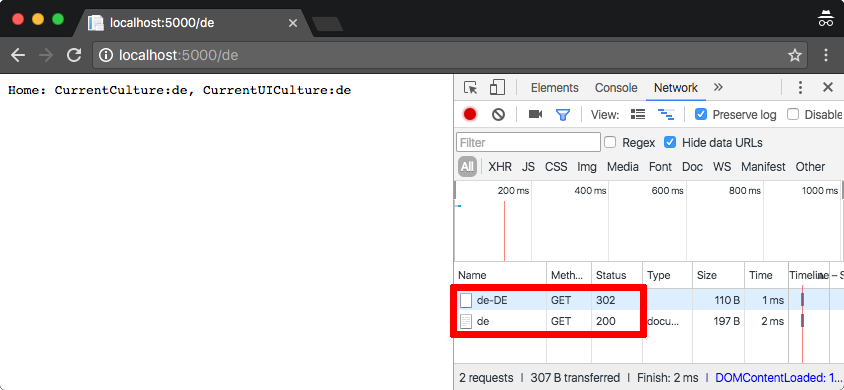
Now if we run the application, you can see the culture is resolved correctly from the url:

Url culture provider using middleware as filters in ASP.NET Core 1.1.0

And there you have it. You can now localise your application using urls instead of querystrings or cookie values. There is obviously more to getting a working solution together here. For example you need to provide an obvious route for the user to easily switch cultures. You also need to consider how this will affect your existing routes, as clearly your urls have changed!

Optional RouteDataRequestCultureProvider configuration

By default, the RouteDataRequestCultureProvider will look for a RouteData key with the value culture when determining the current culture. It also looks for a ui-culture key for setting the UI culture, but if that's missing then it will fallback to culture, as you can see in the previous screenshots. If we tweak the ValuesController, RouteAttribute to be

Route("{culture}/{ui-culture}/[controller]")]  

then we can specify the two separately:

Url culture provider using middleware as filters in ASP.NET Core 1.1.0

When configuring the provider, you can change the RouteData keys to something other that culture and ui-culture if you prefer. It will have no effect on the final result, it will just change the route tokens that are used to identify the culture. For example, we could change the culture RouteData parameter to be lang when configuring the provider:

options.RequestCultureProviders = new[] {  
    new RouteDataRequestCultureProvider() 
        { 
            RouteDataStringKey = "lang",
            Options = options
        } 
    };

We could then write our attribute routes as

Route("{lang}/[controller]")]  

Summary

In this post I showed how you could use the url to localise your application by making use of the MiddlewareFilter and RouteDataRequestCultureProvider that are provided in ASP.NET Core 1.1.0. I will write a couple more posts on using this approach in practical applications.

If you're interested in how the ASP.NET team implemented the feature, then check out my previous post. You can also see an example usage on the announcement page and on Hisham's blog.

Applying the RouteDataRequest CultureProvider globally with middleware as filters

$
0
0
Applying the RouteDataRequest CultureProvider globally with middleware as filters

In my last post I showed how your could use the middleware as filters feature of ASP.NET Core 1.1.0 along with the RouteDataRequestCultureProvider to set the culture of your application from the url. This allowed you to distinguish between different cultures from a url segment, for example www.microsoft.com/en-GB/ and www.microsoft.com/fr-FR/.

The main downside to that approach was that it required inserting and additional {culture} route segment into all your routes, so that the RouteDataRequestCultureProvider could extract the route, and adding a MiddlewareFilter to every applicable controller. I only showed an example for when you are using Attribute routing, but it would also be necessary to add {culture} to all your convention-based routes too (if you're using them).

In this post, I'll show the various ways you can configure your routes globally, so that all your urls will have a culture prefix by default.

Adding a global MiddlewareFilter

I'm going to be continuing where I left off in the last post, with a ValuesController I am using for displaying the current culture:

[Route("{culture}/[controller]")]
[MiddlewareFilter(typeof(LocalizationPipeline))]
public class ValuesController : Controller  
{
    [Route("ShowMeTheCulture")]
    public string GetCulture()
    {
        return $"CurrentCulture:{CultureInfo.CurrentCulture.Name}, CurrentUICulture:{CultureInfo.CurrentUICulture.Name}";
    }
}

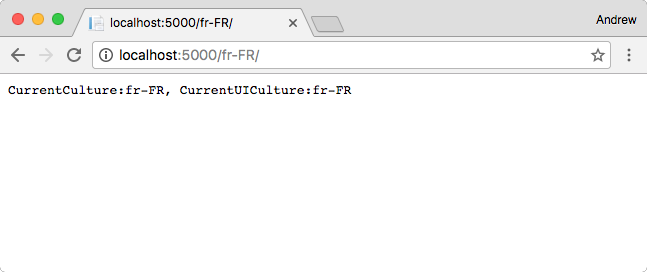
Hitting the url /fr-FR/Values/ShowMeTheCulture for example would show that the current culture was set to fr-FR, which was our goal. The downside to using this approach more generally is that we would need to add the MiddlewareFilter to all our controllers, and add the {culture} url segment. Ideally, we want to just be able to define our routes and controller the same as we were, before we were thinking about localisation.

The first of these problems is easily fixed by adding the MiddlewareFilter as a Global filter to MVC. You can do this by updating the call to AddMvc in ConfigureServices of your Startup class:

public void ConfigureServices(IServiceCollection services)  
{
    services.AddMvc(opts =>
    {
        opts.Filters.Add(new MiddlewareFilterAttribute(typeof(LocalizationPipeline)));
    });

    // other service configuration
}

By adding the filter here, we can remove the MiddlewareFilter attribute from our ValuesController; it will be automatically applied to all our action methods. That's the first step done!

Using a convention to globally add a culture prefix to attribute routes

Now we've dealt with that, we can take a look at our RouteAttribute based routes. We want to avoid having to explicitly add the {culture} segment to every route we define.

Luckily, in ASP.NET Core MVC, you can register custom conventions on application startup which specify additional conventions that can be applied to the url. For example, you could ensure all your url paths are prefixed with /api, or you could specify the current environment (live/test) in the url, or rename your action methods completely.

In this case, we are going to prefix all our attribute routes with {culture} so we don't have to do it manually. I'm not going to go extensively into how the convention works, so I strongly suggest checking out the above links for more details!

First we create our convention by implementing IApplicationModelConvention:

public class LocalizationConvention : IApplicationModelConvention  
{
    public void Apply(ApplicationModel application)
    {
        var culturePrefix = new AttributeRouteModel(new RouteAttribute("{culture}"));

        foreach (var controller in application.Controllers)
        {
            var matchedSelectors = controller.Selectors.Where(x => x.AttributeRouteModel != null).ToList();
            if (matchedSelectors.Any())
            {
                foreach (var selectorModel in matchedSelectors)
                {
                    selectorModel.AttributeRouteModel = AttributeRouteModel.CombineAttributeRouteModel(culturePrefix,
                        selectorModel.AttributeRouteModel);
                }
            }

            var unmatchedSelectors = controller.Selectors.Where(x => x.AttributeRouteModel == null).ToList();
            if (unmatchedSelectors.Any())
            {
                foreach (var selectorModel in unmatchedSelectors)
                {
                    selectorModel.AttributeRouteModel = culturePrefix;
                }
            }
        }
    }
}

This convention is pretty much identical to the one presented by Filip from StrathWeb. It works by looping through all the Controllers in the application, and checking if the controller has an AttributeRoute attribute. If it does, then it combines the route template with the {culture} prefix, otherwise it adds a new one.

After this convention has run, every controller should effectively have a RouteAttribute that is prefixed with {culture}. The next thing to do is to let MVC know about our new convention. We can do this by adding it in the call to AddMvc:

public void ConfigureServices(IServiceCollection services)  
{
    // Add framework services.
    services.AddMvc(opts =>
    {
        opts.Conventions.Insert(0, new LocalizationConvention());
        opts.Filters.Add(new MiddlewareFilterAttribute(typeof(LocalizationPipeline)));
    });
}

With that in place, we can update our ValuesController to remove the {culture} prefix from the RouteAttribute, and can delete the MiddlewareFilterAttribute entirely:

[Route("[controller]")]
public class ValuesController : Controller  
{
    //overall route /{culture}/Values/ShowMeTheCulture
    [Route("ShowMeTheCulture")]
    public string GetCulture()
    {
        return $"CurrentCulture:{CultureInfo.CurrentCulture.Name}, CurrentUICulture:{CultureInfo.CurrentUICulture.Name}";
    }
}

And we're done! We don't need to reference the {culture} directly in our route attributes, but our urls will still require it:

Applying the RouteDataRequest CultureProvider globally with middleware as filters

Caveats

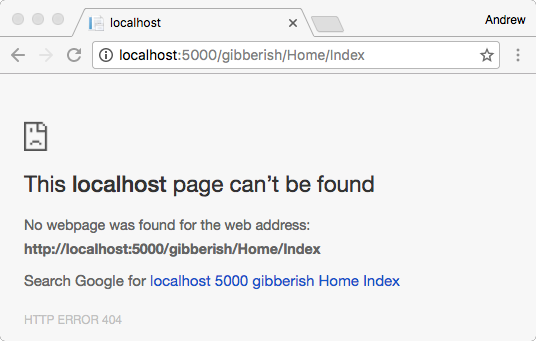
There's a couple of points to be aware of with this method. First off, it's important to understand we have replaced the previous route; so the previous route of /Values/ShowMeThCulture is no longer accessible - you must provide the culture, just as if you had added the {culture} segment to the RouteAttribute directly:

Applying the RouteDataRequest CultureProvider globally with middleware as filters

The other point to be aware of, is that we specified the {culture} prefix on the controller RouteAttribute in the convention. That means using an action RouteAttribute that specifies a path relative to root (which ignores the controller RouteAttribute) will not contain the {culture} prefix.

For example using [Route("~/ShowMeTheCulture")] on an action, will correspond to the url /ShowMeTheCulture - not /{culture}/ShowMeTheCulture. This may or may not be desirable for your use case, but it's likely you want these routes to be localised too, so it's worth keeping an eye out for. There's probably a different way of writing the convention to handle this, but I haven't dug into it too far yet, so please let me know below if you know a way!

Updating the default route handler

We have covered adding a convention for attribute routing, but what if you're using global route handling conventions? In the default templates, ASP.NET Core MVC is configured with the following route:

app.UseMvc(routes =>  
{
    routes.MapRoute(
        name: "default",
        template: "{controller=Home}/{action=Index}/{id?}");
});

This allows you to create controllers without using a RouteAttribute. Instead, the controller and action will be inferred. This lets you create Controllers like this:

    public class HomeController : Controller
    {
        public string Index()
        {
            return $"CurrentCulture:{CultureInfo.CurrentCulture.Name}, CurrentUICulture:{CultureInfo.CurrentUICulture.Name}";
        }
    }

The default values in our routing convention mean that this action method will be hit for the urls /Home/Index/, /Home/ and just /.

If we update the default convention with a {culture} segment, then we can continue to have this behaviour, but with the culture prefixed to the url, so that they map to
/en-GB/Home/Index/ or /fr-FR/ for example. It is as simple as updating the template in UseMvc:

app.UseMvc(routes =>  
{
    routes.MapRoute(
        name: "default",
        template: "{culture}/{controller=Home}/{action=Index}/{id?}");
});

Now when we browse our website, we will get the desired result:

Applying the RouteDataRequest CultureProvider globally with middleware as filters

Caveats

The biggest caveat here is that the IApplicationModelConvention we added previously will break this global route by adding a RouteAttribute to controllers that do not have one. Generally speaking, if you're using an IApplicationModelConvention I'd recommend using either the global routes or RouteAttributes rather than trying to combine both. Again, there's probably a way to write the convention to work with both attribute and global routes but I haven't dug too deep yet.

Also, as before, you won't be able to access the controller at /Home/Index anymore - you always have to specify the culture in the url.

Other considerations

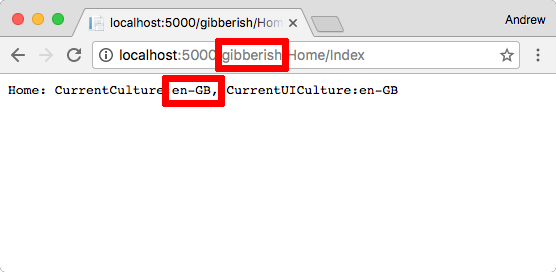
With both of these routes, one major issue is that you always need to specify the culture in the url. This may be fine for an API, but for a website this could give a poor user experience - hitting the base url / would return a 404 with this setup!

It's important to setup additional routes to handle this, most likely redirecting to a route containing the default culture. For example, if you hit the url www.microsoft.com/ you will be redirected to www.microsoft.com/en-GB/ or something similar. This may require adding additional conventions or global routes depending on your setup. I will cover some approaches for doing this in a couple of upcoming posts.

Summary

This post led on from my previous post in which I showed how you could use the middleware as filters feature of ASP.NET Core to set the culture for a request using a URL segment. This post showed how to extend that setup to avoid having to add explicit {culture} segments to all of your controllers by adding a global convention (for route attributes) or by amending your global route configuration.

There are still a number of limitations to be aware of in this setup as I highlighted, but it brings you closer to a complete url localisation solution!


Using a culture constraint and redirecting 404s with the url culture provider

$
0
0
Using a culture constraint and redirecting 404s with the url culture provider

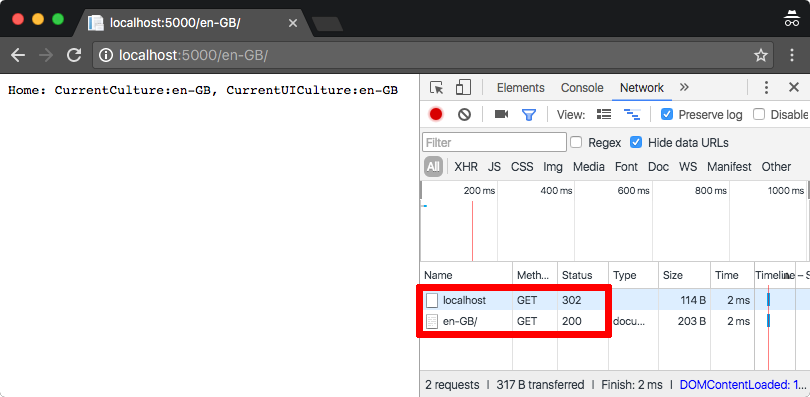
This is the next in a series of posts on using the middleware as filters feature of ASP.NET Core 1.1 to add a url culture provider to your application. To get an idea for how this works, take a look at the microsoft.com homepage, which includes the request culture in the url.

Using a culture constraint and redirecting 404s with the url culture provider

In my original post, I showed how you could set this up in your own app using the new RouteDataRequestCultureProvider which shipped with ASP.NET Core 1.1. When combined with the middleware as filters feature, you can extract this culture name from the url and use it update the request culture.

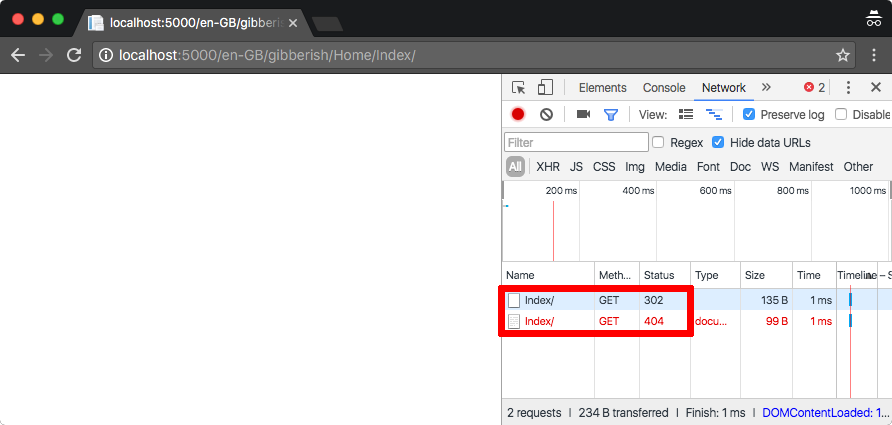
In my previous post, we extended our implementation to setup global conventions, to ensure that all our routes would be prefixed with a {culture} url segment. As I pointed out in the post, the downside to this approach is that urls without a culture segment are not longer valid. Hitting the home page / of your application would give a 404 - hardly a friendly user experience!

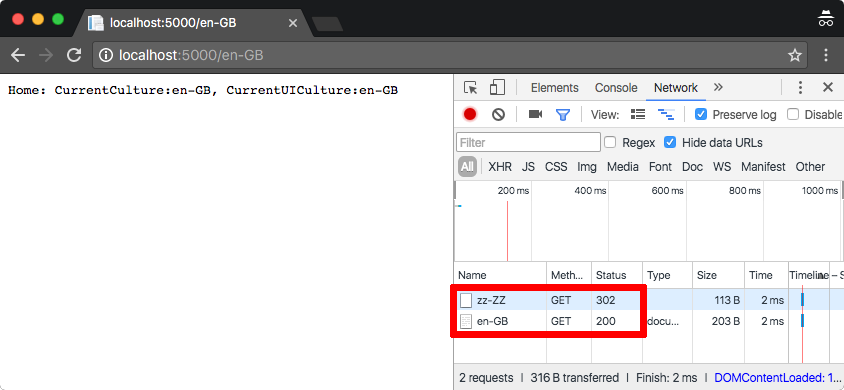
In this post, I'll show how we can create a custom route constraint to help prevent invalid route matching, and add additional routes to catch those pesky 404s by redirecting to a cultured version of the url.

Creating a custom route constraint

As a reminder, in the last post we setup both a global route and an IApplicationModelConvention for attribute routes. The techniques described in this post can be used with both approaches, but I will just talk about the global route for brevity.

The global route we created used a {culture} segment which is extracted by the CultureProvider to determine the request culture:

app.UseMvc(routes =>  
            {
                routes.MapRoute(
                    name: "default",
                    template: "{culture}/{controller=Home}/{action=Index}/{id?}");

One of the problems with this route as it stands, is that there are no limitations on what can match the {culture} segment. If I navigate to /gibberish/ then that would match the route, using the default values for controller and action, and setting culture=gibberish as a route value.

Using a culture constraint and redirecting 404s with the url culture provider

Note that the url contains the route value gibberish, even though the request has fallen back to the default culture as gibberish is not a valid culture. Whether you consider this a big problem or not is somewhat up to you, but consider the case where the url is /Home/Index - that corresponds to a culture of Home and a controller of Index, even though this is clearly not the intention in the url.

Creating a constraint using regular expressions

We can mitigate this issue by adding a constraint to the route value. Constraints limit the values that a route value is allowed to have. If the route value does not satisfy the constraint, then the route will not match the request. There are a whole host of constraints you can use in your routes, such as restricting to integers, maximum lengths, whether the value is optional etc. You can also create new ones.

We want to restrict our {culture} route value to be a valid culture name, i.e. a 2 letter language code, optionally followed by a hyphen and a 2 letter region code. Now, ideally we would also validate that the 2 letters are actually a valid language (e.g. en, de, and fr are valid while zz is not), but for our purposes a simple regular expression will suffice.

With this slightly simplified model, we can easily create a new constraint to satisfy our requirements using the RegexRouteConstraint base class to do all the heavy lifting for us:

using Microsoft.AspNetCore.Routing.Constraints;

public class CultureRouteConstraint : RegexRouteConstraint  
{
    public CultureRouteConstraint()
        : base(@"^[a-zA-Z]{2}(\-[a-zA-Z]{2})?$") { }
}

The next step before we can use the constraint in our routes, is to tell the router about it. We do this by providing a string key for it, and registering our constraint with the RouteOptions object in ConfigureServices. I chose the key "culturecode".

services.Configure<RouteOptions>(opts =>  
    opts.ConstraintMap.Add("culturecode", typeof(CultureRouteConstraint)));

With this in place, we can start using the constraint in our routes

Using a custom constraint in routes

Using the constraint is as simple as adding the key "culturecode" after a colon when specifying our route values:

app.UseMvc(routes =>  
{
    routes.MapRoute(
        name: "default",
        template: "{culture:culturecode}/{controller=Home}/{action=Index}/{id?}");
});

Now, if we hit the gibberish url, we are met with the following instead:

Using a culture constraint and redirecting 404s with the url culture provider

Success! Sort of. Depending on how you look at it. The constraint is certainly doing the job, as the url provided does not match the specified route, so MVC returns a 404.

Adding the culture constraint doesn't seem to achieve a whole lot on its own, but it allows us to more safely add additional catch-all routes, to handle cases where the request culture was not provided.

Handling urls with no specified culture

As I mention in my last post, one of the problems with adding culture to the global routing conventions is that urls such as your home page at / will not match, and will return 404s.

How you want to handle to handle this is a matter of opinion. Maybe you want to have every 'culture-less' route match its 'cultured' equivalent with the default culture, so / would serve the same data as /en-GB/ (for your default culture).

An approach I prefer (and in fact the behaviour you see on the www.microsoft.com website), is that hitting a culture-less route sends a 302 redirect to the cultured route. In that case, / would redirect to /en-GB/.

We can achieve this behaviour by combining our culture constraint with a couple of additional routes, which we'll place after our global route defined above. I'll introduce the new routes one at a time.

routes.MapGet("{culture:culturecode}/{*path}", appBuilder => { });  

This route has two sections to it, the first route value is the {culture} value as we've seen before. The second, is a catch-all route which will match anything at all. This route would catch paths such as /en-GB/this/is/the/path, /en-US/, /es/Home/Missing - basically anything that has a valid culture value.

The handler for this method is essentially doing nothing - normally you would configure how to handle this route, but I am explicitly not adding to the pipeline, so that anything matching this route will return a 404. That means any URL which

  1. Has a culture; and
  2. Does not match the previous global route url

will return a 404.

Redirecting culture-less routes to the default culture

The above route does not do anything when used on its own after the global route, but it allows us to use a complete catch-all route afterward. It essentially filters out any requests that already have a culture route-value specified.

To redirect culture-less routes, we can use the following route:

routes.MapGet("{*path}", (RequestDelegate)(ctx =>  
{
    var defaultCulture = localizationOptions.DefaultRequestCulture.Culture.Name;
    var path = ctx.GetRouteValue("path") ?? string.Empty;
    var culturedPath = $"/{defaultCulture}/{path}";
    ctx.Response.Redirect(culturedPath);
    return Task.CompletedTask;
}));

This route uses a different overload of MapGet to provide a RequestDelgate rather than the Action<IApplicationBuilder> we used in the previous route. The difference is that a RequestDelegate is explicitly handling a matched route, while the previous route was essentially forking the pipeline when the route matched.

This route again uses a catch-all route value called {path}, which this time contains the whole request URL.

First, we obtain the name of the default culture from the RequestLocalizationOptions which we inject into the Configure method (see below for the full code in context). This could be en-GB in my case, or it may be en-US, de etc.

Next, we obtain the request url by fetching the {path} from the request and combine it with our default culture to create the culturedPath.

Finally, we redirect to the culture path and return a completed Task to satisfy the RequestDelegate method signature.

You may notice that I am only redirecting on a GET request. This is to prevent unexpected side effects, and in practice should not be an issue for most MVC sites, as users will be redirected to cultured urls when first hitting your site.
Putting it all together

We now have all the pieces we need to add redirecting to our MVC application. Our Configure method should now look something like this:

public void Configure(IApplicationBuilder app, RequestLocalizationOptions localizationOptions)  
{
    app.UseMvc(routes =>
    {
        routes.MapRoute(
            name: "default",
            template: "{culture:culturecode}/{controller=Home}/{action=Index}/{id?}");
        routes.MapGet("{culture:culturecode}/{*path}", appBuilder => { });
        routes.MapGet("{*path}", (RequestDelegate)(ctx =>
        {
            var defaultCulture = localizationOptions.DefaultRequestCulture.Culture.Name;
            var path = ctx.GetRouteValue("path") ?? string.Empty;
            var culturedPath = $"/{defaultCulture}/{path}";
            ctx.Response.Redirect(culturedPath);
            return Task.CompletedTask;
        }));
    });

Now when we hit our homepage at localhost/ we are redirected to localhost/en-GB/ - a much nicer experience for the user than the 404 we received previously!

Using a culture constraint and redirecting 404s with the url culture provider

If we consider the route I described earlier, localhost/gibberish/Home/Index/, I will still receive a 404, as it did before. Note however that the user is redirected to a correctly cultured route first:

Using a culture constraint and redirecting 404s with the url culture provider

The first time the url is hit it skips the first and second routes, as it does not have a culture, and is redirected to its culture equivalent, localhost/en-GB/gibberish/Home/Index/.

When this url is hit, it matches the first route, but attempts to find a GibberishController which obviously does not match. It therefore matches our second, cultured catch-all route, which returns a 404. The purpose of this second route becomes clear here, in that it prevents an infinite redirect loop, and ensures we return a 404 for urls which genuinely should be returning Not Found.

Summary

In this post I showed how you could extend the global conventions for culture I described in my previous post to handle the case when a user does not provide the culture in the url.

Using a custom routing constraint and two catch-all routes it is possible to have a single 'correct' route which contains a culture, and to re-map culture-less requests onto this route.

For more details on creating and testing custom route constraints, I recommend you check out this post by Scott Hanselman.

Redirecting unknown cultures when using the url culture provider

$
0
0
Redirecting unknown cultures when using the url culture provider

This is the next in a series of posts on using the middleware as filters feature of ASP.NET Core 1.1 to add a url culture provider to your application. In this post I show how to handle the case where a user requests a culture that does not exist, or that we do not support, by redirecting to a URL with a supported culture.

The current series of posts is given below:

By working through each of these posts we are slowly building a full system for having a useable url culture provider. We now have globally defined routing conventions that ensure our urls are prefixed with a culture like en-GB or fr-FR. In the last post we added a culture constraint and catch-all routes to ensure that requests to a culture-less url like Home/Index/ are redirected to a cultured one, like en-GB/Home/Index.

One of the remaining holes in our current implementation is handling the case when users request a URL for a culture that does not exist, or we do not support. For example, in the example below, we do not support Spanish in the application, so the request localisation is set to the default culture en-GB:

Redirecting unknown cultures when using the url culture provider

This is fine from the application's point of view , but it is not great for the user. It looks to the user as though we support Spanish, as we have a Spanish culture url, but all the text will be in English. A potentially better approach would be to redirect the user to a URL with the culture that is actually being used. This also helps reduce the number of pages which are essentially equivalent, which is good for SEO.

Handling redirects in middleware as filters

The technique I'm going to use involves adding an additional piece of middleware to our middleware-as-filters pipeline. If you're not comfortable with how this works I suggest checking out the earlier posts in this series.

This middleware checks the culture that has been applied to the current request to see if it matches the value that was requested via the routing {culture} value. If the values match (ignoring case differences), the middleware just moves on to the next middleware in the pipeline and nothing else happens.

If the requested and actual cultures are different, then the middleware short-circuits the request, sending a redirect to the same URL but with the correct culture. Middleware-as-filters run as ResourceFilters, so they can bypass the action method completely, as in this case.

That is the high level approach, now onto the code. Brace yourself, there's quite a lot, which I'll walk through afterwards.

public class RedirectUnsupportedCulturesMiddleware  
{
    private readonly RequestDelegate _next;
    private readonly string _routeDataStringKey;

    public RedirectUnsupportedCulturesMiddleware(
        RequestDelegate next,
        RequestLocalizationOptions options)
    {
        _next = next;
        var provider = options.RequestCultureProviders
            .Select(x => x as RouteDataRequestCultureProvider)
            .Where(x => x != null)
            .FirstOrDefault();
        _routeDataStringKey = provider.RouteDataStringKey;
    }

    public async Task Invoke(HttpContext context)
    {
        var requestedCulture = context.GetRouteValue(_routeDataStringKey)?.ToString();
        var cultureFeature = context.Features.Get<IRequestCultureFeature>();

        var actualCulture = cultureFeature?.RequestCulture.Culture.Name;

        if (string.IsNullOrEmpty(requestedCulture) ||
            !string.Equals(requestedCulture, actualCulture, StringComparison.OrdinalIgnoreCase))
        {
            var newCulturedPath = GetNewPath(context, actualCulture);
            context.Response.Redirect(newCulturedPath);
            return;
        }

        await _next.Invoke(context);
    }

    private string GetNewPath(HttpContext context, string newCulture)
    {
        var routeData = context.GetRouteData();
        var router = routeData.Routers[0];
        var virtualPathContext = new VirtualPathContext(
            context,
            routeData.Values,
            new RouteValueDictionary { { _routeDataStringKey, newCulture } });

        return router.GetVirtualPath(virtualPathContext).VirtualPath;
    }
}

Breaking down the code

This is a standard piece of ASP.NET Core middleware, so our constructor takes a RequestDelegate which it calls in order to invoke the next middleware in the pipeline.

Our middleware also takes in an instance of RequestLocalizationOptions. It uses this to attempt to determine how the RouteDataRequestCultureProvider has been configured. In particular we need the RouteDataStringKey which represents culture in our URLs. By default it is "culture", but this approach would pick up any changes too.

Note that we assume that we will always have a RouteDataRequestCultureProvider here. That sort of makes sense, as redirecting to a different URL based on culture only makes sense if we are taking the culture from the URL!

We have implemented the standard middleware Invoke function without any further dependencies other than the HttpContext. When invoked, the middleware will attempt to find a route value corresponding to the specified RouteDataStringKey. This will give the name of the culture the user requested, for example es-ES.

Next, we obtain the current culture. I chose to retrieve this from the context using the IRequestCultureFeature, mostly just to show it is possible, but you could also just use the thread culture directly by using CultureInfo.CurrentCulture.Name.

We then compare the culture requested with the actual culture that was set. If the requested culture was one we support, then these should be the same (ignoring case). If the culture requested was not a real culture, was not a culture we support, or was a more-specific culture than we support, then these will not match.

Considering that last point - if the user requested de-DE but we only support de then the culture provider will automatically fall back to de. This is desirable behaviour, but the requested and actual cultures will not match.

Once we have identified that the cultures do not match, we need to redirect the user to the correct url. Achieving this goal seemed surprisingly tricky, and potentially rather fragile, but it worked for me.

In order to route to a url you need an instance of an IRouter. You can obtain a collection of these, along with all the current route values by calling HttpContext.GetData(). I simply chose the first IRouter instance, passed in all the current route values, and provided a new value for the "culture" route value to create a VirtualPathContext, which can in turn be used to generate a path. Hard work!

Adding the middleware to your application

Now we have our middleware, we actually need to add it to our application somewhere. Luckily, we are already using middleware as filters to extract the culture from the url, so we can simply insert our middleware into the pipeline.

public class LocalizationPipeline  
{
    public void Configure(IApplicationBuilder app, RequestLocalizationOptions options)
    {
        app.UseRequestLocalization(options);
        app.UseMiddleware<RedirectUnsupportedCulturesMiddleware>();
    }
}

So our localisation pipeline (which will be run as a filter, thanks to a global MiddlewareFilterAttribute) will first attempt to resolve the request's culture. Immediately after doing so, we run our new middleware, and redirect the request if it is not a culture we support.

If you're not sure what's going on here, I suggest checking out my earlier posts on setting up url localisation in your apps.

Trying it out

That should be all we need to do in order to automatically redirect requests that don't match in culture.

Trying a gibberish culture localhost/zz-ZZ redirects to our default culture:

Redirecting unknown cultures when using the url culture provider

Using a culture we don't support localhost/es-ES similarly redirects to the default culture:

Redirecting unknown cultures when using the url culture provider

If we support a fallback culture de then the request localhost/de-DE is redirected to that:

Redirecting unknown cultures when using the url culture provider

Caveats

One thing I haven't handled here is the difference between CurrentCulture and CurrentUICulture. These two can be different, and are supported by both the RequestLocalizationMiddleware and the RouteDataRequestCultureProvider. I chose not to address it here, but if you are using both in your application, you could easily extend the middleware to handle differences in either value.

Summary

Will these redirects in place, you should hopefully have the last piece of the puzzle for implementing the url culture provider in your ASP.NET Core 1.1 apps. If you come across anything I've missed, comments, or improvements, then do let me know!

Understanding and updating package versions for .NET Core 1.0.3

$
0
0
Understanding and updating package versions for .NET Core 1.0.3

Microsoft introduced the second update to their Long Term Support (LTS) version of .NET Core on 13th December, 3 months after releasing the first update to the platform. This included updates to .NET Core, ASP.NET Core and Entity Framework Core, and takes the overall version number to 1.0.3, though this number can be confusing, as you'll see shortly! You can read about the update in their blog post - I'm going to focus primarily on the ASP.NET Core changes here.

Understanding the version numbers

The first thing to take in with this update, is that it is only for the LTS track. .NET Core and ASP.NET Core follow releases in two different tracks: the safer, more stable, LTS version; and the alternative Fast Track Support (FTS) which sees new features at a higher rate.

Depending on your requirements for stability and the need for new features, you can stick to either the FTS or LTS track - both are supported. The important thing is that you make sure your whole application sticks to one or the other. You can't use some packages from the LTS track and some from the FTS track.

As of writing, the LTS version is at 1.0.3, which follows version numbers of the format 1.0.x. This, as expected implies it will only see patch/bug fixes. In contrast, the FTS version is currently at 1.1.0, which brings a number of additional features over the LTS branch. You can read more about the versioning story on the .NET blog.

Is this the second or third LTS update?

You may have noticed I said that this was the second update to the LTS track, even though we're up to update 1.0.3. That's because the .NET Core 1.0.2 update didn't actually change any code, it simply fixed an issue in the installer on macOS. So although the version number was bumped, there weren't actually any noticeable changes.

Package numbers don't match the ASP.NET Core version

This is where things start to get confusing.

ASP.NET Core is composed of a whole host of loosely coupled packages which can be added to your application to provide various features, as and when you need them. If you don't need a feature, you don't add it to your project. This contrasts with the previous model of ASP.NET in which you always had access to all of the features. It was more of a set-meal approach rather than the à la carte buffet approach of ASP.NET Core.

Each of these packages that make up ASP.NET Core - packages such as Microsoft.AspNetCore.Mvc, Microsoft.Extensions.Configuration.Abstractions, and Microsoft.AspNetCore.Diagnostics - follow semantic versioning. They version independently of one another, and of the framework as a whole.

ASP.NET Core has an overall version number, which for the LTS track is 1.0.3. However, just because the overall ASP.NET Core version has incremented, that doesn't mean that the underlying packages of which it is composed have necessarily changed. If a package has not changed, there is no sense in updating its version number, even though a new version of ASP.NET Core is being released.

Updating your project

Although Microsoft have take a perfectly reasonable approach with regard to this in theory, the reality of trying to keep up with these version changes is somewhat bewildering.

In order to stay supported, you have to ensure all your packages stay on the latest version of the LTS (or FTS) track of ASP.NET Core. But there isn't anywhere that actually lists out all the supported packages for a given overall version of ASP.NET Core, or provides an easy way to update all the packages in your project to the latest on the LTS track. And it's not easy to know what they should be - some packages may be on version 1.0.2, others 1.0.1 and some may still be 1.0.0. It's very hard to tell whether your project.json (or csproj) is all up-to-date.

In a recent post, Steve Gordon ran into exactly this problem when updating the allReady project to 1.0.3. He found he had to go through the NuGet Package Manager GUI in ASP.NET Core and update each of his dependencies independently. He couldn't use the 'Update All' button as this would update to the latest in the FTS track. Hopefully his suggestion of a toggle for selecting which track you wish to stick to will be implemented in VS2017!

As part of his post, he lists all the dependencies he had to update in his project.json in making the move. You also have to ensure you install the latest SDK from https://dot.net and update your global.json accordingly.

Steve lists a whole host of packages to update, but I wanted to try and provide a more comprehensive list, so I decided to take a look through each of the ASP.NET Core repos, and fetch the latest version of the packages for the LTS update.

Latest versions

The latest version of ASP.NET Core packages for version 1.0.3 are listed below. This list attempts to be exhaustive for the core packages in the Microsoft ASP.NET Core repos in GitHub. It's quite possible I've missed some out though - if so, let me know in the comments!

Note that not all of these packages will have changed in the 1.0.3 release (though it seems like most have), these are just the latest packages that it uses.

  "Microsoft.ApplicationInsights.AspNetCore" : "1.0.2",
  "Microsoft.AspNet.Identity.AspNetCoreCompat" : "0.1.1",
  "Microsoft.AspNet.WebApi.Client" : "5.2.2",
  "Microsoft.AspNetCore.Antiforgery" : "1.0.2",
  "Microsoft.AspNetCore.Authentication" : "1.0.1",
  "Microsoft.AspNetCore.Authentication.Cookies" : "1.0.1",
  "Microsoft.AspNetCore.Authentication.Facebook" : "1.0.1",
  "Microsoft.AspNetCore.Authentication.Google" : "1.0.1",
  "Microsoft.AspNetCore.Authentication.JwtBearer" : "1.0.1",
  "Microsoft.AspNetCore.Authentication.MicrosoftAccount" : "1.0.1",
  "Microsoft.AspNetCore.Authentication.OAuth" : "1.0.1",
  "Microsoft.AspNetCore.Authentication.OpenIdConnect" : "1.0.1",
  "Microsoft.AspNetCore.Authentication.Twitter" : "1.0.1",
  "Microsoft.AspNetCore.Authorization" : "1.0.1",
  "Microsoft.AspNetCore.Buffering" : "0.1.1",
  "Microsoft.AspNetCore.CookiePolicy" : "1.0.1",
  "Microsoft.AspNetCore.Cors" : "1.0.1",
  "Microsoft.AspNetCore.Cryptography.Internal" : "1.0.1",
  "Microsoft.AspNetCore.Cryptography.KeyDerivation" : "1.0.1",
  "Microsoft.AspNetCore.DataProtection" : "1.0.1",
  "Microsoft.AspNetCore.DataProtection.Abstractions" : "1.0.1",
  "Microsoft.AspNetCore.DataProtection.Extensions" : "1.0.1",
  "Microsoft.AspNetCore.DataProtection.SystemWeb" : "1.0.1",
  "Microsoft.AspNetCore.Diagnostics" : "1.0.1",
  "Microsoft.AspNetCore.Diagnostics.Abstractions" : "1.0.1",
  "Microsoft.AspNetCore.Diagnostics.Elm" : "0.1.1",
  "Microsoft.AspNetCore.Diagnostics.EntityFrameworkCore" : "1.0.1",
  "Microsoft.AspNetCore.Hosting" : "1.0.1",
  "Microsoft.AspNetCore.Hosting.Abstractions" : "1.0.1",
  "Microsoft.AspNetCore.Hosting.Server.Abstractions" : "1.0.1",
  "Microsoft.AspNetCore.Hosting.WindowsServices" : "1.0.1",
  "Microsoft.AspNetCore.Html.Abstractions" : "1.0.1",
  "Microsoft.AspNetCore.Http" : "1.0.1",
  "Microsoft.AspNetCore.Http.Abstractions" : "1.0.1",
  "Microsoft.AspNetCore.Http.Extensions" : "1.0.1",
  "Microsoft.AspNetCore.Http.Features" : "1.0.1",
  "Microsoft.AspNetCore.HttpOverrides" : "1.0.1",
  "Microsoft.AspNetCore.Identity" : "1.0.1",
  "Microsoft.AspNetCore.Identity.EntityFrameworkCore" : "1.0.1",
  "Microsoft.AspNetCore.JsonPatch" : "1.0.0",
  "Microsoft.AspNetCore.Localization" : "1.0.1",
  "Microsoft.AspNetCore.MiddlewareAnalysis" : "1.0.1",
  "Microsoft.AspNetCore.Mvc" : "1.0.2",
  "Microsoft.AspNetCore.Mvc.Abstractions" : "1.0.2",
  "Microsoft.AspNetCore.Mvc.ApiExplorer" : "1.0.2",
  "Microsoft.AspNetCore.Mvc.Core" : "1.0.2",
  "Microsoft.AspNetCore.Mvc.Cors" : "1.0.2",
  "Microsoft.AspNetCore.Mvc.DataAnnotations" : "1.0.2",
  "Microsoft.AspNetCore.Mvc.Formatters.Json" : "1.0.2",
  "Microsoft.AspNetCore.Mvc.Formatters.Xml" : "1.0.2",
  "Microsoft.AspNetCore.Mvc.Localization" : "1.0.2",
  "Microsoft.AspNetCore.Mvc.Razor" : "1.0.2",
  "Microsoft.AspNetCore.Mvc.Razor.Host" : "1.0.2",
  "Microsoft.AspNetCore.Mvc.TagHelpers" : "1.0.2",
  "Microsoft.AspNetCore.Mvc.ViewFeatures" : "1.0.2",
  "Microsoft.AspNetCore.Mvc.WebApiCompatShim" : "1.0.2",
  "Microsoft.AspNetCore.Owin" : "1.0.1",
  "Microsoft.AspNetCore.Razor.Runtime" : "1.0.1",
  "Microsoft.AspNetCore.Routing" : "1.0.2",
  "Microsoft.AspNetCore.Routing.Abstractions" : "1.0.2",
  "Microsoft.AspNetCore.Server.IISIntegration" : "1.0.1",
  "Microsoft.AspNetCore.Server.IISIntegration.Tools" : "1.0.0-preview4-final",
  "Microsoft.AspNetCore.Server.Kestrel" : "1.0.2",
  "Microsoft.AspNetCore.Server.Kestrel.Https" : "1.0.2",
  "Microsoft.AspNetCore.Server.Testing" : "0.1.1",
  "Microsoft.AspNetCore.StaticFiles" : "1.0.1",
  "Microsoft.AspNetCore.TestHost" : "1.0.1",
  "Microsoft.AspNetCore.Testing" : "1.0.1",
  "Microsoft.AspNetCore.WebUtilities" : "1.0.1",
  "Microsoft.CodeAnalysis.CSharp" : "1.3.0",
  "Microsoft.DotNet.Watcher.Core" : "1.0.0-preview4-final",
  "Microsoft.DotNet.Watcher.Tools" : "1.0.0-preview4-final",
  "Microsoft.EntityFrameworkCore" : "1.0.2",
  "Microsoft.EntityFrameworkCore.Design" : "1.0.2",
  "Microsoft.EntityFrameworkCore.InMemory" : "1.0.2",
  "Microsoft.EntityFrameworkCore.Relational" : "1.0.2",
  "Microsoft.EntityFrameworkCore.Relational.Design" : "1.0.2",
  "Microsoft.EntityFrameworkCore.Relational.Design.Specification.Tests" : "1.0.2",
  "Microsoft.EntityFrameworkCore.Relational.Specification.Tests" : "1.0.2",
  "Microsoft.EntityFrameworkCore.Specification.Tests" : "1.0.2",
  "Microsoft.EntityFrameworkCore.SqlServer" : "1.0.2",
  "Microsoft.EntityFrameworkCore.SqlServer.Design" : "1.0.2",
  "Microsoft.EntityFrameworkCore.Sqlite" : "1.0.2",
  "Microsoft.EntityFrameworkCore.Sqlite.Design" : "1.0.2",
  "Microsoft.Extensions.Caching.Abstractions" : "1.0.1",
  "Microsoft.Extensions.Caching.Memory" : "1.0.1",
  "Microsoft.Extensions.Caching.Redis" : "1.0.1",
  "Microsoft.Extensions.Caching.SqlConfig.Tools" : "1.0.0-preview4-final",
  "Microsoft.Extensions.Caching.SqlServer" : "1.0.1",
  "Microsoft.Extensions.CommandLineUtils" : "1.0.1",
  "Microsoft.Extensions.Configuration" : "1.0.1",
  "Microsoft.Extensions.Configuration.Abstractions" : "1.0.1",
  "Microsoft.Extensions.Configuration.Binder" : "1.0.1",
  "Microsoft.Extensions.Configuration.CommandLine" : "1.0.1",
  "Microsoft.Extensions.Configuration.EnvironmentVariables" : "1.0.1",
  "Microsoft.Extensions.Configuration.FileExtensions" : "1.0.1",
  "Microsoft.Extensions.Configuration.Ini" : "1.0.1",
  "Microsoft.Extensions.Configuration.Json" : "1.0.1",
  "Microsoft.Extensions.Configuration.UserSecrets" : "1.0.1",
  "Microsoft.Extensions.Configuration.Xml" : "1.0.1",
  "Microsoft.Extensions.DependencyInjection" : "1.0.1",
  "Microsoft.Extensions.DependencyInjection.Abstractions" : "1.0.1",
  "Microsoft.Extensions.DependencyInjection.Specification.Tests" : "1.0.1",
  "Microsoft.Extensions.DependencyModel" : "1.0.0",
  "Microsoft.Extensions.DiagnosticAdapter": "1.0.1",
  "Microsoft.Extensions.FileProviders.Abstractions" : "1.0.1",
  "Microsoft.Extensions.FileProviders.Composite" : "1.0.1",
  "Microsoft.Extensions.FileProviders.Embedded" : "1.0.1",
  "Microsoft.Extensions.FileProviders.Physical" : "1.0.1",
  "Microsoft.Extensions.FileSystemGlobbing" : "1.0.1",
  "Microsoft.Extensions.Globalization.CultureInfoCache" : "1.0.1",
  "Microsoft.Extensions.Localization" : "1.0.1",
  "Microsoft.Extensions.Localization.Abstractions" : "1.0.1",
  "Microsoft.Extensions.Logging" : "1.0.1",
  "Microsoft.Extensions.Logging.Abstractions" : "1.0.1",
  "Microsoft.Extensions.Logging.Console" : "1.0.1",
  "Microsoft.Extensions.Logging.Debug" : "1.0.1",
  "Microsoft.Extensions.Logging.EventLog" : "1.0.1",
  "Microsoft.Extensions.Logging.Filter" : "1.0.1",
  "Microsoft.Extensions.Logging.Testing" : "1.0.1",
  "Microsoft.Extensions.Logging.TraceSource" : "1.0.1",
  "Microsoft.Extensions.ObjectPool" : "1.0.1",
  "Microsoft.Extensions.Options" : "1.0.1",
  "Microsoft.Extensions.Options.ConfigurationExtensions" : "1.0.1",
  "Microsoft.Extensions.PlatformAbstractions" : "1.0.0",
  "Microsoft.Extensions.Primitives" : "1.0.1",
  "Microsoft.Extensions.SecretManager.Tools" : "1.0.0-preview4-final",
  "Microsoft.Extensions.WebEncoders" : "1.0.1",
  "Microsoft.IdentityModel.Protocols.OpenIdConnect" : "2.0.0",
  "Microsoft.Net.Http.Headers" : "1.0.1",
  "Microsoft.VisualStudio.Web.BrowserLink.Loader" : "14.0.1"

Hopefully someone will find this useful when trying to work out which *&^#$% package they need to update!

An introduction to ViewComponents - a login status view component

$
0
0
An introduction to ViewComponents - a login status view component

View components are one of the potentially less well known features of ASP.NET Core Razor views. Unlike tag-helpers which have the pretty much direct equivalent of Html Helpers in the previous ASP.NET, view components are a bit different.

In spirit, they fit somewhere between a partial view and a full controller - approximately like a ChildAction. However whereas actions and controllers have full model binding semantics and the filter pipeline etc, view components are invoked directly with explicit data. They are more powerful than a partial view however, as they can contain business logic, and separate the UI generation from the underlying behaviour.

View components seem to fit best in situations where you would want to use a partial, but that the rendering logic is complicated and may need to be tested.

In this post, I'll use the example of a Login widget that displays your email address when you are logged in:

An introduction to ViewComponents - a login status view component

and a register / login link when you are logged out:

An introduction to ViewComponents - a login status view component

This is a trivial example - the behaviour above is achieved without the use of view components in the templates. This post is just meant to introduce you to the concept of view components, so you can see when to use them in your own applications.

Creating a view component

View components can be defined in a multitude of ways. You can give your component a name ending in ViewComponent, you can decorate it with the [ViewComponent] attribute, or you can derive from the ViewComponent base class. The latter of these is probably the most obvious, and provides a number of helper properties you can use, but the choice is yours.

To implement a view component you must expose a public method called InvokeAsync which is called when the component is invoked:

public Task<IViewComponentResult> InvokeAsync();  

As is typical for ASP.NET Core, this method is found at runtime using reflection, so if you forget to add it, you won't get compile time errors, but you will get an exception at runtime:

An introduction to ViewComponents - a login status view component

Other than this restriction, you are pretty much free to design your view components as you like. They support dependency injection, so you are able to inject dependencies into the constructor and use them in your InvokeAsync method. For example, you could inject a DbContext and query the database for the data to display in your component.

The LoginStatusViewComponent

Now you have a basic understanding of view components, we can take a look at the LoginStatusViewComponent. I created this component in a project created using the default MVC web template in VisualStudio with authentication.

This simple view component only has a small bit of logic, but it demonstrates the features of view components nicely.

public class LoginStatusViewComponent : ViewComponent  
{
    private readonly SignInManager<ApplicationUser> _signInManager;
    private readonly UserManager<ApplicationUser> _userManager;

    public LoginStatusViewComponent(SignInManager<ApplicationUser> signInManager, UserManager<ApplicationUser> userManager)
    {
        _signInManager = signInManager;
        _userManager = userManager;
    }

    public async Task<IViewComponentResult> InvokeAsync()
    {
        if (_signInManager.IsSignedIn(HttpContext.User))
        {
            var user = await _userManager.GetUserAsync(HttpContext.User);
            return View("LoggedIn", user);
        }
        else
        {
            return View();
        }
    }
}

You can see I have chosen to derive from the base ViewComponent class, as that provides me access to a number of helper methods.

We are injecting two services into the constructor of our component. These will be fulfilled automatically by the dependency injection container when our component is invoked.

Our InvokeAsync method is pretty self explanatory. We are checking if the current user is signed in using the SignInManager<>, and if they are we fetch the associated ApplicationUser from the UserManager<>. Finally we call the helper View method, passing in a template to render and the model user. If the user is not signed in, we call the helper View without a template argument.

The calls at the end of the InvokeAsync method are reminiscent of action methods. They are doing a very similar thing, in that they are creating a result which will execute a view template, passing in the provided model.

In our example, we are rendering a different template depending on whether the user is logged in or not. That means we could test this ViewComponent in isolation, testing that the correct template is displayed depending on our business requirements, without having to inspect the HTML output, which would be our only choice if this logic was embedded in a partial view instead.

Rendering View templates

When you use return View() in your view component, you are returning a ViewViewComponentResult (yes, that name is correct!) which is analogous to the ViewResult you typically return from MVC action methods.

This object contains an optional template name and view model, which is used to invoke a Razor view template. The location of the view to execute is given by convention, very similar to MVC actions. In the case of our LoginStatusViewComponent, the Razor engine will search for views in two folders:

  1. Views\Components\LoginStatus; and
  2. Views\Components\Shared

If you don't specify the name of the template to find, then the engine will assume the file is called default.cshtml. In the example I provided, when the user is signed in we explicitly provide a template name, so the engine will look for the template at

  1. Views\Components\LoginStatus\LoggedIn.cshtml; and
  2. Views\Components\Shared\LoggedIn.cshtml

The view templates themselves are just normal razor, so they can contain all the usual features, tag helpers, strongly typed models etc. The LoggedIn.cshtml file for our LoginviewComponent is shown below:

@model ApplicationUser
<form asp-area="" asp-controller="Account" asp-action="LogOff" method="post" id="logoutForm" class="navbar-right">  
    <ul class="nav navbar-nav navbar-right">
        <li>
            <a asp-area="" asp-controller="Manage" asp-action="Index" title="Manage">Hello @Model.Email!</a>
        </li>
        <li>
            <button type="submit" class="btn btn-link navbar-btn navbar-link">Log off</button>
        </li>
    </ul>
</form>  

There is nothing special here - we are using the form and action link tag helpers to create links and we are writing values from our strongly typed model to the response. All bread and butter for razor templates!

When the user is not logged in, I didn't specify a template name, so the default name of default.cshtml is used:

An introduction to ViewComponents - a login status view component

This view is even simpler as we didn't pass a model to the view, it just contains a couple of links:

<ul class="nav navbar-nav navbar-right">  
    <li><a asp-area="" asp-controller="Account" asp-action="Register">Register</a></li>
    <li><a asp-area="" asp-controller="Account" asp-action="Login">Log in</a></li>
</ul>  

Invoking a view component

With your component configured, all that remains is to invoke it from your view. View components can be invoked from a different view by calling, in this case, @await Component.InvokeAsync("LoginStatus"), where "LoginStatus" is the name of the view component. We can call it in the header of our _Layout.cshtml:

<div class="navbar-collapse collapse">  
    <ul class="nav navbar-nav">
        <li><a asp-area="" asp-controller="Home" asp-action="Index">Home</a></li>
        <li><a asp-area="" asp-controller="Home" asp-action="About">About</a></li>
        <li><a asp-area="" asp-controller="Home" asp-action="Contact">Contact</a></li>
    </ul>
    @await Component.InvokeAsync("LoginStatus")
</div>  

Invoking directly from a controller

It is also possible to return a view component directly from a controller; this is the closest you can get to directly exposing a view component at an endpoint:

public IActionResult IndexVC()  
{
    return ViewComponent("LoginStatus");
}

Calling View Components like TagHelpers in ASP.NET Core 1.1.0

View components work well, but one of the things that seemed like a bit of a step back was the need to explicitly use the @ symbol to render them. One of the nice things brought to Razor with ASP.NET Core was tag-helpers. These do pretty much the same job as the HTML helpers from the previous ASP.NET MVC Razor views, but in a more editor-friendly way.

For example, consider the following block, which would render a label, text box and validation summary for a property on your model called Email

<div class="form-group">  
    @Html.LabelFor(x=>x.Email, new { @class= "col-md-2 control-label"})
    <div class="col-md-10">
        @Html.TextBoxFor(x=>x.Email, new { @class= "form-control"})
        @Html.ValidationMessageFor(x=>x.Email, null, new { @class= "text-danger" })
    </div>
</div>  

Compare that to the new tag helpers, which allow you to declare your model bindings as asp- attributes:

<div class="form-group">  
    <label asp-for="Email" class="col-md-2 control-label"></label>
    <div class="col-md-10">
        <input asp-for="Email" class="form-control" />
        <span asp-validation-for="Email" class="text-danger"></span>
    </div>
</div>  

Syntax highlighting is easier for basic editors and you don't need to use ugly @ symbols to escape the class properties - everything is just that little bit nicer. In ASP.NET Core 1.1.0, you can get similar benefits for calling your tag helpers, by using a vc: prefix.

To repeat my LoginStatus example in ASP.NET Core 1.1.0, you first need to register your view components as tag helpers in _ViewImports.cshtml (where WebApplication1 is the namespace of your view components) :

@addTagHelper *, WebApplication1

and you can then invoke your view component using the tag helper syntax:

<div class="navbar-collapse collapse">  
    <ul class="nav navbar-nav">
        <li><a asp-area="" asp-controller="Home" asp-action="Index">Home</a></li>
        <li><a asp-area="" asp-controller="Home" asp-action="About">About</a></li>
        <li><a asp-area="" asp-controller="Home" asp-action="Contact">Contact</a></li>
    </ul>
    <vc:login-status></vc:login-status>
</div>  

Note the name of the tag helper here, vc:login-status. The vc helper, indicates that you are invoking a view component, and the name of the helper is our view component's name (LoginStatus) converted to lower-kebab case (thanks to the ASP.NET monsters for figuring out the correct name)!

With these two pieces in place, your tag-helper is functionally equivalent to the previous invocation, but is a bit nicer to read:)

Summary

This post provided an introduction to building your first view component, including how to invoke it. You can find sample code on GitHub. In the next post, I'll show how you can pass parameters to your component when you invoke it.

How to pass parameters to a view component

$
0
0
How to pass parameters to a view component

In my last post I showed how to create a custom view component to simplify my Razor views, and separate the logic of what to display from the UI concern.

View components are a good fit where you have some complex rendering logic, which does not belong in the UI, and is also not a good fit for an action endpoint - approximately equivalent to child actions from the previous version of ASP.NET.

In this post I will show how you can pass parameters to a view component when invoking it from your view, from a controller, or when used as a tag helper.

In the previous post I showed how to create a simple LoginStatusViewComponent that shows you the email of the user and a log out link when a user is logged in, and register or login links when the user is anonymous:

How to pass parameters to a view component

The view component itself was simple, but it separated out the logic of which template to display from the templates themselves. It was created with a simple InvokeAsync method that did not require any parameters:

public class LoginStatusViewComponent : ViewComponent  
{
    private readonly SignInManager<ApplicationUser> _signInManager;
    private readonly UserManager<ApplicationUser> _userManager;

    public LoginStatusViewComponent(SignInManager<ApplicationUser> signInManager, UserManager<ApplicationUser> userManager)
    {
        _signInManager = signInManager;
        _userManager = userManager;
    }

    public async Task<IViewComponentResult> InvokeAsync()
    {
        if (_signInManager.IsSignedIn(HttpContext.User))
        {
            var user = await _userManager.GetUserAsync(HttpContext.User);
            return View("LoggedIn", user);
        }
        else
        {
            return View("Anonymous");
        }
    }
}

Invoking the LoginStatus view component from the _layout.cshtml involves calling Component.InvokeAsync and awaiting the response:

 @await Component.InvokeAsync("LoginStatus")

Updating a view component to accept parameters

The example presented is pretty simple, in that it is self contained; the InvokeAsync method does not have any parameters to pass to it. But what if we wanted to control how the view component behaves when invoked. For example, imagine that you want to control whether to display the Register link for anonymous users. Maybe your site that has an external registration system instead, so the "register" link is not valid in some cases.

First, lets create a simple view model to use in our "anonymous" view:

public class AnonymousViewModel  
{
    public bool IsRegisterLinkVisible { get; set; }
}

Next, we update the InvokeAsync method of our view component to take a boolean parameter. If the user is not logged in, we will pass this parameter down into the view model:

public async Task<IViewComponentResult> InvokeAsync(bool shouldShowRegisterLink)  
{
    if (_signInManager.IsSignedIn(HttpContext.User))
    {
        var user = await _userManager.GetUserAsync(HttpContext.User);
        return View("LoggedIn", user);
    }
    else
    {
        var viewModel = new AnonymousViewModel
        {
            IsRegisterLinkVisible = shouldShowRegisterLink
        };
        return View(viewModel);
    }
}

Finally, we update the anonymous default.cshtml template to honour this boolean:

@model LoginStatusViewComponent.AnonymousViewModel
<ul class="nav navbar-nav navbar-right">  
    @if(Model.IsRegisterLinkVisible)
    {
        <li><a asp-area="" asp-controller="Account" asp-action="Register">Register</a></li>
    }
    <li><a asp-area="" asp-controller="Account" asp-action="Login">Log in</a></li>
</ul>  

Passing parameters to view components using InvokeAsync

Our component is all set up to conditionally show or hide the register link, all that remains is to invoke it.

Passing parameters to a view component is achieved using anonymous types. In our layout, we specify the parameters in an optional parameter passed to InvokeAsync:

<div class="navbar-collapse collapse">  
    <ul class="nav navbar-nav">
        <li><a asp-area="" asp-controller="Home" asp-action="Index">Home</a></li>
        <li><a asp-area="" asp-controller="Home" asp-action="About">About</a></li>
        <li><a asp-area="" asp-controller="Home" asp-action="Contact">Contact</a></li>
    </ul>
    @await Component.InvokeAsync("LoginStatus", new { shouldShowRegisterLink = false })
</div>  

With this in place, the register link can be shown:

How to pass parameters to a view component

or hidden:

How to pass parameters to a view component

If you omit the anonymous type, then the parameters will all have their default values (false for our bool, but null for objects).

Passing parameters to view components when invoked from a controller

Passing parameters to a view component when invoked from a controller is very similar - just pass an anonymous method with the appropriate values when creating the controller:

public IActionResult IndexVC()  
{
    return ViewComponent("LoginStatus", new { shouldShowRegisterLink = false })
}

Passing parameters to view components when invoked as a tag helper in ASP.NET Core 1.1.0

In the previous post I showed how to invoke view components as tag helpers. The parameterless version of our invocation looks like this:

<div class="navbar-collapse collapse">  
    <ul class="nav navbar-nav">
        <li><a asp-area="" asp-controller="Home" asp-action="Index">Home</a></li>
        <li><a asp-area="" asp-controller="Home" asp-action="About">About</a></li>
        <li><a asp-area="" asp-controller="Home" asp-action="Contact">Contact</a></li>
    </ul>
    <vc:login-status></vc:login-status>
</div>  

Passing parameters to a view component tag helper is the same as for normal tag helpers. You convert the parameters to lower-kebab case and add them as attributes to the tag, e.g.:

<vc:login-status should-show-register-link="false"></vc:login-status>  

This gives a nice syntax for invoking our view components without having to drop into C# land use @await Component.InvokeAsync(), and will almost certainly become the preferred way to use them in the future.

Summary

In this post I showed how you can pass parameters to a view component. When invoking from a view in ASP.NET Core 1.0.0 or from a controller, you can use an anonymous method to pass parameters, where the properties are the name of the parameters.

In ASP.NET Core 1.1.0 you can use the alternative tag helper invocation method to pass parameters as attributes. Just remember to use lower-kebab-case for your component name and parameters! You can find sample code for this approach on GitHub.

Reloading strongly typed options in ASP.NET Core 1.1.0

$
0
0
Reloading strongly typed options in ASP.NET Core 1.1.0

Back in June, when ASP.NET Core was still in RC2, I wrote a post about reloading strongly typed Options when the underlying configuration sources (e.g. a JSON) file changes. As I noted in that post, this functionality was removed prior to the release of ASP.NET Core 1.0.0, as the experience was a little confusing. With ASP.NET Core 1.1.0, it's back, and much simpler to use.

In this post, I'll show how you can use the new IOptionsSnapshot<> interface to simplify reloading strongly typed options. I'll provide a very brief summary of using strongly typed configuration in ASP.NET Core, and touch on the approach that used to be required with RC2 to show how much simpler it is now!

tl;dr; To have your options reload when the underlying file / IConfigurationRoot changes, just replace any usages of IOptions<> with IOptionsSnapshot<>

The ASP.NET Core configuration system

The configuration system in ASP.NET Core is rather different to the approach taken in ASP.NET 4.X. Previously, you would typically store your configuration in the AppSettings section of the XML web.config file, and you would load these settings using a static helper class. Any changes to web.config would cause the app pool to recycle, so changing settings on the fly this way wasn't really feasible.

In ASP.NET Core, configuration of app settings is a more dynamic affair. App settings are still essentially key-value pairs, but they can be obtained from a wide array of sources. You can still load settings from XML files, but also JSON files, from the command line, from environment variables, and many others. Writing your own custom configuration provider is also possible if you have another source you wish to use to configure your application.

Configuration is typically performed in the constructor of Startup, loading from multiple sources:

public Startup(IHostingEnvironment env)  
{
    var builder = new ConfigurationBuilder()
        .SetBasePath(env.ContentRootPath)
        .AddJsonFile("appsettings.json", optional: true, reloadOnChange: true)
        .AddJsonFile($"appsettings.{env.EnvironmentName}.json", optional: true)
        .AddEnvironmentVariables();
    Configuration = builder.Build();
}

public IConfigurationRoot Configuration { get; }  

This constructor creates a configuration object, loading the configuration found in each of the file sources (two JSON files and Environment Variables in this case). Each source supplies a set of key-value pairs, and each subsequent source overwrites values found in earlier sources. The final IConfigurationRoot is essentially a dictionary of all the final key-value pairs from all of your configuration sources.

It is perfectly possible to use this IConfigurationRoot directly in your application, but the suggested approach is to use strongly typed settings instead. Rather than injecting the whole dictionary of settings whenever you need to access a single value, you take a dependency on a strongly typed POCO C# class. This can be bound to your configuration values and used directly.

For example, imagine I have the following values in appsettings.json:

{
  "MyValues": {
    "DefaultValue" : "first"
  }
}

This could be bound to the following class:

public class MyValues  
{
    public string DefaultValue { get; set; }
}

The binding is setup when you are configuring your application for dependency injection in the ConfigureServices method:

public void ConfigureServices(IServiceCollection services)  
{
    services.Configure<MyValues>(Configuration.GetSection("MyValues"));
}

With this approach, you can inject an instance of IOptions<MyValues> into your controllers and access the settings values using the strongly typed object. For example, a simple web API controller that just displays the setting value:

[Route("api/[controller]")]
public class ValuesController : Controller  
{
    private readonly MyValues _myValues;
    public ValuesController(IOptions<MyValues> values)
    {
        _myValues = values.Value;
    }

    // GET api/values
    [HttpGet]
    public string Get()
    {
        return _myValues.DefaultValue;
    }
}

would give the following output when the url /api/Values is hit:

Reloading strongly typed options in ASP.NET Core 1.1.0

Reloading strongly typed options in ASP.NET Core RC2

Now that you know how to read settings in ASP.NET Core, we get to the interesting bit - reloading options. You may have noticed that there is a reloadOnChange parameter on the AddJsonFile method when building your configuration object in Startup. Based on this parameter it would seem like any changes to the underlying file should propagate into your project.

Unfortunately, as I explored in a previous post, you can't just expect that functionality to happen magically. While it is possible to achieve, it takes a bit of work.

The problem lies in the fact that although the IConfigurationRoot is automatically updated whenever the underlying appsettings.json file changes, the strongly typed configuration IOptions<> is not. Instead, the IOptions<> is created as a singleton when first requested and is never updated again.

To get around this, RC2 provided the IOptionsMonitor<> interface. In principle, this could be used almost identically to the IOptions<> interface, but it would be updated when the underlying IConfigurationRoot changed. So, for example, you should be able to modify your constructor to take an instance of IOptionsMonitor<MyValues> instead, and to use the CurrentValue property:

public class ValuesController : Controller  
{
    private readonly MyValues _myValues;
    public ValuesController(IOptionsMonitor<MyValues> values)
    {
        _myValues = values.CurrentValue;
    }
}

Unfortunately, as written, this does not have quite the desired effect - there is an additional step required. As well as injecting an instance of IOptionsMonitor you must also configure an event handler for when the underlying configuration changes. This doesn't have to actually do anything, it just has to be set. So for example, you could set the monitor to just create a log whenever the underlying file changes:

public void Configure(IApplicationBuilder app, ILoggerFactory loggerFactory, IOptionsMonitor<MyValues> monitor)  
{
    loggerFactory.AddConsole(Configuration.GetSection("Logging"));
    loggerFactory.AddDebug();

    monitor.OnChange(
        vals =>
        {
            loggerFactory
                .CreateLogger<IOptionsMonitor<MyValues>>()
                .LogDebug($"Config changed: {string.Join(", ", vals)}");
        });

    app.UseMvc();
}

With this in place, changes to the underlying appsettings.json file will be reflected each time you request an instance of IOptionsMonitor<MyValues> from the dependency injection container.

The new way in ASP.NET Core 1.1.0

The approach required for RC2 felt a bit convoluted and was very easy to miss. Microsoft clearly thought the same, as they removed IOptionsMonitor<> from the public package when they went RTM with 1.0.0. Luckily, a new improved approach is back with version 1.1.0 of ASP.NET Core.

No additional setup is required to have your strongly typed options reload when the IConfigurationRoot changes. All you need to do is inject IOptionsSnapshot<> instead of IOptions<>:

public class ValuesController : Controller  
{
    private readonly MyValues _myValues;
    public ValuesController(IOptionsSnapshot<MyValues> values)
    {
        _myValues = values.Value;
    }
}

No additional faffing in the ConfigureMethod, no need to setup additional services to make use of IOptionsSnapshot - it is all setup and works out of the box once you configure your strongly typed class using

public void ConfigureServices(IServiceCollection services)  
{
    services.Configure<MyValues>(Configuration.GetSection("MyValues"));
}

Trying it out

To make sure it really did work as expected, I created a simple project using the values described in this post, and injected both an IOptions<MyValues> object and an IOptionsSnapshot<MyValues> object into a web API controller:

[Route("api/[controller]")]
public class ValuesController : Controller  
{
    private readonly MyValues _myValues;
    private readonly MyValues _snapshot;
    public ValuesController(IOptions<MyValues> optionsValue, IOptionsSnapshot<MyValues> snapshotValue)
    {
        _myValues = optionsValue.Value;
        _snapshot = snapshotValue.Value;
    }

    // GET api/values
    [HttpGet]
    public string Get()
    {
        return $@"
IOptions<>:         {_myValues.DefaultValue}  
IOptionsSnapshot<>: {_snapshot.DefaultValue},  
Are same:           {_myValues == _snapshot}";  
    }
}

When you hit /api/Values this simply writes out the values stored in the current IOptions and IOptionsSnapshot<> values as plaintext:

Reloading strongly typed options in ASP.NET Core 1.1.0

With the application still running, I edited the appsettings.json file:

{
  "MyValues": {
    "DefaultValue" : "The second value"
  }
}

I then reloaded the web page (without restarting the app), and voila, the value contained in IOptionsSnapshot<> has updated while the IOptions value remains the same:

Reloading strongly typed options in ASP.NET Core 1.1.0

One point of note here - although the initial values are the same for both IOptions<> and IOptionsSnapshot<>, they are not actually the same object. If I had injected two IOptions<> objects, they would have been the same object, but that is not the case when one is an IOptionsSnapshot<>. (This makes sense if you think about it - you couldn't have them both be the same object and have one change while the other stayed the same).

If you don't like to use IOptions

Some people don't like polluting their controllers by using the IOptions<> interface everywhere they want to inject settings. There are a number of ways around this, such as those described by Khalid here and Filip from StrathWeb here. You can easily extend those techniques to use the IOptionsSnapshot<> approach, so that all of your strongly typed options classes are reloaded when an underlying file changes.

A simple solution is to just delegate the request for the MyValues object to the IOptionsSnapshot<MyValues>.Value value, by setting up a delegate in ConfigureServices:

public void ConfigureServices(IServiceCollection services)  
{
    services.Configure<MyValues>(Configuration.GetSection("MyValues"));
    services.AddScoped(cfg => cfg.GetService<IOptionsSnapshot<MyValues>>().Value);
}

With this approach, you can have reloading of the MyValues object in the ValuesController, without needing to explicitly specify the IOptionsSnapshot<> interface - just use MyValues directly:

public class ValuesController : Controller  
{
    private readonly MyValues _myValues;
    public ValuesController(MyValues values)
    {
        _myValues = values;
    }
}

Summary

Reloading strongly typed options in ASP.NET Core when the underlying configuration file changes is easy when you are using ASP.NET Core 1.1.0. Simply replace your usages of IOptions<> with IOptionsSnapshot<>.

Logging using DiagnosticSource in ASP.NET Core

$
0
0
Logging using DiagnosticSource in ASP.NET Core

Logging in the ASP.NET Core framework is implemented as an extensible set of providers that allows you to easily plug in new providers without having to change your logging code itself. The docs give a great summary of how to use the ILogger and ILoggerFactory in your application and how to pipe the output to the console, to Serilog, to Azure etc. However, the ILogger isn't the only logging possibility in ASP.NET Core.

In this post, I'll show how to use the DiagnosticSource logging system in your ASP.NET Core application.

ASP.NET Core logging systems

There are actually three logging system in ASP.NET Core:

  1. EventSource - Fast and strongly typed. Designed to interface with OS logging systems.
  2. ILogger - An extensible logging system designed to allow you to plug in additional consumers of logging events.
  3. DiagnosticSource - Similar in design to EventSource, but does not require the logged data be serialisable.

EventSource has been available since the .NET Framework 4.5 and is used extensively by the framework to instrument itself. The data that gets logged is strongly typed, but must be serialisable as the data is sent out of the process to be logged. Ultimately, EventSource is designed to interface with the underlying operating system's logging infrastructure, e.g. Event Tracing for Windows (ETW) or LTTng on Linux.

The ILogger infrastructure is the most commonly used logging ASP.NET Core infrastructure. You can log to the infrastructure by injecting an instance of ILogger into your classes, and calling, for example, ILogger.LogInformation(). The infrastructure is designed for logging strings only, but does allow you to pass objects as additional parameters which can be used for structured logging (such as that provided by SeriLog). Generally speaking, the ILogger implementation will be the infrastructure you want to use in your applications, so check out the documentation if you are not familiar with it.

The DiagnosticSource infrastructure is very similar to the EventSource infrastructure, but the data being logged does not leave the process, so it does not need to be serialisable. There is also an adapter to allow converting DiagnosticSource events to ETW events which can be useful in some cases. It is worth reading the users guide for DiagnosticSource on GitHub if you wish to use it in your code.

When to use DiagnosticSource vs ILogger?

The ASP.NET Core internals use both the ILogger and the DiagnosticSource infrastructure to instrument itself. Generally speaking, and unsurprisingly, DiagnosticSource is used strictly for diagnostics. It records events such as "Microsoft.AspNetCore.Mvc.BeforeViewComponent" and "Microsoft.AspNetCore.Mvc.ViewNotFound".

In contrast, the ILogger is used to log more specific information such as "Executing JsonResult, writing value {Value}." or when an error occurs such as ""JSON input formatter threw an exception.".

So in essence, you should only use DiagnosticSource for infrastructure related events, for tracing the flow of your application process. Generally, ILogger will be the appropriate interface in almost all cases.

An example project using DiagnosticSource

For the rest of this post I'll show an example of how to log events to DiagnosticSource, and how to write a listener to consume them. This example will simply log to the DiagnosticSource when some custom middleware executes, and the listener will write details about the current request to the console. You can find the example project here.

Adding the necessary dependencies.

We'll start by adding the NuGet packages we're going to need for our DiagnosticSource to our project.json (I haven't moved to csproj based projects yet):

{
  dependencies: {
    ...
    "Microsoft.Extensions.DiagnosticAdapter": "1.1.0",
    "System.Diagnostics.DiagnosticSource": "4.3.0"
  }
}

Strictly speaking, the System.Diagnostics.DiagnosticSource package is the only one required, but we will add the adapter to give us an easier way to write a listener later.

Logging to the DiagnosticSource from middleware

Next, we'll create the custom middleware. This middleware doesn't do anything other than log to the diagnostic source:

public class DemoMiddleware  
{
    private readonly RequestDelegate _next;
    private readonly DiagnosticSource _diagnostics;

    public DemoMiddleware(RequestDelegate next, DiagnosticSource diagnosticSource)
    {
        _next = next;
        _diagnostics = diagnosticSource;
    }

    public async Task Invoke(HttpContext context)
    {
        if (_diagnostics.IsEnabled("DiagnosticListenerExample.MiddlewareStarting"))
        {
            _diagnostics.Write("DiagnosticListenerExample.MiddlewareStarting",
                new
                {
                    httpContext = context
                });
        }

        await _next.Invoke(context);
    }
}

This shows the standard way to log using a DiagnosticSource. You inject the DiagnosticSource into the constructor of the middleware for use when the middleware executes.

When you intend to log an event, you first check that there is a listener for the specific event. This approach keeps the logger lightweight, as the code contained within the body of the if statement is only executed if a listener is attached.

In order to create the log, you use the Write method, providing the event name and the data that should be logged. The data to be logged is generally passed as an anonymous object. In this case, the HttpContext is passed to the attached listeners, which they can use to log the data in any ways they sees fit.

Creating a diagnostic listener

There are a number of ways to create a listener that consumes DiagnosticSource events, but one of the easiest approaches is to use the functionality provided by the Microsoft.Extensions.DiagnosticAdapter package.

To create a listener, you can create a POCO class that contains a method designed to accept parameters of the appropriate type. You then decorate the method with a [DiagnosticName] attribute, providing the event name to listen for:

public class DemoDiagnosticListener  
{
    [DiagnosticName("DiagnosticListenerExample.MiddlewareStarting")]
    public virtual void OnMiddlewareStarting(HttpContext httpContext)
    {
        Console.WriteLine($"Demo Middleware Starting, path: {httpContext.Request.Path}");
    }
}

In this example, the OnMiddlewareStarting() method is configured to handle the "DiagnosticListenerExample.MiddlewareStarting" diagnostic event. The HttpContext, that is provided when the event is logged is passed to the method as it has the same name, httpContext that was provided when the event was logged.

Hopefully one of the advantages of the DiagnosticSource infrastructure is apparent in that you can log anything provided as data. We have access to the full HttpContext object that was passed, so we can choose to log anything it contains (just the request path in this case).

Wiring up the DiagnosticListener

All that remains is to hook up our listener and middleware pipeline in our Startup.Configure method:

public class Startup  
{
    public void Configure(IApplicationBuilder app, DiagnosticListener diagnosticListener)
    {
        // Listen for middleware events and log them to the console.
        var listener = new DemoDiagnosticListener();
        diagnosticListener.SubscribeWithAdapter(listener);

        app.UseMiddleware<DemoMiddleware>();
        app.Run(async (context) =>
        {
            await context.Response.WriteAsync("Hello World!");
        });
    }
}

A DiagnosticListener is injected into the Configure method from the DI container. This is the actual class that is used to subscribe to diagnostic events. We use the SubscribeWithAdapter extension method from the Microsoft.Extensions.DiagnosticAdapter package to register our DemoDiagnosticListener. This hooks into the [DiagnosticName] attribute to register our events, so that the listener is invoked when the event is written.

Finally, we configure the middleware pipeline with out demo middleware, and a simple 'Hello world' endpoint to the pipeline.

Running the example

At this point we're all set to run the example. If we hit any page, we just get the 'Hello world' output, no matter the path.

Logging using DiagnosticSource in ASP.NET Core

However, if we check the console, we can see the DemoMiddleware has been raising diagnostic events. These have been captured by the DemoDiagnosticListener which logs the path to the console:

Now listening on: http://localhost:5000  
Application started. Press Ctrl+C to shut down.  
Demo Middleware Starting, path: /  
Demo Middleware Starting, path: /a/path  
Demo Middleware Starting, path: /another/path  
Demo Middleware Starting, path: /one/more  

Summary

And that's it, we have successfully written and consumed a DiagnosticSource. As I stated earlier, you are more likely to use the ILogger in your applications than DiagnosticSource, but hopefully now you will able to use it should you need to. Do let me know in the comments if there's anything I've missed or got wrong!


Exploring IStartupFilter in ASP.NET Core

$
0
0
Exploring IStartupFilter in ASP.NET Core

Note The MEAP preview of my book, ASP.NET Core in Action is now available from Manning! Use the discount code mllock to get 50% off, valid through February 13.

I was spelunking through the ASP.NET Core source code the other day, when I came across something I hadn't seen before - the IStartupFilter interface. This lives in the Hosting repository in ASP.NET Core and is generally used by a number of framework services rather than by ASP.NET Core applications themselves.

In this post, I'll take a look at what the IStartupFilter is and how it is used in the ASP.NET Core infrastructure. In the next post I'll take a look at an external middleware implementation that makes use of it.

The IStartupFilter interface

The IStartupFilter interface lives in the Microsoft.AspNetCore.Hosting.Abstractions package in the Hosting repository on GitHub. It is very simple, and implements just a single method:

namespace Microsoft.AspNetCore.Hosting  
{
    public interface IStartupFilter
    {
        Action<IApplicationBuilder> Configure(Action<IApplicationBuilder> next);
    }
}

The single Configure method that IStartupFilter implements takes and returns a single parameter, an Action<IApplicationBuilder>. That's a pretty generic signature for a class, and doesn't reveal a lot of intent but we'll just go with it for now.

The IApplicationBuilder is what you use to configure a middleware pipeline when building an ASP.NET Core application. For example, a simple Startup.Configure method in an MVC app might look something like the following:

public void Configure(IApplicationBuilder app)  
{
    app.UseStaticFiles();

    app.UseMvc(routes =>
    {
        routes.MapRoute(
            name: "default",
            template: "{controller=Home}/{action=Index}/{id?}");
    });
}

In this method, you are directly provided an instance of the IApplicationBuilder, and can add middleware to it. With the IStartupFilter, you are specifying and returning an Action<IApplicationBuilder>, that is, you are provided a method for configuring an IApplicationBuilder and you must return one too.

Consider this again for a second - the IStartupFilter.Configure method accepts a method for configuring an IApplicationBuilder. In other words, the IStartupFilter.Configure accepts a method such as Startup.Configure:

Startup _startup = new Startup();  
Action<IApplicationBuilder> startupConfigure = _startup.Configure;

IStartupFilter filter1 = new StartupFilter1(); //I'll show an example filter later on  
Action<IApplicationBuilder> filter1Configure = filter1.Configure(startupConfigure)

IStartupFilter filter2 = new StartupFilter2(); //I'll show an example filter later on  
Action<IApplicationBuilder> filter2Configure = filter2.Configure(filter1Configure)  

This may or may not start seeming somewhat familiar… We are building up another pipeline; but instead of a middleware pipeline, we are building a pipeline of Configure methods. This is the purpose of the IStartupFilter, to allow creating a pipeline of Configure methods in your application.

When are IStartupFilters called?

Now we better understand the signature of IStartupFilter, we can take a look at its usage in the ASP.NET Core framework.

To see IStartupFilter in action, you can take a look at the WebHost class in the Microsoft.AspNetCore.Hosting package, in the method BuildApplication. This method is called as part of the general initialisation that takes place when you call Build on a WebHostBuilder. This typically takes place in your program.cs file, e.g.:

public class Program  
{
    public static void Main(string[] args)
    {
        var host = new WebHostBuilder()
            .UseKestrel()    
            .UseContentRoot(Directory.GetCurrentDirectory())
            .UseStartup<Startup>()
            .Build();  // this will result in a call to BuildApplication()

        host.Run(); 
    }
}

Taking a look at BuildApplication in elided form (below), you can see that this method is responsible for instantiating the middleware pipeline. The RequestDelegate it returns represents a complete pipeline, and can be called by the server (Kestrel) when a request arrives.

private RequestDelegate BuildApplication()  
{
    //some additional setup not shown
    IApplicationBuilder builder = builderFactory.CreateBuilder(Server.Features);
    builder.ApplicationServices = _applicationServices;

    var startupFilters = _applicationServices.GetService<IEnumerable<IStartupFilter>>();
    Action<IApplicationBuilder> configure = _startup.Configure;
    foreach (var filter in startupFilters.Reverse())
    {
        configure = filter.Configure(configure);
    }

    configure(builder);

    return builder.Build();

First, this method creates an instance of an IApplicationBuilder, which will be used to build the middleware pipeline, and sets the ApplicationServices to a configured DI container.

The next block is the interesting part. First, an IEnumerable<IStartupFilter> is fetched from the DI container. As I've already hinted, we can configure multiple IStartupFilters to form a pipeline, so this method just fetches them all from the container. Also, the Startup.Configure method is captured into a local variable, configure. This is the Configure method that you typically write in your Startup class to configure your middleware pipeline.

Now we create the pipeline of Configure methods by looping through each IStartupFilter (in reverse order), passing in the Startup.Configure method, and then updating the local variable. This has the effect of creating a nested pipeline of Configure methods. For example, if we have three instances of IStartupFilter, you will end up with something a little like this, where the the inner configure methods are passed in the parameter to the outer methods:

Exploring IStartupFilter in ASP.NET Core

The final value of configure is then used to perform the actual middleware pipeline configuration by invoking it with the prepared IApplicationBuilder. Calling builder.Build() generates the RequestDelegate required for handling HTTP requests.

What does an implementation look like?

We've described in general what IStartupFilter is for, but it's always easier to have a concrete implementation to look at. By default, the WebHostBuilder registers a single IStartupFilter when it initialises - the AutoRequestServicesStartupFilter:

public class AutoRequestServicesStartupFilter : IStartupFilter  
{
    public Action<IApplicationBuilder> Configure(Action<IApplicationBuilder> next)
    {
        return builder =>
        {
            builder.UseMiddleware<RequestServicesContainerMiddleware>();
            next(builder);
        };
    }
}

Hopefully, the behaviour of this class is fairly obvious. Essentially it adds an additional piece of middleware, the RequestServicesContainerMiddleware, at the start of your middleware pipeline.

This is the only IStartupFilter registered by default, and so in that case the parameter next will be the Configure method of your Startup class.

And that is essentially all there is to IStartupFilter - it is a way to add additional middleware (or other configuration) at the beginning or end of the configured pipeline.

How are they registered?

Registering an IStartupFilter is simple, just register it in your ConfigureServices call as usual. The AutoRequestServicesStartupFilter is registered by default in the WebHostBuilder as part of its initialisation:

private IServiceCollection BuildHostingServices()  
{
    ...
    services.AddTransient<IStartupFilter, AutoRequestServicesStartupFilter>();
    ...
}

The RequestServicesContainerMiddleware

On a slightly tangential point, but just for interest, the RequestServicesContainerMiddleware (that is registered by the AutoRequestServicesStartupFilter) is shown in reduced format below:

public class RequestServicesContainerMiddleware  
{
    private readonly RequestDelegate _next;
    private IServiceScopeFactory _scopeFactory;

    public RequestServicesContainerMiddleware(RequestDelegate next, IServiceScopeFactory scopeFactory)
    {
        _scopeFactory = scopeFactory;
        _next = next;
    }

    public async Task Invoke(HttpContext httpContext)
    {
        var existingFeature = httpContext.Features.Get<IServiceProvidersFeature>();

        // All done if request services is set
        if (existingFeature?.RequestServices != null)
        {
            await _next.Invoke(httpContext);
            return;
        }

        using (var feature = new RequestServicesFeature(_scopeFactory))
        {
            try
            {
                httpContext.Features.Set<IServiceProvidersFeature>(feature);
                await _next.Invoke(httpContext);
            }
            finally
            {
                httpContext.Features.Set(existingFeature);
            }
        }
    }
}

This middleware is responsible for setting the IServiceProvidersFeature. When created, the RequestServicesFeature creates a new IServiceScope and IServiceProvider for the request. This handles the creation and disposing of dependencies added to the dependency injection controller with a Scoped lifecycle.
Hopefully it's clear why it's important that this middleware is added at the beginning of the pipeline - subsequent middleware may need access to the scoped services it manages.

By using an IStartupFilter, the framework can be sure the middleware is added at the start of the pipeline, doing it an extensible, self contained way.

When should you use it?

Generally speaking, I would not imagine that there will much need for IStartupFilter to be used in user's applications. By their nature, users can define the middleware pipeline as they like in the Configure method, so IStartupFilter is rather unnecessary.

I can see a couple of situations in which IStartupFilter would be useful to implement:

  1. You are a library author, and you need to ensure your middleware runs at the beginning (or end) of the middleware pipeline.
  2. You are using a library which makes use of the IStartupFilter and you need to make sure your middleware runs before its does.

Considering the first point, you may have some middleware that absolutely needs to run at a particular point in the middleware pipeline. This is effectively the use case for the RequestServicesContainerMiddleware shown previously.

Currently, the order in which services T are registered with the DI container controls the order they will be returned when you fetch an IEnumerable<T> using GetServices(). As the AutoRequestServicesStartupFilter is added first, it will be returned first when fetched as part of an IEnumerable<IStartupFilter>. Thanks to the call to Reverse() in the WebHost.BuildApplication() method, its Configure method will be the last one called, and hence the outermost method.

If you register additional IStartupFilters in your ConfigureServices method, they will be run prior to the AutoRequestServicesStartupFilter, in the reverse order that you register them. The earlier they are registered with the container, the closer to the beginning of the pipeline any middleware they define will be.

This means you can control the order of middleware added by IStartupFilters in your application. If you use a library that registers an IStartupFilter in its 'Add' method, you can choose whether your own IStartupFilter should run before or after it by whether it is registered before or after in your ConfigureServices method.

The whole concept of IStartupFilters is a little confusing and somewhat esoteric, but it's nice to know it's there as an option should it be required!

Summary

In this post I discussed the IStartupFilter and its use by the WebHost when building a middleware pipeline. In the next post I'll explore a specific usage of the IStartupFilter.

Creating GitHub pull requests from the command-line with Hub

$
0
0
Creating GitHub pull requests from the command-line with Hub

If you use GitHub much, you'll likely find yourself having to repeatedly use the web interface to raise pull requests. The web interface is great and all, but it can really take you out of your flow if you're used to creating branches, rebasing, pushing, and pulling from the command line!

Creating GitHub pull requests from the command-line with Hub

Luckily GitHub has a REST API that you can use to create pull requests instead, and a nice command line wrapper to invoke it called Hub! Hub wraps the git command line tool - effectively adding extra commands you can invoke from the command line. Once it's installed (and aliased) you'll be able to call:

> git pull-request

and a new pull request will be created in your repository:

Creating GitHub pull requests from the command-line with Hub

If you're someone who likes using the command line, this can really help streamline your workflow.

Installing Hub

Hub is available on GitHub so you can download binaries, or install it from source. As I use chocolatey on my dev machine, I chose to install Hub using chocolatey by running the following from an administrative powershell:

> choco install hub

Creating GitHub pull requests from the command-line with Hub

Chocolatey will download and install hub into its standard installation folder (C:\ProgramData\chocolatey by default). As this folder should be in your PATH, you can type hub version from the command line and you should get back something similar to:

> hub version
git version 2.15.1.windows.2  
hub version 2.2.9  

That's it, you're good to go. The first time you use Hub to create a pull request (PR), it will prompt you for your GitHub username and password.

Creating a pull request with Hub

Hub is effectively an extension of the git command line, so it can do everything git does, and just adds some helper GitHub methods on top. Anything you can do with git, you can do with hub.

You can view all the commands available by simply typing hub into the command line. As hub is a wrapper for git it starts by displaying the git help message:

> hub
usage: git [--version] [--help] [-C <path>] [-c name=value]  
           [--exec-path[=<path>]] [--html-path] [--man-path] [--info-path]
           [-p | --paginate | --no-pager] [--no-replace-objects] [--bare]
           [--git-dir=<path>] [--work-tree=<path>] [--namespace=<name>]
           <command> [<args>]

These are common Git commands used in various situations:

start a working area (see also: git help tutorial)  
   clone      Clone a repository into a new directory
   init       Create an empty Git repository or reinitialize an existing one
...

At the bottom, hub lists the GitHub specific commands available to you:

These GitHub commands are provided by hub:

   pull-request   Open a pull request on GitHub
   fork           Make a fork of a remote repository on GitHub and add as remote
   create         Create this repository on GitHub and add GitHub as origin
   browse         Open a GitHub page in the default browser
   compare        Open a compare page on GitHub
   release        List or create releases (beta)
   issue          List or create issues (beta)
   ci-status      Show the CI status of a commit

As you can see, there's a whole bunch of useful commands there. The one I'm interested in is pull-request.

Lets imagine we have already checked out a repository we own, and we have created a branch to work on a feature, feature-37:

Creating GitHub pull requests from the command-line with Hub

Before we can create a PR, we need to push our branch to the server:

> git push origin -u feature-37

To create the PR, we use hub. This will open up your configured text editor to enter a message for the PR (I use Notepad++) . In the comments you can see the commit messages for the branch, or if your PR only has a single commit (as in this example), hub will handily fill the message in for you, just as it does in the web interface:

Creating GitHub pull requests from the command-line with Hub

As you can see from the comments in the screenshot, the first line of your message forms the PR title, and the remainder forms the description of the PR. After saving your message, hub spits out the URL for your PR on GitHub. Follow that link, and you can see your shiny new PR ready and waiting approval:

Creating GitHub pull requests from the command-line with Hub

Hub can do lots more than just create pull requests, but for me that's the killer feature I use everyday. If you use more features, then you may want to consider aliasing your hub command to git as it suggests in the docs.

Aliasing hub as git

As I mentioned earlier, hub is a wrapper around git that provides some handy extra tweaks. It even enhances some of the standard git commands: it can expand partial URLs in a git clone to be github.com addresses for example:

> hub clone andrewlock/test

# expands to
git clone git://github.com/andrewlock/test.git  

If you find yourself using the hub command a lot, then you might want to consider aliasing your git command to actually use Hub instead. That means you can just do

> git clone andrewlock/test

for example, without having to think about which commands are hub specific, and which are available in git. Adding an alias is safe to do, you're not modifying the underlying git program or anything, so don't worry about that.

If you're using PowerShell, you can add the alias to your profile by running:

> Add-Content $PROFILE "`nSet-Alias git hub"

and then restarting your session. For troubleshooting and other scripts see https://github.com/github/hub#aliasing.

Streamlining PR creation with a git alias

I love how much time hub has saved me by keeping my hands on the keyboard, but there's one thing that was annoying me: having to run git push before opening the PR. I'm a big fan of Git aliases, so I decided to create an alias called pr that does two things: push, and create a pull request.

If you're new to git aliases, I highly recommend checking out this post from Phil Haack. He explains what aliases are, why you want them, and gives a bunch of really useful aliases to get started.

You can create aliases directly from the command line with git, but for all but the simplest ones I like to edit the .gitconfig file directly. To open your global .gitconfig for editing, use

> git config --global --edit

This will popup your editor of choice, and allow you to edit to your heart's content. Locate the [alias] section of your config file (or if it doesn't exist, add it), and enter the following:

[alias]
    pr="!f() { \
        BRANCH_NAME=$(git rev-parse --abbrev-ref HEAD); \
        git push -u origin $BRANCH_NAME; \
        hub pull-request; \
    };f "

This alias uses the slightly more complex script format that creates a function and executes it immediately. In that function, we do three things:

  • BRANCH_NAME=$(git rev-parse --abbrev-ref HEAD); - Get the name of the current branch from git and store it in a variable, BRANCH_NAME
  • git push -u origin $BRANCH_NAME; - Push the current branch to the remote origin, and associate it with the remote branch of the same name
  • hub pull-request - Create the pull request using hub

To use the alias, simply check out the branch you wish to create a PR for and run:

> git pr

This will push the branch if necessary and create the pull request for you, all in one (prompting you for the PR title in your editor as usual).

> git pr
Counting objects: 11, done.  
Delta compression using up to 8 threads.  
Compressing objects: 100% (11/11), done.  
Writing objects: 100% (11/11), 1012 bytes | 1012.00 KiB/s, done.  
Total 11 (delta 9), reused 0 (delta 0)  
remote: Resolving deltas: 100% (9/9), completed with 7 local objects.  
To https://github.com/andrewlock/NetEscapades.AspNetCore.SecurityHeaders.git  
 * [new branch]      feature-37 -> feature-37
Branch 'feature-37' set up to track remote branch 'feature-37' from 'origin'.  
https://github.com/andrewlock/NetEscapades.AspNetCore.SecurityHeaders/pull/40  

Note, there is code in the Hub GitHub repository indicating that hub pr is going to be a feature that allows you to check-out a given PR. If that's the case this alias may break, so I'll keep an eye out!

Summary

Hub is a great little wrapper from GitHub that just simplifies some of the things I do many times a day. If you find it works for you, check it out on GitHub - it's written in Go and I've no doubt they'd love to have more contributors.

Including linked files from outside the project directory in ASP.NET Core

$
0
0
Including linked files from outside the project directory in ASP.NET Core

This post is just a quick tip that I found myself using recently- including files in a project that are outside the project directory. I suspect this feature may have slipped under the radar for many people due to the slightly obscure UI hints you need to pick up on in Visual Studio.

Adding files from outside the project by copying

Sometimes, you might want to include an existing item in your ASP.NET Core apps that lives outside the project directory. You can easily do this from Visual Studio by right clicking the project you want to include it in, and selecting Add > Existing Item…

Including linked files from outside the project directory in ASP.NET Core

You're then presented with a file picker dialog, so you can navigate to the file, and choose Add. Visual Studio will spot that the file is outside the project directory and will copy it in.

Sometimes this is the behaviour you want, but often you want the original file to remain where it is and for the project to just point to it, not to create a copy.

Adding files from outside the project by linking

To add a file as a link, right click and choose Add > Existing Item… as before, but this time, don't click the Add button. Instead, click the little dropdown arrow next to the Add button and select Add as Link.

Including linked files from outside the project directory in ASP.NET Core

Instead of copying the file into the project directory, Visual Studio will create a link to the original. That way, if you modify the original file you'll immediately see the changes in your project.

Visual Studio shows linked items with a slightly different icon, as you can see below where SharedSettings.json is a linked file and appsettings.json is a normally added file:

Including linked files from outside the project directory in ASP.NET Core

Directly editing the csproj file

As you'd expect for ASP.NET Core projects, you don't need Visual Studio to get this behaviour. You can always directly edit the .csproj file yourself and add the necessary items by hand.

The exact code required depends on the type of file you're trying to link and the type of MSBuild action required. For example, if you want to include a .cs file, you would use the <compile> element, nested in an <ItemGroup>:

<ItemGroup>  
  <Compile Include="..\OtherFolder\MySharedClass.cs" Link="MySharedClass.cs" />
</ItemGroup>  

Include gives the relative path to the file from the project folder, and the Link property tells MSBuild to add the file as a link, plus the name that should be used for it. If you change this file name, it will also change the filename as it's displayed in Visual Studio's Solution Explorer.

For content files like JSON configuration files, you would use the <content> element, for example:

<ItemGroup>  
  <Content Include="..\Shared\SharedSettings.json" Link="SharedSettings.json" CopyToOutputDirectory="PreserveNewest" />
</ItemGroup>  

In this example, I also set the CopyToOutputDirectory to PreserveNewest, so that the file will be copied to the output directory when the project is built or published.

Summary

Using linked files can be handy when you want to share code or resources between multiple projects. Just be sure that the files are checked in to source control along with your project, otherwise you might get build errors when loading your projects!

ASP.NET Core in Action - MVC in ASP.NET Core

$
0
0
ASP.NET Core in Action - MVC in ASP.NET Core

In February 2017, the Manning Early Access Program (MEAP) started for the ASP.NET Core book I am currently writing - ASP.NET Core in Action. This post is a sample of what you can find in the book. If you like what you see, please take a look - for now you can even get a 37% discount with the code lockaspdotnet!

The Manning Early Access Program provides you full access to books as they are written, You get the chapters as they are produced, plus the finished eBook as soon as it’s ready, and the paper book long before it's in bookstores. You can also interact with the author (me!) on the forums to provide feedback as the book is being written.

The book is now finished and completely available in the MEAP, so now is the time to act if you're interested! Thanks 🙂

MVC in ASP.NET Core

As you may be aware, ASP.NET Core implements MVC using a single piece of middleware, which is normally placed at the end of the middleware pipeline, as shown in figure 1. Once a request has been processed by each middleware (and assuming none of them handle the request and short-circuit the pipeline), it is received by the MVC middleware.

ASP.NET Core in Action - MVC in ASP.NET Core

Figure 1. The middleware pipeline. The MVC Middleware is typically configured as the last middleware in the pipeline.

Middleware often handles cross-cutting concerns or narrowly defined requests such as requests for files. For requirements that fall outside of these functions, or which have many external dependencies, a more robust framework is required. The MvcMiddleware in ASP.NET Core can provide this framework, allowing interaction with your application’s core business logic, and generation of a user interface. It handles everything from mapping the request to an appropriate controller, to generating the HTML or API response.

In the traditional description of the MVC design pattern, there is only a single type of model, which holds all the non-UI data and behavior. The controller updates this model as appropriate and then passes it to the view, which uses it to generate a UI. This simple, three-component pattern may be sufficient for some basic applications, but for more complex applications, it often doesn’t scale.

One of the problems when discussing MVC is the vague and overloaded terms that it uses, such as “controller” and “model.” Model, in particular, is such an overloaded term that it’s often difficult to be sure exactly what it refers to – is it an object, a collection of objects, an abstract concept? Even ASP.NET Core uses the word “model” to describe several related, but different, components, as you’ll see shortly.

Directing a request to a controller and building a binding model

The first step when the MvcMiddleware receives a request is the routing of the request to an appropriate controller. Let’s think about another page in our ToDo application. On this page, you’re displaying a list of items marked with a given category, assigned to a particular user. If you’re looking at the list of items assigned to the user “Andrew” with a category of “Simple,” you’d make a request to the URL /todo/list/Simple/Andrew.

Routing takes the path of the request, /todo/list/Simple/Andrew, and maps it against a preregistered list of patterns. These patterns match a path to a single controller class and action method.

DEFINITION An action (or action method) is a method that runs in response to a request. A controller is a class that contains a number of logically grouped action methods.

Once an action method is selected, the binding model (if applicable) is generated, based on the incoming request and the method parameters required by the action method, as shown in figure 2. A binding model is normally a standard class, with properties that map to the request data.

DEFINITION A binding model is an object that acts a “container” for the data provided in a request which is required by an action method.

ASP.NET Core in Action - MVC in ASP.NET Core

Figure 2. Routing a request to a controller, and building a binding model. A request to the URL /todo/list/Simple/Andrew results in the ListCategory action being executed, passing in a populated binding model

In this case, the binding model contains two properties: Category, which is “bound” to the value "Simple"; and the property User which is bound to the value "Andrew". These values are provided in the request URL’s path and are used to populate a binding model of type TodoModel.

This binding model corresponds to the method parameter of the ListCategory action method. This binding model is passed to the action method when it executes, and it can be used to decide how to respond. For this example, the action method uses it to decide which ToDo items to display on the page.

Executing an action using the application model

The role of an action method in the controller is to coordinate the generation of a response to the request it’s handling. That means it should only perform a limited number of actions. In particular, it should:

  • Validate that the data contained in the binding model provided is valid for the request
  • Invoke the appropriate actions on the application model
  • Select an appropriate response to generate, based on the response from the application model

ASP.NET Core in Action - MVC in ASP.NET Core

Figure 3. When executed, an action invokes the appropriate methods in the application model.

Figure 3 shows the action model invoking an appropriate method on the application model. Here you can see that the “application model” is a somewhat abstract concept, which encapsulates the remaining non-UI part of your application. It contains the domain model, a number of services, database interaction, and a few other things.

DEFINITION The domain model encapsulates complex business logic in a series of classes that don’t depend on any infrastructure and can be easily tested

The action method typically calls into a single point in the application model. In our example of viewing a product page, the application model might use a variety of different services to check whether the user is allowed to view the product, to calculate the display price for the product, to load the details from the database, or to load a picture of the product from a file.

Assuming the request is valid, the application model returns the required details back to the action method. It’s then up to the action method to choose a response to generate.

Generating a response using a view model

Once the action method is called out to the application model that contains the application business logic, it’s time to generate a response. A view model captures the details necessary for the view to generate a response.

DEFINITION A view model is a simple object that contains data required by the view to render a UI. It’s typically some transformation of the data contained in the application model, plus extra information required to render the page, for example the page’s title.

The action method selects an appropriate view template and passes the view model to it. Each view is designed to work with a particular view model, which it uses to generate the final HTML response. Finally, this is sent back through the middleware pipeline and out to the user’s browser, as shown in figure 4.

ASP.NET Core in Action - MVC in ASP.NET Core

Figure 4 The action method builds a view model, selects which view to use to generate the response, and passes it the view model. It is the view which generates the response itself.

It is important to note that although the action method selects which view to display, it doesn’t select what’s generated. It is the view itself that decides the content of the response.

Putting it all together: a complete mvc request

Now you’ve seen each of the steps that go into handling a request in ASP.NET Core using MVC, let’s put it all together from request to response. Figure 5 shows how each of the steps combine to handle the request to display the list of ToDos for user “Andrew” and category “Simple.” The traditional MVC pattern is still visible in ASP.NET Core, made up of the action/controller, the view, and the application model.

ASP.NET Core in Action - MVC in ASP.NET Core

Figure 5 A complete MVC request for the list of ToDos in the “Simple” category for user “Andrew”

By now, you might be thinking this whole process seems rather convoluted – numerous steps to display some HTML! Why not allow the application model to create the view directly, rather than having to go on a dance back and forth with the controller/action method?

The key benefit throughout this process is the separation of concerns.

  • The view is responsible for taking some data and generating HTML.
  • The application model is responsible for executing the required business logic.
  • The controller is responsible for validating the incoming request and selecting the appropriate view to display, based on the output of the application model.

By having clearly-defined boundaries it’s easier to update and test each of the components without depending on any of the others. If your UI logic changes, you won’t necessarily need to modify any of your business logic classes, and you’re less likely to introduce errors in unexpected places.

That’s all for this article. For more information, read the free first chapter of ASP.NET Core in Action and see this Slideshare presentation.

Sharing appsettings.json configuration files between projects in ASP.NET Core

$
0
0
Sharing appsettings.json configuration files between projects in ASP.NET Core

A pattern that's common for some apps is the need to share settings across multiple projects. For example, imagine you have both an ASP.NET Core RazorPages app and an ASP.NET Core Web API app in the same solution:

Sharing appsettings.json configuration files between projects in ASP.NET Core

Each of the apps will have its own distinct configuration settings, but it's likely that there will also be settings common to both, like a connection string or logging settings for example.

Sensitive configuration settings like connection strings should only be stored outside the version control repository (for example in UserSecrets or Environment Variables) but hopefully you get the idea.

Rather than having to duplicate the same values in each app's appsettings.json, it can be useful to have a common shared .json file that all apps can use, in addition to their specific appsettings.json file.

In this post I show how you can extract common settings to a SharedSettings.json file,how to configure your projects to use them both when running locally with dotnet run, and how to handle the the issues that arise after you publish your app!

The initial setup

If you create a new ASP.NET Core app from a template, it will use the WebHost.CreateDefaultBuilder(args) helper method to setup the web host. This uses a set of "sane" defaults to get you up and running quickly. While I often use this for quick demo apps, I prefer to use the long-hand approach to creating a WebHostBuilder in my production apps, as I think it's clearer to the next person what's going on.

As we're going to be modifying the ConfigureAppConfiguration call to add our shared configuration files, I'll start by modifying the apps to use the long-hand WebHostBuilder configuration. This looks something like the following (some details elided for brevity)

public class Program  
{
    public static void Main(string[] args) => BuildWebHost(args).Run();

    public static IWebHost BuildWebHost(string[] args) =>
        new WebHostBuilder()
            .UseKestrel()
            .UseContentRoot(Directory.GetCurrentDirectory())
            .ConfigureAppConfiguration((hostingContext, config) =>
            {
                // see below
            })
            .ConfigureLogging((ctx, log) => { /* elided for brevity */ })
            .UseDefaultServiceProvider((ctx, opts) => { /* elided for brevity */ })
            .UseStartup<Startup>()
            .Build();
}

We'll start by just using the standard appsettings.json files, and the environment-specific appsettings.json files, just as you would in a default ASP.NET Core app. I've included the environment variables in there as well for good measure, but it's the JSON files we're interested in for this post.

.ConfigureAppConfiguration((hostingContext, config) =>
{
    var env = hostingContext.HostingEnvironment;

    config.AddJsonFile("appsettings.json", optional: true)
        .AddJsonFile($"appsettings.{env.EnvironmentName}.json", optional: true);

    config.AddEnvironmentVariables();
})

To give us something to test, I'll add some configuration values to the appsettings.json files for both apps. This will consist of a section with one value that should be the same for both apps, and one value that is app specific. So for the Web API app we have:

{
    "MySection": {
        "SharedValue": "This value is shared across both apps",
        "AppSpecificValue": "Value for Api"
    }
}

while for the Razor app we have:

{
    "MySection": {
        "SharedValue": "This value is shared across both apps",
        "AppSpecificValue": "Value for Razor app"
    }
}

Finally, so we can view the actual values received by the app, we'll just dump the configuration section to the screen in the Razor app with the following markup:

@page
@using Microsoft.Extensions.Configuration
@inject IConfiguration _configuration;

@foreach (var kvp in _configuration.GetSection("MySection").AsEnumerable())
{
    <p>@kvp.Key : @kvp.Value</p>
}

which, when run, gives

Sharing appsettings.json configuration files between projects in ASP.NET Core

With our apps primed and ready, we can start extracting the common settings to a shared file.

Extracting common settings to SharedSettings.json

The first question we need to ask is where are we going to actually put the shared file? Logically it doesn't belong to either app directly, so we'll move it outside of the two app folders. I created a folder called Shared at the same level as the project folders:

Sharing appsettings.json configuration files between projects in ASP.NET Core

Inside this folder I created a file called SharedSettings.json, and inside that I added the following JSON:

{
    "MySection": {
        "SharedValue": "This value is shared across both apps",
        "AppSpecificValue": "override me"
    }
}

Note, I added an AppSpecificValue setting here, just to show that the appsettings.json files will override it, but you could omit it completely from SharedSettings.json if there's no valid default value.

I also removed the SharedValue key from each app's appsettings.json file - the apps should use the value from SharedSettings.json instead. The appsettings.json file for the Razor app would be:

{
    "MySection": {
        "AppSpecificValue": "Value for Razor app"
    }
}

If we run the app now, we'll see that the shared value is no longer available, though the AppSpecificValue from appsettings.json is still there:

Sharing appsettings.json configuration files between projects in ASP.NET Core

Loading the SharedSettings.json in ConfigureAppConfiguration

At this point, we've extracted the common setting to SharedSettings.json but we still need to configure our apps to load their configuration from that file as well. That's pretty straight forward, we just need to get the path to the file, and add it in our ConfigureAppConfiguration method, right before we add the appsettings.json files:

.ConfigureAppConfiguration((hostingContext, config) =>
{
    var env = hostingContext.HostingEnvironment;

    // find the shared folder in the parent folder
    var sharedFolder = Path.Combine(env.ContentRootPath, "..", "Shared");

    //load the SharedSettings first, so that appsettings.json overrwrites it
    config
        .AddJsonFile(Path.Combine(sharedFolder, "SharedSettings.json"), optional: true)
        .AddJsonFile("appsettings.json", optional: true)
        .AddJsonFile($"appsettings.{env.EnvironmentName}.json", optional: true);

    config.AddEnvironmentVariables();
})

Now if we run our app again, the setting's back:

Sharing appsettings.json configuration files between projects in ASP.NET Core

Great, it works!

Or does it?

While this works fine in development, we'll have a problem when we publish and deploy the app. The app is going to be looking for the SharedSettings.json file in a parent Shared folder, but that won't exist when we publish - the SharedSettings.json file isn't included in any project files, so as it stands you'd have to manually copy the Shared folder across when you publish. Yuk!

Publishing the SharedSettings.json file with your project.

There's a number of possible solutions to this problem. The one I've settled on isn't necessarily the best or the most elegant, but it works for me and is close to an approach I was using in ASP.NET.

To publish the SharedSettings.json file with each app, I create a link to the file in each app as described in this post, and set the CopyToPublishDirectory property to Always. That way, I can be sure that when the app is published, the SharedSettings.json file will be there in the output directory:

Sharing appsettings.json configuration files between projects in ASP.NET Core

However, that leaves us with a different problem. The SharedSettings.json file will be in a different place depending on if you're running locally with dotnet run (in ../Shared) or the published app with dotnet MyApp.Api.dll (in the working directory).

This is where things get a bit hacky.

For simplicity, rather than trying to work out in which context the app's running (I don't think that's directly possible), I simply try and load the file from both locations - one of them won't exist, but as long as we make the files "optional" that won't be an issue:

.ConfigureAppConfiguration((hostingContext, config) =>
{
    var env = hostingContext.HostingEnvironment;

    var sharedFolder = Path.Combine(env.ContentRootPath, "..", "Shared");

    config
        .AddJsonFile(Path.Combine(sharedFolder, "SharedSettings.json"), optional: true) // When running using dotnet run
        .AddJsonFile("SharedSettings.json", optional: true) // When app is published
        .AddJsonFile("appsettings.json", optional: true)
        .AddJsonFile($"appsettings.{env.EnvironmentName}.json", optional: true);

    config.AddEnvironmentVariables();
})

It's not a particularly elegant solution, but it does the job for me. With the code in place we can now happily share settings across multiple apps, override them with app-specific values, and have the correct behaviour both when developing and after publishing.

Summary

This post showed how you can use a shared configuration file to share settings between multiple apps in a solution. By storing the configuration in a central JSON file accessible by both apps, you can avoid duplicating settings in appsettings.json.

Unfortunately this solution is a bit hacky due to the need to cater to the file being located at two different paths, depending on whether the app has been published or not. If anyone has a better solution, please let me know in the comments!

The sample code for this post can be found on GitHub.

Viewing all 743 articles
Browse latest View live