Quantcast
Channel: Andrew Lock | .NET Escapades
Viewing all 743 articles
Browse latest View live

Exploring the cookie authentication middleware in ASP.NET Core

$
0
0
Exploring the cookie authentication middleware in ASP.NET Core

This is the second in a series of posts looking at authentication and authorisation in ASP.NET Core. In the previous post, I talked about authentication in general and how claims-based authentication works. In this post I'm going to go into greater detail about how an AuthenticationMiddleware is implemented in ASP.NET Core, using the CookieAuthenticationMiddleware as a case study. Note that it focus on 'how the middleware is built' rather than 'how to use it in your application'.

Authentication in ASP.NET Core

Just to recap, authentication is the process of determining who a user is, while authorisation revolves around what they are allowed to do. In this post we are dealing solely with the authentication side of the pipeline.

Hopefully you have an understanding of claims-based authentication in ASP.NET Core at a high level. If not I recommend you check out my previous post. We ended that post by signing in a user with a call to AuthenticationManager.SignInAsync, in which I stated that this would call down to the cookie middleware in our application.

The Cookie Authentication Middleware

In this post we're going to take a look at some of that code in the CookieAuthenticationMiddleware, to see how it works under the hood and to get a better understanding of the authentication pipeline in ASP.NET Core. We're only looking at the authentication side of security at the moment, and just trying to show the basic mechanics of what's happening, rather than look in detail at how cookies are built and how they're encrypted etc. We're just looking at how the middleware and handlers interact with the ASP.NET Core framework.

So first of all, we need to add the CookieAuthentiationMiddleware to our pipeline, as per the documentation. As always, middleware order is important, so you should include it before you need to authenticate a user:

app.UseCookieAuthentication(new CookieAuthenticationOptions()  
{
    AuthenticationScheme = "MyCookieMiddlewareInstance",
    LoginPath = new PathString("/Account/Unauthorized/"),
    AccessDeniedPath = new PathString("/Account/Forbidden/"),
    AutomaticAuthenticate = true,
    AutomaticChallenge = true
});

As you can see, we set a number of properties on the CookieAuthenticationOptions when configuring our middleware, most of which we'll come back to later.

So what does the cookie middleware actually do? Well, looking through the code, surprisingly little actually - it sets up some default options and it derives from the base class AuthenticationMiddleware<T>. This class just requires that you return an AuthenticationHandler<T> from the overloaded method CreateHandler(). It's in this handler where all the magic happens. We'll come back to the middleware itself later and focus on the handler for now.

AuthenticateResult and AuthenticationTicket

Before we get in to the meaty stuff, there are a couple of supporting classes we will use in the authentication handler which we should understand: AuthenticateResult and AuthenticationTicket, outlined below:

public class AuthenticationTicket  
{
    public string AuthenticationScheme { get; }
    public ClaimsPrincipal Principal{ get; }
    public AuthenticationProperties Properties { get; }
}

AuthenticationTicket is a simple class that is returned when authentication has been successful. It contains the authenticated ClaimsPrinciple, the AuthenticationScheme indicating which middleware was used to authenticate the request, and an AuthenticationProperties object containing optional additional state values for the authentication session.

public class AuthenticateResult  
{
    public bool Succeeded
    {
        get
        {
            return Ticket != null;
        }
    }
    public AuthenticationTicket Ticket { get; }
    public Exception Failure { get; }
    public bool Skipped { get; }

    public static AuthenticateResult Success(AuthenticationTicket ticket)
    {
        return new AuthenticateResult() { Ticket = ticket };
    }

    public static AuthenticateResult Skip()
    {
        return new AuthenticateResult() { Skipped = true };
    }

    public static AuthenticateResult Fail(Exception failure)
    {
        return new AuthenticateResult() { Failure = failure };
    }
}

An AuthenticateResult holds the result of an attempted authentication and is created by calling one of the static methods Success, Skip or Fail. If the authentication was successful, then a successful AuthenticationTicket must be provided.

The CookieAuthenticationHandler

The CookieAuthenticationHandler is where all the authentication work is actually done. It derives from the AuthenticationHandler base class, and so in principle only a single method needs implementing - HandleAuthenticateAsync():

protected abstract Task<AuthenticateResult> HandleAuthenticateAsync();  

This method is responsible for actually authenticating a given request, i.e. determining if the given request contains an identity of the expected type, and if so, returns an AuthenticateResult containing the authenticated ClaimsPrinciple. As is to be expected, the CookieAuthenticationHandler implementation depends on a number of other methods but we'll run through each of those shortly:

protected override async Task<AuthenticateResult> HandleAuthenticateAsync()  
{
    var result = await EnsureCookieTicket();
    if (!result.Succeeded)
    {
        return result;
    }

    var context = new CookieValidatePrincipalContext(Context, result.Ticket, Options);
    await Options.Events.ValidatePrincipal(context);

    if (context.Principal == null)
    {
        return AuthenticateResult.Fail("No principal.");
    }

    if (context.ShouldRenew)
    {
        RequestRefresh(result.Ticket);
    }

    return AuthenticateResult.Success(new AuthenticationTicket(context.Principal, context.Properties, Options.AuthenticationScheme));
}

So first of all, the handler calls EnsureCookieTicket() which tries to create an AuthenticateResult from a cookie in the HttpContext. Three things can happen here, depending on the state of the cookie:

  1. If the cookie doesn't exist, i.e. the user has not yet signed in, the method will return AuthenticateResult.Skip(), indicating this status.
  2. If the cookie exists and is valid, it returns a deserialised AuthenticationTicket using AuthenticateResult.Success(ticket).
  3. If the cookie cannot be decrypted (e.g. it is corrupt or has been tampered with), if it has expired, or if session state is used and no corresponding session can be found, it returns AuthenticateResult.Fail().

At this point, if we don't have a valid AuthenticationTicket, then the method just bails out. Otherwise, we are theoretically happy that a request is authenticated. However at this point we have literally just taken the word of an encrypted cookie. It's possible that things may have changed in the back end of your application since the cookie was issued - the user may have been deleted for instance! To handle this, the CookieHandler calls ValidatePrincipal, which should set the ClaimsPrincipal to null if it is no longer valid. If you are using the CookieAuthenticationMiddleware in your own apps and are not using ASP.NET Core Identity, you should take a look at the documentation for handling back-end changes during authentication.

SignIn and SignOut

For the simplest authentication, implementing HandleAuthenticateAsync is all that is required. In reality however, you will need to override other methods of AuthenticationHandler in order to have usable behaviour. The CookieAuthenticationHandler needs more behaviour than just this method - HandleAuthenticateAsync means we can read and deserialise and authentication ticket to a ClaimsPrinciple, but we also need to have the ability to set a cookie when the user signs in, and to remove the cookie when the user signs out.

The HandleSignInAsync(SignInContext signin) method builds up a new AuthenticationTicket, encrypts it, and writes the cookie to the response. It is called internally as part of a call to SignInAsync(), which in turn is called by AuthenticationManager.SignInAsync(). I won't cover this aspect in detail in this post, but it is the AuthenticationManager which you would typically invoke from your AccountController after a user has successfully logged in. As shown in my previous post, you would construct a ClaimsPrincipal with the appropriate claims and pass that in to AuthenticationManager, which eventually would reach the CookieAuthenticationMiddleware and allow you to set the cookie. Finally, if the user is currently on the login page, it redirects the user to the return url.

At the other end of the process, HandleSignOutAsync deletes the authentication cookie from the context, and if the user is on the logout page, redirects the user to the return url.

Unauthorised vs Forbidden

The final two methods of AuthenticationHandler which are overridden in the CookieAuthenticationHandler deal with the case where authentication or authorisation has failed. These two cases are distinct but easy to confuse.

A user is unauthorised if they have not yet signed in. This corresponds to a 401 when thinking about HTTP requests. A user is forbidden if they have already signed in, but the identity they are using does not have permission to view the requested resource, which corresponds to a 403 in HTTP.

The default implementations of HandleUnauthorizedAsync and HandleForbiddenAsync in the base AuthenticationHandler are very simple, and look like this (for the forbidden case):

protected virtual Task<bool> HandleForbiddenAsync(ChallengeContext context)  
{
    Response.StatusCode = 403;
    return Task.FromResult(true);
}

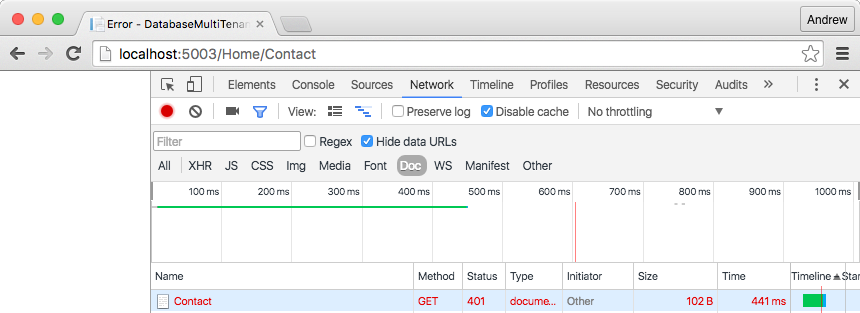
As you can see, they just set the status code of the response and leave it at that. While perfectly valid from an HTTP and security point of view, leaving the methods as that would give a poor experience for users, as they would simply see a blank screen:

Exploring the cookie authentication middleware in ASP.NET Core

Instead, the CookieAuthenticationHandler overrides these methods and redirects the users to a different page. For the unauthorised response, the user is automatically redirected to the LoginPath which we specified when setting up the middleware. The user can then hopefully login and continue where they left off.

Similarly, for the Forbidden response, the user is redirected to the path specified in AccessDeniedPath when we added the middleware to our pipeline. We don't redirect to the login path in this case, as the user is already authenticated, they just don't have the correct claims or permissions to view the requested resource.

Customising the CookieHandler using CookieHandlerOptions

We've already covered a couple of the properties on the CookieAuthenticationOptions we passed when creating the middleware, namely LoginPath and AccessDeniedPath, but it's worth looking at some of the other common properties too.

First up is AuthenticationScheme. In the previous post on authentication we said that when you create an authenticated ClaimsIdentity you must provide an AuthenticationScheme. The AuthenticationScheme provided when configuring the middleware is passed down into the ClaimsIdentity when it is created, as well as into a number of other fields. It becomes particularly important when you have multiple middleware for authentication and authorisation (which I'll go into on a later post).

Next, up is the property AutomaticAuthenticate, but that requires us to back peddle slightly, to think about how the authentication middleware works. I'm going to assume you understand about ASP.NET Core middleware in general, if not it's probably worth reading up on it first!

The AuthenticationHandler Middleware

The CookieAuthenticationMiddleware is typically configured to run relatively early in the pipeline. The abstract base class AuthentictionMiddleware<T> from which it derives has a simple Invoke method, which just creates a new handler of the appropriate type, initialises it, runs the remaining middleware in the pipeline, and then tears down the handler:

 public abstract class AuthenticationMiddleware<TOptions> 
    where TOptions : AuthenticationOptions, new()
{
    private readonly RequestDelegate _next;

    public string AuthenticationScheme { get; set; }
    public TOptions Options { get; set; }
    public ILogger Logger { get; set; }
    public UrlEncoder UrlEncoder { get; set; }

    public async Task Invoke(HttpContext context)
    {
        var handler = CreateHandler();
        await handler.InitializeAsync(Options, context, Logger, UrlEncoder);
        try
        {
            if (!await handler.HandleRequestAsync())
            {
                await _next(context);
            }
        }
        finally
        {
            try
            {
                await handler.TeardownAsync();
            }
            catch (Exception)
            {
                // Don't mask the original exception, if any
            }
        }
    }

    protected abstract AuthenticationHandler<TOptions> CreateHandler();
}

As part of the call to InitializeAsync, the handler verifies whether AutomaticAuthenticate is true. If it is, then the handler will immediately run the method HandleAuthenticateAsync, so all subsequent middleware in the pipeline will see an authenticated ClaimsPrincipal. In contrast, if you do not set AutomaticAuthenticate to true, then authentication will only occur at the point authorisation is required, e.g. when you hit an [Authorize] attribute or similar.

Similarly, during the return path through the middleware pipeline, if AutomaticChallenge is true and the response code is 401, then the handler will call HandleUnauthorizedAsync. In the case of the CookieAuthenticationHandler, as discussed, this will automatically redirect you to the login page specified.

The key points here are that when the Automatic properties are set, the authentication middleware always runs at it's configured place in the pipeline. If not, the handlers are only run in response to direct authentication or challenge requests. If you are having problems where you are returning a 401 from a controller, and you are not getting redirected to the login page, then check the value of AutomaticChallenge and make sure it's true.

In cases, where you only have a single piece of authentication middleware, it makes sense to have both values set to true. Where it gets more complicated is if you have multiple authentication handlers. In that case, as explained in the docs, you must set AutomaticAuthenticate to false. I'll cover the specifics of using multiple authentication handlers in a subsequent post but the docs give a good starting point.

Summary

In this post we used the CookieAuthenticationMiddleware as an example of how to implement an AuthenticationMiddleware. We showed some of the methods which must be handled in order to implement an AuthenticationHandler, the methods called to sign a user in and out, and how unauthorised and forbidden requests are handled.

Finally, we showed some of the common options available when configuring the CookieAuthenticationOptions, and the effects they have.

In later posts I will cover how to configure your application to use multiple authentication handlers, how authorisation works and the various ways to use it, and how ASP.NET Core Identity pulls all of these aspects together to do the hard work for you.

How to set the hosting environment in ASP.NET Core

$
0
0
How to set the hosting environment in ASP.NET Core

When running ASP.NET Core apps, the WebHostBuilder will automatically attempt to determine which environment it is running in. By convention, this will be one of Development, Staging or Production but you can set it to any string value you like.

The IHostingEnvironment allows you to programatically retrieve the current environment so you can have environment-specific behaviour. For example, you could enable bundling and minification of assets when in the Production environment, while serving files unchanged in the Development environment.

In this post I'll show how to change the current hosting environment used by ASP.NET Core using environment variables on Windows and OS X, using Visual Studio and Visual Studio Code, or by using command line arguments.

Changing the hosting environment

ASP.NET Core uses the ASPNETCORE_ENVIRONMENT environment variable to determine the current environment. By default, if you run your application without setting this value, it will automatically default to the Production environment.

When you run your application using dotnet run, the console output lists the current hosting environment in the output:

> dotnet run
Project TestApp (.NETCoreApp,Version=v1.0) was previously compiled. Skipping compilation.

Hosting environment: Production  
Content root path: C:\Projects\TestApp  
Now listening on: http://localhost:5000  
Application started. Press Ctrl+C to shut down.  

There are a number of ways to set this environment variable, the method that is best depends on how you are building and running your applications.

Setting the environment variable in Windows

The most obvious way to change the environment is to update the environment variable on your machine. This is useful if you know, for example, that applications run on that machine will always be in a given environment, whether that is Development, Staging or Production.

On Windows, there are a number of ways to change the environment variables, depending on what you are most comfortable with.

At the command line

You can easily set an environment variable from a command prompt using the setx.exe command included in Windows since Vista. You can use it to easily set a user variable:

>setx ASPNETCORE_ENVIRONMENT "Development"

SUCCESS: Specified value was saved.

Note that the environment variable is not set in the current open window. You will need to open a new command prompt to see the updated environment. It is also possible to set system variables (rather than just user variables) if you open an administrative command prompt and add the /M switch:

>setx ASPNETCORE_ENVIRONMENT "Development" /M

SUCCESS: Specified value was saved.

Using PowerShell

Alternatively, you can use PowerShell to set the variable. In PowerShell, as well as the normal user and system variables, you can also create a temporary variable using the $Env: command:

$Env:ASPNETCORE_ENVIRONMENT = "Development"

The variable created lasts just for the duration of your PowerShell session - once you close the window the environment reverts back to its default value.

Alternatively, you could set the user or system environment variables directly. This method does not change the environment variables in the current session, so you will need to open a new PowerShell window to see your changes. As before, changing the system (Machine) variables will require administrative access

[Environment]::SetEnvironmentVariable("ASPNETCORE_ENVIRONMENT", "Development", "User")
[Environment]::SetEnvironmentVariable("ASPNETCORE_ENVIRONMENT", "Development", "Machine")

Using the windows control panel

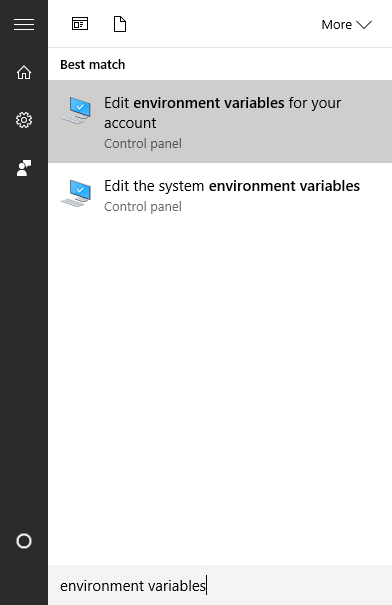
If you're not a fan of the command prompt, you can easily update your variables using your mouse!Click the windows start menu button (or press the Windows key), search for environment variables, and choose Edit environment variables for your account:

How to set the hosting environment in ASP.NET Core

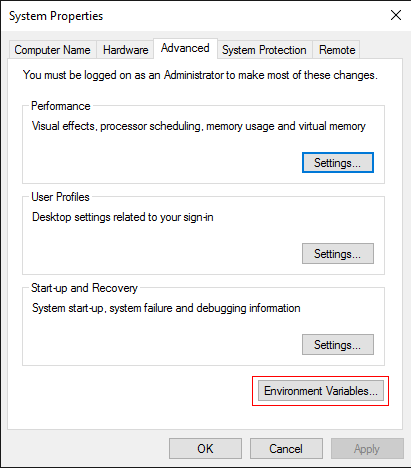
Selecting this option will open the System Properties dialog:

How to set the hosting environment in ASP.NET Core

Click Environment Variables to view the list of current environment variables on your system.

How to set the hosting environment in ASP.NET Core

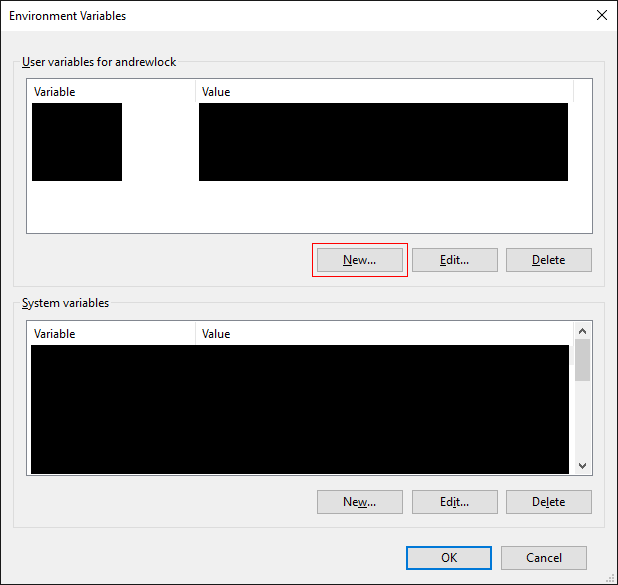
Assuming you do not already have a variable called ASPNETCORE_ENVIRONMENT, click the New... button and add a new account environment variable:

How to set the hosting environment in ASP.NET Core

Click OK to save all your changes. You will need to re-open any command windows to ensure the new environment variables are loaded.

Setting the environment variables on OS X

You can set an environment variable on OS X by editing or creating the .bash_profile file in your favourite editor (I'm using nano):

$ nano ~/.bash_profile

You can then export the ASPNETCORE_ENVIRONMENT variable. The variable will not be set in the current session, but will be updated when you open a new terminal window:

export ASPNETCORE_ENVIRONMENT=development  

Important, the command must be as is written above - there must be no spaces either side of the =. Also note that my bash knowledge is pretty poor, so if this approach doesn't work for you, I encourage you to go googling for one that does:)

Configuring the hosting environment using your IDE

Instead of updating the user or system environment variables, you can also configure the environment from your IDE, so that when you run or debug the application from there, it will use the correct environment.

Visual studio launchSettings.json

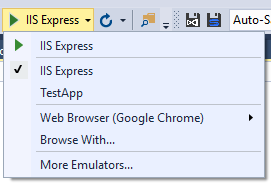
When you create an ASP.NET Core application using the Visual Studio templates, it automatically creates a launchSettings.json file. This file serves as the provider for the Debug targets when debugging with F5 in Visual Studio:

How to set the hosting environment in ASP.NET Core

When running with one of these options, Visual Studio will set the environment variables specified. In the file below, you can see the ASPNETCORE_ENVIRONMENT variable is set to Development.

{
  "iisSettings": {
    "windowsAuthentication": false,
    "anonymousAuthentication": true,
    "iisExpress": {
      "applicationUrl": "http://localhost:53980/",
      "sslPort": 0
    }
  },
  "profiles": {
    "IIS Express": {
      "commandName": "IISExpress",
      "launchBrowser": true,
      "environmentVariables": {
        "ASPNETCORE_ENVIRONMENT": "Development"
      }
    },
    "TestApp": {
      "commandName": "Project",
      "launchBrowser": true,
      "launchUrl": "http://localhost:5000",
      "environmentVariables": {
        "ASPNETCORE_ENVIRONMENT": "Development"
      }
    }
  }
}

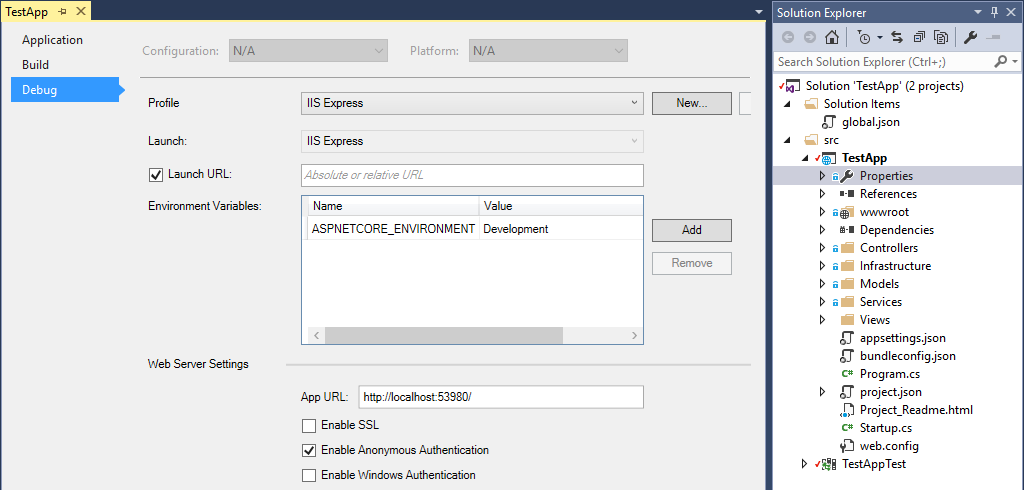
You can also edit this file using the project Properties window. Just double click the Properties node in your solution, and select the Debug tab:

How to set the hosting environment in ASP.NET Core

Visual Studio Code launch.json

If you are using Visual Studio Code, there is a similar file, launch.json which is added when you first debug your application. This file contains a number of configurations one of which should be called ".NET Core Launch (web)". You can set additional environment variables when launching with this command by adding keys to the env property:

{
    "version": "0.2.0",
    "configurations": [
        {
            "name": ".NET Core Launch (web)",
            "type": "coreclr",
            "request": "launch",
            "preLaunchTask": "build",
            "program": "${workspaceRoot}/bin/Debug/netcoreapp1.0/TestApp.dll",
            "args": [],
            "cwd": "${workspaceRoot}",
            "stopAtEntry": false,
            "launchBrowser": {
                "enabled": true,
                "args": "${auto-detect-url}",
                "windows": {
                    "command": "cmd.exe",
                    "args": "/C start ${auto-detect-url}"
                },
                "osx": {
                    "command": "open"
                },
                "linux": {
                    "command": "xdg-open"
                }
            },
            "env": {
                "ASPNETCORE_ENVIRONMENT": "Development"
            },
            "sourceFileMap": {
                "/Views": "${workspaceRoot}/Views"
            }
        }
    ]
}

Setting hosting environment using command args

Depending on how you have configured your WebHostBuilder, you may also be able to specify the environment by providing a command line argument. To do so, you need to use a ConfigurationBuilder which uses the AddCommandLine() extension method from the Microsoft.Extensions.Configuration.CommandLine package. You can then pass your configuration to the WebHostBuilder using UseConfiguration(config):

var config = new ConfigurationBuilder()  
    .AddCommandLine(args)
    .Build();

var host = new WebHostBuilder()  
    .UseConfiguration(config)
    .UseContentRoot(Directory.GetCurrentDirectory())
    .UseKestrel()
    .UseIISIntegration()
    .UseStartup<Startup>()
    .Build();

This allows you to specify the hosting environment at run time using the --environment argument:

> dotnet run --environment "Staging"

Project TestApp (.NETCoreApp,Version=v1.0) was previously compiled. Skipping compilation.

Hosting environment: Staging  
Content root path: C:\Projects\Repos\Stormfront.Support\src\Stormfront.Support  
Now listening on: http://localhost:5000  
Application started. Press Ctrl+C to shut down.  

Summary

In this post I showed a number of ways you can specify which environment you are currently running in. Which method is best will depend on your setup and requirements. However you choose, if you change the environment variable you will need to restart the Kestrel server, as the environment is determined as part of the server start up.

Altering the hosting environment allows you to configure your application differently at run time, enabling debugging tools in a development setting or optimisations in a production environment. For details on using the IHostingEnvironment service, checkout the documentation here.

One final point - environment variables are case insensitive, so you can use "Development", "development" or "DEVELOPMENT" to your heart's content.

A look behind the JWT bearer authentication middleware in ASP.NET Core

$
0
0
A look behind the  JWT bearer authentication middleware in ASP.NET Core

This is the next in a series of posts about Authentication and Authorisation in ASP.NET Core. In the first post we had a general introduction to authentication in ASP.NET Core, and then in the previous post we looked in more depth at the cookie middleware, to try and get to grips with the process under the hood of authenticating a request.

In this post, we take a look at another middleware, the JwtBearerAuthenticationMiddleware, again looking at how it is implemented in ASP.NET Core as a means to understanding authentication in the framework in general.

What is Bearer Authentication?

The first concept to understand is Bearer authentication itself, which uses bearer tokens. According to the specification, a bearer token is:

A security token with the property that any party in possession of the token (a "bearer") can use the token in any way that any other party in possession of it can. Using a bearer token does not require a bearer to prove possession of cryptographic key material (proof-of-possession).

In other words, by presenting a valid token you will be automatically authenticated, without having to match or present any additional signature or details to prove it was granted to you. It is often used in the OAuth 2.0 authorisation framework, such as you might use when signing in to a third-party site using your Google or Facebook accounts for example.

In practice, a bearer token is usually presented to the remote server using the HTTP Authorization header:

Authorization: Bearer BEARER_TOKEN  

where BEARER_TOKEN is the actual token. An important point to bear in mind is that bearer tokens entitle whoever is in it's possession to access the resource it protects. That means you must be sure to only use tokens over SSL/TLS to ensure they cannot be intercepted and stolen.

What is a JWT?

A JSON Web Token (JWT) is a web standard that defines a method for transferring claims as a JSON object in such a way that they can be cryptographically signed or encrypted. It is used extensively in the internet today, in particular in many OAuth 2 implementations.

JWTs consist of 3 parts:

  1. Header: A JSON object which indicates the type of the token (JWT) and the algorithm used to sign it
  2. Payload: A JSON object with the asserted Claims of the entity
  3. Signature: A string created using a secret and the combined header and payload. Used to verify the token has not been tampered with.

These are then base64Url encoded and separated with a .. Using JSON Web Tokens allows you to send claims in a relatively compact way, and to protect them against modification using the signature. One of their main advantages is that they can allow stateless applications by including the storing the required claims in the token, rather than server side in a session store.

I won't go into all the details of JWT tokens, or the OAuth framework here, as that is a huge topic on it's own. In this post I'm more interested in how the middleware and handlers interact with ASP.NET Core authentication framework. If you want to find out more about JSON web tokens, I recommend you check out jwt.io and auth0.com as they have some great information and tutorials.

Just to give a vague idea of what JSON Web Tokens looks like in practice, the payload and header given below:

{
  "alg": "HS256",
  "typ": "JWT"
}
{
  "name": "Andrew Lock"
}

could be encoded in the following header:

Authorisation: bearer eyJhbGciOiJIUzI1NiIsInR5cCI6IkpXVCJ9.eyJuYW1lIjoiQW5kcmV3IExvY2sifQ.RJJq5u9ITuNGeQmWEA4S8nnzORCpKJ2FXUthuCuCo0I  

JWT bearer authentication in ASP.NET Core

You can add JWT bearer authentication to your ASP.NET Core application using the Microsoft.AspNetCore.Authentication.JwtBearer package. This provides middleware to allow validating and extracting JWT bearer tokens from a header. There is currently no built-in mechanism for generating the tokens from your application, but if you need that functionality, there are a number of possible projects and solutions to enable that such as IdentityServer 4. Alternatively, you could create your own token middleware as is shown in this post.

Once you have added the package to your project.json, you need to add the middleware to your Startup class. This will allow you to validate the token and, if valid, create a ClaimsPrinciple from the claims it contains.

You can add the middleware to your application using the UseJwtBearerAuthentication extension method in your Startup.Configure method, passing in a JwtBearerOptions object:

app.UseJwtBearerAuthentication(new JwtBearerOptions  
{
    AutomaticAuthenticate = true,
    AutomaticChallenge = true,
    TokenValidationParameters = new TokenValidationParameters
    {
        ValidateIssuer = true,
        ValidIssuer = "https://issuer.example.com",

        ValidateAudience = true,
        ValidAudience = "https://yourapplication.example.com",

        ValidateLifetime = true,
    }
});

There are many options available on the JwtBearerOptions - we'll cover some of these in more detail later.

The JwtBearerMiddleware

in the previous post we saw that the CookieAuthenticationMiddleware inherits from the base AuthenticationMiddleware<T>, and the JwtBearerMiddleware is no different. When created, the middleware performs various precondition checks, and initialises some default values. The most important check is to initialise the ConfigurationManager, if it has not already been set.

The ConfigurationManager object is responsible for retrieving, refreshing and caching the configuration metadata required to validate JWTs, such as the issuer and signing keys. These can either be provided directly to the ConfigurationManager by configuring the JwtBearerOptions.Configuration property, or by using a back channel to fetch the required metadata from a remote endpoint. The details of this configuration is outside the scope of this article.

As in the cookie middleware, the middleware implements the only required method from the base class, CreateHandler(), and returns a newly instantiated JwtBearerHandler.

The JwtBearerHandler HandleAuthenticateAsync method

Again, as with the cookie authentication middleware, the handler is where all the work really takes place. JwtBearerHandler derives from AuthenticationHandler<JwtBearerOptions>, overriding the required HandleAuthenticateAsync() method.

This method is responsible for deserialising the JSON Web Token, validating it, and creating an appropriate AuthenticateResult with an AuthenticationTicket (if the validation was successful). We'll walk through the bulk of it in this section, but it is pretty long, so I'll gloss over some of it!

On MessageReceived

The first section of the HandleAuthenticateAsync method allows you to customise the whole bearer authentication method.

// Give application opportunity to find from a different location, adjust, or reject token
var messageReceivedContext = new MessageReceivedContext(Context, Options);

// event can set the token
await Options.Events.MessageReceived(messageReceivedContext);  
if (messageReceivedContext.CheckEventResult(out result))  
{
    return result;
}

// If application retrieved token from somewhere else, use that.
token = messageReceivedContext.Token;  

This section calls out to the MessageReceived event handler on the JwtBearerOptions object. You are provided the full HttpContext, as well as the JwtBearerOptions object itself. This allows you a great deal of flexibility in how your applications uses tokens. You could validate the token yourself, using any other side information you may require, and set the AuthenticateResult explicitly. If you take this approach and handle the authentication yourself, the method will just directly return the AuthenticateResult after the call to messageReceivedContext.CheckEventResult.

Alternatively, you could obtain the token from somewhere else, such as a different header, or even a cookie. In that case, the handler will use the provided token for all further processing.

Read Authorization header

In the next section, assuming a token was not provided by the messageReceivedContext, the method tries to read the token from the Authorization header:

if (string.IsNullOrEmpty(token))  
{
    string authorization = Request.Headers["Authorization"];

    // If no authorization header found, nothing to process further
    if (string.IsNullOrEmpty(authorization))
    {
        return AuthenticateResult.Skip();
    }

    if (authorization.StartsWith("Bearer ", StringComparison.OrdinalIgnoreCase))
    {
        token = authorization.Substring("Bearer ".Length).Trim();
    }

    // If no token found, no further work possible
    if (string.IsNullOrEmpty(token))
    {
        return AuthenticateResult.Skip();
    }
}

As you can see, if the header is not found, or it does not start with the string "Bearer ", then the remainder of the authentication is skipped. Authentication would pass to the next handler until it finds a middleware to handle it.

Update TokenValidationParameters

At this stage we have a token, but we still need to validate and deserialise it to a ClaimsPrinciple. The next section of HandleAuthenticationAsync uses the ConfigurationManager object created when the middleware was instantiated to update the issuer and signing keys that will be used to validate the token:

if (_configuration == null && Options.ConfigurationManager != null)  
{
    _configuration = await Options.ConfigurationManager.GetConfigurationAsync(Context.RequestAborted);
}

var validationParameters = Options.TokenValidationParameters.Clone();  
if (_configuration != null)  
{
    if (validationParameters.ValidIssuer == null && !string.IsNullOrEmpty(_configuration.Issuer))
    {
        validationParameters.ValidIssuer = _configuration.Issuer;
    }
    else
    {
        var issuers = new[] { _configuration.Issuer };
        validationParameters.ValidIssuers = (validationParameters.ValidIssuers == null ? issuers : validationParameters.ValidIssuers.Concat(issuers));
    }

    validationParameters.IssuerSigningKeys = (validationParameters.IssuerSigningKeys == null ? _configuration.SigningKeys : validationParameters.IssuerSigningKeys.Concat(_configuration.SigningKeys));
}

First _configuration, a private field, is updated with the latest (cached) configuration details from the ConfigurationManager. The TokenValidationParameters specified when configuring the middleware are then cloned for this request, and augmented with the additional configuration. Any other validation specified when the middleware was added will also be validated (for example, we included ValidateIssuer, ValidateAudience and ValidateLifetime requirements in the example above).

Validating the token

Everything is now set for validating the provided token. The JwtBearerOptions object contains a list of ISecurityTokenValidator so you can potentially use custom token validators, but the default is to use the built in JwtSecurityTokenHandler. This will validate the token, confirm it meets all the requirements and has not been tampered with, and then return a ClaimsPrinciple.

List<Exception> validationFailures = null;  
SecurityToken validatedToken;  
foreach (var validator in Options.SecurityTokenValidators)  
{
    if (validator.CanReadToken(token))
    {
        ClaimsPrincipal principal;
        try
        {
            principal = validator.ValidateToken(token, validationParameters, out validatedToken);
        }
        catch (Exception ex)
        {
            //... Logging etc

            validationFailures = validationFailures ?? new List<Exception>(1);
            validationFailures.Add(ex);
            continue;
        }

        // See next section - returning a success result.
    }
}

So for each ISecurityTokenValidator in the list, we check whether it can read the token, and if so attempt to validate and deserialise the principal. If that is successful, we continue on to the next section, if not, the call to ValidateToken will throw.

Thankfully, the built in JwtSecurityTokenHandler handles all the complicated details of implementing the JWT specification correctly, so as long as the ConfigurationManager is correctly setup, you should be able to validate most types of token.

I've glossed over the catch block somewhat, but we log the error, add it to the validationFailures error collection, potentially refresh the configuration from ConfigurationManager and try the next handler.

When validation is successful

If we successfully validate a token in the loop above, then we can create an authentication ticket from the principal provided.

Logger.TokenValidationSucceeded();

var ticket = new AuthenticationTicket(principal, new AuthenticationProperties(), Options.AuthenticationScheme);  
var tokenValidatedContext = new TokenValidatedContext(Context, Options)  
{
    Ticket = ticket,
    SecurityToken = validatedToken,
};

await Options.Events.TokenValidated(tokenValidatedContext);  
if (tokenValidatedContext.CheckEventResult(out result))  
{
    return result;
}
ticket = tokenValidatedContext.Ticket;

if (Options.SaveToken)  
{
    ticket.Properties.StoreTokens(new[]
    {
        new AuthenticationToken { Name = "access_token", Value = token }
    });
}

return AuthenticateResult.Success(ticket);  

Rather than returning a success result straight away, the handler first calls the TokenValidated event handler. This allows us to fully customise the extracted ClaimsPrincipal, even replacing it completely, or rejecting it at this stage by creating a new AuthenticateResult.

Finally the handler optionally stores the extracted token in the AuthenticationProperties of the AuthenticationTicket for use elsewhere in the framework, and returns the authenticated ticket using AuthenticateResult.Success.

When validation fails

If the security token could not be validated by any of the ISecurityTokenValidators, the handler gives one more chance to customise the result.

if (validationFailures != null)  
{
    var authenticationFailedContext = new AuthenticationFailedContext(Context, Options)
    {
        Exception = (validationFailures.Count == 1) ? validationFailures[0] : new AggregateException(validationFailures)
    };

    await Options.Events.AuthenticationFailed(authenticationFailedContext);
    if (authenticationFailedContext.CheckEventResult(out result))
    {
        return result;
    }

    return AuthenticateResult.Fail(authenticationFailedContext.Exception);
}

return AuthenticateResult.Fail("No SecurityTokenValidator available for token: " + token ?? "[null]");  

The AuthenticationFailed event handler is invoked, and again can set the AuthenticateResult directly. If the handler does not directly handle the event, or if there were no configured ISecurityTokenValidators that could handle the token, then authentication has failed.

Also worth noting is that any unexpected exceptions thrown from event handlers etc will result in a similar call to Options.Events.AuthenticationFailed before the exception bubbles up the stack.

The JwtBearerHandler HandleUnauthorisedAsync method

The other significant method in the JwtBearerHandler is HandleUnauthorisedAsync, which is called when a request requires authorisation but is unauthenticated. In the CookieAuthenticationMiddleware, this method redirects to a logon page, while in the JwtBearerHandler, a 401 will be returned, with the WWW-Authenticate header indicating the nature of the error, as per the specification.

Prior to returning a 401, the Options.Event handler gets one more attempt to handle the request with a call to Options.Events.Challenge. As before, this provides a great extensibility point should you need it, allowing you to customise the behaviour to your needs.

SignIn and SignOut

The last two methods in the JwtBearerHandler, HandleSignInAsync and HandleSignOutAsync simply throw a NotSupportedException when called. This makes sense when you consider that the tokens have to come from a different source.

To effectively 'sign in', a client must request a token from the (remote) issuer and provide it when making requests to your application. Signing out from the handler's point of view would just require you to discard the token, and not send it with future requests.

Summary

In this post we looked in detail at the JwtBearerHandler as a means to further understanding how authentication works in the ASP.NET Core framework. It is rare you would need to dive into this much detail when simply using the middleware, but hopefully it will help you get to grips of what is going on under the hood when you add it to your application.

An introduction to Session storage in ASP.NET Core

$
0
0
An introduction to Session storage in ASP.NET Core

A common requirement of web applications is the need to store temporary state data. In this article I discuss the use of Session storage for storing data related to a particular user or browser session.

Options for storing application state

When building ASP.NET Core applications, there are a number of options available to you when you need to store data that is specific to a particular request or session.

One of the simplest methods is to use querystring parameters or post data to send state to subsequent requests. However doing so requires sending that data to the user's browser, which may not be desirable, especially for sensitive data. For that reason, extra care must be taken when using this approach.

Cookies can also be used to store small bits of data, though again, these make a roundtrip to the user's browser, so must be kept small, and if sensitive, must be secured.

For each request there exists a property Items on HttpContext. This is an IDictionary<string, object> which can be used to store arbitrary objects against a string key. The data stored here lasts for just a single request, so can be useful for communicating between middleware components and storing state related to just a single request.

Files and database storage can obviously be used to store state data, whether related to a particular user or the application in general. However they are typically slower to store and retrieve data than other available options.

Session state relies on a cookie identifier to identify a particular browser session, and stores data related to the session on the server. This article focuses on how and when to use Session in your ASP.NET Core application.

Session in ASP.NET Core

ASP.NET Core supports the concept of a Session out of the box - the HttpContext object contains a Session property of type ISession. The get and set portion of the interface is shown below (see the full interface here):

public interface ISession  
{
    bool TryGetValue(string key, out byte[] value);
    void Set(string key, byte[] value);
    void Remove(string key);
}

As you can see, it provides a dictionary-like wrapper over the byte[] data, accessing state via string keys. Generally speaking, each user will have an individual session, so you can store data related to a single user in it. However you cannot technically consider the data secure as it may be possible to hijack another user's session, so it is not advisable to store user secrets in it. As the documentation states:

You can’t necessarily assume that a session is restricted to a single user, so be careful what kind of information you store in Session.

Another point to consider is that the session in ASP.NET Core is non-locking, so if multiple requests modify the session, the last action will win. This is an important point to consider, but should provide a significant performance increase over the locking session management used in the previous ASP.NET 4.X framework.

Under the hood, Session is built on top of IDistributedCache, which can be used as a more generalised cache in your application. ASP.NET Core ships with a number of IDistributedCache implementations, the simplest of which is an in-memory implementation, MemoryCache, which can be found in the Microsoft.Extensions.Caching.Memory package.

MVC also exposes a TempData property on a Controller which is an additional wrapper around Session. This can be used for storing transient data that only needs to be available for a single request after the current one.

Configuring your application to use Session

In order to be able to use Session storage in your application, you must configure the required Session services, the Session middleware, and an IDistributedCache implementation. In this example I will be using the in-memory distributed cache as it is simple to setup and use, but the documentation states that this should only be used for development and testing sites. I suspect this reticence is due it not actually being distributed and the fact that app restarts will clear the session.

First, add the IDistributedCache implementation and Session state packages to your project.json:

dependencies: {  
  "Microsoft.Extensions.Caching.Memory" : "1.0.0",
  "Microsoft.AspNetCore.Session": "1.0.0"
}

Next, add the required services to Startup in ConfigureServices:

public void ConfigureServices(IServiceCollection services)  
{
    services.AddMvc();

    services.AddDistributedMemoryCache();
    services.AddSession();
}

Finally, configure the session middleware in the Startup.Configure method. As with all middleware, order is important in this method, so you will need to enable the session before you try and access it, e.g. in your MVC middleware:

public void Configure(IApplicationBuilder app)  
{
    app.UseStaticFiles();

    //enable session before MVC
    app.UseSession();

    app.UseMvc(routes =>
    {
        routes.MapRoute(
            name: "default",
            template: "{controller=Home}/{action=Index}/{id?}");
    });
}

With all this in place, the Session object can be used to store our data.

Storing data in Session

As shown previously, objects must be stored in Session as a byte[], which is obviously not overly convenient. To alleviate the need to work directly with byte arrays, a number of extensions exist for fetching and setting int and string. Storing more complex objects requires serialising the data.

As an example, consider the simple usage of session below.

public IActionResult Index()  
{
    const string sessionKey = "FirstSeen";
    DateTime dateFirstSeen;
    var value = HttpContext.Session.GetString(sessionKey);
    if (string.IsNullOrEmpty(value))
    {
        dateFirstSeen = DateTime.Now;
        var serialisedDate = JsonConvert.SerializeObject(dateFirstSeen);
        HttpContext.Session.SetString(sessionKey, serialisedDate);
    }
    else
    {
        dateFirstSeen = JsonConvert.DeserializeObject<DateTime>(value);
    }

    var model = new SessionStateViewModel
    {
        DateSessionStarted = dateFirstSeen,
        Now = DateTime.Now
    };

    return View(model);
}

This action simply simply returns a view with a model that shows the current time, and the time the session was initialised.

First, the Session is queried using GetString(key). If this is the first time that action has been called, the method will return null. In that case, we record the current date, serialise it to a string using Newtonsoft.Json, and store it in the session using SetString(key, value).

On subsequent requests, the call to GetString(key) will return our serialised DateTime which we can set on our view model for display. After the first request to our action, the DateSessionStarted property will differ from the Now property on our model:

An introduction to Session storage in ASP.NET Core

This was a very trivial example, but you can store any data that is serialisable to a byte[] in the Session. The JSON serialisation used here is an easy option as it is likely already used in your project. Obviously, serialising and deserialising large objects on every request could be a performance concern, so be sure to think about the implications of using Session storage in your application.

Customising Session configuration

When configuring your session in Startup, you can provide an instance of StartupOptions or a configuration lambda to either the UseSession or AddSession calls respectively. This allows you to customise details about the session cookie that is used to track the session in the browser. For example you can customise the cookie name, domain, path and how long the session may be idle before the session expires. You will likely not need to change the defaults, but it may be necessary in some cases:

services.AddSession(opts =>  
    {
        opts.CookieName = ".NetEscapades.Session";
        opts.IdleTimeout = TimeSpan.FromMinutes(5);
    });

Note the cookie name is not the default .AspNetCore.Session:

An introduction to Session storage in ASP.NET Core

It's also worth noting that in ASP.NET Core 1.0, you cannot currently mark the cookie as Secure. This has been fixed here so should be in the 1.1.0 release (probably Q4 206/ Q1 2017).

Summary

In this post we saw an introduction to using Session storage in an ASP.NET Core application. We saw how to configure the required services and middleware, and to use it to store and retrieve simple strings to share state across requests.

As mentioned previously, it's important to not store sensitive user details in Session due to potential security issues, but otherwise it is a useful location for storage of serialisable data.

Further Reading

An introduction to OAuth 2.0 using Facebook in ASP.NET Core

$
0
0
An introduction to OAuth 2.0 using Facebook in ASP.NET Core

This is the next post in a series on authentication and authorisation in ASP.NET Core. In this post I look in moderate depth at the OAuth 2.0 protocol as it pertains to ASP.NET Core applications, walking through the protocol as seen by the user of your website as well as the application itself. Finally, I show how you can configure your application to use a Facebook social login when you are using ASP.NET Core Identity.

OAuth 2.0

OAuth 2.0 is an open standard for authorisation. It is commonly used as a way for users to login to a particular website (say, catpics.com) using a third party account such as a Facebook or Google account, without having to provide catpics.com the password for their Facebook account.

While it is often used for authentication, being used to log a user in to a site, it is actually an authorisation protocol. We'll discuss the detail of the flow of requests in the next sections, but in essence, you as a user are providing permission for the catpics.com website to access some sort of personal information from the OAuth provider website (Facebook). So catpics.com is able to access your personal Facebook cat pictures, without having full access to your account, and without requiring you to provide your password directly.

There are a number of different ways you can use OAuth 2.0, each of which require different parameters and different user interactions. Which one you should use depends on the nature of the application you are developing, for example:

  • Resource Owner Grant - Requires the user to directly enter their username and password to the application. Useful when you are developing a 1st party application to authenticate with your own servers, e.g. the Facebook mobile app might use a Resource Owner Grant to authenticate with Facebook's servers.
  • Implicit Grant - Authenticating with a server returns an access token to the browser which can then be used to access resources. Useful for Single Page Applications (SPA) where communication cannot be private.
  • Authorisation Code Grant - The typical OAuth grant used by web applications, such as you would use in your ASP.NET apps. This is the flow I will focus on for the rest of the article.

The Authorisation Code Grant

Before explaining the flow fully, we need to clarify some of the terminology. This is where I often see people getting confused with the use of overloaded terms like 'Client'. Unfortunately, these are taken from the official spec, so I will use them here as well, but for the remainder of the article I'll try and use disambiguated names instead.

We will consider an ASP.NET application that finds cats in your Facebook photos by using Facebook's OAuth authorisation.

  • Resource owner (e.g. the user) - This technically doesn't need to be a person as OAuth allows machine-to-machine authorisation, but for our purposes it is the end-user who is using your application.
  • Resource service (e.g. the Facebook API server) - This is the endpoint your ASP.NET application will call to access Facebook photos once it has been given an access token.
  • Client (e.g. your app) - This is the application which is actually making the requests to the Resource service. So in this case it is the ASP.NET application.
  • Authorisation server (e.g. the Facebook authorisation server) - This is the server that allows the user to login to their Facebook account.
  • Browser (e.g. Chrome, Safari) - Not required by OAuth in general, but for our example, the browser is the user-agent that the resource owner/user is using to navigate your ASP.NET application.

The flow

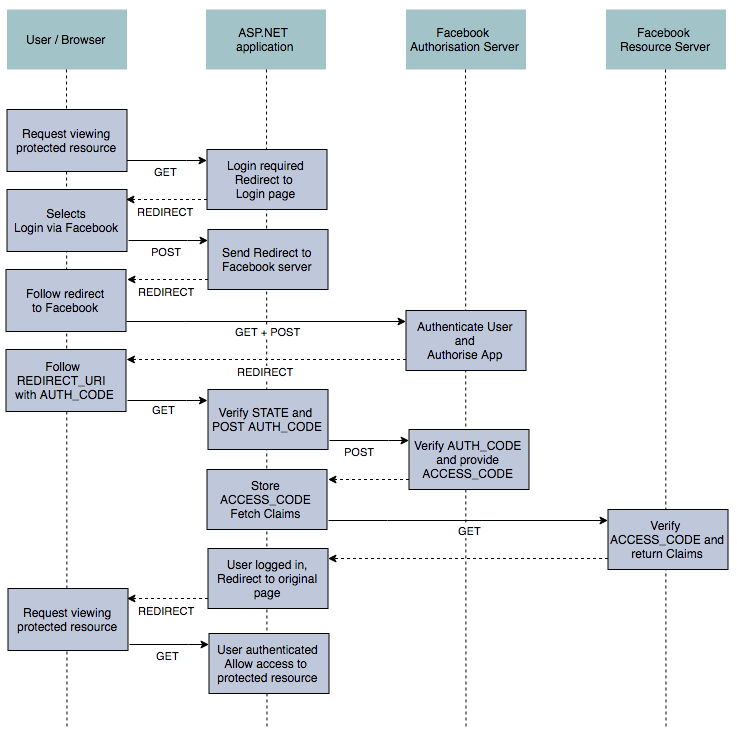
Now we have nailed some of the terminology, we can think about the actual flow of events and data when OAuth 2.0 is in use. The image below gives a detailed overview of the various interactions, from the user first requesting access to a protected resource, to them finally gaining access to it. The flow looks complicated, but the key points to notice are the three calls to Facebook's servers.

An introduction to OAuth 2.0 using Facebook in ASP.NET Core

As we go through the flow, we'll illustrate it from a user's point of view, using the default MVC template with ASP.NET Core Identity, configured to use Facebook as an external authentication mechanism.

Before you can use OAuth in your application, you first need to register your application with the Authorisation server (Facebook). There you will need to provide a REDIRECT_URI and you will be provided a CLIENT_ID and CLIENT_SECRET. The process is different for each Authorisation server so it is best to consult their developer docs for how to go about this. I'll cover how to register your application with Facebook later in this article.

Authorising to obtain an authorisation code

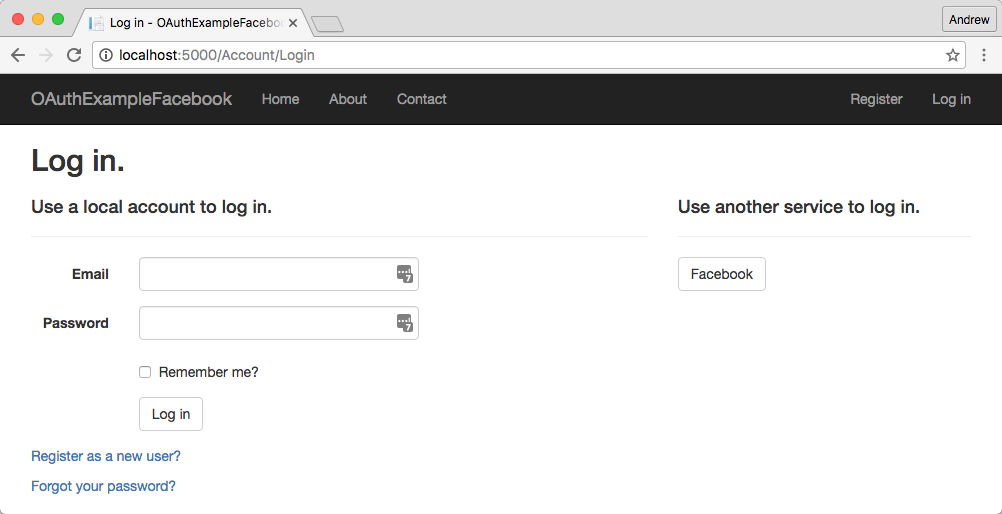
When the user requests a page on your app that requires authorisation, they will be redirected to the login page. Here they can either login using a username and password to create an account directly with the site, or they can choose to login with an external provider - in this case just Facebook.

An introduction to OAuth 2.0 using Facebook in ASP.NET Core

When the user clicks on the Facebook button, the ASP.NET application sends a 302 to the user's browser, with a url similar to the following:

https://www.facebook.com/v2.6/dialog/oauth?client_id=CLIENT_ID&scope=public_profile,email&response_type=code&redirect_uri=REDIRECT_URI&state=STATE_TOKEN  

This url points to the Facebook Authorisation server, and contains a number of replacement fields. The CLIENT_ID and REDIRECT_URI are the ones we registered and were provided when we registered our app in Facebook. The STATE_TOKEN is a CSRF token generated automatically by our application for security reasons (that I won't go into). Finally, the scope field indicates what resources we have requested access to - namely public_profile and their email.

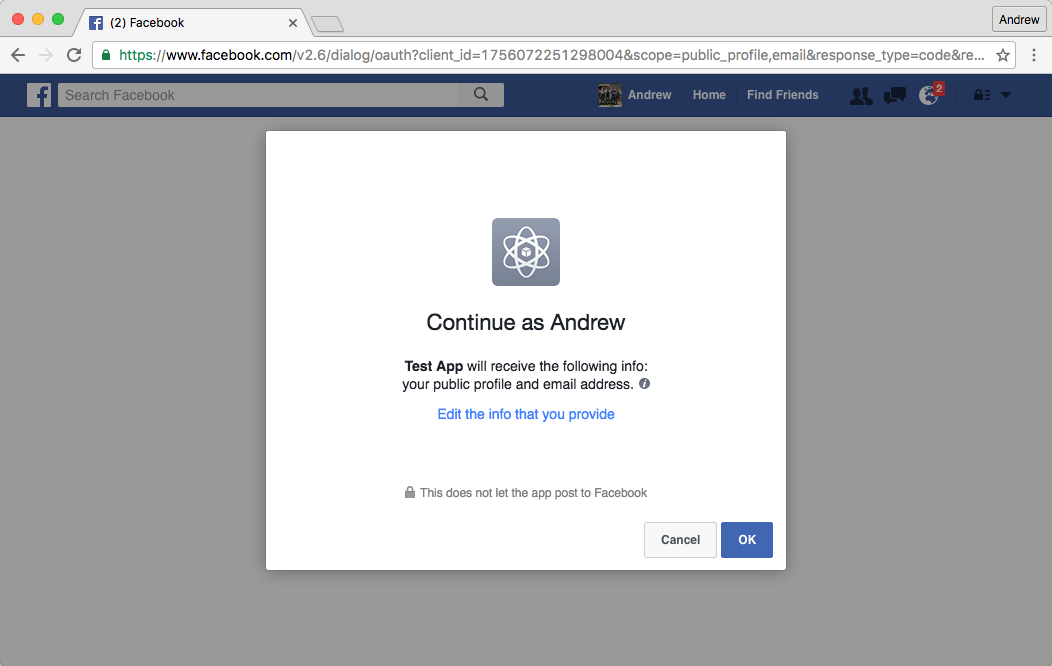
Following this link, the user is directed in their browser to their Facebook login page. Once they have logged in, or if they are already logged in, they must grant authorisation to our registered ASP.NET application to access the requested fields:

An introduction to OAuth 2.0 using Facebook in ASP.NET Core

If the user clicks OK, then Facebook sends another 302 response to the browser, with a url similar to the following:

http://localhost:5000/signin-facebook?code=AUTH_CODE&state=STATE_TOKEN  

Facebook has provided an AUTH_CODE, along with the STATE_TOKEN we supplied with the initial redirect. The state can be verified to ensure that requests are not being forged by comparing it to the version stored in our session state in the ASP.NET application. The AUTH_CODE however is only temporary, and cannot be directly used to access the user details we need. Instead, we need to exchange it for an access token with the Facebook Authorisation server.

Exchanging for an access token

This next portion of the flow occurs entirely server side - communication occurs directly between our ASP.NET application and the Facebook authorisation server.

Our ASP.NET application constructs a POST request to the Facebook Authorization server, to an Access token endpoint. The request sends our app's registered details, including the CLIENT_SECRET and the AUTH_TOKEN to the Facebook endpoint:

POST /v2.6/oauth/access_token HTTP/1.1  
Host: graph.facebook.com  
Content-Type: application/x-www-form-urlencoded

grant_type=authorization_code&  
code=AUTH_CODE&  
redirect_uri=REDIRECT_URI&  
client_id=CLIENT_ID&  
client_secret=CLIENT_SECRET  

If the token is accepted by Facebook's Authorisation server, then it will respond with (among other things) an ACCESS_TOKEN. This access token allows our ASP.NET application to access the resources (scopes) we requested at the beginning of the flow, but we don't actually have the details we need in order to create the Claims for our user yet.

Accessing the protected resource

After receiving and storing the access token, our app can now contact Facebook's Resource server. We are still completely server-side at this point, communicating directly with Facebook's user information endpoint.

Our application constructs a GET request, providing the ACCESS_TOKEN and a comma separated (and URL encoded) list of requested fields in the querystring:

GET /v2.6/me?access_token=ACCESS_TOKEN&fields=name%2Cemail%2Cfirst_name%2Clast_name  
Host: graph.facebook.com  

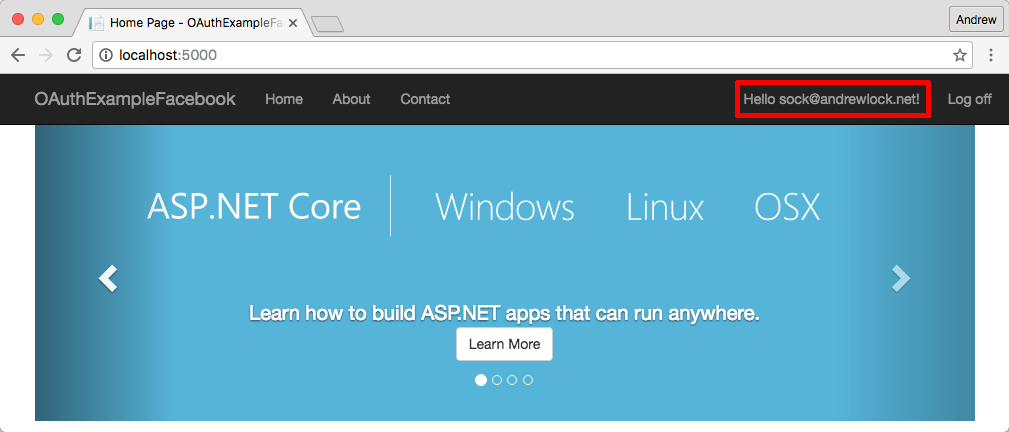
Assuming all is good, Facebook's resource server should respond with the requested fields. Your application can then add the appropriate Claims to the ClaimsIdentity and your user is authenticated!

An introduction to OAuth 2.0 using Facebook in ASP.NET Core

The description provided here omits a number of things such as handling expiration and refresh tokens, as well as the ASP.NET Core Identity process or associating the login to an email, but hopefully it provides an intermediate view of what is happening as part of a social login.

Example usage in ASP.NET Core

If you're anything like me, when you first start looking at how to implement OAuth in your application, it all seems a bit daunting. There's so many moving parts, different grants and backchannel communication that it seems like it will be a chore to setup.

Luckily, the ASP.NET Core team have solved a massive amount of the headache for you! If you are using ASP.NET Core Identity, then adding external providers is a breeze. The ASP.NET Core documentation provides a great walkthrough to creating your application and getting it all setup.

Essentially, if you have an app that uses ASP.NET Core Identity, all that is required to add facebook authentication is to install the package in your project.json:

{
  "dependencies": {
    "Microsoft.AspNetCore.Authentication.Facebook": "1.0.0"
  }
}

and configure the middleware in your Startup.Configure method:

public void Configure(IApplicationBuilder app, IHostingEnvironment env)  
{

    app.UseStaticFiles();

    app.UseIdentity();

    app.UseFacebookAuthentication(new FacebookOptions
    {
        AppId = Configuration["facebook:appid"],
        AppSecret = Configuration["facebook:appsecret"],
        Scope = { "email" },
        Fields = { "name", "email" },
        SaveTokens = true,
    });

    app.UseMvc(routes =>
    {
        routes.MapRoute(
            name: "default",
            template: "{controller=Home}/{action=Index}/{id?}");
    });
}

You can see we are loading the AppId and AppSecret (our CLIENT_ID and CLIENT_SECRET) from configuration. On a development machine, these should be stored using the user secrets manager or environment variables (never commit them directly to your repository).

If you want to use a different external OAuth provider then you have several options. Microsoft provide a number of packages similar to the Facebook package shown which make integrating external logins simple. There are currently providers for Google, Twitter and (obviously) Microsoft accounts.

In addition, there are a number of open source libraries that provide similar handling of common providers. In particular, the AspNet.Security.OAuth.Providers repository has middleware for providers like GitHub, Foursquare, Dropbox and many others.

Alternatively, if a direct provider is not available, you can use the generic Microsoft.AspNetCore.Authentication.OAuth package on which these all build. For example Jerrie Pelser has an excellent post on configuring your ASP.NET Core application to use LinkedIn.

Registering your application with Facebook Graph API

As discussed previously, before you can use an OAuth provider, you must register your application with the provider to obtain the CLIENT_ID and CLIENT_SECRET, and to register your REDIRECT_URI. I will briefly show how to go about doing this for Facebook.

First, navigate to https://developers.facebook.com and login. If you have not already registered as a developer, you will need to register and agree to Facebook's policies.

An introduction to OAuth 2.0 using Facebook in ASP.NET Core

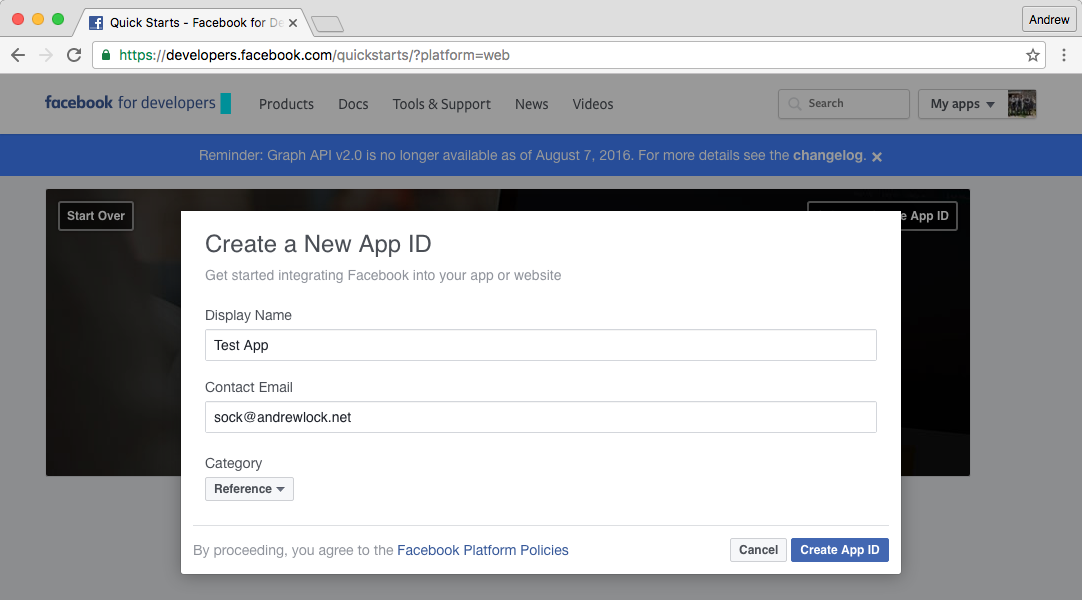
Once a developer, you can create a new web application by following the prompts or navigating to https://developers.facebook.com/quickstarts/?platform=web. Here you will be prompted to provide a name for your web application, and then to configure some basic details about it.

An introduction to OAuth 2.0 using Facebook in ASP.NET Core

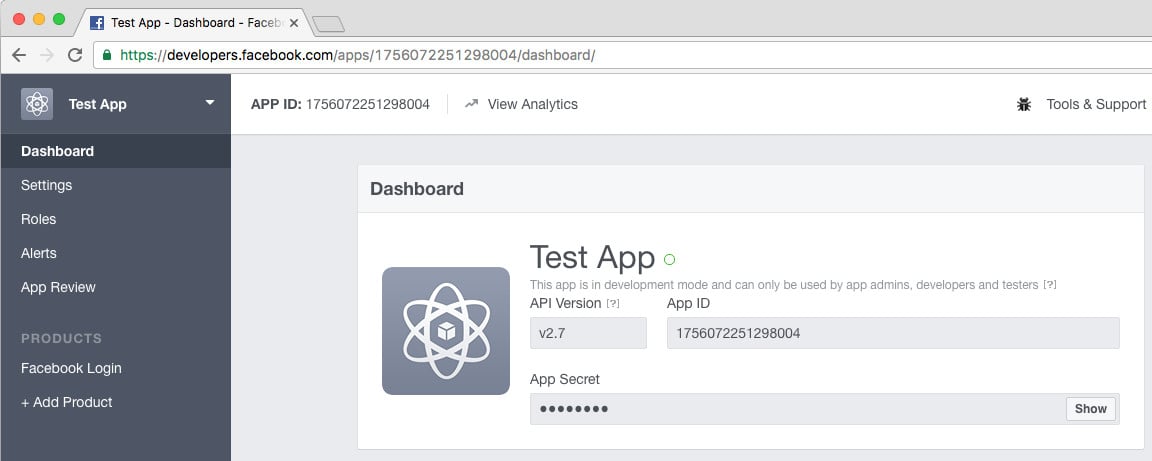
Once created, navigate to https://developers.facebook.com/apps and click on your application's icon. You will be taken to your app's basic details. Here you can obtain the App Id and App Secret you will need in your application. Make a note of them (store them using your secrets manager).

An introduction to OAuth 2.0 using Facebook in ASP.NET Core

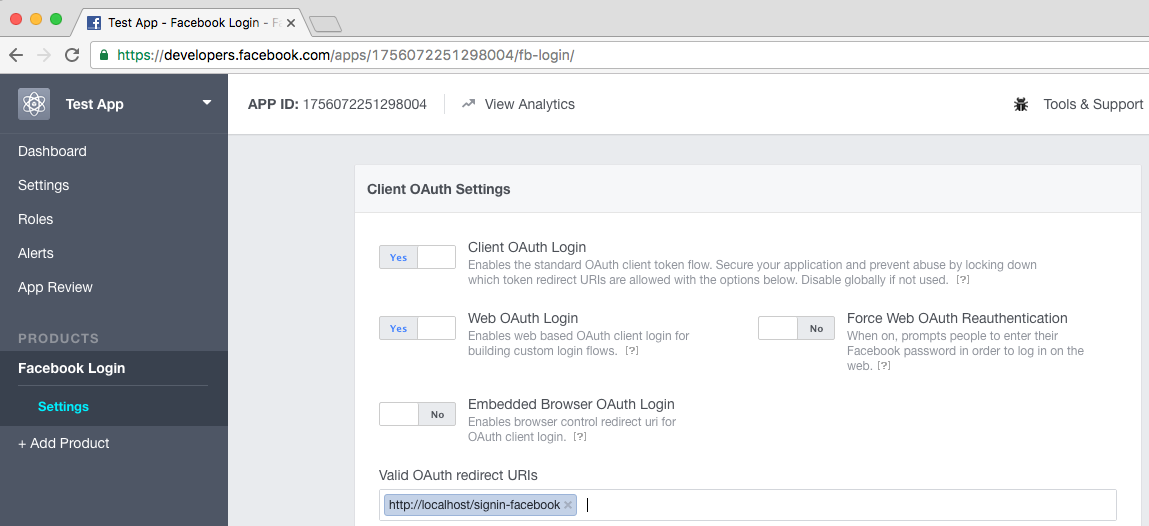
The last step is to configure the redirect URI for your application. Click on '+ Add Product' at the bottom of the menu and choose Facebook Login. This will enable OAuth for your application, and allow you to set the REDIRECT_URI for your application.

The redirect path for the Facebook middleware is /signin-facebook. In my case, I was only running the app locally, so my full redirect url was http://localhost:5000/signin-facebook.

An introduction to OAuth 2.0 using Facebook in ASP.NET Core

Assuming everything is setup correctly, you should now be able to use OAuth 2.0 to login to your ASP.NET Core application with Facebook!

Final thoughts

In this post I showed how you could use OAuth 2.0 to allow users to login to your ASP.NET Core application with Facebook and other OAuth 2.0 providers.

One point which is often overlooked is the fact that OAuth 2.0 is a protocol for performing authorisation, not authentication. The whole process is aimed at providing access to protected resources, rather than proving the identity of a user, which has some subtle security implications.

Luckily there is an another protocol OpenId Connect, which deals with many of these issues, which essentially provides and additional layer on top of the OAuth 2.0 protocol. I'll be doing a post on OpenId Connect soon, but if you want to learn more, I've provided some additional details below.

In the mean time, enjoy your social logins!

POST-REDIRECT-GET using TempData in ASP.NET Core

$
0
0
POST-REDIRECT-GET using TempData in ASP.NET Core

In this post I will show how you can use Session state and TempData to implement the POST-REDIRECT-GET (PRG) design pattern in your ASP.NET Core application.

Disclaimer - The technique shown here, while working very well in the previous version of ASP.NET, is not as simple in ASP.NET Core. This is due to the fact that the TempData object is a wrapper around Session which is itself a wrapper around the IDistributedCache interface. This interface requires you to serialise your objects to and from a byte array before storage, where previously serialisation was not necessary. Consequently there are some trade-offs required in this implementation, so be sure you understand the implications.

What is PRG?

The POST-REDIRECT-GET (PRG) design pattern states that a POST should be answered with a REDIRECT response, to which the user's browser will follow with a GET request. It is designed to reduce the number of duplicate form submissions caused by users refreshing their browser and navigating back and forth.

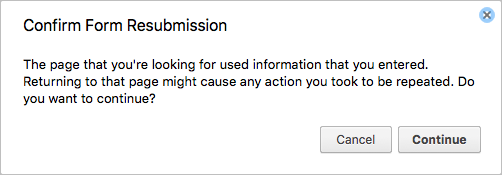
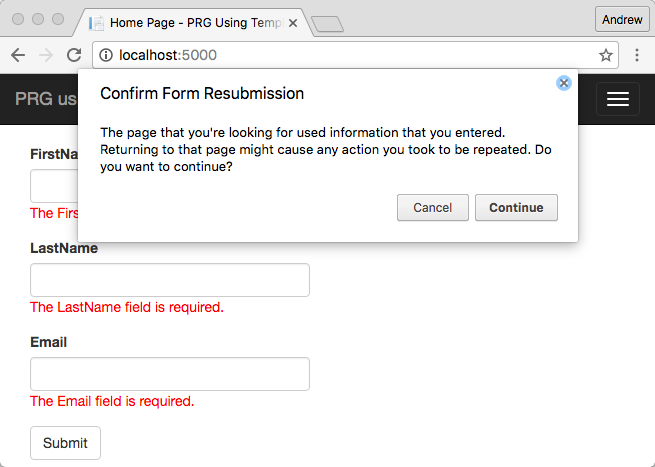
No doubt in your general internet travels you will have refreshed a page and seen a popup similar to the following:

POST-REDIRECT-GET using TempData in ASP.NET Core

This occurs when the response returned from a POST is just content, with no REDIRECT. When you click reload, the browser attempts to resend the last request, which in this case was a POST. In some cases this may be the desired behaviour, but in my experience it invariably is not!

Luckily, as suggested, handling this case is simple when the form data submitted in the post is valid and can be handled correctly. Simply return a redirect response from your controller actions to a new page. So for example, consider we have a simple form on our home page which can POST an EditModel. If the form is valid, then we redirect to the Success action, instead of returning a View result directly. That way if the user reloads the screen, they replay the GET request to Success instead of the POST to Index.

public class HomeController : Controller  
{
    public IActionResult Index()
    {
        return View(new EditModel());
    }

    [HttpPost]
    public IActionResult Index(EditModel model)
    {
        if (!ModelState.IsValid)
        {
            return View(model);
        }
        return RedirectToAction("Success");
    }

    public IActionResult Success()
    {
        return View();
    }
}

Handling invalid forms

Unfortunately the waters get a little more muddy when the form data you have submitted is not valid. As PRG is primarily intended to prevent double form submissions, it does not necessarily follow that you should REDIRECT a user if the form is invalid. In that case, the request should not be modifying state, and so it is valid to submit the form again.

In MVC, this has generally been the standard way of handling invalid forms. In the example above, we check the ModelState.IsValid property in our POST handler, and if not valid, we simply redisplay the form, using the current ModelState to populate the validation helpers etc. This is a conceptually simple solution, that still allows us to use PRG when the post is successful.

Unfortunately, this approach has some drawbacks. It is still quite possible for users to be hit with the (for some, no-doubt confusing) 'Confirm form resubmission' popup.

Consider the controller above. A user can submit the form, where if invalid we return the validation errors on the page. The user then reloads the page and is shown the 'Confirm form resubmission' popup:

POST-REDIRECT-GET using TempData in ASP.NET Core

It is likely the user expected reloading the page to actually reload the page and clear the previously entered values, rather than resubmitting the form. Luckily, we can use PRG to produce that behaviour and to provide a cleaner user experience.

Using TempData to save ModelState

The simple answer may seem to be changing the View(model) statement to be RedirectToAction("Index") - that would satisfy the PRG requirement and prevent form resubmissions. However doing that would cause a 'fresh' GET on the Index page, so we would lose the previously entered input fields and all of the validation errors - not a nice user experience at all!

In order to display the validation messages and input values we need to somehow preserve the ModelStateDictionary exposed as ModelState in the controller. In ASP.NET 4.X, that is relatively easy to do using the TempData structure, which stores data in the Session for the current request and the next one, after which it is deleted.

Matthew Jones has an excellent post on using TempData to store and rehydrate the ModelState when doing PRG in ASP.NET 4.X, which was the inspiration for this post. Unfortunately there are some limitations in ASP.NET Core which make the application of his example slightly less powerful, but hopefully still sufficient in the majority of cases.

Serialising ModelState to TempData

The biggest problem here is that ModelState is not generally serialisable. As discussed in this GitHub issue, ModelState can contain Exceptions which themselves may not be serialisable. This was not an issue in ASP.NET 4.X as TempData would just store the ModelState object itself, rather than having to serialise at all.

To get around this, we have to extract the details we care about from the ModelStateDictionary, serialise those details, and then rebuild the ModelStateDictionary from the serialised representation on the next request.

To do this, we can create a simple serialisable transport class, which contains only the details we need to redisplay the form inputs correctly:

public class ModelStateTransferValue  
{
    public string Key { get; set; }
    public string AttemptedValue { get; set; }
    public object RawValue { get; set; }
    public ICollection<string> ErrorMessages { get; set; } = new List<string>();
}

All we store is the Key (the field name) the RawValue and AttemptedValue (the field values) and the ErrorMessages associated with the field. These map directly to the equivalent fields in ModelStateDictionary.

Note that the RawValue type is an object, which again leaves us with the problem that ModelStateTransferValue may not be serialisable. I haven't come across any times where this is the case but it is something to be aware of if you are using some complex objects in your view models.

We then create a helper class to allow us to serialise the ModelSateDictionary to and from TempData. When serialising, we first convert it to a collection of ModelStateTransferValue and then serialise these to a string. On deserialisation, we simply perform the process in reverse:

public static class ModelStateHelpers  
{
    public static string SerialiseModelState(ModelStateDictionary modelState)
    {
        var errorList = modelState
            .Select(kvp => new ModelStateTransferValue
            {
                Key = kvp.Key,
                AttemptedValue = kvp.Value.AttemptedValue,
                RawValue = kvp.Value.RawValue,
                ErrorMessages = kvp.Value.Errors.Select(err => err.ErrorMessage).ToList(),
            });

        return JsonConvert.SerializeObject(errorList);
    }

    public static ModelStateDictionary DeserialiseModelState(string serialisedErrorList)
    {
        var errorList = JsonConvert.DeserializeObject<List<ModelStateTransferValue>>(serialisedErrorList);
        var modelState = new ModelStateDictionary();

        foreach (var item in errorList)
        {
            modelState.SetModelValue(item.Key, item.RawValue, item.AttemptedValue);
            foreach (var error in item.ErrorMessages)
            {
                modelState.AddModelError(item.Key, error);
            }
        }
        return modelState;
    }
}

ActionFilters for exporting and importing

With these helpers in place, we can now create the ActionFilters where we will store and rehydrate the model data. These filters are almost identical to the ones proposed by Matthew Jones in his post, just updated to ASP.NET Core constructs, and calling our ModelStateHelpers as required:

public abstract class ModelStateTransfer : ActionFilterAttribute  
{
    protected const string Key = nameof(ModelStateTransfer);
}

public class ExportModelStateAttribute : ModelStateTransfer  
{
    public override void OnActionExecuted(ActionExecutedContext filterContext)
    {
        //Only export when ModelState is not valid
        if (!filterContext.ModelState.IsValid)
        {
            //Export if we are redirecting
            if (filterContext.Result is RedirectResult 
                || filterContext.Result is RedirectToRouteResult 
                || filterContext.Result is RedirectToActionResult)
            {
                var controller = filterContext.Controller as Controller;
                if (controller != null && filterContext.ModelState != null)
                {
                    var modelState = ModelStateHelpers.SerialiseModelState(filterContext.ModelState);
                    controller.TempData[Key] = modelState;
                }
            }
        }

        base.OnActionExecuted(filterContext);
    }
}

public class ImportModelStateAttribute : ModelStateTransfer  
{
    public override void OnActionExecuted(ActionExecutedContext filterContext)
    {
        var controller = filterContext.Controller as Controller;
        var serialisedModelState = controller?.TempData[Key] as string;

        if (serialisedModelState != null)
        {
            //Only Import if we are viewing
            if (filterContext.Result is ViewResult)
            {
                var modelState = ModelStateHelpers.DeserialiseModelState(serialisedModelState);
                filterContext.ModelState.Merge(modelState);
            }
            else
            {
                //Otherwise remove it.
                controller.TempData.Remove(Key);
            }
        }

        base.OnActionExecuted(filterContext);
    }
}

The ExportModelStateAttribute runs after an Action has executed, checks whether the ModelState was invalid and if the returned result was a redirect result. If it was, then it serialises the ModelState and stores it in TempData.

The ImportModelStateAttribute also runs after an Action has executed, checks we have a serialised model state and that we are going to execute a ViewResult. If so, then it deserialises to state to a ModelStateDictionary and merges it into the existing ModelState.

We can simply apply these attributes to our HomeController to give PRG on invalid forms, if we also update the !ModelState.IsValid case to redirect to Index:

public class HomeController : Controller  
{
    [ImportModelState]
    public IActionResult Index()
    {
        return View(new EditModel());
    }

    [HttpPost]
    [ExportModelState]
    public IActionResult Index(EditModel model)
    {
        if (!ModelState.IsValid)
        {
            return RedirectToAction("Index");
        }
        return RedirectToAction("Success");
    }
}

The result

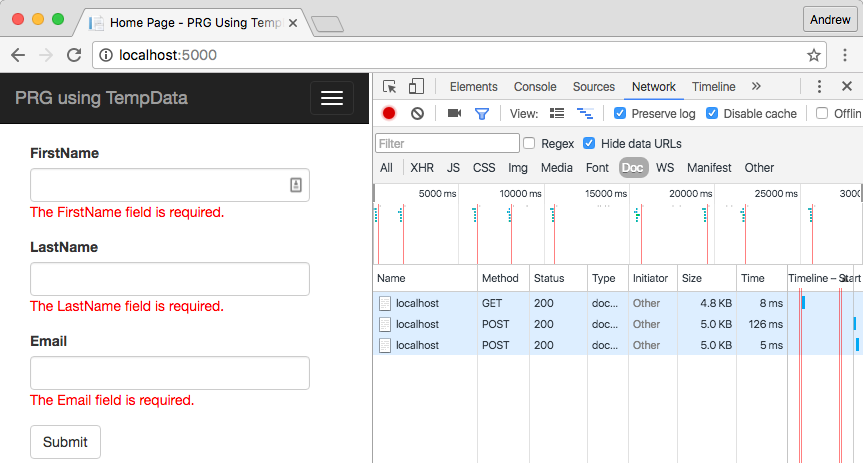
We're all set to give this a try now. Previously, if we submitted a form with errors, then reloading the page would give us the 'Confirm form resubmission' popup. This was because the POST was being resent to the server, as we can see by viewing the Network tab in Chrome:

POST-REDIRECT-GET using TempData in ASP.NET Core

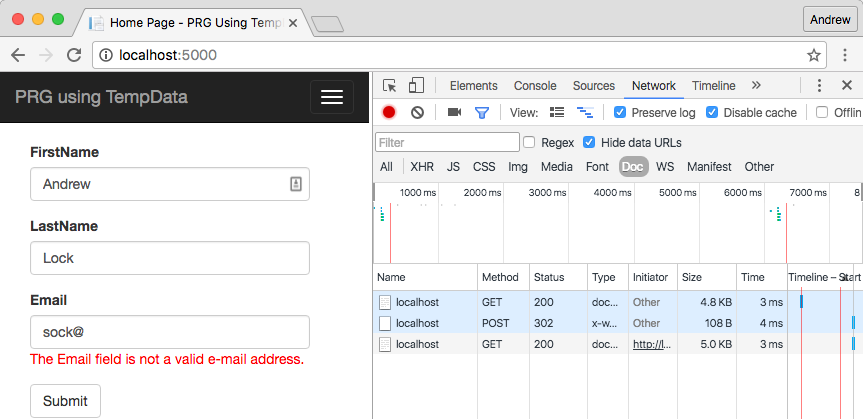
See those POSTS returning a 200? That's what we're trying to avoid. With our new approach, errors in the form cause a redirect to the Index page, followed by a GET request by the browser. The form fields and validation errors are all still visible, even though this is a normal GET request.

POST-REDIRECT-GET using TempData in ASP.NET Core

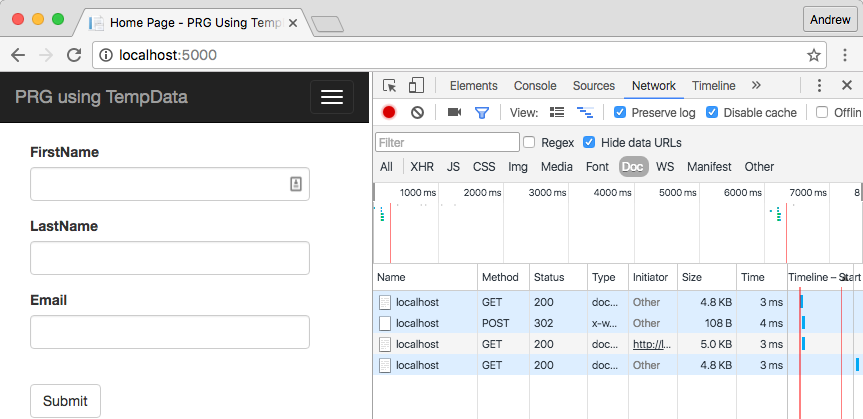
Out POST now returns a 302, which is followed by a GET. Now if the user refreshes the page, the page will actually refresh, clearing all the input values and validation errors and giving you a nice clean form, with no confusing popups!

POST-REDIRECT-GET using TempData in ASP.NET Core

Summary

This post shows how you can implement PRG for all your POSTs in ASP.NET Core. Whether you actually want to have this behaviour is another question which is really up to you. It allows you to avoid the annoying popups, but on the other hand it is not (and likely will not be) a pattern that is directly supported by the ASP.NET Core framework itself. The ModelState serialisation requirement is a tricky problem which may cause issues for you in some cases, so use it with caution!

To be clear, you absolutely should be using the PRG pattern for successful POSTs, and this approach is completely supported - just return a RedirectResult from your Action method. The choice of whether to use PRG for invalid POSTs is down to you.

An introduction to OpenID Connect in ASP.NET Core

$
0
0
An introduction to OpenID Connect in ASP.NET Core

This post is the next in a series of posts on authentication in ASP.NET Core. In the previous post we showed how you can use the OAuth 2.0 protocol to provide 'Login via Facebook' functionality to your website.

While a common approach, there are a number of issues with using OAuth as an authentication protocol, rather than the authorisation protocol it was designed to be.

Open ID Connect adds an additional layer on top of the OAuth protocol that solves a number of these problems. In this post we take a look at the differences between OpenID Connect and OAuth, how to use Open ID Connect in your ASP.NET Core application, and how to register your application with an OpenID Connect provider (in this case, Google).

What is OpenID Connect?

OpenID Connect is a simple identity layer that works over the top of OAuth 2.0. It uses the same underlying REST protocol, but adds consistency and additional security on top of the OAuth protocol.

It is also worth noting that OpenID Connect is a very different protocol to OpenID. The later was an XML based protocol, which follows similar approaches and goals to OpenID Connect but in a less developer-friendly way.

Why use it instead of OAuth 2.0?

In my recent post I showed how you could use OAuth 2.0 to login with Facebook on your ASP.NET Core application. You may be thinking 'why do I need another identity layer, OAuth 2.0 works perfectly well?'. Unfortunately there are a few problems with OAuth 2.0 as an authentication mechanism.

First of all, OAuth 2.0 is fundamentally an authorisation protocol, not an authentication protocol. It's entire design is based around providing access to some protected resource (e.g. Facebook Profile, or Photos) to a third party (e.g. your ASP.NET Core application).

When you 'Login with Facebook' we are doing a pseudo-authentication, by proving that you can provide access to the protected resource. Nat Sakimura explains it brilliantly on his blog, when he says using OAuth for authentication is like giving someone a valet key to your house. By being able to produce a key to your house, the website is able to assume that you are a given person, but you haven't really been properly authenticated as such. Also, that website now has a key to your house! That latter point is one of the major security concerns around OAuth 2.0 - there are various mitigations in place, but they don't address the fundamental concern.

OpenID Connect handles this issue in OAuth 2.0 by essentially only providing a key to a locker that contains your identity proof. Rather than granting access to your whole house, the locker is all you can get to.

Secondly, OAuth 2.0 is very loose in it's requirements for implementation. The specification sets a number of technical details, but there are many subtly different implementations across various providers. Just take a look at the number of providers available in the AspNet.Security.OAuth.Providers repository to get a feel for it. Each of those providers requires some degree of customisation aside from specifying urls and secrets. Each one returns data in a different format and must have the returned Claims parsed. OpenID Connect is far more rigid in its requirements, which allows a great deal of interoperability.

Finally, OpenID Connect provides additional features that enhance security such as signing of web tokens and verification that a given token was assigned to your application. It also has a discovery protocol which allows your website to dynamically register with a new OpenID Connect Provider, without having to explicitly pre-register your application with them.

Where it is available, it really seems like the best advice is to always choose over OpenID Connect over plain OAuth. Indeed, Brock Allen, of Identity Server fame (among other things), says pretty much this on his blog:

...we always saw OpenID Connect as a “super-set” of OAuth 2.0 and always recommended against using OAuth without the OIDC parts.

The Flow

In terms of the protocol flow between the user, your ASP.NET application and the identity provider when using OpenID Connect, it is essentially the same as the OAuth 2.0 flow I outlined in the previous article on OAuth 2.0. As mentioned previously, OpenID Connect builds on top of OAuth 2.0, so it probably shouldn't be that surprising!

An introduction to OpenID Connect in ASP.NET Core

As before there are multiple different possible flows depending on your application type (e.g. mobile app, website, single page application etc), but the standard website flow is essentially identical to OAuth 2.0. This version typically still requires you register your application with the provider before adding it to your website, but allows automatic configuration of the endpoint urls in your website through a service discovery protocol. You just need to set the domain (Authority in spec parlance) at which the configuration can be found and your application can set everything else up for you.
Under the covers there are some subtle differences in the data getting sent back and forth between your application and the authorisation servers, but this is largely hidden from you as a consuming developer. The scope parameter has an additional openid value to indicate that it is a OpenID Connect request and the ACCESS_CODE response contains an id_token which is used to verify the integrity of the data. Finally, the request to the resource server to fetch any additional claims returns claims in a standardised way, using preset claim keys such as given_name, family_name and email. This spares you the implementation-specific mapping of claims that is necessary with OAuth 2.0.

Adding OpenID Connect to your application

Hopefully by now you are convinced of the benefits OpenID Connect can provide, so lets look at adding it to an ASP.NET Core project.

As before, I'll assume you have an ASP.NET Core project, built using the default 'Individual user accounts' MVC template.

The first thing is to add the OpenID Connect package to your project.json:

{
  "dependencies": {
    "Microsoft.AspNetCore.Authentication.OpenIdConnect": "1.0.0"
  }
}

and configure the middleware in your Startup.Configure method:

public void Configure(IApplicationBuilder app, IHostingEnvironment env)  
{

    app.UseStaticFiles();

    app.UseIdentity();

    app.UseOpenIdConnectAuthentication(new OpenIdConnectOptions
        {
            ClientId = Configuration["ClientId"],
            ClientSecret = Configuration["ClientSecret"],
            Authority = Configuration["Authority"],
            ResponseType = OpenIdConnectResponseType.Code,
            GetClaimsFromUserInfoEndpoint = true
        });

    app.UseMvc(routes =>
    {
        routes.MapRoute(
            name: "default",
            template: "{controller=Home}/{action=Index}/{id?}");
    });
}

We created a new OpenIdConnectOptions object, added the ClientId and ClientSecret we received when registering our app with the OpenID Connect provider (more on that below), and specified the Authority which indicates the actual OpenID Connect provider we are using. As usual, we loaded these values from configuration, which should be stored in the user secrets manager when developing.

For the remainder of the article I'll assume you are configuring Google as your provider, so in this case the 'Authority' value would be "https://accounts.google.com". With the middleware in place, we have everything we need for a basic 'Login via Google' OpenID Connect implementation.

When the user gets to the login page, they will see the option to login using 'OpenIdConnect'. Obviously in production you would probably want to update that to something more user-friendly!

An introduction to OpenID Connect in ASP.NET Core

The user is then presented with their usual google login screen (if not already logged in) and asked to authorise your ASP.NET application:

An introduction to OpenID Connect in ASP.NET Core

Clicking 'Allow' will redirect the user back to your ASP.NET application with an AUTH_CODE. You app can then communicate through the back channel to Google to authenticate the user, and to sign them in to your application.

Registering your application with Google

Just like when we were configuring Facebook to be an OAuth 2.0 provider for our application, we need to register our application with Google before we can use OpenID Connect.

The first step is to visit http://console.developers.google.com and sign up as a developer. Once you are logged in and configured, you can register your app. Click 'Project' and 'Create Project' from the top menu

An introduction to OpenID Connect in ASP.NET Core

You will need to give your application a name and agree to the terms and conditions:

An introduction to OpenID Connect in ASP.NET Core

Now you need to generate some credentials for your application so we can obtain the necessary CLIENTID and CLIENTSECRET. Click 'Credentials' in the left bar, and if necessary, select your project. You can then create credentials for your project. For an ASP.NET Core website you will want to select the OAuth client ID option:

An introduction to OpenID Connect in ASP.NET Core

Next, choose Web application from the available options, provide a name, and a redirect URI. This URI will be the domain at which your application will be deployed (in my case http://localhost:5000) followed by /signin-oidc (by default)

An introduction to OpenID Connect in ASP.NET Core

On clicking create, you will be presented with your CLIENTID and CLIENTSECRET. Simply store these in your user secrets and you're good to go!

Summary

In this post we saw how to add sign in using OpenID Connect to an ASP.NET Core application. We outlined the differences of the OpenID Connect protocol compared to OAuth 2.0 and highlighted the security and development benefits over plain OAuth. Finally, we showed how to register your application with Google to obtain your Client Id and Secret.

Configuring environment specific services for dependency injection in ASP.NET Core

$
0
0
Configuring environment specific services for dependency injection in ASP.NET Core

In this short post I show how you can configure dependency injection so that different services will be injected depending if you are in a development or production environment.

tl;dr - save the IHostingEnvironment injected in your Startup constructor for use in your ConfigureServices method.

Why would you want to?

There are a whole number of possibilities for why you might want to do this, but fundamentally it's becuase you want things to work differently in production than in development. For example when you're running and testing in a development environment:

  • You probably don't want emails to be sent to customers
  • You might not want to rely on an external service
  • You might not want to use live authentication details for an external service
  • You might not want to have to use 2FA every time you login to your app.

Many of these issues can be handled with simple configuration - for example you may point to a local development mail server instead of the production mail server for email. This is simple to do with the new configuration system and is a great option in many cases.

However sometimes configuration just can't handle everything you need. For example, say call an external api to retrieve currency rates. If that api costs money, you obviously don't want to be calling it in development. However you can't necessarily just use configuration to point to a different endpoint - you would need a different endpoint that delivers data in the same format etc which is likely not available to you.

Instead, a better way to handle the issue would be to use a facade around the external api call, and creating two separate implementations - one that uses the external api, the other that just returns some dummy data. In production you can use the live api, while in production you can use the dummy service, without having to worry about the external service at all.

For example, you might create code similar to the following:

public interface ICurrencyRateService  
{
    ICollection<CurrencyRate> GetCurrencyRates();
}

public class ExternalCurrencyRateService : ICurrencyRateService  
{
    private readonly IExternalService _service;
    public ExternalCurrencyRateService(IExternalService service)
    {
        _service = service;
    }

    ICollection<CurrencyRate> GetCurrencyRates()
    {
        return _service.GetRates();
    }
}

public class DummyCurrencyRateService : ICurrencyRateService  
{
    public ICollection<CurrencyRate> GetCurrencyRates()
    {
        return new [] {
            new CurrencyRate {
                Currency = "GBP",
                Rate = 1.00
            },
            new CurrencyRate {
                Currency = "USD",
                Rate = 1.31
            }
            // ...more currencies
        };
    }
}

In these classes we define an interface, a live implementation which uses the IExternalService, and a dummy service which just returns back some dummy data.

A first attempt

In my first attempt to hook these two services up, I tried just injecting the IHostingEnvironment directly into the ConfifgureServices call in my Startup class, like so:

public void ConfigureServices(IServiceCollection services, IHostingEnvironment env)  
{
    // Add required services.
}

Many methods in the ASP.NET Core framework allow this kind of dependency injection at the method level. For example you can inject services into the Startup.Configure method when configuring your app, or into the Invoke method when creating custom middleware. Unfortunately in this case, the method must be exactly as described, otherwise your app will crash on startup with the following error:

Unhandled Exception: System.InvalidOperationException: The ConfigureServices method  
must either be parameterless or take only one parameter of type IServiceCollection.  

Doh! This does kind of make sense as until you have configured the services by calling the method, you don't have a service provider to use to inject them!

The right way

Luckily, we have a simple alternative. The Startup class itself may contain a constructor which accepts an instance of IHostingEnvironment. By convention this method creates the IConfigurationRoot using a ConfigurationBuilder and saves it to a property on Startup called Configuration.

We can easily take a similar approach for IHostingEnvironment by saving it to a property on Startup, for use later in ConfigureServices. Our Startup method would look something like this:

using Microsoft.AspNetCore.Builder;  
using Microsoft.AspNetCore.Hosting;  
using Microsoft.Extensions.Configuration;  
using Microsoft.Extensions.DependencyInjection;  
using Microsoft.Extensions.Logging;

public class Startup  
{
    public Startup(IHostingEnvironment env)
    {
        Configuration = new ConfigurationBuilder()
            .SetBasePath(env.ContentRootPath)
            .AddJsonFile("appsettings.json", optional: true, reloadOnChange: true)
            .Build();

        HostingEnvironment = env;
    }

    public IConfigurationRoot Configuration { get; }
    public IHostingEnvironment HostingEnvironment { get; }

    public void ConfigureServices(IServiceCollection services)
    {
        if (HostingEnvironment.IsDevelopment())
        {
            services.AddTransient<ICurrencyRateService, DummyCurrencyRateService>();
        }
        else
        {
            services.AddTransient<ICurrencyRateService, ExternalCurrencyRateService>();
        }

        // other services
    }

    public void Configure(IApplicationBuilder app, IHostingEnvironment env, ILoggerFactory loggerFactory)
    {
            // middleware configuration
    }
}

As you can see, we simply save the inject IHostingEnvironment in the constructor to the HostingEnvironment property. Later, in the ConfigureServices method, we can check the environment, and if in a development setting, inject the appropriate ICurrencyRateService.

Summary

The technique shown above will not always be necessary, and generally speaking configuration will probably be a simple and more intuitive route to handling different behaviour based on environment. However the dependency injection container is also a great point to switch out your services. If you are using a third party container there are often other ways of achieving the same effect with their native APIs, for example the profiles feature in StructureMap.


Configuring environment specific services in ASP.NET Core - Part 2

$
0
0
Configuring environment specific services in ASP.NET Core - Part 2

In my previous post, I showed how you could configure different services for dependency injection depending on the current hosting environment, i.e. whether you are currently running in Development or Production.

The approach I demonstrated required storing the IHostingEnvironment variable passed to the constructor of your Startup class, for use in the ConfigureServices method.

In this post I show an alternative approach, in which you use environment-specific methods on your startup class, rather than if-else statements in ConfigureServices.

The default Startup class

By convention, a standard ASP.NET Core application uses a Startup class for application setting configuration, setting up dependency injection, and defining the middleware pipeline. If you use the default MVC template when creating your project, this will produce a Startup class with a signature similar to the following:

public class Startup  
{
  public Startup(IHostingEnvironment env)
  {
    // Configuration settings
  }

  public void ConfigureServices(IServiceCollection services)
  {
    // Service dependency injection configuration
  }

  public void Configure(IApplicationBuilder app)
  {
    /// Middleware configuration
  }
}

Note that the Startup class does not implement any particular interface, or inherit from a base class. Instead, it is a simple class, which follows naming conventions for the configuration methods.

As a reminder, this class is referenced as part of the WebHostBuilder setup, which typically resides in Program.cs:

var host = new WebHostBuilder()  
    .UseKestrel()
    .UseContentRoot(Directory.GetCurrentDirectory())
    .UseStartup<Startup>()
    .Build();

host.Run();  

In addition to this standard format, there are some supplementary conventions that are particularly useful in the scenarios I described in my last post, where you want a different service injected depending on the runtime hosting environment. I'll come to the conventions shortly, but for now consider the following scenario.

I have an ISmsService my application uses to send SMS messages. In production I will need to use the full implementation, but when in development I don't want an SMS to be sent every time I test it, especially as it costs me money each time I use it. Instead, I need to use a dummy implementation of ISmsService.

Extension methods

In the previous post, I showed how you can easily use an if-else construct in your ConfigureServices method to meet these requirements. However, if you have a lot of these dummy services that need to be wired up, the method could quickly become long and confusing, especially in large apps with a lot of dependencies.

This can be mitigated to an extent if you use the extension method approach for configuring your internal services, similar to that suggested by K. Scott Allen in his post. In his post, he suggests wrapping each segment of configuration in an extension method, to keep the Startup.ConfigureServices method simple and declarative.

Considering the SMS example above, we might construct an extension method that takes in the hosting environment, and configures all the ancillary services. For example:

public static class SmsServiceExtensions  
{
  public static IServiceCollection AddSmsService(this IServiceCollection services, IHostingEnvironment env, IConfigurationRoot config)
  {
    services.Configure<SmsSettings>(config.GetSection("SmsSettings"));
    services.AddSingleton<ISmsTemplateFactory, SmsTemplateFactory>();
    if(env.IsDevelopment())
    {
      services.AddTransient<ISmsService, DummySmsService>();
    }
    else
    {
      services.AddTransient<ISmsService, SmsService>();
    }
    return services;
  }
}

These extension methods encapsulate a discrete unit of configuration, all of which would otherwise have resided in the Startup.ConfigureServices method, leaving your ConfigureServices method far easier to read:

public void ConfigureServices(IServiceCollection services)  
{
  services.AddMVC();
  services.AddSmsService(Environment, Configuration);
}

The downside to this approach is that your service configuration is now spread across many different classes and methods. Some people will prefer to have all the configuration code in the Startup.cs file, but still want to avoid the many if-else constructs for configuring Development vs Production dependencies.

Luckily, there is another approach at your disposal, by way of environment-specific Configure methods.

Environment-Specific method conventions

The ASP.NET Core WebHostBuilder has a number of conventions it follows when locating the configuration methods on the Startup class.

As we've seen, the Configure and ConfigureServices methods are used by default. The main advantage of not requiring an explicit interface implementation is that the WebHostBuilder can inject additional dependencies into these methods. However it also enables the selection of different methods depending on context.

As described in the documentation, the Startup class can contain environment specific configuration methods of the form Configure{EnvironmentName}() and Configure{EnvironmentName}Services().

If the WebHostBuilder detects methods of this form, they will be called preferentially to the standard Configure and ConfigureServices methods. We can use this to avoid the proliferation of if-else in our startup class. For example, considering the SMS configuration previously:

public class Startup  
{
  public void ConfigureServices(IServiceCollection services)
    {
        ConfigureCommonServices(services);
        services.AddTransient<ISmsService, SmsService>();
    }

    // This method gets called by the runtime. Use this method to add services to the container.
    public void ConfigureDevelopmentServices(IServiceCollection services)
    {
        ConfigureCommonServices(services);
        services.AddTransient<ISmsService, DummySmsService>();
    }

    private void ConfigureCommonServices(IServiceCollection services)
    {
        services.Configure<SmsSettings>(config.GetSection("SmsSettings"));
        services.AddSingleton<ISmsTemplateFactory, SmsTemplateFactory>();
    }
}

With this approach, we can just configure our alternative implementation services in the appropriate methods. At runtime the WebHostBuilder will check for the presence of a Configure{EnvironmentName}Services method.

When running in Development, ConfigureDevelopmentServices will be selected and the DummySmsService will be used. In any other environment, the default ConfigureServices will be called.

Note that we add all the service configuration that is common between environments to a private method ConfigureCommonServices, which is called by both configure methods. This prevents fragile duplication of configuration for services common between environments.

Environment-Specific class conventions

As well as the convention based methods in Startup, you can also take a convention-based approach for the whole Startup class. This allows you to completely separate your configuration code when in Development from other environments, by creating classes of the form Startup{Environment}.

For example, you can create a StartupDevelopment class and a Startup class - when you run in the Development environment, StartupDevelopment will be used for configuring your app and services. In other environments, Startup will be used.

So for example, we could have the following Startup Class

public class Startup  
{
  public Startup(IHostingEnvironment env)
  {
    // Configuration settings
  }

  public void ConfigureServices(IServiceCollection services)
  {
    // Service dependency injection configuration
    services.AddTransient<ISmsService, SmsService>();
  }

  public void Configure(IApplicationBuilder app)
  {
    /// Middleware configuration
  }
}

and an environment-specific version for the Development environment:

public class StartupDevelopment  
{
  public StartupDevelopment(IHostingEnvironment env)
  {
    // Configuration settings
  }

  public void ConfigureServices(IServiceCollection services)
  {
    // Service dependency injection configuration
    services.AddTransient<ISmsService, DummySmsService>();
  }

  public void Configure(IApplicationBuilder app)
  {
    /// Middleware configuration
  }
}

In order to use this convention based approached to your startup class, you need to use a different overload in the WebHostBuilder:

var assemblyName = typeof(Startup).GetTypeInfo().Assembly.FullName;

var host = new WebHostBuilder()  
    .UseKestrel()
    .UseContentRoot(Directory.GetCurrentDirectory())
    .UseStartup(assemblyName)
    .Build();

host.Run();  

Rather than using the generic UseStartup<T> method, we need to use the overload UseStartup(string startupAssemblyName). Under the hood, the WebHostBuilder will use reflection to find a Startup class in the provided assembly called Startup or Startup{Environment}. The environment-specific class will be used by default, falling back to the Startup class if no environment-specific version is found. If no candidate classes are found, the builder will throw an InvalidOperationException when starting your application.

Bear in mind that if you use this approach, you will need to duplicate any configuration that is common between environments, including application settings, service configuration and the middleware pipeline. If your application runs significantly differently between Development and Production then this approach may work best for you.

In my experience, the majority of the application configuration is common between all environments, with the exception of a handful of environment-specific services and middleware. Generally I prefer the if-else approach with encapsulation via extension methods as the application grows, but it is generally down to personal preference, and what works best for you.
Summary

In a previous post, I showed how you could use IHostingEnvironment to control which services are registered with the DI container at runtime, depending on the hosting environment.

In this post, I showed how you could achieve a similar result using naming conventions baked in to the WebHostBuilder implementation.

These conventions allow automatic selection of Configure{EnvironmentName} and Configure{Environment}Services methods in your Startup class depending on the current hosting environment.

Additionally, I showed the convention based approach to Startup class selection, whereby your application will automatically select a Startup class of the form Startup{Environment} if available.

HTML minification using WebMarkupMin in ASP.NET Core

$
0
0
HTML minification using WebMarkupMin in ASP.NET Core

It is common practice in web development to minify your static assets (CSS, JavaScript, images) as part of your deployment process. This reduces the amount of data being sent over the network, without changing the function of the code within.

In contrast, it is not very common to minify the HTML returned as part of a standard web request. In this post I show an easy way to add to add HTML minification to your ASP.NET Core application at runtime.

Why minify?

First of all, lets consider why we would want to minify HTML at all. It has been shown time and again that a slower page response leads to higher bounce rates, and that a more performant site has a direct benefit in terms of greater sales, so the speed with which we can render something on the user's browser is critical.

Minification is a performance optimisation, designed to reduce the amount of data being transferred over the network. At the simplest level it involves removing white-space, while more complex minifiers can perform operations such as variable renaming to reduce name lengths, and rewriting if-else constructs to use ternary expressions for example.

Javascript libraries are often available on public CDNs, so you can gain an additional performance boost there, avoiding having to serve files from your own servers at all.

HTML on the other hand will likely always need to come directly from your server. In addition, it will normally be the very first request sent as part of a page load, so getting the data back to the browser as fast as possible is critical.

Why isn't HTML minified by default?

Given that the benefits of reducing the size of data sent across the network seems clear, you may wonder why HTML isn't minimised by default.

The CSS and Javascript for a web application are typically fixed at build time, which gives the perfect opportunity to optimise the files prior to deployment. You can minify (and bundle) them once when you publish your application and know you won't have to update them again.

In contrast, the HTML returned by an application is often highly dynamic. Consider a simple ecommerce site - different HTML needs to be returned for the same url depending if the user is logged in or not, whether the product is on sale, whether the related products have changed etc etc.

Given the HTML is not static, we either have to minify the HTML in realtime as it is generated and sent across the network, or, if possible, minify the HTML portion of the templates from which we are generating the final markup.

In addition, it is sometimes pointed out that using compression on your server (e.g. GZIP) will already be significantly reducing the data sent across the network, and that minifying your html is not worth the work. It's true that GZIP is very effective, especially for a markup language like HTML, however there are still gains to be made, as I'll show below.

How much could we save?

About two years ago, Mads Kristensen wrote a series of posts about HTML minification, in one of which he demonstrated the savings that could be made by minifying as well as using GZIP on some HTML pages. I decided to recreate his experiment using the web pages as they are today, and got the following results:

ModeFile Size (KB)MinifiedGZIPMinified & GZIPSaving
amazon.com 35533277.172.95.4%
xbox.com 16110623.319.914.5%
twitter.com 72467577.165.015.6%
Default MVC Template Home Page7.35.31.91.85.3%

HTML minification using WebMarkupMin in ASP.NET Core

The results are broadly in line with those found by Mads. GZIP compression does perform the bulk of the work in reducing file size, but minifying the HTML prior to GZIP compression can reduce the file size by an additional 5-15%, which is not to be sniffed at!

Potential solutions

As mentioned before, in order to add HTML minification to your application you either need to minify the HTML at runtime as part of the pipeline, or you can minify the razor templates that are used to generate the final HTML.

Minifying razor templates

As with most software architecture choices, there are tradeoffs for each approach. Minifying the razor templates before publishing them seems like the most attractive option as it is a one-off compile time cost, and is in-keeping with the CSS and JavaScript best practices used currently. Unfortunately doing so requires properly parsing the razor syntax which, due to a few quirks, is not as trivial as might seem.

One such attempt is the ASP.NET Html Minifier by Dean Hume and is described in his blog post. It uses a standalone application to parse and minify your .cshtml files as part of the publish process. Under the hood, the majority of the processing is performed using regular expressions.

Another approach by Muhammed Rehan Saeed uses a gulp task to minify the .cshtml razor files on a publish. This also uses a regex approach to isolating the razor portions. Rehan has a blog post discussing the motivation for HTML minification in ASP.NET which is well worth reading. He also raised the issue with the MVC team regarding adding razor minification as part of the standard build process.

Minifying HTML at runtime

Minifying the razor templates seems like the most attractive solution, as it has zero overhead at runtime - the razor templates just happen to contain (mostly) already minified HTML before they are parsed and executed as part of a ViewResult. However, in some cases the razor syntax may cause the Regex minifiers to work incorrectly. As minification only occurs on publish, this could have the potential to cause bugs only in production, as development requires working with the unminified razor files.

Minifying the HTML just before it is served to the client (and before compression) is an easier process conceptually, as you are working directly with the raw HTML. You don't need to account for dynamic portions of the markup and you can be relatively sure about the results. Also, as the html is compressed as part of the pipeline, the razor templates can be pretty and unminified while you work with them, even if the resulting html is minified.

The downside to the runtime approach is the extra processing required for every request. No minification is done up front, and as the HTML may be different every time, the results of minification cannot be easily cached. This additional processing will inevitably add a small degree of latency. The tradeoff between the additional latency due to the extra processing and the reduced download time due to small data size is again something you will need to consider in general.

In the previous ASP.NET there were a couple of options to choose from for doing runtime minification of HTML, e.g. Meleze.Web or Mads' WhitespaceModule, but the only project I have found for ASP.NET Core is WebMarkupMin.

Adding Web Markup Min to your ASP.NET Core app

WebMarkupMin is a very mature minifier, not just for HTML but also XML and XHTML, as well as script and style tags embedded in your HTML. They provide multiple NuGet packages for hooking up your ASP.NET applications, both for ASP.NET 4.x using MVC, HttpModules, WebForms(!) and luckily for us, ASP.NET Core.

The first thing to get started with WebMarkupMin is to install the package in your project.json. Be sure to install the WebMarkupMin.AspNetCore1 package for ASP.NET Core (not the WebMarkupMin.Core package):

{
  "dependencies": {
    "WebMarkupMin.AspNetCore1": "2.1.0"
  }
}

The HTMl minifier is implemented as a standard ASP.NET Core middleware, so you register it in your application's Startup.Configure method as usual:

public void Configure(IApplicationBuilder app)  
{
    app.UseStaticFiles();

    app.UseWebMarkupMin();

    app.UseMvc(routes =>
    {
        routes.MapRoute(
            name: "default",
            template: "{controller=Home}/{action=Index}/{id?}");
    });
}

As always with ASP.NET Core middleware, order is important here. I chose to register the WebMarkupMin middleware after the static file handler. That means the minifier will not run if the static file handler serves a file. If you are serving html files (or angular templates etc) using the static file handler then you may want to move the minifier earlier in the pipeline.

The final piece of configuration for the middleware is to add the required services to the IoC container. The minification and compression services are opt-in, so you only add the minifiers you actually need. In this case I am going to add an HTML minifier and HTTP compression using GZIP, but will not bother with XML or XHTML minifiers as they are not being used.

public void ConfigureServices(IServiceCollection services)  
{
    services.AddMvc();

    services.AddWebMarkupMin(
        options =>
        {
            options.AllowMinificationInDevelopmentEnvironment = true;
            options.AllowCompressionInDevelopmentEnvironment = true;
        })
        .AddHtmlMinification(
            options =>
            {
                options.MinificationSettings.RemoveRedundantAttributes = true;
                options.MinificationSettings.RemoveHttpProtocolFromAttributes = true;
                options.MinificationSettings.RemoveHttpProtocolFromAttributes = true;
            })
        .AddHttpCompression();
}

The services allow you to set a plethora of options in each case. I have chosen to enable minification and compression in development (rather than only in production), and have enabled a number of additional HTML minification options. These options will remove attributes from HTML elements where they are not required (e.g. the type="text" attribute on an input) and will strip the protocol from uri based attributes.

There are a whole host of additional options you can specify to control the HTML minification, which has excellent documentation on the GitHub wiki. Here you can control any number of additional parameters such as level of whitespace removal, preserving custom elements for e.g. angular templates, or defining required HTML comments for e.g. Knockout containerless binding directives.

With your services and middleware in place, you can run your application and see the sweet gains!

The image below shows the result of loading the xbox home page before and after adding WebMarkupMin to an ASP.NET Core application. I used the built in network throttle in Chrome Dev tools set to DSL (5ms latency, 2 Mbit/s download speed) to emulate a realistic network and compared the results before and after :

HTML minification using WebMarkupMin in ASP.NET Core

As you can see, adding the HTML minification + compression at runtime has a latency cost that is relatively significant when you add in minification, but this loss is well compensated for by the reduced size of the data transfer, giving an 80% reduction in total download time.

Summary

In this post I explained the motivation for HTML minification and showed the reduction in file size that could be achieved through HTML compression, with or without additional GZIP HTTP compression.

I described the options for using HTML minification, be that at publish or runtime, and presented tools to achieve both.

Finally I demonstrated how you could use WebPackMin in your ASP.NET Core application to enable HTML minification and HTTP compression, and showed the improvement in download time that it gives on a relatively large HTML file.

I hope you found the post useful, as usual you can find the source code for this and my other posts on GitHub at https://github.com/andrewlock/blog-examples. If you know of any other useful tools, do let me know in the comments. Thanks!

Viewing what's changed in ASP.NET Core 1.0.1

$
0
0
Viewing what's changed in ASP.NET Core 1.0.1

On 13th September, Microsoft announced they are releasing an update to .NET Core they are calling .NET Core 1.0.1. Along with the framework update, they are also releasing 1.0.1 version of ASP.NET and Entity Framework Core. Details about the update can be found in a blog post by Microsoft.

The post does a good job of laying out the process you should take to update both your machine and applications. It also outlines the changes that have occurred, as well as the corresponding security advisory.

I was interested to know exactly what had changed in the source code between the different releases, in ASP.NET in particular. Luckily as all ASP.NET Core development is open source on GitHub, that's pretty easy to do!:)

Comparing between tags and branches in GitHub

A feature that is not necessarily that well known is the ability to compare between two tags and branches using a url of the form:

https://github.com/{username}/{repo}/compare/{older-tag}...{newer-tag}  

This presents you with a view of all the changes between the two provided tags. Alternatively, navigate to a repository, select branches, click the compare button and select the branches or tags to compare manually.

Viewing what's changed in ASP.NET Core 1.0.1

In the rest of the post, I'll give a rundown of the significant changes in the ASP.NET Core and EF Core libraries.

Changes in ASP.NET MVC

Most of the changes in the ASP.NET MVC repository are version changes of dependencies, incrementing from 1.0.0 to 1.0.1. Aside from these, there were a number of minor whitespace changes, comment changes, minor refactorings and additional unit tests. For the purpose of this post, I'm only going to focus on changes with a tangible difference to users. You can see the full diff here.

The first notable change is the handling of FIPS mode in the SHA256 provider. A static helper class, CryptographyAlgorithms, shown below, has been added to handle the case that you are running on a Windows machine with FIPS mode enabled. FIPS mode stands for 'Federal Information Processing Standard' and defines a set of approved cryptographic algorithms for US government computers - see here for a more detailed description. If you're not running applications on US federal computers, this change probably won't affect you.

using System.Security.Cryptography;

namespace Microsoft.AspNetCore.Mvc.TagHelpers.Internal  
{
    public static class CryptographyAlgorithms
    {
#if NETSTANDARD1_6
        public static SHA256 CreateSHA256()
        {
            var sha256 = SHA256.Create();

            return sha256;
        }
#else
        public static SHA256 CreateSHA256()
        {
            SHA256 sha256;

            try
            {
                sha256 = SHA256.Create();
            }
            // SHA256.Create is documented to throw this exception on FIPS compliant machines.
            // See: https://msdn.microsoft.com/en-us/library/z08hz7ad%28v=vs.110%29.aspx?f=255&MSPPError=-2147217396
            catch (System.Reflection.TargetInvocationException)
            {
                // Fallback to a FIPS compliant SHA256 algorithm.
                sha256 = new SHA256CryptoServiceProvider();
            }

            return sha256;
        }
#endif
    }
}

The second significant change is in MvcViewFeaturesMvcCoreBuilderExtensions. This class is called as part of the standard MVC service configuration for registering with the dependency injection container. The file has a single changed line, where the registration of ViewComponentResultExecutor is changed from singleton to transient.

Viewing what's changed in ASP.NET Core 1.0.1

I haven't dug into it further, but I suspect this is where the privilege elevation security bug mentioned in the announcement arose. This really shows how important it is to configure your service lifetimes correctly. This is especially important when adding additional dependency to an already existing and configured class, to be ensure you don't end up with captured transient dependencies.

The final main change in the MVC repository fixes this issue whereby a DELETE route is incorrectly matched against a GET method. The commit message for the commit fixing the issue gives a great explanation of the problem, which boiled down to an overloaded == operator giving incorrect behaviour in this method. The fix was to replace the implicit Equals calls with ReferenceEquals.

Changes in AntiForgery

Much like the MVC repository, the AntiForgery repository uses a SHA256 algorithm. In order to not throw a TargetInvocationException when calling SHA256.Create() on FIPS enabled hardware, it falls back to the SHA256CryptoServiceProvider. Again, if you are not running on US Federal government computers then this probably won't affect you. You can view the diff here.

Changes in KestrelHttpServer

There is a single change in the Kestrel web server that fixes this bug, whereby replacing the Request.Body or Response.Body stream of the HttpContext causes it to be replaced for all subsequent requests too. This simple fix solves the problem by ensuring the streams are reset correctly on each request:

Viewing what's changed in ASP.NET Core 1.0.1

Other changes

I've highlighted the changes in ASP.NET Core 1.0.1, but there are also a tonne of minor changes in the Entity Framework Core library, too many to list here. You can view the full change list here. Finally, the CoreCLR runtime has fixed these three bugs (here, here and here), and the templates in the dotnet CLI have been updated to use version 1.0.1 of various packages.

Summary

This was just a quick update highlighting the changes in ASP.NET Core. As you can see, the changes are pretty minimal, like you'd expect for a patch release. However the changes highlight a number of bugs to keep an eye out for when writing your own applications - namely incorrect service lifetimes and potential bugs when overloading the == operators.

Adding Localisation to an ASP.NET Core application

$
0
0
Adding Localisation to an ASP.NET Core application

In this post I'll walk through the process of adding localisation to an ASP.NET Core application using the recommended approach with resx resource files.

Introduction to Localisation

Localisation in ASP.NET Core is broadly similar to the way it works in the ASP.NET 4.X. By default you would define a number of .resx resource files in your application, one for each culture you support. You then reference resources via a key, and depending on the current culture, the appropriate value is selected from the closest matching resource file.

While the concept of a .resx file per culture remains in ASP.NET Core, the way resources are used has changed quite significantly. In the previous version, when you added a .resx file to your solution, a designer file would be created, providing static strongly typed access to your resources through calls such as Resources.MyTitleString.

In ASP.NET Core, resources are accessed through two abstractions, IStringLocalizer and IStringLocalizer<T>, which are typically injected where needed via dependency injection. These interfaces have an indexer, that allows you to access resources by a string key. If no resource exists for the key (i.e. you haven't created an appropriate .resx file containing the key), then the key itself is used as the resource.

Consider the following example:

using Microsoft.AspNet.Mvc;  
using Microsoft.Extensions.Localization;

public class ExampleClass  
{
    private readonly IStringLocalizer<ExampleClass> _localizer;
    public ExampleClass(IStringLocalizer<ExampleClass> localizer)
    {
        _localizer = localizer;
    }

    public string GetLocalizedString()
    {
        return _localizer["My localized string"];
    }
}

In this example, calling GetLocalizedString() will cause the IStringLocalizer<T> to check the current culture, and see if we have an appropriate resource file for ExampleClass containing a resource with the name/key "My localized string". If it finds one, it returns the localised version, otherwise, it returns "My Localized string".

The idea behind this approach is to allow you to design your app from the beginning to use localisation, without having to do up front work to support it by creating the default/fallback .resx file. Instead, you can just write the default values, then add the resources in later.

Personally, I'm not sold on this approach - it makes me slightly twitchy to see all those magic strings around which are essentially keys into a dictionary. Any changes to the keys may have unintended consequences, as I'll show later in the post.

Adding localisation to your application

For now, I'm going to ignore that concern, and dive in using Microsoft's recommended approach. I've started from the default ASP.NET Core Web application without authentication - you can find all the code on GitHub.

The first step is to add the localisation services in your application. As we are building an MVC application, we'll also configure View localisation and DataAnnotations localisation. The localisation packages are already referenced indirectly by the Microsoft.AspNetCore.MVC package, so you should be able to add the services and middleware directly in your Startup class:

public void ConfigureServices(IServiceCollection services)  
{
    services.AddLocalization(opts => { opts.ResourcesPath = "Resources"; });

    services.AddMvc()
        .AddViewLocalization(
            LanguageViewLocationExpanderFormat.Suffix,
            opts => { opts.ResourcesPath = "Resources"; })
        .AddDataAnnotationsLocalization();
}

These services allow you to inject the IStringLocalizer service into your classes. They also allow you to have localised View files (so you can have Views with names like MyView.fr.cshtml) and inject the IViewLocalizer, to allow you to use localisation in your view files. Calling AddDataAnnotationsLocalization configures the Validation attributes to retrieve resources via an IStringLocalizer.

The ResourcePath parameter on the Options object specifies the folder of our application in which resources can be found. So if the root of our application is found at ExampleProject, we have specified that our resources will be stored in the folder ExampleProject/Resources.

Configuring these classes is all that is required to allow you to use the localisation services in your application. However you will typically also need some way to select what the current culture is for a given request.

To do this, we use the RequestLocalizationMiddleware. This middleware uses a number of different providers to try and determine the current culture. To configure it with the default providers, we need to decide which cultures we support, and which is the default culture.

Note that the configuration example in the documentation didn't work for me, though the Localization.StarterWeb they reference did, and is reproduced below.

public void ConfigureServices(IServiceCollection services)  
{
    // ... previous configuration not shown

    services.Configure<RequestLocalizationOptions>(
        opts =>
        {
            var supportedCultures = new[]
            {
                new CultureInfo("en-GB"),
                new CultureInfo("en-US"),
                new CultureInfo("en"),
                new CultureInfo("fr-FR"),
                new CultureInfo("fr"),
            };

            opts.DefaultRequestCulture = new RequestCulture("en-GB");
            // Formatting numbers, dates, etc.
            opts.SupportedCultures = supportedCultures;
            // UI strings that we have localized.
            opts.SupportedUICultures = supportedCultures;
        });
}

public void Configure(IApplicationBuilder app)  
{
    app.UseStaticFiles();

    var options = app.ApplicationServices.GetService<IOptions<RequestLocalizationOptions>>();
    app.UseRequestLocalization(options.Value);

    app.UseMvc(routes =>
    {
        routes.MapRoute(
            name: "default",
            template: "{controller=Home}/{action=Index}/{id?}");
    });
}

Using localisation in your classes

We now have most of the pieces in place to start adding localisation to our application. We don't yet have a way for users to select which culture they want to use, but we'll come to that shortly. For now, lets look at how we go about retrieving a localised string.

Controllers and services

Whenever you want to access a localised string in your services or controllers, you can inject an IStringLocalizer<T> and use its indexer property. For example, imagine you want to localise a string in a controller:

public class HomeController: Controller  
{
    private readonly IStringLocalizer<HomeController> _localizer;

    public HomeController(IStringLocalizer<HomeController> localizer)
    {
        _localizer = localizer;
    }

    public IActionResult Index()
    {
        ViewData["MyTitle"] = _localizer["The localised title of my app!"];
        return View(new HomeViewModel());
    }
}

Calling _localizer[] will lookup the provided string based on the current culture, and the type HomeController. Assuming we have configured our application as discussed previously, the HomeController resides in the ExampleProject.Controllers namespace, and we are currently using the fr culture, then the localizer will look for either of the following resource files:

  • Resources/Controller.HomeController.fr.resx
  • Resources/Controller/HomeController.fr.resx

If a resource exists in one of these files with the key "The localised title of my app!" then it will be used, otherwise the key itself will be used as the resource. This means you don't need to add any resource files to get started with localisation - you can just use the default language string as your key and come back to add .resx files later.

Views

There are two kinds of localisation of views. As described previously, you can localise the whole view, duplicating it and editing as appropriate, and providing a culture suffix. This is useful if the views need to differ significantly between different cultures.

You can also localise strings in a similar way to that shown for the HomeController. Instead of an IStringLocalizer<T>, you inject an IViewLocalizer into the view. This handles HTML encoding a little differently, in that it allows you to store HTML in the resource and it won't be encoded before being output. Generally you'll want to avoid that however, and only localise strings, not HTML.

The IViewLocaliser uses the name of the View file to find the associated resources, so for the HomeController's Index.cshtml view, with the fr culture, the localiser will look for:

  • Resources/Views.Home.Index.fr.resx
  • Resources/Views/Home/Index.fr.resx

The IViewLocalizer is used in a similar way to IStringLocalizer<T> - pass in the string in the default language as the key for the resource:

@using Microsoft.AspNetCore.Mvc.Localization
@model AddingLocalization.ViewModels.HomeViewModel
@inject IViewLocalizer Localizer
@{
    ViewData["Title"] = Localizer["Home Page"];
}
<h2>@ViewData["MyTitle"]</h2>  

DataAnnotations

One final common area that needs localisation is DataAnnotations. These attributes can be used to provide validation, naming and UI hints of your models to the MVC infrastructure. When used, they provide a lot of additional declarative metadata to the MVC pipeline, allowing selection of appropriate controls for editing the property etc.

Error messages for DataAnnotation validation attributes all pass through an IStringLocalizer<T> if you configure your MVC services using AddDataAnnotationsLocalization(). As before, this allows you to specify the error message for an attribute in your default language in code, and use that as the key to other resources later.

public class HomeViewModel  
{
    [Required(ErrorMessage = "Required")]
    [EmailAddress(ErrorMessage = "The Email field is not a valid e-mail address")]
    [Display(Name = "Your Email")]
    public string Email { get; set; }
}

Here you can see we have three DataAnnotation attributes, two of which are ValidationAttributes, and the DisplayAttribute, which is not. The ErrorMessage specified for each ValidationAttribute is used as a key to lookup the appropriate resource using an IStringLocalizer<HomeViewModel>. Again, the files searched for will be something like:

  • Resources/ViewModels.HomeViewModel.fr.resx
  • Resources/ViewModels/HomeViewModel.fr.resx

A key thing to be aware of is that the DisplayAttribute is not localised using the IStringLocalizer<T>. This is far from ideal, but I'll address it in my next post on localisation.

Allowing users to select a culture

With all this localisation in place, the final piece of the puzzle is to actually allow users to select their culture. The RequestLocalizationMiddleware uses an extensible provider mechanism for choosing the current culture of a request, but it comes with three providers built in

  • QueryStringRequestCultureProvider
  • AcceptLanguageHeaderRequestCultureProvider
  • CookieRequestCultureProvider

These allow you to specify a culture in the querystring (e.g ?culture=fr-FR), via the Accept-Language header in a request, or via a cookie. Of the three approaches, using a cookie is the least intrusive, as it will obviously seamlessly be sent with every request, and does not require the user to set the Accept-Language header in their browser, or require adding to the querystring with every request.

Again, the Localization.StarterWeb sample project provides a handy implementation that shows how you can add a select box to the footer of your project to allow the user to set the language. Their choice is stored in a cookie, which is handled by the CookieRequestCultureProvider for each request. The provider then sets the CurrentCulture and CurrentUICulture of the thread for the request to the user's selection.

To add the selector to your application, create a partial view _SelectLanguagePartial.cshtml in the Shared folder of your Views:

@using System.Threading.Tasks
@using Microsoft.AspNetCore.Builder
@using Microsoft.AspNetCore.Localization
@using Microsoft.AspNetCore.Mvc.Localization
@using Microsoft.Extensions.Options

@inject IViewLocalizer Localizer
@inject IOptions<RequestLocalizationOptions> LocOptions

@{
    var requestCulture = Context.Features.Get<IRequestCultureFeature>();
    var cultureItems = LocOptions.Value.SupportedUICultures
        .Select(c => new SelectListItem { Value = c.Name, Text = c.DisplayName })
        .ToList();
}

<div title="@Localizer["Request culture provider:"] @requestCulture?.Provider?.GetType().Name">  
    <form id="selectLanguage" asp-controller="Home"
          asp-action="SetLanguage" asp-route-returnUrl="@Context.Request.Path"
          method="post" class="form-horizontal" role="form">
        @Localizer["Language:"] <select name="culture"
                                        asp-for="@requestCulture.RequestCulture.UICulture.Name" asp-items="cultureItems"></select>
        <button type="submit" class="btn btn-default btn-xs">Save</button>

    </form>
</div>  

We want to display this partial on every page, so update the footer of your _Layout.cshtml to reference it:

<footer>  
    <div class="row">
        <div class="col-sm-6">
            <p>&copy; 2016 - Adding Localization</p>
        </div>
        <div class="col-sm-6 text-right">
            @await Html.PartialAsync("_SelectLanguagePartial")
        </div>
    </div>
</footer>  

Finally, we need to add the controller code to handle the user's selection. This currently maps to the SetLanguage action in the HomeController:

[HttpPost]
public IActionResult SetLanguage(string culture, string returnUrl)  
{
    Response.Cookies.Append(
        CookieRequestCultureProvider.DefaultCookieName,
        CookieRequestCultureProvider.MakeCookieValue(new RequestCulture(culture)),
        new CookieOptions { Expires = DateTimeOffset.UtcNow.AddYears(1) }
    );

    return LocalRedirect(returnUrl);
}

And that's it! If we fire up the home page of our application, you can see the culture selector in the bottom right corner. At this stage, I have not added any resource files, but if I trigger a validation error, you can see that the resource key is used for the resource itself:

Adding Localisation to an ASP.NET Core application

My development flow is not interrupted by having to go and mess with resource files, I can just develop the application using the default language and add resx files later in development. If I later add appropriate resource files for the fr culture, and a user changes their culture via the selector, I can see the effect of localisation in the validation attributes and other localised strings:

Adding Localisation to an ASP.NET Core application

As you can see, the validation attributes and page title are localised, but the label field 'Your Email' has not, as that is set in the DisplayAttribute. (Apologies to any french speakers - totally Google translate's fault if it's gibberish!)

Summary

In this post I showed how to add localisation to your ASP.NET Core application using the recommended approach of providing resources for the default language as keys, and only adding additional resources as required later.

In summary, the steps to localise your application are roughly as follows:

  1. Add the required localisation services
  2. Configure the localisation middleware and if necessary a culture provider
  3. Inject IStringLocalizer<T> into your controllers and services to localise strings
  4. Inject IViewLocalizer into your views to localise strings in views
  5. Add resource files for non-default cultures
  6. Add a mechanism for users to choose their culture

In the next post, I'll address some of the problems I've run into adding localisation to an application, namely the vulnerability of 'magic strings' to typos, and localising the DisplayAttribute.

How to use machine-specific configuration with ASP.NET Core

$
0
0
How to use machine-specific configuration with ASP.NET Core

In this quick post I'll show how to easily setup machine-specific configuration in your ASP.NET Core applications. This allows you to use different settings depending on the name of the machine you are using.

The tl;dr; version is to add a json file to your project containing your computer's name, e.g. appsettings.MACHINENAME.json, and update your ConfigurationBuilder in Startup with the following line:

.AddJsonFile($"appsettings.{Environment.MachineName}.json", optional: true)

Background

Why would you want to do this? Well, it depends.

When working on an application with multiple people, you will often run into a situation where you need different configuration settings for each developer's machine. Typically, we find that file paths and sometimes connection strings need to customised per developer.

In ASP.NET 4.x we found this somewhat of an ordeal to manage. Typically, we would create a connection string for each developer's machine, and create appsettings of the form MACHINENAME_APPSETTINGNAME. For example,

<configuration>  
  <connectionStrings>
    <add name="DAVES-MACBOOK" connectionString="Data Source=DAVES-MACBOOK;Initial Catalog=TestApp; Trusted_Connection=True;" />
    <add name="JON-PC" connectionString="Data Source=JON-PC;Initial Catalog=TestAppDb; Trusted_Connection=True;" />
  </connectionStrings>
  <appSettings>
    <add key="DAVES-MACBOOK_StoragePath" value="D:\" />
    <add key="JON-PC_StoragePath" value="C:\Dump" />
  </appSettings>
</configuration>  

So in this case, for the two developer machines named DAVES-MACBOOK and JON-PC, we have a different connection string for each machine, as well as different values for each of the StoragePath application settings.

This requires a bunch of wrapper classes around accessing appsettings which, while a good idea generally, is a bit of an annoyance and ends up polluting web.config.

The new way in ASP.NET Core

With ASP.NET Core, the updated configuration system allows for a much cleaner replacement of settings depending on the environment.

For example, in the default configuration for a web application, you can have environment specific appsettings files such as appsettings.Production.json which will override the default values in the appropriate environment:

public Startup(IHostingEnvironment env)  
{
    var builder = new ConfigurationBuilder()
        .SetBasePath(env.ContentRootPath)
        .AddJsonFile("appsettings.json", optional: true, reloadOnChange: true)
        .AddJsonFile($"appsettings.{env.EnvironmentName}.json", optional: true)
        .AddEnvironmentVariables();
    Configuration = builder.Build();
}

Similarly, environment variables and UserSecrets can be used to override the default values. It's likely that in the majority of cases, these are perfect for the situation described above - they apply only to the single machine, and can override the default values provided.

In larger teams and projects this approach will almost certainly be the correct one - each individual machine contains the the specific settings for just that machine, and the repo isn't polluted with 101 different versions of the same setting.

However, it may be desirable in some cases, particularly in smaller teams, to actually store these values in the repo. Environment variables can be overwritten, UserSecrets can be deleted etc etc. With the .NET Core configuration system this alternative approach simple to achieve with a single additional line:

.AddJsonFile($"appsettings.{Environment.MachineName}.json", optional: true)

This uses string interpolation to insert the current machine name in the file path. The Environment class contains a number of environment-specific static properties like ProcessorCount, NewLine and luckily for us, MachineName. Using this approach, we can add a configuration file for each user with their machine-specific values e.g.

appsettings.DAVES-MACBOOK.json:

{
  "ConnectionStrings": {
    "DefaultConnection": "Data Source=DAVES-MACBOOK;Initial Catalog=TestApp; Trusted_Connection=True;"
  },
  "StoragePath": "D:\"
}

appsettings.JON-PC.json:

{
  "ConnectionStrings": {
    "DefaultConnection": "Data Source=JON-PC;Initial Catalog=TestAppDb; Trusted_Connection=True;"
  },
  "StoragePath": "C:\Dump"
}

Finally, if you want to deploy your machine-specific json files (you quite feasibly may not want to), then be sure to update the publishOptions section of your project.json:

{
  "publishOptions": {
    "include": [
      "wwwroot",
      "Views",
      "appsettings.json",
      "appsettings.*.json",
      "web.config"
    ]
  }
}

Note that you can use a wildcard in the appsettings name to publish all of your machine sepecific appsettings files, but be aware this will also publish all files of the format appsettings.Development.json etc too.

So there you have it, no more wrappers around the built in app configuration, per-machine settings stored in the application repo, and a nice clean interface, all courtesy of the cleanly designed .NET Core configuration system!

Localising the DisplayAttribute and avoiding magic strings in ASP.NET Core

$
0
0
Localising the DisplayAttribute and avoiding magic strings in ASP.NET Core

This post follows on from my previous post about localising an ASP.NET Core application. At the end of that article, we had localised our application so that the user could choose their culture, which would update the page title and the validation attributes with the appropriate translation, but not the form labels. In this post, we cover some of the problems you may run into when localising your application and approaches to deal with them.

Localising the DisplayAttribute and avoiding magic strings in ASP.NET Core

Brief Recap

Just so we're all on the same page, I'll briefly recap how localisation works in ASP.NET Core. If you would like a more detailed description, check out my previous post or the documentation.

Localisation is handled in ASP.NET Core through two main abstractions IStringLocalizer and IStringLocalizer<T>. These allow you to retrieve the localised version of a key by passing in a string; if the key does not exist for that resource, or you are using the default culture, the key itself is returned as the resource:

public class ExampleClass  
{
    public ExampleClass(IStringLocalizer<ExampleClass> localizer)
    {
        // If the resource exists, this returns the localised string
        var localisedString1 = _localizer["I exist"]; // "J'existe"

        // If the resource does not exist, the key itself  is returned
        var localisedString2 = _localizer["I don't exist"]; // "I don't exist"
    }
}

Resources are stored in .resx files that are named according to the class they are localising. So for example, the IStringLocalizer<ExampleClass> localiser would look for a file named (something similar to) ExampleClass.fr-FR.resx. Microsoft recommends that the resource keys/names in the .resx files are the localised values in the default culture. That way you can write your application without having to create any resource files - the supplied string will be used as the resource.

As well as arbitrary strings like this, DataAnnotations which derive from ValidationAttribute also have their ErrorMessage property localised automatically. However the DisplayAttribute and other non-ValidationAttributes are not localised.

Finally, you can localise your Views, either providing whole replacements for your View by using filenames of the form Index.fr-FR.cshtml, or by localising specific strings in your view with another abstraction, the IViewLocalizer, which acts as a view-specific wrapper around IStringLocalizer.

Some of the pitfalls

There are two significant issues I personally find with the current state of localisation;

  1. Magic strings everywhere
  2. Can't localise the DisplayAttribute

The first of these is a design decision by Microsoft, to reduce the ceremony of localising an application. Instead of having to worry about extracting all your hard coded strings out of the code and into .resx files, you can just wrap it in a call to the IStringLocalizer and worry about localising other languages down the line.

While the attempt to improve productivity is a noble goal, it comes with a risk. The problem is that the string values embedded in your code ("I exist" and "I don't exist" in the code above) are serving a dual purpose, both as a string resource for the default culture, and as a key into a resource dictionary.

Inevitably, at some point you will introduce a typo into one of your string resources, it's just a matter of time. You better be sure whoever spots it understands the implications of changing it however, as fixing your typo will cause every other localised language to break. The default resource which is embedded in your code can only be changed if you ensure that every other resource file changes at the same time. That coupling is incredibly fragile, and it will not necessarily be obvious to the person correcting the typo that anything has broken. It is only obvious if they explicitly change culture and notice that the string is no longer localised.

The second issue related to the DisplayAttribute seems like a fairly obvious omission - by it's nature it contains values which are normally highly visible (used as labels for a form) and will pretty much always need to be localised. As I'll show shortly there are workarounds for this, but currently they are rather clumsy.

It may be that these issues either don't bother you or are not a big deal, but I wanted to work out how to deal with them in a way that made me more comfortable. In the next sections I show how I did that.

Removing the magic strings

Removing the magic strings is something that I tend to do in any new project. MVC typically uses strings for any sort of dictionary storage, for example Session storage, ViewData, AuthorizationPolicy names, the list goes on. I've been bitten too many times by subtle typos causing unexpected behaviour that I like to pull these strings into utility classes with names like ViewDataKeys and PolicyNames:

public static class ViewDataKeys  
{
    public const string Title = "Title";
}

That way, I can use the strongly typed Title property whenever I'm accessing ViewData - I get intellisense, avoid typos and get renaming safely. This is a pretty common approach, and it can be applied just as easily with our localisation problem.

public static class ResourceKeys  
{
    public const string HomePage = "HomePage";
    public const string Required = "Required";
    public const string NotAValidEmail = "NotAValidEmail";
    public const string YourEmail = "YourEmail";
}

Simply create a static class to hold your string key names, and instead of using the resource in the default culture as the key, use the appropriate strongly typed member:

public class HomeViewModel  
{
    [Required(ErrorMessage = ResourceKeys.Required)]
    [EmailAddress(ErrorMessage = ResourceKeys.NotAValidEmail)]
    [Display(Name = "Your Email")]
    public string Email { get; set; }
}

Here you can see the ErrorMessage properties of our ValidationAttributes reference the static properties instead of the resource in the default culture.

The final step is to add a .resx file for each localised class for the default language (without a culture suffix on the file name). This is the downside to this approach that Microsoft were trying to avoid with their design, and I admit, it is a bit of a drag. But at least you can fix typos in your strings without breaking all your other languages!

How to Localise DisplayAttribute

Now we have the magic strings fixed, we just need to try and localise the DisplayAttribute. As of right now, the only way I have found to localise the display attribute is to use the legacy localisation capabilities which still reside in the DataAnnotation attributes, namely the ResourceType property.

This property is a Type, and allows you to specify a class in your solution that contains a static property corresponding to the value provided in the Name of the DisplayAttribute. This allows us to use the Visual Studio resource file designer to auto-generate a backing class with the required properties to act as hooks for the localisation.

Localising the DisplayAttribute and avoiding magic strings in ASP.NET Core

If you create a .resx file in Visual Studio without a culture suffix, it will automatically create a .designer.cs file for you. With the new localisation features of ASP.NET Core, this can typically be deleted, but in this case we need it. Generating the above resource file in Visual Studio will generate a backing class similar to the following:
public class ViewModels_HomeViewModel {

    private static global::System.Resources.ResourceManager resourceMan;
    private static global::System.Globalization.CultureInfo resourceCulture;

    // details hidden for brevity

    public static string NotAValidEmail {
        get {
            return ResourceManager.GetString("NotAValidEmail", resourceCulture);
        }
    }

    public static string Required {
        get {
            return ResourceManager.GetString("Required", resourceCulture);
        }
    }

    public static string YourEmail {
        get {
            return ResourceManager.GetString("YourEmail", resourceCulture);
        }
    }

We can now update our display attribute to use the generated resource, and everything will work as expected. We'll also remove the magic string from the Name attribute at this point and move the resource into our .resx file:

public class HomeViewModel  
{
    [Required(ErrorMessage = ResourceKeys.Required)]
    [EmailAddress(ErrorMessage = ResourceKeys.NotAValidEmail)]
    [Display(Name = ResourceKeys.YourEmail, ResourceType = typeof(Resources.ViewModels_HomeViewModel))]
    public string Email { get; set; }
}

If we run our application again, you can see that the display attribute is now localised to say 'Votre Email' - lovely!

Localising the DisplayAttribute and avoiding magic strings in ASP.NET Core

How to localise DisplayAttribute in the future

If that seems like a lot of work to get a localised DisplayAttribute then you're not wrong. That's especially true if you're not using Visual Studio, and so don't have the resx-auto-generation process.

Unfortunately it's a tricky problem to work around currently, in that it's just fundamentally not supported in the current version of MVC. The localisation of the ValidationAttribute.ErrorMessage happens deep in the inner workings of the MVC pipeline (in the DataAnnotationsMetadataProvider) and this is ideally where the localisation of the DisplayAttribute should be happening.

Luckily, this has already been fixed and is currently on the development branch of the ASP.NET Core repo. Theoretically that means it should appear in the 1.1.0 release when that happens, but we are at very early days at the moment!

Still, I wanted to give the current implementation a test, and luckily this is pretty simple to setup, as all the ASP.NET Core packages produced as part of the normal development workflow are pushed to various public MyGet feeds. I decided to use the 'aspnetcore-dev' feed, and updated my application to pull NuGet packages from it.

Be aware that pulling packages from this feed should not be something you do in a production app. Things are likely to change and break, so stick to the release NuGet feed unless you are experimenting or you know what you're doing!

Adding a pre-release MVC package

First, add a nuget.config file to your project and configure it to point to the aspnetcore-dev feed:

<?xml version="1.0" encoding="utf-8"?>  
<configuration>  
  <packageSources>
    <add key="AspNetCore" value="https://dotnet.myget.org/F/aspnetcore-dev/api/v3/index.json" />
    <add key="NuGet" value="https://api.nuget.org/v3/index.json" />
  </packageSources>
</configuration>  

Next, update the MVC package in your project.json to pull down the latest package, as of writing this was version 1.1.0-alpha1-22152, and run a dotnet restore.

{
  "dependencies": {
    ...
    "Microsoft.AspNetCore.Mvc": "1.1.0-alpha1-22152",
    ...
  }
}

And that's it! We can remove the ugly ResourceType property from a DisplayAttribute, delete our resource .designer.cs file and everything just works as you would expect. If you are using the magic string approach, that just works, or you can use the approach I described above with ResourceKeys.

public class HomeViewModel  
{
    [Required(ErrorMessage = ResourceKeys.Required)]
    [EmailAddress(ErrorMessage = ResourceKeys.NotAValidEmail)]
    [Display(Name = ResourceKeys.YourEmail)]
    public string Email { get; set; }
}

As already mentioned, this is early pre-release days, so it will be a while until this capability is generally available, but it's heartening to see it ready and waiting!

Loading all resources from a single file

The final slight bugbear I have with the current localisation implementation is the resource file naming. As described in the previous post, each localised class or view gets its own embedded resource file that has to match the file name. I was toying with the idea of having a a single .resx file for each culture which contains all the required strings instead, with the resource key prefixed by the type name, but I couldn't see any way of doing this out of the box.

You can get close to this out of the box, by using a 'Shared resource' as the type parameter in injected IStringLocalizer<T>, so that all the resources using it will, by default, be found in a single .resx file. Unfortunately that only goes part of the way, as you are still left with the DataAnnotations and IViewLocalizer which will use the default implementations, and expect different files per class.

As far as I can see, in order to achieve this, we need to replace the IStringLocalizer and IStringLocalizerFactory services with our own implementations that will load the strings from a single file. Given this small change, I looked at just overriding the default ResourceManagerStringLocalizerFactory implementation, however the methods that would need changing are not virtual, which leaves us re-implementing the whole class again.

The code is a little long and tortuous, and this post is already long enough, so I won't post it here, but you can find the approach I took on GitHub. It is in a somewhat incomplete but working state, so if anyone is interested in using it then it should provide a good starting point for a proper implementation.

For my part, and given the difficulty of working with .resx files outside of Visual Studio, I have started to look at alternative storage formats. Thanks to the use of abstractions like IStringLocalizerFactory in ASP.NET Core, it is perfectly possible to load resources from other sources.

In particular, Damien has a great post with source code on GitHub on loading resources from the database using Entity Framework Core. Alternatively, Ronald Wildenberg has built a JsonLocalizer which is available on GitHub.

Summary

In this post I described a couple of the pitfalls of the current localisation framework in ASP.NET Core. I showed how magic strings could be the source of bugs and how to replace them with a static helper class.

I also showed how to localise the DisplayAttribute using the ResourceType property as required in the current 1.0.0 release of ASP.NET Core, and showed how it will work in the (hopefully near) future.

Finally I linked to an example project that stores all resources in a single file per culture, instead of a file per resource type.

Injecting services into ValidationAttributes in ASP.NET Core

$
0
0
Injecting services into ValidationAttributes in ASP.NET Core

I was battling the other day writing a custom DataAnnotations ValidationAttribute, where I needed access to a service class to perform the validation. The documentation on creating custom attributes is excellent, covering both server side and client side validation, but it doesn't mention this, presumably relatively common, requirement. This post describes how to use dependency injection with ValidationAttributes in ASP.NET Core, and the process I took in trying to figure out how!

Injecting services into attributes in general has always been somewhat problematic as you can't use constructor injection for anything that's not a constant. This often leads to implementations requiring some sort of service locator pattern when external services are required, or a factory pattern to create the attributes.

tl;dr; ValidationAttribute.IsValid() provides a ValidationContext parameter you can use to retrieve services from the DI container by calling GetService().

Injecting services into ActionFilters

In ASP.NET Core MVC, as well having simple 'normal' IFilter attributes that can be used to decorate your actions, there are ServiceFilter and TypeFilter attributes. These implement the IFilterFactory interface, which, as the name suggests, acts as a factory for IFilters!

These two filter types allow you to use classes with constructor dependencies as attributes. For example, we can create an IFilter implementation that has external dependencies:

public class FilterClass : ActionFilterAttribute  
{
  public FilterClass(IDependency1 dependency1, IDependency2 dependency2)
  {
    // ...use dependencies
  }
}

We can then decorate our controller actions to use FilterClass by using the ServiceFilter or TypeFilter:

public class HomeController: Controller  
{
    [TypeFilter(typeof(FilterClass))]
    [ServiceFilter(typeof(FilterClass))]
    public IActionResult Index()
    {
        return View();
    }
}

Both of these attributes will return an instance of the FilterClass to the MVC Pipeline when requested, as though the FilterClass was an attribute applied directly to the Action. The difference between them lies in how they create an instance of the FilterClass.

The ServiceFilter will attempt to resolve an instance of FilterClass directly from the IoC container, so the FilterClass and its dependencies must be registered with the IoC container.

The Typefilter attribute also creates an instance of the FilterClass but only its dependencies are resolved from the IoC Container, rather than FilterClass.

For more details on using TypeFilter and ServiceFilter see the documentation or this post.

How ValidationAttributes are resolved

For my CustomValidationAttribute I needed access to an external service to perform the validation:

public class CustomValidationAttribute: ValidationAttribute  
{
  protected override ValidationResult IsValid(object value, ValidationContext validationContext)
    {
        // ... need access to external service here
    }
}

In my first attempt to inject a service I thought I would have to take a similar approach to the ServiceFilter and TypeFilter attributes. Optimistically, I created a TypeFilter, passed in my CustomValidationAttribute, applied it to the model property and crossed my fingers.

It didn't work.

The mechanism by which DataAnnotation ValidationAttributes are applied to your model is completely different to the IFilter and IFilterFactory attributes used by the MVC infrastructure to build a pipeline.

The default implementation of IModelValidatorProvider used by the Microsoft.AspNetCore.Mvc.DataAnnotations library (cunningly called DataAnnotationsModelValidatorProvider) is responsible for creating the IModelValidator instances in the method CreateValidators. The IModelValidator is responsible for performing the actual validation of a decorated property.

I thought about creating a custom IModelValidatorProvider and creating the validators myself using an ObjectFactory, similar to the way the ServiceFilter and TypeFilter work.

Inside the DataAnnotationsModelValidatorProvider.CreateValidators method is this section of code, which creates a DataAnnotationsModelValidator object from a ValidationAttribute (see here for the full code):

var attribute = validatorItem.ValidatorMetadata as ValidationAttribute;  
if (attribute == null)  
{
    continue;
}

var validator = new DataAnnotationsModelValidator(  
    _validationAttributeAdapterProvider,
    attribute,
    stringLocalizer);

As you can see, the attributes are already created at this point, and exist as ValidatorMetadata on the ModelValidatorProviderContext passed to the function. In order to be able to use a TypeFilter-like approach, we would have to hook in much further up the stack.

At this point I decided that I must be missing something, as it couldn't possibly be this difficult…

The solution

Sure enough, the final answer was simple!

When creating a custom validation attribute you need to override the Validate method:

public class CustomValidationAttribute : ValidationAttribute  
{
    protected override ValidationResult IsValid(object value, ValidationContext validationContext)
    {
        // ... validation logic
    }
}

As you can see, you are provided a ValidationContext as part of the method call. The context object contains a number of properties related to the object currently being validated, and also this handy number:

public object GetService(Type serviceType);  

This hooks into the IoC IServiceProvider to allow retrieving services in your ValidationAttributes:

protected override ValidationResult IsValid(object value, ValidationContext validationContext)  
{
    var service = validationContext.GetService(typeof(IExternalService));
    // use service
}

So in the end, nice and easy, no need for the complex re-implementations route I was eyeing up.

Happy validating!


Introduction to Authorisation in ASP.NET Core

$
0
0
Introduction to Authorisation in ASP.NET Core

This is the next in series of posts about authentication and authorisation in ASP.NET Core. In the first post we introduced authentication in ASP.NET Core at a high level, introducing the concept of claims-based authentication. In the next two post, we looked in greater depth at the Cookie and JWT middleware implementations to get a deeper understanding of the authentication process. Finally, we looked at using OAuth 2.0 and OpenID Connect in your ASP.NET Core applications.

In this post we'll learn about the authorisation aspect of ASP.NET Core.

Introduction to Authorisation

Just to recap, authorisation is the process of determining if a given user has the necessary attributes/permissions to access a given resource/section of code. In ASP.NET Core, the user is specified by a ClaimsPrincipal object, which may have one or more associated ClaimsIdentity, which in turn may have any number of Claims. The process of creating the ClaimsPrincipal and assigning it the correct Claims is the process of authentication. Authentication is independent and distinct from authorisation, but must occur before authorisation can take place.

In ASP.NET Core, authorisation can be granted based on a number of different factors. These may be based on the roles of the current user (as was common in previous version of .NET), the claims of the current user, the properties of the resource being accessed, or any other property you to care to think of. In this post we'll cover some of the most common approaches to authorising users in your MVC application.

Authorisation in MVC

Authorisation in MVC all centres around the AuthorizeAttribute. In it's simplest form, applying it to an Action (or controller, or globally) marks that action as requiring an authenticated user. Thinking in terms of ClaimsPrincipal and ClaimsIdentity, that means that the current principal must contain a ClaimsIdentity for which IsAuthenticated=true.

This is the coarsest level of granularity - either you are authenticated, and you have access to the resource, or you aren't, and you do not.

You can use the AllowAnonymousAttribute to ignore an AuthorizeAttribute, so in the following example, only authorised users can call the Manage method, while anyone can call the Logout method:

[Authorize]
public class AccountController: Controller  
{
    public IActionResult Manage()
    {
        return View();
    }

    [AllowAnonymous]
    public IActionResult Logout()
    {
        return View();
    }
}

Under the hood

Before we go any further I'd like to take a minute to dig into what is actually happening under the covers here.

The AuthorizeAttribute applied to your actions and controllers is mostly just a marker attribute, it does not contain any behaviour. Instead, it is the AuthorizeFilter which MVC adds to its filter pipeline when it spots the AuthorizeAttribute applied to an action. This filter implements IAsyncAuthorizationFilter, so that it is called early in the MVC pipeline to verify the request is authorised:

public interface IAsyncAuthorizationFilter : IFilterMetadata  
{
    Task OnAuthorizationAsync(AuthorizationFilterContext context);
}

AuthorizeFilter.OnAuthenticationAsync is called to authorise the request, which undertakes a number of actions. The method is reproduced below with some precondition checks removed for brevity - we'll dissect it in a minute:

public virtual async Task OnAuthorizationAsync(AuthorizationFilterContext context)  
{
    var effectivePolicy = Policy;
    if (effectivePolicy == null)
    {
        effectivePolicy = await AuthorizationPolicy.CombineAsync(PolicyProvider, AuthorizeData);
    }

    if (effectivePolicy == null)
    {
        return;
    }

    // Build a ClaimsPrincipal with the Policy's required authentication types
    if (effectivePolicy.AuthenticationSchemes != null && effectivePolicy.AuthenticationSchemes.Count > 0)
    {
        ClaimsPrincipal newPrincipal = null;
        for (var i = 0; i < effectivePolicy.AuthenticationSchemes.Count; i++)
        {
            var scheme = effectivePolicy.AuthenticationSchemes[i];
            var result = await context.HttpContext.Authentication.AuthenticateAsync(scheme);
            if (result != null)
            {
                newPrincipal = SecurityHelper.MergeUserPrincipal(newPrincipal, result);
            }
        }
        // If all schemes failed authentication, provide a default identity anyways
        if (newPrincipal == null)
        {
            newPrincipal = new ClaimsPrincipal(new ClaimsIdentity());
        }
        context.HttpContext.User = newPrincipal;
    }

    // Allow Anonymous skips all authorization
    if (context.Filters.Any(item => item is IAllowAnonymousFilter))
    {
        return;
    }

    var httpContext = context.HttpContext;
    var authService = httpContext.RequestServices.GetRequiredService<IAuthorizationService>();

    // Note: Default Anonymous User is new ClaimsPrincipal(new ClaimsIdentity())
    if (!await authService.AuthorizeAsync(httpContext.User, context, effectivePolicy))
    {
        context.Result = new ChallengeResult(effectivePolicy.AuthenticationSchemes.ToArray());
    }
}

First, it calculates the applicable AuthorizationPolicy for the request. This sets the requirements that must be met for the request to be authorised. The next step is to attempt to authenticate the request by calling AuthenticateAsync(scheme) on the AuthenticationManager found at HttpContext.Authentication. This will run through the authentication process I have discussed in previous posts, and if successful, returns an authenticated ClaimsPrincipal back to the filter.

Once an authenticated principal has been obtained, the authorisation process can begin. First, the method is checked to see if it has an IAllowAnonymousFilter applied (added when an AllowAnonymousAttribute is used), and if it does, returns successfully without any further processing.

If authorisation is required, then the filter requests an instance of IAuthorizationService from the HttpContext. This service neatly encapsulates all the logic for deciding whether a ClaimsPrinciapl meets the requirements of the particular AuthorizationPolicy. A call to IAuthorizationService.AuthorizeAsync() returns a boolean, indicating if the result was successful.

If the IAuthorizationService indicates the user was not successful, the AuthorizationFilter returns a ChallengeResult, bypassing the remainder of the MVC pipeline. When executed, this result calls ChallengeAsync on the AuthenticationManager, which in turn calls HandleUnauthorizedAsync or HandleForbiddenAsync on the underlying AuthenticationHandler as covered previously.

The end result will be either a 403 indicating the user does not have permission, or a 401 indicating they are not logged in, which will generally be captured and converted to a redirect to the login page.

The details of how the AuthorizationFilter works is rather tangential to this introduction in general, but it highlights the separation of concerns and abstractions used to facilitate easier testing, and the use of dumb marker attributes to act has hooks for other more complex services.

Authorising based on claims

Now that detour is over and we understand more of how authorisation works in MVC, we can look at creating some specific authorisation requirements, more than just 'you logged in'.

As I discussed in the introduction to authentication, identity in ASP.NET Core is really entirely focussed around Claims. Given that fact, one of the most obvious modes of authentication is to check that a user has a given claim. For example, there may be a section of your site which is only available to VIPs. In order to authorise requests you could create a CanAccessVIPArea policy, or more specifically an AuthorizationPolicy.

To create a new policy, we configure them as part of the service configuration in the ConfigureServices method of your Startup class using an AuthorizationPolicyBuilder. We provide a name for the policy, "CanAccessVIPArea", and add a requirement that the user has the VIPNumber claim:

public void ConfigureServices(IServiceCollection services)  
{
    services.AddMvc();

    services.AddAuthorization(options =>
    {
        options.AddPolicy(
            "CanAccessVIPArea",
            policyBuilder => policyBuilder.RequireClaim("VIPNumber"));
    });
}

This requirement ensures only that the ClaimsPrincipal has the VIPNumber claim, it does not make any requirements on the value of the claim. If we required the claim to have specific values, we can pass those to the RequireClaimMethod:

public void ConfigureServices(IServiceCollection services)  
{
    services.AddMvc();

    services.AddAuthorization(options =>
    {
        options.AddPolicy(
            "CanAccessVIPArea",
            policyBuilder => policyBuilder.RequireClaim("VIPNumber", "1", "2"));
    });
}

With our policy configured, we can now apply it to our actions or controllers to protect them from the proletariat:

[Authorize(Policy = "CanAccessVIPArea")]
public class ImportantController: Controller  
{
    public IActionResult FancyMethod()
    {
        return View();
    }
}

Note that if you have multiple AuthorizeAttributes applied to an action then all of the policies much be satisfied for the request to be authorised.

Authorising based on roles

Before claims based authentication was embraced, authorisation by role was a common approach. As shown previously, ClaimsPrincipal still has an IsInRole(string role) method that you can use if needed. In particular, you can specify required roles on AuthorizeAttributes, which will then verify the user is in the correct role before authorising the user:

[Authorize(Roles = "HRManager, CEO")]
public class AccountController: Controller  
{
    public IActionResult ViewUsers()
    {
        return View();
    }
}

However, other than for simplicity in porting from ASP.NET 4.X, I wouldn't recommend using the Roles property on the AuthorizeAttribute. Instead, it is far better to use the same AuthorizationPolicy infrastructure as for Claim requirements. This provides far more flexibility than the previous approach, making it simpler to update when policies change, or they need to be dynamically loaded for example.

Configuring a role-based policy is much the same as for Claims and allows you to specify multiple roles; membership in any of these will satisfy the policy requirement.

public void ConfigureServices(IServiceCollection services)  
{
    services.AddMvc();

    services.AddAuthorization(options =>
    {
        options.AddPolicy(
            "CanViewAllUsers",
            policy => policy. RequireRole("HRManager", "CEO"));
    });
}

We can now update the previous method to use our new policy:

[Authorize(Policy = "CanViewAllUsers")]
public class AccountController: Controller  
{
    public IActionResult ViewUsers()
    {
        return View();
    }
}

Later on, if we decide to take a claims based approach to our authorisation, we can just update the policies as appropriate, rather than having to hunt through all the Controllers in our solution to find usages of the magic role strings.

Behind the scenes, the roles of a ClaimsPrincipal are actually just claims create with a type of ClaimsIdentity.RoleClaimType. By default, this is given by ClaimType.Role, which is the string http://schemas.microsoft.com/ws/2008/06/identity/claims. When a user is authenticated appropriate claims are added for their roles which can be found later as required.

It's worth bearing this in mind if you have difficult with AuthorizeAttributes not working. Most external identity providers will use a different set of claims representing role, name etc that do not marry up with the values used by Microsoft in the ClaimType class. As Dominick Baier discusses on his blog, this can lead to situations where claims are not translated and so users can appear to not be in a given role. If you run into issues where your authorisation does not appear to working correctly, I strongly recommend you check out his post for all the details.

Generally speaking, unless you have legacy requirements, I would recommend against using roles - they are essentially just a subset of the Claims approach, and provide limited additional value.

Summary

This post provided an introduction to authorisation in ASP.NET Core MVC, using the AuthorizeAttribute. We touched on three simple ways you can authorise users - based on whether they are authenticated, by policy, and by role. We also went under the covers briefly to see how the AuthorisationFilter works when called as part of the MVC pipeline.

In the next post we will explore policies further, looking at how you can create custom policies and custom requirements.

Custom authorisation policies and requirements in ASP.NET Core

$
0
0
Custom authorisation policies and requirements in ASP.NET Core

This post is the next in a series of posts on the authentication and authorisation infrastructure in ASP.NET Core . In the previous post we showed the basic framework for authorisation in ASP.NET Core i.e. restricting access to parts of your application depending on the current authenticated user. We introduced the concept of Policies, to decouple your authorisation logic from the underlying roles and claims of users. Finally, we showed how to create simple policies that verify the existence of a single claim or role.

In this post we look at creating more complex policies with multiple requirements, creating a custom requirement, and applying an authorisation policy to your entire application.

Policies with multiple requirements

In the previous post, I showed how we could create a simple policy, named CanAccessVIPArea to verify whether a user is allowed to access VIP related methods. This policy tested for a single claim on the User, and authorised the user if the policy was satisfied. For completeness, this is how we configured it in our Startup class:

public void ConfigureServices(IServiceCollection services)  
{
    services.AddMvc();

    services.AddAuthorization(options =>
    {
        options.AddPolicy(
            "CanAccessVIPArea",
            policyBuilder => policyBuilder.RequireClaim("VIPNumber"));
    });
}

Imagine now that the original requirements have changed. For example, consider this policy as being applied to the VIP lounge at an airport. In the current implementation, you would be allowed to enter, only if you have a VIP number. However, we now want to ensure that employees of the airline are also allowed to use the VIP lounge, as well as the CEO of the airport.

When you first consider the problem, you might see the policyBuilder object above, notice that it provides a fluent interface, and be tempted to chain additional RequireClaim() calls to it, something like

policyBuilder => policyBuilder  
    .RequireClaim("VIPNumber")
    .RequireClaim("EmployeeNumber")
    .RequireRole("CEO"));

Unfortunately this won't produce the desired behaviour. Each of the requirements that make up the policy must be satisfied, i.e. they are combined using AND whereas we have an OR requirement. To pass the policy in this current state, you would need to have a VIPNumber, an EmployeeNumber and also be a CEO!

Creating a custom policy using a Func

There are a number of different approaches available to satisfy our business requirement, but as the policy is simple to express in this case, we will simply use a Func<AuthorizationHandlerContext, bool> provided to the PolicyBuilder.RequireAssertion method:

services.AddAuthorization(options =>  
{
    options.AddPolicy(
        "CanAccessVIPArea",
        policyBuilder => policyBuilder.RequireAssertion(
            context => context.User.HasClaim(claim => 
                           claim.Type == "VIPNumber" 
                           || claim.Type == "EmployeeNumber")
                        || context.User.IsInRole("CEO"))
        );
});

To satisfy this requirement we are returning a simple bool to indicate whether a user is authorised based on the policy. We are provided an AuthorizationHandlerContext which provides us access to the current ClaimsPrincipal via the User property. This allows us to verify the claims and role of the user.

As you can see from our logic, our "CanAccessVIPArea" policy will now authorise if any of our original business requirements are met, which provides multiple ways to authorise a user.

Creating a custom requirement

While the above approach works for the simplest requirements, it's easy to see that as the rules become more complicated, your policy code could quickly become unmanageable. Additionally, you may need access to other services via dependency injection. In these cases, it's worth considering creating custom requirements and handlers.

Before I jump into the code, a quick recap on the terminology used here:

  • We have a Resource that needs to be protected (e.g. an MVC Action) so that only some users may be authorised to access it,
  • A resource may be protected by one or more Policies (e.g. CanAccessVIPArea). All policies must be satisfied in order for access to the resource to be granted.
  • Each Policy has one or more Requirements (e.g. IsVIP, IsBookedOnToFlight). All requirements must be satisfied on a policy for the overall policy to be satisfied.
  • Each Requirement has one or more Handlers. A requirement is satisfied, if any of them return a Success result, and none of them return an explicit Fail result.

With this in mind, we will redesign our VIP policy above to use a custom requirement, and create some handlers for it.

The Requirement

A requirement in ASP.NET Core is a simple class that implements the empty marker interface IAuthorizationRequirement. You can also use it to store any additional parameters for use later. We have extended our basic VIP requirement described previously to also provide an Airline, so that we only allow employees of the given airline to access the VIP lounge:

public class IsVipRequirement : IAuthorizationRequirement  
{
    public IsVipRequirement(string airline)
    {
        Airline = airline;
    }

    public string Airline { get; }
}

The Authorisation Handlers

The authorisation handler is where all the work of authorising a requirement takes place. To implement a handler you inherit from AuthorizationHandler<T>, and implement the HandleRequirementAsync() method. As mentioned previously, a requirement can have multiple handlers, and only one of these needs to succeed for the requirement to be satisfied.

In our business requirement, we have three handlers corresponding to the three different ways to satisfy the requirement. Each of these are presented and explained below. I will also add an additional handler which checks whether a user has been banned from the VIP lounge previously, so shouldn't be let in again!

The simplest handler is the 'CEO' handler. This simply checks if the current authenticated user is in the role "CEO". If they are, then the handler calls Succeed on the underlying requirement. A default task is returned at the end of the method as the method is asynchronous. Note that in the case that the requirement is not fulfilled, we do nothing with the context; if cannot fulfill it with the current handler, we leave it for the next handler to deal with.

public class IsCEOAuthorizationHandler : AuthorizationHandler<IsVipRequirement>  
{
    protected override Task HandleRequirementAsync(AuthorizationHandlerContext context, IsVipRequirement requirement)
    {
        if (context.User.IsInRole("CEO"))
        {
            context.Succeed(requirement);
        }
        return Task.FromResult(0);
    }
}

The VIP number handler is much the same, it performs a simple check that the current ClaimsPrincipalcontains a claim of type "VIPNumber", and if so, satisfies the requirements.

public class HasVIPNumberAuthorizationHandler : AuthorizationHandler<IsVipRequirement>  
{
    protected override Task HandleRequirementAsync(AuthorizationHandlerContext context, IsVipRequirement requirement)
    {
        if (context.User.HasClaim(claim => claim.Type == "VIPNumber"))
        {
            context.Succeed(requirement);
        }
        return Task.FromResult(0);
    }
}

Our next handler is the 'employee' handler. This verifies that the authenticated user has a claim of type 'EmployeeNumber', and also that this claim was issued by the given Airline. We will see shortly where the requirement object passed in comes from, but you can see that we can access its Airline property and use that within our handler:

public class IsAirlineEmployeeAuthorizationHandler : AuthorizationHandler<IsVipRequirement>  
{
    protected override Task HandleRequirementAsync(AuthorizationHandlerContext context, IsVipRequirement requirement)
    {
        if (context.User.HasClaim(claim =>
            claim.Type == "EmployeeNumber" && claim.Issuer == requirement.Airline))
        {
            context.Succeed(requirement);
        }
        return Task.FromResult(0);
    }
}

Our final handler deals with the case that a user has been banned from being a VIP (maybe they stole too many tiny tubes of toothpaste, or had one two many Laphroaigs). Even if other requirements are met, we don't want to grant the authenticated user VIP status. So even if the user is a CEO, has a VIP Number and is an employee - if they are banned, they can't come in.

We can code this business requirement by calling the context.Fail() method as appropriate within the HandleRequirementAsync method:

public class IsBannedAuthorizationHandler : AuthorizationHandler<IsVipRequirement>  
{
    protected override Task HandleRequirementAsync(AuthorizationHandlerContext context, IsVipRequirement requirement)
    {
        if (context.User.HasClaim(claim => claim.Type == "IsBannedFromVIP"))
        {
            context.Fail();
        }
        return Task.FromResult(0);
    }
}

Calling Fail() overrides any other Success() calls for a requirement. Note that whether a handler calls Success or Fail, all of the registered handlers will be called. This ensures that any side effects (such as logging etc) will always be executed, no matter the order in which the handlers run.

Wiring it all up

Now we have all the pieces we need, we just need to wire up out policy and handlers. We modify the configuration of our AddAuthorization call to use our IsVipRequirement, and also register our handlers with the dependency injection container. We can use singletons here as we are not injecting any dependencies.

public void ConfigureServices(IServiceCollection services)  
{
    services.AddMvc();

    services.AddAuthorization(options =>
    {
        options.AddPolicy(
            "CanAccessVIPArea",
            policyBuilder => policyBuilder.AddRequirements(
                new IsVipRequirement("British Airways"));
    });

   services.AddSingleton<IAuthorizationHandler, IsCEOAuthorizationHandler>();
   services.AddSingleton<IAuthorizationHandler, HasVIPNumberAuthorizationHandler>();
   services.AddSingleton<IAuthorizationHandler, IsAirlineEmployeeAuthorizationHandler>();
   services.AddSingleton<IAuthorizationHandler, IsBannedAuthorizationHandler>();
}

An important thing to note here is that we are explicitly creating an instance of the IsVipRequirement to be associated with this policy. That means the "CanAccessVIPArea" policy only applies to "British Airways" employees. If we wanted similar behaviour for "American Airlines" employees, we would need to create a second Policy. It is this IsVipRequirement object which is passed to the HandleRequirementAsync method in our handlers.

With our policy in place, we can easily apply it in multiple locations via the AuthorizeAttribute and protect our Action methods:

public class VIPLoungeControllerController : Controller  
{
    [Authorize("CanAccessVIPArea")]
    public IActionResult ViewTheFancySeatsInTheLounge()
    {
       return View();
    }

Applying a global authorisation requirement

As well as applying the policy to individual Actions or Controllers, you can also apply policies globally to protect all of your MVC endpoints. A classic example of this is that you always want a user to be authenticated to browse your site. You can easily create a policy for this by using the RequireAuthenticatedUser() method on PolicyBuilder, but how do you apply the policy globally?

To do this you need to add an AuthorizeFilter to the global MVC filters as part of your call the AddMvc(), passing in the constructed Policy:

services.AddMvc(config =>  
{
    var policy = new AuthorizationPolicyBuilder()
        .RequireAuthenticatedUser()
        .Build();
    config.Filters.Add(new AuthorizeFilter(policy));
});

As shown in the previous post, the AuthorizeFilter is where the authorisation work happens in an MVC application, and is added wherever an AuthorizeAttribute is used. In this case we are ensuring an additional AuthorizeFilter is added for every request.

Note that as this happens for every Action, you will need to decorate your Login methods etc with the AllowAnonymous attribute so that you can actually authenticate and browse the rest of the site!

Summary

In this post I showed in more detail how authorisation policies, requirements and handlers work in ASP.NET Core. I showed how you could use a Func<> to handle simple policies, and how to create custom requirements and handlers for more complex policies. Finally, I showed how you could apply a policy globally to your whole MVC application.

Modifying the UI based on user authorisation in ASP.NET Core

$
0
0
Modifying the UI based on user authorisation in ASP.NET Core

This post is the next in the series on authentication and authorisation in ASP.NET Core. It shows how to modify the UI you present based on the authorisation level of the current user. This allows you to hide links to pages the user is not authorised to access, for example.

While important from a user-experience point of view, note that this technique does not provide security per se. You should always use it in combination with the authorisation policy techniques described previously.

Posts in the series:

The default user experience

In my previous post on authorisation in ASP.NET Core, I showed how to create custom authorisation policies and how to apply these to your MVC actions. I finished the post by decorating one of the controller actions with an AuthorizeAttribute to restrict access to only VIPs.

public class VIPLoungeController : Controller  
{
    [Authorize("CanAccessVIPArea")]
    public IActionResult ViewTheFancySeatsInTheLounge()
    {
       return View();
    }
}

This secured the endpoint, so any unauthenticated users trying to access it would be redirected to the login screen. Any user that was already logged in who didn't satisfy the authorisation requirements would receive a 403 - Forbidden response.

This satisfies the security aspect of our requirements but it does not necessarily provide a great user experience out of the box. For example, imagine we have a link in our web page which takes you to the MVC action described above. If the user is logged in, and does not have permission, they will probably be presented with a message similar to this:

Modifying the UI based on user authorisation in ASP.NET Core

or possibly even this:

Modifying the UI based on user authorisation in ASP.NET Core

If the user was not going to be allowed to access the page, they really should not have been shown the link to let them try!

The next question is how to go about conditionally hiding the link to this inaccessible page. So far we have only seen how to apply authorisation policies using attributes at the Controller or Action level (as shown above), or alternatively at a global level.

Before we see exactly how to update the UI, we'll take a slight detour to look at the key enabler service, the IAuthorisationService.

The IAuthorisationService

In my previous introduction to authorisation I described the process that occurs when you decorate your MVC Actions and Controllers with the AuthorizeAttribute. Under the hood, the MVC pipeline is injected with an AuthorizeFilter, which is responsible for authenticating the current user, and verifying whether they have access based on the applicable AuthorizationPolicy.

In order to perform the authorisation, the AuthorizeFilter retrieves an instance of IAuthorizationService from the application's dependency injection container. This service is responsible for actually evaluating the applicable AuthorizationHandler<T>s for the current policy being evaluated. It implements two related methods:

public interface IAuthorizationService  
{
    Task<bool> AuthorizeAsync(ClaimsPrincipal user, object resource, IEnumerable<IAuthorizationRequirement> requirements);

    Task<bool> AuthorizeAsync(ClaimsPrincipal user, object resource, string policyName);
}

The IAuthorizationService has just one job to do - it takes in a ClaimsPrincipal (User), an IEnumerable<IAuthorizationRequirement> (or a policy name) and an optional resource object (we'll come back to this in a later post), and determines whether all the requirements are satisfied. After checking each of the associated AuthorizationHandler<T>s, it returns a boolean indicating whether authorisation was successful.

Using the IAuthorisationService in your views

In the same way that MVC uses the IAuthorisationService to verify a user's authorisation, we can use it directly in our Views by injecting the service using dependency injection. Simply add an @inject directive at the top of your view page:

@inject IAuthorizationService AuthorizationService

The page will automatically resolve an instance of the IAuthorizationService from the DI container, and make it available as an AuthorizationService property in the view.

We can now use the service to conditionally hide parts of our UI based on the result of a call to AuthorizeAsync. We wrap the link to ViewTheFancySeatsInTheLounge in a call to the AuthorizationService using the User property and the name of the same policy we used previously in the AuthorizeAttribute:

@if (await AuthorizationService.AuthorizeAsync(User, "CanAccessVIPArea"))
{
  <li>
    <a asp-area="" 
       asp-controller="VIPLounge" asp-action="ViewTheFancySeatsInTheLounge"
    >View seats in the lounge</a>
  </li>
}

Now when we view our site as someone who is authorised to call the Action, the link will be available for us:

Modifying the UI based on user authorisation in ASP.NET Core

But when we are unauthenticated, or are not authorised to view the link, it won't be available at all:

Modifying the UI based on user authorisation in ASP.NET Core

Summary

In this post, we introduced the IAuthorisationService and how it can be used for imperative authorisation. We showed how you can inject it into a View, allowing you to hide or modify portions of the UI which the current user will not be authorised to access, providing a smoother user experience.

Resource-based authorisation in ASP.NET Core

$
0
0
Resource-based authorisation in ASP.NET Core

In this next post on authorisation in ASP.NET Core, we look at how you can secure resources based on properties of that resource itself.

In a previous post, we saw how you could create a policy that protects a resource based on properties of the user trying to access it. We used Claims-based identity to verify whether they had the appropriate claim values, and granted or denied access based on these as appropriate.

In some cases, it may not be possible to decide whether access is appropriate based on the current user's claims alone. For example, we may allow users to edit documents that they created, but only access a read-only view of documents created by others. In that case, we not only need an authenticated user, we also need to know who created the document we are attempting to access.

In this post I'll show how we can use the AuthorisationService to take into account the resource we are accessing when determining if a user is authorised to access it.

Previous posts in the authentication/authorisation series:

Resource-based Authorisation

As an example, we will consider the authorisation policy from a previous post, "CanAccessVIPArea", in which we created a policy using a custom AuthorizationRequirement with multiple AuthorizationHandlers to determine if you were allowed access to the protected action.

One of the handlers we created was to satisfy the requirement that employees of the Airline's Lounge were allowed to use the VIP area. In order to be able to verify this, we had to provide a fixed string to our policy when it was initially configured:

public void ConfigureServices(IServiceCollection services)  
{
    services.AddMvc();

    services.AddAuthorization(options =>
    {
        options.AddPolicy(
            "CanAccessVIPArea",
            policyBuilder => policyBuilder.AddRequirements(
                new IsVipRequirement("British Airways"));
    });
}

An obvious problem with this is that our policy only works for a single airline. We now need a separate policy for each new Airline, and the 'Lounge' method must secured by the correct policy. This may be acceptable if there are not many airlines, but it is an obvious source of potential errors.

Instead, it seems like a better solution would be able to take into consideration the Lounge that is being accessed when determining whether a particular employee can access it. This is a perfect use case for resource-based authorisation.

Defining the resource

First of all, we will need to define the 'Lounge' resource that we are attempting to protect:

public class Lounge  
{
    public string AirlineName {get; set;}
    public bool IsOpen {get; set;}
    public int SeatingCapacity {get; set;}
    public int NumberofOccupants {get; set;}
}

This is a fairly self-explanatory example - the Lounge belongs to the single airline defined in AirlineName.

Authorising using IAuthorisationService

Now we have a resource, we need some way of passing it to the authorisation handlers. Previously, we decorated our Controllers and Actions with [Authorize("CanAccessVIPArea")] to declaratively authorise the Action being executed. Unfortunately, we have no way of passing a Lounge object to the AuthoriseAttribute. Instead, we will use imperative authorisation by calling the IAuthorisationService directly.

In the previous post on UI modification I showed how you can inject the IAuthorisationService into your Views, to dynamically authorise a User for the purpose of hiding inaccessible UI elements. We can use a similar technique in our controllers whenever we need to do resource-based authorisation:

public class VIPLoungeControllerController : Controller  
{
    private readonly IAuthorizationService _authorizationService;

    public VIPLoungeControllerController(IAuthorizationService authorizationService)
    {
        _authorizationService = authorizationService;
    }

    [HttpGet]
    public async Task<IActionResult> ViewTheFancySeatsInTheLounge(int loungeId)
    {
       // get the lounge object from somewhere
       var lounge = LoungeRepository.Find(loungeId);

       if (await authorizationService.AuthorizeAsync(User, lounge, "CanAccessVIPArea"))
       {
           return View();
       }
       else
       {
           return new ChallengeResult();
       }
    }

We use dependency injection to inject an instance of the IAuthorizationService into our controller for use in our action method. Next we obtain an instance of our resource from somewhere (e.g. loaded from the database based on an id) and provide the Lounge object as a parameter to AuthorizeAsync, along with the policy we wish to apply. If the authorisation is successful, we display the View, otherwise we return a ChallengeResult. The ChallengeResult can return a 401 or 403 response, depending on the authentication state of the user, which in turn may be captured further down the pipeline and turned into a 302 redirect to the login page. For more details on authentication, check out my previous posts.

Note that we are no longer using the AuthorizeAttribute on our method; the authorisation is a part of the execution of our action, rather than occurring before it can run.

Updating the AuthorizationPolicy

Seeing as how we have switched to resource-based authorisation, we no longer need to define an Airline name on our AuthorizationRequirement, or when we configure the policy. We can simplify our requirement to being a simple marker class:

public class IsVipRequirement : IAuthorizationRequirement  { }  

and update our policy definition accordingly:

services.AddAuthorization(options =>  
    {
        options.AddPolicy(
            "CanAccessVIPArea",
            policyBuilder => policyBuilder.AddRequirements(
                new IsVipRequirement());
    });

Resource-based Authorisation Handlers

The last things we need to update are our AuthorizationHandlers, which can now make use of the provided resource. The only handler from the previous post that needs updating is the IsAirlineEmployeeAuthorizationHandler, which we can now modify to use the AirlineName defined on our Lounge object, instead of being hardcoded to the AuthorizationRequirement at startup:

public class IsAirlineEmployeeAuthorizationHandler : AuthorizationHandler<IsVipRequirement, Lounge>  
{
    protected override Task HandleRequirementAsync(
        AuthorizationHandlerContext context, 
        IsVipRequirement requirement
        Lounge lounge)
    {
        if (context.User.HasClaim(claim =>
            claim.Type == "EmployeeNumber" && claim.Issuer == lounge.AirlineName))
        {
            context.Succeed(requirement);
        }
        return Task.FromResult(0);
    }
}

Two things have changed here from our previous implementation. First, we are inheriting from AuthorizationHandler<IsVipRequirement, Lounge>, instead of AuthorizationHandler<IsVipRequirement>. This handles extracting the provided resource from the authorisation context. Secondly, the HandleRequirementAsync method now takes a Lounge parameter, which the base AuthorizationHandler<,> automatically provides from the context. We are then free to use the handler in our method to authorise the employee.

Now we have access to the resource object, we could also add handlers to check whether the Lounge is currently open, and whether it has reached seating capacity, but I'll leave that as an exercise for the dedicated!

When to use resource-based authorisation?

Now you have seen two techniques for performing authorisation - declarative, attribute based authorisation, and imperative, IAuthorisationService based authorisation - you may be wondering which approach to use and when. I think the simple answer is really to only use resource-based authorisation when you have to.

In our case, with the attribute-based approach, we had to hard-code the name of each airline into our AuthorizationRequirement, which was not very scalable and in practice meant that couldn't correctly protect our endpoint. In this case resource-based authorisation was pretty much required.

However, moving to the resource-based approach has some downsides. The code in our Action is more complicated and it is less obvious what it is doing. Also, when you use an AuthorizeAttribute, the authorisation code is run right at the beginning of the pipeline, before all other filters and model binding occurs. In contrast, the whole of the pipeline runs when using resource-based auth, even if it turns out the user is ultimately not authorised. This may not be a problem, but it is something to bear in mind and be aware of when choosing your approach.

In general, your application will probably need to use both techniques, it is just a matter of choosing the correct one for each instance.

Summary

In this post I updated an existing authorisation example to use resource-based authorisation. I showed how to call the IAuthorisationService to perform authorisation based on a document or resource that is being protected. Finally I updated an AuthorizationHandler to derive from the generic AuthorizationHandler<,> to access the resource at runtime.

Accessing services when configuring MvcOptions in ASP.NET Core

$
0
0
Accessing services when configuring MvcOptions in ASP.NET Core

This post is a follow on to an article by Steve Gordon I read the other day on how to HTML encode deserialized JSON content from a request body. It's an interesting post, but it spurred me thinking about a tangential issue - using injected services when configuring MvcOptions.

The setting - Steve's post in brief

I recommend you read Steve's post first, but the key points to this discussion are described below.

Steve wanted to ensure that HTML POSTed inside a JSON string property was automatically HTML encoded, so that potentially malicious script couldn't be stored in the database. This wouldn't necessarily be something you'd always want to do, but it worked for his use case. It ensured that a string such as

{
  "text": "<script>alert('got you!')</script>" 
}

was automatically converted to

{
  "text": "&lt;script&gt;alert(&#x27;got you!&#x27;)&lt;/script&gt;" 
}

by the time it was received in an Action method. He describes creating a custom ContractResolver and ValueProvider to override the CreateProperties method and automatically encode any string properties.

The section I am interested in is where he wires up his new resolver and provider using a small extension method UseHtmlEncodeJsonInputFormatter. This requires providing a number of services in order to correctly create the JsonInputFormatter. I have reproduced his extension method below:

ublic static class MvcOptionsExtensions  
{
    public static void UseHtmlEncodeJsonInputFormatter(this MvcOptions opts, ILogger<MvcOptions> logger, ObjectPoolProvider objectPoolProvider)
    {
        opts.InputFormatters.RemoveType<JsonInputFormatter>();

        var serializerSettings = new JsonSerializerSettings
        {
            ContractResolver = new HtmlEncodeContractResolver()
        };

        var jsonInputFormatter = new JsonInputFormatter(logger, serializerSettings, ArrayPool<char>.Shared, objectPoolProvider);

        opts.InputFormatters.Add(jsonInputFormatter);
    }
}

For the full details of this method, check out his post. For our discussion, all that's necessary is to appreciate that we are modifying the MvcOptions by adding a new JsonInputFormatter, and that to do so we need instances of an ILogger<T> and ObjectPoolProvider.

The need for these services is a little problematic - we will be calling this extension method when we are first configuring MVC, within the ConfigureServices method, but at that point, we don't have an easy method of accessing other configured services.

The approach Steve used was to build a service provider, and then create the required services using it, as shown below:

public void ConfigureServices(IServiceCollection services)  
{
    var sp = services.BuildServiceProvider();
    var logger = sp.GetService<ILoggerFactory>();
    var objectPoolProvider = sp.GetService<ObjectPoolProvider>();

    services
        .AddMvc(options =>
        {
            options.UseHtmlEncodeJsonInputFormatter(
                logger.CreateLogger<MvcOptions>(), 
                objectPoolProvider);
        });
}

This approach works, but it's not the cleanest, and luckily there's a handy alternative!

What does AddMvc actually do?

Before I get into the cleaned up approach, I just want to take a quick diversion into what the AddMvc method does. In particular, I'm interested in the overload that takes an Action<MvcOption> setup action.

Taking a look at the source code, you can see that it is actually pretty simple:

public static IMvcBuilder AddMvc(this IServiceCollection services, Action<MvcOptions> setupAction)  
{
    // precondition checks removed for brevity
    var builder = services.AddMvc();
    builder.Services.Configure(setupAction);

    return builder;
}

This overload calls AddMvc() without an action, which returns an IMvcBuilder. We then call Configure with the Action<> to configure an instance of MvcOptions.

ConfigureOptions to the rescue!

When I saw the Configure call, I immediately thought of a post I wrote previously, about using ConfigureOptions to inject services when configuring IOptions implementations.

Using this technique, we can avoid having to call BuildServiceProvider inside the ConfigureServices method, and can leverage dependency injection instead by creating an instance of IConfigureOptions<MvcOptions>.

Implementing the interface is simply a case of calling our already defined extension method, from within the required Configure method:

public class ConfigureMvcOptions : IConfigureOptions<MvcOptions>  
{
    private readonly ILogger<MvcOptions> _logger;
    private readonly ObjectPoolProvider _objectPoolProvider;
    public ConfigureMvcOptions(ILogger<MvcOptions> logger, ObjectPoolProvider objectPoolProvider)
    {
        _logger = logger;
        _objectPoolProvider = objectPoolProvider;
    }

    public void Configure(MvcOptions options)
    {
        options.UseHtmlEncodeJsonInputFormatter(_logger, _objectPoolProvider);
    }
}

We can then update our configuration method to use the basic AddMvc() method and inject our new configuration class:

public void ConfigureServices(IServiceCollection services)  
{
    // Add framework services.
    services.AddMvc();
    services.AddSingleton<IConfigureOptions<MvcOptions>, ConfigureMvcOptions>();
}

With this configuration in place, we have the same behaviour as before, just with some nicer wiring in the Setup class! For a more detailed explanation of why this works, check out my previous post.

Summary

This post was a short follow-up to a post by Steve Gordon in which he showed how to create a custom JsonInputFormatter. I showed how you can use IConfigureOptions<> to use dependency injection when adding MvcOptions as part of your MVC configuration.

Viewing all 743 articles
Browse latest View live