Quantcast
Channel: Andrew Lock | .NET Escapades
Viewing all 743 articles
Browse latest View live

Starting a blog to get yourself noticed

$
0
0
Starting a blog to get yourself noticed

I never really thought I would start a blog.

Don't get me wrong, I wanted to. I'm an avid consumer of other people's blogs and podcasts. My RSS feed is always filling up with the latest .NET news from a myriad of developer personalities.

The trouble was that I never felt that I would be able to match up to the level of quality that I see every time I open my inbox. That level of personality, with such a huge following was just so daunting that I always balked at the first step - actually getting anything live. I procrastinated to such an extent that I never chose a platform, a theme, a topic, anything!

Then I heard John Sonmez talking on Software Engineering Radio about exactly this problem. The point that really hit me was when he described addressing a room of developers at a conference:

How many people here have a blog?

About 50% of the room raised their hand.

How many people have blogged this year?

A proportion of people lower their hand

How many people have blogged in the last month?

More hands go down.

How many people have blogged in the last week.

Just one hand remains. One.

That's when I realised how much I was sabotaging my own career by never just getting on with it and starting to write. Previously I would have been in the bottom half of that room. If I could just blog consistently every week, then eventually I've climbed to the top! No longer would I be one of the multitude of 'ordinary', 'average' developers. Just like that I'm conspicuous among my peers.

For me, what previously seemed completely unobtainable, being distinguished, suddenly seemed like an achievable goal.

So as soon as I got home, I signed up for John's free email blogging course.

That course has been exactly what I need to finally breathe life into this site and give me the last push to get it live.

It's going to be a slow burner - writing once a week is all well and good but you have to keep writing once a week. I'm sure lots of those developers started off all rosy eyed with the best of intentions but they slipped back into the masses. I'm hoping that having that image in the back of my mind is going to keep me honest and committed!

I'm not expecting a mass influx of traffic to this site, but just writing consistently has so much potential for opening doors down the line that it's crazy not too.

So if you haven't already , I would really encourage you to head across to John's Simple Programmer website and check out all the great content he has on there. And don't forget to sign up for the blogging course!

Happy blogging!

Starting a blog to get yourself noticed


Understanding .NET Core, NETStandard, .NET Standard applications and ASP.NET Core

$
0
0
Understanding .NET Core, NETStandard, .NET Standard applications and ASP.NET Core

As anyone in the .NET community who hasn't been living under a rock will know, there's a lot of exciting things happening with .NET at the moment with the announcement of the open source, cross platform, .NET Core. However, partly due to the very open nature of its evolution, there's been a whole host of names associated with its development - vNext, ASP.NET 5, ASP.NET Core, .NET generations etc.

In this post I'm going to try and clarify some of the naming and terminology surrounding the evolution of the .NET framework. I'll discuss some of the challenges the latest iteration is attempting to deal with and how the latest developments aim to address these.

This is really for those that have seen some of the big announcements but aren't sure about the intricacies of this new framework and how it relates to the existing ecosystem, which was my situation before I really started digging into it all properly!

Hopefully by the end of this article you'll have a clearer grasp of the latest in .NET!

The .NET Framework today

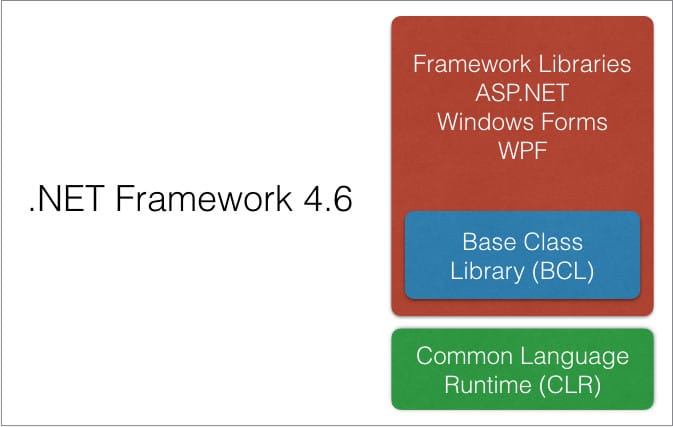
For some desktop .NET developers today, in particular ASP.NET developers, there is only one .NET Framework - the 'Big', 'Full' framework that is Windows only, the latest stable release of which is up to 4.6.1. The Framework as a whole consists of several distinct layers, as shown below.

Understanding .NET Core, NETStandard, .NET Standard applications and ASP.NET Core

The most important parts for this discussion are the Common Language Runtime (CRL) which converts IL to machine code; the Base Class Library (BCL) which provides fundamental classes such as primitives, collections and IO classes that are found in System.dll. System.Text etc.; and the Framework Libraries which is a superset of the BCL and provides the various app models, for example Windows Forms, ASP.NET and WPF. I've omitted the compilers and language components for now, as they are largely tangential to this discussion.

Another key aspect of the the full .NET platform is the fact is it centrally installed. This has many benefits such as allowing a single known location for services, and reducing the overall footprint on disk (installed once per system instead of once per application), however it has a few drawbacks which we'll discuss later.

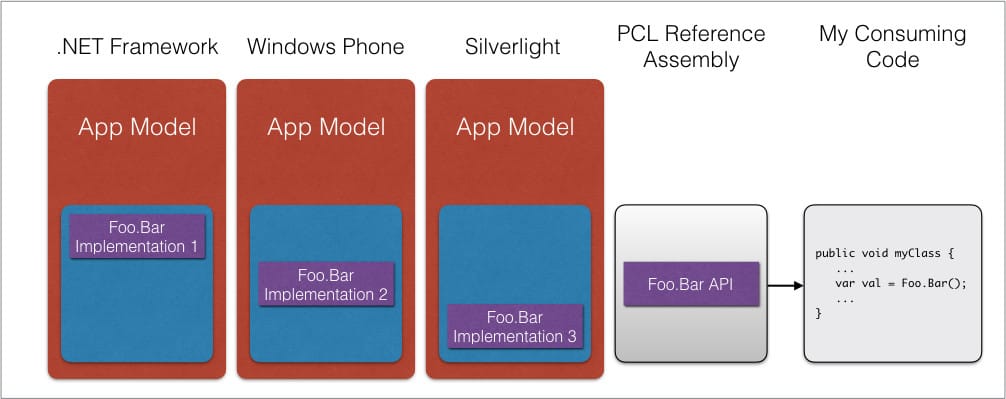
While some developers may well be isolated to working solely with the 'full' .NET Framework, multi-platform developers and PCL library authors will be aware there are in fact multiple .NET platforms, of which the .NET Framework is but one. On windows, as well as the full .NET Framework, there is the Windows 8/8.1 platform and the Universal Windows Platform. On phones there's the Windows Phone 8.1 platform and the Windows Phone Silverlight platform, as well as the Xamarin platforms for iOS and Android. The list goes on (Mono, Silverlight, .NET CF, .NET Micro etc).

Each of these frameworks implement a different subsection of the Methods and Classes available in other frameworks, while often adding additional APIs, and in general are not interoperable.

Understanding .NET Core, NETStandard, .NET Standard applications and ASP.NET Core

Portable Class libraries

Originally, although multiple frameworks shared various APIs, there was no simple way of writing code to run on multiple platforms without a significant amount of Visual Studio-foo and preprocessor #ifdefs.

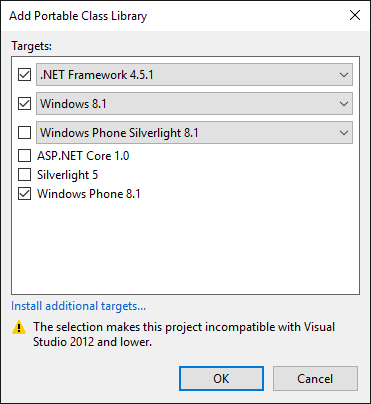
Portable Class Libraries (PCLs) were introduced to make the process of compiling code and sharing code across multiple platforms much simpler. They have significant tooling in Visual Studio to help authoring, and overall the solution worked well enough.

Understanding .NET Core, NETStandard, .NET Standard applications and ASP.NET Core

However the complexities of targeting multiple libraries and understanding the available APIs for each combination of platforms can be daunting.

Understanding .NET Core, NETStandard, .NET Standard applications and ASP.NET Core

There are also some additional issues PCLs did not address.

Supporting new platforms

When a new platform is released, any existing PCL libraries that want to be used on that platform must be recompiled to support it, even if the API surface exposed by the new platform is entirely contained in the PCL library's supported platforms.

For example, imagine you create a PCL which supports the .NET Framework 4.5 and also Windows Phone 8.1. You use only the subset of APIs in common between the two platforms and you publish your library to NuGet with the expected descriptive moniker portable-net45+wpa81.

Suppose some time later, a new .NET Framework called '.NET Watch' is released which exposes exactly the same API surface as Windows Phone 8.1. While the new platform would be perfectly capable of running your PCL Foo.dll, it is blocked from doing so by the explicit moniker attached to it.

I'll cover Microsoft's solution to this a little later in the section on NETStandard.

Each framework is a fork

While PCLs allow a certain degree of convergence in the APIs between various .NET platforms, this requires a significant development from Microsoft for one key reason - each of the .NET platforms described previously is a separate implementation fork. Updating or adding an API for use on each platform means separately implementing the code required in each of the distinct forks. Clearly that's an expensive process, especially given the massive developer dependence on the framework classes being robust and reliable.

Say hello to .NET Core

At the end of 2014, at the connect() developer conference, a new .NET Framework was announced - the open source, cross-platform (Linux, Windows and OS X), .NET Core.

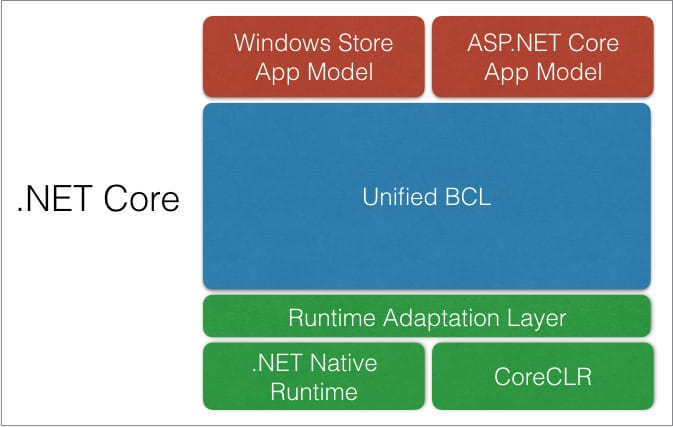
As discussed in this highly recommended video, .NET Core is essentially an umbrella term used to describe a whole host of developments, designed to address the issues discussed previously. The new .NET Core platform looks as follows:

Understanding .NET Core, NETStandard, .NET Standard applications and ASP.NET Core

Where previously Windows Store and the ASP.NET Core app models would have sat in completely separate stacks, they now share a common BCL, called CoreFX. CoreFX is not only a matching API surface for each model, it is exactly the same implementation, and is delivered via NuGet. It consists solely of normal MSIL assemblies, of the sort that you write in your applications, and that anyone can contribute to on GitHub.

A further benefit of delivering the BCL by NuGet is that it allows a so called pay-for-play model, in which the system is highly modular, and you only add those modules which are required, as opposed to always having a much larger list of libraries always available (as in the full .NET Framework). This model enables you to easily upgrade the framework of a single application, while leaving other existing installed applications unaffected. This is important in, for example, a web server scenario, where updating the centrally installed .NET Framework can currently cause rare compatibility issues.

At the bottom of the stack, there is a very thin layer consisting of the CoreCLR (cross platform) and .NET Native (Windows) runtimes, which contains low level types such as String and Int32. While these are different for the two (current) app models, they are very thin layers that will change rarely. Plus, even this is delivered via NuGet.

As an aside, and hopefully to avoid any confusion later if you stumble across it, there is actually already a framework called .NETCore which is the the underlying framework name and moniker (netcore) used in Windows Store Development, and shouldn't be confused with the majority of 'new' references to .NET Core!

NETStandard - an evolution of PCLs

So, CoreFX and the CoreCLR provide a subset of the .NET Framework APIs, as a highly modular, cross platform, open source framework with a single implementation. However this still doesn't address the other previously mentioned issue of PCLs - new frameworks are unsupported without compilation.

In order to address this, Microsoft are actively working on an another target framework, NETStandard which can be targeted for PCLs, and will allow new platforms that meet the required specifications to be supported without re-compilation. This is being actively developed based on a spec here, and I really suggest checking it out to get a fuller understanding of the platform. The key figure in the document is the figure reproduced below.

Target Platform Name Alias
.NET Platform Standard netstandard 1.0 1.1 1.2 1.3 1.4 1.5
.NET Core netcoreapp 1.0
.NET Framework net 4.6.2
4.6.1
4.6
4.5.2
4.5.1
4.5
Universal Windows Platform uap 10.0
Windows win 8.1
8.0
Windows Phone wpa 8.1
Windows Phone Silverlight wp 8.1
8.0
Mono/Xamarin Platforms *
Mono *

In essence, instead of targeting (as in the example from earlier) .NET Framework 4.5 and also Windows Phone 8.1, you would target the .NET Platform Standard which allows you to target those platforms by default. So, from the table, you would target .NET Platform Standard 1.1, as that is the highest platform to which both frameworks conform. By doing that, you would actually also get compatibility with any other framework in the table which also implements 1.1 for 'free' - in this case all platforms except Windows Phone Silverlight. Later, if the new '.Net Watch' framework is released and implements all the required libraries from .NET Platform Standard 1.1, then your library will just work, without any additional compilation, and will have the NuGet moniker netstandard1.1.

Note, the netstandard moniker is not yet supported on NuGet but according to the documentation, should be supported in v3.4. Also, note that the netstandard monikers are actually the renamed values of dotnet monikers from a previous implementation - netstandard1.0 corresponds with dotnet5.0, netstandard1.1 corresponds with dotnet5.1 etc, up to dotnet5.4.

Currently, the proposed NETStandard reference set of libraries/contracts that are supported includes pretty much every package in CoreFX, versioned appropriately. In order for a platform to be considered to support a version of NETStandard, it must implement a subset of these reference assemblies, though it does not necessarily need to support them all. You can therefore end up in a situation where you are targeting e.g netstandard1.4, but using a dll that is not implemented by a particular platform target even though it supports netstandard1.4. For this reason, and unlike previous PCLs, all package dependencies must be fully specified. Supporting the 'unimplemented' assembly situation today seems somewhat sketchy, but no doubt will be handled by tooling (Visual Studio) more gracefully later, in order to guide you through such situations. More details on using 'Guard Rails (supports)' can be found in the working spec.

NET Standard Applications

Finally, this brings me to NET Standard Applications, netstandardapp. If you've managed to get this far, hopefully you have a pretty good understanding of the new .NET Core landscape, and this is just the final piece of the puzzle. The FAQ in the documentation really explains it best:

A .NET Standard application is an application that can run on any .NET Core runtime: CoreCLR (current), .NETNative (future).

So, just as a WinForms application targets the .NET Framework, and a Windows Phone App might target the Windows Phone Platform, so a .NET Standard application targets the .NET Core platform. The naming for this is all a bit jumbled due to reuse (you get the feeling they would really rather call it a .NET Core application but can't because of the already used netcore moniker), but it's really as simple as that.

A .NET Standard application, given it runs on .NET Core which will support a version of NETStandard, will likely predominantly consist of calls to NETStandard APIs. Therefore, the majority of the code can likely be shared with, for example, a .NET Framework application, as long as it supports the appropriate NETStandard version. However, it is important to note that a .NET Standard application cannot inherently be reused on other frameworks - it relies on the .NET Core runtime. The NETStandard target framework is an abstract set of contracts that must be implemented in a framework. Think of it like interfaces, classes and apps - the NETStandard framework provides the interface, while the .NET Framework and .NET Core provide the implementations, and WinForms and .NET Standard applications target those frameworks.

ASP.NET Core

So what can we build with .NET Core? Currently there are two options - you can build Windows Store Apps which use the .NET Native Runtime, or you can build ASP.NET Core 1.0 web apps. This new framework (previously called ASP.NET 5, and before that vNext), is a complete rewrite of the existing ASP.NET framework designed to be highly modular, with a number of best practices built in (e.g. dependency injection).

For developers with prior familiarity with ASP.NET development, on opening a new ASP.NET Core project you will be greeted with a sense of both refreshing familiarity and significant differences. No longer is there a web.config or global.asax, and in their place are startup.cs and project.json (among others).

Note: as of RC2, web.config is back (though settings will live in appsettings.json), and project.json is going away!

WebForms, VB, WebPages and SignalR are all a no-go currently, (though most of those are now on the road map). However, once you get past that initial setup hurdle, you are working with pretty much the same ASP.NET MVC you have been, just with some nice enhancements like tag helpers.

Although ASP.NET Core is designed to be used with .NET Core, ASP.NET Core applications can also target the full .NET Framework. In this case, you don't get the benefit of running cross platform but you do get a stable, robust framework, that is probably already deployed where your applications need to run! I'll be going into far more detail about ASP.NET in subsequent posts so I'll leave it at that for now.

Summary

.NET Core is a somewhat nebulous term for a new framework, runtime and standards. It's easy to get lost in all the new names, especially given how many iterations some of them went through to get to this stage. Given that RC2 has only just been announced, there will no doubt be more changes before this all finally settles down, but I'll try to keep this post updated with any changes. I've also intentionally left out details of the Dotnet CLI and the (now obsolete) DNX, DNVM and DNU for simplicity and as the tooling is in greater flux than the library and runtime aspect discussed. However, if you made it this far hopefully you now have a better grasp of the (suddenly cross-platform) landscape that is on the horizon for .NET development!

Further reading

Model binding JSON POSTs in ASP.NET Core

$
0
0
Model binding JSON POSTs in ASP.NET Core

I was catching up on the latest ASP.NET Community Standup the other day when a question popped up about Model Binding that I hadn't previously picked up on (you can see the question around 46:30). It pointed out that in ASP.NET Core (the new name for ASP.NET 5), you can no longer simply post JSON data to an MVC controller and have it bound automatically, which you could previously do in ASP.NET 4/MVC 5.

In this post, I am going to show what to do if you are converting a project to ASP.NET Core and you discover your JSON POSTs aren't working. I'll demonstrate the differences between MVC 5 model binding and MVC Core model binding, highlighting the differences between the two, and how to setup your controllers for your project, depending on the data you expect.

TL;DR: Add the [FromBody] attribute to the parameter in your ASP.NET Core controller action

Where did my data go?

Imagine you have created a shiny new ASP.NET core project which you are using to rewrite an existing ASP.NET 4 app (only for sensible reasons of course!) You copy and paste your old WebApi controller in to your .NET Core Controller, clean up the namespaces, test out the GET action and all seems to be working well.

Note: In ASP.NET 4, although the MVC and WebApi pipelines behave very similarly, they are completely separate. Therefore you have separate ApiController and Controller classes for WebApi and Mvc respectively (and all the associated namespace confusion). In ASP.NET Core, the pipelines have all been merged and there is only the single Controller class.

As your GET request is working, you know the majority of your pipeline, for example routing, is probably configured correctly. You even submit a test form, which sends a POST to the controller and receives the JSON values it sent back. All looking good.

Model binding JSON POSTs in ASP.NET Core

As the final piece of the puzzle, you test sending an AJAX POST with the data as JSON, and it all falls apart - you receive a 200 OK, but all the properties on your object are empty. But why?

Model binding JSON POSTs in ASP.NET Core

What is Model Binding?

Before we can go into details of what is happening here, we need to have a basic understanding of model binding. Model binding is the process whereby the MVC or WebApi pipeline takes the raw HTTP request and converts that into the arguments for an action method invocation on a controller.

So for example, consider the following WebApi controller and Person class:

public class PersonController : ApiController  
{
    [HttpPost]
    public Person Index(Person person)
    {
        return person;
    }
}

public class Person  
{
    public string FirstName { get; set; }
    public string LastName { get; set; }
    public int Age { get; set; }
}

We can see that there is a single action method on the controller, a POST action, which takes a single parameter - an instance of the Person class. The controller then just echoes that object out, back to the response.

So where does the Person parameter come from? Model binding to the rescue! There are a number of different places the model binders can look for data in order to hydrate the person object. The model binders are highly extensible, and allow custom implementations, but common bindings include:

  • Route values - navigating to a route such as {controller}/{action}/{id} will allow binding to an id parameter
  • Querystrings - If you have passed variables as querystring parameters such as ?FirstName=Andrew, then the FirstName parameter can be bound.
  • Body - If you send data in the body of the post, this can be bound to the Person object
  • Header - You can also bind to HTTP header values, though this is less common.

So you can see there are a number of ways to send data to the server and have the model binder automatically create the correct method parameter for you. Some require explcit configuration, while others you get for free. For example Route values and querystring parameters are always bound, and for complex types (i.e. not primitives like string or int) the body is also bound.

It is important to note that if the model binders fail to bind the parameters for some reason, they will not throw an error, instead you will receive a default object, with none of the properties set, which is the behaviour we showed earlier.

How it works in ASP.NET 4

To play with what's going on here I created two projects, one using ASP.NET 4 and the other using the latest ASP.NET Core (so very nearly RC2). You can find them on github here and here.

In the ASP.NET WebApi project, there is a simple controller which takes a Person object and simply returns the object back as I showed in the previous section.

On a simple web page, we then make POSTs (using jQuery for convenience), sending requests either x-www-form-urlencoded (as you would get from a normal form POST) or as JSON.

 //form encoded data
 var dataType = 'application/x-www-form-urlencoded; charset=utf-8';
 var data = $('form').serialize();

 //JSON data
 var dataType = 'application/json; charset=utf-8';
 var data = {
    FirstName: 'Andrew',
    LastName: 'Lock',
    Age: 31
 }

 console.log('Submitting form...');
 $.ajax({
    type: 'POST',
    url: '/Person/Index',
    dataType: 'json',
    contentType: dataType,
    data: data,
    success: function(result) {
        console.log('Data received: ');
        console.log(result);
    }
});

This will create an HTTP request for the form encoded POST similar to (elided for brevity):

POST /api/Person/UnProtected HTTP/1.1  
Host: localhost:5000  
Accept: application/json, text/javascript, */*; q=0.01  
Content-Type: application/x-www-form-urlencoded; charset=UTF-8

FirstName=Andrew&LastName=Lock&Age=31  

and for the JSON post:

POST /api/Person/UnProtected HTTP/1.1  
Host: localhost:5000  
Accept: application/json, text/javascript, */*; q=0.01  
Content-Type: application/x-www-form-urlencoded; charset=UTF-8

{"FirstName":"Andrew","LastName":"Lock","Age":"31"}

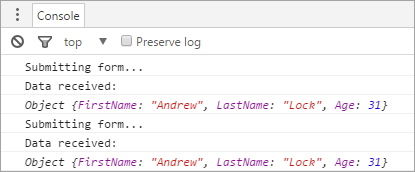
Sending these two POSTs elicits the following console response:

Model binding JSON POSTs in ASP.NET Core

In both cases the controller has bound to the body of the HTTP request, and the parameters we sent were returned back to us, without us having to do anything declarative. The model binders do all the magic for us. Note that although I've been working with a WebApi controller, the MVC controller model binders behave the same in this example, and would bind both POSTs.

The new way in ASP.NET Core

So, moving on to ASP.NET Core, we create a similar controller, using the same Person class as a parameter as before:

public class PersonController : Controller  
{
    [HttpPost]
    public IActionResult Index(Person person){
        return Json(person);   
    } 
}

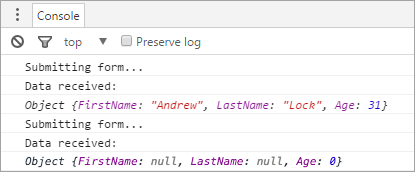
Using the same HTTP requests as previously, we see the following console output, where the x-www-url-formencoded POST is bound correctly, but the JSON POST is not.

Model binding JSON POSTs in ASP.NET Core

In order to bind the JSON correctly in ASP.NET Core, you must modify your action to include the attribute [FromBody] on the parameter. This tells the framework to use the content-type header of the request to decide which of the configured IInputFormatters to use for model binding.

By default, when you call AddMvc() in Startup.cs, a JSON formatter, JsonInputFormatter, is automatically configured, but you can add additional formatters if you need to, for example to bind XML to an object.

With that in mind, our new controller looks as follows:

public class PersonController : Controller  
{
    [HttpPost]
    public IActionResult Index([FromBody] Person person){
        return Json(person);   
    } 
}

And our JSON POST now works like magic again!

Model binding JSON POSTs in ASP.NET Core

So just always include [FromBody]?

So if you were thinking you can just always use [FromBody] in your methods, hold your horses. Lets see what happens when you hit your new endpoint with a x-www-url-formencoded request:

Model binding JSON POSTs in ASP.NET Core

Oh dear. In this case, we have specifically told the ModelBinder to bind the
body of the post, which is FirstName=Andrew&LastName=Lock&Age=31, using an IInputFormatter. Unfortunately, the JSON formatter is the only formatter we have and that doesn't match our content type, so we get a 415 error response.

In order to specifically bind to the form parameters we can either remove the FromBody attribute or add the alternative FromForm attribute, both of which will allow our form data to be bound but again will prevent the JSON binding correctly.

But what if I need to bind both data types?

In some cases you may need to be able to bind both types of data to an action. In that case, you're a little bit stuck, as it won't be possible to have the same end point receive two different sets of data.

Instead you will need to create two different action methods which can specifically bind the data you need to send, and then delegate the processing call to a common method:

public class PersonController : Controller  
{
    //This action at /Person/Index can bind form data 
    [HttpPost]
    public IActionResult Index(Person person){
        return DoSomething(person);   
    } 

    //This action at /Person/IndexFromBody can bind JSON 
    [HttpPost]
    public IActionResult IndexFromBody([FromBody] Person person){
        return DoSomething(person);   
    } 

    private IActionResult DoSomething(Person person){
        // do something with the person here
        // ...

        return Json(person);
    }
}

You may find it inconvenient to have to use two different routes for essentially the same action. Unfortunately, routes are obviously mapped to actions before model binding has occurred, so the model binder cannot be used as a discriminator. If you try to map the two above actions to the same route you will get an error saying Request matched multiple actions resulting in ambiguity. It may be possible to create a custom route to call the appropriate action based on header values, but in all likelihood that will just be more effort than it's worth!

Why the change?

So why has this all changed? Wasn't it simpler and easier the old way? Well, maybe, though there are a number of gotchas to watch out for, particularly when POSTing primitive types.

The main reason, according to Damian Edwards at the community standup, is for security reasons, in particular cross-site request forgery (CSRF) prevention. I will do a later post on anti-CSRF in ASP.NET Core, but in essence, when model binding can occur from multiple different sources, as it did in ASP.NET 4, the resulting stack is not secure by default. I confess I haven't got my head around exactly why that is yet or how it could be exploited, but I presume it is related to identifying your anti-CSRF FormToken when you are getting your data from multiple sources.

Summary

In short, if your model binding isn't working properly, make sure it's trying to bind from the right part of your request and you have registered the appropriate formatters. If it's JSON binding you're doing, adding [FromBody] to your parameters should do the trick!

References

How to add default security headers in ASP.NET Core using custom middleware

$
0
0
How to add default security headers in ASP.NET Core using custom middleware

One of the easiest ways to harden and improve the security of a web application is through the setting of certain HTTP header values. As these headers are often added by the server hosting the application (e.g. IIS, Apache, NginX), they are normally configured at this level rather than directly in your code.

In ASP.NET 4, there was also the possibility of adding to the <system.webServer> element in web.config:

<system.webServer>  
  <httpProtocol>
      <customHeaders>
        <add name="X-Frame-Options" value="SAMEORIGIN" />
        <add name="X-XSS-Protection" value="1; mode=block" />
        <add name="X-Content-Type-Options" value="nosniff" />
        <add name="Strict-Transport-Security" value="max-age=31536000; includeSubDomains" />
        <remove name="X-Powered-By" />
      </customHeaders>
    </httpProtocol>
</system.webServer>  

This allows you to set the X-Frame-Options, X-XSS-Protection, X-Content-Type-Options and Strict-Transport-Security headers and remove the X-Powered-By header at the application level, without having to modify your IIS server configuration directly. While X-Powered-By isn't always included in lists of headers to remove, for example on https://securityheaders.io, it is not required by browsers and anything that makes it harder to fingerprint your server is probably a good idea.

In ASP.NET Core, web.config has gone so this approach will no longer work (though you can still set the headers at the server level). However the configuration of your app in Startup.cs is far more explicit than before, which opens up another avenue whereby to modify the headers - the middleware. In this post I'm going to show how you can easily extend the existing middleware to add your own security headers to requests.

Update - as of RC2, the <web.config> file is back for IIS! That means that middleware is no longer necessarily the easiest way to customise headers per application in this case. However the middleware approach described here is far more extensible than using <customHeaders> so may well still find use cases. Also, using middleware ensures the headers are still added when you are self hosting Kestrel rather than hooking in to IIs.

What is Middleware?

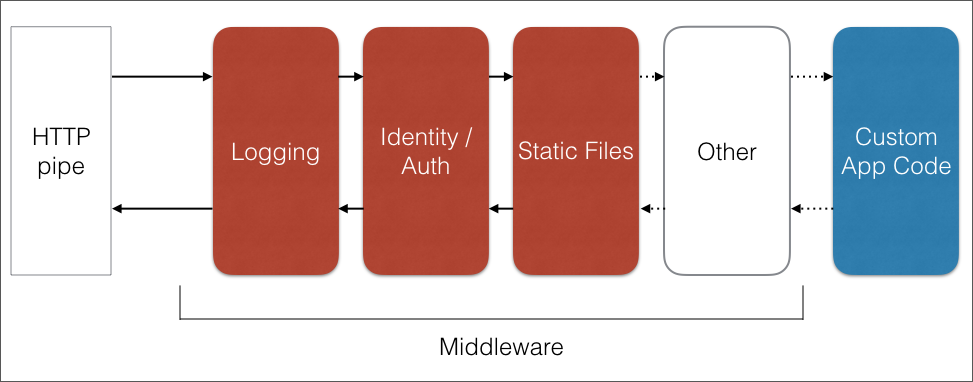
The concept of middleware is probably pretty well understood in the world of node and express.js where it is a fundamental concept for building a web server, but for .NET developers it may be slightly less familiar. Middleware is essentially everything that sits in between the server HTTP pipe and your application proper, executing actions in your controllers in the case of MVC.

How to add default security headers in ASP.NET Core using custom middleware

Middleware is composed of simple modular blocks that are each handed the HTTP request in turn, process it in some way, and then either return a response directly or hands off to the next block. In this way you can build easily composable blocks that provide a different part of the process. For example, one block could check for authentication credentials, another could simple log the request somewhere etc

In ASP.NET Core, the middleware is defined in Startup.cs in the Configure method, in which each of the extension methods called on the IApplicationBuilder adds another module to the pipeline. The default pipeline as of RC2 is:

public void Configure(IApplicationBuilder app, IHostingEnvironment env, ILoggerFactory loggerFactory)  
{
    loggerFactory.AddConsole(Configuration.GetSection("Logging"));
    loggerFactory.AddDebug();

    if (env.IsDevelopment())
    {
        app.UseDeveloperExceptionPage();
        app.UseBrowserLink();
    }
    else
    {
        app.UseExceptionHandler("/Home/Error");
    }

    app.UseStaticFiles();

    app.UseMvc(routes =>
    {
        routes.MapRoute(
            name: "default",
            template: "{controller=Home}/{action=Index}/{id?}");
    });
}

Creating a middleware component

In order to create a new middleware component, you must do two things:
1. Create a class with the appropriate signature
2. Register the class on the IApplicationBuilder

Creating the middleware class

A middleware class is just a standard class, it does not implement an interface as such, but it must conform to a certain shape in order to be successfully called at runtime:

using System.Threading.Tasks;  
using Microsoft.AspNetCore.Builder;  
using Microsoft.AspNetCore.Http;

public class MyMiddleware  
{
    private readonly RequestDelegate _next;

    public MyMiddleware(RequestDelegate next)
    {
        _next = next;
    }

    public async Task Invoke(HttpContext context)
    {
        await _next(context);
    }
}

So this class will be passed a RequestDelegate in the constructor, which is a pointer to the next piece of middleware in the pipeline. When a request is made to the server, the first piece of middleware registered in Startup.cs is called using Invoke and passed the context. When a piece of middleware finishes processing, it then directly invokes the next piece of middleware in the chain until a response is returned.

It is worth noting that you are free to pass additional services and objects required to process the request in to the constructor of your middleware class - these will be automatically found and instantiated using dependency injection.

Registering the middleware in Startup

The current standard approach to registering middleware in Startup is to create an extension method on IApplicationBuilder that registers the correct class. If you have additional configuration required to create the middleware, it is suggested to create an overload which takes a Builder object or configuration class. Note that it is no longer considered best practice to create an extension method which takes a delegate.

using System;  
using Microsoft.AspNetCore.Builder;

public static class MyMiddlewareExtensions  
{
    public static IApplicationBuilder UseMyMiddleware(this IApplicationBuilder app)
    {
        return app.UseMiddleware<MyMiddleware>();
    }

    public static IApplicationBuilder UseSecurityHeadersMiddleware(this IApplicationBuilder app, MyMiddlewareBuilder builder)
    {
        return app.UseMiddleware<MyMiddleware>(builder.Build());
    }
}

Now all that is required is to register your middleware in the Configure method using:

  app.UseMyMiddleware();

Building the SecurityHeaderMiddleware

So now we know how to create and edit a piece of middleware, lets create one for ourselves! You can find a sample project containing the middleware on GitHub but the key classes are discussed below, elided for brevity.

First we have a SecurityHeadersPolicy object, which is a simple class containing a list of the headers to add and remove:

public class SecurityHeadersPolicy  
{
    public IDictionary<string, string> SetHeaders { get; } 
         = new Dictionary<string, string>();

    public ISet<string> RemoveHeaders { get; } 
        = new HashSet<string>();
}

Next we have the middleware itself, SecurityHeadersMiddleware. An instance of SecurityHeadersPolicy is passed to the constructor of our middleare and used to modify the response in the pipeline:

public class SecurityHeadersMiddleware  
{
    private readonly RequestDelegate _next;
    private readonly SecurityHeadersPolicy _policy;

    public SecurityHeadersMiddleware(RequestDelegate next, SecurityHeadersPolicy policy)
    {
        _next = next;
        _policy = policy;
    }

    public async Task Invoke(HttpContext context)
    {        
        IHeaderDictionary headers = context.Response.Headers;

        foreach (var headerValuePair in _policy.SetHeaders)
        {
            headers[headerValuePair.Key] = headerValuePair.Value;
        }

        foreach (var header in _policy.RemoveHeaders)
        {
            headers.Remove(header);
        }

       await _next(context);
    }
}

In the Invoke method, the headers we have registered are set on the output, and the headers we wish to remove are removed.

It's important to note here that we are overwriting the header values in the response with the values we provide, so if a header has already been set in a previous piece of middleware, it will have our new value. It is also worth noting that we cannot remove headers which have not yet been added to the response. This means that the IIS header modification discussed at the beginning of the post has the last word!

So next we have the extension method to register our middleware:

public static class MiddlewareExtensions  
{
    public static IApplicationBuilder UseSecurityHeadersMiddleware(this IApplicationBuilder app, SecurityHeadersBuilder builder)
    {
        SecurityHeaderPolicy policy = builder.Build();
        return app.UseMiddleware<SecurityHeadersMiddleware>(policy);
    }
}

In this extension method we provide an instance of a SecurityHeadersBuilder which exposes a Build() method to return the SecurityHeaderPolicy object. This is later injected in to the constructor of the SecurityHeaderMiddleware and allows you to customise which headers are added and removed.

The builder class exposes a number of methods to allow you to fluently construct it, building up a SecurityHeaderPolicy slowly. The general methods are shown below along with the methods for configuring X-Frame-Options and removing the server tag. The full class contains a number of additional methods for configuring other headers and can be found here.

public class SecurityHeadersBuilder  
{
    private readonly SecurityHeadersPolicy _policy = new SecurityHeadersPolicy();

    public SecurityHeadersBuilder AddDefaultSecurePolicy()
    {
        AddFrameOptionsDeny();
        AddXssProtectionBlock();
        AddContentTypeOptionsNoSniff();
        AddStrictTransportSecurityMaxAge();
        RemoveServerHeader();

        return this;
    }

    public SecurityHeadersBuilder AddFrameOptionsDeny()
    {
        _policy.SetHeaders[FrameOptionsConstants.Header] = FrameOptionsConstants.Deny;
        return this;
    }

    public SecurityHeadersBuilder AddFrameOptionsSameOrigin()
    {
        _policy.SetHeaders[FrameOptionsConstants.Header] = FrameOptionsConstants.SameOrigin;
        return this;
    }

    public SecurityHeadersBuilder AddFrameOptionsSameOrigin(string uri)
    {
        _policy.SetHeaders[FrameOptionsConstants.Header] = string.Format(FrameOptionsConstants.AllowFromUri, uri);
        return this;
    }

    public SecurityHeadersBuilder RemoveServerHeader()
    {
        _policy.RemoveHeaders.Add(ServerConstants.Header);
        return this;
    }

    public SecurityHeadersBuilder AddCustomHeader(string header, string value)
    {
        _policy.SetHeaders[header] = value;
        return this;
    }

    public SecurityHeadersBuilder RemoveHeader(string header)
    {
        _policy.RemoveHeaders.Add(header);
        return this;
    }

    public SecurityHeadersPolicy Build()
    {
        return _policy;
    }
}

With all these pieces in place, it is a simple case of configuring the middleware in Configure() in Startup.cs:

app.UseSecurityHeadersMiddleware(new SecurityHeadersBuilder()  
  .AddDefaultSecurePolicy()
  .AddCustomHeader("X-My-Custom-Header", "So cool")
);

And we're all done!

Comparing the (abbreviated) output from a call to the homepage before and after adding the middleware gives:

Before:

HTTP/1.1 200 OK  
Content-Type: text/html; charset=utf-8  
Server: Kestrel  
X-Powered-By: ASP.NET  

After:

HTTP/1.1 200 OK  
Content-Type: text/html; charset=utf-8  
X-Frame-Options: DENY  
X-My-Custom-Header:So cool  
X-XSS-Protection: 1; mode=block  
X-Content-Type-Options: nosniff  
Strict-Transport-Security: max-age=31536000  
X-Powered-By: ASP.NET  

We can see that we've successfully added X-Frame-Options, X-XSS-Protection, X-Content-Type-Options and Strict-Transport-Security headers, and removed the Server header, not too shabby!

It's important to remember these headers are returned for every request, which is not necessarily appropriate (e.g. the Strict-Transport-Security) should only be returned over HTTPS, whereas with the above implementation they will be returned with every request.

Another thing to remember is that the order of the middleware being registered is important. To add to all requests, UseSecurityHeadersMiddleware should be called very early in the configuration pipeline, before other middleware has a chance to return a response. For example, if you add the UseSecurityHeadersMiddleware call after the call to UseStaticFiles(), then any requests for static files will not have the headers added, as the static file middleware will return a response before the security header middleware has been invoked. In that case calls which exercise the full MVC pipeline would have different security headers to static file requests.

One slight annoyance of the setup provided when running under IIS/IIS Express is the X-Powered-By, header which is added outside of the Startup.cs pipeline (it is added in applicationhost.config). This header is not available in context.Response.Headers even if our middleware is the last in the pipe, so we can't remove it using this method!

Summary

In this post I discussed how to create custom middleware in general. I then demonstrated sample classes that allow you to automatically add and remove headers to and from HTTP requests. This allows you to add headers such as X-Frame-Options and X-XSS-Protection to all your responses, while removing unnecessary headers like Server.

How to use the IOptions pattern for configuration in ASP.NET Core RC2

$
0
0
How to use the IOptions pattern for configuration in ASP.NET Core RC2

Almost every project will have some settings that need to be configured and changed depending on the environment, or secrets that you don't want to hard code into your repository. The classic example is connection strings and passwords etc which in ASP.NET 4 were often stored in the <applicationSettings> section of web.config.

In ASP.NET Core this model of configuration has been significantly extended and enhanced. Application settings can be stored in multiple places - environment variables, appsettings.json, user secrets etc - and easily accessed through the same interface in your application. Further to this, the new configuration system in ASP.NET allows (actually, enforces) strongly typed settings using the IOptions<> pattern.

While working on an RC2 project the other day, I was trying to use this facility to bind a custom Configuration class, but for the life of me I couldn't get it to bind my properties. Partly that was down to the documentation being somewhat out of date since the launch of RC2, and partly down to the way binding works using reflection. In this post I'm going to go into demonstrate the power of the IOptions<> pattern, and describe a few of the problems I ran in to and how to solve them.

Strongly typed configuration

In ASP.NET Core, there is now no default AppSettings["MySettingKey"] way to get settings. Instead, the recommended approach is to create a strongly typed configuration class with a structure that matches a section in your configuration file (or wherever your configuration is being loaded from):

public class MySettings  
{
    public string StringSetting { get; set; }
    public int IntSetting { get; set; }
}

Would map to the lower section in the appsettings.json below.

{
  "Logging": {
    "IncludeScopes": false,
    "LogLevel": {
      "Default": "Debug",
      "System": "Information",
      "Microsoft": "Information"
    }
  },
  "MySettings": {
    "StringSetting": "My Value",
    "IntSetting": 23 
  }
}

Binding the configuration to your classes

In order to ensure your appsettings.json file is bound to the MySettings class, you need to do 2 things.
1. Setup the ConfigurationBuilder to load your file
2. Bind your settings class to a configuration section

When you create a new ASP.NET Core application from the default templates, the ConfigurationBuilder is already configured in Startup.Startup to load settings from environment variables, appsettings.json, and in development environments, from user secrets:

public Startup(IHostingEnvironment env)  
{
    var builder = new ConfigurationBuilder()
        .SetBasePath(env.ContentRootPath)
        .AddJsonFile("appsettings.json", optional: true, reloadOnChange: true)
        .AddJsonFile($"appsettings.{env.EnvironmentName}.json", optional: true);

    if (env.IsDevelopment())
    {
        builder.AddUserSecrets();
    }

    builder.AddEnvironmentVariables();
    Configuration = builder.Build();
}

If you need to load your configuration from another source then this is the place to do it, but for most common situations this setup should suffice. There are a number of additional configuration providers that can be used to bind other sources, such as xml files for example.

In order to bind a settings class to your configuration you need to configure this in the ConfigureServices method of Startup.cs:

public void ConfigureServices(IServiceCollection services)  
{
    services.Configure<MySettings>(options => Configuration.GetSection("MySettings").Bind(options));
}

Note: The syntax for model binding has changed from RC1 to RC2 and was one of the issues I was battling with. The previous method, using services.Configure<MySettings>(Configuration.GetSection("MySettings")), is no longer available

You may also need to add the configuration binder package to the dependencies section of your project.json:

"dependencies": {
  ...
  "Microsoft.Extensions.Configuration.Binder": "1.0.0-rc2-final"
  ...
}

Update: As mentioned by Larry Ruckman, you can now use the old binding syntax if you add the package Microsoft.Extensions.Options.ConfigurationExtensions with version 1.0.0-rc2-final to your project.json

Using your configuration class

When you need to access the values of MySettings you just need to inject an instance of an IOptions<> class into the constructor of your consuming class, and let dependency injection handle the rest:

public class HomeController : Controller  
{
    private MySettings _settings;
    public HomeController(IOptions<MySettings> settings)
    {
        _settings = settings.Value
        // _settings.StringSetting == "My Value";
    }
}

The IOptions<> service exposes a Value property which contains your configured MySettings class.

It's important to note that there doesn't appear to be a way to access the raw IConfigurationRoot through dependency injection, so the strongly typed route is the only way to get to your settings.

Complex configuration classes

The example shown above is all very nice, but what if you have a very complex configuration, nested types, collections, the whole 9 yards?

public class MySettings  
{
    public string StringSetting { get; set; }
    public int IntSetting { get; set; }
    public Dictionary<string, InnerClass> Dict { get; set; }
    public List<string> ListOfValues { get; set; }
    public MyEnum AnEnum { get; set; }
}

public class InnerClass  
{
    public string Name { get; set; }
    public bool IsEnabled { get; set; } = true;
}

public enum MyEnum  
{
    None = 0, 
    Lots = 1
}

Amazingly we can bind that using the same configure<MySettings> call to the following, and it all just works:

{
  "MySettings": {
    "StringSetting": "My Value",
    "IntSetting": 23,
    "AnEnum": "Lots",
    "ListOfValues": ["Value1", "Value2"],
    "Dict": {
      "FirstKey": {
        "Name": "First Class",
           "IsEnabled":  false 
      }, 
      "SecondKey": {
        "Name": "Second Class"
      } 
    }
  }
}

When values aren't provided, they get their default values, (e.g. MySettings.Dict["SecondKey].IsEnabled == true). Dictionaries, lists and enums are all bound correctly. That is until they aren't...

Models that won't bind

So after I'd beaten the RC2 syntax change in to submission, I thought I was home and dry, but I still couldn't get my configuration class to bind correctly. Getting frustrated, I decided to dive in to the source code for the binder and see what's going on (woo, open source!).

It was there I found a number of interesting cases where a model's properties won't be bound even if there are appropriate configuration values. Most of them are fairly obvious, but could feasibly sting you if you're not aware of them. I am only going to go into scenarios that do not throw exceptions, as these seem like the hardest ones to figure out.

Properties must have a public Get method

The properties of your configuration class must have a getter, which is public and must not be an indexer, so none of these properties would bind:

private string _noGetter;  
private string[] _arr;

public string NoGetter { set { _noGetter = value; } }  
public string NonPublicGetter { set { _noGetter = value; } }  
public string this[int i]  
{
    get { return _arr[i]; }
    set { _arr[i] = value; }
}

Properties must have a public Set method...

Similarly, properties must have a public setter, so again, none of these would bind:

public string NoGetter { get; }  
public string NonPublicGetter { get; private set; }  

...Except when they don't have to

The public setter is actually only required if the value being bound is null. If it's a simple type like a string or and int, then the setter is required as there's no way to change the value. You can create readonly properties with default values, but they just won't be bound. For properties which are complex types, you don't need a setter, as long as the value has a value at binding time:

public MyInnerClass ComplexProperty { get; } = new MyInnerClass();  
public List<string> ListValues { get; } = new List<string>();  
public Dictionary<string, string> DictionaryValue1 { get; } = new Dictionary<string,string>();  
private Dictionary<string, string> _dict = new Dictionary<string,string>();  
public Dictionary<string, string> DictionaryValue2 { get { return _dict; } }  

The sub properties of the MyInnerClass object returned by ComplexProperty would be bound, values would be added to the collection in ListValues, and KeyValuePairs would be added to the dictionaries.

Dictionaries must have string keys

This is one of the gotchas that got me! While integers, are obviously perfectly valid keys to dictionaries usually, they are not allowed in this case thanks to this snippet in ConfigurationBinder.BindDictionary:

var typeInfo = dictionaryType.GetTypeInfo();

// IDictionary<K,V> is guaranteed to have exactly two parameters
var keyType = typeInfo.GenericTypeArguments[0];  
var valueType = typeInfo.GenericTypeArguments[1];

if (keyType != typeof(string))  
{
    // We only support string keys
    return;
}

Don't expose IDictionary

This is another one that got me accidentally. While coding to interfaces is nice, the model binder uses reflection and Activator.CreateInstance(type) to create the classes to be bound. If your properties are interfaces or abstract then the binder will throw when trying to create them.

If you are exposing your properties as a readonly getter however, then the binder does not need to create the property and you might think the configuration class would bind correctly. And that is true in almost all cases. Unforunately while the binder can bind any properties which are a type that derives from IDictionary<,>, it will not bind an IDictionary<,> property directly. This leaves you with the following situation:

public interface IMyDictionary<TKey, TValue> : IDictionary<TKey, TValue> { }

public class MyDictionary<TKey, TValue>  
    : Dictionary<TKey, TValue>, IMyDictionary<TKey, TValue>
{
}

public class MySettings  
{
  public IDictionary<string, string> WontBind { get; } = new Dictionary<string, string>();
  public IMyDictionary<string, string> WillBind { get; } = new MyDictionary<string, string>();
}

Our wrapper type IMyDictionary which is really just an IDictionary will be bound, whereas the directly exposed IMyDictionary will not. This doesn't feel right to me and I've raised an issue with the team.

Make properties Implementing ICollection also expose an Add method

Types deriving from ICollection<> are automatically bound in the same way as dictionaries, however the ICollection<> interface exposes no methods to add an object to the collection, only methods for enumerating and counting. It may seem strange then that it is this interface the binder looks for when checking whether a property can be bound.

If a property exposes a type that implements ICollection<> (and is not an ICollection<> itself, as for IDictionary above, though that makes sense in this case), then it is a candidate for binding. In order to add an item to the collection, reflection is used to invoke an Add method on the type:

var addMethod = typeInfo.GetDeclaredMethod("Add");  
addMethod.Invoke(collection, new[] { item });  

If an add method on the exposed type does not exist (e.g. it could be a ReadOnlyCollection<>), then this property will not be bound, but no error will be thrown, you will just get an empty collection. This one feels a little nasty to me, but I guess the common use case is you will be exposing List<> and IList<> etc. Feels like they should be looking for IList<> if that is what they need though!

Summary

The strongly typed configuration is a great addition to ASP.NET Core, providing a clean way to apply the Interface Segregation Principle to your configuration. Currently it seems more convoluted to retrieve your settings than tin ASP.NET 4, but I wouldn't be surprised if they add some convenience methods for quickly accessing values in a forthcoming release.

It's important to consider the gotchas described if you're having trouble binding values (and you're not getting an exceptions thrown). Pay particular attention to your collections, as that's where my issues arose.

Resources

A deep dive into the ASP.NET Core CORS library

$
0
0
A deep dive into the ASP.NET Core CORS library

In a previous post I showed how you could use custom middleware to automatically add security headers to requests. This works well if you require a single policy to be applied to all requests. But what if you want certain actions to have a stricter policy wHere possible?

For example, it may be desirable to enable the Content-Security-Policy header to mitigate Cross Site Scripting (XSS) attacks, but there are pretty stringent requirements for it's use - you can't use inline javascript for example. With the previously described example, if you needed it disabled anywhere, you would have to disable it everywhere.

In order to make the security headers approach more flexible, I wanted to introduce the idea of multiple policies that could be applied to MVC controllers at the action or controller level, only falling back to the default policy when no others were specified.

The idea was that you could use an attribute [SecurityHeaderPolicy("policyName")] to indicate that a particular action or controller should use the specified "policyName" policy, which would be registered during configuration. The only problem is I wasn't sure how to connect all the parts.

To get some inspiration I decided to explore the code behind the Cross-Origin Resource Sharing (CORS) library, which obviously, being part of ASP.NET Core, is open source on GitHub. The design of the ASP.NET Core CORS library is pretty much exactly what I have described, in which you can apply a policy at the middleware level , or register multiple policies and select one at runtime via MVC attributes.

In this post I wont be going in to detail about how CORS works itself, or how to enable it for your application. If that's what you're after then I suggest you checkout the documentation, which is excellent.

Instead I'm going to dive in to the code of the Microsoft.AspNetCore.Cors and Microsoft.AspNetCore.Mvc libraries themselves. I'll describe some of the patterns the ASP.NET Core team have used and the infrastructure required to configure a system as I have outlined.

Any code is pulled from the repos directly, but generally with comments and precondition checks removed.

Middleware or filters?

One of the key decisions made by the team is to split out the core CORS functionality (applying the appropriate headers etc) into a separate service, which is consumed in two distinct places - the middleware infrastructure and the MVC infrastructure.

Also, they have made the decision that the middleware implementation and the MVC attribute implementation work independently - you should only use one in your application otherwise you will get unexpected results.

Whichever approach you choose there is a lot of code in common. The mechanisms for building policies, registering them and applying them at runtime are common to both; it is only the method by which a particular policy is selected at runtime, and how the services are invoked which varies between the two methods.

Registering your policies

There are three main classes associated with the building and registering of policies: CorsOptions, CorsPolicy and CorsPolicyBuilder.

The CorsPolicy class is the heart of the library - it contains various properties that define the CORS mechanism, such as which headers, methods and origins are supported by a given resource.

public class CorsPolicy  
{
    public bool AllowAnyHeader { get { ... } } 
    public bool AllowAnyMethod { get { ... } } 
    public bool AllowAnyOrigin { get { ... } } 

    public IList<string> ExposedHeaders { get; } = new List<string>();
    public IList<string> Headers { get; } = new List<string>();
    public IList<string> Methods { get; } = new List<string>();
    public IList<string> Origins { get; } = new List<string>();

    public TimeSpan? PreflightMaxAge  { get { ... } } 
    public bool SupportsCredentials { get; set; }
}

The CorsPolicyBuilder is a utility class to assist in building a CorsPolicy correctly, and contains methods such as AllowAnyOrigin(), and AllowCredentials()

The core of the CorsOptions class is a private IDictionary<string, CorsPolicy> which contains all the policies currently registered. There are utility methods for adding a CorsPolicy to the dictionary with a given key, and for retrieving them by key, but it is little more than a dictionary of all the policies that are registered.

public class CorsOptions  
{
    private IDictionary<string, CorsPolicy> PolicyMap { get; } = new Dictionary<string, CorsPolicy>();

    public string DefaultPolicyName { get; set; }

    public void AddPolicy(string name, CorsPolicy policy)
    {
        PolicyMap[name] = policy;
    }

    public void AddPolicy(string name, Action<CorsPolicyBuilder> configurePolicy)
    {
        var policyBuilder = new CorsPolicyBuilder();
        configurePolicy(policyBuilder);
        PolicyMap[name] = policyBuilder.Build();
    }

    public CorsPolicy GetPolicy(string name)
    {
        return PolicyMap.ContainsKey(name) ? PolicyMap[name] : null;
    }
}

Finally, there is an extension method AddCors() on IServiceCollection which you can call when registering the required services which wraps a call to services.Configure<CorsOptions>(). This uses the options pattern to register the CorsOptions and ensures they are available for dependency injection later.

This mechanism for configuration seems pretty standard and allows quite a lot of flexibility for configuring multiple policies in code. However, the design of the CorsOptions object doesn't really lend itself to binding to a configuration data source, which would allow, for example, different policies defined by different environment variables.

Given the relatively complex requirements of implementing CORS correctly, this is probably intentional. It might have been a nice addition to allow, for example, binding the list of allowed origins from appsettings.json, but it's a minor point.

Finding and applying a policy

So your configuration is all complete, your policies are registered, now how are these policies found at runtime? Well, that varies depending on whether you are using the middleware or MVC attributes. With the middleware approach you have the option to directly pass in a CorsPolicyBuilder when the middleware is registered. If you do, then that will be used to build a CorsPolicy which will be injected in to the middleware constructor and used for every request. Alternatively, you can provide a policy name as a string, which will be injected into the middleware instead.

When using the MVC attributes, you also provide a policy name via an [EnableCors(policyName)] attribute at the global, controller or action level, which, after a relatively complex series of steps that I'll cover later, eventually spits out a policy name at the end of it.

This string "policyName" is used to obtain a CorsPolicy to apply by using the ICorsPolicyProvider interface:

using System.Threading.Tasks;  
using Microsoft.AspNetCore.Http;

public interface ICorsPolicyProvider  
{
    Task<CorsPolicy> GetPolicyAsync(HttpContext context, string policyName);
}

This can be used to asynchronously retrieve a CorsPolicy given the current HttpContext and the policy name. The default implementation in the library (cunningly called DefaultCorsPolicyProvider), simply returns the appropriate policy from the provided options object, or null if no policy is found:

public class DefaultCorsPolicyProvider : ICorsPolicyProvider  
{
    private readonly CorsOptions _options;

    public DefaultCorsPolicyProvider(IOptions<CorsOptions> options)
    {
        _options = options.Value;
    }

    public Task<CorsPolicy> GetPolicyAsync(HttpContext context, string policyName)
    {
        return Task.FromResult(_options.GetPolicy(policyName ?? _options.DefaultPolicyName));
    }
}

If a policy is found, it can be applied using an instance of a service implementing ICorsService:

public interface ICorsService  
{
    CorsResult EvaluatePolicy(HttpContext context, CorsPolicy policy);

    void ApplyResult(CorsResult result, HttpResponse response);
}

The method EvaluatePolicy returns an intermediate CorsResult that indicates the necessary action to take (which headers to set, whether to respond to an identified preflight request). Apply result is then used to apply these changes to the HttpResponse, nicely separating these two distinct actions.

Applying CORS via middleware

All of the classes described so far are used regardless of which method you choose to apply CORS. If you use the middleware, then the final connecting piece is the middleware itself, which is surprisingly simple. With the constructors removed, the middleware becomes:

public class CorsMiddleware  
{
    private readonly RequestDelegate _next;
    private readonly ICorsService _corsService;
    private readonly ICorsPolicyProvider _corsPolicyProvider;
    private readonly CorsPolicy _policy;
    private readonly string _corsPolicyName;

    public async Task Invoke(HttpContext context)
    {
        if (context.Request.Headers.ContainsKey(CorsConstants.Origin))
        {
            var corsPolicy = _policy ?? await _corsPolicyProvider?.GetPolicyAsync(context, _corsPolicyName);
            if (corsPolicy != null)
            {
                var corsResult = _corsService.EvaluatePolicy(context, corsPolicy);
                _corsService.ApplyResult(corsResult, context.Response);

                var accessControlRequestMethod =
                    context.Request.Headers[CorsConstants.AccessControlRequestMethod];
                if (string.Equals(
                        context.Request.Method,
                        CorsConstants.PreflightHttpMethod,
                        StringComparison.Ordinal) &&
                        !StringValues.IsNullOrEmpty(accessControlRequestMethod))
                {
                    // Since there is a policy which was identified,
                    // always respond to preflight requests.
                    context.Response.StatusCode = StatusCodes.Status204NoContent;
                    return;
                }
            }
        }

        await _next(context);
    }
}

In the Invoke method, which is called when the middleware executes, first a policy is identified (either via a constructor injected policy or using the ICorsPolicyProvider). If a policy is found it is evaluated and applied using the ICorsService. Finally, if the request is identified as a preflight request and the policy allows it, a 204 status code is returned. Otherwise, the next piece of middleware is invoked. Simple!

Applying CORS via MVC attributes

While the middleware approach is simple, it only allows you to provide a single CORS policy for all requests that it processes. If you need more flexibility then there are a couple of approaches you can take.

If you are not using MVC, then implementing your own ICorsService and/or ICorsPolicyProvider may be your only option. The ICorsPolicyProvider is passed the HttpContext when looking for a policy, so it would be possible to implement this interface and return a particular policy based on something exposed there. Alternatively, the CorsService class is designed with extensibility in mind, with several methods exposed as public virtual to allow easy overriding in derived classes. This gives you a ton of flexibility, but obviously 'With Great Power…'.

If you are using MVC then the [EnableCors] and [DisableCors] attributes should provide you all the flexibility you need, allowing you to specify different policies, in a cascading fashion, at the global, controller and action level. It's very simple to consume, but under the hood there's a lot of moving parts!

Dumb marker attributes

First the attributes, [EnableCors] and [DisableCors]. These attributes are simple marker attributes only, with no functionality other than capturing a given policy name. They implement [IEnableCorsAttribute] and [IDisableCorsAttribute] but are used purely to provide metadata, not functionality:

public interface IDisableCorsAttribute { }  
public class DisableCorsAttribute : Attribute, IDisableCorsAttribute { }

public interface IEnableCorsAttribute  
{
    string PolicyName { get; set; }
}

public class EnableCorsAttribute : Attribute, IEnableCorsAttribute  
{
    public EnableCorsAttribute(string policyName)
    {
        PolicyName = policyName;
    }

    public string PolicyName { get; set; }
}

Authorization filters doing all the hard work

So if the attributes themselves don't apply the CORS policy, where does the magic happen? Well the simple answer is in a different type of attribute - an ICorsAuthorizationFilter. There are just two attributes that implement this interface, the CorsAuthorizationFilter, and the DisableCorsAuthorizationFilter.

These attributes work very similarly to the CorsMiddleware shown previously. In the implemented IAuthorizationFilter.OnAuthorizationAsync method, the CorsAuthorizationFilter uses an injected ICorsPolicyProvider to find the appropriate CorsPolicy by name, then evaluates and applies it using the ICorsService.

public async Task OnAuthorizationAsync(Filters.AuthorizationFilterContext context)  
{
    // If this filter is not closest to the action, it is not applicable.
    if (!IsClosestToAction(context.Filters))
    {
        return;
    }

    var httpContext = context.HttpContext;
    var request = httpContext.Request;
    if (request.Headers.ContainsKey(CorsConstants.Origin))
    {
        var policy = await _corsPolicyProvider.GetPolicyAsync(httpContext, PolicyName);

        if (policy == null)
        {
            throw new InvalidOperationException(
                Resources.FormatCorsAuthorizationFilter_MissingCorsPolicy(PolicyName));
        }

        var result = _corsService.EvaluatePolicy(context.HttpContext, policy);
        _corsService.ApplyResult(result, context.HttpContext.Response);

        var accessControlRequestMethod =
                httpContext.Request.Headers[CorsConstants.AccessControlRequestMethod];
        if (string.Equals(
                request.Method,
                CorsConstants.PreflightHttpMethod,
                StringComparison.Ordinal) &&
            !StringValues.IsNullOrEmpty(accessControlRequestMethod))
        {
            // If this was a preflight, there is no need to run anything else.
            // Also the response is always 200 so that anyone after mvc can handle the pre flight request.
            context.Result = new StatusCodeResult(StatusCodes.Status200OK);
        }

        // Continue with other filters and action.
    }
}

The main difference between the CorsAuthorizationFilter and the middleware is the additional call at the start of the method to IsClosestToAction, which bypasses the filter if there is a more specific ICorsAuthorizationFilter closer to the final action called. This allows the ability to have a Globally applied filter, which is overriden by a controller level filter, which in turn is overriden by a filter applied to an action.

The DisableCorsAuthorizationFilter is effectively a stripped down version of the CorsAuthorizationFilter - it does not look for or apply a policy, and so does not add the CORS headers, but if it detects a preflight request it returns the 200 status code.

Creating attributes that have constructor dependencies

Phew! That was hard work, so we have our marker attributes to indicate which policy we want applied (or disabled), and we have our ICorsAuthorizationFilter actually applying the CORS, but how are the two connected? It's not like we decorate our controllers and actions with CorsAuthorizationFilter attributes. And why don't we just directly use those attributes?

The simple answer is we need an ICorsService and ICorsPolicyProvider in order to execute the CORS request. These are transient services which we need injected from the IoC container. Unfortunately in order for a filter to be applied to an action it has to have a parameterless constructor. That leaves you trying to use the Service Locator anti-pattern or setter injection or similar, none of which are particularly appealing.

So how are the filters created? The answer to this is through the use of two more interfaces - IFilterFactory and IApplicationModelProvider.

IFilterFactory

Unsurprisingly, the IFilterFactory interface does exactly what it says on the tin - it creates an IFilterMetadata given an IServiceProvider:

public interface IFilterFactory : IFilterMetadata  
{
    bool IsReusable { get; }
    IFilterMetadata CreateInstance(IServiceProvider serviceProvider);
}

Although very simple, this interface very nicely allows you to inject additional dependencies where it wouldn't otherwise be possible. The IServiceProvider is essentially the IoC container that you can query to retrieve services. The CorsAuthorizationFilterFactory (elided) looks like this:

public class CorsAuthorizationFilterFactory : IFilterFactory, IOrderedFilter  
{
    private readonly string _policyName;

    public CorsAuthorizationFilterFactory(string policyName)
    {
        _policyName = policyName;
    }

    public int Order { get { return int.MinValue + 100; } }
    public bool IsReusable => true;

    public IFilterMetadata CreateInstance(IServiceProvider serviceProvider)
    {
        var filter = serviceProvider.GetRequiredService<CorsAuthorizationFilter>();
        filter.PolicyName = _policyName;
        return filter;
    }
}

When CreateInstance is called, the factory fetches a CorsAuthorizationFilter directly from the container - the ICorsService and ICorsPolicyProvider are automatically wired up using dependency injection internally, and the fully constructed filter is returned. All that remains is to set the policy name on the filter.

Another interesting point to note about IFilterFactory is that as well as allowing you to create an instance of a IFilterMetadata, it is itself an instance of IFilterMetadata. Under the hood, the ASP.NET Core MVC pipeline can use these filters interchangeably, and just attempts to cast to IFilterFactory before using a filter.

Although it's not used as part of the CORS functionality, that ability means you can create attributes which implement IFilterFactory and directly decorate your controllers with them, using them as a proxy to decorating with an attribute that requires dependency injection.

Some of the interfaces have changed a little but this blog post at StrathWeb has a great explanation of this, and shows how to use the [ServiceFilter] attribute to create a logging filter using [ServiceFilter(typeof(LogFilter))], I recommend checking it out!

The last piece of the puzzle.

Hopefully that all makes sense but you might still be scratching your head a little - we aren't decorating our methods with CorsAuthorizationFilterFactory either! How do we get from EnableCors to here?

The answer, is by customising the ApplicationModel using an IApplicationModelProvider.

Wait, what?

This post is already way too long so I won't go in to too much detail but essentially the application model is a representation of all the components - the controllers, actions and filters - that the MVC pipeline knows about. This is constructed through a number of IApplicationModelProviders.

The CORS implementation uses the CorsApplicationModelProvider to supplement the marker [EnableCors] and [DisableCors] attributes with instances of the CorsAuthorizationFilterFactory and the DisableCorsAuthorizationFilter. It loops through each controller and each action or each controller in the call to OnProvidersExecuting and adds the appropriate filter:

public void OnProvidersExecuting(ApplicationModelProviderContext context)  
{
    IEnableCorsAttribute enableCors;
    IDisableCorsAttribute disableCors;

    foreach (var controllerModel in context.Result.Controllers)
    {
        enableCors = controllerModel.Attributes.OfType<IEnableCorsAttribute>().FirstOrDefault();
        if (enableCors != null)
        {
            controllerModel.Filters.Add(new CorsAuthorizationFilterFactory(enableCors.PolicyName));
        }

        disableCors = controllerModel.Attributes.OfType<IDisableCorsAttribute>().FirstOrDefault();
        if (disableCors != null)
        {
            controllerModel.Filters.Add(new DisableCorsAuthorizationFilter());
        }

        foreach (var actionModel in controllerModel.Actions)
        {
            enableCors = actionModel.Attributes.OfType<IEnableCorsAttribute>().FirstOrDefault();
            if (enableCors != null)
            {
                actionModel.Filters.Add(new CorsAuthorizationFilterFactory(enableCors.PolicyName));
            }

            disableCors = actionModel.Attributes.OfType<IDisableCorsAttribute>().FirstOrDefault();
            if (disableCors != null)
            {
                actionModel.Filters.Add(new DisableCorsAuthorizationFilter());
            }
        }
    }
}

All that remains is for these additional classes to be hooked in to the dependency injection as part of a call to AddMvc in the ConfigureServices method of your ASP.NET app's Startup class and all is good. This is done automatically internally when you configure Mvc for Cors using an extension method on IMvcCoreBuilder, which eventually calls the following method:

internal static void AddCorsServices(IServiceCollection services)  
{
    services.AddCors();
    services.TryAddEnumerable(
        ServiceDescriptor.Transient<IApplicationModelProvider, CorsApplicationModelProvider>());
    services.TryAddTransient<CorsAuthorizationFilter, CorsAuthorizationFilter>();
}

Summary

Phew! If you made it this far, colour me impressed. It definitely ended up being a more meaty post than I had originally intended, mostly because the MVC implementation has more parts to it than I appreciated! As a recap there are three main sections, the CORS services, the middleware and the MVC implementation:

Services:
  • Policies are registered using the CorsOptions and CorsPolicyBuilder classes.
  • Policies are located and applied at runtime using the ICorsPolicyProvider and ICorsService.
Middleware:
  • The CorsMiddleware, if configured, applies a single CORS policy object to all requests it handles.
MVC:
  • Marker attributes [EnableCors] and [DisableCors] are applied to controllers, actions, or globally.
  • At runtime, a CorsApplicationModelProvider locates these attributes and replaces them with CorsAuthorizationFilterFactory and DisableCorsAuthorizationFilter respectively.
  • The CorsAuthorizationFilterFactory is used to create a fully service-injected CorsAuthorizationFilter.
  • These authorization filters run early in the normal MVC pipeline (to intercept preflight requests) and apply the appropriate CORS policy (or not in the case of the Disable attribute) in the same way as the middleware.

References

Use project.lock.json to troubleshoot dotnet restore problems

$
0
0
Use project.lock.json to troubleshoot dotnet restore problems

This is a quick post about how to troubleshoot problems using dotnet restore, where it is fails to restore packages due to an error in your project.json. I ran into it the other day and it caused me far too much frustration considering how simple the problem was!

I was working on an ASP.NET Core website that had been created using dotnet new and had been manually updated. When I started working on it, I ran dotnet restore to restore all the packages from NuGet. Most packages restored correctly, however near the bottom of the log there was the following error message:

info : Committing restore...  
log  : Writing lock file to disk. Path: /Users/Sock/Documents/Projects/TestWebsite/src/TestWebsite/project.lock.json  
log  : /Users/Sock/Documents/Projects/TestWebsite/src/TestWebsite/project.json  
log  : Restore failed in 4087ms.

Errors in /Users/Sock/Documents/Projects/TestWebsite/src/TestWebsite/project.json  
    Package Microsoft.DotNet.ProjectModel 1.0.0-rc3-002886 is not compatible with netcoreapp1.0 (.NETCoreApp,Version=v1.0). Package Microsoft.DotNet.ProjectModel 1.0.0-rc3-002886 supports:
      - net451 (.NETFramework,Version=v4.5.1)
      - netstandard1.6 (.NETStandard,Version=v1.6)
    One or more packages are incompatible with .NETCoreApp,Version=v1.0.

My first thought was that there was an incorrect reference to Microsoft.DotNet.ProjectModel in the project.json. This was an RC2 app, and there was clearly a reference to 1.0.0-rc3-002886 in the log which what was failing to restore, however on inspection, there was no explicit reference to it in the project.json anywhere. That meant it had to be being pulled in as a dependency of another package, I just needed to figure out where. This is the file I was working with:

{
  "buildOptions": {
    "emitEntryPoint": true
  },
  "dependencies": {
    "Microsoft.AspNetCore.Server.IISIntegration": "1.0.0-rc2-final",
    "Microsoft.AspNetCore.Server.Kestrel": "1.0.0-rc2-final",
    "Microsoft.AspNetCore.Server.Kestrel.Https": "1.0.0-rc2-final"
  },
  "frameworks": {
    "net451": {},
    "netcoreapp1.0": {
      "dependencies": {
        "Microsoft.NETCore.App": {
          "version": "1.0.0-rc2-3002702",
          "type": "platform"
        }
      },
      "imports": [
        "dnxcore50"
      ]
    }
  },
  "publishOptions": {
    "include": [
      "web.config"
    ]
  },
  "tools": {
    "Microsoft.AspNetCore.Server.IISIntegration.Tools": {
      "version": "1.0.0-*",
      "imports": "portable-net45+wp80+win8+wpa81+dnxcore50"
    }
  },
  "scripts": {
    "postpublish": "dotnet publish-iis --publish-folder %publish:OutputPath% --framework %publish:FullTargetFramework%"
  }
}

Now, you may spot the issue immediately. Looking at it now it seems obvious, but at the time I was tearing my hair out trying to work out what was going on.

I checked all the references in the dependencies section, but they all point to *-rc2-final which is correct. Then I checked all the dependencies under each frameworks node - there's only one in this case, Microsoft.NETCore.App - but again, all looked good.
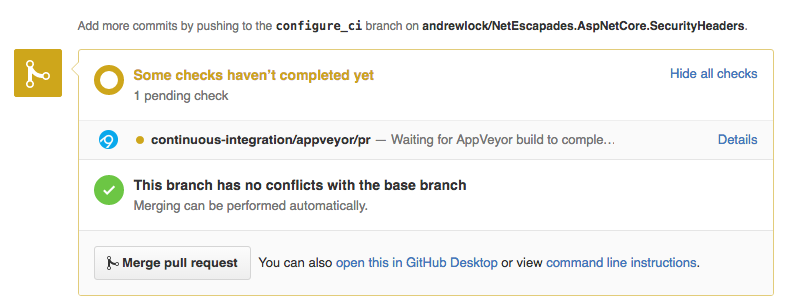
Trying a different tack, I searched the dotnet restore log for 'ProjectModel', but there was only the existing error message we had, no indication of what the parent dependency was or anything.

It was then I had a mini-revelation - the project.lock.json file! Anyone working on ASP.NET Core will probably have seen this file, but as it's just used by the NuGet infrastructure behind the scenes, you may not have even looked in it. This file helps to manage all the package dependencies for a project, and the local location of all the files.

A quick search in project.lock.json, for 'ProjectModel', and the culprit instantly revealed itslef:

{
  ...
  "tools": {
    ".NETCoreApp,Version=v1.0": {
      "Microsoft.AspNetCore.Server.IISIntegration.Tools/1.0.0-preview2-21125": {
        "type": "package",
        "dependencies": {
          "Microsoft.DotNet.ProjectModel": "1.0.0-rc3-002886",
          "Microsoft.Extensions.CommandLineUtils": "1.0.0-rc3-21125",
          "Microsoft.NETCore.App": "1.0.0-rc3-004312",
          "System.Diagnostics.Process": "4.1.0-rc3-24127-00"
        },
        "compile": {
          "lib/netcoreapp1.0/dotnet-publish-iis.dll": {}
        },
        "runtime": {
          "lib/netcoreapp1.0/dotnet-publish-iis.dll": {}
        }
      }
    }
  },
 ...
}

So the "Microsoft.DotNet.ProjectModel": "1.0.0-rc3-002886" dependency was being pulled in by the package Microsoft.AspNetCore.Server.IISIntegration.Tools. Looking back at the project.json, you can see that the version number I used was 1.0.0-*. I needed version 1.0.0-preview1-final, but this will pull the highest version of a 1.0.0 package it can find in the configured feeds.

I had been playing with a lot of the cutting edge stuff up to the RC2 release, and so I had two feeds configured in my NuGet.config file

The first of those feeds is the normal NuGet feed, but the second is a CI MyGet feed, containing the latest packages from the CI process. As I had used the open-ended version number, NuGet looked in both feeds for the highest 1.0.0 version package, and found version 1.0.0-preview2-21125 of Microsoft.AspNetCore.Server.IISIntegration.Tools on MyGet and preferentially pulled in that package. That has a dependency on Microsoft.DotNet.ProjectModel version 1.0.0-rc3-002886, which unfortunately requires netstandard1.6, where netcoreapp1.0 only supports netstandard1.5, hence the error.

So how to fix it? Well, there are two pretty easy options:

  1. Remove the MyGet feed from NuGet.config
  2. Specify a specific version in project.json

If you remove the MyGet feed, then dotnet restore will only use packages from NuGet. The highest version of IISIntegration.Tools on there is 1.0.0-preview1-final, which is the one I needed.

Alternatively, you can specify the specific version of the package you need in your project.json, and then you know (almost) which package you'll be getting! Unless you really do want everything to be pulling the very latest packages, I'd suggest that this is the option you should plump for preferentially (though of course, you could always remove the other feed if you are not using it).

So, for completion sake, this is the final project.json, with the explicit dependency version listed in the tools section, which now completes successfully with a call to dotnet restore:

{
  "buildOptions": {
    "emitEntryPoint": true
  },
  "dependencies": {
    "Microsoft.AspNetCore.Server.IISIntegration": "1.0.0-rc2-final",
    "Microsoft.AspNetCore.Server.Kestrel": "1.0.0-rc2-final",
    "Microsoft.AspNetCore.Server.Kestrel.Https": "1.0.0-rc2-final"
  },
  "frameworks": {
    "net451": {},
    "netcoreapp1.0": {
      "dependencies": {
        "Microsoft.NETCore.App": {
          "version": "1.0.0-rc2-3002702",
          "type": "platform"
        }
      },
      "imports": [
        "dnxcore50"
      ]
    }
  },
  "publishOptions": {
    "include": [
      "web.config"
    ]
  },
  "tools": {
    "Microsoft.AspNetCore.Server.IISIntegration.Tools": {
      "version": "1.0.0-preview1-final",
      "imports": "portable-net45+wp80+win8+wpa81+dnxcore50"
    }
  },
  "scripts": {
    "postpublish": "dotnet publish-iis --publish-folder %publish:OutputPath% --framework %publish:FullTargetFramework%"
  }
}

Summary

So, in conclusion, if you are having trouble with dotnet restore, keep in mind the following points:

  1. Use specific versions of dependencies, at least when using CI build feeds that are likely to be in a high state of flux and can lead to the situation I found.
  2. Don't forget to look everywhere dependencies are listed in project.json - dependencies, frameworks/dependencies and tools
  3. Check which feeds dotnet restore is using - it lists them after you run a restore, and which files it used to find the feeds.
  4. If all else fails, take a look in project.lock.json and work out what's going on!

Introduction to integration testing with xUnit and TestServer in ASP.NET Core

$
0
0
Introduction to integration testing with xUnit and TestServer in ASP.NET Core

Most developers understand the value of unit testing and the importance of having a large test base for non-trivial code. However it is also important to have at least some integration tests which confirm that the various parts of your app are functioning together correctly.

In this post I'm going to demonstrate how to create some simple integration tests using xUnit and TestServer for testing the custom middleware shown in my previous post. I'm using the terms functional/integration testing pretty interchangeably here to refer to tests that cover the whole infrastructure stack.

Creating an integration test project

In order to run your integration tests, you will need to add a test project to your solution. By convention your test projects should reside in a subfolder, test, of the root folder. You may also need to update your global.json to account for this:

{
  "projects": [ "src", "test" ],
  "sdk": {
    "version": "1.0.0-preview1-002702"
  }
}

There are multiple ways to create a new project but all that is required is a project.json in your project folder, which you can create using dotnet new.

You then need to add a dependency to the project under test - in this case NetEscapades.AspNetCore.SecurityHeaders - and the necessary xUnit testing libraries. We also add a reference to Microsoft.AspNetCore.TestHost.

{
    "version": "1.0.0-*",
    "dependencies": {
        "dotnet-test-xunit": "1.0.0-rc2-*",
        "xunit": "2.1.0",
        "Microsoft.AspNetCore.TestHost": "1.0.0-rc2-final",
        "NetEscapades.AspNetCore.SecurityHeaders": {
            "version": "1.0.0-*",
            "target": "project"
        }
    },
    "testRunner": "xunit",
    "frameworks": {
        "netcoreapp1.0": {
            "dependencies": {
                "Microsoft.NETCore.App": {
                    "version": "1.0.0-rc2-3002702",
                    "type": "platform"
                }
            },
            "imports": [
                "dnxcore50",
                "portable-net451+win8"
            ]
        },
        "net451": { }
    }
}

We have added our project under test with the "target": "project" attribute - this ensures that when dependencies are restored, you don't accidentally restore a package from NuGet with the same name. You can also see we are targeting two frameworks, the net451 and netcoreapp1.0, where the latter additionally has a dependency on the platform Microsoft.NETCore.App.

Configuring the TestServer

ASP.NET Core includes a TestServer class in the Microsoft.AspNetCore.TestHost library which can be used to simulate ASP.NET Core applications for testing purposes. We can use this to test the whole ASP.NET Core pipeline, without having to worry about spinning up an actual test website in a different process to test against.

The TestServer class is configured by passing an IWebHostBuilder in the constructor. There are many ways to configure the IWebHostBuilder and various ways to use the configured TestServer, two of which I'll cover here.

Direct configuration in code

With this approach, we directly create a WebHostBuilder in code, and configure it as required for testing our middleware:

var policy = new SecurityHeadersPolicyBuilder()  
    .AddDefaultSecurePolicy();

var hostBuilder = new WebHostBuilder()  
    .ConfigureServices(services => services.AddSecurityHeaders())
    .Configure(app =>
    {
        app.UseSecurityHeadersMiddleware(policy);
        app.Run(async context =>
        {
            await context.Response.WriteAsync("Test response");
        })
    });

Here we configure the bare minimum we require to setup our app - we setup our SecurityHeadersPolicy, add the required services for our custom middleware, and setup the WebHostBuilder to call our middleware. Finally, the app will return the content string "Test response" for all requests.

Next, we configure our test to create a TestServer object, passing in our WebHostBuilder. We can use this to create and send requests through the ASP.NET Core pipeline.

using (var server = new TestServer(hostBuilder))  
{
    var response = await server.CreateRequest("/")
        .SendAsync("GET");

    // Assert 
    response.EnsureSuccessStatusCode();
    var content = await response.Content.ReadAsStringAsync();

    Assert.Equal("Test response", content);
}

In this case we create a request to the root of the web application, send it, and read the content asynchronously. The TestServer object handles resolving and creating the necessary services and middleware, just as it would if it were a normal ASP.NET Core application.

We have now all the pieces we need to perform our integration test, all we need to do is put it together to create our xUnit [Fact] test:

using System;  
using System.Threading.Tasks;  
using Microsoft.AspNetCore.Builder;  
using Microsoft.AspNetCore.Hosting;  
using Microsoft.AspNetCore.Http;  
using Microsoft.AspNetCore.TestHost;  
using NetEscapades.AspNetCore.SecurityHeaders.Infrastructure;  
using Xunit;

namespace NetEscapades.AspNetCore.SecurityHeaders  
{
    public class SecurityHeadersMiddlewareTests
    {
        [Fact]
        public async Task DefaultSecurePolicy_RemovesServerHeader()
        {
            // Arrange
            var policy = new SecurityHeadersPolicyBuilder()
                .AddDefaultSecurePolicy();

            var hostBuilder = new WebHostBuilder()
                .ConfigureServices(services => services.AddSecurityHeaders())
                .Configure(app =>
                {
                    app.UseSecurityHeadersMiddleware(policy);
                    app.Run(async context =>
                    {
                        await context.Response.WriteAsync("Test response");
                    });
                });

            using (var server = new TestServer(hostBuilder))
            {
                // Act
                // Actual request.
                var response = await server.CreateRequest("/")
                    .SendAsync("GET");

                // Assert
                response.EnsureSuccessStatusCode();
                var content = await response.Content.ReadAsStringAsync();

                Assert.Equal("Test response", content);
                Assert.False(response.Headers.Contains("Server"), "Should not contain server header");
            }
        }
    }
}

We have added an extra assert here to check that our SecurityHeadersMiddleware is correctly removing the "Server" tag.

Using a Startup configuration file

We have shown how to create a TestServer using a manually created WebHostBuilder. This is useful for testing our middleware in various scenarios, but it does not necessarily test a system as it is expected to be used in production.

An alternative to this is to have a separate ASP.NET Core website configured to use our middleware, which we can run using dotnet run. We can then configure our TestServer class to directly use the test website's Startup.cs class for configuration, to ensure our integration tests match the production system as closesly as possible.

Rather than add our TestServer configuration to the body of our tests in this case, we will instead create a helper TestFixture class which we will use to initialise our tests.

public class TestFixture<TStartup> : IDisposable where TStartup : class  
{
    private readonly TestServer _server;

    public TestFixture()
    {
        var builder = new WebHostBuilder().UseStartup<TStartup>();
        _server = new TestServer(builder);

        Client = _server.CreateClient();
        Client.BaseAddress = new Uri("http://localhost:5000");
    }

    public HttpClient Client { get; }

    public void Dispose()
    {
        Client.Dispose();
        _server.Dispose();
    }
}

We use the UseStartup<T>() extension method to tell the WebHostBuilder to use our test system's Startup class to configure the application. We then create the TestServer object, and from this we obtain an HttpClient which we can use to send our requests to the TestServer. Finally we set the base address URL that the server will be bound to.

In our test fixture we can implement the IClassFixture<TestFixture> interface to gain access to an instance of the TestFixture class, which xUnit will create and inject into the constructor automatically. We can then use the HttpClient it exposes to run tests against our TestServer.

public class MiddlewareIntegrationTests : IClassFixture<TestFixture<SystemUnderTest.Startup>>  
{
    public MiddlewareIntegrationTests(TestFixture<SystemUnderTest.Startup> fixture)
    {
        Client = fixture.Client;
    }

    public HttpClient Client { get; }

    [Theory]
    [InlineData("GET")]
    [InlineData("HEAD")]
    [InlineData("POST")]
    public async Task AllMethods_RemovesServerHeader(string method)
    {
        // Arrange
        var request = new HttpRequestMessage(new HttpMethod("GET"), "/");

        // Act
        var response = await Client.SendAsync(request);

        // Assert
        Assert.Equal(HttpStatusCode.OK, response.StatusCode);
        var content = await response.Content.ReadAsStringAsync();

        Assert.Equal("Test response", content);
        Assert.False(response.Headers.Contains("Server"), "Should not contain server header");
    }
}

We now have a test configured and running using the same Startup class as our website project SystemUnderTest. It's worth noting that although we have a TestServer configured as part of the test, it is not actually listening globally - navigating to http://localhost:5000 in a browser while running the test will timeout and not call in to the configured pipeline.

Running the tests

To run our tests we must first ensure our dependencies are installed by calling dotnet restore in the solution folder. We can then run this test by calling dotnet test in the root of the test project folder. The test project and other required projects will then be compiled and the tests run, which hopefully should give output similar to the following (depending on which platform you're running on):

Project NetEscapades.AspNetCore.SecurityHeaders.Tests (.NETCoreApp,Version=v1.0) was previously compiled. Skipping compilation.  
xUnit.net .NET CLI test runner (64-bit .NET Core win10-x64)  
  Discovering: NetEscapades.AspNetCore.SecurityHeaders.Tests
  Discovered:  NetEscapades.AspNetCore.SecurityHeaders.Tests
  Starting:    NetEscapades.AspNetCore.SecurityHeaders.Tests
  Finished:    NetEscapades.AspNetCore.SecurityHeaders.Tests
=== TEST EXECUTION SUMMARY ===
   NetEscapades.AspNetCore.SecurityHeaders.Tests  Total: 2, Errors: 0, Failed: 0, Skipped: 0, Time: 0.281s

Project NetEscapades.AspNetCore.SecurityHeaders.Tests (.NETFramework,Version=v4.5.1) was previously compiled. Skipping  
compilation.  
xUnit.net .NET CLI test runner (64-bit Desktop .NET win10-x64)  
  Discovering: NetEscapades.AspNetCore.SecurityHeaders.Tests
  Discovered:  NetEscapades.AspNetCore.SecurityHeaders.Tests
  Starting:    NetEscapades.AspNetCore.SecurityHeaders.Tests
  Finished:    NetEscapades.AspNetCore.SecurityHeaders.Tests
=== TEST EXECUTION SUMMARY ===
   NetEscapades.AspNetCore.SecurityHeaders.Tests  Total: 2, Errors: 0, Failed: 0, Skipped: 0, Time: 0.257s
SUMMARY: Total: 2 targets, Passed: 2, Failed: 0.  

Note that as we targeted both net451 and netcoreapp1.0 in our project.json, the tests are compiled and run once on each platform. A test execution summary is produced for each, with each platform showing the number of tests discovered and run. The final summary shows the number of platforms that passed and failed.

Note, there is currently a bug in the test runner of linux/OSX where you cannot run tests on both .NET Core and Mono. The provided code will run correctly on Windows, and the .NET Core tests run successfully, but the net451 tests will not run as described here.

Integration tests over HTTPS

We have successfully configured and run our integration tests using the startup class of our test website. But what if we want to test the behaviour over SSL? Well the simple answer is that we don't necessarily need to - it depends what we are trying to achieve.

For the middleware tests I was running, I needed to verify that the Strict-Transport-Security header would only be added when running over SSL. This is relatively easy to do, by just updating the TestServer and HttpClient to use an HTTPS base url.

So for the TestFixture approach we just need to change the Client.BaseAddress uri.

Client.BaseAddress = new Uri("https://localhost:5001");  

Where we configure the 'WebHostBuilder' in code, we add a call to UseUrls() and update the server BaseAddress:

var hostBuilder = new WebHostBuilder()  
    .UseUrls("https://localhost:5001")
    .ConfigureServices(services => services.AddSecurityHeaders())
    .Configure(app =>
    {
        app.UseSecurityHeadersMiddleware(policy);
        app.Run(async context =>
        {
            await context.Response.WriteAsync("Test response");
        });
    });

using (var server = new TestServer(hostBuilder))  
{
    server.BaseAddress = new Uri("https://localhost:5001");
    ...
}

The pipeline will then proceed as though the request was made over https.

However, it's important to note with this approach that the request is not actually being made over SSL. If you call dotnet run on the test project you will find you can't establish a secure connection, as we haven't actually configured a certificate.

Introduction to integration testing with xUnit and TestServer in ASP.NET Core

Again, this is not actually required given the way the TestServer works, but for completion sake, I'll describe how to add a certificate to your test project.

Configuring Kestral to use SSL

First, we'll need an SSL certificate. For simplicity, I created a self-signed certificate using IIS - this is fine for testing purposes but you'll run into issues if you try to use it in production. I saved this in a tools subfolder in the solution folder, with the name democertificate.pfx and password democertificate.

Next, we configure the test website to use SSL. The project.json file is updated with the Microsoft.AspNetCore.Server.Kestrel.Https package and we run dotnet restore:

{
 "dependencies": {
    "NetEscapades.AspNetCore.SecurityHeaders": {
        "version": "1.0.0-*",
        "target": "project"
     },
    "Microsoft.AspNetCore.Server.IISIntegration": "1.0.0-rc2-final",
    "Microsoft.AspNetCore.Server.Kestrel": "1.0.0-rc2-final",
    "Microsoft.AspNetCore.Server.Kestrel.Https": "1.0.0-rc2-final"
  },
}

Finally, we update the static void Main() entry point to use our new certificate when initialising the app.

public static void Main(string[] args)  
{
    var certificatePath = Path.GetFullPath(
        Path.Combine(Directory.GetCurrentDirectory(), "..", "..", "tools", "democertificate.pfx"));

    var host = new WebHostBuilder()
        .UseKestrel(options => options.UseHttps(certificatePath, "democertificate"))
        .UseUrls("http://localhost:5000", "https://localhost:5001")
        .UseIISIntegration()
        .UseStartup<Startup>()
        .Build();

    host.Run();
}

First we build the path (using Path.Combine to avoid environment specific path separators so it works correctly in Windows and linux) to the self-signed certificate. This is passed to the extension method UseHttps and the urls are updated to listen to both HTTP and HTTPS.

With that, we are able to make requests to our test app over SSL, though we will get a warning about the certificate being self-signed.

Introduction to integration testing with xUnit and TestServer in ASP.NET Core

Obviously there is no reason why you can't configure your integration tests with the same demo certificate. However as demonstrated previously, that's generally not actually required to test most of the behaviour of requests.

Summary

This post demonstrated how to create a test project to perform functional and integration tests with xUnit and the TestServer class in the Microsoft.AspNetCore.TestHost package. It showed two ways to build up the test server, including using the Startup class of a test website. This allows you to send requests and receive responses as though running the app using host.Run(). Finally, it showed how to perform integration tests over SSL. Happy testing!


Publishing your first .NET Core NuGet package with AppVeyor and MyGet

$
0
0
Publishing your first .NET Core NuGet package with AppVeyor and MyGet

In this post I'm going to describe the process for beginners to go from 'Code in Github' to 'Package on NuGet'. It is very much inspired by (read: copied from) Jimmy Bogard's post on his OSS CI/CD pipeline, which I really recommend checking out as he explains the whole process.

I'm going to assume you've been building a .NET Core library and you have all your code on GitHub. I'll assume you have been building and testing locally using dotnet build and dotnet test, whether in Visual Studio or Visual Studio Code. Now you're at a point where you want to push your packages to NuGet, but you don't want to go through the laborious process of uploading your packages by hand. This is where the fun of CI comes in!

As we're going to be running our CI/CD build using AppVeyor our pipeline is going to be Windows only at this stage; I'll cover running CI on Linux in a later post.

Updating your build process

The first step to having a dependable CI pipeline is to make sure you have a dependable build script. You want to be sure that when you build locally on your machine, you will consistently get the same results. Similarly, you want to be sure that your build server is using the same build process, and so is equally consistent.

To give this guarantee, we will use a build script that lives as part of the project source control. It is almost completely taken from Jimmy Bogard's MediatR library, and is a powershell script that performs 5 operations:

  1. Clean any previous build artifacts
  2. Restore necessary dependencies
  3. Build the project
  4. Run tests
  5. Package project for NuGet

If you are following along with your own project, the first thing you'll want to do is create a branch, e.g. configure_ci, in your repo for your CI build setup:

> git checkout master
> git pull origin
> git checkout -b configure_ci

Next, update the project.json of your .NET Cor library to use SemVer versioning if you are not already, with a variable build number. Also add any packOptions settings for your NuGet packages here, e.g.:

{
  "version": "0.1.0-beta-*",
  "packOptions": {
    "licenseUrl": "https://github.com/andrewlock/NetEscapades.AspNetCore.SecurityHeaders/blob/master/LICENSE",
    "projectUrl": "https://github.com/andrewlock/NetEscapades.AspNetCore.SecurityHeaders/",
  }

Now we add the build script itself Build.ps1 in the root of our repo:

if(Test-Path .\artifacts) { Remove-Item .\artifacts -Force -Recurse }

EnsurePsbuildInstalled

exec { & dotnet restore }

Invoke-MSBuild

$revision = @{ $true = $env:APPVEYOR_BUILD_NUMBER; $false = 1 }[$env:APPVEYOR_BUILD_NUMBER -ne $NULL];
$revision = "{0:D4}" -f [convert]::ToInt32($revision, 10)

exec { & dotnet test .\test\YOUR_TEST_PROJECT_NAME -c Release }

exec { & dotnet pack .\src\YOUR_PROJECT_NAME -c Release -o .\artifacts --version-suffix=$revision }  

Note that the first half of the script is being ommitted here for brevity - the definition of EnsurePsBuildInstalled and exec is included in the full script found at the bottom of this post.

The script pretty much just works through the 5 steps we outlined above, and adds an auto-incrementing build number to any packages produced. To run your build process you just have to run the powershell script .\Build.ps1 and it will clean, build, test and package your project. Be sure to insert your main and test project names in the YOUR_PROJECT_NAME placeholders at the bottom of the file.

Note: when you first run the script on your machine, psbuild is installed if it is not already found. When I first ran it, I received an error: Exception calling "DownloadString" with "1" argument(s): "The remote name could not be resolved: 'raw.githubusercontent.com'". If this happens to you, the script failed to connect to the interwebs to download psbuild. Resetting my network adapter fixed the issue.

Hopefully at this stage you have a successful build process, all your tests pass and your .\artifacts folder contains your nupkg files:

Publishing your first .NET Core NuGet package with AppVeyor and MyGet

With step 1 down, just commit those files and we'll move on to the fun bits!

> git add .
> git commit -m "Add build scripts"

Signing up to MyGet

In order to be able to publish our packages, we need somewhere to publish our packages to. You could just push all your packages to NuGet, but you don't necessarily want all your pre-release and CI build packages being pushed up for everyone to immediately pull down when they may or may not be ready.

The suggested alternative is to use MyGet as your hosted package server for CI. For that you will need to signup for a free (for open source) account at https://www.myget.org/.

After creating an account, you will be prompted to create a new feed, providing a unique url and a description. I used andrewlock-ci as the feed name:

Publishing your first .NET Core NuGet package with AppVeyor and MyGet

After creating your feed, navigate to the details page, in my case https://www.myget.org/feed/Details/andrewlock-ci. Here you can see the NuGet feed URLs and your API key. Take a note of the v2 feed url and your API key as you'll need them later:

Publishing your first .NET Core NuGet package with AppVeyor and MyGet

Signing up for NuGet

If you haven't already, you will probably want to sign up for an account on NuGet so you can publish your package for others to consume. Again free, sign up at https://www.nuget.org and create your account, going through the usual email verification rigmarole.

Once you're in, navigate to your account page and again make a note of the API key as we'll need it to allow AppVeyor to publish for us directly.

Publishing your first .NET Core NuGet package with AppVeyor and MyGet

Setting up AppVeyor

We're getting there, just a couple more steps. In order to hook up our GitHub repo with AppVeyor and to configure our CI/CD, we first need to create an account with them.

Visit https://www.appveyor.com/ and sign up for an account (free for open source projects) - you can create an account with them or use any of a number of OAuth accounts.

Once you are all signed up, you should be taken to the 'New Project' screen. You can add projects from lots of different sources, GitHub, BitBucket, VS Online, directly from Git etc. Select GitHub, choose the project you are configuring, and authorise the app to hook in to your repository:

Publishing your first .NET Core NuGet package with AppVeyor and MyGet

We are going to configure AppVeyor to use WebHooks to listen for activity on our repo. In particular, we are going to configure the following rules (again, following Jimmy Bogard's lead here):

  1. When a pull request is made, build the branch.
  2. When a branch is merged to master, build and publish the package to MyGet.
  3. When master is tagged, build and publish a package to NuGet.org.

To set this up, we will add an appveyor.yml file in the root of our repo:

version: '{build}'  
pull_requests:  
  do_not_increment_build_number: true
branches:  
  only:
  - master
nuget:  
  disable_publish_on_pr: true
build_script:  
- ps: .\Build.ps1
test: off  
artifacts:  
- path: .\artifacts\**\*.nupkg
  name: NuGet
deploy:  
- provider: NuGet
  server: https://www.myget.org/F/andrewlock-ci/api/v2/package
  api_key:
    secure: lyyiBvn6TJr0kN0WCgou8bYVU+J5ymVbM9x4xvv05LDxWCLbJ92Sm4LIk1j3WSh3
  skip_symbols: true
  on:
    branch: master
- provider: NuGet
  name: production
  api_key:
    secure: K9fYWxy1AnyvMSW/zrMyiH5OiCZGBNjh9qH/K8OcSYfElGWpm5/qJD9wqH/Uw==
  on:
    branch: master
    appveyor_repo_tag: true

This file gives AppVeyor all the details it needs to run our build process, just as we have on our local machine, and to deploy packages to MyGet and NuGet. Note that there are 2 NuGet providers listed - the first one is our MyGet feed, the second one is our NuGet.org feed.

There are a couple of fields you will need to replace:

  1. Update the server value in the first deploy section to use your MyGet v2 NuGet URL.
  2. Replace the API key for MyGet (first key).
  3. Replace the API key for NuGet (second key).

Note that the API keys are encrypted. To encrypt your keys, navigate to https://ci.appveyor.com/tools/encrypt and paste in the key you noted from MyGet/NuGet. It will then spit out your encrypted version which you can paste into appveyor.yml.

Publishing your first .NET Core NuGet package with AppVeyor and MyGet

Commit this file to your repo and push your branch up to GitHub - we're ready to take it for a spin!

> git add "appveyor.yml"
> git commit -m "Add appveyor config"
> git push origin configure_ci

Putting it all together

We now have all the pieces in place for our complete CI/CD pipeline, and we can test it with our new configure_ci branch.

Building pull requests

Our first step is to create a pull request in GitHub. As we described earlier, this should trigger AppVeyor to build our project. Sure enough, shortly after you create the pull request, you should see the feed update, noting that our continuous integration checks have not completed yet:

Publishing your first .NET Core NuGet package with AppVeyor and MyGet

If we check on our project in AppVeyor, you should see it queued and then building. My project was queued for 5 minutes before I saw any movement so be patient!

Once the build is underway you can view the console output in realtime, see any tests that were discovered and run as part of the build process, and the artifacts it generated.

Publishing your first .NET Core NuGet package with AppVeyor and MyGet

Assuming all goes well and your build is successful, the AppVeyor build should turn green, and if you flick back to your pull request, you can see it has been given the all clear:

Publishing your first .NET Core NuGet package with AppVeyor and MyGet

Publishing to MyGet

Now we have our pull request all primed, it's time to merge it to master. Clicking the Merge pull request button to merge configure_ci to master triggers another build in AppVeyor, but this time, it finishes by publishing your packages to to NuGet. If you navigate to your package list (for me located at https://www.myget.org/feed/Packages/andrewlock-ci), you can see a shiny new package there ready and waiting:

Publishing your first .NET Core NuGet package with AppVeyor and MyGet

Now you have your packages hosted on your feed, you just configure your NuGet client (e.g. Visual Studio) to use it. One way to do this with the new tooling is to add/update a nuget.config file in the root of your repo to add a new package source. This will allow dotnet restore to find your packages. For example this nuget.config uses the ASP.NET CI feed, my CI feed and the NuGet.org feed to source packages.

<?xml version="1.0" encoding="utf-8"?>  
<configuration>  
  <packageSources>
    <add key="AspNetVNext" value="https://www.myget.org/F/aspnetcidev/api/v3/index.json" />
    <add key="AndrewLockCI" value="https://www.myget.org/F/andrewlock-ci/api/v3/index.json" />
    <add key="NuGet" value="https://api.nuget.org/v3/index.json" />
  </packageSources>
</configuration>  

Publishing to NuGet

Finally, we can publish our package to NuGet by pushing a tag to master using:

> git checkout master
> git pull origin
> git tag v0.1.0-beta
> git push origin --tags

This will trigger another build on AppVeyor, and will publish your package to NuGet with the version tag provided in your project.json (including the AppVeyor build number).

Publishing your first .NET Core NuGet package with AppVeyor and MyGet

And there you go, you now have a full CI/CD build powered by your GitHub activity.

Bonus - adding build badges to your readme.md

Just for fun, why not add the build and package status badges to the readme.md of your repo:

Publishing your first .NET Core NuGet package with AppVeyor and MyGet

First, the AppVeyor badge is pretty easy as they do all the hard work for you - just head to your AppVeyor project, and click on Badges. They give you the links and all the markdown you need to add it to your site

Publishing your first .NET Core NuGet package with AppVeyor and MyGet

Next up is your MyGet package. This is slightly trickier, but is made significantly easier by https://shields.io which does all the hard work for you.

Essentially they provide some demo urls for different build and package feeds, and you just need to replace the repo and package names. So for MyGet, we start with the demo url for mongodb: https://img.shields.io/myget/mongodb/v/MongoDB.Driver.Core.svg. We then replace mongodb with your feed name (e.g. andrewlock-ci in my case) and replace MongoDB.Driver.Core with your package name. It's then just a case of adding a link to your package feed and converting it to markdown:

[![MyGet CI](https://img.shields.io/myget/andrewlock-ci/v/NetEscapades.AspNetCore.SecurityHeaders.svg)](http://myget.org/gallery/acndrewlock-ci)

For NuGet itself, the link is almost identical, but you obviously don't specify the specific feed, just the package name. For example:

[![NuGet](https://img.shields.io/nuget/v/NetEscapades.AspNetCore.SecurityHeaders.svg)](https://www.nuget.org/packages/NetEscapades.AspNetCore.SecurityHeaders/)

Summary

To setup CI/CD, we needed to do 3 things:

  1. Update project.json with our package options and version number
  2. Add build.ps1 to the root of the repository
  3. Add appveyor.yml to the root of your repository
    • Update the MyGet feed url
    • Encode and update the MyGet api key
    • Encode and update the NuGet api key

The actual deployment steps were then triggered by :

  • When a pull request is made, the branch is built.
  • When a branch is merged to master, the package is published to MyGet.
  • When master is tagged, the package is published to NuGet.org.

Resources

The full build script (from the MediatR repo) is listed below

<#  
.SYNOPSIS
    You can add this to you build script to ensure that psbuild is available before calling
    Invoke-MSBuild. If psbuild is not available locally it will be downloaded automatically.
#>
function EnsurePsbuildInstalled{  
    [cmdletbinding()]
    param(
        [string]$psbuildInstallUri = 'https://raw.githubusercontent.com/ligershark/psbuild/master/src/GetPSBuild.ps1'
    )
    process{
        if(-not (Get-Command "Invoke-MsBuild" -errorAction SilentlyContinue)){
            'Installing psbuild from [{0}]' -f $psbuildInstallUri | Write-Verbose
            (new-object Net.WebClient).DownloadString($psbuildInstallUri) | iex
        }
        else{
            'psbuild already loaded, skipping download' | Write-Verbose
        }

        # make sure it's loaded and throw if not
        if(-not (Get-Command "Invoke-MsBuild" -errorAction SilentlyContinue)){
            throw ('Unable to install/load psbuild from [{0}]' -f $psbuildInstallUri)
        }
    }
}

# Taken from psake https://github.com/psake/psake

<#  
.SYNOPSIS
  This is a helper function that runs a scriptblock and checks the PS variable $lastexitcode
  to see if an error occcured. If an error is detected then an exception is thrown.
  This function allows you to run command-line programs without having to
  explicitly check the $lastexitcode variable.
.EXAMPLE
  exec { svn info $repository_trunk } "Error executing SVN. Please verify SVN command-line client is installed"
#>
function Exec  
{
    [CmdletBinding()]
    param(
        [Parameter(Position=0,Mandatory=1)][scriptblock]$cmd,
        [Parameter(Position=1,Mandatory=0)][string]$errorMessage = ($msgs.error_bad_command -f $cmd)
    )
    & $cmd
    if ($lastexitcode -ne 0) {
        throw ("Exec: " + $errorMessage)
    }
}

if(Test-Path .\artifacts) { Remove-Item .\artifacts -Force -Recurse }

EnsurePsbuildInstalled

exec { & dotnet restore }

Invoke-MSBuild

$revision = @{ $true = $env:APPVEYOR_BUILD_NUMBER; $false = 1 }[$env:APPVEYOR_BUILD_NUMBER -ne $NULL];
$revision = "{0:D4}" -f [convert]::ToInt32($revision, 10)

exec { & dotnet test .\test\MediatR.Tests -c Release }

exec { & dotnet pack .\src\MediatR -c Release -o .\artifacts --version-suffix=$revision }  

Adding Travis CI builds to a .NET Core app

$
0
0
Adding Travis CI builds to a .NET Core app

In my last post I described A CI/CD pipeline for ASP.NET Core projects that used AppVeyor to build and test the project in a Windows environment, and deploy the packages to MyGet and NuGet.

In this post I'm going to describe how to build and test your project in a Linux and Mac environment using Travis CI. I'm not going to worry about publishing packages as AppVeyor is going to handle that for us.

As previously, we are first going to create a build script to allow us to build and test our project in the same way both locally and on the server. Our build script will perform 5 operations:

  1. Clean any previous build artifacts
  2. Restore necessary dependencies
  3. Build the project
  4. Run tests
  5. Package project (but don't publish)

Based on these requirements, I came up with the following script build.sh. I'm very much a Windows developer (even though I work on a Mac), so creating the script was definitely a case of trial and error!

#!/usr/bin/env bash

#exit if any command fails
set -e

artifactsFolder="./artifacts"

if [ -d $artifactsFolder ]; then  
  rm -R $artifactsFolder
fi

dotnet restore

# Ideally we would use the 'dotnet test' command to test netcoreapp and net451 so restrict for now 
# but this currently doesn't work due to https://github.com/dotnet/cli/issues/3073 so restrict to netcoreapp

dotnet test ./test/TEST_PROJECT_NAME -c Release -f netcoreapp1.0

# Instead, run directly with mono for the full .net version 
dotnet build ./test/TEST_PROJECT_NAME -c Release -f net451

mono \  
./test/TEST_PROJECT_NAME/bin/Release/net451/*/dotnet-test-xunit.exe \
./test/TEST_PROJECT_NAME/bin/Release/net451/*/TEST_PROJECT_NAME.dll

revision=${TRAVIS_JOB_ID:=1}  
revision=$(printf "%04d" $revision) 

dotnet pack ./src/PROJECT_NAME -c Release -o ./artifacts --version-suffix=$revision  

To use in your project, just replace PROJECT_NAME with your project name and TEST_PROJECT_NAME with your test project name.

The script is as simple as feasibly possibly (partly by design, partly due to my like of familiarity with Shell scripts!) with one particular complication. Currently, there is a bug running xUnit using the dotnet CLI on mono - the dotnet test command is unable to find the test runner. There is currently an open issue about this on GitHub.

In order to work around this, we do three things. First, we restrict out dotnet test call to only test the .NET Core framework and skip the .NET 4.5.1 framework using the -f option. Secondly, we explicitly build the test project for net451 using dotnet build. Finally, we directly invoke mono and pass in the path to dotnet-test-xunit.exe and the test project dll. This allows us to test our project on both supported frameworks.

You may notice there is a wildcard * in the path for specifying the test runner exe and the test dll. This is required as the intermediate folder is named depending on the current operating system and architecture, for example osx.10.11-x64 or debian.8-x64.

An additional smaller issue I ran into which wouldn't hamper more seasoned *nix developers is simply assigning values - when assigning a value make sure to not put spaces around the =, e.g. artifactsFolder="./artifacts"!

Even though we are not going to be pushing our packages to NuGet, we still build our package using dotnet pack, just so that we know we can, and that everything is working correctly on the Mac and linux side.

To test our script we first give it execute permissions, and then execute it:

chmod +x ./build.sh  
./build.sh

Finally, we create a branch, and commit our new build script to it

git checkout -b configure_travis  
git add .  
git commit -m "Add build script"  

Continuous Integration using Travis CI

Now we have a build script running locally we just need to set up Travis. You will need to sign up for a new account using your GitHub account - it takes all of 10 seconds! Once authorised you will be presented with a list of your repositories - just flick the switch on the correct repository to enable Travis continuous integration:

Adding Travis CI builds to a .NET Core app

Next, click the settings icon next to your repo. I have updated the repo to build on all pushes and on pull-requests, but we will lock this down further using our .travis.yml file later:

Adding Travis CI builds to a .NET Core app

The last step in our configuration is to add a .travis.yml file to the repository. This file contains the repository specific settings for Travis builds:

language: csharp  
sudo: required  
dist: trusty  
env:  
  - CLI_VERSION=latest
addons:  
  apt:
    packages:
    - gettext
    - libcurl4-openssl-dev
    - libicu-dev
    - libssl-dev
    - libunwind8
    - zlib1g
mono:  
  - 4.2.3
os:  
  - linux
  - osx
osx_image: xcode7.1  
branches:  
  only:
    - master
before_install:  
  - if test "$TRAVIS_OS_NAME" == "osx"; then brew update; brew install openssl; brew link --force openssl; fi
install:  
  - export DOTNET_INSTALL_DIR="$PWD/.dotnetcli"
  - curl -sSL https://raw.githubusercontent.com/dotnet/cli/rel/1.0.0/scripts/obtain/dotnet-install.sh | bash /dev/stdin --version "$CLI_VERSION" --install-dir "$DOTNET_INSTALL_DIR"
  - export PATH="$DOTNET_INSTALL_DIR:$PATH"  
script:  
  - ./build.sh

Many of the settings should be self explanatory but I'll run through the important ones. You can see we are installing a bunch of packages that we need in order to run mono, and that we are installing mono itself. We will be running both on Linux and OS X, and we specify the OS X Xcode version we will be using. In the branches section, we specify that we only want pushes to master to be built. Note that this will also allow pull-requests to master to be built.

As for scripts, before we start installing we ensure that openssl is installed when we are running on OSX. We then fetch the latest dotnet CLI, install it inside our current working directory, and add dotnet to to the PATH. Finally, we specify our script build.sh to build, test and pack our project.

I ran into a couple of minor issues when configuring this script. First, if you were running your build script locally using sh ./build.sh then you may run into permission denied errors on the Travis server:

Adding Travis CI builds to a .NET Core app

This is due to the script not having execute permissions - adding execute using chmod should fix this as described here.

Another issue I ran into, was the OS X build hanging for no apparent reason after running the tests on mono. Updating the version of mono from 4.0.5 to 4.2.3 fixed the issue easily.

Commit the .travis.yml file to your branch and push to the server, we're ready to try it out now.

git add .travis.yml  
git commit -m "Add travis config file"  
git push origin configure_travis  

Building a pull request

All the infrastructure we need is now in place, so it's just a case of creating our pull request for the configure_travis branch in GitHub.

Adding Travis CI builds to a .NET Core app

As before with our AppVeyor setup, GitHub knows there are build checks waiting to complete. If you click details you will be taken to the build in Travis where you can see the build progress. Hopefully all will go to plan, and you'll see successful builds on both linux and OS X:

Adding Travis CI builds to a .NET Core app

We're now free to merge the pull request to master. Doing so will trigger another build on both AppVeyor and Travis.
We can add a Travis badge to our readme.md to give some visibility to our build state using the following markdown, where USER and REPO is your GitHub username and repository respectively:

[![Travis](https://img.shields.io/travis/USER/REPO.svg?maxAge=3600&label=travis)](https://travis-ci.org/andrewlock/NetEscapades.AspNetCore.SecurityHeaders)

Adding Travis CI builds to a .NET Core app

Success! We now have a continuous integration pipeline that automatically validates out repository builds on Windows, OS X and linux, and then publishes the results to MyGet and NuGet!

Alternative approach - KoreBuild

While the build script shown above works well for me, there is an alternative - KoreBuild. This is a project which is part of ASP.NET Core and provides build scripts for the other projects.

I tried it out and it works great for building on Linux/OS X, with just one caveat - it does not appear to run tests for the full .NET framework on mono i.e. it runs test for netcoreapp1.0 but not net451. It may be that this is only temporary while the dotnet test xUnit bug is hanging around, but I wanted to make sure I was running tests on both TFNs.

If that's not a concern for you, then KoreBuild offers an easy to use alternative. You can just copy the build.sh script from one of the ASP.NET Core projects and use that as your *nix build script. If you are doing this, then there is also a build.ps1 you can use for your Windows build script too.

#!/usr/bin/env bash
repoFolder="$( cd "$( dirname "${BASH_SOURCE[0]}" )" && pwd )"  
cd $repoFolder

koreBuildZip="https://github.com/aspnet/KoreBuild/archive/dev.zip"  
if [ ! -z $KOREBUILD_ZIP ]; then  
    koreBuildZip=$KOREBUILD_ZIP
fi

buildFolder=".build"  
buildFile="$buildFolder/KoreBuild.sh"

if test ! -d $buildFolder; then  
    echo "Downloading KoreBuild from $koreBuildZip"

    tempFolder="/tmp/KoreBuild-$(uuidgen)"    
    mkdir $tempFolder

    localZipFile="$tempFolder/korebuild.zip"

    retries=6
    until (wget -O $localZipFile $koreBuildZip 2>/dev/null || curl -o $localZipFile --location $koreBuildZip 2>/dev/null)
    do
        echo "Failed to download '$koreBuildZip'"
        if [ "$retries" -le 0 ]; then
            exit 1
        fi
        retries=$((retries - 1))
        echo "Waiting 10 seconds before retrying. Retries left: $retries"
        sleep 10s
    done

    unzip -q -d $tempFolder $localZipFile

    mkdir $buildFolder
    cp -r $tempFolder/**/build/** $buildFolder

    chmod +x $buildFile

    # Cleanup
    if test ! -d $tempFolder; then
        rm -rf $tempFolder  
    fi
fi

$buildFile -r $repoFolder "$@"

Summary

In order to set up continuous integration on Linux/OS X we added a simple build script and a .travis.yml file to our repository. By connecting our GitHub account to Travis-CI, pull requests and pushes to the master branch will trigger a build and test of our project on both Linux and OS X. Happy coding!

Creating a custom ConfigurationProvider in ASP.NET Core to parse YAML

$
0
0
Creating a custom ConfigurationProvider in ASP.NET Core to parse YAML

In the previous incarnation of ASP.NET, configuration was primarily handled by the ConfigurationManager in System.Configuration, which obtained it's values from web.config. In ASP.NET Core there is a new, lightweight configuration system that is designed to be highly extensible. It lets you aggregate many configuration values from multiple different sources, and then access those in a strongly typed fashion using the new Options pattern.

Microsoft have written a number of packages for loading configuration from a variety of sources. Currently, using packages in the Microsoft.Extensions.Configuration namespace, you can read values from:

  • Console command line arguments
  • Environment variables
  • User Secrets stored using the Secrets Manager
  • In memory collections
  • JSON files
  • XML files
  • INI files

I recently wanted to use a YAML file as a configuration source, so I decided to write my own provider to support it. In this article I'm going to describe the process of creating a custom configuration provider. I will outline the provider I created, but you could easily adapt it to read any other sort of structured file you need to.

If you are just looking for the YAML provider itself, rather than how to create your own custom provider, you can find the code on GitHub and on NuGet.

Introduction to the ASP.NET Core configuration system

For those unfamiliar with it, the code below shows a somewhat typical File - New Project configuration for an ASP.NET Core application. It shows the constructor for the Startup class which is called when your app is just starting up.

public Startup(IHostingEnvironment env)  
{
    var builder = new ConfigurationBuilder()
        .SetBasePath(env.ContentRootPath)
        .AddJsonFile("appsettings.json", optional: true, reloadOnChange: true)
        .AddJsonFile($"appsettings.{env.EnvironmentName}.json", optional: true)
        .AddEnvironmentVariables();
    Configuration = builder.Build();
}

public IConfigurationRoot Configuration { get; }  

This version was scaffolded by the Yeoman generator so may differ from the Visual Studio template but they are both similar. Configuration is performed using a ConfigurationBuilder which is used to aggregate settings from various sources. Before adding anything else, you should be sure to set the ContentRootPath, so the builder knows where to look for your files.

We are then adding two JSON files - the appsettings.json file (which is typically where you would store settings you previously stored in web.config), and an environment specific JSON file (when in development, it would look for a appsettings.development.json file). Any settings with the same key in the latter file will overwrite settings read from the first.

Finally, the environment variables are added to the settings collection, again overwriting any identical values, and the configuration is built into an IConfigurationRoot, which essentially exposes a key-value store of setting keys and values.

Under the hood

There are a few important points to note in this setup.

  1. Settings discovered later in the pipeline overwrite any settings found previously.
  2. The setting keys are case insensitive.
  3. Setting keys are a string representation of the whole context of a setting, with a context delimited by the : character.

Hopefully the first two points make sense but what about that third one? Essentially we need to 'flatten' all our configuration files so that they have a single string key for every value. Taking a simple JSON example:

{
  "Outer" : { 
    "Middle" : { 
      "Inner": "value1",
      "HasValue": true
    }
  }
}

This example contains nested objects, but only two values that are actually being exposed as settings. The JsonConfigurationProvider takes this representation and ultimately converts it into an IDictionary<string, string> with the following values:

new Dictionary<string, string> {  
  {"Outer:Middle:Inner", "value1"},
  {"Outer:Middle:HasValue", "true"}
}

YAML basics

YAML stands for "YAML Ain't Markup Language", and according to the official YAML website::

YAML is a human friendly data serialization standard for all programming languages.

It is a popular format for configuration files as it is easy to ready and write, used by continuous integration tools like AppVeyor and Travis. For example, an appveyor.yml file might look something like the following:

version: '{build}'  
pull_requests:  
  do_not_increment_build_number: true
branches:  
  only:
  - master
nuget:  
  disable_publish_on_pr: true
build_script:  
- ps: .\Build.ps1
test: off  
artifacts:  
- path: .\artifacts\**\*.nupkg
  name: NuGet
deploy:  
- provider: NuGet
  server: https://www.myget.org/F/andrewlock-ci/api/v2/package
  skip_symbols: true
  on:
    branch: master
- provider: NuGet
  name: production
  on:
    branch: master
    appveyor_repo_tag: true

Whitespace and case are important in YAML, so the indents all have meaning. If you are used to working with JSON, it may help to think of an indented YAML section as being surrounded by {}.

There are essentially 3 primary structures in YAML, which correspond quite nicely to JSON equivalents. I'll go over these briefly as we will need to understand how each should be converted to produce the key-value pairs we need for the configuration system.

YAML Scalar

A scalar is just a value - this might be the property key on the left, or the property value on the right. All of the identifiers in the snippet below are scalars.

key1: value  
key2: 23  
key3: false  

The scalar corresponds fairly obviously with the simple types in javascript (int, string, boolean etc - not arrays or objects), whether they are used as keys or values.

YAML Mapping

The YAML mapping structure is essentially a dictionary, with a unique identifier and a value. It corresponds to an object in JSON. Within a mapping, all the keys must be unique; YAML is case sensitive. The example below shows a simple mapping structure, and two nested mappings:

mapping1:  
  prop1: val1
  prop2: val2
mapping2:  
  mapping3:
    prop1: otherval1
    prop2: otherval2
  mapping4: 
    prop1: finalval
    prop1: finalval

YAML Sequence

Finally, we have the sequence, which is equivalent to a JSON array. Again, nested sequences are possible - the example shows a sequence of mappings, equivalent to a JSON array of objects:

sequence1:  
- map1:
   prop1: value1
- map2:
   prop2: value2

Creating a custom configuration provider

Now we have an understanding of what we are working with, we can dive in to the fun bit, creating our configuration provider!

In order to create a custom provider, you only need to implement two interfaces from the Microsoft.Extensions.Configuration.Abstractions package - IConfigurationProvider and IConfigurationSource.

In reality, it's unlikely you will need to implement these directly - there are a number of base classes you can use which contain partial implementations to get you started.

The ConfigurationSource

The first interface to implement is the IConfigurationSource. This has a single method that needs implementing, but there is also a base FileConfigurationSource which is more appropriate for our purposes:

public class YamlConfigurationSource : FileConfigurationSource  
{
    public override IConfigurationProvider Build(IConfigurationBuilder builder)
    {
        FileProvider = FileProvider ?? builder.GetFileProvider();
        return new YamlConfigurationProvider(this);
    }
}

If not already set, this calls the extension method GetFileProvider on IConfigurationBuilder to obtain an IFileProvider which is used later to load files from disk. It then creates a new instance of a YamlConfigurationProvider (described next), and returns it to the caller.

The ConfigurationProvider

There are a couple of possibilities for implementing IConfigurationProvider but we will be implementing the base class FileConfigurationProvider. This base class handles all the additional requirements of loading files for us, handling missing files, reloads, setting key management etc. All that is required is to implement a single Load method. The YamlConfigurationProvider (elided for brevity) is show below:

using System;  
using System.IO;  
using Microsoft.Extensions.Configuration;

public class YamlConfigurationProvider : FileConfigurationProvider  
{
    public YamlConfigurationProvider(YamlConfigurationSource source) : base(source) { }

    public override void Load(Stream stream)
    {
        var parser = new YamlConfigurationFileParser();

        Data = parser.Parse(stream);
    }
}

Easy, we're all done! We just create an instance of the YamlConfiguraionFileParser, parse the stream, and set the output string dictionary to the Data property.

Ok, so we're not quite there. While we have implemented the only required interfaces, we have a couple of support classes we need to setup.

The FileParser

The YamlConfigurationProvider above didn't really do much - it's our YamlConfigurationFileParser that contains the meat of our provider, converting the stream of characters provided to it into a string dictionary.

In order to parse the stream, I turned to YamlDotNet, a great open source library for parsing YAML files into a representational format. I also took a peek at the source code behind the JsonConfigurationFileParser in the aspnet/Configuration project on GitHub. In fact, given how close the YAML and JSON formats are, most of the code I wrote was inspired either by the Microsoft source code, or examples from YamlDotNet.

The parser we create must take a stream input from a file, and convert it in to an IDictionary<string, string>. To do this, we make use of the visitor pattern, visiting each of the YAML nodes we discover in turn. I'll break down the basic outline of the YamlConfigurationFileParser below:

using System;  
using System.Collections.Generic;  
using System.IO;  
using System.Linq;  
using Microsoft.Extensions.Configuration;  
using YamlDotNet.RepresentationModel;

internal class YamlConfigurationFileParser  
{
    private readonly IDictionary<string, string> _data = 
        new SortedDictionary<string, string>(StringComparer.OrdinalIgnoreCase);
    private readonly Stack<string> _context = new Stack<string>();
    private string _currentPath;

    public IDictionary<string, string> Parse(Stream input)
    {
        _data.Clear();
        _context.Clear();

        var yaml = new YamlStream();
        yaml.Load(new StreamReader(input));

        // Examine the stream and fetch the top level node
        var mapping = (YamlMappingNode)yaml.Documents[0].RootNode;

        // The document node is a mapping node
        VisitYamlMappingNode(mapping);

        return _data;
    }

    // Implementation details elided for brevity
    private void VisitYamlMappingNode(YamlMappingNode node) { }

    private void VisitYamlMappingNode(YamlScalarNode yamlKey, YamlMappingNode yamlValue) { }

    private void VisitYamlNodePair(KeyValuePair<YamlNode, YamlNode> yamlNodePair) { }

    private void VisitYamlSequenceNode(YamlScalarNode yamlKey, YamlSequenceNode yamlValue) { }

    private void VisitYamlSequenceNode(YamlSequenceNode node) { }

    private void EnterContext(string context) { }

    private void ExitContext() { }

    // Final 'leaf' call for each tree which records the setting's value 
    private void VisitYamlScalarNode(YamlScalarNode yamlKey, YamlScalarNode yamlValue)
    {
        EnterContext(yamlKey.Value);
        var currentKey = _currentPath;

        if (_data.ContainsKey(currentKey))
        {
            throw new FormatException(Resources.FormatError_KeyIsDuplicated(currentKey));
        }

        _data[currentKey] = yamlValue.Value;
        ExitContext();
    }

}

I've hidden most of the visitor functions as they're really just implementation details, but if you're interested you can find the full YamlConfigurationFileParser code on GitHub.

First, we have our private fields - Dictionary<string, string> _data which will contain all our settings once parsing is complete, Stack<string> _context which keeps track of the level of nesting we have, and string _currentPath which will be set to the current setting key when _context changes. Note that the dictionary is created with StringComparer.OrdinalIgnoreCase (remember we said setting keys are case insensitive).

The processing is started by calling Parse(stream) with the open file stream. We clear any previous data or context we have, create an instance of YamlStream, and load our provided stream into it. We then retrieve the document level RootNode which you can think of as sitting just outside the YAML document, pointing to the document contents.

Creating a custom ConfigurationProvider in ASP.NET Core to parse YAML

Now we have a reference to the document structures, we can visit each of these in sequence, looping over all of the children until we have visited every node. For each node, we call the appropriate 'visit' method depending on the node type.

I have only shown the body of the VisitYamlScalarNode(keyNode, valueNode) for brevity but the other 'visit' methods are relatively simple. For every level you go into a mapping structure, the mapping 'key' node gets pushed onto the context stack. For a sequence structure, the 0 based index of the item is pushed on to the stack before it is processed.

Every visitation context will ultimately terminate in a call to VisitYamlScalarNode. This method adds the final key to the context, and fetches the combined setting key path in _currentPath. It checks that the key has not been previously added (in this file), and then saves the setting key and final scalar value into the dictionary.

Once all the nodes have been visited, the final Dictionary is returned, and we're done! To give a concrete example, consider the following YAML file:

key1: value1  
mapping1:  
  mapping2a: 
    inside: value2
  mapping2b:
  - seq1
  - seq2
a_sequence:  
- a_mapping: 
    inner: value3

Once every node has been visited, we would have a dictionary with the following entries:

new Dictionary<string, string> {  
  {"key1", "value1"},
  {"mapping1:mapping2a:inside", "value2"},
  {"mapping1:mapping2b:0", "seq1"},
  {"mapping1:mapping2b:1", "seq2"},
  {"a_sequence:0:a_mapping:inner", "value3"},
}

The builder extension methods

We now have all the pieces that are required to load and provide configuration values from a YAML file. However the new configuration system makes heavy use of extension methods to enable a fluent configuration experience. In keeping, with this, we will add a few extension methods to IConfigurationBuilder to allow you to easily add a YAML source.

using System;  
using System.IO;  
using Microsoft.Extensions.FileProviders;  
using Microsoft.Extensions.Configuration

public static class YamlConfigurationExtensions  
{
    public static IConfigurationBuilder AddYamlFile(this IConfigurationBuilder builder, string path)
    {
        return AddYamlFile(builder, provider: null, path: path, optional: false, reloadOnChange: false);
    }

    public static IConfigurationBuilder AddYamlFile(this IConfigurationBuilder builder, string path, bool optional)
    {
        return AddYamlFile(builder, provider: null, path: path, optional: optional, reloadOnChange: false);
    }

    public static IConfigurationBuilder AddYamlFile(this IConfigurationBuilder builder, string path, bool optional, bool reloadOnChange)
    {
        return AddYamlFile(builder, provider: null, path: path, optional: optional, reloadOnChange: reloadOnChange);
    }

    public static IConfigurationBuilder AddYamlFile(this IConfigurationBuilder builder, IFileProvider provider, string path, bool optional, bool reloadOnChange)
    {
        if (provider == null && Path.IsPathRooted(path))
        {
            provider = new PhysicalFileProvider(Path.GetDirectoryName(path));
            path = Path.GetFileName(path);
        }
        var source = new YamlConfigurationSource
        {
            FileProvider = provider,
            Path = path,
            Optional = optional,
            ReloadOnChange = reloadOnChange
        };
        builder.Add(source);
        return builder;
    }
}

These overloads all mirror the AddJsonFile equivalents you will likely have already used. The first three overloads of AddYamlFile all just delegate to the final overload, passing in default values for the various optional parameters. In the final overload, we first create a PhysicalFileProvider which is used to load files from disk, if one was not provided. We then setup our YamlConfigurationSource with the provided options, add it to the collection of IConfigurationSource in IConfigurationBuilder, and return the builder itself to allow the fluent configuration style.

Putting it all together

We now have all the pieces required to load application settings from YAML files! If you have created your own custom file provider in a class library, you need to include a reference to it in the project.json of your web application. If you just want to use the public YamlConfigurationProvider described here, you can pull it from NuGet using:

{
  "dependencies": {
    "NetEscapades.Configuration.Yaml": "1.0.3"
  }
}

Finally, use the extension method in your Startup configuration!

public Startup(IHostingEnvironment env)  
{
    var builder = new ConfigurationBuilder()
        .SetBasePath(env.ContentRootPath)
        .AddYamlFile("my_required_settings.yml", optional: false);
        .AddJsonFile("appsettings.json", optional: true, reloadOnChange: true)
        .AddJsonFile($"appsettings.{env.EnvironmentName}.json", optional: true)
        .AddEnvironmentVariables();
    Configuration = builder.Build();
}

public IConfigurationRoot Configuration { get; }  

In the configuration above, you can see we have added a YAML file to the start of our configuration pipeline, in which we load a required my_required_settings.yml file. This can be used to give us default setting values which can then be overwritten by our JSON files if required.

As mentioned before, all the code for this setup is on GitHub and NuGet so feel free to check it out. If you find any bugs, or issues, please do let me know.

Happy coding!

Resources

Reloading strongly typed Options on file changes in ASP.NET Core RC2

$
0
0
Reloading strongly typed Options on file changes in ASP.NET Core RC2

In the previous version of ASP.NET, configuration was typically stored in the <AppSettings> section of web.config. Touching the web.config file would cause the application to restart with the new settings. Generally speaking this worked well enough, but triggering a full application reload every time you want to tweak a setting can sometimes create a lot of friction during development.

ASP.NET Core has a new configuration system that is designed to aggregate settings from multiple sources, and expose them via strongly typed classes using the Options pattern. You can load your configuration from environment variables, user secrets, in memory collections json file types, or even your own custom providers.

When loading from files, you may have noticed the reloadOnChange parameter in some of the file provider extension method overloads. You'd be right in thinking that does exactly what it sounds - it reloads the configuration file if it changes. However, it probably won't work as you expect without some additional effort.

In this article I'll describe the process I went through trying to reload Options when appsettings.json changes. Note that the final solution is currently only applicable for RC2 - it has been removed from the RTM release, but will be back post-1.0.0.

Trying to reload settings

To demonstrate the default behaviour, I've created a simple ASP.NET Core WebApi project using Visual Studio. To this I have added a MyValues class:

public class MyValues  
{
    public string DefaultValue { get; set; }
}

This is a simple class that will be bound to the configuration data, and injected using the options pattern into consuming classes. I bind the DefaultValues property by adding a Configure call in Startup.ConfigureServices :

public class Startup  
{
    public Startup(IHostingEnvironment env)
    {
        var builder = new ConfigurationBuilder()
            .SetBasePath(env.ContentRootPath)
            .AddJsonFile("appsettings.json", optional: true, reloadOnChange: true)
            .AddJsonFile($"appsettings.{env.EnvironmentName}.json", optional: true)
            .AddEnvironmentVariables();
        Configuration = builder.Build();
    }

    public void ConfigureServices(IServiceCollection services)
    {
        // Configure our options values
        services.Configure<MyValues>(Configuration.GetSection("MyValues"));
        services.AddMvc();
    }
}

I have included the configuration building step so you can see that appsettings.json is configured with reloadOnChange: true. Our MyValues class needs a default value, so I added the required configuration to appsettings.json:

{
  "Logging": {
    "IncludeScopes": false,
    "LogLevel": {
      "Default": "Debug",
      "System": "Information",
      "Microsoft": "Information"
    }
  },
  "MyValues": {
    "DefaultValue" : "first"
  }
}

Finally, the default ValuesController is updated to have an IOptions<MyValues> instance injected in to the constructor, and the Get action just prints out the DefaultValue.

[Route("api/[controller]")]
public class ValuesController : Controller  
{
    private readonly MyValues _myValues;
    public ValuesController(IOptions<MyValues> values)
    {
        _myValues = values.Value;
    }

    // GET api/values
    [HttpGet]
    public string Get()
    {
        return _myValues.DefaultValue;
    }
}

Debugging our application using F5, and navigating to http://localhost:5123/api/values, gives us the following output:

Reloading strongly typed Options on file changes in ASP.NET Core RC2

Perfect, so we know our values are being loaded and bound correctly. So what happens if we change appsettings.json? While still debugging, I updated the appsettings.json as below, and hit refresh in the browser…

{
  "Logging": {
    "IncludeScopes": false,
    "LogLevel": {
      "Default": "Debug",
      "System": "Information",
      "Microsoft": "Information"
    }
  },
  "MyValues": {
    "DefaultValue": "I'm new!"
  }
}

Reloading strongly typed Options on file changes in ASP.NET Core RC2

Hmmm… That's the same as before… I guess it doesn't work.

Overview of configuration providers

Before we dig in to why this didn't work, and how to update it to give our expected behaviour, I'd like to take a step back to cover the basics of how the configuration providers work.

After creating a ConfigurationBuilder in our Startup class constructor, we can add a number of sources to it. These can be file-based providers, user secrets, environment variables or a wide variety of other sources. Once all your sources are added, a call to Build will cause each source's provider to load their configuration settings internally, and returns a new ConfigurationRoot.

This ConfigurationRoot contains a list of providers with the values loaded, and functions for retrieving particular settings. The settings themselves are stored internally by each provider in an IDictionary<string, string>. Considering the first appsettings.json in this post, once loaded the JsonConfigurationProvider would contain a dictionary similar to the following:

new Dictionary<string, string> {  
  {"Logging:IncludeScopes": "Debug"},
  {"Logging:LogLevel:Default": "Debug"},
  {"Logging:LogLevel:System": "Information"}
  {"Logging:LogLevel:Microsoft": "Information"},
  {"MyValues:DefaultValue": first}
}

When retrieving a setting from the ConfigurationRoot, the list of sources is inspected in reverse to see if it has a value for the string key provided; if it does, it returns the value, otherwise the search continues up the stack of providers until it is found, or all providers have been searched.

Overview of model binding

Now we understand how the configuration values are built, let's take a quick look at how our IOptions<> instances get created. There are a number of gotchas to be aware of when model binding (I discuss some in a previous post), but essentially it allows you to bind the flat string dictionary that IConfigurationRoot receives to simple POCO classes that can be injected.

When you setup one of your classes (e.g. MyValues above) to be used as an IOptions<> class, and you bind it to a configuration section, a number of things happen.

First of all, the binding occurs. This takes the ConfigurationRoot we were supplied previously, and interrogates it for settings which map to properties on the model. So, again considering the MyValues class, the binder first creates an instance of the class. It then uses reflection to loop over each of the properties in the class (in this case it only finds DefaultValue) and tries to populate it. Once all the properties that can be bound are set, the instantiated MyValues object is cached and returned.

Secondly, it configures the IoC dependency injection container to inject the IOptions<MyValues> class whenever it is required.

Exploring the reload problem

Lets recap. We have an appsettings.json file which is used to provide settings for an IOptions<MyValues> class which we are injecting into our ValuesController. The JSON file is configured with reloadOnChange: true. When we run the app, we can see the values load correctly initially, but if we edit appsettings.json then our injected IOptions<MyValues> object does not change.

Let's try and get to the bottom of this...

The reloadOnChange: true parameter

We need to establish at which point the reload is failing, so we'll start at the bottom of the stack and see if the configuration provider is noticing the file change. We can test this by updating our ConfigureServices call to inject the IConfigurationRoot directly into our ValuesController, so we can directly access the values. This is generally discouraged in favour of the strongly typed configuration available through the IOptions<> pattern, but it lets us bypass the model binding for now.
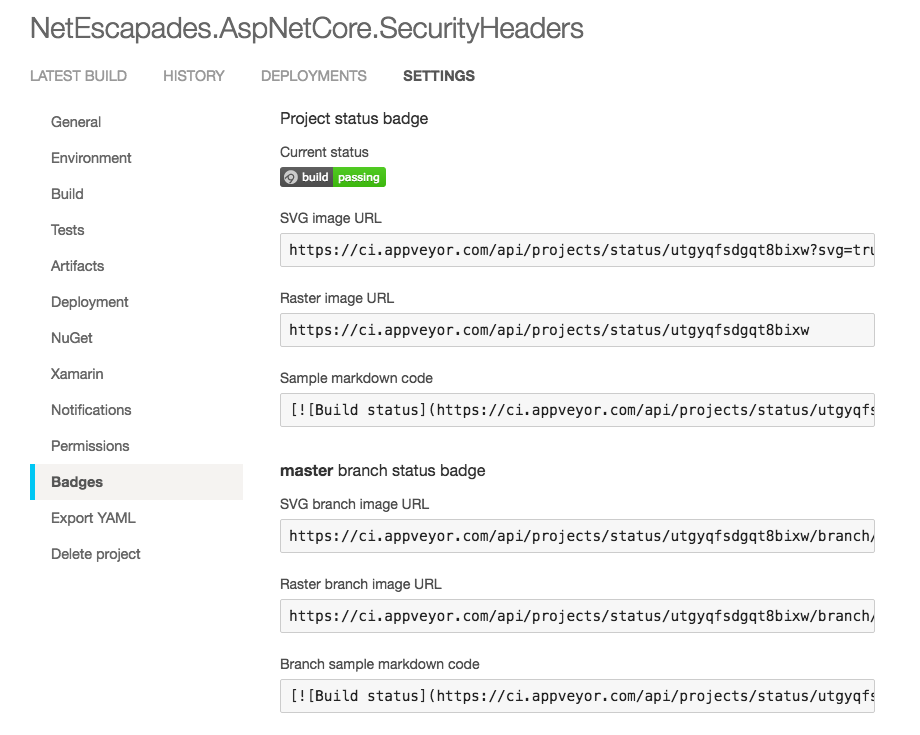
First we add the configuration to our IoC container:

public class Startup  
{
    public void ConfigureServices(IServiceCollection services)
    {
        // inject the configuration directly
        services.AddSingleton(Configuration);

        // Configure our options values
        services.Configure<MyValues>(Configuration.GetSection("MyValues"));
        services.AddMvc();
    }
}

And we update our ValuesController to receive and display the MyValues section of the IConfigurationRoot.
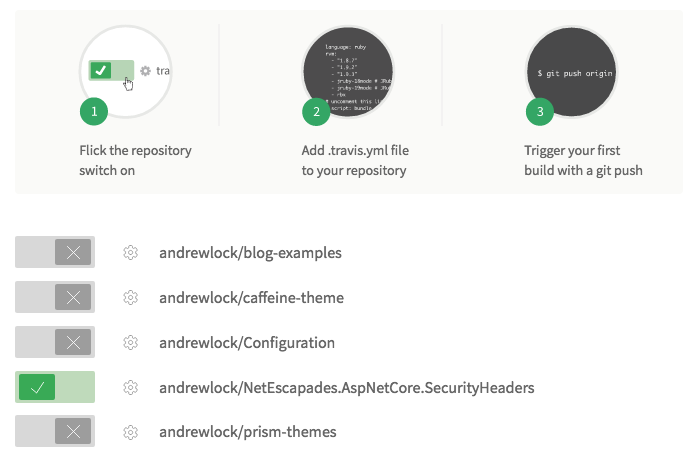
[Route("api/[controller]")]
public class ValuesController : Controller  
{
    private readonly IConfigurationRoot _config;
    public ValuesController(IConfigurationRoot config)
    {
        _config = config;
    }

    // GET api/values
    [HttpGet]
    public IEnumerable<KeyValuePair<string,string>> Get()
    {
        return _config.GetValue<string>("MyValues:DefaultValue");
    }
}

Performing the same operation as before - debugging, then changing appsettings.json to our new values - gives:

Reloading strongly typed Options on file changes in ASP.NET Core RC2

Excellent, we can see the new value is returned! This demonstrates that the appsettings.json file is being reloaded when it changes, and that it is being propagated to the IConfigurationRoot.

Enabling trackConfigChanges

Given we know that the underlying IConfigurationRoot is reloading as required, there must be an issue with the binding configuration of IOptions<>. We bound the configuration to our MyValues class using services.Configure<MyValues>(Configuration.GetSection("MyValues"));, however there is another extension method available to us:

services.Configure<MyValues>(Configuration.GetSection("MyValues"), trackConfigChanges: true);  

This extension has the property trackConfigChanges, which looks to be exactly what we're after! Unfortunately, updating our Startup.Configure() method to use this overload doesn't appear to have any effect - our injected IOptions<> still isn't updated when the underlying config file changes.

Using IOptionsMonitor

Clearly we're missing something. Diving in to the aspnet/Options library on GitHub we can see that as well as IOptions<> there is also an IOptionsMonitor<> interface.

Note, a word of warning here - the rest of this post is applicable to RC2, but has since been removed from RTM. It will be back post-1.0.0.

using System;

namespace Microsoft.Extensions.Options  
{
    public interface IOptionsMonitor<out TOptions>
    {
        TOptions CurrentValue { get; }
        IDisposable OnChange(Action<TOptions> listener);
    }
}

You can inject this class in much the same way as you do IOptions<MyValues> - we can retrieve our setting value from the CurrentValue property.

We can test our appsettings.json modification routine again by injecting into our ValuesController:

private readonly MyValues _myValues;  
public ValuesController(IOptionsMonitor<MyValues> values)  
{
    _myValues = values.CurrentValue;
}

Unfortunately, we have the exact same behaviour as before, no reloading for us yet:

Reloading strongly typed Options on file changes in ASP.NET Core RC2

Which, finally, brings us to…

The Solution

So again, this solution comes with the caveat that it only works in RC2, but it will most likely be back in a similar way post 1.0.0.

The key to getting reloads to propagate is to register a listener using the OnChange function of an OptionsMonitor<>. Doing so will retrieve a change token from the IConfigurationRoot and register the listener against it. You can see the exact details here. Whenever a change occurs, the OptionsMonitor<> will reload the IOptionsValue using the original configuration method, and then invoke the listener.

So to finally get reloading of our configuration-bound IOptionsMonitor<MyValues>, we can do something like this:

public void Configure(IApplicationBuilder app, IHostingEnvironment env, ILoggerFactory loggerFactory, IOptionsMonitor<MyValues> monitor)  
{
    loggerFactory.AddConsole(Configuration.GetSection("Logging"));
    loggerFactory.AddDebug();

    monitor.OnChange(
        vals =>
        {
            loggerFactory
                .CreateLogger<IOptionsMonitor<MyValues>>()
                .LogDebug($"Config changed: {string.Join(", ", vals)}");
        });

    app.UseMvc();
}

In our configure method we inject an instance of IOptionsMonitor<MyValues> (this is automatically registered as a singleton in the services.Configure<MyValues> method). We can then add a listener using OnChange - we can do anything here, a noop function is fine. In this case we create a logger that writes out the full configuration.

We are already injecting IOptionsMonitor<MyValues> into our ValuesController so we can give one last test by running with F5, viewing the output, then modifying our appsettings.json and checking again:

Reloading strongly typed Options on file changes in ASP.NET Core RC2

Success!

Summary

In this post I discussed how to get changes to configuration files to be automatically detected and propagated to the rest of the application via the Options pattern.

It is simple to detect configuration file changes if you inject the IConfigurationRoot object into your classes. However, this is not the recommended approach to configuration - a strongly typed approach is considered better practice.

In order to use both strongly typed configuration and have the ability to respond to changes we need to use the IOptionsMonitor<> implementations in Microsoft.Extensions.Options. We must register a callback using the OnChange method and then inject IOptionsMonitor<> in our classes. With this setup, the CurrentValue property will always represent the latest configuration values.

As stated earlier, this setup works currently in the RC2 version of ASP.NET Core, but has been subsequently postponed till a post 1.0.0 release.

Getting started with StructureMap in ASP.NET Core

$
0
0
Getting started with StructureMap in ASP.NET Core

ASP.NET Core 1.0 was released today, and those of you who haven't already, I really urge you to check it out and have a play. There are a whole raft of features that make it a very enjoyable development experience compared to the venerable ASP.NET 4.x. Plus, upgrading from RTM to RC2 is a breeze.

Among those feature, is the first class support for dependency injection (DI) and inversion of control (IoC) containers. While this was possible in ASP.NET 4.x, it often felt like a bit of an after thought, with many different extensibility points that you had to hook into to get complete control. In this post I will show to integrate StructureMap into your ASP.NET Core apps to use as your dependency injection container.

Why choose a different container?

With ASP.NET Core, Microsoft have designed the framework to use dependency injection as standard everywhere. ASP.NET Core apps use a minimal feature set container by default, and require you to register all your services for injection throughout your app. Pretty much every Hello World app you see shows how to configure a services container.

This works great for small apps and demos, but as anyone who has a built a web app of a reasonable size knows, your container can end up being somewhat of a code smell. Each new class/interface also requires a tweak to your container configuration, in what often feels like a redundant step. If you find yourself writing a lot of code like this:

services.AddTransient<IMyService, MyService>();  

then it may be time to start thinking about a more fully featured IoC container.

There are many possibilities (e.g. Autofac or Ninject) but my personal container of choice is StructureMap. StructureMap strongly emphasises convention over configuration, which helps to minimise a lot of the repeated mappings, allowing you to DRY up your container configuration.

To give a flavour of the benefits this can bring I'll show an example service configuration which includes a variety of different mappings. We'll then update the configuration to use StructureMap which will hopefully make the advantages evident. You can find the code for the project using the built in container here and for the project using StructureMap here.

As an aside, for those of you who may have looked at StructureMap a while back but were discouraged by the lack and/or age of the documentation - you have nothing to fear, it is really awesome now! Plus it's kept permanently in sync with the code base thanks to StoryTeller.

The test project using the built in container

First of all, I'll present the Startup configuration for the example app, using the built in ASP.NET Core container. All of the interfaces and classes are just for example, so they don't have any actual members, but that's not really important in this case. However, the inter-dependencies are such that an instance of every configured class is required when constructing the default ValuesController.

public class Startup  
{
    public Startup(IHostingEnvironment env)
    {
        var builder = new ConfigurationBuilder()
            .SetBasePath(env.ContentRootPath)
            .AddJsonFile("appsettings.json", optional: true, reloadOnChange: true)
            .AddJsonFile($"appsettings.{env.EnvironmentName}.json", optional: true)
            .AddEnvironmentVariables();
        Configuration = builder.Build();
    }

    public IConfigurationRoot Configuration { get; }

    public void ConfigureServices(IServiceCollection services)
    {
        // Add framework services.
        services.AddMvc();

        // Configure the IoC container
        ConfigureIoC(services);
    }

    public void Configure(IApplicationBuilder app, IHostingEnvironment env, ILoggerFactory loggerFactory)
    {
        loggerFactory.AddConsole(Configuration.GetSection("Logging"));
        loggerFactory.AddDebug();

        app.UseMvc();
    }

    public void ConfigureIoC(IServiceCollection services)
    {
        services.AddTransient<IPurchasingService, PurchasingService>();
        services.AddTransient<ConcreteService, ConcreteService>();
        services.AddTransient<IGamingService, CrosswordService>();
        services.AddTransient<IGamingService, SudokuService>();
        services.AddScoped<IUnitOfWork, UnitOfWork>(provider => new UnitOfWork(priority: 3));

        services.Add(ServiceDescriptor.Transient(typeof(ILeaderboard<>), typeof(Leaderboard<>)));
        services.Add(ServiceDescriptor.Transient(typeof(IValidator<>), typeof(DefaultValidator<>))); 
        services.AddTransient<IValidator<UserModel>, UserModelValidator>();
    }
}

The Configure call and the constructor are just the default from the ASP.NET Core template. In ConfigureServices we first call AddMvc(), as required to register all our MVC services in the container, and then call out to a method ConfigureIoC, which encapsulates configuring all our app-specific services. I'll run through each of these registrations briefly to explain their intent.

services.AddTransient<IPurchasingService, PurchasingService>();  
services.AddTransient<ConcreteService, ConcreteService>();  

These are the simplest registrations - whenever an IPurchasingService is requested, a new PurchasingService should be created and used. Similarly for the specific concrete class ConcreteService, a new instance should be created and used whenever it is requested.

services.AddTransient<IGamingService, CrosswordService>();  
services.AddTransient<IGamingService, SudokuService>();  

These next two calls are registering all of our instances of IGamingService. These will both be injected when we have a constructor that requires IEnumerable<IGamingService> for example.

services.AddScoped<IUnitOfWork, UnitOfWork>(provider => new UnitOfWork(priority: 3));  

This is our first registration with a different lifetime - in this case, we are explicitly creating a new UnitOfWork for each http request that is made (instead of every time an IUnitOfWork is required, which may be more than once per Http request for Transient lifetimes.)

services.Add(ServiceDescriptor.Transient(typeof(ILeaderboard<>), typeof(Leaderboard<>)));  

This next registration is our first use of generics and allows us to do some pretty handy things using open generics. For example, if I request a type of ILeaderboard<UserModel> in my ValuesController constructor, the container knows that it should inject a concrete type of Leaderboard<UserModel>, without having to somehow register each and every generic mapping.

services.Add(ServiceDescriptor.Transient(typeof(IValidator<>), typeof(DefaultValidator<>)));  
services.AddTransient<IValidator<UserModel>, UserModelValidator>();  

Finally, we have another aspect of generic registrations. We have a slightly different situation here however - we have a specific UserModelValidator that we want to use whenever an IValidator<UserModel> is requested, and an open DefaultValidator<T> that we want to use for every other IValidator<T> request. We can specify the default IValidator<T> cleanly, but we must also explicitly register every specific implementation that we need - a list which will no doubt get longer as our app grows.

With our services all registered what are the key things we note? Well the main thing is that pretty much every concrete service we want to use has to be registered somewhere in the container. Every new class we add will probably result in another line in our Startup file, which could easily get out of hand. Which brings us to…

The test project using StructureMap

In order to use StructureMap in your ASP.NET Core app, you'll need to install the StructureMap.DNX library into your project.json, which as of writing is at version 0.5.1-rc2-final:

{
  "dependencies": {
    "StructureMap.Dnx": "0.5.1-rc2-final"
  }
}

I'll present the Startup configuration for the same app, but this time using StructureMap in place of the built-in container. Those functions which are unchanged are elided for brevity:

public class Startup  
{
    public Startup(IHostingEnvironment env) { /* Unchanged */}

    public IConfigurationRoot Configuration { get; }

    public IServiceProvider ConfigureServices(IServiceCollection services)
    {
        // Add framework services.
        services.AddMvc()
            .AddControllersAsServices();

        return ConfigureIoC(services);
    }

    public void Configure(IApplicationBuilder app, IHostingEnvironment env, ILoggerFactory loggerFactory) { /* Unchanged */}

    public IServiceProvider ConfigureIoC(IServiceCollection services)
    {
        var container = new Container();

        container.Configure(config =>
        {
            // Register stuff in container, using the StructureMap APIs...
            config.Scan(_ =>
            {
                _.AssemblyContainingType(typeof(Startup));
                _.WithDefaultConventions();
                _.AddAllTypesOf<IGamingService>();
                _.ConnectImplementationsToTypesClosing(typeof(IValidator<>));
            });

            config.For(typeof(IValidator<>)).Add(typeof(DefaultValidator<>));
            config.For(typeof(ILeaderboard<>)).Use(typeof(Leaderboard<>));
            config.For<IUnitOfWork>().Use(_ => new UnitOfWork(3)).ContainerScoped();

            //Populate the container using the service collection
            config.Populate(services);
        });

        return container.GetInstance<IServiceProvider>();

    }
}

On first glance it may seem like there is more configuration, not less! However, this configuration is far more generalised, emphasises convention over explicit class registrations, and will require less modification as the app grows. I'll run through each of the steps again and then we can compare the two approaches.

First of all, you should note that the ConfigureServices (and ConfigureIoC) call returns an instance of an IServiceProvider. This is the extensibility point that allows the built in container to be swapped out in place of StructureMap, and is implemented by the StructureMap.DNX library.

Within the ConfigureIoC method we create our StructureMap Container - this is the DI container against which mappings are registered - and configure it using a number of different approaches.

config.Scan(_ =>  
            {
                _.AssemblyContainingType(typeof(Startup));
                _.WithDefaultConventions();
                // ...remainder of scan method
            }

The first technique we use is the assembly scanner using Scan. This is one of the most powerful features of StructureMap as it allows you to automatically register classes against interfaces without having to configure them explicitly. In this method we have asked StructureMap to scan our assembly (the assembly containing our Startup class) and to look for candidate classes WithDefaultConventions. The default convention will register concrete classes to interfaces where the names match, for example IMyService and MyService. From personal experience, the number of these cases will inevitably grow with the size of your application, so the ability to have the simple cases like this automatically handled is invaluable.

_.AddAllTypesOf<IGamingService>();  

Within the scanner we also automatically register all our implementations of IGamingService using AddAllTypesOf. This will automatically find and register CrosswordService and SudokuService against the IGamingService interface. If later we add WordSearchService as an additional implementation of IGamingService, we don't have to remember to head back to our Startup class and configure it - StructureMap will seamlessly handle it.

_.ConnectImplementationsToTypesClosing(typeof(IValidator<>));  

The final auto-registration calls ConnectImplementationsToTypesClosing. This method looks for any concrete IValidator<T> implementations that close the interface, and registers them. For our app, we just have the one - UserModelValidator. However if you add new ones to your app, an AvatarModelValidator for example, StructureMap will automatically pick them up.

config.For(typeof(IValidator<>)).Add(typeof(DefaultValidator<>));  

For those IValidator<T> without an explicit implementation, we register the open generic DefaultValidator<T>, which will be used when there is no concrete class that closes the generic for T. So requests to IValidator<Something> will be resolved with DefaultValidator<Something>.

config.For(typeof(ILeaderboard<>)).Use(typeof(Leaderboard<>));  
config.For<IUnitOfWork>().Use(_ => new UnitOfWork(3)).ContainerScoped();  

The next two registrations work very similarly to their equivalents using the built in DI container. The first call registers the Leaderboard<T> type to be used wherever an ILeaderboard<T> is requested. The final call describes an expression that can be used to create a new UnitOfWork, and specifies that it should be ContainerScoped, i.e. per Http request.

config.Populate(services);  

The final call in our StructureMap configuration comes from the StructureMap.DNX library. This call takes all those services which were previously registered in the container (e.g. all the MVC services etc registered by the framework itself), and registers them with StructureMap.

Note: I won't go in to why here, (this issue covers it pretty well), but if you run into problems with your MVC controllers not being created correctly it is probably because you need to call AddControllersAsServices after calling AddMvc in ConfigureServices. This ensures that StructureMap is used to create the instances of your controllers instead of an internal DefaultControllerActivator, which will bypass a lot of your StructureMap configuration. In this example app, AddControllersAsServices is required for ConcreteService to be automatically resolved correctly.

What's the point?

Given that we wrote just as much configuration code for this small app using StructureMap as we did for the built in container, you may be thinking "why bother?" And for very small apps you may well be right, the extra dependency may not be worthwhile. The real value appears when your app starts to grow. Just consider how many of our concrete services were automatically registered without us needing to explicitly configure them:

  • PurchasingService - default convention
  • CrosswordService - registered as implements IGamingService
  • SudokuService - registered as implements IGamingService
  • ConcreteService - concrete services are automatically registered
  • UserModelValidator - closes the IValidator<T> generic

That's a whopping 5 services out of the 8 we registered using the built in service that we didn't need to mention with StructureMap. As your app grows and more services are added, you'll find you have to touch your ConfigureIoC method far less than if you had stuck with the built in container.

If you're still not convinced there are a whole host of other benefits and features StructureMap can provide, some of which are:

  • Creating child/nested containers e.g. for multi tenancy support
  • Multiple profiles, similarly for tenancy support
  • Setter Injection
  • Constructor selection
  • Conventional "Auto" Registration
  • Automatic Lazy<T>/Func<T> resolution
  • Auto resolution of concrete types
  • Interception and Configurable Decorators
  • Amazing debugging/testing tools for viewing inside your container
  • Configurable assembly scanning

Conclusion

In this post I tried to highlight the benefits of using StructureMap as your dependency injection container in your ASP.NET Core applications. While the built-in container is a great start, using a more fully featured container will really simplify configuration as your app grows. I highly recommend checking out the documentation at http://structuremap.github.io to learn more. Give it a try in your ASP.NET Core applications using StructureMap.DNX.

How to configure urls for Kestrel, WebListener and IIS express in ASP.NET Core

$
0
0
How to configure urls for Kestrel, WebListener and IIS express in ASP.NET Core

In this post I describe how to configure the urls your application binds to when using the Kestrel or WebListener HTTP servers that come with ASP.NET Core. I'll also cover how to set the url when you are developing locally with Visual Studio using IIS Express, and how this relates to Kestrel and WebListener.

Background

In ASP.NET Core the hosting model has completely changed from ASP.NET 4.x. Previously your application was inextricably bound to IIS and System.Web, but in ASP.NET Core, your application is essentially just a console app. You then create and configure your own lightweight HTTP server within your application itself. This provides a larger range of hosting options than just hosting in IIS - in particular self-hosting in your own process.

ASP.NET Core comes with two HTTP servers which you can plug straight in out of the box. If you have been following the development of ASP.ENT Core at all, you will no doubt have heard of Kestrel, the new high performance, cross-platform web server built specifically for ASP.NET Core.

The other server is WebListener. Kestrel get's all the attention, and probably rightly so given it's performance and cross-platform credentials, but web listener is actually more fully featured, in particular regarding platform specific features such as Windows-Authentication.

While you can directly self-host your ASP.NET Core applications using Kestrel or WebListener, that's generally not the recommended approach when you come to deploy your application. According to the documentation:

If you intend to deploy your application on a Windows server, you should run IIS as a reverse proxy server that manages and proxies requests to Kestrel. If deploying on Linux, you should run a comparable reverse proxy server such as Apache or Nginx to proxy requests to Kestrel.

For self-hosting scenarios, such as running in Service Fabric, we recommend using Kestrel without IIS. However, if you require Windows Authentication in a self-hosting scenario, you should choose WebListener.

Using a reverse-proxy generally brings a whole raft of advantages. IIS can for example handle restarting your app if it crashes, it can manage the SSL layer and certificates for you, it can filter requests, as well as handle hosting multiple applications on the same server.

Configuring Urls in Kestrel and WebListener

Now we have some background on where Kestrel and WebListener fit, we'll dive into the mechanics of configuring the servers to listen at the correct urls. To be clear, we are talking about setting the url to which our application is bound e.g. http://localhost:5000, or http://myfancydomain:54321, which you would navigate to in your browser to view your app.

There is an excellent post from Ben Foster which shows the most common ways to configure Urls when you are using Kestrel as the web server. It's worth noting that all these techniques apply to WebListener too.

These methods assume you are working with an ASP.NET Core application created using one of the standard templates. Once created, there will be a file Program.cs which contains the static void main() entry point for your application:

public class Program  
{
    public static void Main(string[] args)
    {
        var host = new WebHostBuilder()
            .UseContentRoot(Directory.GetCurrentDirectory())
            .UseKestrel()
            .UseIISIntegration()
            .UseStartup<Startup>()
            .Build();

        host.Run();
    }
}

It is the WebHostBuilder class which configures your application and HTTP server (in the example, Kestrel), and starts your app listening for requests with host.Run().

UseUrls()

The first, and easiest, option to specify the binding URLs is to hard code them into the WebHostBuilder using AddUrls():

var host = new WebHostBuilder()  
    .UseKestrel()
    .UseContentRoot(Directory.GetCurrentDirectory())
    .UseUrls("http://localhost:5100", "http://localhost:5101", http://*:5102)
    .UseIISIntegration()
    .UseStartup<Startup>()
    .Build();

Simply adding this one line will allow you to call your application at any of the provided urls, and even at the wildcard host. However, hard-coding the urls never feels like a particularly clean or extensible solution. Luckily, you can also load the urls from an external configuration file, from environment variables, from command line arguments, or any source supported by the Configuration system.

External file - hosting.json

To load from a file, create hosting.json, in the root of your project, and set the server.urls key as appropriate, separating each url with a semicolon. You can actually use any name now, the name hosting.json is no longer assumed, but it's probably best to continue to use it by convention.

{
  "server.urls": "http://localhost:5100;http://localhost:5101;http://*:5102"
}

Update your WebHostBuilder to load hosting.json as part of the initial configuration. It's important to set the base path so that the ConfigurationBuilder knows where to look for your hosting.json file.

var config = new ConfigurationBuilder()  
    .SetBasePath(Directory.GetCurrentDirectory())
    .AddJsonFile("hosting.json", optional: true)
    .Build();

var host = new WebHostBuilder()  
    .UseConfiguration(config)
    .UseContentRoot(Directory.GetCurrentDirectory())
    .UseKestrel()
    .UseIISIntegration()
    .UseStartup<Startup>()
    .Build();

Note that the ConfigurationBuilder we use here is distinct from the ConfigurationBuilder typically used to read appsettings.json etc as part of your Startup.cs configuration. It is an instance of the same class, but the WebHostBuilder and app configuration are built separately - values from hosting.json will not pollute your appsettings.json configuration.

Command line arguments

As mentioned previously, and as shown in the previous snippet, you can configure your WebHostBuilder using any mechanism available to the ConfigurationBuilder. If you prefer to configure your application using command line arguments, add the Microsoft.Extensions.Configuration.CommandLine package to your project.json and update your ConfigurationBuilder to the following:

var config = new ConfigurationBuilder()  
    .AddCommandLine(args)
    .Build();

You can then specify the urls to use at runtime, again passing in the urls separated by semicolons:

> dotnet run --server.urls "http://localhost:5100;http://localhost:5101;http://*:5102"

Environment Variables

There are a couple of subtleties to using environment variables to configure your WebHostBuilder. The first approach is to just set your own environment variables and load them as usual with the ConfigurationBuilder. For example, using PowerShell you could set the variable "MYVALUES_SERVER.URLS" using:

[Environment]::SetEnvironmentVariable("MYVALUES_SERVER.URLS", "http://localhost:5100")

which can be loaded in our configuration builder using the prefix "MYVALUES_", allowing us to again set the urls at runtime:

var config = new ConfigurationBuilder()  
    .AddEnvironmentVariables("MYVALUES_")
    .Build();

ASPNETCORE_URLS

The other option to be aware of is the special environment variable, "ASPNETCORE_URLS". If this is set, it will overwrite any other values that have been set by UseConfiguration, whether from hosting.json or command line arguments etc. The only way (that I found) to overwrite this value is with an explicit UseUrls() call.

Using the ConfigurationBuilder approach to configuring your server gives the most flexibility at runtime for specifying your urls, so I would definitely encourage you to use this approach any time you find the need to specify your urls. However, you may well find the need to configure your Kestrel/WebListener urls at all surprisingly rare…

Configuring IIS Express and Visual Studio

In the previous section I demonstrated how to configure the urls used by your ASP.NET Core hosting server, whether Kestrel or WebListener. While you might directly expose those self-hosted servers in some cases (the docs cite Service Fabric as a possible use case), in most cases you will be reverse-proxied behind IIS on Windows, or Apache/Nginix on Linux. This means that the urls you have configured will not be the actual urls exposed to the outside world.

You can see this effect for yourself if you are developing using Visual Studio and IIS. When you create a new ASP.NET Core project in Visual studio 2015 (Update 3), a launchSettings.json file is created inside the Properties folder of your project. This file contains settings for when you host your application in IIS:

{
  "iisSettings": {
    "windowsAuthentication": false,
    "anonymousAuthentication": true,
    "iisExpress": {
      "applicationUrl": "http://localhost:55862/",
      "sslPort": 0
    }
  },
  "profiles": {
    "IIS Express": {
      "commandName": "IISExpress",
      "launchBrowser": true,
      "environmentVariables": {
        "ASPNETCORE_ENVIRONMENT": "Development"
      }
    },
    "ExampleWebApplication": {
      "commandName": "Project",
      "launchBrowser": true,
      "launchUrl": "http://localhost:5000",
      "environmentVariables": {
        "ASPNETCORE_ENVIRONMENT": "Development"
      }
    }
  }
}

This file contains two sections, iisSettings and profiles. When running in visual studio, profiles provides the hooks required to launch and debug your application using F5. In this case we have two profiles; IIS Express, which fairly obviously runs the application using IIS Express; and ExampleWebApplication, the name of the web project, which runs the application using dotnet run.

How to configure urls for Kestrel, WebListener and IIS express in ASP.NET Core

These two profiles run your application in two distinct ways. The project profile, ExampleWebApplication, runs your application as though you had run the application directly using dotnet run from the command line - it even opens the console window that is running the application. In contrast, IIS Express hosts your application, acting as a reverse-proxy in the same wasy as IIS would in production.

If you were following along with updating your urls, using the methods described in the previous section and running using F5, you may have found that things weren't running as smoothly as expected.

When running using IIS Express or IIS, the urls you configure as part of Kestrel/WebListener are essentially unused - it is the url configured in IIS that is publicly exposed and which you can navigate to in your browser. Therefore when developing locally with IIS Express, you must update the iisSettings:applicationUrl key in launchSettings.json to change the url to which you are bound. You can also update the url in the Debug tab of Properties (Right click your project -> Properties -> Debug).

How to configure urls for Kestrel, WebListener and IIS express in ASP.NET Core

In contrast, when you run the project profile, the urls you configure using the previous section are directly exposed. However, by default the profile opens a browser window - which requires a url - so a default url of http://localhost:5000 is specified in the launchSettings setting. If you are running directly on Kestrel/Weblistener and are customising your urls don't forget to update this setting to load the correct url, or set "launchBrowser": false!

Summary

This post gave a brief summary of the changes to the server hosting model in ASP.NET Core. It described the various ways in which you can specify the binding urls when self-hosting your application using the Kestrel or WebListener servers. Finally it described things to look out for related to changing your urls when developing locally using Visual Studio and IIS Express.

Adding EF Core and PostgreSQL to an ASP.NET Core project on OS X

$
0
0
Adding EF Core and PostgreSQL to an ASP.NET Core project on OS X

One of the great selling points of the .NET Core framework is its cross-platform credentials. Similar to most .NET developers I imagine, the vast majority of my development time has been on Windows. As a Mac user, however, I have been experimenting with creating ASP.NET applications directly in OS X.

In this post I'll describe the process of installing PostgreSQL, adding Entity Framework (EF) Core to your application, building a model, and running migrations to create your database. You can find the source code for the final application on GitHub.

Prerequisites

There are a number of setup steps I'm going to assume here in order to keep the post to a sensible length.

  1. Install the .NET Core SDK for OS X from dot.net. This will also encourage you to install Homebrew in order to update your openssl installation. I recommend you do this as we'll be using Homebrew again later.
  2. Install Visual Studio Code. This great cross platform editor is practically a requirement when doing .NET development where Visual Studio isn't available. You should also install the C# extension.
  3. (Optional) Install Yeoman ASP.NET templates (and npm). Although not required, installing Yeoman and the .NET Core templates can get you up and running with a new web application faster. Yeoman uses npm and can be directly integrated into VS Code using an extension.
  4. Create a new application. In this post I have created a basic MVC application without any authentication/identity or entity framework models in it.

Installing PostgreSQL

There are a number of Database Providers you can use with Entity Framework core today, with more on the way. I chose to go with PostgreSQL as it's a mature, cross-platform database (and I want to play with Marten later!)

The easiest way to install PostgreSQL on OS X is to use Homebrew. Hopefully you already have it installed as part of installing the .NET Core SDK. If you'd rather use a graphical installer there are a number of possibilities listed on their downloads page.

Running the following command will download and install PostgreSQL along with any dependencies.

$ brew install postgresql

Assuming all goes well, the database manager should be installed. You have a couple of options for running it; you can either run the database on demand in the foreground of a terminal tab, or you can have it run automatically on restart as a background service. To run as a service, use:

$ brew services start postgresql

I chose to run in the foreground, as I'm just using it for experimental development at the moment. You can do so with:

$ postgres -D /usr/local/var/postgres

In order to use Entity Framework migrations, you need a user with the createdb permission. When PostgreSQL is installed, a new super-user role should be created automatically in your provider with your current user's login details. We can check this by querying the pg_roles table.

To run queries against the database you can use the psql interactive terminal. In a new tab, run the following command to view the existing roles, which should show your username and that you have the createdb permission.

$ psql postgres -c "SELECT rolname, rolcreatedb::text FROM pg_roles"

 rolname | rolcreatedb 
---------+-------------
 Sock    | true
(1 row)

Installing EF Core into your project

Now we have PostgreSQL installed, we can go about adding Entity Framework Core to our ASP.NET Core application. First we need to install the required libraries into our project.json. The only NuGet package directly required to use PostgreSQL is the Npgsql provider, but we need the additional EF Core libraries in order to run migrations against the database. Note that the Tools library should go in the tools section of your project.json, while the others should go in the dependencies section.

{
  dependencies: {
    "Npgsql.EntityFrameworkCore.PostgreSQL": "1.0.0",
    "Microsoft.EntityFrameworkCore.Design": "1.0.0-preview2-final"
  },

  tools: {
    "Microsoft.EntityFrameworkCore.Tools": {
      "version": "1.0.0-preview2-final",
      "imports": "portable-net45+win8+dnxcore50"
    }
  }
}

Migrations allow us to use a code-first approach to creating the database. This means we can create our models in code, generate a migration, and run that against PostgreSQL. The migrations will then create the database if it doesn't already exist and update the tables to match our model as required.

The first step is to create our entity models and db context. in this post I am using a simple model consisting of an Author which may have many Articles.

using Microsoft.EntityFrameworkCore;

public class Author  
{
    public int Id { get; set; }
    public string FirstName { get; set; }
    public string LastName { get; set; }

    public List<Article> Articles { get; set; } = new List<Article>();
}

public class Article  
{
    public int Id { get; set; }
    public string Title { get; set; }
    public string Url { get; set; }
    public string Body { get; set; }

    public int AuthorId { get; set; }
    public Author Author { get; set; }
}

public class ArticleContext : DbContext  
{
    public ArticleContext(DbContextOptions<ArticleContext> options)
        : base(options)
    { }

    public DbSet<Article> Articles { get; set; }
    public DbSet<Author> Authors { get; set; }
}

Our entity models are just simple POCO objects, which use the default conventions for the Primary Key and relationships. The DbContext can be used to customise your model, and to expose the DbSet<T>s which are used to query the database.

Now our model is designed, we need to setup our app to use the ArticleContext and our database. Add a section in your appsettings.json, or use any other configuration method to setup a connection string. The connection string should contain the name of the database to be created, in this case, DemoArticlesApp. The username and password will be your local OS X account's details.

{
  "DbContextSettings" :{
    "ConnectionString" : "User ID=Sock;Password=password;Host=localhost;Port=5432;Database=DemoArticlesApp;Pooling=true;"
  }
}

Finally, update the ConfigureServices method of your Startup class to inject your ArticleContext when requested, and to use the connection string specified in your configuration.

public void ConfigureServices(IServiceCollection services)  
{
    // Add framework services.
    services.AddMvc();

    var connectionString = Configuration["DbContextSettings:ConnectionString"];
    services.AddDbContext<ArticleContext>(
        opts => opts.UseNpgsql(connectionString)
    );
}

Generate Migrations using EF Core Tools

Now we have our instance of PostgreSQL started and our models built, we can use the EF Core tools to scaffold our migrations and update our database! When using Visual Studio, you would typically run entity framework migration code from the Package Manager Console, and that is still possible. However now we have the dotnet CLI we are also able to hook into the command support and run our migrations directly on the command line.

Note, before running these commands you must make sure you are in the root of your project, i.e. the same folder that contains your project.json.

We add our first migration and give it a descriptive name, InitialMigration using the ef migrations add command:

$ dotnet ef migrations add InitialMigration

Project adding-ef-core-on-osx (.NETCoreApp,Version=v1.0) will be compiled because inputs were modified  
Compiling adding-ef-core-on-osx for .NETCoreApp,Version=v1.0  
Compilation succeeded.  
    0 Warning(s)
    0 Error(s)
Time elapsed 00:00:01.5865396

Done. To undo this action, use 'dotnet ef migrations remove'  

This first builds your project, and then generates the migration files. As this is the first migration, it will also create the Migrations folder in your project, and add the new migrations to it.

Adding EF Core and PostgreSQL to an ASP.NET Core project on OS X

You are free to look at the scaffolding code that was generated to make sure you are happy with what will be executed on the database. If you want to change something, you can remove the last migration with the command:

$ dotnet ef migrations remove

You can then fix any bugs, and add the initial migration again.

The previous step generated the code necessary to create our migrations, but it didn't touch the database itself. We can apply the generated migration to the database using the command ef database update:

$ dotnet ef database update 

Project adding-ef-core-on-osx (.NETCoreApp,Version=v1.0) will be compiled because Input items added from last build  
Compiling adding-ef-core-on-osx for .NETCoreApp,Version=v1.0  
Compilation succeeded.  
    0 Warning(s)
    0 Error(s)
Time elapsed 00:00:01.9422901

Done.  

All done! Our database has been created (as it didn't previously exist) and the tables for our entities have been created. To prove it for yourself run the following command, replacing DemoArticlesApp with the database name you specified earlier in your connection string:

$ psql DemoArticlesApp -c "SELECT table_name FROM Information_Schema.tables where table_schema='public'"

      table_name       
-----------------------
 __EFMigrationsHistory
 Authors
 Articles
(3 rows)

Here we can see the Authors and Articles tables which correspond to their model equivalents. There is also an __EFMigrationsHistory which is used by Entity Framework core to keep track of which migrations have been applied.

Injecting your DbContext into MVC Controllers

Now we have both our app and our database configured, lets put the two to use. I've created a couple of simple WebApi controllers to allow getting and posting Authors and Articles. To hook this up to the database, we inject an instance of our ArticlesContext to use for querying and updates. Only the AuthorsController is shown below, but the Articles controller is very similar.

using System.Collections.Generic;  
using System.Linq;  
using AddingEFCoreOnOSX.Models;  
using Microsoft.AspNetCore.Mvc;

namespace AddingEFCoreOnOSX.Controllers  
{
    [Route("api/[controller]")]
    public class AuthorsController : Controller
    {
        private readonly ArticleContext _context;
        public AuthorsController(ArticleContext context)
        {
            _context = context;
        }

        // GET: api/authors
        public IEnumerable<Author> Get()
        {
            return _context.Authors.ToList();
        }

        // GET api/authors/5
        [HttpGet("{id}")]
        public Author Get(int id)
        {
            return _context.Authors.FirstOrDefault(x => x.Id == id);
        }

        // POST api/authors
        [HttpPost]
        public IActionResult Post([FromBody]Author value)
        {
            _context.Authors.Add(value);
            _context.SaveChanges();
            return StatusCode(201, value);
        }
    }
}

This is a very simple controller. We can create a new Author by POSTing appropriate data to /api/authors (created using PostMan):

Adding EF Core and PostgreSQL to an ASP.NET Core project on OS X

We can then fetch our list of authors with a GET to `/api/authors:

Adding EF Core and PostgreSQL to an ASP.NET Core project on OS X

Similarly, we can create and list a new Article with a POST and GET to /api/articles:

Adding EF Core and PostgreSQL to an ASP.NET Core project on OS X

Adding EF Core and PostgreSQL to an ASP.NET Core project on OS X

Summary

In this post I showed how to install PostgreSQL on OS X. I then built an Entity Framework Core entity model in my project, and added the required DbContext and settings. I used the dotnet CLI to generate migrations for my model and then applied these to the database. Finally, I injected the DbContext into my MVC Controllers to query the newly created database .


Loading tenants from the database with SaasKit in ASP.NET Core

$
0
0
Loading tenants from the database with SaasKit in ASP.NET Core

Building a multi-tenant application can be a difficult thing to get right - it's normally critical that there is no leakage between tenants, where one tenant sees details from another. In the previous version of ASP.NET this problem was complicated by the multiple extension points you needed to hook into to inject your custom behaviour.

With the advent of ASP.NET Core and the concept of the 'Middleware pipeline', modelled after the OWIN interface, this process becomes a little easier. The excellent open source project SaasKit, by Ben Foster, makes adding multi-tenancy to your application a breeze. He has a number of posts on building multi-tenant applications on his blog, which I recommend checking out. In particular, his post here gave me the inspiration to try out SaasKit, and write this post.

In his post, Ben describes how to add middleware to your application to resolve the tenant for a given hostname from a list provided in appsettings.json. As an extension to this, rather than having a fixed set of tenants loaded at start up, I wanted to be able to resolve the tenants at runtime from a database.

In this post I'll show how to add multi-tenancy to an ASP.NET Core application where the tenant mapping is stored in a database. I'll be using the cross platform PostgreSQL database (see my previous post for configuring PostreSQL on OS X) but you can easily use a different database provider.

The Setup

First create a new ASP.NET Core application. We are going to be loading our tenants from the database using Entity Framework Core, so you will need to add a database provider and your connection string.

Once you're database is all configured, we will create our AppTenant entity. Tenants can be split in multiple ways, basically based on any consistent property of a request (e.g. hostname, headers etc). We will be use a hostname per tenant, so our AppTenant class looks like this:

namespace DatabaseMultiTenancyWithSaasKit.Models  
{
    public class AppTenant
    {
        public int AppTenantId { get; set; }
        public string Name { get; set; }
        public string Hostname { get; set; }
    }
}

We can add a migration and update our database with our new entity using the Entity Framework tools:

$ dotnet ef migrations add AddAppTenantEntity
$ dotnet ef database update

Resolving Tenants

We are using SaasKit to simplify our tenant handling so we will need to add SaasKit.Multitenancy to our project.json:

{
  "dependencies": {
    ...
    "SaasKit.Multitenancy": "1.1.4",
    ...
  },
}

Next we can add an implementation of an ITenantResolver<AppTenant>. This class will be used to identify the associated tenant for a given request. If a tenant is found it returns a TenantContext<AppTenant>, if no tenant can be resolved it returns null.

using System.Linq;  
using System.Threading.Tasks;  
using DatabaseMultiTenancyWithSaasKit.Models;  
using Microsoft.AspNetCore.Http;  
using SaasKit.Multitenancy;

namespace DatabaseMultiTenancyWithSaasKit.Services  
{
    public class AppTenantResolver : ITenantResolver<AppTenant>
    {
        private readonly ApplicationDbContext _dbContext;

        public AppTenantResolver(ApplicationDbContext dbContext)
        {
            _dbContext = dbContext;
        }

        public Task<TenantContext<AppTenant>> ResolveAsync(HttpContext context)
        {
            TenantContext<AppTenant> tenantContext = null;
            var hostName = context.Request.Host.Value.ToLower();

            var tenant = _dbContext.AppTenants.FirstOrDefault(
                t => t.Hostname.Equals(hostName));

            if (tenant != null)
            {
                tenantContext = new TenantContext<AppTenant>(tenant);
            }

            return Task.FromResult(tenantContext);
        }
    }
}

In this implementation we just find the first AppTenant in the database with the provided HostName - you can obviously match on any parameter here depending on your AppTenant definition.

Configuring the services and Middleware

Now we have defined our AppTenant and a way of resolving a tenant from the database, we just need to wire this all up in to to our applications.

As with most ASP.NET Core components we need to register the dependent services and the middleware in our Startup class. First we configure our tenant class and resolver with the AddMultitenancy extension method on the IServiceCollection:

public void ConfigureServices(IServiceCollection services)  
{
    //Add other services e.g. MVC, connection string, IOptions<T> etc
    services.AddMultitenancy<AppTenant, AppTenantResolver>();
}

Finally we setup our middleware to resolve our tenant. The order of middleware components is important - we add the SaasKit middleware early in the pipeline, just after the static file middleware.

// This method gets called by the runtime. Use this method to configure the HTTP request pipeline.
public void Configure(IApplicationBuilder app, IHostingEnvironment env, ILoggerFactory loggerFactory)  
{
    // if astatic file is requested, serve that without needing to resolve a tenant from the db first.
    app.UseStaticFiles();
    app.UseMultitenancy<AppTenant>();
    // other middleware
}

Setup app to listen on multiple urls

In order to have a multi-tenant app based on hostname, we need to update our app to actually listen on multiple urls. How to do this will depend on how you are hosting your app.

For now I will configure Kestrel to listen on three urls by specifying them directly in our WebHostBuilder. In production you would definitely want to configure this using a different approach so the urls are not hard coded - otherwise we will not be getting any benefit of storing tenants in the database!

public class Program  
{
    public static void Main(string[] args)
    {
        var host = new WebHostBuilder()
            .UseKestrel()
            .UseContentRoot(Directory.GetCurrentDirectory())
            .UseUrls(
                "http://localhost:5000",
                "http://localhost:5001",
                "http://localhost:5002")
            .UseStartup<Startup>()
            .Build();

        host.Run();
    }
}

We also need to add the tenants to the database. As I'm using PostgreSQL, I did this from the command line using psql, inserting a new AppTenant into the DbTenantswithSaaskit database:

$ psql -d DbTenantswithSaaskit -c "INSERT INTO \"AppTenants\"(\"AppTenantId\", \"Hostname\", \"Name\") Values(1, 'localhost:5000', 'First Tenant')"

Once they are all added, we have 3 tenants in our database:

$ psql -d DbTenantswithSaaskit -c "SELECT * FROM \"AppTenants\""

 AppTenantId |    Hostname    |     Name      
-------------+----------------+---------------
           1 | localhost:5000 | First Tenant
           2 | localhost:5001 | Second Tenant
           3 | localhost:5002 | Third Tenant
(3 rows)

If we run the app now, the AppTenant is resolved from the database based on the current hostname. However currently we aren't actually using the tenant anywhere so running the app just gives us the default view no matter which url we hit:

Loading tenants from the database with SaasKit in ASP.NET Core

Injecting the current tenant

To prove that our AppTenant has been resolved, we will inject it into _Layout.cshtml and use it to change the title in the navigation bar.

The ability to inject arbitrary services directly into view pages is new in ASP.NET Core and can be useful for injecting view specific services. An AppTenant is not view-specific, so it is more likely to be required in the Controller rather than the View, however view injection is a useful mechanism for demonstration here.

First we add the @inject statement to the top of _Layout.cshtml:

@inject DatabaseMultiTenancyWithSaasKit.Models.AppTenant Tenant;

We now effectively have a property Tenant we can reference later in the layout page:

<a asp-area="" asp-controller="Home" asp-action="Index" class="navbar-brand">@Tenant.Name</a>  

Now when we navigate to the various registered urls, we can see the current AppTenant has been loaded from the database, and it's Name displayed in the navigation bar:

Loading tenants from the database with SaasKit in ASP.NET Core

Loading tenants from the database with SaasKit in ASP.NET Core

Loading tenants from the database with SaasKit in ASP.NET Core

Summary

One of the first steps in any multi-tenant application is identifying which tenant the current request is related to. In this post we used the open source SaasKit to resolve tenants based on the current request hostname. We designed the resolver to load the tenants from a database, so that we could dynamically add new tenants at runtime. We then used service injection to show that the AppTenant object representing our current tenant can be sourced from the dependency injection container. The source code for the above example can be found here.

If you are interested in building multi-tenancy apps with SaasKit I highly recommend you check out Ben Foster's blog at benfoster.io for more great examples.

Loading tenants from the database with SaasKit - Part 2, Caching

$
0
0
Loading tenants from the database with SaasKit - Part 2, Caching

In my previous post, I showed how you could add multi-tenancy to an ASP.NET Core application using the open source SaasKit library. Saaskit requires you to register an ITenantResolver<TTenant> which is used to identify and resolve the applicable tenant (if any) for a given HttpContext. In my post I showed how you could resolve tenants stored in a database using Entity Framework Core.

One of the advantages of loading tenants from the database is that the available tenants can be configured at runtime, as opposed to loaded once at startup. That means we can bring new tenants online or take others down while our app is still running, without any downtime. Also, the tenant details are completely decoupled from our application settings - there's no risk of tenant details being uploaded to our source control system, as the tenant details are production data that just lives in our production database.

The main disadvantage is that every single request (which makes it through the middleware pipeline to the TenantResolutionMiddleware) will be hitting the database to try and resolve the current tenant. We will always be getting the freshest data that way, but it will become more of a problem as our app scales.

In this post, I'm going to show a couple of ways you can get around this problem, while still storing your tenants in the database. You can find the source code for the examples on GitHub.

1. Loading tenants from the database into IOptions<T>

One of the simplest ways around the problem is to go back to storing our AppTenant models in an IOptions<T> backed setting class. In the simplest configuration-based implementation, the AppTenants themselves are loaded from appsettings.json (for example) and used directly in the ITenantResolver. This is the approach demonstrated in one of the SaasKit samples.

First we create an Options object containing our tenants:

public class MultitenancyOptions  
{
    public ICollection<AppTenant> AppTenants { get; set; } = new List<AppTenant>();
}

Then we update the app tenant resolver to resolve the tenants from our MultitenancyOptions object using the IOptions pattern:

public class AppTenantResolver : ITenantResolver<AppTenant>  
{
    private readonly ICollection<AppTenant> _tenants;

    public AppTenantResolver(IOptions<MultitenancyOptions> appTenantSettings)
    {
        _tenants = appTenantSettings.Value.AppTenants;
    }

    public Task<TenantContext<AppTenant>> ResolveAsync(HttpContext context)
    {
        TenantContext<AppTenant> tenantContext = null;

        var tenant = _tenants.FirstOrDefault(
            t => t.Hostname.Equals(context.Request.Host.Value.ToLower()));

        if (tenant != null)
        {
            tenantContext = new TenantContext<AppTenant>(tenant);
        }

        return Task.FromResult(tenantContext);
    }
}

Finally, in the ConfigureServices method of Startup, you can configure the MultitenancyOptions. In the SaasKit sample application, this is loaded directly from the IConfigurationRoot using:

services.Configure<MultitenancyOptions>(Configuration.GetSection("Multitenancy"));  

We can use a similar technique in our application, using the same AppTenantResolver and MultitenancyOptions, but instead of configuring them directly from IConfigurationRoot, we will load them from the database. Our full ConfigureServices method, including configuring our Entity Framework DbContext and adding the multi-tenancy services, is shown below:

public void ConfigureServices(IServiceCollection services)  
{
    // Add framework services.
    services.AddMvc();

    var connectionString = Configuration["ApplicationDbContext:ConnectionString"];
    services.AddDbContext<ApplicationDbContext>(
        opts => opts.UseNpgsql(connectionString)
    );

    services.Configure<MultitenancyOptions>(
        options =>
        {
            var provider = services.BuildServiceProvider();
            using (var dbContext = provider.GetRequiredService<ApplicationDbContext>())
            {
                options.AppTenants = dbContext.AppTenants.ToList();
            }
        });

    services.AddMultitenancy<AppTenant, AppTenantResolver>();
}

The key here is that we are configuring our MultitenancyOptions to be loaded from the database. This lambda will be run the first time that IOptions<MultitenancyOptions> is required and will be cached for the lifetime of the app.

When the first request comes in, the TenantResolutionMiddleware will attempt to resolve a TenantContext<AppTenant>. This requires creating an instance of the AppTenantResolver, which in turn has a dependency on IOptions<MultitenancyOptions>. At this point, the AppTenants are loaded from the database as per our configuration and added to the MultitenancyOptions. The remainder of the request then processes as normal.

On subsequent requests, the previously configured IOptions<MultitenancyOptions> is injected immediately into the AppTenantResolver, so the configuration code and our database are hit only once.

Obviously this approach has a significant drawback - any changes to the AppTenants table in the database are ignored by the application; the available tenants are fixed after the first request. However it does still have the advantage of tenant details being stored in the database, so it may fit your needs.

One final thing to point out is the way we resolved the Entity Framework ApplicationDbContext while still in the ConfigureService method. To do this, we had to call IServiceCollection.BuildServiceProvider in order to get an IServiceProvider, from which we could then retrieve an ApplicationDbContext.

While this works perfectly well in this example, I am not 100% sure this is a great idea - explicitly having to call BuildServiceProvider just feels wrong! Also, I believe it could lead to some subtle bugs if you are using a third party container (like Autofac or StructureMap) that uses it's own implementation of IServiceProvider; the code above would bypass the third-party container. Just some things to be aware of if you decide to use it in your application.

2.Caching tenants using MemoryCacheTenantResolver

So the configuration based approach works well enough but it has some caveats. We no longer hit the database on every request, but we've lost the ability to add new tenants at runtime.

Luckily, SaasKit comes with an ITenantResolver<TTenant> implementation base class which will give us the best of both worlds - the MemoryCacheTenantResolver<TTenant>. This class adds a wrapper around an IMemoryCache, allowing you to easily cache TenantContexts between requests.

To make use of it we need to implement some abstract methods:

public class CachingAppTenantResolver : MemoryCacheTenantResolver<AppTenant>  
{
    private readonly ApplicationDbContext _dbContext;

    public CachingAppTenantResolver(ApplicationDbContext dbContext, IMemoryCache cache, ILoggerFactory loggerFactory)
        : base(cache, loggerFactory)
    {
        _dbContext = dbContext;
    }

    protected override string GetContextIdentifier(HttpContext context)
    {
        return context.Request.Host.Value.ToLower();
    }

    protected override IEnumerable<string> GetTenantIdentifiers(TenantContext<AppTenant> context)
    {
        return new[] { context.Tenant.Hostname };
    }

    protected override Task<TenantContext<AppTenant>> ResolveAsync(HttpContext context)
    {
        TenantContext<AppTenant> tenantContext = null;
        var hostName = context.Request.Host.Value.ToLower();

        var tenant = _dbContext.AppTenants.FirstOrDefault(
            t => t.Hostname.Equals(hostName));

        if (tenant != null)
        {
            tenantContext = new TenantContext<AppTenant>(tenant);
        }

        return Task.FromResult(tenantContext);
    }
}

The first method, GetContextIdentifier() returns the unique identifier for a tenant. It is used as the key for the IMemoryCache, so it must be unique and resolvable from the HttpContext.

GetTenantIdentifiers() is called after a tenant has been resolved. We return all the applicable identifiers for the given tenant, which allows us to resolve the provided context when any of these identifiers are found in the HttpContext. That allows you to have multiple hostnames which resolve to the same tenant, for example.

Finally, ResolveAsync() is the method where the actual resolution for a tenant occurs, which is called if a tenant cannot be found in the IMemoryCache. This method call is identical to the one in my previous post, where we are finding the first tenant with the provided hostname in the database. If the tenant can be resolved, we create a new context and return it, whereupon it will be cached for future requests.

It's worth noting that if the tenant can not be resolved from the HttpContext (no tenant exists in the database with the provided hostname), then ResolveAsync returns null. However, this value is not cached in the IMemoryCache. This means every request with the missing hostname will require a call to ResolveAsync and consequently a hit against the database. Depending on your setup that may or may not be an issue. If necessary you could create your own version of MemoryCacheTenantResolver which also caches null results.

To see the caching in effect we can just check out the logs generated by SaasKit when we make a request, thanks to the universal logging enabled by universal dependency injection.

On the first request to a new host, where I have my tenants stored in a PostgreSQL database, we can see the MemoryCacheTenantResolver attempting to resolve the tenant using the hostname, getting a miss, and so hitting the database:

dbug: SaasKit.Multitenancy.Internal.TenantResolutionMiddleware[0]  
      Resolving TenantContext using CachingAppTenantResolver.
dbug: SaasKit.Multitenancy.MemoryCacheTenantResolver[0]  
      TenantContext not present in cache with key "localhost:5000". Attempting to resolve.
dbug: Npgsql.NpgsqlConnection[3]  
      Opening connection to database 'DbTenantswithSaaskit' on server 'tcp://localhost:5432'.
info: Microsoft.EntityFrameworkCore.Storage.Internal.RelationalCommandBuilderFactory[1]  
      Executed DbCommand (2,233ms) [Parameters=[@__ToLower_0='?'], CommandType='Text', CommandTimeout='30']
      SELECT "t"."AppTenantId", "t"."Hostname", "t"."Name"
      FROM "AppTenants" AS "t"
      WHERE "t"."Hostname" = @__ToLower_0
      LIMIT 1
dbug: Npgsql.NpgsqlConnection[4]  
      Closing connection to database 'DbTenantswithSaaskit' on server 'tcp://localhost:5432'.
dbug: SaasKit.Multitenancy.MemoryCacheTenantResolver[0]  
      TenantContext:131d4739-0447-47f6-a0b3-f8a8656a946f resolved. Caching with keys "localhost:5000".
dbug: SaasKit.Multitenancy.Internal.TenantResolutionMiddleware[0]  
      TenantContext Resolved. Adding to HttpContext.

On the second request to the same tenant, the MemoryCacheTenantResolver gets a hit from the cache, so immediately returns the TenantContext from the first request.

dbug: SaasKit.Multitenancy.Internal.TenantResolutionMiddleware[0]  
      Resolving TenantContext using CachingAppTenantResolver.
dbug: SaasKit.Multitenancy.MemoryCacheTenantResolver[0]  
      TenantContext:131d4739-0447-47f6-a0b3-f8a8656a946f retrieved from cache with key "localhost:5000".
dbug: SaasKit.Multitenancy.Internal.TenantResolutionMiddleware[0]  
      TenantContext Resolved. Adding to HttpContext.

When we call a different host (localhost:5001), the MemoryCacheTenantResolver again hits the database, and stores the result in the cache.

dbug: SaasKit.Multitenancy.Internal.TenantResolutionMiddleware[0]  
      Resolving TenantContext using CachingAppTenantResolver.
dbug: SaasKit.Multitenancy.MemoryCacheTenantResolver[0]  
      TenantContext not present in cache with key "localhost:5001". Attempting to resolve.
dbug: Npgsql.NpgsqlConnection[3]  
      Opening connection to database 'DbTenantswithSaaskit' on server 'tcp://localhost:5432'.
info: Microsoft.EntityFrameworkCore.Storage.Internal.RelationalCommandBuilderFactory[1]  
      Executed DbCommand (118ms) [Parameters=[@__ToLower_0='?'], CommandType='Text', CommandTimeout='30']
      SELECT "t"."AppTenantId", "t"."Hostname", "t"."Name"
      FROM "AppTenants" AS "t"
      WHERE "t"."Hostname" = @__ToLower_0
      LIMIT 1
dbug: Npgsql.NpgsqlConnection[4]  
      Closing connection to database 'DbTenantswithSaaskit' on server 'tcp://localhost:5432'.
dbug: SaasKit.Multitenancy.MemoryCacheTenantResolver[0]  
      TenantContext:3915c2b9-8210-47ad-a22c-193e23f2d552 resolved. Caching with keys "localhost:5001".
dbug: SaasKit.Multitenancy.Internal.TenantResolutionMiddleware[0]  
      TenantContext Resolved. Adding to HttpContext.

With our new CachingAppTenantResolver we now have the best of both worlds - we can happily add new tenants to the database and they will be resolved in subsequent requests, but we are not hitting the database for every subsequent request to a known host. Obviously this approach can be extended - as with any sort of caching, we may well need to be able to invalidate certain tenant contexts if for example a tenant is removed. And there is the question of whether failed tenant resolutions should be cached. Again, just things to think about when you come to adding it to your application!

Summary

Multi-tenancy can be a tricky thing to get right, and SaasKit is a great open source project for providing the basics to get up and running. As before, I recommend you check out the project on GitHub and also check out Ben Foster's blog as he has whole bunch of posts on it. In this post we showed a couple of approaches for caching TenantContexts between requests, to reduce the traffic to the database.

Whether either of these approaches will work for you will depend on your exact use case, but hopefully they will give you a start in the right direction. Thanks to the design of the SaasKit TenantResolutionMiddleware it is easy to just plug in a new ITenantResolver if your requirements change down the line.

Forking the pipeline - adding tenant-specific files with SaasKit in ASP.NET Core

$
0
0
Forking the pipeline - adding tenant-specific files with SaasKit in ASP.NET Core

This is another in a series of posts looking at how to add multi-tenancy to ASP.NET Core applications using SaasKit. SaasKit is an open source project, created by Ben Foster, to make adding multi-tenancy to your application easier.

In the last two posts I looked at how you can load your tenants from the database, and cache the TenantContext<AppTenant> between requests. Once you have a tenant context being correctly resolved as part of your middleware pipeline, you can start to add additional tenant-specific features on top of this.

Theming and static files

One very common feature in multi-tenant applications is the ability to add theming, so that different tenants can have a custom look-and feel, while keeping the same overall functionality. Ben described a way to do this on his blog using custom Views per tenant, and a custom IViewLocationExpander for resolving them at run time.

This approach works well for what it is trying to achieve - a tenant can have a highly customised view of the same underlying functionality by customising the view templates per tenant. Similarly, the custom _layout.cshtml files reference different css files located at, for example /themes/THEME_NAME/assets, so the look of the site can be customised per tenant. However this is relatively complicated if all you want to do is, for example, serve a different file for each tenant - it requires you to create a custom theme and view for each tenant.

Also, in this approach there is no isolation between the different themes, the templates just reference different files. It is perfectly possible to reference the files of one theme from another, by just including the appropriate path. This approach assumes there is no harm with a tenant using theme A accessing files from theme B. This is a safe bet when just used for theming, but what if we were serving some semi-sensitive file, say a site logo. It may be that we don't want Tenant A to be able to view the logo of Tenant B, without explicitly being within the Tenant B context.

To demonstrate the problem, I created a simple MVC multi-tenant application using the default template and added SaasKit. I added my AppTenant model shown below, and configured the tenant to be loaded by hostname from configuration for simplicity. You can find the full code on GitHub.

public class AppTenant  
{
    public string Name { get; set; }
    public string Hostname { get; set; }
    public string Folder { get; set; }
}

Note that the AppTenant class has a Folder property. This will be the name of the subfolder in which tenant specific assets live. Static files are served by default from the wwwroot folder; we will store our tenant specific files in a sub folder of this as indicated by the Folder property. For example. for Tenant 1, we store our files in /wwwroot/tenants/tenant1:

Forking the pipeline - adding tenant-specific files with SaasKit in ASP.NET Core

Inside of each of the tenant-specific folders I have created an images/banner.svg file which will we show on the homepage for each tenant. The key thing to keep in mind is we don't want tenants to be able to access the banner of another tenant.

First attempt - direct serving of static files

The easiest way to show the tenant specific banner on the homepage is to just update the image path to include AppTenant.Folder. To do this we first inject the current AppTenant into our View as described in a previous post, and use the property directly in the image path:

@inject AppTenant Tenant;
@{
    ViewData["Title"] = "Home Page";
}

<div id="myCarousel" class="carousel slide">  
    <div class="carousel-inner" role="listbox">
        <div class="item active">
            <img src="~/tenant/@Tenant.Folder/images/banner.svg" alt="ASP.NET" class="img-responsive" />
        </div>
    </div>
</div>  

Here you can see we are creating a banner header containing just one image, and injecting the AppTenant.Folder property to ensure we get the right banner. The result is that different images are displayed per tenant

Tenant 1 (localhost:5001):
Forking the pipeline - adding tenant-specific files with SaasKit in ASP.NET Core

Tenant 2 (localhost:5002):
Forking the pipeline - adding tenant-specific files with SaasKit in ASP.NET Core

This satisfies our first requirement of having tenant-specific files, but it fails at the second - we can access the Tenant 2 banner from the Tenant 1 hostname (localhost:5001):

Forking the pipeline - adding tenant-specific files with SaasKit in ASP.NET Core

This is the specific problem we are trying to address, so we will need a new approach.

Forking the middleware pipeline

The technique we are going to use here is to fork the middleware pipeline. As explained in my previous post on creating custom middleware, middleware is essentially everything that sits between the raw request constructed by the web server and your application behaviour.

In ASP.NET Core the middleware effectively sits in a sequential pipe. Each piece of middleware can perform some operation on the HttpContext, and then either return, or call the next middleware in the pipe. Finally it gets another chance to modify the HttpContext on the way 'back through'.

Forking the pipeline - adding tenant-specific files with SaasKit in ASP.NET Core

When you use SaasKit in your application, you add a piece of TenantResolutionMiddleware into the pipeline. It is also possible, as described in Ben Foster's post, to split the middleware pipeline per tenant. In that way you can have different middleware for each tenant, before the pipeline merges again, to continue with the remainder of the middleware:

Forking the pipeline - adding tenant-specific files with SaasKit in ASP.NET Core

To achieve our requirements, we are going to be doing something slightly different again - we are going to fork the pipeline completely such that requests to our tenant specific files go down one branch, while all other requests continue down the pipeline as usual.

Forking the pipeline - adding tenant-specific files with SaasKit in ASP.NET Core

Building the middleware

Before we go about building the required custom middleware, it's worth noting that there are actually lots of different ways to achieve what I'm aiming for here. The approach I'm going to show is just one of them.

  • Tenant resolution should happen at the start of the pipeline
  • Requests for tenant specific static files should arrive at the static file path, with the AppTenant.Folder segment removed. e.g. from the example above, a request for the banner image for tenant 1 should go to /tenant/images/banner.svg.
  • Register a route which matches paths starting with the /tenant/ segment.
  • If the route is not matched, continue on the pipeline as usual.
  • If the route is matched, fork the pipeline. Insert the appropriate AppTenant.Folder segment into the path and serve the file using the standard static file middleware.

UseRouter to match path and fork the pipeline

The first step in processing a tenant-specific file, is identifying when a tenant-specific static file is requested. We can achieve this using the IRouter interface from the ASP.NET Core library, and configuring it to look for our path prefix.

We know that any requests to our files should start with the folder name /tenant/ so we configure our router to fork the pipeline whenever it is matched. We can do this using a RouteBuilder and MapRoute in the Startup.Configure method:

var routeBuilder = new RouteBuilder(app);  
var routeTemplate = "tenant/{*filePath}";  
routeBuilder.MapRoute(routeTemplate, (IApplicationBuilder fork) =>  
    {
        //Add middleware to rewrite our path for tenant specific files
        fork.UseMiddleware<TenantSpecificPathRewriteMiddleware>();
        fork.UseStaticFiles();
    });
var router = routeBuilder.Build();  
app.UseRouter(router);  

We are mapping a single route as required, and also specifying a catch-all route parameter which will match everything after the first segment, and assign it to the filePath route parameter.

It is also here that the middleware pipeline is forked when the route is matched. We have added the static file middleware to the end of the pipeline fork, and our custom middleware just before that. As the static file middleware just sees a path that contains our tenant-specific files, it acts exactly like normal - if the file exists, it serves it, otherwise it returns a 404.

Rewriting the path for tenant-specific files

In order to rewrite the path we will use a small piece of middleware which is called before we attempt to resolve our tenant-specific static files.

public class TenantSpecificPathRewriteMiddleware  
{
    private readonly RequestDelegate _next;

    public TenantSpecificPathRewriteMiddleware(
        RequestDelegate next)
    {
        _next = next;
    }

    public async Task Invoke(HttpContext context)
    {
        var tenantContext = context.GetTenantContext<AppTenant>();

        if (tenantContext != null)
        {
            //remove the prefix portion of the path
            var originalPath = context.Request.Path;
            var tenantFolder = tenantContext.Tenant.Folder;
            var filePath = context.GetRouteValue("filePath");
            var newPath = new PathString($"/tenant/{tenantFolder}/{filePath}");

            context.Request.Path = newPath;

            await _next(context);

            //replace the original url after the remaining middleware has finished processing
            context.Request.Path = originalPath;
        }
    }
}

This middleware just does one thing - it inserts the AppTenant.Folder segment into the path, and replaces the value of HttpContext.Request.Path. It then calls the remaining downstream middleware (in our case, just the static file handler). Once the remaining middleware has finished processing, it restores the original request path. That way, any upstream middleware which looks at the path on the return journey through will be unaware any change happened.

It is worth noting that this setup makes it impossible to access files from another tenant's folder. For example, if I am Tenant 1, attempting to access the banner of Tenant 2, I might try a path like /tenant/tenant2/images/banner.svg. However, our rewriting middleware will alter the path to be /tenant/tenant1/tenant2/images/banner.svg - which likely does not exist, but in any case resides in the tenant1 folder and so is by definition acceptable for serving to Tenant 1.

Referencing a tenant specific file

Now we have the relevant infrastructure in place we just need to reference the tenant-specific banner file in our view:

@{
    ViewData["Title"] = "Home Page";
}

<div id="myCarousel" class="carousel slide">  
    <div class="carousel-inner" role="listbox">
        <div class="item active">
            <img src="~/tenant/images/banner.svg" alt="ASP.NET" class="img-responsive" />
        </div>
    </div>
</div>  

As an added bonus, we no longer need to inject the tenant into the view in order to build the full path to the tenant-specific file. We just reference the path without the AppTenant.Folder segment in the knowledge it'll be added later.

Testing it out

And that's it, we're all done! To test it out we verify that localhost:5001 and localhost:5002 return their appropriate banners as before.

Tenant 1 (localhost:5001):
Forking the pipeline - adding tenant-specific files with SaasKit in ASP.NET Core

Tenant 2 (localhost:5002):
Forking the pipeline - adding tenant-specific files with SaasKit in ASP.NET Core

So that still works, but what about if we try and access the purple banner of Tenant 2 from Tenant 1?

Forking the pipeline - adding tenant-specific files with SaasKit in ASP.NET Core

Success - looking at the developer tools we can see that the request returned a 404. This was because the actual path tested by the static file middleware, /tenant/tenant1/tenant2/images/banner.svg, does not exist.

Tidying things up

Now we've seen that our implementation works, we can tidy things up a little. As a convention, middleware is typically added to the pipeline with a Use extension method, in the same way UseStaticFiles was added to our fork earlier. We can easily wrap our router in an extension method to give the same effect

public static IApplicationBuilder UsePerTenantStaticFiles<TTenant>(  
    this IApplicationBuilder app,
    string pathPrefix,
    Func<TTenant, string> tenantFolderResolver)
{
    var routeBuilder = new RouteBuilder(app);
    var routeTemplate = pathPrefix + "/{*filePath}";
    routeBuilder.MapRoute(routeTemplate, (IApplicationBuilder fork) =>
        {
            fork.UseMiddleware<TenantSpecificPathRewriteMiddleware<TTenant>>(pathPrefix, tenantFolderResolver);
            fork.UseStaticFiles();
        });
    var router = routeBuilder.Build();
    app.UseRouter(router);

    return app;
}

As well as wrapping the route builder in an IApplicationBuilder extension method, I've done a couple of extra things too. First, I've made the method (and our TenantSpecificPathRewriteMiddleware) generic, so that we can reuse it in apps with other AppTenant implementations. As part of that, you need to pass in a Func<TTenant, string> to indicate how to obtain the tenant-specific folder name. Finally, you can pass in the tenant/ routing template prefix, so you can name the tenant-specific folder in wwwroot anything you like.

To use the extension method , we just call it in Startup.Configure, after the tenant resolution middleware:

public void Configure(IApplicationBuilder app, IHostingEnvironment env, ILoggerFactory loggerFactory)  
{
    //other configuration
    app.UseMultitenancy<AppTenant>();

    app.UsePerTenantStaticFiles<AppTenant>("tenant", x => x.Folder);

    app.UseStaticFiles();
    //app.UseMvc(); etc
}

Considerations

As always with middleware, the order is important. Obviously we cannot use tenant specific static files if we have not yet run the tenant resolution middleware. Also, it's critical for this design that the UseStaticFiles call comes after both UseMultitenancy and UsePerTenantStaticFiles. This is in contrast to the usual pattern where you would have UseStaticFiles very early in the pipeline.

The reason for this is that we need to make sure we fork the pipeline as early as possible when resolving paths of the form /tenant/REST_OF_THE_PATH. If the static file handler was first in the pipeline then we would be back to square one in serving files from other tenants!

Another point I haven't addressed is how we handle the case when the tenant context cannot be resolved. There are many different ways to handle this, which Ben covers in detail in his post on handling unresolved tenants. These include adding a default tenant (so a context always exists), adding additional middleware to redirect, or returning a 404 if the tenant cannot be resolved.

With respect to our fork of the pipeline, we are explicitly checking for a tenant context in the TenantSpecificPathRewriteMiddleware, and if one is not found, we are just returning immediately. Note however that we are no setting a status code, which means that the response sent to the browser will be the default 200, but with no content. The result is essentially undefined at this point, so it is probably wise to handle the unresolved context issue immediately after the call to UseMultitenancy, before calling our tenant-specific static file middleware.

As I mentioned previously, there are a number of different ways we could achieve the end result we're after here. For example, we could have used the Map extension on IApplicationBuilder to fork the pipeline instead of using an IRouter. The Map method looks for a path prefix (/tenant in our case) and forks the pipeline at this point, in a similar way to the IRouter implementation shown. It's worth nothing there's also a basic url-rewriting middleware in development which may be useful for this sort of requirement in the near future.

Summary

Adding multi-tenancy to an ASP.NET Core application is made a lot simpler thanks to the open source SaasKit. Depending on your requirements, it can be used to enable data partitioning by using different databases per client, to provide different themes and styling across tenants, or to wholesale swap out portions of the middleware pipeline depending on the tenant.

In this post I showed how we can create a fork of the ASP.NET Core middleware pipeline and to use it to map generic urls of the form PREFIX/path/to/file.txt, to a tenant-specific folder such as PREFIX/TENANT/path/to/file.txt. This allows us to isolate static files between tenants where necessary.

Introduction to Authentication with ASP.NET Core

$
0
0
Introduction to Authentication with ASP.NET Core

This is the first in a series of posts looking at authentication and authorisation in ASP.NET Core. In this post, I'm going to talk about authentication in general and how claims-based authentication works in ASP.NET Core.

The difference between Authentication and Authorisation

First of all, we should clarify the difference between these two dependent facets of security. The simple answer is that Authentication is the process of determining who you are, while Authorisation revolves around what you are allowed to do, i.e. permissions. Obviously before you can determine what a user is allowed to do, you need to know who they are, so when authorisation is required, you must also first authenticate the user in some way.

Authentication in ASP.NET Core

The fundamental properties associated with identity have not really changed in ASP.NET Core - although they are different, they should be familiar to ASP.NET developers in general. For example, in ASP.NET 4.x, there is a property called User on HttpContext, which is of type IPrincipal, which represents the current user for a request. In ASP.NET Core there is a similar property named User, the difference being that this property is of type ClaimsPrincipal, which implements IPrincipal.

The move to use ClaimsPrincipal highlights a fundamental shift in the way authentication works in ASP.NET Core compared to ASP.NET 4.x. Previously, authorisation was typically Role-based, so a user may belong to one or more roles, and different sections of your app may require a user to have a particular role in order to access it. In ASP.NET Core this kind of role-based authorisation can still be used, but that is primarily for backward compatibility reasons. The route they really want you to take is claims-based authentication.

Claims-based authentication

The concept of claims-based authentication can be a little confusing when you first come to it, but in practice it is probably very similar to approaches you are already using. You can think of claims as being a statement about, or a property of, a particular identity. That statement consists of a name and a value. For example you could have a DateOfBirth claim, FirstName claim, EmailAddress claim or IsVIP claim. Note that these statements are about what or who the identity is, not what they can do.

The identity itself represents a single declaration that may have many claims associated with it. For example, consider a driving license. This is a single identity which contains a number of claims - FirstName, LastName, DateOfBirth, Address and which vehicles you are allowed to drive. Your passport would be a different identity with a different set of claims.

So lets take a look at that in the context of ASP.NET Core. Identities in ASP.NET Core are a ClaimsIdentity. A simplified version of the class might look like this (the actual class is a lot bigger!):

public class ClaimsIdentity: IIdentity  
{
    public string AuthenticationType { get; }
    public bool IsAuthenticated { get; }
    public IEnumerable<Claim> Claims { get; }

    public Claim FindFirst(string type) { /*...*/ }
    public Claim HasClaim(string type, string value) { /*...*/ }
}

I have shown there of the main properties in this outline, including Claims which consists of all the claims associated with an identity. There are a number of utility methods for working with the Claims, two of which I have shown here. These are useful when you come to authorisation, and you are trying to determine whether a particular Identity has a given Claim you are interested in.

The AuthenticationType property is fairly self-explanatory. In our practical example previously, this might be the string Passport or DriversLicense, but in ASP.NET it is more likely to be Cookies, Bearer, or Google etc. It's simply the method that was used to authenticate the user, and to determine the claims associated with an identity.

Finally, the property IsAuthenticated indicates whether an identity is authenticated of not. This might seem redundant - how could you have an identity with claims when it is not authenticated? One scenario may be where you allow guest users on your site, e.g. on a shopping cart. You still have an identity associated with the user, and that identity may still have claims associated with it, but they will not be authenticated. This is an important distinction to bear in mind.

As an adjunct to that, in ASP.NET Core if you create a ClaimsIdentity and provide an AuthenticationType in the constructor, IsAuthenticated will always be true. So an authenticated user must always have an AuthenticationType, and, conversely, you cannot have an unauthenticated user which has an AuthenticationType.

Multiple Identities

Hopefully at this point you have a conceptual handle on claims and how they relate to an Identity. I said at the beginning of this section that the User property on HttpContext is a ClaimsPrinciple, not a ClaimsIdentity, so lets take a look at a simplified version of it:

public class ClaimsPrincipal :IPrincipal  
{
    public IIdentity Identity { get; }
    public IEnumerable<ClaimsIdentity> Identities { get; }
    public IEnumerable<Claim> Claims { get; }

    public bool IsInRole(string role) { /*...*/ }
    public Claim FindFirst(string type) { /*...*/ }
    public Claim HasClaim(string type, string value) { /*...*/ }
}

The important point to take from this class is that there is an Identities property which returns IEnumerable<ClaimsIdentity>. So a single ClaimsPrincipal can consist of multiple Identities. There is also an Identity property that is there in order to implement the IPrincipal interface - in .NET Core it just selects the first identity in Identites.

Going back to our previous example of the passport and driving license, multiple identities actually makes sense - those documents are both forms of identity, each of which contain a number of claims. In this case you are the principal, and you have two forms of identity. When you have those two pieces of identity in your possession, you as the principal inherit all the claims from all your identities.

Consider another practical example - you are taking a flight. First you will be asked at the booking desk to prove the claims you make about your FirstName and LastName etc. Luckily, you remembered your passport, which is an identity that verifies those claims, so you receive your boarding pass and you're on your way to the next step.

At security you are asked to prove the claim that you are booked on to a flight. This time you need the other form of identity you are carrying, the boarding pass, which has the FlightNumber claim, so you are allowed to continue on your way.

Finally, once you are through security, you make your way to the VIP lounge, and are asked to prove your VIP status with the VIP Number claim. This could be in the form of a VIP card, which would be another form of identity and would verify the claim requested. If you did not have a card, you could not present the requested claim, you would be denied access, and so would be asked to leave and stop making a scene.

Introduction to Authentication with ASP.NET Core

Again, the key points here are that a principal can have multiple identities, these identities can have multiple claims, and the ClaimsPrincipal inherits all the claims of its Identities.

As mentioned previously, the role based authorisation is mostly around for backwards compatibility reasons, so the method IsInRole will be generally unneeded if you adhere to the claims-based authentication emphasised in ASP.NET Core. Under the hood, this is also just implemented using claims, where the claim type defaults to RoleClaimType, or ClaimType.Role.

Thinking in terms of ASP.NET Core again, multiple identities and claims could be used for securing different parts of your application, just as they were at the airport. For example, you may login with a username and password, and be granted a set of claims based on the identity associated with that, which allows you to browse the site. But say you have a particularly sensitive section in your app, that you want to secure further. This could require that you present an additional identity, with additional associated claims, for example by using two factor authentication, or requiring you to re-enter your password. That would allow the current principle to have multiple identities, and to assume the claims of all the provided identities.

Creating a new principal

So now we've seen how principals work in ASP.NET Core, how would we go about actually creating one? A simple example, such as you might see in a normal web page login might contain code similar to the following

public async Task<IActionResult> Login(string returnUrl = null)  
{
    const string Issuer = "https://gov.uk";

    var claims = new List<Claim> {
        new Claim(ClaimTypes.Name, "Andrew", ClaimValueTypes.String, Issuer),
        new Claim(ClaimTypes.Surname, "Lock", ClaimValueTypes.String, Issuer),
        new Claim(ClaimTypes.Country, "UK", ClaimValueTypes.String, Issuer),
        new Claim("ChildhoodHero", "Ronnie James Dio", ClaimValueTypes.String)
    };

    var userIdentity = new ClaimsIdentity(claims, "Passport");

    var userPrincipal = new ClaimsPrincipal(userIdentity);

    await HttpContext.Authentication.SignInAsync("Cookie", userPrincipal,
        new AuthenticationProperties
        {
            ExpiresUtc = DateTime.UtcNow.AddMinutes(20),
            IsPersistent = false,
            AllowRefresh = false
        });

    return RedirectToLocal(returnUrl);
}

This method currently hard-codes the claims in, but obviously you would obtain the claim values from a database or some other source. The first thing we do is build up a list of claims, populating each with a string for its name, a string for its value, and optional Issuer and ClaimValueType fields. The ClaimType class is a helper which exposes a number of common claim types. Each of these is a url for example http://schemas.xmlsoap.org/ws/2005/05/identity/claims/name, but you do not have to use a url, as shown in the last claim added.

Once you have built up your claims you can create a new ClaimsIdentity, passing in your claim list, and specifying the AuthenticationType (to ensure that your identity has IsAuthentication=true). Finally you can create a new ClaimsPrincipal using your identity and sign the user in. In this case we are telling the AuthenticationManager to use the "Cookie" authentication handler, which we must have configured as part of our middleware pipeline.

Summary

In this post, I described how claims-based authentication works and how it applies to ASP.NET Core. In the next post, I will look at the next stage of the authentication process - how the cookie middleware actually goes about signing you in with the provided principal. Subsequent posts will cover how you can use multiple authentication handlers, how authorisation works, and how ASP.NET Core Identity ties it all together.

Access services inside ConfigureServices using IConfigureOptions in ASP.NET Core

$
0
0
Access services inside ConfigureServices using IConfigureOptions in ASP.NET Core

In a recent post I showed how you could populate an IOptions<T> object from the database for the purposes of caching the query result. It wasn't the most flexible solution or really recommended but it illustrated the point.

However one of the issues I had with the solution was the need to access configured services from within the IOptions<T> configuration lambda, inside ConfigureServices itself.

The solution I came up with was to use the injected IServiceCollection to build an ISerivceProvider to get the configured service I needed. As I pointed out at the time, this serivce-locator pattern felt icky and wrong, but I couldn't see any other way of doing it.

Thankfully, and inspired by this post from Ben Collins, there is a much better solution to be had by utilising the IConfigureOptions<T> interface

The previous version

In my post, I had this (abbreviated) code, which was trying to access an Entity Framework Core DbContext in the Configure method to setup the MultitenancyOptions class:

public class Startup  
{
    public Startup(IHostingEnvironment env) { /* ... build configuration */ }

    public IConfigurationRoot Configuration { get; }

    public void ConfigureServices(IServiceCollection services)
    {
        // add MVC, connection string etc

        services.Configure<MultitenancyOptions>(  
            options =>
            {
                var scopeFactory = services
                    .BuildServiceProvider()
                    .GetRequiredService<IServiceScopeFactory>();

                using (var scope = scopeFactory.CreateScope())
                {
                    var provider = scope.ServiceProvider;
                    using (var dbContext = provider.GetRequiredService<ApplicationDbContext>())
                    {
                        options.AppTenants = dbContext.AppTenants.ToList();
                    }
                }
            });

        // add other services
    }

    public void Configure(IApplicationBuilder app) { /* ... configure pipeline */ }
}

Yuk. As you can see, the call to Configure is a mess. In order to obtain a scoped lifetime DbContext it has to build the service collection to produce an IServiceProvider, to then obtain an IServiceScopeFactory. From there it can create the correct scoping, create another IServiceProvider, and finally find the DbContext we actually need. This lambda has way too much going on, and 90% of it is plumbing.

If you're wondering why you shouldn't just fetch a DbContext directly from the first service provider, check out this twitter discussion between Julie Lerman, David Fowler and Shawn Wildermuth.

The new improved answer

So, now we know what we're working with, how do we improve it? Luckily, the ASP.NET team anticipated this issue - instead of providing a lambda for configuring the MultitenancyOptions object, we implement the IConfigureOptions<TOptions> interface, where TOptions: MultitenancyOptions. This interface has a single method, Configure, which is passed a constructed MultitenancyOptions object for you to update:

public class ConfigureMultitenancyOptions : IConfigureOptions<MultitenancyOptions>  
{
    private readonly IServiceScopeFactory _serviceScopeFactory;
    public ConfigureMultitenancyOptions(IServiceScopeFactory serivceScopeFactory)
    {
        _serviceScopeFactory = serivceScopeFactory;
    }

    public void Configure(MultitenancyOptions options)
    {
        using (var scope = _serviceScopeFactory.CreateScope())
        {
            var provider = scope.ServiceProvider;
            using (var dbContext = provider.GetRequiredService<ApplicationDbContext>())
            {
                options.AppTenants = dbContext.AppTenants.ToList();
            }
        }
    }
}

We then just need to register our configuration class in the normal ConfigureServices method, which becomes:

public void ConfigureServices(IServiceCollection services)  
{
    // add MVC, connection string etc

    services.AddSingleton<IConfigureOptions<MultitenancyOptions>, ConfigureMultitenancyOptions>();

    // add other services
}

The advantage of this approach is that the configuration class is created through the usual DI container, so can have dependencies injected simply through the constructor. There is still a slight complexity introduced by the fact we want MultitenancyOptions to have a singleton lifecycle. To prevent leaking a lifetime scope, we must inject an IServiceScopeFactory and create an explicit scope before retrieving our DbContext. Again, check out Julie Lerman's twitter conversation and associated post for more details on this.

The most important point here is that we are no longer calling BuildServiceProvider() in our Configure method, just to get a service we need. So just try and forget that I ever mentioned doing that ;)

Under the hood

In hindsight, I really should have guessed that this approach was possible, as the lambda approach is really just a specialised version of the IConfigureOptions approach.

Taking a look at the Options source code really shows how these two methods tie together. The Configure extension method on IServiceCollection that takes a lambda looks like the following (with precondition checks etc removed)

public static IServiceCollection Configure<TOptions>(  
    this IServiceCollection services, Action<TOptions> configureOptions)
{
    services.AddSingleton<IConfigureOptions<TOptions>>(new ConfigureOptions<TOptions>(configureOptions));
    return services;
}

All this method is doing is creating an instance of the ConfigureOptions<TOptions> class, passing in the configuration lambda, and registering that as a singleton. That looks suspiciously like our tidied up approach, the difference being that we left the instantiation of our ConfigureMultitenancyOptions to the DI system, instead of new-ing it up directly.

As is to be expected, the ConfigureOptions<TOptions>, which implements IConfigureOptions<TOptions> just calls the provided lambda in it's Configure method:

public class ConfigureOptions<TOptions> : IConfigureOptions<TOptions> where TOptions : class  
{
    public ConfigureOptions(Action<TOptions> action)
    {
        Action = action;
    }

    public Action<TOptions> Action { get; }

    public virtual void Configure(TOptions options)
    {
        Action.Invoke(options);
    }
}

So again, the only substantive difference between using the lambda approach and the IConfigureOptions approach is that the latter allows you to inject services into your options class to be used during configuration.

One final useful point to be ware of: you can register multiple instances of IConfigureOptions<TOptions> for the same TOptions. They will all be applied, and in the order they were added to the service collection in ConfigureServices. That allows you to do simple configuration in ConfigureServices using the Configure lambda, while using a separate implementation of IConfigureOptions elsewhere, if you're so inclined.

Viewing all 743 articles
Browse latest View live