Quantcast
Channel: Andrew Lock | .NET Escapades
Viewing all 759 articles
Browse latest View live

Upgrading a .NET 5 "Startup-based" app to .NET 6: Exploring .NET 6 - Part 12

$
0
0
Upgrading a .NET 5

In this short post I tackle a question I have received several times—"how can I update an ASP.NET Core 5 app that uses Startup to .NET 6's minimal hosting APIs"?

Background: Minimal Hosting in .NET 6

I've had quite a few emails recently from people about some of the changes introduced in .NET 6 which I've described in this series. Most of the questions are around the "minimal hosting" changes, and "minimal APIs", and what that means for their existing .NET 5 apps.

I've covered the new WebApplication and WebApplicationBuilder types a lot in this post, so if you're not familiar with them at all, I suggest looking at the second post in this series. In summary, your typical "empty" .NET 5 app goes from two files, Program.cs and Startup.cs, to just one, which contains something like the following:

var builder = WebApplication.CreateBuilder(args);

var app = builder.Build();

app.MapGet("/", () => "Hello World!");

app.Run();

There are many C# features that have gone into .NET 6 to really make this file as simple as possible, such as global using statements and top level programs, but the new WebApplication types are what really seem to trip people up.

The "problem", is that the templates (and, to be fair, many of the demos) put all the logic that used to be spread across at least two files and multiple methods into a single file.

The argument for doing that is sound enough—this is all "procedural" setup code, so why not just put it in a single "script-like" file, and avoid unneccessary layers of abstractions? The trouble is that for bigger apps, this file could definitely get chunky. So what do I recommend?

Option 1: Do nothing

If you have a .NET 5 app that you're upgrading to .NET 6, and you're worried about what to do about Program.cs and Startup.cs, then the simple answer is: don't do anything.

The "old" style startup using the generic host and Startup is completely supported. After all, under the hood, the new WebApplication hotness is just using the generic Host.. Literally, the only changes you will likely need to make are to update the target framework in your .csproj file and update some NuGet packages:

<Project Sdk="Microsoft.NET.Sdk.Web">

  <PropertyGroup>
    <!--               👇                 -->
    <TargetFramework>net6.0</TargetFramework>
  </PropertyGroup>

</Project>

Your Program.cs file will work as normal. Your Startup class will work as normal. Just enjoy those sweet performance improvements and move on 😄

Option 2: Re-use your Startup class

But what if you really want to use the new WebApplication-style, but don't want to put everything in Program.cs. I get it, it's shiny and new, but that file could get loooong, depending on how much work you're doing in your Startup class.

One approach you could take is to keep your Startup class, but call it manually, instead of using the magical UseStartup<T>() method. For example, let's assume your Startup class is relatively typical:

  • It takes an IConfigurationRoot in the constructor
  • It has a ConfigureServices() method for configuring DI
  • It has a Configure() method for configuring your middleware and endpoints, which includes other services injected from the built DI container (IHostApplicationLifetime in this case).

Overall, it probably looks something like this:

public class Startup
{
    public Startup(IConfigurationRoot configuration)
    {
        Configuration = configuration;
    }

    public IConfigurationRoot Configuration { get; }

    public void ConfigureServices(IServiceCollection services)
    {
        // ...
    }

    public void Configure(IApplicationBuilder app, IHostApplicationLifetime lifetime)
    {
        // ...
    }
}

With the pre-.NET 6 UseStartup<T> method used with generic hosting, the Startup class was magically created, and its methods were called automatically at the appropriate points. However, there's nothing to stop you doing the same steps "manually" with the new WebApplicationBuilder hosting model.

For example, if we start with the hello-world of minimal hosting:

var builder = WebApplication.CreateBuilder(args);
var app = builder.Build();
app.MapGet("/", () => "Hello World!");
app.Run();

We can update it to use our existing Startup class:

var builder = WebApplication.CreateBuilder(args);

// Manually create an instance of the Startup class
var startup = new Startup(builder.Configuration);

// Manually call ConfigureServices()
startup.ConfigureServices(builder.Services);

var app = builder.Build();

// Fetch all the dependencies from the DI container 
// var hostLifetime = app.Services.GetRequiredService<IHostApplicationLifetime>();
// As pointed out by DavidFowler, IHostApplicationLifetime is exposed directly on ApplicationBuilder

// Call Configure(), passing in the dependencies
startup.Configure(app, app.Lifetime);

app.Run();

This is probably the simplest approach to re-use your Startup class if you want to shift to the new WebApplication approach.

You need to be aware there are some small differences when you use WebApplication that may not be initially apparent. For example, you can't change settings like the app name or environment after you've created a WebApplicationBuilder. See the docs for more of these subtle differences.

Option 3: Local methods in Program.cs

If I was starting a new .NET 6 application, I probably wouldn't choose to create a Startup class, but I probably would add similar methods into my Program.cs file to give it some structure.

For example, a typical structure I would choose might look something like the following:

var builder = WebApplication.CreateBuilder(args);

ConfigureConfiguration(builder.configuration);
ConfigureServices(builder.Services);

var app = builder.Build();

ConfigureMiddleware(app, app.Services);
ConfigureEndpoints(app, app.Services);

app.Run();

void ConfigureConfiguration(ConfigurationManager configuration) => { }
void ConfigureServices(IServiceCollection services) => { }
void ConfigureMiddleware(IApplicationBuilder app, IServiceProvider services) => { }
void ConfigureEndpoints(IEndpointRouteBuilder app, IServiceProvider services) => { }

Overall, this looks very similar to the Startup-based version in Option 2, but I've removed some of the boilerplate of having a separate class. There's a few other things to note:

  • I have separate methods for setting up middleware and endpoint: the former are sensitive to order, and the latter are not, so I like to keep these separate.
  • I used the IApplicationBuilder and IEndpointRouteBuilder types in the method signatures to enforce it.
  • It's easy to update the method signatures or break these out if we need more flexibility .

Overall, I think this is as good a pattern as any in many cases, but it really doesn't matter - you can impose as little or as much structure here as you're comfortable with.

Bonus: Extract modules, use Carter

If you're really keen to use WebApplication, then it should be very easy to "inline" your Startup class into Program.cs, by copy-pasting the ConfigureServices() and Configure() methods into the right place, similar to the above.

Of course, at some point, you might realise that you were drunk with power, and your Program.cs is now a huge mess of configuration code and endpoints. What then?

One of the things some people like about the new hosting model is that it doesn't enforce any particular patterns or requirements on your code. That gives you a lot of scope to apply whatever patterns work for you.

Personally, I would prefer my frameworks to have fewer choices, to elect a "winner" pattern, and for projects to all look quite similar. The trouble is, historically, the "blessed" pattern in ASP.NET/ASP.NET Core has not been a great one. I'm looking at you Controllers folder…

One approach to tackle extract common features into "modules". This may be especially useful if you're using the minimal APIs, and don't want to have them all listed in Program.cs!

If by this point you're thinking "someone must already have a library for managing this", then you're in luck: Carter is what you're looking for.

Carter contains a variety of helper methods for working with minimal APIs, one of which is a handy "module" grouping (taken from their docs):

public class HomeModule : ICarterModule
{
    public void AddRoutes(IEndpointRouteBuilder app)
    {
        app.MapGet("/", () => "Hello from Carter!");
        app.MapGet("/conneg", (HttpResponse res) => res.Negotiate(new { Name = "Dave" }));
        app.MapPost("/validation", HandlePost);
    }

    private IResult HandlePost(HttpContext ctx, Person person, IDatabase database)
    {
        // ...
    }
}

You can use these modules to add some structure back to your application if you go too far destructuring your application from Web APIs to minimal APIs! If you're interested in Carter, I strongly suggest watching the introduction on the .NET community standup.

Summary

In this short post I described how to update a .NET 5 ASP.NET Core app to .NET 6. The simple approach is to ignore the minimal hosting WebApplicationBuilder APIs, and just update your target framework! If you want to use the minimal hosting APIs, but have a large Startup class you don't want to replace, I showed how you could call your Startup class directly. Finally, if you want to go the other way and add some structure to your minimal APIs, check out Carter!


Creating an incremental generator: Creating a source generator - Part 1

$
0
0
Creating an incremental generator

This post is my contribution to the .NET Advent calendar be sure to check there for other great posts!

In this post I describe how to create an incremental source generator. As a case study, I describe a source generator for generating an extension method for enums called ToStringFast(). This method is much faster than the built-in ToString() equivalent, and using a source generator means it's just as easy to use!

This is based on a source generator I created recently called NetEscapades.EnumGenerators. You can find it on GitHub or on NuGet.

I start by providing a small amount of background on source generators, and the problem with calling ToString() on an enum. For the remainder of the post, I walk step by step through creating an incremental generator. The final result is a working source generator, though with limitations, as I describe at the end of the post.

  1. Creating the Source generator project
  2. Collecting details about enums
  3. Adding a marker attribute
  4. Creating the incremental source generator
  5. Building the incremental generator pipeline
  6. Implementing the pipeline stages
  7. Parsing the EnumDeclarationSyntax to create an EnumToGenerate
  8. Generating the source code
  9. Limitations

Background: source generators

Source generators were added as a built-in feature in .NET 5. They perform code generation at compile time, providing the ability to add source code to your project automatically. This opens up a vast realm of possibilities, but the ability to use source generators to replace things that would otherwise need to be done using reflection is a firm favourite.

I've written many posts about source generators already, for example:

If you're completely new to source generators, I recommend this intro to source generators talk by Jason Bock given at .NET Conf. It's only half an hour (he has a longer version of the talk too) and it will get you up and running quickly.

In .NET 6, a new API was introduced for creating "incremental generators". These have broadly the same functionality as the source generators in .NET 5, but they are designed to take advantage of caching to significantly improve performance, so that your IDE doesn't slow down! The main downside to incremental generators is that they are only supported in the .NET 6 SDK (and so only in VS 2022).

The domain: enums and ToString()

The simple enum in c# is a handy little think for representing a choice of options. Under the hood, it's represented by a numeric value (typically an int), but instead of having to remember in your code that 0 represents "Red" and 1 represents "Blue", you can use an enum that holds that information for you:

public enum Colour // Yes, I'm British
{
    Red = 0,
    Blue = 1,
}

In your code, you pass instances of the enum Colour around, but behind the scenes the runtime really just uses an int. The trouble is, sometimes you want to get the name of the colour. The built-in way to do that is to call ToString()

public void PrintColour(Colour colour)
{
    Console.Writeline("You chose "+ colour.ToString()); // You chose Red
}

That probably is all well known to anyone reading this post. But it's maybe less common knowledge that this is sloooow. We'll look at how slow shortly, but first we'll look at a fast implementation, using modern C#:

public static class EnumExtensions
{
    public string ToStringFast(this Colour colour)
        => colour switch
        {
            Colour.Red => nameof(Colour.Red),
            Colour.Blue => nameof(Colour.Blue),
            _ => colour.ToString(),
        }
    }
}

This simple switch statement checks for each of the known values of Colour and uses nameof to return the textual representation of the enum. If it's an unknown value, then the underlying value is returned as a string.

You always have to be careful about these unknown values: for example this is valid C# PrintColour((Colour)123)

If we compare this simple switch statement to the default ToString() implementation using BenchmarkDotNet for a known colour, you can see how much faster our implementation is:

BenchmarkDotNet=v0.13.1, OS=Windows 10.0.19042.1348 (20H2/October2020Update)
Intel Core i7-7500U CPU 2.70GHz (Kaby Lake), 1 CPU, 4 logical and 2 physical cores
  DefaultJob : .NET Framework 4.8 (4.8.4420.0), X64 RyuJIT
.NET SDK=6.0.100
  DefaultJob : .NET 6.0.0 (6.0.21.52210), X64 RyuJIT
Method FX Mean Error StdDev Ratio Gen 0 Allocated
EnumToString net48 578.276 ns 3.3109 ns 3.0970 ns 1.000 0.0458 96 B
ToStringFast net48 3.091 ns 0.0567 ns 0.0443 ns 0.005 - -
EnumToString net6.0 17.9850 ns 0.1230 ns 0.1151 ns 1.000 0.0115 24 B
ToStringFast net6.0 0.1212 ns 0.0225 ns 0.0199 ns 0.007 - -

First off, it's worth pointing out that ToString() in .NET 6 is over 30× faster and allocates only a quarter of the bytes than the method in .NET Framework! Compare that to the "fast" version though, and it's still super slow!

As fast as it is, creating the ToStringFast() method is a bit of a pain, as you have to make sure to keep it up to date as your enum changes. Luckily, that's a perfect usecase for a source generator!

I'm aware of a couple of enum generators from the community, namely this one and this one, but neither of them did quite I wanted, so I made my own!

In this post, we'll walk through creating a source generator to generate the ToStringFast() method, using the new incremental source generators supported in the .NET 6 SDK.

1. Creating the Source generator project

To get started we need to create a C# project. Source generators must target netstandard2.0, and you'll need to add some standard packages to get access to the source generator types.

Start by creating a class library. The following uses the sdk to create a solution and a project in the current folder:

dotnet new sln -n NetEscapades.EnumGenerators
dotnet new classlib -o ./src/NetEscapades.EnumGenerators
dotnet sln add ./src/NetEscapades.EnumGenerators

Replace the contents of NetEscapades.EnumGenerators.csproj with the following. I've described what each of the properties do in comments:

<Project Sdk="Microsoft.NET.Sdk">

  <PropertyGroup>
    <!-- 👇 Source generators must target netstandard 2.0 -->
    <TargetFramework>netstandard2.0</TargetFramework> 
    <!-- 👇 We don't want to reference the source generator dll directly in consuming projects -->
    <IncludeBuildOutput>false</IncludeBuildOutput> 
    <!-- 👇 New project, why not! -->
    <Nullable>enable</Nullable>
    <ImplicitUsings>true</ImplicitUsings>
    <LangVersion>Latest</LangVersion>
  </PropertyGroup>

  <!-- The following libraries include the source generator interfaces and types we need -->
  <ItemGroup>
    <PackageReference Include="Microsoft.CodeAnalysis.Analyzers" Version="3.3.2" PrivateAssets="all" />
    <PackageReference Include="Microsoft.CodeAnalysis.CSharp" Version="4.0.1" PrivateAssets="all" />
  </ItemGroup>

  <!-- This ensures the library will be packaged as a source generator when we use `dotnet pack` -->
  <ItemGroup>
    <None Include="$(OutputPath)\$(AssemblyName).dll" Pack="true" 
        PackagePath="analyzers/dotnet/cs" Visible="false" />
  </ItemGroup>
</Project>

This is pretty much just all boilerplate for now, so lets get onto the code.

2. Collecting details about enums

Before we build the generator itself, lets consider the extension method we're trying to create. At a minimum, we need to know:

  • The full Type name of the enum
  • The name of all the values

And that's pretty much it. There's lots of more information we could collect for a better user experience, but for now, we'll stick with that, to get something working. Given that, we can create a simple type to hold the details about the enums we discover:

public readonly struct EnumToGenerate
{
    public readonly string Name;
    public readonly List<string> Values;

    public EnumToGenerate(string name, List<string> values)
    {
        Name = name;
        Values = values;
    }
}

3. Adding a marker attribute

We also need to think about how we are going to choose which enums to generate the extension methods for. We could do it for every enum in the project, but that seems a bit overkill. Instead, we could use a "marker attribute". A marker attribute is a simple attribute that doesn't have any functionality, and only exists so that something else (in this case, our source generator) can locate the type. Users would decorate their enum with the attribute, so we know to generate the extension method for it:

[EnumExtensions] // Our marker attribute
public enum Colour
{
    Red = 0,
    Blue = 1,
}

We'll create a simple marker attribute as shown below, but we're not going to define this attribute in code directly. Rather, we're creating a string containing c# code for the [EnumExtensions] marker attribute. We'll make the source generator automatically add this to the compilation of consuming projects at runtime so the attribute is available.

public static class SourceGenerationHelper
{
    public const string Attribute = @"
namespace NetEscapades.EnumGenerators
{
    [System.AttributeUsage(System.AttributeTargets.Enum)]
    public class EnumExtensionsAttribute : System.Attribute
    {
    }
}";
}

We'll be adding more to this SourceGenerationHelper class later, but for now it's time to create the actual generator itself.

4. Creating the incremental source generator

To create an incremental source generator, you need to do 3 things:

  1. Include the Microsoft.CodeAnalysis.CSharp package in your project. Note that incremental generators were introduced in version 4.0.0, and are only supported in .NET 6/VS 2022.
  2. Create a class that implements IIncrementalGenerator
  3. Decorate the class with the [Generator] attribute

We've already done the first step, so let's create our EnumGenerator implementation:

namespace NetEscapades.EnumGenerators;

[Generator]
public class EnumGenerator : IIncrementalGenerator
{
    public void Initialize(IncrementalGeneratorInitializationContext context)
    {
        // Add the marker attribute to the compilation
        context.RegisterPostInitializationOutput(ctx => ctx.AddSource(
            "EnumExtensionsAttribute.g.cs", 
            SourceText.From(SourceGenerationHelper.Attribute, Encoding.UTF8)));

        // TODO: implement the remainder of the source generator
    }
}

IIncrementalGenerator only requires you implement a single method, Initialize(). In this method you can register your "static" source code (like the marker attributes), as well as build a pipeline for identifying syntax of interest, and transforming that syntax into source code.

In the implementation above, I've already added the code that registers our marker attribute to the compilation. In the next section we'll build up the code to identify enums that have been decorated with the marker attribute.

5. Building the incremental generator pipeline

One of the key things to remember when building source generators, is that there are a lot of changes happening when you're writing source code. Every change the user makes could trigger the source generator to run again, so you have to be efficient, otherwise you're going to kill the user's IDE experience

This isn't just anecdotal, the preview versions of the [LoggerMessage] generator ran into exactly this problem.

The design of incremental generators is to create a "pipeline" of transforms and filters, memoizing the results at each layer to avoid re-doing work if there are no changes. It's important that the stage of the pipeline is very efficient, as this will be called a lot, ostensibly for every source code change. Later layers need to remain efficient, but there's more leeway there. If you've designed your pipeline well, later layers will only be called when users are editing code that matters to you.

I wrote about this design in a recent blog post.

With that in mind (and taking inspiration from the [LoggerMessage] generator) we'll create a simple generator pipeline that does the following:

  • Filter syntax to only enums which have one or more attributes. This should be very fast, and will contain all the enums we're interested in.
  • Filter syntax to only enums which have the [EnumExtensions] attribute. This is slightly more costly than the first stage, as it uses the semantic model (not just syntax), but is still not very expensive.
  • Extract all the information we need using the Compilation. This is the most expensive step, and it combines the Compilation for the project with the previously-selected enum syntax. This is where we can create our collection of EnumToGenerate, generate the source, and register it as a source generator output.

In code, the pipeline is shown below. The three steps above correspond to the IsSyntaxTargetForGeneration(), GetSemanticTargetForGeneration() and Execute() methods respectively, which we'll show in the next section.

namespace NetEscapades.EnumGenerators;

[Generator]
public class EnumGenerator : IIncrementalGenerator
{
    public void Initialize(IncrementalGeneratorInitializationContext context)
    {
        // Add the marker attribute
        context.RegisterPostInitializationOutput(ctx => ctx.AddSource(
            "EnumExtensionsAttribute.g.cs", 
            SourceText.From(SourceGenerationHelper.Attribute, Encoding.UTF8)));

        // Do a simple filter for enums
        IncrementalValuesProvider<EnumDeclarationSyntax> enumDeclarations = context.SyntaxProvider
            .CreateSyntaxProvider(
                predicate: static (s, _) => IsSyntaxTargetForGeneration(s), // select enums with attributes
                transform: static (ctx, _) => GetSemanticTargetForGeneration(ctx)) // sect the enum with the [EnumExtensions] attribute
            .Where(static m => m is not null)!; // filter out attributed enums that we don't care about

        // Combine the selected enums with the `Compilation`
        IncrementalValueProvider<(Compilation, ImmutableArray<EnumDeclarationSyntax>)> compilationAndEnums
            = context.CompilationProvider.Combine(enumDeclarations.Collect());

        // Generate the source using the compilation and enums
        context.RegisterSourceOutput(compilationAndEnums,
            static (spc, source) => Execute(source.Item1, source.Item2, spc));
    }
}

The first stage of the pipeline uses CreateSyntaxProvider() to filter the incoming list of syntax tokens. The predicate, IsSyntaxTargetForGeneration(), provides a first layer of filtering. The transform, GetSemanticTargetForGeneration(), can be used to transform the syntax tokens, but in this case we only use it to provide additional filtering after the predicate. The subsequent Where() clause looks like LINQ, but it's actually a method on IncrementalValuesProvider which does that second layer of filtering for us.

The next stage of the pipeline simply combines our collection of EnumDeclarationSyntax emitted from the first stage, with the current Compilation.

Finally, we use the combined tuple of (Compilation, ImmutableArray<EnumDeclarationSyntax>) to actually generate the source code for the EnumExtensions class, using the Execute() method.

Now let's take a look at each of those methods.

6. Implementing the pipeline stages

The first stage of the pipeline needs to be very fast, so we operate solely on the SyntaxNode passed in, filtering down to select only EnumDeclarationSyntax nodes, which have at least one attribute:

static bool IsSyntaxTargetForGeneration(SyntaxNode node)
    => node is EnumDeclarationSyntax m && m.AttributeLists.Count > 0;

As you can see, this is a very efficient predicate. It's using a simple pattern match to check the type of the node, and checking the properties.

In C# 10 you could also write that as node is EnumDeclarationSyntax { AttributeLists.Count: > 0 }, but personally I prefer the former.

After this efficient filtering has run, we can be a bit more critical. We don't want any attribute, we only want our specific marker attribute. In GetSemanticTargetForGeneration() we loop through each of the nodes that passed the previous test, and look for our marker attribute. If the node has the attribute, we return the node so it can take part in further generation. If the enum doesn't have the marker attribute, we return null, and filter it out in the next stage.

private const string EnumExtensionsAttribute = "NetEscapades.EnumGenerators.EnumExtensionsAttribute";

static EnumDeclarationSyntax? GetSemanticTargetForGeneration(GeneratorSyntaxContext context)
{
    // we know the node is a EnumDeclarationSyntax thanks to IsSyntaxTargetForGeneration
    var enumDeclarationSyntax = (EnumDeclarationSyntax)context.Node;

    // loop through all the attributes on the method
    foreach (AttributeListSyntax attributeListSyntax in enumDeclarationSyntax.AttributeLists)
    {
        foreach (AttributeSyntax attributeSyntax in attributeListSyntax.Attributes)
        {
            if (context.SemanticModel.GetSymbolInfo(attributeSyntax).Symbol is not IMethodSymbol attributeSymbol)
            {
                // weird, we couldn't get the symbol, ignore it
                continue;
            }

            INamedTypeSymbol attributeContainingTypeSymbol = attributeSymbol.ContainingType;
            string fullName = attributeContainingTypeSymbol.ToDisplayString();

            // Is the attribute the [EnumExtensions] attribute?
            if (fullName == "NetEscapades.EnumGenerators.EnumExtensionsAttribute")
            {
                // return the enum
                return enumDeclarationSyntax;
            }
        }
    }

    // we didn't find the attribute we were looking for
    return null;
}   

Note that we're still trying to be efficient where we can, so we're using foreach loops, rather than LINQ.

After we've run this stage of the pipeline, we will have a collection of EnumDeclarationSyntax that we know have the [EnumExtensions] attribute. In the Execute method, we create an EnumToGenerate to hold the details we need from each enum, pass that to our SourceGenerationHelper class to generate the source code, and add it to the compilation output

static void Execute(Compilation compilation, ImmutableArray<EnumDeclarationSyntax> enums, SourceProductionContext context)
{
    if (enums.IsDefaultOrEmpty)
    {
        // nothing to do yet
        return;
    }

    // I'm not sure if this is actually necessary, but `[LoggerMessage]` does it, so seems like a good idea!
    IEnumerable<EnumDeclarationSyntax> distinctEnums = enums.Distinct();

    // Convert each EnumDeclarationSyntax to an EnumToGenerate
    List<EnumToGenerate> enumsToGenerate = GetTypesToGenerate(compilation, distinctEnums, context.CancellationToken);

    // If there were errors in the EnumDeclarationSyntax, we won't create an
    // EnumToGenerate for it, so make sure we have something to generate
    if (enumsToGenerate.Count > 0)
    {
        // generate the source code and add it to the output
        string result = SourceGenerationHelper.GenerateExtensionClass(enumsToGenerate);
        context.AddSource("EnumExtensions.g.cs", SourceText.From(result, Encoding.UTF8));
    }
}

We're getting close now, we just have two more methods to fill in:GetTypesToGenerate(), and SourceGenerationHelper.GenerateExtensionClass().

7. Parsing the EnumDeclarationSyntax to create an EnumToGenerate

The GetTypesToGenerate() method is where most of the typical work associated with working with Roslyn happens. We need to use the combination of the syntax tree and the semantic Compilation to get the details we need, namely:

  • The full type name of the enum
  • The name of all the values in the enum

The following code loops through each of the EnumDeclarationSyntax and gathers that data.

static List<EnumToGenerate> GetTypesToGenerate(Compilation compilation, IEnumerable<EnumDeclarationSyntax> enums, CancellationToken ct)
{
    // Create a list to hold our output
    var enumsToGenerate = new List<EnumToGenerate>();
    // Get the semantic representation of our marker attribute 
    INamedTypeSymbol? enumAttribute = compilation.GetTypeByMetadataName("NetEscapades.EnumGenerators.EnumExtensionsAttribute");

    if (enumAttribute == null)
    {
        // If this is null, the compilation couldn't find the marker attribute type
        // which suggests there's something very wrong! Bail out..
        return enumsToGenerate;
    }

    foreach (EnumDeclarationSyntax enumDeclarationSyntax in enums)
    {
        // stop if we're asked to
        ct.ThrowIfCancellationRequested();

        // Get the semantic representation of the enum syntax
        SemanticModel semanticModel = compilation.GetSemanticModel(enumDeclarationSyntax.SyntaxTree);
        if (semanticModel.GetDeclaredSymbol(enumDeclarationSyntax) is not INamedTypeSymbol enumSymbol)
        {
            // something went wrong, bail out
            continue;
        }

        // Get the full type name of the enum e.g. Colour, 
        // or OuterClass<T>.Colour if it was nested in a generic type (for example)
        string enumName = enumSymbol.ToString();

        // Get all the members in the enum
        ImmutableArray<ISymbol> enumMembers = enumSymbol.GetMembers();
        var members = new List<string>(enumMembers.Length);

        // Get all the fields from the enum, and add their name to the list
        foreach (ISymbol member in enumMembers)
        {
            if (member is IFieldSymbol field && field.ConstantValue is not null)
            {
                members.Add(member.Name);
            }
        }

        // Create an EnumToGenerate for use in the generation phase
        enumsToGenerate.Add(new EnumToGenerate(enumName, members));
    }

    return enumsToGenerate;
}

The only thing remaining is to actually generate the source code from our List<EnumToGenerate>!

8. Generating the source code

The final method SourceGenerationHelper.GenerateExtensionClass() shows how we take our list of EnumToGenerate, and generate the EnumExtensions class. This one is relatively simple conceptually (though a little hard to visualise!), as it's just building up a string:

public static string GenerateExtensionClass(List<EnumToGenerate> enumsToGenerate)
{
    var sb = new StringBuilder();
    sb.Append(@"
namespace NetEscapades.EnumGenerators
{
    public static partial class EnumExtensions
    {");
    foreach(var enumToGenerate in enumsToGenerate)
    {
        sb.Append(@"
                public static string ToStringFast(this ").Append(enumToGenerate.Name).Append(@" value)
                    => value switch
                    {");
        foreach (var member in enumToGenerate.Values)
        {
            sb.Append(@"
                ").Append(enumToGenerate.Name).Append('.').Append(member)
                .Append(" => nameof(")
                .Append(enumToGenerate.Name).Append('.').Append(member).Append("),");
        }

        sb.Append(@"
                    _ => value.ToString(),
                };
");
    }

    sb.Append(@"
    }
}");

    return sb.ToString();
}

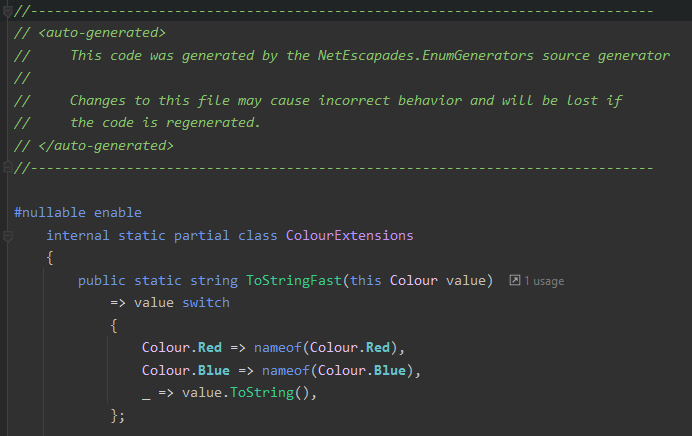
And we're done! We now have a fully functioning source generator. Adding the source generator to a project containing the Colour enum from the start of the post will create an extension method like the following:

public static class EnumExtensions
{
    public string ToStringFast(this Colour colour)
        => colour switch
        {
            Colour.Red => nameof(Colour.Red),
            Colour.Blue => nameof(Colour.Blue),
            _ => colour.ToString(),
        }
    }
}

Limitations

With your source generator complete, you can package it up by running dotnet pack -c Release, and upload to NuGet!

Hold on, don't actually do that.

There's a whole load of limitations to this code, not least the fact we haven't actually tested it yet. Off the top of my head:

  • The EnumExtensions class is always called the same thing, and is always in the same namespace. It would be nice for the user to be able to control that
  • We haven't considered the visibility of the enum. If the enum is internal, the generated code won't compile, as it's a public extension method
  • We should mark the code as autogenerated and with #nullable enable as the code formatting might not match the project conventions
  • We haven't tested it, so we don't know if it actually works!
  • Adding marker attributes directly to the compilation can sometimes be an issue, more about this one in a later post.

That said, this has hopefully still been useful. I will address many of the above issues in future posts, but the code in this post should provide a good framework if you're looking to create your own incremental generator.

Summary

In this post I described all the steps required to create an incremental generator. I showed how to create the project file, how to add a marker attribute to the compilation, how to implement IIncrementalGenerator, and how to keep performance in mind to ensure consumers of your generator don't experience lag in their IDE. The resulting implementation has many limitations, but it shows the basic process. In future posts in this series, we'll address many of these limitations.

You can find my NetEscapades.EnumGenerators project on GitHub, and the source code for the basic stripped down version of it used in this post in my blog samples.

Testing an incremental generator with snapshot testing: Creating a source generator - Part 2

$
0
0
Testing an incremental generator with snapshot testing

In my previous post, I showed in detail how to create a source generator, but I missed out one very important step: testing. In this post I describe one of the ways I like to test my source generators, by running the source generator manually against a known string and evaluating the output. Snapshot testing provides a great way to ensure your generator keeps working, and in this post I use the excellent Verify library.

Recap: the EnumExtensions generator

As a quick recap, in the previous post I discussed the problem with calling ToString() on an enum (it's slow), and described how we could use a source generator to create an extension method that provides the same functionality, but 100s of times faster.

So for a simple enum like the following:

public enum Colour
{
    Red = 0,
    Blue = 1,
}

we generate an extension method that looks like the following:

public static class EnumExtensions
{
    public string ToStringFast(this Colour colour)
        => colour switch
        {
            Colour.Red => nameof(Colour.Red),
            Colour.Blue => nameof(Colour.Blue),
            _ => colour.ToString(),
        }
    }
}

As you can see, this implementation consists of a simple switch expression, and makes use of the nameof keyword, so that doing Colour.Red.ToStringFast() returns "Red" as expected.

I'm not going to go over the implementation of the generator in this post, refer back to the previous post if that's what you're after.

Instead, in this post, we're going to look at a way of testing our source generator generates the right code. My preferred approach for this is to use "snapshot testing".

Snapshot testing for source generators

I haven't written about snapshot testing before, and this post is long enough without going into detail here but the concept is quite simple: instead of asserting against one or two properties, snapshot testing asserts a whole object (or other file) is identical to the expected result. There's a lot more to it than that, but it'll have to do for now!

Luckily, Dan Clarke recently wrote an excellent introduction to snapshot testing as his contribution to the .NET Advent Calendar!

As it turns out, source generators are a great fit for snapshot testing. Source generators are all about generating a deterministic output for a given input (the source code), and we always want that output to be exactly the same. By creating a "snapshot" of our required output and comparing the real output against it, we can be sure our source generator is working correctly

Now, you could write the code to do all this manually, but there's no need, as there's an excellent library to do that for you called Verify written by Simon Cropp. This library takes care of the serialization and comparison for you, handling file naming, and even integrating with diff-tools to make it simple to compare visualize the differences between your objects when a test fails.

Verify also has a whole host of extensions for snapshot testing almost anything: in-memory objects, EF Core queries, images, Blazor components, HTML, XAML, WinForms UIs, the list is seemingly endless! The extension we're interested in though is Verify.SourceGenerators.

I didn't realise that Verify had built-in support for testing generators until recently. Previously I had been "manually" using Verify, but when I heard Simon talking to Dan Clarke on the Unhandled Exception Podcast, I had to give it a try!

The extensions and helpers provided by Verify.SourceGenerators work with both "original" source generators (ISourceGenerator) and incremental source generators IIncrementalGenerator, and have two main benefits over the "manual" approach I was using previously:

  • They automatically handle multiple generated files being added to the compilation
  • They gracefully handle any diagnostics added to the compilation

For those reasons I'll be going through and updating any source generators I have to use his library!

That covers the basic of snapshot testing for now, so it's time to add a test project and start testing our incremental source generator!

1. Create a test project

I'm going to carry on from where I left off last time, in which we have a single project called NetEscapades.EnumGenerators in a solution. This project contains our source generator.

In the following script I do the following:

  • Create an xunit test project
  • Add it to the solution
  • Add a reference to the src project from the test project
  • Add some packages that we need to the test project:
    • Microsoft.CodeAnalysis.CSharp and Microsoft.CodeAnalysis.Analyzers contain methods for running a source generator in memory and examining the output.
    • Verify.XUnit contains the Verify snapshot testing integration for xunit. There are equivalent adapters for other testing frameworks
    • Verify.SourceGenerators contains the extensions to Verify specifically for working with source generators. This isn't required, but makes things a lot easier!
dotnet new xunit -o ./tests/NetEscapades.EnumGenerators.Tests
dotnet sln add ./tests/NetEscapades.EnumGenerators.Tests
dotnet add ./tests/NetEscapades.EnumGenerators.Tests reference ./src/NetEscapades.EnumGenerators
# Add some helper packages to the test project
dotnet add ./tests/NetEscapades.EnumGenerators.Tests package Microsoft.CodeAnalysis.CSharp
dotnet add ./tests/NetEscapades.EnumGenerators.Tests package Microsoft.CodeAnalysis.Analyzers
dotnet add ./tests/NetEscapades.EnumGenerators.Tests package Verify.SourceGenerators
dotnet add ./tests/NetEscapades.EnumGenerators.Tests package Verify.XUnit

After running the above script, your test project's .csproj file should look something like the following

<Project Sdk="Microsoft.NET.Sdk">

  <PropertyGroup>
    <TargetFramework>net6.0</TargetFramework>
    <Nullable>enable</Nullable>
    <IsPackable>false</IsPackable>
    <ImplicitUsings>true</ImplicitUsings>
  </PropertyGroup>

  <!-- Add these 👇 to the base template  -->
  <ItemGroup>
    <PackageReference Include="Verify.XUnit" Version="14.7.0" />
    <PackageReference Include="Verify.SourceGenerators" Version="1.2.0" />
    <PackageReference Include="Microsoft.CodeAnalysis.Analyzers" Version="3.3.2" PrivateAssets="all" />
    <PackageReference Include="Microsoft.CodeAnalysis.CSharp" Version="4.0.1" PrivateAssets="all" />
  </ItemGroup>

  <!-- Add  👇 a reference to the generator project  -->
  <ItemGroup>
    <ProjectReference Include="..\..\src\NetEscapades.EnumGenerators\NetEscapades.EnumGenerators.csproj" />
  </ItemGroup>

  <!-- 👇 These are all part of the base template  -->
  <ItemGroup>
    <PackageReference Include="Microsoft.NET.Test.Sdk" Version="16.11.0" />
    <PackageReference Include="xunit" Version="2.4.1" />
    <PackageReference Include="xunit.runner.visualstudio" Version="2.4.3">
      <IncludeAssets>runtime; build; native; contentfiles; analyzers; buildtransitive</IncludeAssets>
      <PrivateAssets>all</PrivateAssets>
    </PackageReference>
    <PackageReference Include="coverlet.collector" Version="3.1.0">
      <IncludeAssets>runtime; build; native; contentfiles; analyzers; buildtransitive</IncludeAssets>
      <PrivateAssets>all</PrivateAssets>
    </PackageReference>
  </ItemGroup>

</Project>

Now we have all the dependencies installed lets write a test!

2. Create a simple snapshot test

Testing a source generator takes a little bit of set-up, so we're going to create a helper class that creates a Compilation from a string, runs our source generator on it, and then uses snapshot testing to test the output.

Before we get to that, let's see what our test is going to look like:

using VerifyXunit;
using Xunit;

namespace NetEscapades.EnumGenerators.Tests;

[UsesVerify] // 👈 Adds hooks for Verify into XUnit
public class EnumGeneratorSnapshotTests
{
    [Fact]
    public Task GeneratesEnumExtensionsCorrectly()
    {
        // The source code to test
        var source = @"
using NetEscapades.EnumGenerators;

[EnumExtensions]
public enum Colour
{
    Red = 0,
    Blue = 1,
}";

        // Pass the source code to our helper and snapshot test the output
        return TestHelper.Verify(source);
    }
}

Out TestHelper is doing all the work here, so rather than bury the lede, the following shows the initial implementation, annotated to describe what's going on

using Microsoft.CodeAnalysis;
using Microsoft.CodeAnalysis.CSharp;
using VerifyXunit;

namespace NetEscapades.EnumGenerators.Tests;

public static class TestHelper
{
    public static Task Verify(string source)
    {
        // Parse the provided string into a C# syntax tree
        SyntaxTree syntaxTree = CSharpSyntaxTree.ParseText(source);

        // Create a Roslyn compilation for the syntax tree.
        CSharpCompilation compilation = CSharpCompilation.Create(
            assemblyName: "Tests",
            syntaxTrees: new[] { syntaxTree });


        // Create an instance of our EnumGenerator incremental source generator
        var generator = new EnumGenerator();

        // The GeneratorDriver is used to run our generator against a compilation
        GeneratorDriver driver = CSharpGeneratorDriver.Create(generator);

        // Run the source generator!
        driver = driver.RunGenerators(compilation);

        // Use verify to snapshot test the source generator output!
        return Verifier.Verify(driver);
    }
}

If you run your snapshot test, Verify will attempt to compare a snapshot of the GeneratorDriver output with an existing snapshot. As this is the first time you're running the test, the test will fail, so Verify will automatically pop open your default diff tool, in my case VS Code. However, the diff probably doesn't show what you're expecting!

Diff tool showing {} in the left pane, and an empty right pane

The right-hand pane is empty, as we don't have an existing snapshot. But rather than showing our source generator output on the left, we only see {}. It looks like something went wrong.

Well, it turns out, that's because I didn't read the docs. The Verify.SourceGenerators readme very clearly states that you need to initialize the converters for handling source generator outputs, by calling VerifySourceGenerators.Enable(); once for the assembly.

The correct way to do this in modern c# is to use a [ModuleInitializer] attribute. As described in the spec, this code will run once, before any other code in your assembly.

You can create a module initializer by decorating any static void method in your project with the [ModuleInitializer] attribute. In our case, we would do the following:

using System.Runtime.CompilerServices;
using VerifyTests;

namespace NetEscapades.EnumGenerators.Tests;

public static class ModuleInitializer
{
    [ModuleInitializer]
    public static void Init()
    {
        VerifySourceGenerators.Enable();
    }
}

Note that module initializers are a C#9 feature, which means you can use them even if you're targeting older versions of .NET. However the [ModuleInitializer] attribute is only available in .NET 5+. If you're targeting older versions of .NET, create your own implementation of the attribute, similar to the approach I describe in this post for the [DoesNotReturn] attribute.

After adding the initializer, if we run our test again, we get something that looks a bit better: it's our custom [EnumExtensions] attribute we added to the compilation as part of our source generator:

Diff tool showing the EnumExtensionsAttribute in the left pane, and an empty right pane

This attribute looks like what we're expecting, but there's still something wrong; there is no other generated source code. Our source generator has added the attribute, but it should also be generating an EnumExtensions class. 🤔

3. Debugging a failure: missing references

The good thing about testing source generators like this is that they're super easy to debug. No need to start up separate instances of your IDE or anything like that. You're literally running the source generator in the context of the unit test, so you can just hit "Debug" on the test in your IDE (I'm using JetBrains Rider) and step through the code!

Given that the test isn't throwing an exception, it's just not generating the correct output, I suspected that my logic must be wrong somewhere in the source generator. I placed a breakpoint in GetSemanticTargetForGeneration() the first "transform" methods in our incremental generator pipeline. I then started debugging, and checked to see that we hit the breakpoint.

JetBrains Rider debugging the source generator, we have hit a breakpoint

As you can see above, we've hit the breakpoint in GetSemanticTargetForGeneration() and the enumDeclarationSyntax variable contains the Colour enum from our test code, so everything is looking good so far. I stepped through the method, in which we loop over the attributes on the enum declaration, trying to find our [EnumExtensions] attribute. However, strangely, an attempt to use the SemanticModel to access the Symbol of the [EnumExtensions] syntax returned null so we bailed out! This explains how our source generator was failing. The next question is, why?

context.SemanticModel.GetSymbolInfo(attributeSyntax).Symbol was null

Before I stopped debugging I checked the values of context.SemanticModel.GetSymbolInfo(attributeSyntax).CandidateSymbols using the immediate window. This returned a single value, so the failure wasn't due to ambiguity or some similar problem. Checking context.SemanticModel.GetSymbolInfo(attributeSyntax).CandidateReason returned NotAnAttributeType.

eh? NotAnAttributeType?

After a bit of digging I realised that the problem was that the compilation doesn't have any references by default. That meant that it couldn't find System.Attribute, so it couldn't create the [EnumExtensions] attribute correctly. The solution was to update my TestHelper to add a reference to the right dll. I created a reference to the assembly containing object (System.Private.CoreLib here), and added that to the compilation. The full TestHelper class becomes:

using Microsoft.CodeAnalysis;
using Microsoft.CodeAnalysis.CSharp;
using VerifyXunit;

namespace NetEscapades.EnumGenerators.Tests;

public static class TestHelper
{
    public static Task Verify(string source)
    {
        SyntaxTree syntaxTree = CSharpSyntaxTree.ParseText(source);
        // Create references for assemblies we require
        // We could add multiple references if required
        IEnumerable<PortableExecutableReference> references = new[]
        {
            MetadataReference.CreateFromFile(typeof(object).Assembly.Location)
        };

        CSharpCompilation compilation = CSharpCompilation.Create(
            assemblyName: "Tests",
            syntaxTrees: new[] { syntaxTree },
            references: references); // 👈 pass the references to the compilation

        EnumGenerator generator = new EnumGenerator();

        GeneratorDriver driver = CSharpGeneratorDriver.Create(generator);

        driver = driver.RunGenerators(compilation);

        return Verifier
            .Verify(driver)
            .UseDirectory("Snapshots");
    }
}

After making this change and running the test, Verify pops open our diff-tool again, and this time it contains two diffs—the [EnumExtensions] attribute as before, but also the generated EnumExtensions class:

The generated source code

At this point we can accept the verified file diffs, which will save them to disk. You can either manually copy the diffs across from one side to the other, or you can run the command that Verify puts into the clipboard at a terminal, e.g.

cmd /c del "C:\repo\sourcegen\tests\NetEscapades.EnumGenerators.Tests\EnumGeneratorSnapshotTests.GeneratesEnumExtensionsCorrectly.00.verified.txt"
cmd /c del "C:\repo\sourcegen\tests\NetEscapades.EnumGenerators.Tests\EnumGeneratorSnapshotTests.GeneratesEnumExtensionsCorrectly.02.verified.cs"
cmd /c del "C:\repo\sourcegen\tests\NetEscapades.EnumGenerators.Tests\EnumGeneratorSnapshotTests.GeneratesEnumExtensionsCorrectly.verified.cs"
cmd /c del "C:\repo\sourcegen\tests\NetEscapades.EnumGenerators.Tests\EnumGeneratorSnapshotTests.GeneratesEnumExtensionsCorrectly.verified.txt"
cmd /c move /Y "C:\repo\sourcegen\tests\NetEscapades.EnumGenerators.Tests\EnumGeneratorSnapshotTests.GeneratesEnumExtensionsCorrectly.00.received.cs" "C:\repo\sourcegen\tests\NetEscapades.EnumGenerators.Tests\EnumGeneratorSnapshotTests.GeneratesEnumExtensionsCorrectly.00.verified.cs"
cmd /c move /Y "C:\repo\sourcegen\tests\NetEscapades.EnumGenerators.Tests\EnumGeneratorSnapshotTests.GeneratesEnumExtensionsCorrectly.01.received.cs" "C:\repo\sourcegen\tests\NetEscapades.EnumGenerators.Tests\EnumGeneratorSnapshotTests.GeneratesEnumExtensionsCorrectly.01.verified.cs"

Now that we've updated our snapshots, if we run the tests again, the snapshot tests will pass! 🎉

4. Moar tests

Now that we've written a single snapshot test for our source generator, it's trivial to add some more. I decided to test the following cases:

  • enum without the attribute—doesn't generate the extension method
  • enum missing the correct namespace import—doesn't generate the extension method
  • Two enums in the file —generates extensions for both enums
  • Two enums, one without an attribute—only generates an extension for the attributed enum

You can find the source code for these examples on GitHub, but they look virtually identical to our existing test. The only thing that changes are the test source code and the snapshots.

5. Testing diagnostics

One aspect of source generators we haven't looked at yet is diagnostics. Source generators also act as analyzers, so they can report problems in user's source code. This is useful if you need to tell a user that they're using your generator incorrectly in some way, for example.

We don't have any diagnostics in our source generator, but just to demonstrate that they work well with snapshot testing, we'll add a dummy one in!

First we'll create a helper method to generate a diagnostic for an enum in the source generator:

static Diagnostic CreateDiagnostic(EnumDeclarationSyntax syntax)
{
    var descriptor = new DiagnosticDescriptor(
        id: "TEST01",
        title: "A test diagnostic",
        messageFormat: "A description about the problem",
        category: "tests",
        defaultSeverity: DiagnosticSeverity.Warning,
        isEnabledByDefault: true);

    return Diagnostic.Create(descriptor, syntax.GetLocation());
}

Next, we'll call that method to create a diagnostic in the Execute() method of our source generator, and register it with the output using the SourceProductionContext provided to the method:

static void Execute(Compilation compilation, ImmutableArray<EnumDeclarationSyntax> enums, SourceProductionContext context)
{
    if (enums.IsDefaultOrEmpty)
    {
        return;
    }

    // Add a dummy diagnostic
    context.ReportDiagnostic(CreateDiagnostic(enums[0]));

    // ...
}

Remember, this is just to demonstrate snapshot testing, we don't really want random diagnostics appearing!

If we re-run our tests, we'll now get failures. Verify extracts both the additional source code added to the compilation and the diagnostics. The Diagnostic is a C# object, so it's serialized to a JSON-ish document, something like the following:

{
  Diagnostics: [
    {
      Id: TEST01,
      Title: A test diagnostic,
      Severity: Warning,
      WarningLevel: 1,
      Location: : (3,0)-(8,1),
      MessageFormat: A description about the problem,
      Message: A description about the problem,
      Category: tests
    }
  ]
}

Verify fires up the diff tool one more time, and shows that there's now an additional file for the tests, the diagnostic:

Diff tool showing the serialized diagnostic in the left pane, and an empty right pane

Source generators seem like an almost perfect use-case for snapshot testing, given that there's normally a very specific, deterministic output that you want for a given input. Obviously you can architect your source generators for more granular unit testing, but for the most part I find snapshot testing with a bit of debugging where necessary gives me everything I need!

Summary

In this post I showed how to use snapshot testing to test the source generator I created in my previous post. I gave a brief introduction to snapshot testing, and then showed how you can use Verify.SourceGenerators to test your generator output. We debugged through a couple of issues, and finally demonstrated that Verify handles both diagnostics and syntax trees that your source generator creates.

Integration testing and NuGet packaging: Creating a source generator - Part 3

$
0
0
Integration testing and NuGet packaging

In the first post in this series, I described how to create a .NET 6 incremental source generator, and in the second post I described how to unit-test your generators using snapshot testing with Verify. These are essential first steps to building a source generator, and the snapshot testing provides a quick, easily-debuggable testing approach.

Another essential part of testing your package is integration testing. By that, I mean testing the source generator as it will be used in practice, as part of a project's compilation process. Similarly, if you are going to ship your source generator as a NuGet package, then you should test that the NuGet package is working correctly when used by consuming projects.

In this post, I'm going to do 3 things for the source generator I've been creating in this series:

  • Create an integration test project
  • Create a NuGet package
  • Test the NuGet package in an integration test project

Everything in this post builds on the work in the earlier posts, so make sure to refer back to those if you find something confusing!

  1. Create the integration test project
  2. Add the integration test
  3. Create a NuGet package
  4. Creating a local NuGet package source with a custom NuGet config
  5. Add a NuGet package test project
  6. Run the NuGet package integration test

1. Create the integration test project

The first step is to create the integration test project. The following script creates a new xunit test project, adds it to the solution, and adds a reference to the source generator project:

dotnet new xunit -o ./tests/NetEscapades.EnumGenerators.IntegrationTests
dotnet sln add ./tests/NetEscapades.EnumGenerators.IntegrationTests
dotnet add ./tests/NetEscapades.EnumGenerators.IntegrationTests reference ./src/NetEscapades.EnumGenerators

This creates a normal project reference between the test project and the source generator project, something like this following:

<ProjectReference Include="..\..\src\NetEscapades.EnumGenerators\NetEscapades.EnumGenerators.csproj" />

Unfortunately, for source generator (or analyzer) projects, you need to tweak this element slightly so that it works correctly. Specifically, you need to add the OutputItemType and ReferenceOutputAssembly attributes

  • OutputItemType="Analyzer" tells the compiler to load the project as part of the compilation process.
  • ReferenceOutputAssembly="false" tells the project not to reference the source generator project's dll

This gives a project reference similar to the following:

<ProjectReference Include="..\..\src\NetEscapades.EnumGenerators\NetEscapades.EnumGenerators.csproj"
    OutputItemType="Analyzer" ReferenceOutputAssembly="false" />

With these changes, your integration test project should look something like the following:

<Project Sdk="Microsoft.NET.Sdk">

  <PropertyGroup>
    <TargetFramework>net6.0</TargetFramework>
    <Nullable>enable</Nullable>
    <IsPackable>false</IsPackable>
  </PropertyGroup>

  <ItemGroup>
    <!-- 👇 This project reference is added by the script...-->
    <ProjectReference Include="..\..\src\NetEscapades.EnumGenerators\NetEscapades.EnumGenerators.csproj"
                      OutputItemType="Analyzer" ReferenceOutputAssembly="false" />
                <!-- 👆 But you need to add these attributes yourself-->
  </ItemGroup>

  <!-- 👇 Added in the template by default -->
  <ItemGroup>
    <PackageReference Include="Microsoft.NET.Test.Sdk" Version="16.11.0" />
    <PackageReference Include="xunit" Version="2.4.1" />
    <PackageReference Include="xunit.runner.visualstudio" Version="2.4.3">
      <IncludeAssets>runtime; build; native; contentfiles; analyzers; buildtransitive</IncludeAssets>
      <PrivateAssets>all</PrivateAssets>
    </PackageReference>
    <PackageReference Include="coverlet.collector" Version="3.1.0">
      <IncludeAssets>runtime; build; native; contentfiles; analyzers; buildtransitive</IncludeAssets>
      <PrivateAssets>all</PrivateAssets>
    </PackageReference>
  </ItemGroup>

</Project>

With the project file sorted, let's add some basic tests to confirm the source generator is working correctly!

2. Add the integration test

The first thing we need for our tests is an enum for the source generator to create an extension class. The following is a super basic one, but note that I've given it the [Flags] attribute for extra complexity. This isn't necessary but it's a slightly more complex example for our tests which we want to make sure to handle:

using System;

namespace NetEscapades.EnumGenerators.IntegrationTests;

[EnumExtensions]
[Flags]
public enum Colour
{
    Red = 1,
    Blue = 2,
    Green = 4,
}

For our initial tests, we're simply going to confirm two things:

  1. The source generator generates an extension method called ToStringFast() when an enum is decorated with the [EnumExtensions] attribute.
  2. The result of calling ToStringFast() is the same as calling ToString().

The following test does just that. It tests 5 different values for the Colour enum, including:

  • Valid values (Color.Red)
  • Invalid values ((Colour)15)
  • Composite value (Colour.Green | Colour.Blue)

This test confirms both that the extension exists (otherwise it wouldn't compile) and that we get the expected results for all the above values:

using Xunit;

namespace NetEscapades.EnumGenerators.IntegrationTests;

public class EnumExtensionsTests
{
    [Theory]
    [InlineData(Colour.Red)]
    [InlineData(Colour.Green)]
    [InlineData(Colour.Green | Colour.Blue)]
    [InlineData((Colour)15)]
    [InlineData((Colour)0)]
    public void FastToStringIsSameAsToString(Colour value)
    {
        var expected = value.ToString();
        var actual = value.ToStringFast();

        Assert.Equal(expected, actual);
    }
}

And that's it. We can run all our tests by running dotnet test on the solution.

Note that if you make changes to your source generator you may need to close and re-open your IDE before your integration test project respects the changes.

If you're creating a source generator for a specific project, then this level of integration test may be all you need. However, if you're planning on sharing the source generator more widely, then you will likely want to create a NuGet package.

3. Create a NuGet package

Creating a NuGet package from a source generator is similar to a NuGet package for a standard library, but the contents of the NuGet package will be laid out differently. Specifically, you have to:

  • Ensure the build output ends up in the analyzers/dotnet/cs folder in the NuGet package.
  • Ensure the dll doesn't end up in the "normal" folder in the NuGet package.

For the first point, ensure you have the following <ItemGroup> in your project:

<ItemGroup>
  <None Include="$(OutputPath)\$(AssemblyName).dll" Pack="true" 
      PackagePath="analyzers/dotnet/cs" Visible="false" />
</ItemGroup>

This will ensure the source generator assembly is packed into the correct location in the NuGet package, so that the compiler will load it as an analyzer/source generator.

You should also set the property IncludeBuildOutput to false, so that the consuming project doesn't get a reference to the source generator dll itself:

<PropertyGroup>
  <IncludeBuildOutput>false</IncludeBuildOutput>
</PropertyGroup>

With that, you can simply dotnet pack the project. In the following example, I set the version number to 0.1.0-beta, and ensure the output is put into the folder ./artifacts:

dotnet pack -c Release -o ./artifacts -p:Version=0.1.0-beta

This will produce a NuGet package called something like:

NetEscapades.EnumGenerators.0.1.0-beta.nupkg

If you open the package in NuGet package explorer, the layout should be as shown in the following image, with the dll inside the analyzers/dotnet/cs folder, with no other dlls/folders included.

The NuGet package layout

Now, testing this package is where things get tricky. We don't want to push the NuGet package to a repository before we've tested it. We also don't want to "pollute" our local NuGet cache with this package. That requires jumping through a few hoops.

4. Creating a local NuGet package source with a custom NuGet config

First off, we need to create a local NuGet package source. By default, when you run dotnet restore, packages are restored from nuget.org, but we want to ensure our NuGet test project uses the local test package. That means we need to configure a custom restore source.

The typical way to do this is to create a nuget.config file, and list the additional sources. You can include both remote sources (like nuget.org, or private NuGet feeds like myget.org) and "local" sources, which are just a folder of NuGet packages. That latter option is exactly what we want.

However, for our testing we don't necessarily want to create a config file with the "default" nuget.config name, as otherwise that source would be used for restoring everything in our solution. Ideally, we only want to use the local source with our beta package for this one NuGet integration test project. To achieve that, we give our config file a different name so that it's not used automatically, and we will explicitly specify this name where necessary.

The following script creates a nuget.config file, renames it to nuget.integration-tests.config, and adds the ./artifacts directory as a nuget source called local-packages (where we packaged our test NuGet package):

dotnet new nugetconfig 
mv nuget.config nuget.integration-tests.config
dotnet nuget add source ./artifacts -n local-packages --configfile nuget.integration-tests.config

The resulting nuget.integration-tests.config file looks like this:

<?xml version="1.0" encoding="utf-8"?>
<configuration>
  <packageSources>
    <!--To inherit the global NuGet package sources remove the <clear/> line below -->
    <clear />
    <add key="nuget" value="https://api.nuget.org/v3/index.json" />
    <add key="local-packages" value="./artifacts" />
  </packageSources>
</configuration>

Now we have the config file it's time to create our NuGet-integration-test project.

6. Add a NuGet package test project

In the first part of this post we created an integration test project, to confirm the source generator worked correctly when running "inline" in the compiler. For the NuGet package tests I'm going to use a little MSBuild trickery to use exactly the same test files in the NuGet package test as the "normal" integration test, to reduce the duplication and ensure consistency.

The following script creates a new xunit test project, and adds a reference to our test NuGet package:

dotnet new xunit -o ./tests/NetEscapades.EnumGenerators.NugetIntegrationTests
dotnet add ./tests/NetEscapades.EnumGenerators.NugetIntegrationTests package NetEscapades.EnumGenerators --version 0.1.0-beta

Note that we're not adding this project to the solution file, so it's not part of the normal restore/build/test dev cycle. This simplifies several things, and as we already have the integration test, that's not a big problem. This project tests that the NuGet package is being created correctly, but I think it's fine to only do that as part of the CI process.

Another option is to add the project to the solution, but remove the project from all the solution's build configurations.

After running the above script, we need to make some manual changes to the .csproj file to include all the C# files from the "normal" integration test project in this NuGet integration test project. To do that, we can use a <Compile> element, with a wildcard for the Include attribute referencing the other project's .cs files. The resulting project file should look something like this:

<Project Sdk="Microsoft.NET.Sdk">

  <PropertyGroup>
    <TargetFramework>net6.0</TargetFramework>
    <Nullable>enable</Nullable>
    <IsPackable>false</IsPackable>
  </PropertyGroup>

  <!-- 👇 Add the temporary package -->
  <ItemGroup>
    <PackageReference Include="NetEscapades.EnumGenerators" Version="0.1.0-beta" />
  </ItemGroup>

  <!-- 👇 Link in all the files from the integration test project, so we run the same tests -->
  <ItemGroup>
    <Compile Include="..\NetEscapades.EnumGenerators.IntegrationTests\*.cs" Link="%(Filename)%(Extension)"/>
  </ItemGroup>

  <!-- Standard packages from the template -->
  <ItemGroup>
    <PackageReference Include="Microsoft.NET.Test.Sdk" Version="16.11.0" />
    <PackageReference Include="xunit" Version="2.4.1" />
    <PackageReference Include="xunit.runner.visualstudio" Version="2.4.3">
      <IncludeAssets>runtime; build; native; contentfiles; analyzers; buildtransitive</IncludeAssets>
      <PrivateAssets>all</PrivateAssets>
    </PackageReference>
    <PackageReference Include="coverlet.collector" Version="3.1.0">
      <IncludeAssets>runtime; build; native; contentfiles; analyzers; buildtransitive</IncludeAssets>
      <PrivateAssets>all</PrivateAssets>
    </PackageReference>
  </ItemGroup>

</Project>

And that's it. This project literally consists of a project file and the nuget.integration-tests.config config file. All that remains is to run it.

7. Run the NuGet package integration test

Unfortunately, running the project is another case where we need to be careful. We don't want to "pollute" our machine NuGet caches with the test NuGet package, and we need to use our custom nuget.config file. That requires running the restore/build/test steps all separately, passing the required command switches where necessary.

To make sure we don't pollute our NuGet caches with the test package, we restore NuGet packages to a local folder, ./packages. This will use a lot more drive space and network during restore (as you'll be pulling NuGet packages that are already cached elsewhere to this folder). But trust me, it's absolutely worth doing. If you don't, you're setting yourself up for confusing errors down the line, when you can't update your test package, or some completely separate project starts using your test package!

The following script runs the restore/build/test for the NuGet integration test project. It assumes that you've already built the NuGet package as described in section 3.

# Restore the project using the custom config file, restoring packages to a local folder
dotnet restore ./tests/NetEscapades.EnumGenerators.NugetIntegrationTests --packages ./packages --configfile "nuget.integration-tests.config" 

# Build the project (no restore), using the packages restored to the local folder
dotnet build ./tests/NetEscapades.EnumGenerators.NugetIntegrationTests -c Release --packages ./packages --no-restore

# Test the project (no build or restore)
dotnet test ./tests/NetEscapades.EnumGenerators.NugetIntegrationTests -c Release --no-build --no-restore 

If all has gone well, your tests should pass, and you can be confident that the NuGet package you created is correctly built and ready for distribution!

Summary

In this post I showed how to create an integration test project for a source generator by using a project reference, running the generator as part of the compiler, just as you would for a normal reference. I also showed how to create a NuGet package for your source generator, and how to create an integration test for your package, to ensure it's been created correctly. This latter process is more complicated, as you have to be careful not to pollute your local NuGet package caches with the test package.

Customising generated code with marker attributes: Creating a source generator - Part 4

$
0
0
Customising generated code with marker attributes

In the previous posts in this series I showed how to create an incremental source generator, how to unit and integration test it, and how to package it in a NuGet package. In this post I describe how to customise the source generator's behaviour by extending the marker attribute with additional properties.

Extending the source generator marker attribute

One of the first steps for any source generator is to identify which code in the project needs to partake in the source generation. The source generator might look for specific types or members, but another common approach is to use a marker attribute. This is the approach I described in the first post in this series.

The [EnumExtensions] attribute I described in the first post was a simple attribute with no other properties. That meant there was no way to customise the code generated by the source generator. That was one of the limitations I discussed at the end of the post.

A common way to provide this functionality is to add additional properties to the marker attribute. In this post, I'm going to show how to do this for a single setting—the name of the extension method class to generate.

By default, the name EnumExtensions is used for the extension method class. With this change, you'll be able to specify an alternative name by setting the ExtensionClassName property. For example the following:

[EnumExtensions(ExtensionClassName = "DirectionExtensions")]
public enum Direction
{
    Left,
    Right,
    Up,
    Down,
}

would generate a class called DirectionExtensions, that looks something like this:

//HintName: EnumExtensions.g.cs

namespace NetEscapades.EnumGenerators
{
    public static partial class DirectionExtensions // 👈 Note the custom name
    {
        public static string ToStringFast(this Direction value)
            => value switch
            {
                Direction.Left => nameof(Direction.Left),
                Direction.Right => nameof(Direction.Right),
                Direction.Up => nameof(Direction.Up),
                Direction.Down => nameof(Direction.Down),
                _ => value.ToString(),
            };
    }
}

For the remainder of the post, I'll walk through the changes needed to the original source generator to achieve this.

I'm not going to show the full code for the source generator here, just the incremental changes over the original in the first post. You can find the full code on GitHub.

1. Update the marker attribute

The first step is to update the marker attribute with the new property:

[System.AttributeUsage(System.AttributeTargets.Enum)]
public class EnumExtensionsAttribute : System.Attribute
{
    public string ExtensionClassName { get; set; } // 👈 New property
}

This marker attribute is automatically added to the compilation by the source generator, as described in the first post, so we're actually updating a string here rather than an attribute. If you want to add more customisation, like the ability to customise the generated code's namespace for example, then you can add extra properties to this attribute.

2. Allow setting separate extension class name for each enum

With this change, users can now set a different name for the extension class for each enum, so we need to record the extension name when we're extracting the details about the enum into an EnumToGenerate object:

public readonly struct EnumToGenerate
{
    public readonly string ExtensionName; // 👈 New field
    public readonly string Name;
    public readonly List<string> Values;

    public EnumToGenerate(string extensionName, string name, List<string> values)
    {
        Name = name;
        Values = values;
        ExtensionName = extensionName;
    }
}

Note that as we make the extension method partial, and each ToStringFast() method will be a different overload, it doesn't matter if a user specifies the same extension class name more than once.

3. Update code generation

We're working backwards somewhat here, so the following shows the updated code for the extension generator. There's nothing complicated here, it's just a bit fiddly working with the StringBuilder. The main difference from the previous iteration is that we generate a separate class for each enum (instead of one class with many methods), and that the class name comes from the EnumToGenerate:

public static string GenerateExtensionClass(List<EnumToGenerate> enumsToGenerate)
{
    var sb = new StringBuilder();
    sb.Append(@"
namespace NetEscapades.EnumGenerators
{");
    foreach(var enumToGenerate in enumsToGenerate)
    {
        sb.Append(@"
public static partial class ").Append(enumToGenerate.ExtensionName).Append(@"
{
    public static string ToStringFast(this ").Append(enumToGenerate.Name).Append(@" value)
        => value switch
        {");
        foreach (var member in enumToGenerate.Values)
        {
            sb.Append(@"
            ")
                .Append(enumToGenerate.Name).Append('.').Append(member)
                .Append(" => nameof(")
                .Append(enumToGenerate.Name).Append('.').Append(member).Append("),");
        }

        sb.Append(@"
            _ => value.ToString(),
        };
}
");
    }
    sb.Append('}');

    return sb.ToString();
}

All that's left is to update the source generator code itself to read the value of ExtensionClassName from the marker attribute.

4. Reading the property value from a marker attribute

So far we've only had to make small changes to support this new functionality, but we haven't done the hard part yet—reading the value from the compilation. When you set a property on an attribute, semantically you're setting a named constructor argument.

To find the value of the property ExtensionClassName, we first need to find the AttributeData for the [EnumExtensions] attribute. We can then check the NamedArguments for the specific property. The following shows a stripped down version of the code to extract the property value if it's provided:

static List<EnumToGenerate> GetTypesToGenerate(Compilation compilation, IEnumerable<EnumDeclarationSyntax> enums, CancellationToken ct)
{
    var enumsToGenerate = new List<EnumToGenerate>();
    // Get a reference to the [EnumExtensions] symbol
    INamedTypeSymbol? enumAttribute = compilation.GetTypeByMetadataName("NetEscapades.EnumGenerators.EnumExtensionsAttribute");

    // ... error checking and verification elided

    foreach (var enumDeclarationSyntax in enums)
    {
        // Get the semantic model of the enum symbol
        SemanticModel semanticModel = compilation.GetSemanticModel(enumDeclarationSyntax.SyntaxTree);
        INamedTypeSymbol enumSymbol = semanticModel.GetDeclaredSymbol(enumDeclarationSyntax);

        // Set the default extension name
        string extensionName = "EnumExtensions";

        // Loop through all of the attributes on the enum
        foreach (AttributeData attributeData in enumSymbol.GetAttributes())
        {
            if (!enumAttribute.Equals(attributeData.AttributeClass, SymbolEqualityComparer.Default))
            {
                // This isn't the [EnumExtensions] attribute
                continue;
            }

            // This is the attribute, check all of the named arguments
            foreach (KeyValuePair<string, TypedConstant> namedArgument in attributeData.NamedArguments)
            {
                // Is this the ExtensionClassName argument?
                if (namedArgument.Key == "ExtensionClassName"
                    && namedArgument.Value.Value?.ToString() is { } n)
                {
                    extensionName = n;
                }
            }

            break;
        }

        // ... Not shown: existing code to retrieve the enum name and members

        // Record the extension name
        enumsToGenerate.Add(new EnumToGenerate(extensionName, enumName, members));
    }

    return enumsToGenerate;
}

With these changes, you can add arbitrarily more customisation to your source generator by extending the marker attribute.

5. Supporting attribute constructors

In the example above, we're only checking the NamedArguments of the attribute, because the attribute doesn't have a constructor, so it's the only way to specify the ExtensionClassName property. But what if the marker attribute was defined differently, and did have a constructor? For example, what if we make the ExtensionClassName required, and add a new optional property, ExtensionNamespaceName:

[System.AttributeUsage(System.AttributeTargets.Enum)]
public class EnumExtensionsAttribute : System.Attribute
{
    public EnumExtensionsAttribute(string extensionClassName)
    {
        ExtensionClassName = extensionClassName;
    }

    public string ExtensionClassName { get; }
    public string ExtensionNamespaceName { get; set; }
}

Then the code in the previous section won't work. And if you have multiple properties, and multiple constructors, then things become more complicated again. The following code shows the general approach to extract these values inside the source generator. Specifically, you need to read both the ConstructorArguments and the NamedArguments of the AttributeData, and infer the values set correctly:

INamedTypeSymbol enumSymbol = semanticModel.GetDeclaredSymbol(enumDeclarationSyntax);

// Placeholder variables for the specififed ExtensionClassName and ExtensionNamespaceName
string className = null;
string namespaceName = null;

// Loop through all of the attributes on the enum until we find the [EnumExtensions] attribute
foreach (AttributeData attributeData in enumSymbol.GetAttributes())
{
    if (!enumAttribute.Equals(attributeData.AttributeClass, SymbolEqualityComparer.Default))
    {
        // This isn't the [EnumExtensions] attribute
        continue;
    }

    // This is the right attribute, check the constructor arguments
    if (!attribute.ConstructorArguments.IsEmpty)
    {
        ImmutableArray<TypedConstant> args = attribute.ConstructorArguments;

        // make sure we don't have any errors
        foreach (TypedConstant arg in args)
        {
            if (arg.Kind == TypedConstantKind.Error)
            {
                // have an error, so don't try and do any generation
                return;
            }
        }

        // Use the position of the argument to infer which value is set
        switch (args.Length)
        {
            case 1:
                className = (string)args[0].Value;
                break;
        }
    }


    // now check for named arguments
    if (!attribute.NamedArguments.IsEmpty)
    {
        foreach (KeyValuePair<string, TypedConstant> arg in attribute.NamedArguments)
        {
            TypedConstant typedConstant = arg.Value;
            if (typedConstant.Kind == TypedConstantKind.Error)
            {
                // have an error, so don't try and do any generation
                return;
            }
            else
            {
                // Use the constructor argument or property name to infer which value is set
                switch (arg.Key)
                {
                    case "extensionClassName":
                        className = (string)typedConstant.Value;
                        break;
                    case "ExtensionNamespaceName":
                        namespaceName = (string)typedConstant.Value;
                        break;
                }
            }
        }
    }

    break;
}

This is obviously more complex, but may well be necessary to provide a better user experience for the consumer of your source generator.

Summary

In this post I described how you can provide customisation options to consumers of a source generator by adding properties to a marker attribute. This requires a few gymnastics to parse the provided values, especially if you use required constructor arguments in your attribute, as well as named properties. Overall though this is generally a good way to expand the capabilities of your source generator.

Finding a type declaration's namespace and type hierarchy: Creating a source generator - Part 5

$
0
0
Finding a type declaration's namespace and type hierarchy

In this next post on source generators, I show a couple of common patterns that I've needed when building source generators, namely:

  • How to determine the namespace of a type for a given class/struct/enum syntax
  • How to handle nested types when calculating the name of a class/struct/enum

On the face of it, these seem like simple tasks, but there are subtleties that can make it trickier than expected.

Finding the namespace for a class syntax

A common requirement for a source generator is determining the namespace of a given class or other syntax. For example, so far in this series, the EnumExtensions generator I've described generates its extension method in a fixed namespace: NetEscapades.EnumGenerators. One improvement might be to generate the extension method in the same namespace as the original enum.

For example, if we have this enum:

namespace MyApp.Domain
{
    [EnumExtensions]
    public enum Colour
    {
        Red = 0,
        Blue = 1,
    }
}

We might want to generate the extension method in the MyApp.Domain namespace:

namespace MyApp.Domain
{
    public partial static class EnumExtensions
    {
        public string ToStringFast(this Colour colour)
            => colour switch
            {
                Colour.Red => nameof(Colour.Red),
                Colour.Blue => nameof(Colour.Blue),
                _ => colour.ToString(),
            }
        }
    }
}

On the face of it, this seems like it should be easy, but unfortunately there's quite a few cases we have to handle:

  • File scoped namespaces—introduced in C# 10, these omit the curly braces, and apply the namespace to the entire file, e.g.:
public namespace MyApp.Domain; // file scope namespace

[EnumExtensions]
public enum Colour
{
    Red = 0,
    Blue = 1,
}
  • Multiple nested namespaces—somewhat unusual, but you can have multiple nested namespace declarations:
namespace MyApp
{
    namespace Domain // nested namespace
    {
        [EnumExtensions]
        public enum Colour
        {
            Red = 0,
            Blue = 1,
        }
    }
}
  • Default namespace—if you don't specify a namespace at all, the default namespace is used, which may be global::, but may also be overridden in the csproj file using <RootNamespace>.
[EnumExtensions]
public enum Colour // no namespace specified, so uses the default
{
    Red = 0,
    Blue = 1,
}

The following annotated snippet is based on code used by the LoggerMessage generator to handle all these cases. It can be used when you have some sort of "type" syntax that derives from BaseTypeDeclarationSyntax (which includes EnumDeclarationSyntax, ClassDeclarationSyntax, StructDeclarationSyntax, RecordDeclarationSyntax etc), so it should handle most cases.

// determine the namespace the class/enum/struct is declared in, if any
static string GetNamespace(BaseTypeDeclarationSyntax syntax)
{
    // If we don't have a namespace at all we'll return an empty string
    // This accounts for the "default namespace" case
    string nameSpace = string.Empty;

    // Get the containing syntax node for the type declaration
    // (could be a nested type, for example)
    SyntaxNode? potentialNamespaceParent = syntax.Parent;

    // Keep moving "out" of nested classes etc until we get to a namespace
    // or until we run out of parents
    while (potentialNamespaceParent != null &&
            potentialNamespaceParent is not NamespaceDeclarationSyntax
            && potentialNamespaceParent is not FileScopedNamespaceDeclarationSyntax)
    {
        potentialNamespaceParent = potentialNamespaceParent.Parent;
    }

    // Build up the final namespace by looping until we no longer have a namespace declaration
    if (potentialNamespaceParent is BaseNamespaceDeclarationSyntax namespaceParent)
    {
        // We have a namespace. Use that as the type
        nameSpace = namespaceParent.Name.ToString();

        // Keep moving "out" of the namespace declarations until we 
        // run out of nested namespace declarations
        while (true)
        {
            if (namespaceParent.Parent is not NamespaceDeclarationSyntax parent)
            {
                break;
            }

            // Add the outer namespace as a prefix to the final namespace
            nameSpace = $"{namespaceParent.Name}.{nameSpace}";
            namespaceParent = parent;
        }
    }

    // return the final namespace
    return nameSpace;
}

With this code, we can handle all of the namespace cases defined above. For the default/global namespace, we return string.Empty, which indicates to the source generator to not emit a namespace declaration. That ensures the generated code will be in the same namespace as the target type, whether it's global:: or some other value defined in <RootNamespace>.

With this code we can now generate our extension method in the same namespace as the original enum. This will likely provide a better user experience for consumers of the source generator, as the extension methods for a given enum will be more discoverable if they're in the same namespace as the enum by default.

Finding the full type hierarchy of a type declaration syntax

So far in this series, we have implicitly supported nested enums for our extension methods, because we've been calling ToString() on an INamedTypeSymbol, which accounts for nested types. For example, if you have an enum defined like this:

public record Outer
{
    public class Nested
    {
        [EnumExtensions]
        public enum Colour
        {
            Red = 0,
            Blue = 1,
        }
    }
}

Then calling ToString() on the Colour syntax returns Outer.Nested.Colour, which we can happily use in our extension method:

public static partial class EnumExtensions
{
    public static string ToStringFast(this Outer.Nested.Colour value)
        => value switch
        {
            Outer.Nested.Colour.Red => nameof(Outer.Nested.Colour.Red),
            Outer.Nested.Colour.Blue => nameof(Outer.Nested.Colour.Blue),
            _ => value.ToString(),
        };
}

Unfortunately, this falls down if you have a generic outer type, e.g. Outer<T>. Replacing Outer with Outer<T> in the above snippet results in an EnumExtensions class that doesn't compile:

public static partial class EnumExtensions
{
    public static string ToStringFast(this Outer<T>.Nested.Colour value) // 👈 Not valid C#
    // ...
}

There are a couple of ways to handle this, but in most cases, we need to understand the whole hierarchy of types. We can't simply "replicate" the hierarchy for our extension class (extension methods can be defined in nested types), but if you're extending types in other ways, this may well solve your problem. For example, I have a source generator project that adds members to struct types call StronglyTypedId. If you decorate a nested struct like this:

public partial record Outer
{
    public partial class Generic<T> where T: new()
    {
        public partial struct Nested
        {
            [StronglyTypedId]
            public partial readonly struct TestId
            {
            }
        }
    }
}

then we need to generate code similar to the following, that replicates the hierarchy:

public partial record Outer
{
    public partial class Generic<T> where T: new()
    {
        public partial struct Nested
        {
            public partial readonly struct TestId
            {
                public TestId (int value) => Value = value;
                public int Value { get; }
                // ... etc
            }
        }
    }
}

This avoids us needing to add special handling for generic types or anything like that, and is generally very versatile. It's the same approach the LoggerMessage generator uses to implement high-performance logging in .NET 6.

To implement this in our source generator, we'll need a helper (that we'll call ParentClass), to hold the details of each "parent" type of the nested target (Colour). We need to record 3 pieces of information:

  • The keyword of the type, i.e. class/stuct/record
  • The name of the type, i.e. Outer, Nested, Generic<T>
  • Any constraints on a generic type i.e. where T: new()

We also need to record the parent/child reference between classes. We could use a stack/queue for this, but the implementation below uses a linked list approach instead, where each ParentClass contains a reference to its child:

internal class ParentClass
{
    public ParentClass(string keyword, string name, string constraints, ParentClass? child)
    {
        Keyword = keyword;
        Name = name;
        Constraints = constraints;
        Child = child;
    }

    public ParentClass? Child { get; }
    public string Keyword { get; }
    public string Name { get; }
    public string Constraints { get; }
}

Starting from the enum declaration itself, we can build up the linked list of ParentClasses, using code similar to the following. As before, this code works for any type (class/struct etc):

static ParentClass? GetParentClasses(BaseTypeDeclarationSyntax typeSyntax)
{
    // Try and get the parent syntax. If it isn't a type like class/struct, this will be null
    TypeDeclarationSyntax? parentSyntax = typeSyntax.Parent as TypeDeclarationSyntax;
    ParentClass? parentClassInfo = null;

    // Keep looping while we're in a supported nested type
    while (parentSyntax != null && IsAllowedKind(parentSyntax.Kind()))
    {
        // Record the parent type keyword (class/struct etc), name, and constraints
        parentClassInfo = new ParentClass(
            keyword: parentSyntax.Keyword.ValueText,
            name: parentSyntax.Identifier.ToString() + parentSyntax.TypeParameterList,
            constraints: parentSyntax.ConstraintClauses.ToString(),
            child: parentClassInfo); // set the child link (null initially)

        // Move to the next outer type
        parentSyntax = (parentSyntax.Parent as TypeDeclarationSyntax);
    }

    // return a link to the outermost parent type
    return parentClassInfo;

}

// We can only be nested in class/struct/record
static bool IsAllowedKind(SyntaxKind kind) =>
    kind == SyntaxKind.ClassDeclaration ||
    kind == SyntaxKind.StructDeclaration ||
    kind == SyntaxKind.RecordDeclaration;

This code builds up the list starting from the type closest to our target type. So for our previous example, this creates a ParentClass hierarchy that is equivalent to this:

var parent = new ParentClass(
    keyword: "record",
    name: "Outer",
    constraints: "",
    child: new ParentClass(
        keyword: "class",
        name: "Generic<T>",
        constraints: "where T: new()",
        child: new ParentClass(
            keyword: "struct",
            name: "Nested",
            constraints: "",
            child: null
        )
    )
);

We can then reconstruct this hierarchy in our source generator when generating the output. The following shows a simple way to use both the ParentClass hierarchy and the extracted namespace from the previous section:

static public GetResource(string nameSpace, ParentClass? parentClass)
{
    var sb = new StringBuilder();

    // If we don't have a namespace, generate the code in the "default"
    // namespace, either global:: or a different <RootNamespace>
    var hasNamespace = !string.IsNullOrEmpty(nameSpace)
    if (hasNamespace)
    {
        // We could use a file-scoped namespace here which would be a little impler, 
        // but that requires C# 10, which might not be available. 
        // Depends what you want to support!
        sb
            .Append("namespace ")
            .Append(nameSpace)
            .AppendLine(@"
    {");
    }

    // Loop through the full parent type hiearchy, starting with the outermost
    while (parentClass is not null)
    {
        sb
            .Append("    partial ")
            .Append(parentClass.Keyword) // e.g. class/struct/record
            .Append(' ')
            .Append(parentClass.Name) // e.g. Outer/Generic<T>
            .Append(' ')
            .Append(parentClass.Constraints) // e.g. where T: new()
            .AppendLine(@"
        {");
        parentsCount++; // keep track of how many layers deep we are
        parentClass = parentClass.Child; // repeat with the next child
    }

    // Write the actual target generation code here. Not shown for brevity
    sb.AppendLine(@"public partial readonly struct TestId
    {
    }");

    // We need to "close" each of the parent types, so write
    // the required number of '}'
    for (int i = 0; i < parentsCount; i++)
    {
        sb.AppendLine(@"    }");
    }

    // Close the namespace, if we had one
    if (hasNamespace)
    {
        sb.Append('}').AppendLine();
    }

    return sb.ToString();
}

The above example isn't a complete example, and won't work for every situation, but it shows one possible approach which may work for you, as I've found it useful in several situations.

Summary

In this post I showed how to calculate two specific features useful in source generators: the namespace of a type declaration syntax, and the nested type hierarchy of a type declaration syntax. These won't always be necessary, but they can be useful for handling complexities like generic parent types, or for ensuring you generate your code in the same namespace as the original.

Saving source generator output in source control: Creating a source generator - Part 6

$
0
0
Saving source generator output in source control

In this post I describe how to persist the output of your source generator to disk so that it can be part of source control and code reviews, how to control where the files are output, and how to handle the case where your source generator produces different output depending on the target framework.

Source generators don't produce artifacts by default

One of the big selling points about source-generators is that they run in the compiler. That makes them more convenient than other source generation techniques, such as t4 templates, as you don't need a separate build step.

However, one potential disadvantage also stems from the fact the source generator runs inside the compiler. That can make it hard to see the effect of a source generator when you're not in the context of an IDE.

For example, if you're reviewing a pull request on GitHub that uses source generators, and you make a change that adds code to the project, you may find it useful to have that output visible in the PR. This may be especially important for "critical" code.

For example, in the Datadog Tracer we recently started using source generators to generate methods called by the "native" part of the profiler, that controls which integrations are enabled. This is a crucial part of the tracer so it's important to see any changes. We wanted any changes to be visible in PRs, so we needed to make sure the source generator output was written to files.

Emitting compiler generated files

There's a simple switch to enable persisting source generator files to the file system: EmitCompilerGeneratedFiles. You can set this property in your project file:

<PropertyGroup>
    <EmitCompilerGeneratedFiles>true</EmitCompilerGeneratedFiles>
</PropertyGroup>

Or you can set the MSBuild property in any other way, e.g. at the command line when building

dotnet build /p:EmitCompilerGeneratedFiles=true

When you set this property alone, the compiler will output the hint files to disk. For example, if we consider the NetEscapades.EnumGenerators package, and enable the EmitCompilerGeneratedFiles property, we can see that the source generated files are written to the obj folder:

Generated files in the obj folder

Specifically, the source generator output is written to a folder defined as:

{BaseIntermediateOutpath}/generated/{Assembly}/{SourceGeneratorName}/{GeneratedFile}

In the example above, we have

  • BaseIntermediateOutpath: obj/Debug/net6.0
  • Assembly: NetEscapades.EnumGenerators
  • SourceGeneratorName: NetEscapades.EnumGenerators.EnumGenerator
  • GeneratedFile: ColoursExtensions_EnumExtensions.g.cs, EnumExtensionsAttribute.g.cs

Writing files to the obj folder is all well and good, but it doesn't really solve our problem, as the bin and obj folders are typically excluded from source control. We could explicitly include them into source control, but a better option is to emit the files somewhere else.

Controlling the output location

You can control the location of the compiler emitted files by setting the CompilerGeneratedFilesOutputPath property. This is a path relative to the project root folder. So for example, if you set the following in your project file:

<PropertyGroup>
    <EmitCompilerGeneratedFiles>true</EmitCompilerGeneratedFiles>
    <CompilerGeneratedFilesOutputPath>Generated</CompilerGeneratedFilesOutputPath>
</PropertyGroup>

This will write the files to the Generated folder in the project folder:

Generated files in the 'Generated' folder

Whatever you place in CompilerGeneratedFilesOutputPath replaces the {BaseIntermediateOutpath}/generated prefix in the file path, so the files are written to:

{CompilerGeneratedFilesOutputPath}/{Assembly}/{SourceGeneratorName}/{GeneratedFile}

On the face of it, this seems like it solves all the issues: the source generator contents are emitted to the file system, to a place that's included in source control. Problem solved right?

The difficulty is when you try and build for a second time, after the files have already been written, you'll get a number of errors:

ColoursExtensions_EnumExtensions.g.cs(31,28): error CS0111: Type 'ColoursExtensions' already defines a member called 'IsDefined' with the same parameter types ColoursExtensions_EnumExtensions.g.cs(40,28): error CS0111: Type 'ColoursExtensions' already defines a member called 'TryParse' with the same parameter types  

That's because the compiler is including the emitted files in addition to the in-memory source generator output. This causes duplication of the types and the errors above. The answer is to exclude the files from the compilation.

Excluding emitted files from the compilation

The simple solution to this problem is to remove the emitted files from the project compilation, so that only the in-memory source generator output is part of the compilation. You can exclude these individually (e.g. by right-clicking the file in Visual Studio), or more usefully, you can use a wildcard pattern to exclude all the .cs files in those folders:

<PropertyGroup>
    <EmitCompilerGeneratedFiles>true</EmitCompilerGeneratedFiles>
    <CompilerGeneratedFilesOutputPath>Generated</CompilerGeneratedFilesOutputPath>
</PropertyGroup>

<ItemGroup>
    <!-- Exclude the output of source generators from the compilation -->
    <Compile Remove="$(CompilerGeneratedFilesOutputPath)/**/*.cs" />
</ItemGroup>

With this change, we now have the best of all worlds—the source generator output is emitted to disk, it is included in source control so can be reviewed in PRs etc, and it doesn't impact the compilation itself.

Splitting by target framework

The properties above are what we initially used when adding our first source generator in the Datadog Tracer. However, this subsequently caused us a bit of an issue.

For context, the Datadog Tracer currently supports multiple target frameworks: net461, netstandard2.0, netcoreapp3.1. However some of our integrations are only applicable for specific target frameworks. For example, the ASP.NET integration only applies to net461, so we use #if NETFRAMEWORK to exclude it from the .NET Core assembly.

The difficulty is that the output of our source generator is different for each target framework, yet the output of each target framework compilation is written into the same folder in all cases. Each time the compiler runs for a target framework, it overwrites the existing file output in Generated/AssemblyName/GeneratorName/FileName.cs! Three different outputs of the source generator, but only one of those is persisted to disk.

To work around this problem, we added the target framework to the output file path using the $(TargetFramework) property.

<PropertyGroup>
    <!-- Persist the source generator (and other) files to disk -->
    <EmitCompilerGeneratedFiles>true</EmitCompilerGeneratedFiles>
    <!-- 👇 The "base" path for the source generators -->
    <GeneratedFolder>Generated</GeneratedFolder>
    <!-- 👇 Write the output for each target framework to a different sub-folder -->
    <CompilerGeneratedFilesOutputPath>$(GeneratedFolder)\$(TargetFramework)</CompilerGeneratedFilesOutputPath>
</PropertyGroup>

<ItemGroup>
    <!-- 👇 Exclude everything in the base folder -->
    <Compile Remove="$(GeneratedFolder)/**/*.cs" />
</ItemGroup>

With this change, the output of the source generator for each framework is written into a separate folder, so we can easily see the difference between the assemblies.

Splitting files by target framework

Obviously this approach isn't necessary unless you're multi-targeting and you produce different source-generator output for different target frameworks, but it's an easy approach if you are.

Summary

In this post I described how you can ensure source generators emit their generated outputs to disk. This can be useful if you want to monitor for changes in the source generator output, or want to be able to review that output in a non-IDE scenario, such as in a pull request on GitHub. I then showed how to control where the files are written, and one approach to handle the case where the source generator creates different output for different target framework builds of your project.

Solving the source generator 'marker attribute' problem - Part 1: Creating a source generator - Part 7

$
0
0
Solving the source generator 'marker attribute' problem - Part 1

In this post I describe a problem I've been wrestling with around source generators: where to put the 'marker attributes' that drive the source generator. In this post I describe what marker attributes are, why they're useful for source generators, and why deciding where to put them can be problematic. Finally, In the next post I describe the solution I settled on that seems to give the best of all worlds.

Marker attributes and source generators

I'm quite a fan of source generators in C#, and I've written several posts about using them in your applications. I recently updated a library for generating strong-typed IDs, called StronglyTypedId to use .NET's built-in source generator support rather than a custom Roslyn task.

One of the key stages of most source generators is to identify the syntax in your application that needs to take part in code generation. This will depend entirely on the purpose of the source generator, but a very common approach is to use attributes to decorate code that needs to take part in the code generation process.

For example, the LoggerMessage source generator that is part of the Microsoft.Extensions.Logging library in .NET 6 uses a [LoggerMessage] attribute to define the code that will be generated:

using Microsoft.Extensions.Logging;

public partial class TestController
{
    // Adding the attribute here indicates the LogHelloWorld
    // method needs to have code generated
    [LoggerMessage(0, LogLevel.Information, "Writing hello world response to {Person}")]
    partial void LogHelloWorld(Person person);
}

Similarly, in my StronglyTypedId package I use an attribute [StronglyTypedId] applied to structs to indicate that you want the type to be a StronglyTypedId:

using StronglyTypedIds;

[StronglyTypedId]
public partial struct MyCustomId { }

In both of these cases, the attribute itself is only a marker, used at compile-time, to tell the source generator what to generate. It doesn't need to be in the final compiled output, though generally it won't be a problem if it is.

The question I'm tackling in this post is: where should those marker attributes be defined?

Defining the marker attribute

In some cases, there is a trivial answer. If the generator is an enhancement to an existing library that has some functionality the user needs, then the generator can simply be packaged with that library.

For example, the LoggerMessage generator is part of the Microsoft.Extensions.Logging.Abstractions library. It is packaged in the same NuGet package that people will install anyway, and the marker attributes are contained in the referenced dll, so they will always be there. This is the "best case" scenario as far as marker attributes are concerned.

The contents of the Microsoft.Extensions.Logging.Abstractions package contains both the dll and the analyzer

But what if you have a library that is only a source generator. You still need to reference those attributes, so on the face of it, you have 3 main options.

  1. Use the source generator to automatically add the attributes to your compilation.
  2. Ask users to add the attribute themselves to the compilation.
  3. Include the attributes in an external dll, and ensure the project references that.

Each of these has its advantages and disadvantages, so in this post I'll talk through the pros and cons of each, and which one I think is the best.

1. Adding the attributes to a users compilation

Source-generators have the ability to add source code to a consuming project. In general, source generators cannot access code that they have added to the compilation, which avoids a whole swathe of recursion issues. There is one exception: a source generator can register a "post initialization" hook, which allows them to add some fixed sources to the compilation.

For .NET 6's incremental generator API, this hook is called RegisterPostInitializationOutput(). You don't have any access to the user's code at this point, so it's only useful for adding fixed code, but the user can reference it, and you can use code that references it in your source generator. For example

[Generator]
public class HelloWorldGenerator : IIncrementalGenerator
{
    /// <inheritdoc />
    public void Initialize(IncrementalGeneratorInitializationContext context)
    {
        // Register the attribute source
        context.RegisterPostInitializationOutput(i =>
        {
            var attributeSource = @"
            namespace HelloWorld
            {
                public class MyExampleAttribute: System.Attribute {} 
            }";
            i.AddSource("MyExampleAttribute.g.cs", attributeSource);
        });

        // ... generator implementaation
    }
}

This hook is seemingly tailor made for adding marker attributes to the user's compilation, which you can then use later in the generator. In fact, this scenario is explicitly called out in the source generator cook book as "the way" to work with marker attributes.

And most of the time, this works perfectly.

Where things fall down, is if a user references your source generator in more than one project. The class MyExampleAttribute would be added to two projects, in the HelloWorld namespace. If one of your projects references the other, you'll get a CS0436 warning, and a build warning along the lines of:

warning CS0436: The type 'MyExampleAttribute' in 'HelloWorldGenerator\MyExampleAttribute.g.cs' conflicts with the imported type 'MyExampleAttribute' in 'MyProject, Version=1.0.0.0, Culture=neutral, PublicKeyToken=null'.

The problem is we've defined the same type, in two different projects, and the compiler can't distinguish between them. So how can we solve that?

The obvious solution is to make the attribute internal instead of public. That way each project will only reference the MyExampleAttribute added to that specific project. And that will work 🎉

However, it won't work if someone is using [InternalsVisibleTo]. At that point, effectively all internal types are public, so we're back to square one.

Now, maybe you're thinking, "people don't really use [InternalsVisibleTo] do they?". Well, I originally took this approach in my StronglyTypedId and I can confirm yes, yes they are. But I'm not one to judge, our AssemblyInfo.cs file for my day job contains 22 [InternalsVisibleTo] attributes!

The big problem is that there's no workaround for users here. They're just broken in that scenario. So lets look at another option.

2. Ask users to create it themselves

The next option is to ask users to add the attribute themselves. You might be wondering how or why that helps, but the key is that the users can add it once, and use the same attribute throughout their whole solution. Instead of the source generator adding to every project, the user creates MyExampleAttribute in their "domain helpers" class (for example).

This approach isn't actually as weird or backwards as it seems on the face of it. In fact, there are a number of C# features which use exactly this approach. I mentioned one such case in a recent post when I mentioned using the [DoesNotReturn] attribute. This attribute is used for nullable flow-analysis among other things, but it's only defined in the BCL for .NET Core 3. That means you can't use it if you're targeting .NET Core 2.x or .NET Standard right?

Well, no! The C# compiler uses the "add it yourself" approach. It doesn't care where the attribute is defined, as long as it's defined somewhere. That means you can add it to your own project (making sure to use the correct namespace), and the C# compiler will "magically" treat it the same as the "original".

#if !NETCOREAPP3_0_OR_GREATER
namespace System.Diagnostics.CodeAnalysis
{
    [AttributeUsage(AttributeTargets.Method)]
    public class DoesNotReturnAttribute: Attribute { }
}
#endif

We could take exactly the same approach with source generators. However, asking users to do this just feels a bit like hard work. Also, it's fine for a super basic attribute like [DoesNotReturn], but what about a complex attribute like [StronglyTypedId]?

using System;

namespace StronglyTypedIds
{
    [AttributeUsage(AttributeTargets.Struct, Inherited = false, AllowMultiple = false)]
    [System.Diagnostics.Conditional("STRONGLY_TYPED_ID_USAGES")]
    public sealed class StronglyTypedIdAttribute : Attribute
    {
        public StronglyTypedIdAttribute(
            StronglyTypedIdBackingType backingType = StronglyTypedIdBackingType.Default,
            StronglyTypedIdConverter converters = StronglyTypedIdConverter.Default,
            StronglyTypedIdImplementations implementations = StronglyTypedIdImplementations.Default)
        {
            BackingType = backingType;
            Converters = converters;
            Implementations = implementations;
        }

        public StronglyTypedIdBackingType BackingType { get; }
        public StronglyTypedIdConverter Converters { get; }
        public StronglyTypedIdImplementations Implementations { get; }
    }
}

Asking a user to add that, getting everything exactly correct so it doesn't break the generator seems like a non-starter to me. On top of that, you lose the ability to evolve your API, as users would have to update this code every time they update your project. That seems like a recipe for support calls…

So that leaves us just one remaining option.

3. Reference the marker attributes in an external dll

With this approach, the generator doesn't add the marker attributes itself, and the user doesn't add them to their compilation either. Instead, the source generator relies on the attributes being defined in a dll that is referenced by the user's project.

Note that I'm being deliberately cagey about how or where that dll comes from, as there's lots of options. The [LoggerMessage] generator, for example, relies on attributes that are present in the Microsoft.Extensions.Logging.Abstractions NuGet package, which also contains the generator. This is particularly convenient as the generator can be sure the attributes are always available for use, and vice versa; if the attribute is available, so is the generator.

If your generator is an "optional extra" to a "main" dll, then this approach makes perfect sense. A similar argument could be made for including the generator in a separate package, which the "main" package then takes a dependency on, similar to the way this is done for analyzers in some projects. Source generators are really like fancy analyzers, so many of the same patterns should apply. For example, the main xunit package takes a dependency on the xunit.analyzers package.

The xunit package depends on the xunit.analyzers package

This approach makes sense if your generator is an "added extra" to a main package. By keeping the dependency chain this way, it ensures that if the marker attributes are present (in the xunit package for example), then the generator will always be referenced.

Although it's possible to install the generator package (e.g. xunit.analyzers) without the main xunit package, attempting to use the marker attributes would be a compile error, so the behaviour is expected.

But going back to the original problem, what if you have a "standalone" generator, that is just a source generator? We don't really have to introduce a NuGet package that only contains the attributes, just to work around this do we?

Another possibility is to include the attributes inside the source generator dll itself. By default, the dll containing the source generator isn't included in the user's compilation, but it could be. Crazy enough to work?

I tried several different approaches to tackling the issue with my StronglyTypedId generator project. And rather than jump straight to the solution, In the next post I'm going to make you suffer along with me as I talk through some of the approaches I tried, how I failed, and ultimately the solution I settled on.

Summary

In this post I described what "marker attributes" are in the context of source generators, and how they can help drive the code generation. I then discussed the question of how the attributes should be added to the compilation.

Conventional wisdom uses the source generator itself to add them to the compilation, but this can run into problems when users use the [InternalsVisibleTo] attribute. As a workaround, we could ask users to add the attribute itself, as the C# compiler does in some cases. Alternatively, we could add the attributes to a dll, and reference that dll somehow. There are lots of different options for how to achieve this. In the next post I'll explore some of these, and describe the solution I settled on.


Solving the source generator 'marker attribute' problem - Part 2: Creating a source generator - Part 8

$
0
0
Solving the source generator 'marker attribute' problem - Part 2

In the previous post I described marker attributes, how they're used by source generators, and the problem with deciding how they should be referenced in a user's project. In this post I describe some of the approaches I tried, along with the final approach I decided on.

Referencing marker attributes in an external dll

As a quick recap, marker attributes are simple attributes that are used to control which types a source generator should use for code generation, and provide a way to pass options to the source generator.

For example, my StronglyTypedId project allows you to decorate a struct with a [StronglyTypedId] attribute. The source generator uses the presence of that attribute to trigger generation of type converters and properties for the struct.

Similarly the [LoggerMessage] attribute in Microsoft.Extensions.Logging.Abstractions is used to generate efficient log infrastructure.

The question is, where should the marker attributes live? In the previous post I described three options:

  1. Added to the compilation by the source generator.
  2. Manually created by users.
  3. Included in a referenced dll.

Option 1. is the standard approach, but it doesn't work when users are using [InternalsVisibleTo], as you can end up defining the same type multiple times. In this post, I explore variations on option 3. These variations are pretty much in the same order I tried them while trying to solve this problem for myself.

1. Directly referencing the build output

The first option is kind of brilliant in its simplicity. Typically the analyzer/source generator dll isn't referenced in the normal way when you add the generator package to a project. With this approach, we change that!

The beauty of this one is how simple it is. Simply create the attributes inside your source generator project, and remove the <IncludeBuildOutput>false</IncludeBuildOutput> override that you typically have in source generators. For example:

<Project Sdk="Microsoft.NET.Sdk">

  <PropertyGroup>
    <TargetFramework>netstandard2.0</TargetFramework>
    <!-- 👇 don't include this, so the dll ends up in the build output-->
    <!-- <IncludeBuildOutput>false</IncludeBuildOutput> -->
  </PropertyGroup>

  <!-- Standard source generator references -->
  <ItemGroup>
    <PackageReference Include="Microsoft.CodeAnalysis.Analyzers" Version="3.3.3" PrivateAssets="all" />
    <PackageReference Include="Microsoft.CodeAnalysis.CSharp" Version="4.0.1" PrivateAssets="all" />
  </ItemGroup>

  <!-- Package the build output into the "analyzer" slot in the NuGet package -->
  <ItemGroup>
    <None Include="$(OutputPath)\$(AssemblyName).dll" Pack="true" PackagePath="analyzers/dotnet/cs" Visible="false" />
  </ItemGroup>
</Project>

I only had to make a single tweak to the generator project, so far so good! After we pack this into a NuGet package, the dll will be added to both the analyzers/dotnet/cs path (required for source generators) and in the normal lib folder, for direct reference by the consuming project:

Example layout

Consumers of the NuGet package will all reference the marker attributes contained in your generator dll, so there's no problems with conflicting types. Problem solved!

If you're referencing the source generator project within the same solution, either for testing purposes, or because you have a solution-specific generator you'll need to set ReferenceOutputAssembly="true" in the <ProjectReference> element of the consuming project. For example:

<ItemGroup>
  <ProjectReference Include="..\StronglyTypedId\StronglyTypedId.csproj" 
    OutputItemType="Analyzer" 
    ReferenceOutputAssembly="true" /> <!-- 👈 This is normally false -->
</ItemGroup>

So that's it, problem solved right? Well…maybe. But I don't really like this approach. Your generator dll is now part of the user's references, which just feels icky. There's also potential issues around the Microsoft.CodeAnalysis.CSharp dependencies etc. For example, in my testing, while my projects would build ok, there were a host of warnings about mismatched versions of System.Collections.Immutable:

warning MSB3277: Found conflicts between different versions of "System.Collections.Immutable" that could not be resolved.
warning MSB3277: There was a conflict between "System.Collections.Immutable, Version=1.2.5.0, Culture=neutral, PublicKeyToken=b03f5f7f11d50a3a" and "System.Collections.Immutable, Version=5.0.0.0, Culture=neutral, PublicKeyToken=b03f5f7f11d50a3a". 

None of my projects were directly referencing System.Collections.Immutable but it's a transitive reference used by the generator, hence the issues. The potential for issues was just too large for my liking, so I put this one aside, and tried a different approach.

2. Creating a separate NuGet package for the dll only

Instead of referencing the source generator dll, and all the associated dependencies that relies on, we really want a tiny dll that contains only the marker attributes (and associated types). The logical step then is to create a NuGet package that just contains these marker types. We can then add a dependency to the generator project, so that when you add the attributes project to a consuming project, the generator project is automatically added to the consuming package too.

My main concern with this approach wasn't really related to technical difficulties. Instead, my concerns rested more around naming, and things feeling ugly.

As it turns out, I did have some technical difficulties with this, but this was more to the specifics of my project I think, so I don't consider it a real hurdle.

For example, take my StronglyTypedId project. Should the "marker attributes" package be called StronglyTypedId.Attributes, and the "generator" package called StronglyTypedId? That seems likely that users are going to add the StronglyTypedId package, and then not understand why the generator doesn't appear to be working (as they don't have any references to the marker attributes).

Alternatively, I could call the marker-attributes package StronglyTypedId and call the source generator package StronglyTypedId.Generator. That feels like the hierarchy works better, but still feels like someone is going to add the generator package without the attributes. It's the generator they want after all, the attributes are a by-product! Documentation is great, but people don't read it 😉

3. Making the additional attributes package optional

The previous solution felt like it was nearly the right one, but I didn't like the fact users always had to think about two different packages. While fiddling with this I realised I was trying to solve a problem for, potentially, a small subset of users of the project, and maybe that should drive my approach.

As I mentioned in the previous post, there's a "standard" way to use marker attributes with source generators: the source generator adds them itself as part of the initialization phase. This works well except in the case where users have [InternalsVisibleTo] attributes, and are using the source generator in multiple projects.

In which case, I decided, why not use the source-generator initialization phase to add the attributes automatically, and provide a separate attributes package for users that run into trouble?

This would mean that 99% of users would just have a single package, using the auto-added attributes as normal, and not have to worry about the other one. The main generator package would be called StronglyTypedId and the supplementary attributes package would be called StronglyTypedId.Attributes. The hierarchy feels right, and people are (hopefully) driven towards the right package.

The problem with this approach, is that users that run into [InternalsVisibleTo] need a way of "turning" off the auto-added attributes. The best way I could think of doing that, was to wrap the generated attribute code in an #if/#endif. For example, something like the following:

#if !STRONGLY_TYPED_ID_EXCLUDE_ATTRIBUTES

using System;
namespace StronglyTypedIds
{
    [AttributeUsage(AttributeTargets.Struct, Inherited = false, AllowMultiple = false)]
    [System.Diagnostics.Conditional("STRONGLY_TYPED_ID_USAGES")]
    internal sealed class StronglyTypedIdAttribute : Attribute
    {
        public StronglyTypedIdAttribute(
            StronglyTypedIdBackingType backingType = StronglyTypedIdBackingType.Default,
            StronglyTypedIdConverter converters = StronglyTypedIdConverter.Default,
            StronglyTypedIdImplementations implementations = StronglyTypedIdImplementations.Default)
        {
            BackingType = backingType;
            Converters = converters;
            Implementations = implementations;
        }

        public StronglyTypedIdBackingType BackingType { get; }
        public StronglyTypedIdConverter Converters { get; }
        public StronglyTypedIdImplementations Implementations { get; }
    }
}
#endif

By default, the variable STRONGLY_TYPED_ID_EXCLUDE_ATTRIBUTES would not be set, so the attributes would be part of the compilation. If a user runs into the [InternalsVisibleTo] problem, they could define this constant in their project, and the embedded generated attributes would no longer be part of the compilation. They could instead then reference the StronglyTypedId.Attributes package to use the generator

 <Project Sdk="Microsoft.NET.Sdk">

   <PropertyGroup>
     <OutputType>Exe</OutputType>
     <TargetFramework>net6.0</TargetFramework>
    <!--  Define the MSBuild constant    -->
     <DefineConstants>STRONGLY_TYPED_ID_EXCLUDE_ATTRIBUTES</DefineConstants>
   </PropertyGroup>

  <PackageReference Include="StronglyTypedId" Version="1.0.0" PrivateAssets="All"/>
  <PackageReference Include="StronglyTypedId.Attributes" Version="1.0.0" PrivateAssets="All" />

 </Project>

The main advantage of this approach is that most users don't have to worry about the extra package. It's only when you have a problem that you need to dig into it, at which point you're more motivated to read the docs 😉

4. Pack the dll into the generator package

It was shortly after implementing and shipping the previous approach that I realised I'd missed a trick. Instead of requiring users to install a separate package to resolve the problem, I could just package the attributes dll inside the generator package, and skip the auto-embedding of the marker attributes entirely.

This is the same approach used by the [LoggerMessage] generator. I face-palmed when I realised I'd finally arrived at this point, given I'd been referring to that project as a reference 🤦‍♂️

The net result is a NuGet package layout that looks like the following, with the StronglyTypedId.dll "generator" dll in the analyzers/dotnet/cs folder, so it's used for generation, and the marker attributes dll StronglyTypedId.Attributes.dll in the lib folder, that will be directly referenced by user code.

Note that in my case I also want to reference the marker attributes from within my generator code, so StronglyTypedId.Attributes.dll is packed in analyzers/dotnet/cs too - that likely won't be necessary for all source generator projects.

The layout of the NuGet package, with multiple dlls

Achieving this layout required a little bit of csproj magic to make sure dotnet pack put the dlls in the right place, but nothing too arcane.

<Project Sdk="Microsoft.NET.Sdk">

  <PropertyGroup>
    <TargetFramework>netstandard2.0</TargetFramework>
    <IncludeBuildOutput>false</IncludeBuildOutput>
  </PropertyGroup>

  <!-- Standard source generator references -->
  <ItemGroup>
    <PackageReference Include="Microsoft.CodeAnalysis.Analyzers" Version="3.3.3" PrivateAssets="all" />
    <PackageReference Include="Microsoft.CodeAnalysis.CSharp" Version="4.0.1" PrivateAssets="all" />
  </ItemGroup>


  <!-- Reference the attributes from the generator to compile against them -->
  <!-- Ensure we specify PrivateAssets so the NuGet doesn't have any dependencies -->
  <ItemGroup>
    <ProjectReference Include="..\StronglyTypedIds.Attributes\StronglyTypedIds.Attributes.csproj" PrivateAssets="All" /> 
  </ItemGroup>

  <ItemGroup>
    <!-- Pack the generator dll in the analyzers/dotnet/cs path -->
    <None Include="$(OutputPath)\$(AssemblyName).dll" Pack="true" PackagePath="analyzers/dotnet/cs" Visible="false" />

    <!-- Pack the attributes dll in the analyzers/dotnet/cs path -->
    <None Include="$(OutputPath)\StronglyTypedIds.Attributes.dll" Pack="true" PackagePath="analyzers/dotnet/cs" Visible="false" />

    <!-- Pack the attributes dll in the lib\netstandard2.0 path -->
    <None Include="$(OutputPath)\StronglyTypedIds.Attributes.dll" Pack="true" PackagePath="lib\netstandard2.0" Visible="true" />
  </ItemGroup>

</Project>

There's probably "better" ways to do this, but this worked so it'll do for me.

When it comes to referencing the NuGet package, you don't need to do anything special:

<ItemGroup>
  <PackageReference Include="StronglyTypedId" Version="1.0.0" PrivateAssets="all" />
</ItemGroup>

I used PrivateAssets="all" here to prevent downstream projects also getting a reference to the source generator, but that's entirely optional. One thing to be aware of is that this will result in the marker attribute dll StronglyTypedId.Attributes.dll appearing in the project's bin folder. However, the attributes themselves are decorated with the conditional, so there's no runtime dependency on the dll.

You can ensure the dll doesn't get copied to the output by setting ExcludeAssets="runtime" on the <PackageReference> element:

<ItemGroup>
  <PackageReference Include="StronglyTypedId" Version="1.0.0" 
    PrivateAssets="all" ExcludeAssets="runtime" />
</ItemGroup>

This will still let you compile against the marker attributes, but the dll won't be in your bin folder.

If you're referencing the source generator project from inside the same solution you will need to add a normal <PackageReference> to the attributes project too. In my case, it was a little more complicated as I needed both the source generator and the destination project to have a reference to the attributes dll.

Source generators live in their own little bubble in terms of references. Even though the consuming project has a reference to the attributes project, the source generator won't have access to it, or any other reference in the consuming project.

It's all a bit confusing, but for the source generator project to access the attributes dll in the consuming project, you need to tell the consuming project to treat the attributes project as an analyzer. The source generator "analyzer" can then reference it and generate correctly. Because we want the consuming project to also reference the marker attributes dll, we must set ReferenceOutputAssembly="true".

<Project Sdk="Microsoft.NET.Sdk">

  <PropertyGroup>
    <TargetFramework>net6.0</TargetFramework>
  </PropertyGroup>

  <ItemGroup>
    <!-- Rererence the source generator project -->
    <ProjectReference Include="..\StronglyTypedIds\StronglyTypedIds.csproj"
        OutputItemType="Analyzer" 
        ReferenceOutputAssembly="false" /> <!-- Don't reference the generator dll -->

    <!-- Rererence the attributes project "treat as an analyzer"-->
    <ProjectReference Include="..\StronglyTypedIds.Attributes\StronglyTypedIds.Attributes.csproj" 
        OutputItemType="Analyzer" 
        ReferenceOutputAssembly="true" /> <!-- We DO reference the attributes dll -->
  </ItemGroup>
</Project>

With this final setup, I think we have the best of all worlds:

  • Only a single NuGet package to worry about
  • No issues when users are using [InternalsVisibleTo]
  • Users can exclude the marker dll from their build output using ExcludeAssets="runtime"
  • Users can do dotnet add package StronglyTypedId and it will just work, the extra <PackageReference> properties are purely optional

Bonus: embed the attributes if you want!

For StronglyTypedId, I actually went one step further and allowed users to opt-in to embedding the attributes in their project's dll using the source generator by setting an MSBuild variable STRONGLY_TYPED_ID_EMBED_ATTRIBUTES. The attributes are always added to the compilation, but they aren't available unless this is set:

#if STRONGLY_TYPED_ID_EMBED_ATTRIBUTES

using System;

namespace StronglyTypedIds
{
    [AttributeUsage(AttributeTargets.Struct, Inherited = false, AllowMultiple = false)]
    [System.Diagnostics.Conditional("STRONGLY_TYPED_ID_USAGES")]
    internal sealed class StronglyTypedIdAttribute : Attribute
    {
        // ...
    }
}
#endif

If users do turn this on, then initially they'll get duplicate type problems, as you will have the "internal" types embedded by the source generator, as well as the public types in the attribute dll. To solve this, you can add compile to the ExcludeAssets for the package:

<Project Sdk="Microsoft.NET.Sdk">

  <PropertyGroup>
    <TargetFramework>net6.0</TargetFramework>
    <!-- Define this constant so the embedded attributes are activated -->
    <DefineConstants>STRONGLY_TYPED_ID_EMBED_ATTRIBUTES</DefineConstants>
  </PropertyGroup>

  <ItemGroup>
    <PackageReference Include="StronglyTypedId" Version="1.0.0" 
        ExcludeAssets="compile;runtime" PrivateAssets="all" />
        <!-- Add this  ☝ so you don't compile against the marker attribute dll -->
  </ItemGroup>
</Project>

Now, I can't really think of why someone would want to do that, but seeing as I already had the code written for the original approach, I left it there for anyone that needs it! 😄

Summary

In this post I describe the journey I went through deciding how to handle marker attributes for my source generator. I described 4 main approaches: Directly referencing the source generator dll in the consuming project; creating two independent NuGet packages; making the marker attribute NuGet package optional using conditional compilation; and embedding the marker attribute dll and generator dll in the same NuGet package. The final option seemed like the best approach, and gives the smoothest experience for users.

NetEscapades.EnumGenerators: a source generator for enum performance

$
0
0
NetEscapades.EnumGenerators: a source generator for enum performance

In this post I describe a source generator I created to improve the performance of enum operations. It is available as a NuGet package, so you're free to use it in your projects too!

The NetEscapades.EnumGenerators NuGet package currently generates 7 useful enum methods that are much faster than their built-in equivalents:

  • ToStringFast() (replaces ToString())
  • IsDefined(T value) (replaces Enum.IsDefined<T>(T value))
  • IsDefined(string name) (new, is the provided string a known name of an enum)
  • TryParse(string? name, bool ignoreCase, out T value) (replaces Enum.TryParse())
  • TryParse(string? name, out T value) (replaces Enum.TryParse())
  • GetValues() (replaces Enum.GetValues())
  • GetNames() (replaces Enum.GetNames())

You can see the benchmarks for these methods below, or read on to learn why you should use them, and how to use the source generator in your project.

Why use a source generator for enums? Performance

One of the first questions you should be asking yourself is why use a source generator? The simple answer is that enums can be very slow in some cases. By using a source generator you can get some of this performance back.

For example, let's say you have this simple enum:

public enum Colour
{
    Red = 0,
    Blue = 1,
}

At some point, you want to print out the name of the enum using ToString(). No problem, right?

public void PrintColour(Colour colour)
{
    Console.WriteLine("You chose "+ colour.ToString()); // You chose Red
}

So what's the problem? Well, unfortunately, calling ToString() on an enum is really slow. We'll look at how slow shortly, but first we'll look at a fast implementation, using modern C#:

public static class ColourExtensions
{
    public string ToStringFast(this Colour colour)
        => colour switch
        {
            Colour.Red => nameof(Colour.Red),
            Colour.Blue => nameof(Colour.Blue),
            _ => colour.ToString(),
        }
    }
}

This simple switch statement checks for each of the known values of Colour and uses nameof to return the textual representation of the enum. If it's an unknown value, then the underlying value is returned using the built-in ToString() implementation.

You always have to be careful about these unknown values: for example this is valid C# PrintColour((Colour)123)

If we compare this simple switch statement to the default ToString() implementation using BenchmarkDotNet for a known colour, you can see how much faster our implementation is:

BenchmarkDotNet=v0.13.1, OS=Windows 10.0.19042.1348 (20H2/October2020Update)
Intel Core i7-7500U CPU 2.70GHz (Kaby Lake), 1 CPU, 4 logical and 2 physical cores
  DefaultJob : .NET Framework 4.8 (4.8.4420.0), X64 RyuJIT
.NET SDK=6.0.100
  DefaultJob : .NET 6.0.0 (6.0.21.52210), X64 RyuJIT
Method FX Mean Error StdDev Ratio Gen 0 Allocated
ToString net48 578.276 ns 3.3109 ns 3.0970 ns 1.000 0.0458 96 B
ToStringFast net48 3.091 ns 0.0567 ns 0.0443 ns 0.005 - -
ToString net6.0 17.9850 ns 0.1230 ns 0.1151 ns 1.000 0.0115 24 B
ToStringFast net6.0 0.1212 ns 0.0225 ns 0.0199 ns 0.007 - -

First off, it's worth pointing out that ToString() in .NET 6 is over 30× faster and allocates only a quarter of the bytes than the method in .NET Framework! Compare that to the "fast" version though, and it's still super slow!

As fast as it is, creating the ToStringFast() method is a bit of a pain, as you have to make sure to keep it up to date as your enum changes. That's where the NetEscapades.EnumGenerators source generator comes in!

Installing the NetEscapades.EnumGenerators source generator

You can install the NetEscapades.EnumGenerators NuGet package containing the source generator by running the following from your project directory:

dotnet add package NetEscapades.EnumGenerators --prerelease

Note that this NuGet package uses the .NET 6 incremental generator APIs, so you must have the .NET 6 SDK installed, though you can target earlier frameworks.

This adds the package to your project file:

<PackageReference Include="NetEscapades.EnumGenerators" Version="1.0.0-beta04" />

I suggest you update this to set PrivateAssets="all", and ExcludeAssets="runtime":

<PackageReference Include="NetEscapades.EnumGenerators" Version="1.0.0-beta04" 
    PrivateAssets="all" ExcludeAssets="runtime" />

Setting PrivateAssets="all" means any projects referencing this one won't get a reference to the NetEscapades.EnumGenerators package. Setting ExcludeAssets="runtime" ensures the NetEscapades.EnumGenerators.Attributes.dll file used by the source generator is not copied to your build output (it is not required at runtime).

This package uses the marker-attribute approach I described in my previous post to avoid transitive project reference issues.

Using the source generator

Adding the package to your project automatically adds a marker attribute, [EnumExtensions], to your project. To use the generator, add the [EnumExtensions] attribute to an enum. For example:

using NetEscapades.EnumGenerators;

[EnumExtensions]
public enum Colour
{
    Red = 0,
    Blue = 1,
}

This generates various extension methods for your enum, including ToStringFast(). You can use this method anywhere you would ordinarily call ToString() on the enum, and benefit from the performance improvement for known values:

public void PrintColour(Colour colour)
{
    Console.WriteLine("You chose "+ colour.ToStringFast()); // You chose Red
}

You can view the definition of ToStringFast() by navigating to it's definition:

The ToStringFast definition for Colour

By default, source generators don't write their output to disk. In a previous post I described how you can set <EmitCompilerGeneratedFiles> and <CompilerGeneratedFilesOutputPath> to persist this files to disk.

The ToStringFast() method above is low-hanging fruit for speeding up enums, it's one many people know about. But many of the methods around enums are quite slow. The source generator can help with those too!

Source generating other helper methods

A recent tweet from Bartosz Adamczewski highlighted how slow another enum method is, Enum.IsDefined<T>(T value):

As shown in the benchmarks above, calling Enum.IsDefined<T>(T value) can be slower than you might expect! Luckily, if you're using NetEscapades.EnumGenerators you get a fast version of this method generated for free:

internal static partial class ColourExtensions
    public static bool IsDefined(Colour value)
        => value switch
        {
            Colour.Red => true,
            Colour.Blue => true,
            _ => false,
        };

Rather than generate this as an extension method, this method is exposed as a static on the generated static class. The same is true for all the additional helper functions generated by the source generator.

The benchmarks for this method are in-line with those shown by Bartosz:

BenchmarkDotNet=v0.13.1, OS=Windows 10.0.19042.1348 (20H2/October2020Update)
Intel Core i7-7500U CPU 2.70GHz (Kaby Lake), 1 CPU, 4 logical and 2 physical cores
.NET SDK=6.0.100
  [Host]     : .NET 6.0.0 (6.0.21.52210), X64 RyuJIT
  DefaultJob : .NET 6.0.0 (6.0.21.52210), X64 RyuJIT
Method Mean Error StdDev Median Ratio Gen 0 Allocated
EnumIsDefined 123.6001 ns 1.0314 ns 0.9648 ns 123.7756 ns 1.000 0.0114 24 B
ExtensionsIsDefined 0.0016 ns 0.0044 ns 0.0039 ns 0.0000 ns 0.000 - -

This shows the benefit of two of the source-generated methods, ToStringFast() and IsDefined(). The code below shows the complete generated code for the ColourExtensions class generated by the source generator, including all 7 methods:

#nullable enable
internal static partial class ColourExtensions
{
    public static string ToStringFast(this Colour value)
        => value switch
        {
            Colour.Red => nameof(Colour.Red),
            Colour.Blue => nameof(Colour.Blue),
            _ => value.ToString(),
        };

    public static bool IsDefined(Colour value)
        => value switch
        {
            Colour.Red => true,
            Colour.Blue => true,
            _ => false,
        };

    public static bool IsDefined(string name)
        => name switch
        {
            nameof(Colour.Red) => true,
            nameof(Colour.Blue) => true,
            _ => false,
        };

    public static bool TryParse(
#if NETCOREAPP3_0_OR_GREATER
        [System.Diagnostics.CodeAnalysis.NotNullWhen(true)]
#endif
        string? name, 
        bool ignoreCase, 
        out Colour value)
        => ignoreCase ? TryParseIgnoreCase(name, out value) : TryParse(name, out value);

    private static bool TryParseIgnoreCase(
#if NETCOREAPP3_0_OR_GREATER
        [System.Diagnostics.CodeAnalysis.NotNullWhen(true)]
#endif
        string? name, 
        out Colour value)
    {
        switch (name)
        {
            case { } s when s.Equals(nameof(Colour.Red), System.StringComparison.OrdinalIgnoreCase):
                value = Colour.Red;
                return true;
            case { } s when s.Equals(nameof(Colour.Blue), System.StringComparison.OrdinalIgnoreCase):
                value = Colour.Blue;
                return true;
            case { } s when int.TryParse(name, out var val):
                value = (Colour)val;
                return true;
            default:
                value = default;
                return false;
        }
    }

    public static bool TryParse(
#if NETCOREAPP3_0_OR_GREATER
        [System.Diagnostics.CodeAnalysis.NotNullWhen(true)]
#endif
        string? name, 
        out Colour value)
    {
        switch (name)
        {
            case nameof(Colour.Red):
                value = Colour.Red;
                return true;
            case nameof(Colour.Blue):
                value = Colour.Blue;
                return true;
            case { } s when int.TryParse(name, out var val):
                value = (Colour)val;
                return true;
            default:
                value = default;
                return false;
        }
    }

    public static Colour[] GetValues()
    {
        return new[]
        {
            Colour.Red,
            Colour.Blue,
        };
    }

    public static string[] GetNames()
    {
        return new[]
        {
            nameof(Colour.Red),
            nameof(Colour.Blue),
        };
    }
}

As you can see, there's a lot of code being generated for free here! And just for completeness, the following shows some benchmarks comparing the source-generated methods to their framework equivalents:

BenchmarkDotNet=v0.13.1, OS=Windows 10.0.19042.1348 (20H2/October2020Update)
Intel Core i7-7500U CPU 2.70GHz (Kaby Lake), 1 CPU, 4 logical and 2 physical cores
.NET SDK=6.0.100
  [Host]     : .NET 6.0.0 (6.0.21.52210), X64 RyuJIT
  DefaultJob : .NET 6.0.0 (6.0.21.52210), X64 RyuJIT
Method Mean Error StdDev Ratio Gen 0 Allocated
EnumToString 17.9850 ns 0.1230 ns 0.1151 ns 1.000 0.0115 24 B
ToStringFast 0.1212 ns 0.0225 ns 0.0199 ns 0.007 - -
Method Mean Error StdDev Median Ratio Gen 0 Allocated
EnumIsDefined 123.6001 ns 1.0314 ns 0.9648 ns 123.7756 ns 1.000 0.0114 24 B
ExtensionsIsDefined 0.0016 ns 0.0044 ns 0.0039 ns 0.0000 ns 0.000 - -
Method Mean Error StdDev Ratio Allocated
EnumIsDefinedName 60.735 ns 0.3510 ns 0.3284 ns 1.00 -
ExtensionsIsDefinedName 5.757 ns 0.0875 ns 0.0730 ns 0.09 -
Method Mean Error StdDev Median Ratio RatioSD Allocated
EnumTryParseIgnoreCase 75.20 ns 3.956 ns 10.962 ns 70.55 ns 1.00 0.00 -
ExtensionsTryParseIgnoreCase 14.27 ns 0.486 ns 1.371 ns 13.91 ns 0.19 0.03 -
Method Mean Error StdDev Ratio Gen 0 Allocated
EnumGetValues 470.613 ns 9.3125 ns 16.3101 ns 1.00 0.0534 112 B
ExtensionsGetValues 4.705 ns 0.1455 ns 0.1290 ns 0.01 0.0191 40 B
Method Mean Error StdDev Ratio RatioSD Gen 0 Allocated
EnumGetNames 27.88 ns 1.557 ns 4.540 ns 1.00 0.00 0.0229 48 B
ExtensionsGetNames 12.28 ns 0.315 ns 0.323 ns 0.42 0.08 0.0229 48 B

Basically, all the benchmarks show improved execution times, and most show reduced allocations. These are all Good Things™

Summary

In this post, I described the NetEscapades.EnumGenerators NuGet package. This provides a number of helper methods for working with enums that have better performance than the built-in methods, without requiring anything more than adding a package, and adding an [EnumExtensions] attribute. If it looks interesting, please give it a try, and feel free to raise issues/PRs on GitHub!

Waiting for your ASP.NET Core app to be ready from an IHostedService in .NET 6

$
0
0
Waiting for your ASP.NET Core app to be ready from an IHostedService in .NET 6

In this post I describe how you can wait for your ASP.NET Core app to be ready to receive requests from inside an IHostedService/BackgroundService in .NET 6. This can be useful if your IHostedService needs to send requests to your ASP.NET Core app, if it needs to find the URLs the app is listening on, or if it otherwise needs to wait for the app to be fully started.

Why do we need to find the URLs in a hosted service?

One of the most popular posts on my blog is "5 ways to set the URLs for an ASP.NET Core app". In a follow up post, I showed how you could tell ASP.NET Core to randomly choose a free port, instead of having to provide a specific port. The difficulty with that approach is finding out which port ASP.NET Core has chosen.

I was recently writing a small test app in which I needed to find which URLs the application was listening on from inside a BackgroundService. The details of why aren't very important, but I wanted the BackgroundService to call some public endpoints in the app as a "self test":

  • App starts up, starts listening on a random port
  • Hosted service calls public endpoint in the app
  • After receiving the response, the service triggers the app to shut down.

The question was - how could I determine which URLs Kestrel was listening on from the hosted service.

Finding which URLs ASP.NET Core is listening on

As I discussed in a previous post, finding the URLs an ASP.NET Core app is listening on is easy enough. If you fetch an IServer instance using dependency injection, then you can check the IServerAddressesFeature on the Features property. This exposes the Addresses property, which lists the addresses.

void PrintAddresses(IServiceProvider services)
{
    Console.WriteLine("Checking addresses...");
    var server = services.GetRequiredService<IServer>();
    var addressFeature = server.Features.Get<IServerAddressesFeature>();
    foreach(var address in addressFeature.Addresses)
    {
        Console.WriteLine("Listing on address: " + address);
    }
}

So if it's as simple as that, then there shouldn't be any problems right? You can fetch the addresses from the IHostedService/BackgroundService and send requests to them? Not exactly…

IHostedService startup order in .NET 6

In .NET Core 2.x, before the introduction of the generic IHost abstraction, the IHostedService for your application would start after Kestrel had been fully configured and started listening for requests. I discussed this in a series on running async startup tasks back then. Somewhat ironically, the reason IHostedService wasn't suitable for running async startup tasks back then (they started after Kestrel) would make it perfect for my use case now, as I could fetch the Kestrel addresses, knowing that they would be available.

In .NET Core 3.0, when ASP.NET Core was re-platformed on top of the generic IHost, things changed. Now Kestrel would run as an IHostedService itself, and it would be started last, after all other IHostedServices. This made IHostedService perfect for the async start tasks, but now you couldn't rely on Kestrel being available when your IHostedService runs.

In .NET 6, things changed slightly again with the introduction of the minimal hosting API. With these hosting APIs you can create incredibly terse programs (no need for Startup classes, and "magic" method names etc) but there are some differences around how things are created and started. Specifically, the IHostedServices are started when you call WebApplication.Run(), which is typically after you've configured your middleware and endpoints:

var builder = WebApplication.CreateBuilder(args);
builder.Services.AddHostedService<TestHostedService>();
var app = builder.Build();

app.MapGet("/", () => "Hello World!");

app.Run(); // 👈 TestHostedService is started here

This differs slightly from .NET Core 3.x/.NET 5/IHost scenario, in which the hosted services would be started before the Startup.Configure() method was called. Now all the endpoints and middleware are added, and it's only when you call WebApplication.Run() that all the hosted services are started.

This difference doesn't necessarily change anything for our scenario, but it's something to be aware of if you need your IHostedService to start before the middleware routes are configured. See this GitHub issue for more details.

The end result is that we can't rely on Kestrel having started and being available when your IHostedService/BackgroundService runs, so we need a way of waiting for this in our service.

Receiving app status notifications with IHostApplicationLifetime

Luckily, there's a service available in all ASP.NET Core 3.x+ apps that can notify you as soon as your application has finished starting, and is handling requests: IHostApplicationLifetime. This interface includes 3 properties which can notify you about stages of your application lifecycle, and one method for triggering your application to shut down

public interface IHostApplicationLifetime
{
    CancellationToken ApplicationStarted { get; }
    CancellationToken ApplicationStopping { get; }
    CancellationToken ApplicationStopped { get; }
    void StopApplication();
}

As you can see, each of the properties are a CancellationToken. This might seem an odd choice for receiving notifications (nothing is cancelled when your application has just started!🤔) but it provides a convenient way to safely run callbacks when an event occurs. For example:

public void PrintStartedMessage(IHostApplicationLifetime lifetime)
{
    lifetime.ApplicationStarted.Register(() => Console.WriteLine("App has started!"));
}

As this shows, you can call Register() and pass in an Action which is executed when the app has started up. Similarly, you can receive notifications for the other statuses, such as "stopping" or "stopped".

The Stopping callback is particularly useful, for example, as it allows you to block shutdown until the callback completes, giving you a chance to drain resource or do other long-running cleanup for example.

While this is useful, it is just one piece of the puzzle. We need to run some asynchronous code (calling an HTTP API for example) when the app has started, so how can we do that safely?

Waiting for Kestrel to be ready in a background service

Lets start with something concrete, a BackgroundService which we want to "block" until the application has started:

public class TestHostedService: BackgroundService
{
    private readonly IServiceProvider _services;
    public TestHostedService(IServiceProvider services)
    {
        _services = services;
    }

    protected override async Task ExecuteAsync(CancellationToken stoppingToken)
    {
        // TODO: wait here until Kestrel is ready

        PrintAddresses(_services);
        await DoSomethingAsync();
    }
}

In an initial approach, we can use the IHostApplicationLifetime and a simple bool to wait for the app to be ready, looping until we receive that signal:

public class TestHostedService: BackgroundService
{
    private readonly IServiceProvider _services;
    private volatile bool _ready = false; // 👈 New field
    public TestHostedService(IServiceProvider services, IHostApplicationLifetime lifetime)
    {
        _services = services;
        lifetime.ApplicationStarted.Register(() => _ready = true); // 👈 Update the field when Kestrel has started
    }

    protected override async Task ExecuteAsync(CancellationToken stoppingToken)
    {
        while(!_ready)
        {
            // App hasn't started yet, keep looping!
            await Task.Delay(1_000)
        }

        PrintAddresses(_services);
        await DoSomethingAsync();
    }
}

This works, but it's not exactly pretty. Every second the ExecuteAsync method is checking the _ready field, and is then going to sleep again if it's not set. That probably won't happen too many times (unless your app startup is very slow), but it still feels a bit messy.

I'm explicitly ignoring the stoppingToken passed to the method for now, we'll come back to it later!

The cleanest approach I have found is to use a helper class as an intermediary between the "started" cancellation token signal, and the async code we need to run. Ideally, we want to await a Task that completes when the ApplicationStarted signal is received. The following code uses TaskCompletionSource to do just that:

public class TestHostedService: BackgroundService
{
    private readonly IServiceProvider _services;
    private readonly IHostApplicationLifetime _lifetime;
    private readonly TaskCompletionSource _source = new(); // 👈 New field
    public TestHostedService(IServiceProvider services, IHostApplicationLifetime lifetime)
    {
        _services = services;
        _lifetime = lifetime;

        // 👇 Set the result in the TaskCompletionSource
        _lifetime.ApplicationStarted.Register(() => _source.SetResult()); 
    }

    protected override async Task ExecuteAsync(CancellationToken stoppingToken)
    {
        await _source.Task.ConfigureAwait(false); // Wait for the task to complete!

        PrintAddresses(_services);
        await DoSomethingAsync();
    }
}

This approach is much nicer. Instead of using polling to set a field, we have a single await of a Task, which completes when the ApplicationStarted event triggers. This is the suggested approach any time you find yourself wanting to "await a CancellationToken" like this.

However, there's a potential problem in the code. What if the application never starts up!?

If the ApplicationStarted token never triggers, then the TaskCompletionSource.Task will never complete, and the ExecuteAsync method will never complete! This is unlikely, but could happen if there's a problem starting your application, for example.

Luckily there's a fix for this by using the stoppingToken passed to ExecuteAsync and another TaskCompletionSource! For example:

public class TestHostedService: BackgroundService
{
    private readonly IServiceProvider _services;
    private readonly IHostApplicationLifetime _lifetime;
    private readonly TaskCompletionSource _source = new();
    public TestHostedService(IServiceProvider services, IHostApplicationLifetime lifetime)
    {
        _services = services;
        _lifetime = lifetime;

        _lifetime.ApplicationStarted.Register(() => _source.SetResult());
    }

    protected override async Task ExecuteAsync(CancellationToken stoppingToken)
    {
        // 👇 Create a TaskCompletionSource for the stoppingToken
        var tcs = new TaskCompletionSource();
        stoppingToken.Register(() => tcs.SetResult());

        // wait for _either_ of the sources to complete
        await Task.WhenAny(tcs.Task, _source.Task).ConfigureAwait(false);

        // if cancellation was requested, stop 
        if (stoppingToken.IsCancellationRequested)
        {
            return;
        }

        // Otherwise, app is ready, do your thing
        PrintAddresses(_services);
        await DoSomethingAsync();
    }
}

This code is slightly more complex, but it gracefully handles everything we need. We could even extract it into a handy helper method.

public class TestHostedService: BackgroundService
{
    private readonly IServiceProvider _services;
    private readonly IHostApplicationLifetime _lifetime;
    public TestHostedService(IServiceProvider services, IHostApplicationLifetime lifetime)
    {
        _services = services;
        _lifetime = lifetime;

    }

    protected override async Task ExecuteAsync(CancellationToken stoppingToken)
    {
        if (!await WaitForAppStartup(_lifetime, stoppingToken))
        {
            return;
        }

        PrintAddresses(_services);
        await DoSomethingAsync();
    }

    static async Task<bool> WaitForAppStartup(IHostApplicationLifetime lifetime, CancellationToken stoppingToken)
    {
        var startedSource = new TaskCompletionSource();
        lifetime.ApplicationStarted.Register(() => startedSource.SetResult());
        var cancelledSource = new TaskCompletionSource();
        stoppingToken.Register(() => cancelledSource.SetResult());

        Task completedTask = await Task.WhenAny(startedSource.Task, cancelledSource.Task).ConfigureAwait(false);

        // If the completed tasks was the "app started" task, return true, otherwise false
        return completedTask == startedSource.Task;
    }
}

Whichever approach you take, you can now execute your background task code, safe in the knowledge that Kestrel will be listening!

Summary

In this post I described how to wait in a BackgroundService/IHostedService for your ASP.NET Core application to finish starting, so you can send requests to Kestrel, or retrieve the URLs it's using (for example). This approach uses the IHostApplicationLifetime service available through dependency injection. You can hook up a callback to the ApplicationStarted CancellationToken it exposes to trigger a TaskCompletionSource, which you can then await in your ExecuteAsync method. This avoids the need for looping constructs, or for running async code in a sync context.

Please stop lying about .NET Standard 2.0 support!

$
0
0
Please stop lying about .NET Standard 2.0 support!

This post is a bit of a rant about an issue I've been fighting against more and more recently: NuGet packages lying about supporting .NET Standard 2.0 when they don't, because they don't work on .NET Core 2.x/3.0.

A brief history lesson: .NET Standard 2.0

When Microsoft first released .NET Core 1.0, it only contained a small selection of the APIs available in .NET Framework at the time. In an effort to make it easier to write libraries that could be used in both .NET Framework and .NET Core (without needing to multi-target), they introduced the concept of .NET Standard.

Unlike .NET Core and .NET Framework which are platforms you can download and run on, .NET Standard is just an interface definition. Each version of .NET Standard contains a list of APIs a platform must support in order to implement that version of .NET Standard. For example, you can find the APIs in .NET Standard 1.0 here.

Each version of .NET Standard is a strict superset of the earlier versions, so all the APIs from earlier versions are available on later versions (let's just pretend .NET Standard 1.5/1.6 didn't happen😉). Similarly, if a platform implements, say, .NET Standard 1.4, then by definition, it implements .NET Standard 1.0-1.3 as well:

Each version of .NET Standard includes all the APIs from previous versions. The smaller the version of .NET Standard, the smaller the number of APIs. Taken from my book, ASP.NET Core in Action, Second Edition

You can also think of .NET Standard in terms of C# classes and interfaces. I like this metaphor from David Fowler.

.NET Standard 2.0 was released with .NET Core 2.0, and it introduced a lot of new APIs over the previous versions. It was heavily modelled on the surface area of .NET Framework 4.6.1. The upshot was that you should be able to write a library that targets .NET Standard 2.0 and it should work on .NET Framework 4.6.1+ and .NET Core 2.0+.

And that worked (mostly), until very recently, when it stopped working.

That's a lot of integration testing

In the Datadog APM tracer library, we multi-target for maximum compatibility with customers. We currently support .NET 4.6.1, .NET Standard 2.0, and .NET Core 3.1, which means we can run on any application that targets .NET Framework 4.6.1+ or .NET Core 2.1+.

The Datadog tracer integrates with a whole range of libraries to add APM tracing capabilities, in a wide range of old and new libraries, across all these frameworks. Obviously that means we need to do a lot of integration testing, so we run extensive integration tests for the packages we support, across a big range of TFMs:

<PropertyGroup>
    <!-- only run .NET Framework tests on Windows -->
    <TargetFrameworks Condition="'$(OS)' == 'Windows_NT'">net461;netcoreapp2.1;netcoreapp3.0;netcoreapp3.1;net5.0;net6.0</TargetFrameworks>
    <TargetFrameworks Condition="'$(OS)' != 'Windows_NT'">netcoreapp2.1;netcoreapp3.0;netcoreapp3.1;net5.0;net6.0</TargetFrameworks>
</PropertyGroup>

The Datadog tracer relies on internal implementation details of most of the libraries it supports, which means we have to be very careful to look for breaking changes. Consequently, we run tests against the latest minor version of each package, for all the supported framework versions. We programmatically generate this list for each library, based on our supported version range, and the frameworks that the library itself supports. For example, for Npgsql, we generate the following XUnit theory data:

public static IEnumerable<object[]> Npgsql =>
    new List<object[]>
    {
#if NET461
        new object[] { "4.0.12" },
        new object[] { "4.1.10" },
        new object[] { "5.0.12" },
        new object[] { "6.0.3" },
#endif
#if NETCOREAPP2_1
        new object[] { "4.0.12" },
        new object[] { "4.1.10" },
        new object[] { "5.0.12" },
#endif
#if NETCOREAPP3_0
        new object[] { "4.0.12" },
        new object[] { "4.1.10" },
        new object[] { "5.0.12" },
#endif
#if NETCOREAPP3_1
        new object[] { "4.0.12" },
        new object[] { "4.1.10" },
        new object[] { "5.0.12" },
        new object[] { "6.0.3" },
#endif
#if NET5_0
        new object[] { "4.0.12" },
        new object[] { "4.1.10" },
        new object[] { "5.0.12" },
        new object[] { "6.0.3" },
#endif
#if NET6_0
        new object[] { "4.0.12" },
        new object[] { "4.1.10" },
        new object[] { "5.0.12" },
        new object[] { "6.0.3" },
#endif
    }

The eagle-eyed among you may notice that the #if for .NET Core 2.1 and .NET Core 3.0 don't include a 6.x version of the Npgsql, even though Npgsql clearly shows it supports .NET Standard 2.0, and hence should support both .NET Core 2.1 and .NET Core 3.0:

Npgsql NuGet package, showing the supported framework versions

The problem is, it doesn't. So what gives?

When a package lies about .NET Standard 2.0

To be clear, it isn't Npgsql lying, it's one of its dependencies, System.Runtime.CompilerServices.Unsafe. This package claims to support

  • .NET Framework 4.6.1
  • .NET Standard 2.0
  • .NET Core 3.1
  • .NET 6

So you can quite happily install it in a .NET Core 2.1 or .NET Core 3.0 app thanks to the .NET Standard 2.0 target:

> dotnet add package System.Runtime.CompilerServices.Unsafe
  Determining projects to restore...
  Writing C:\Users\Sock\AppData\Local\Temp\tmp9167.tmp
info : Adding PackageReference for package 'System.Runtime.CompilerServices.Unsafe' into project 'C:\repos\temp\temp.csproj'.
info :   GET https://api.nuget.org/v3/registration5-gz-semver2/system.runtime.compilerservices.unsafe/index.json
info :   OK https://api.nuget.org/v3/registration5-gz-semver2/system.runtime.compilerservices.unsafe/index.json 423ms
info : Restoring packages for C:\repos\temp\temp.csproj...
info : Package 'System.Runtime.CompilerServices.Unsafe' is compatible with all the specified frameworks in project 'C:\repos\temp\temp.csproj'.
info : PackageReference for package 'System.Runtime.CompilerServices.Unsafe' version '6.0.0' added to file 'C:\repos\temp\temp.csproj'.
info : Committing restore...
info : Generating MSBuild file C:\repos\temp\temp5\obj\temp5.csproj.nuget.g.props.
info : Generating MSBuild file C:\repos\temp\temp5\obj\temp5.csproj.nuget.g.targets.
info : Writing assets file to disk. Path: C:\repos\temp\temp5\obj\project.assets.json
log  : Restored C:\repos\temp\temp.csproj (in 151 ms).

But if you run dotnet restore or dotnet build you suddenly get an error:

C:\Users\Sock\.nuget\packages\system.runtime.compilerservices.unsafe\6.0.0\buildTransitive\netcoreapp2.0\System.Runtime.CompilerServices.Unsafe.targets(4,5): 
error : System.Runtime.CompilerServices.Unsafe doesn't support netcoreapp2.1. Consider updating your TargetFramework to netcoreapp3.1 or later. [C:\repos\temp\temp.csproj]

So what's going on here? The package supports .NET Standard, why can't you use it in a .NET Standard compatible project?!

Well, you can. You just can't use in a .NET Core 2.1 or .NET Core 3.0 app. You can use it in a Xamarin app, a UWP app, a Unity app, anything else that implements .NET Standard 2.0. Just not .NET Core before .NET Core 3.1.

But... why?

The short answer is that .NET Core 2.1 and .NET Core 3.0 are now out of support. According to the original PR and this document about the change:

Continuing to build for all frameworks increases the complexity and size of a package. In the past, .NET solved this issue by building only for current frameworks and harvesting binaries for older frameworks. Harvesting means that during build, the earlier version of the package is downloaded and the binaries are extracted.

While consuming a harvested binary means that you can always update without worrying that a framework is dropped, it also means that you don't get any bug fixes or new features. In other words, harvested assets can't be serviced. That's hidden from you because you're able to keep updating the package to a later version even though you're consuming the same old binary that's no longer updated.

Starting with .NET 6, .NET no longer performs any form of harvesting to ensure that all shipped assets can be serviced.

On the one hand, this all seems reasonable to me. Out of support versions shouldn't be holding back development. They don't need to be supported, and don't need to receive any ongoing development.

But, if the package does still support .NET Standard 2.0 then you don't need to put any effort into supporting those out-of support versions, you get that support for free.

The whole point of .NET Standard 2.0 is that any platform that implements it can use packages targeting .NET Standard 2.0.

So you can absolutely remove all that complexity from the build, and if you're targeting .NET Standard 2.0, then it doesn't matter, you should still be able to use them! But instead, the package explicitly errors when you try to use it in a .NET Core 2.1/3.0 app.

I don't see anything in the document or PR that address why they need to error. All I can find is a reference to the fact you'll get errors at runtime, though in my limited testing, I haven't see any. 🤷‍♂️

Fundamentally, this feels like a big change in support policy. where "not supported" no longer means "you're on your own if it doesn't work" to "we are actively stopping you".

So does it really matter? Is it reasonable?

So the question is, am I getting het up about nothing here? So a bunch of NuGet packages (~50) imply they're compatible with .NET Core 2.1 but then error when you restore/build. Is that a big deal? If you're using an app that old, you will find out very quickly and can (hopefully) stay on the older version of the package.

I'd argue that there are 2 fundamental problems with this:

  • .NET Standard is now meaningless
  • These packages are often transitive dependencies

Taking the first point, this fundamentally breaks the contract that .NET Standard was meant to provide. Yes, .NET Standard is becoming less relevant with the combining of Xamarin/Maui into .NET proper, but that shouldn't mean Microsoft goes out of its way to be actively hostile to its whole purpose.

If they don't really support .NET Standard 2.0 (because they don't run on platforms that support .NET Standard 2.0), then I feel like they could/should have used more specific TFMs for the platforms they do support. Yes, that means more targets in the packages again, but at least those targets are correct.

But the real issue is when they're used as transitive dependencies. Take the Npgsql package, for example. As we've already seen, this supports .NET Standard 2.0, but due to a transitive dependency on System.Runtime.CompilerServices.Unsafe, it can no longer be used with .NET Core 2.1/3.0.

Now, the author of Npgsql, Shay Rojansky works for Microsoft, so he definitely understands the implications, and made the break on a major version, so fair enough. But what about other package authors?

  • The CouchbaseNetClient package removed support in version 3.2.6, when it works on .NET Core 2.1 in version 3.2.5.
  • StackExchange.Redis 2.2.x fails at runtime on .NET Core 2.1/3.0 with "The assembly for System.Runtime.CompilerServices.Unsafe could not be loaded".

I'm sure there's going to be more, and again, I'd like to reiterate that I have no expectation or desire for package authors to support these old frameworks. The problem is that .NET Standard doesn't mean anything any more.

And just to be clear, the first builds of .NET 7 show that .NET Core 3.1 and .NET 5 targets are going to be removed (as these will be out of support by November 2022). So bear that in mind in the future.

How are they even doing it anyway?

OK, so that's the way it is now. But some of you might be wondering how these packages are causing the errors when you restore/build. You can find the answer inside the NuGet package. As shown below, there's a buildTransitive folder which contains a netcoreapp2.0 folder with a .targets file, and an empty netcoreapp3.1 folder.

The contents of the nuget package

The buildTransitive folder allows you to add .targets and .props files that apply to both the consuming project, and any downstream projects that consume that project.

By including the .targets file in a netcoreapp2.0 folder and an empty netcoreapp3.1 folder, the .targets file will only apply to projects using one of the following target frameworks:

  • .NET Core 2.0
  • .NET Core 2.1
  • .NET Core 2.2
  • .NET Core 3.0

The .targets file itself simply writes an Error (unless the variable SuppressTfmSupportBuildWarnings is set)

<Project InitialTargets="NETStandardCompatError_System_Runtime_CompilerServices_Unsafe_netcoreapp3_1">
  <Target Name="NETStandardCompatError_System_Runtime_CompilerServices_Unsafe_netcoreapp3_1"
          Condition="'$(SuppressTfmSupportBuildWarnings)' == ''">
    <Error Text="System.Runtime.CompilerServices.Unsafe doesn't support $(TargetFramework). Consider updating your TargetFramework to netcoreapp3.1 or later." />
  </Target>
</Project>

This causes all restore/build operations to error, as we've already seen. It's pretty elegant, in its own way.

As you can see from the file above, you could try setting SuppressTfmSupportBuildWarnings to build and run using the .NET Standard 2.0 assets. From my (limited) testing, this seems to work fine on .NET Core 2.1 and .NET Core 3.0. But do you really want to risk it? 🤔

So, am I overreacting here?

Yeah, probably.

Summary

In this post I described how some NuGet packages that support .NET Standard 2.0, don't support .NET Core 2.1/.NET Core 3.0. You can install these NuGet packages, as they appear to be supported in .NET Core 2.1 projects. But when you run dotnet restore/dotnet build, you get an error saying the package isn't supported. In my opinion, this fundamentally breaks the promise of .NET Standard.

Cancelling await calls in .NET 6 with Task.WaitAsync()

$
0
0
Cancelling await calls in .NET 6 with Task.WaitAsync()

In this post I discuss the new Task.WaitAsync() APIs introduced in .NET 6, how you can use them to "cancel" an await call, and how they can replace other approaches you may be using currently.

The new Task.WaitAsync API in .NET 6

In a recent post, I described how to use a TaskCompletionSource with IHostApplicationLifetime as a way of "pausing" a background service until the application starts up. In that code I used the following function that waits for a TaskCompletionSource.Task to complete, but also supports cancellation via a CancellationToken:

static async Task<bool> WaitForAppStartup(IHostApplicationLifetime lifetime, CancellationToken stoppingToken)
{
    var startedSource = new TaskCompletionSource();
    var cancelledSource = new TaskCompletionSource();

    using var reg1 = lifetime.Register(() => startedSource.SetResult());
    using var reg2 = stoppingToken.Register(() => cancelledSource.SetResult());

    Task completedTask = await Task.WhenAny(
        startedSource.Task,
        cancelledSource.Task).ConfigureAwait(false);

    // If the completed tasks was the "app started" task, return true, otherwise false
    return completedTask == startedSource.Task;
}

This code works on many versions of .NET, but in the post I specifically mentioned that this was talking about .NET 6, so Andreas Gehrke pointed out that I could have used a simpler approach:

Andreas is referring to a new API introduced to the Task (and Task<T>) API, which allows you to await a Task while also making that await cancellable:

namespace System.Threading.Tasks;
public class Task
{
    public Task WaitAsync(CancellationToken cancellationToken);
    public Task WaitAsync(TimeSpan timeout);
    public Task WaitAsync(TimeSpan timeout, CancellationToken cancellationToken);
}

As you can see, there are three new methods added to Task, all are overloads of WaitAsync(). This is useful for the exact scenario I described earlier—you want to await the completion of a Task, but want that await to be cancellable by a CancellationToken.

Based on this new API, we could rewrite the WaitForAppStartup function as the following:

static async Task<bool> WaitForAppStartup(IHostApplicationLifetime lifetime, CancellationToken stoppingToken)
{
    try
    {
        var tcs = new TaskCompletionSource();
        using var _ = lifetime.ApplicationStarted.Register(() => tcs.SetResult());
        await tcs.Task.WaitAsync(stoppingToken).ConfigureAwait(false);
        return true;
    }
    catch(TaskCanceledException)
    {
        return false;
    }
}

I think this is much easier to read, so thanks Andreas for pointing it out!

Awaiting a Task with a timeout

The Task.WaitAsync(CancellationToken cancellationToken) method (and its counterpart on Task<T>) is very useful when you want to make an await cancellable by a CancellationToken. The other overloads are useful if you want to make it cancellable based on a timeout.

For example, consider the following pseudo code:

public async Task<int> GetResult()
{
    var cachedResult = await LoadFromCache();
    if (cachedResult is not null)
    {
        return cachedResult.Value;
    }

    return await LoadDirectly(); //TODO: store the result in the cache

    async Task<int?> LoadFromCache()
    {
        // simulating something quick
        await Task.Delay(TimeSpan.FromMilliseconds(10));

        return 123;
    }

    async Task<int> LoadDirectly()
    {
        // simulating something slow
        await Task.Delay(TimeSpan.FromSeconds(30));

        return 123;
    }
}

This code shows a single public method, with two local functions:

  • GetResult() returns the result of an expensive operation, the result of which may be cached
  • LoadFromCache() returns the result from a cache, with a short delay
  • LoadDirectly() returns the result from the original source, which takes a lot longer

This code is pretty typical for when you need to cache the result of an expensive operation. But note that the "caching API" in this example is async. This could be because you're using the IDistributedCache in ASP.NET Core for example.

If all goes well then calling GetResult() multiple times should work like the following:

var result1 = await GetResult(); // takes ~5s
var result2 = await GetResult(); // takes ~10ms, as the result is cached
var result3 = await GetResult(); // takes ~10ms, as the result is cached

In this case, the cache is doing a great job speeding up subsequent requests for the result.

But what if something goes wrong with the distributed cache?

For example, maybe you're using Redis as a distributed cache, which most of the time is lighting-fast. But for some reason, your Redis server suddenly becomes unavailable: maybe the server crashes, there's network problems, or the network just becomes very slow.

Suddenly, your LoadFromCache() method is actually making the call to GetResult() slower, not faster!😱

Ideally, you want to be able to say "Try and load this from the cache, but if it takes longer than x milliseconds, then stop trying". i.e. you want to set a timeout.

Now, you may well be able to add a sensible timeout within the Redis connection library itself, but assume for a moment that you can't, or that your caching API doesn't provide any such APIs. In that case, you can use .NET 6's Task<T>.WaitAsync(TimeSpan):

public async Task<int> GetResult()
{
    // set a threshold to wait for the cached result
    var cacheTimeout = TimeSpan.FromMilliseconds(100);
    try
    {
        var cachedResult = await LoadFromCache().WaitAsync(cacheTimeout);
        if (cachedResult is not null)
        {
            return cachedResult.Value;
        }
    }
    catch(TimeoutException)
    {
        // cache took too long
    }

    return await LoadDirectly(); //TODO: store the result in the cache
    // ...
}

With this change, GetResult() won't wait longer than 100ms for the cache to return. If LoadFromCache() exceeds that timeout, Task.WaitAsync() throws a TimeoutException and the function immediately loads from LoadDirectly() instead.

Note that if you're using the CancellationToken overload of WaitAsync(), you'll get a TaskCanceledException when the task is cancelled. If you use a timeout, you'll get TimeoutException.

If you wanted this behaviour before .NET 6, you could replicate it using an extension something like the following:

// Extension method on `Task<T>`
public static async Task<TResult> TimeoutAfter<TResult>(this Task<TResult> task, TimeSpan timeout)
{
    // We need to be able to cancel the "timeout" task, so create a token source
    var cts = new CancellationTokenSource();

    // Create the timeout task (don't await it)
    var timeoutTask = Task<TResult>.Delay(timeout, cts.Token);

    // Run the task and timeout in parallel, return the Task that completes first
    var completedTask = await Task<TResult>.WhenAny(task, timeoutTask).ConfigureAwait(false);

    if (completedTask == task)
    {
        // Cancel the "timeout" task so we don't leak a Timer
        cts.Cancel();
        // await the task to bubble up any errors etc
        return await task.ConfigureAwait(false);
    }
    else
    {
         throw new TimeoutException($"Task timed out after {timeout}");
    }
}

Having this code be part of the .NET base class library is obviously very handy, but it also helps avoid subtle bugs from writing this code yourself. In the extension above, for example, it would be easy to forget to cancel the Task.Delay() call. This would leak a Timer instance until the delay trigger fires in the background. In high-throughput code, that could easily become an issue!

On top of that, .NET 6 adds a further overload that supports both a timeout, and a CancellationToken, saving you one more extension method to write 🙂 In the next post I'll dive into how this is actually implemented under the hood, as there's a lot more to it than the extension method above!

Summary

In this post I discussed the new Task.WaitAsync() method overloads introduced in .NET 6, and how you can use them to simplify any code where you wanted to wait for a Task, but wanted the await to be cancellable either via a CancellationToken or after a specified timeout.

A deep-dive into the new Task.WaitAsync() API in .NET 6

$
0
0
A deep-dive into the new Task.WaitAsync() API in .NET 6

In this post I look at how the new Task.WaitAsync() API is implemented in .NET 6, looking at the internal types used to implement it.

Adding a timeout or cancellation support to await Task

In my previous post, I showed how you could "cancel" an await Task call for a Task that didn't directly support cancellation by using the new WaitAsync() API in .NET 6.

I used WaitAsync() in that post to improve the code that waits for the IHostApplicationLifetime.ApplicationStarted event to fire. The final code I settled on is shown below:

static async Task<bool> WaitForAppStartup(IHostApplicationLifetime lifetime, CancellationToken stoppingToken)
{
    try
    {
        // Create a TaskCompletionSource which completes when 
        // the lifetime.ApplicationStarted token fires
        var tcs = new TaskCompletionSource();
        using var _ = lifetime.ApplicationStarted.Register(() => tcs.SetResult());

        // Wait for the TaskCompletionSource Task, _or_ the stopping Token to fire
        // using the new .NET 6 API, WaitAsync()
        await tcs.Task.WaitAsync(stoppingToken).ConfigureAwait(false);
        return true;
    }
    catch(TaskCanceledException)
    {
        // stoppingToken fired
        return false;
    }
}

In this post, I look at how the .NET 6 API Task.WaitAsync() is actually implemented.

Diving into the Task.WaitAsync implementation

For the rest of the post I'm going to walk through the implementation behind the API. There's not anything very surprising there, but I haven't looked much at the code behind Task and its kin, so it was interesting to see some of the details.

Task.WaitAsync() was introduced in this PR by Stephen Toub.

We'll start with the Task.WaitAsync methods:

public class Task
{
    public Task WaitAsync(CancellationToken cancellationToken) 
        => WaitAsync(Timeout.UnsignedInfinite, cancellationToken);

    public Task WaitAsync(TimeSpan timeout) 
        => WaitAsync(ValidateTimeout(timeout, ExceptionArgument.timeout), default);

    public Task WaitAsync(TimeSpan timeout, CancellationToken cancellationToken)
        => WaitAsync(ValidateTimeout(timeout, ExceptionArgument.timeout), cancellationToken);
}

These three methods all ultimately delegate to a different, private, WaitAsync overload (shown shortly) that takes a timeout in milliseconds. This timeout is calculated and validated in the ValidateTimeout method, shown below, which asserts that the timeout is in the allowed range, and converts it to a uint of milliseconds.

internal static uint ValidateTimeout(TimeSpan timeout, ExceptionArgument argument)
{
    long totalMilliseconds = (long)timeout.TotalMilliseconds;
    if (totalMilliseconds < -1 || totalMilliseconds > Timer.MaxSupportedTimeout)
    {
        ThrowHelper.ThrowArgumentOutOfRangeException(argument, ExceptionResource.Task_InvalidTimerTimeSpan);
    }

    return (uint)totalMilliseconds;
}

Now we come to the WaitAsync method that all the public APIs delegate too. I've annotated the method below:

private Task WaitAsync(uint millisecondsTimeout, CancellationToken cancellationToken)
{
    // If the task has already completed, or if we don't have a timeout OR a cancellation token
    // then there's nothing we can do, and WaitAsync is a noop that returns the original Task
    if (IsCompleted || (!cancellationToken.CanBeCanceled && millisecondsTimeout == Timeout.UnsignedInfinite))
    {
        return this;
    }

    // If the cancellation token has already fired, we can immediately return a cancelled Task
    if (cancellationToken.IsCancellationRequested)
    {
        return FromCanceled(cancellationToken);
    }

    // If the timeout is 0, then we will immediately return a faulted Task
    if (millisecondsTimeout == 0)
    {
        return FromException(new TimeoutException());
    }

    // The CancellationPromise<T> is where most of the heavy lifting happens
    return new CancellationPromise<VoidTaskResult>(this, millisecondsTimeout, cancellationToken);
}

Most of this method is checking whether we can take a fast-path and avoid the extra work involved in creating a CancellationPromise<T>, but if not, then we need to dive into it. Before we do, it's worth addressing the VoidTaskResult generic parameter used with the returned CancellationPromise<T>.

VoidTaskResult is an internal nested type of Task, which is used a little like the unit type in functional programming; it indicates that you can ignore the T.

// Special internal struct that we use to signify that we are not interested in
// a Task<VoidTaskResult>'s result.
internal struct VoidTaskResult { }

Using VoidTaskResult means more of the implementation of Task and Task<T> can be shared. In this case, the CancellationPromise<T> implementation is the same in both the Task.WaitAsync() implementation (shown above), and the generic versions of those methods exposed by Task<TR>..

So with that out the way, let's look at the implementation of CancellationPromise<T> to see how the magic happens.

Under the hood of CancellationPromise<T>

There's quite a few types involved in CancellationPromise that you probably won't be familiar with unless you regularly browse the .NET source code, so we'll take this one slowly.

First of all, we have the type signature for the nested type CancellationPromise<T>:

public class Task
{
    private protected sealed class CancellationPromise<TResult> : Task<TResult>, ITaskCompletionAction
    {
        // ...
    }
}

There's a few things to note in the signature alone:

  • private protected—this modifier means that the CancellationPromise<T> type can only be accessed from classes that derive from Task, and are in the same assembly. Which means you can't use it directly in your user code.
  • Task<TResult>—the CancellationPromise<T> derives from Task<TResult>. For the most part it's a "normal" task, that can be cancelled, completed, or faulted just like any other Task.
  • ITaskCompletionAction—this is an internal interface that essentially allows you to register a lightweight action to take when a Task completes. This is similar to a standard continuation created with ContinueWith, except it is lower overhead. Again, this is internal, so you can't use it in your types. We'll look in more depth at this shortly.

We've looked at the signature, now let's look at it's private fields. The descriptions for these in the source cover it pretty well I think:

/// <summary>The source task.  It's stored so that we can remove the continuation from it upon timeout or cancellation.</summary>
private readonly Task _task;
/// <summary>Cancellation registration used to unregister from the token source upon timeout or the task completing.</summary>
private readonly CancellationTokenRegistration _registration;
/// <summary>The timer used to implement the timeout.  It's stored so that it's rooted and so that we can dispose it upon cancellation or the task completing.</summary>
private readonly TimerQueueTimer? _timer;

So we have 3 fields:

  • The original Task on which we called WaitAsync()
  • The cancellation token registration received when we registered with the CancellationToken. If the default cancellation token was used, this will be a "dummy" default instance.
  • The timer used to implement the timeout behaviour (if required).

Note that the _timer field is of type TimerQueueTimer. This is another internal implementation, this time it is part of the overall Timer implementation. We're going deep enough as it is in this post, so I'll only touch on how this is used briefly below. For now it's enough to know that it behaves similarly to a regular System.Threading.Timer.

So, the CancellationPromise<T> is a class that derives from Task<T> , maintains a reference to the original Task, a CancellationTokenRegistration, and a TimerQueueTimer.

The CancellationPromise constructor

Lets look at the constructor now. We'll take this in 4 bite-size chunks. First off, the arguments passed in from Task.WaitAsync() have some debug assertions applied, and then the original Task is stored in _task. Finally, the CancellationPromise<T> instance is registered as a completion action for the source Task (we'll come back to what this means shortly).

internal CancellationPromise(Task source, uint millisecondsDelay, CancellationToken token)
{
    Debug.Assert(source != null);
    Debug.Assert(millisecondsDelay != 0);

    // Register with the target task.
    _task = source;
    source.AddCompletionAction(this);

    // ... rest of the constructor covered shortly
}

Next we have the timeout configuration. This creates a TimerQueueTimer and passes in a callback to be executed after millisecondsDelay (and does not execute periodically). A static lambda is used to avoid capturing state, which instead is passed as the second argument to the TimerQueueTimer. The callback tries to mark the CancellationPromise<T> as faulted by setting a TimeoutException() (remember that CancellationPromise<T> itself is a Task), and then does some cleanup we'll see later.

Note also that flowExecutionContext is false, which avoids capturing and restoring the execution context for performance reasons. For more about execution context, see this post by Stephen Toub.

// Register with a timer if it's needed.
if (millisecondsDelay != Timeout.UnsignedInfinite)
{
    _timer = new TimerQueueTimer(static state =>
    {
        var thisRef = (CancellationPromise<TResult>)state!;
        if (thisRef.TrySetException(new TimeoutException()))
        {
            thisRef.Cleanup();
        }
    }, 
    state: this, 
    duetime: millisecondsDelay, 
    period: Timeout.UnsignedInfinite, 
    flowExecutionContext: false);
}

After configuring the timeout, the constructor configures the CancellationToken support. This similarly registers a callback to fire when the provided CancellationToken is cancelled. Note that again this uses UnsafeRegister() (instead of the normal Register()) to avoid flowing the execution context into the callback.

// Register with the cancellation token.
_registration = token.UnsafeRegister(static (state, cancellationToken) =>
{
    var thisRef = (CancellationPromise<TResult>)state!;
    if (thisRef.TrySetCanceled(cancellationToken))
    {
        thisRef.Cleanup();
    }
}, this);

Finally, the constructor does some house keeping. This accounts for the situation where the source Task completes while the constructor is executing, before the timeout and cancellation have been registered. Or if the timeout fires before the cancellation is registered. Without the following block, you could end up with leaking resources not being cleaned up

// If one of the callbacks fired, it's possible they did so prior to our having registered the other callbacks,
// and thus cleanup may have missed those additional registrations.  Just in case, check here, and if we're
// already completed, unregister everything again.  Unregistration is idempotent and thread-safe.
if (IsCompleted)
{
    Cleanup();
}

That's all the code in the constructor. Once constructed, the CancellationPromise<T> is returned from the WaitAsync() method as a Task (or a Task<T>), and can be awaited just as any other Task. In the next section we'll see what happens when the source Task completes.

Implementing ITaskCompletionAction

In the constructor of CancellationPromise<T> we registered a completion action with the source Task (the one we called WaitAsync() on):

_task = source;
source.AddCompletionAction(this);

The object passed to AddCompletionAction() must implement ITaskCompletionAction (as CancellationPromise<T> does) ITaskCompletionAction interface is simple, consisting of a single method (which is invoked when the source Task completes) and a single property:

internal interface ITaskCompletionAction
{
    // Invoked to run the action
    void Invoke(Task completingTask);
    // Should only return false for specialised scenarios for performance reasons
    // Controls whether to force running as a continuation (synchronously)
    bool InvokeMayRunArbitraryCode { get; }
}

CancellationPromise<T> implements this method as shown below. It sets InvokeMayRunArbitraryCode to true (as all non-specialised scenarios do) and implements the Invoke() method, receiving the completed source Task as an argument.

The implementation essentially "copies" the status of the completed source Task into the CancellationPromise<T> task:

  • If the source Task was cancelled, it calls TrySetCancelled, re-using the exception dispatch information to "hide" the details of CancellationPromise<T>
  • If the source task was faulted, it calls TrySetException()
  • If the task completed, it calls TrySetResult

Note that whatever the status of the source Task, the TrySet* method may fail, if cancellation was requested or the timeout expired in the mean time. In those cases the bool variable is set to false, and we can skip calling Cleanup() (as the successful path will call it instead).

class CancellationPromise<TResult> : ITaskCompletionAction
{
    bool ITaskCompletionAction.InvokeMayRunArbitraryCode => true;

    void ITaskCompletionAction.Invoke(Task completingTask)
    {
        Debug.Assert(completingTask.IsCompleted);

        bool set = completingTask.Status switch
        {
            TaskStatus.Canceled => TrySetCanceled(completingTask.CancellationToken, completingTask.GetCancellationExceptionDispatchInfo()),
            TaskStatus.Faulted => TrySetException(completingTask.GetExceptionDispatchInfos()),
            _ => completingTask is Task<TResult> taskTResult ? TrySetResult(taskTResult.Result) : TrySetResult(),
        };

        if (set)
        {
            Cleanup();
        }
    }
}

Now you've seen all three callbacks for the 3 possible outcomes of WaitAsync(). In each case, whether the task, timeout, or cancellation completes first, we have some cleanup to do.

Cleaning up

One of the things you can forget when working with CancellationTokens and timers, is to make sure you clean up after yourself. CancellationPromise<T> makes sure to do this by always calling Cleanup(). This does three things:

  • Dispose the CancellationTokenRegistration returned from CancellationToken.UnsafeRegister()
  • Close the ThreadQueueTimer (if it exists), which cleans up the underlying resources
  • Removes the callback from the source Task, so the ITaskCompletionAction.Invoke() method on CancellationPromise<T> won't be called.
private void Cleanup()
{
    _registration.Dispose();
    _timer?.Close();
    _task.RemoveContinuation(this);
}

Each of these methods is idempotent and thread-safe, so it's safe to call the Cleanup() method from multiple callbacks, which might happen if something fires when we're still running the CancellationPromise<T> constructor, for example.

One point to bear in mind is that even if a timeout occurs, or the cancellation token fires and the CancellationPromise<T> completes, the source Task will continue to execute in the background. The caller who executed source.WaitAsync() won't ever see the output of result of the Task, but if that Task has side effects, they will still occur.

And that's it! It took a while to go through it, but there's not actually much code involved in the implementation of WaitAsync(), and it's somewhat comparable to the "naive" approach you might have used in previous versions of .NET, but using some of .NET's internal types for performance reasons. I hope it was interesting!

Summary

In this post I took an in-depth look at the new Task.WaitAsync() method in .NET 6, exploring how it is implemented using internal types of the BCL. I showed that the Task returned from WaitAsync() is actually a CancellationPromise<T> instance, which derives from Task<T>, but which supports cancellation and timeouts directly. Finally, I walked through the implementation of CancellationPromise<T>, showing how it wraps the source Task.

Just because you stopped waiting for it, doesn't mean the Task stopped running

$
0
0
Just because you stopped waiting for it, doesn't mean the Task stopped running

At the end of my previous post, in which I took a deep-dive into the new .NET 6 API Task.WaitAsync(), I included a brief side-note about what happens to your Task when you use Task.WaitAsync(). Namely, that even if the WaitAsync() call is cancelled or times-out, the original Task continues running in the background.

Depending on your familiarity with the Task Parallel Library (TPL) or .NET in general, this may or may not be news to you, so I thought I would take some time to describe some of the potential gotchas at play when you cancel Tasks generally (or they "timeout").

Without special handling, a Task always run to completion

Let's start by looking at what happens to the "source" Task when you use the new WaitAsync() API in .NET 6.

One point you might not consider when calling WaitAsync() is that even if a timeout occurs, or the cancellation token fires, the source Task will continue to execute in the background. The caller who executed source.WaitAsync() won't ever see the output of result of the Task, but if that Task has side effects, they will still occur.

For example, in this trivial example, we have a function that loops 10 times, printing to the console every second. We invoke this method and call WaitAsync():

using System;
using System.Threading.Tasks;

try
{
    await PrintHello().WaitAsync(TimeSpan.FromSeconds(3));
}
catch(Exception)
{
    Console.WriteLine("I'm done waiting");
}

// don't exit
Console.ReadLine();

async Task PrintHello()
{
    for(var i=0; i<10; i++)
    {
        Console.WriteLine("Hello number " + i);
        await Task.Delay(1_000);
    }
}

The output shows that the Task we awaited was cancelled after 3s, but the PrintHello() task continued to execute:

Hello number 0
Hello number 1
Hello number 2
Hello number 3
I'm done waiting
Hello number 4
Hello number 5
Hello number 6
Hello number 7
Hello number 8
Hello number 9

WaitAsync() allows you to control when you stop waiting for a Task to complete. It does not allow you to arbitrarily stop a Task from running. The same is true if you use a CancellationToken with WaitAsync(), the source Task will run to completion, but the result won't be observed.

You'll also get a similar behaviour if you use a "poor man's" WaitAsync() (which is one of the approaches you could use pre-.NET 6):

using System;
using System.Threading.Tasks;

var printHello = PrintHello();
var completedTask = Task.WhenAny(printHello, Task.Delay(TimeSpan.FromSeconds(3));

if (completedTask == printHello)
{
    Console.WriteLine("PrintHello finished"); // this won't be called due to the timeout
}
else
{
    Console.WriteLine("I'm done waiting");
}

// don't exit
Console.ReadLine();

async Task PrintHello()
{
    for(var i=0; i<10; i++)
    {
        Console.WriteLine("Hello number " + i);
        await Task.Delay(1_000);
    }
}

As before, the output shows that the printHello task continues to execute, even after we've stopped waiting for it:

Hello number 0
Hello number 1
Hello number 2
Hello number 3
I'm done waiting
Hello number 4
Hello number 5
Hello number 6
Hello number 7
Hello number 8
Hello number 9

So what if you want to stop a Task in its tracks, and stop it using resources?

Actually cancelling a task

The only way to get true cancellation of a background Task, is for the Task itself to support it. That's why async APIs should almost always take a CancellationToken, to provide the caller a mechanism to ask the Task to stop processing!

For example, we could rewrite the previous program using a CancellationToken instead:

using System;
using System.Threading;
using System.Threading.Tasks;

try
{
    using var cts = new CancellationTokenSource();
    cts.CancelAfter(TimeSpan.FromSeconds(3));
    await PrintHello(cts.Token);
}
catch(Exception)
{
    Console.WriteLine("I'm done waiting");
}

// don't exit
Console.ReadLine();

async Task<bool> PrintHello(CancellationToken ct)
{
    for(var i=0; i<10; i++)
    {
        Console.WriteLine("Hello number " + i);
        ct.ThrowIfCancellationRequested(); // we could exist gracefully, but just throw instead
        await Task.Delay(TimeSpan.FromSeconds(1), ct);
    }
    return true;
}

Running this program shows the following output:

Hello number 0
Hello number 1
Hello number 2
I'm done waiting

We could alternatively re-write the PrintHello method so that it doesn't throw when cancellation is requested:

async Task<bool> PrintHello(CancellationToken ct)
{
    try
    {
        for(var i=0; i<10; i++)
        {
            Console.WriteLine("Hello number " + i);
            if(ct.IsCancellationRequested())
            {
                return false;
            }
            ct.ThrowIfCancellationRequested(); 

            // This will throw if ct is cancelled while waiting
            // so need the try catch
            await Task.Delay(TimeSpan.FromSeconds(1), ct);
        }
        return true;
    }
    catch(TaskCancelledException ex)
    {
        return false;
    }
}

Note, however, that in a recent blog post, Stephen Cleary points out that generally shouldn't silently exit when cancellation is requested. Instead, you should throw.

Handling cancellation cooperatively with a CancellationToken is generally a best practice, as consumers will typically want to stop a Task from processing immediately when they stop waiting for it. But what if you want to do something a bit different…

If the Task keeps running, can I get its result?

While writing this post I realised there was an interesting scenario you could support with the help of the new WaitAsync() API in .NET 6. Namely, you can await the source Task after WaitAsync() has completed. For example, you could wait a small time for a Task to complete, and if it doesn't, do something else in the mean time, before coming back to it later:

using System;
using System.Threading.Tasks;

var task = PrintHello();
try
{
    // await with a timeout
    await task.WaitAsync(TimeSpan.FromSeconds(3));
    // if this completes successfully, the job finished before the timeout was exceeded
}
catch(TimeoutException)
{
    // Timeout exceeded, do something else for a while
    Console.WriteLine("I'm done waiting, doing some other work....");
}

// Ok, we really need that result now
var result = await task;
Console.WriteLine("Received: " + result);

async Task<bool> PrintHello()
{
    for(var i=0; i<10; i++)
    {
        Console.WriteLine("Hello number " + i);
        await Task.Delay(TimeSpan.FromSeconds(1));
    }

    return true;
}

This is similar to the first example in this post, where the task continues to run after we time out. But in this case we subsequently retrieve the result of the completed task, even though the WaitAsync() task was cancelled:

Hello number 0
Hello number 1
Hello number 2
Hello number 3
I'm done waiting, doing some other work....
Hello number 4
Hello number 5
Hello number 6
Hello number 7
Hello number 8
Hello number 9
Received: True

Building support for cancellation into your async methods gives the most flexibility for callers, as it allows them to cancel it. And you probably should cancel tasks if you're not waiting for them any more, even if they don't have side effects.

Cancelling calls to Task.Delay()

One example of a Task without side effects is Task.Delay(). You've likely used this API before; it waits asynchronously (without blocking a Thread) for a time period to expire before continuing.

It's possible to use Task.Delay() as a "timeout", similar to the way I showed previously as a "poor man's WaitAsync", something like the following:

// Start the actual task we care about (don't await it)
var task = DoSomethingAsync(); 

// Create the timeout task (don't await it)
var timeout = TimeSpan.FromSeconds(10);
var timeoutTask = Task.Delay(timeout);

// Run the task and timeout in parallel, return the Task that completes first
var completedTask = await Task.WhenAny(task, timeoutTask);

if (completedTask == task)
{
    // await the task to bubble up any errors etc
    return await task.ConfigureAwait(false);
}
else
{
    throw new TimeoutException($"Task timed out after {timeout}");
}

I'm not saying this is the "best" way to create a timeout, you could also use CancellationTokenSource.CancelAfter().

In the previous example we start both the "main" async task and also call Task.Delay(timeout), without awaiting either of them. We then use Task.WhenAny() to wait for either the task to complete, or the timeout Task to complete, and handle the result as appropriate.

The "nice" thing about this approach is that you don't necessarily have to have any exception handling. You can throw if you want (as I have in the case of a Timeout in the previous example), but you could easily use a non-exception approach.

The thing to remember here is that whichever Task finishes first the other one keeps running.

So why does it matter if a Task.Delay() keeps running in the background? Well, Task.Delay() uses a timer under-the-hood (specifically, a TimerQueueTimer). This is mostly an implementation detail. But if you are creating a lot of calls to Task.Delay() for some reason, you may be leaking these references. The TimerQueueTimer instances will be cleaned up when the Task.Delay() call expires, but if you're creating Task.Delay() calls faster than they're ending, then you will have a memory leak.

So how can you avoid this leak? The "simple" answer, much as it was before, is to cancel the Task when you're done with it. For example:

var task = DoSomethingAsync(); 
var timeout = TimeSpan.FromSeconds(10);

// 👇 Use a CancellationTokenSource, pass the token to Task.Delay
var cts = new CancellationTokenSource();
var timeoutTask = Task.Delay(timeout, cts.Token);

var completedTask = await Task.WhenAny(task, timeoutTask);

if (completedTask == task)
{
    cts.Cancel(); // 👈 Cancel the delay
    return await task.ConfigureAwait(false);
}
else
{
    throw new TimeoutException($"Task timed out after {timeout}");
}

This approach will prevent the Task.Delay() from leaking, though be aware, the CancellationTokenSource is also quite heavyweight, so you should take that into account too if you're creating a lot of them!

Summary

This post showed a number of different scenarios around Task cancellation, and what happens to Tasks that don't support cooperative cancellation with a CancellationToken. In all cases, the Task keeps running in the background. If the Task causes side effects, then you need to be aware these may continue happening. Similarly, even if the Task doesn't have additional side effects, it may be leaking resources by continuing to run.


Tracking down a hanging xUnit test in CI: building a custom Test Framework

$
0
0
Tracking down a hanging xUnit test in CI: building a custom Test Framework

In this post I describe how we tracked down a hanging xUnit test in our CI build. To achieve that, we wanted to have xUnit log which tests were running. This proved much harder than we had planned, and ended with us creating a custom XunitTestFramework implementation. This post shares our pain with the world.

The problem: a hanging test in CI

In the Datadog APM tracer library we run a lot of tests. We obviously have lots of unit tests which run quickly and rarely have issues. But because of the nature of the APM tracer, where we hook deep into the CLR Profiler APIs, we run a lot of integration tests, in which we instrument sample applications and confirm their behaviour is as expected.

These tests are expensive to run, as each test requires starting a separate process, hooking up the tracer, and running expected behaviour (such as sending web requests, accessing a database, and so on). On top of that, as these are real applications, with all the concurrency and edge cases that goes along with that, sometimes, a test will hang.

The trouble is that sometimes a test hangs in CI. And by default, you won't know which one. xUnit doesn't list which test is running. And if you can't replicate the issue locally in an IDE, then how can we even know which test was hanging? 🤔

This seemed like it should be something simple to enable: a log message when a test starts, and another one when a test ends. That way we could track down the culprit that was hanging. It wasn't quite as simple as we hoped.

Creating a custom test framework in xUnit

xUnit takes a very opinionated view as a test framework. It provides the minimal features required for a framework, and leaves the rest up to you. There are lots of ways to extend and plug in to the framework, but the framework doesn't give you a huge amount out of the box.

My colleague Kevin Gosse is the one to thank/blame for this code, which can be found on GitHub

After much hunting we (Kevin) established that the only way to log when a test starts and finishes is to write a custom test framework for xUnit.

In this section, I'll talk through all the layers required to achieve this, but as a quick test, I created a new project using the .NET CLI by running:

dotnet new xunit -n XunitCustomFrameworkTests
dotnet new sln
dotnet sln add ./XunitCustomFramework.csproj

I then added a simple test:

using Xunit;
namespace XunitCustomFrameworkTests;

public class CalculatorTests
{
    [Fact]
    public void ItWorks()
    {
        Assert.True(true);
    }
}

Now we have a test project, lets set about logging when a method is starting and finishing

Creating the custom TestFramework

The TestFramework in xUnit is responsible for discovering and executing all the tests in your application. The default implementation is XunitTestFramework, but you can create your own test framework and "register" it with xUnit by adding an [assembly:Xunit.TestFramework] attribute.

The following creates our CustomTestFramework by deriving from the default XunitTestFramework.

using Xunit.Abstractions;
using Xunit.Sdk;

namespace XunitCustomFrameworkTests;

public class CustomTestFramework : XunitTestFramework
{
    public CustomTestFramework(IMessageSink messageSink)
        : base(messageSink)
    {
    }
}

The IMessageSink is an important interface that we will use to write messages to the console outside the context of a test. We'll use it to log when a test starts, and when it stops.

If you want to write messages to test output from inside a test, you should use the ITestOutputHelper interface, and inject it into your test class constructors.

Xunit won't use the CustomTestFramework automatically, you need to add the [TestFramework] attribute to the assembly. For example:

[assembly:Xunit.TestFramework("XunitCustomFrameworkTests.CustomTestFramework", "XunitCustomFrameworkTests")]

Note that you must place assembly attributes outside namespace declarations. With C#10's new namespace declarations, it's easy to get them the wrong way around!

Adding a diagnostic message

With the CustomTestFramework in place, lets add a message to the constructor, to confirm that we're using the type as expected:

public CustomTestFramework(IMessageSink messageSink)
    : base(messageSink)
{
    messageSink.OnMessage(new DiagnosticMessage("Using CustomTestFramework"));
}

To write a message, you must create a DiagnosticMessage, and pass it to the IMessageSink.OnMessage method. We can test it out by running dotnet test:

> dotnet test --no-build --nologo --no-restore
Test run for C:\repos\blog-examples\XunitCustomFramework\bin\Debug\net6.0\XunitCustomFramework.dll (.NETCoreApp,Version=v6.0)
Starting test execution, please wait...
A total of 1 test files matched the specified pattern.

Passed!  - Failed:     0, Passed:    1, Skipped:     0, Total:    11, Duration: 11 ms - XunitCustomFramework.dll (net6.0)

Hmmm, there's no diagnostic messages there, which indicates the CustomTestFramework isn't being called. That's because diagnostic messages have to be enabled in xUnit's configuration.

Enabling diagnostic messages

The suggested approach to configuring xUnit is to use an xunit.runner.json file that is copied to your build output. Create the file xunit.runner.json in the root of your test project and add the following:

{
  "$schema": "https://xunit.net/schema/current/xunit.runner.schema.json",
  "diagnosticMessages": true
}

The $schema key enables IntelliSense for most editors in the file, and we've also enabled diagnostic messages. You should make sure the json file is set to be copied to your build output, so make sure you have the following <ItemGroup> in your csproj file:

<ItemGroup>
  <None Update="xunit.runner.json" CopyToOutputDirectory="PreserveNewest" />
</ItemGroup>

Now if we run dotnet test we can see the diagnostic message

> dotnet test
Test run for C:\repos\blog-examples\XunitCustomFramework\bin\Debug\net6.0\XunitCustomFramework.dll (.NETCoreApp,Version=v6.0)
Starting test execution, please wait...
A total of 1 test files matched the specified pattern.
[xUnit.net 00:00:00.43] XunitCustomFramework: Using CustomTestFramework

Passed!  - Failed:     0, Passed:    1, Skipped:     0, Total:    11, Duration: 11 ms - XunitCustomFramework.dll (net6.0)

OK, now we know we're hooking in correctly, we can go about achieving our goal: logging when each test starts and finishes.

Creating a custom TestMethodRunner

The TestFramework is the "top-level" piece of the equation that we need to replace, but I'm going to jump to the lowest level piece now, the custom TestMethodRunner. The RunTestCaseAsync method on this class is invoked once for every test case (a [Fact], or a single case of a [Theory] test), so it provides a good place for us to log the behaviour.

For simplicity we can derive from the default implementation, XunitTestMethodRunner, and override the RunTestCaseAsync() method to add the behaviour we need. The following annotated code shows how to do this:

class CustomTestMethodRunner : XunitTestMethodRunner
{
    private readonly IMessageSink _diagnosticMessageSink;

    // We need to pass all the injected values into the base constructor
    public CustomTestMethodRunner(ITestMethod testMethod, IReflectionTypeInfo @class, IReflectionMethodInfo method, IEnumerable<IXunitTestCase> testCases, IMessageSink diagnosticMessageSink, IMessageBus messageBus, ExceptionAggregator aggregator, CancellationTokenSource cancellationTokenSource, object[] constructorArguments)
        : base(testMethod, @class, method, testCases, diagnosticMessageSink, messageBus, aggregator, cancellationTokenSource, constructorArguments)
    {
        _diagnosticMessageSink = diagnosticMessageSink;
    }

    protected override async Task<RunSummary> RunTestCaseAsync(IXunitTestCase testCase)
    {
        // Create a text representation of the test parameters (for theory tests)
        var parameters = string.Empty;

        if (testCase.TestMethodArguments != null)
        {
            parameters = string.Join(", ", testCase.TestMethodArguments.Select(a => a?.ToString() ?? "null"));
        }

        // Build the full name of the test (class + method + parameters)
        var test = $"{TestMethod.TestClass.Class.Name}.{TestMethod.Method.Name}({parameters})";

        // Write a log to the output that we're starting the test
        _diagnosticMessageSink.OnMessage(new DiagnosticMessage($"STARTED: {test}"));

        try
        {
            // Execute the test and get the result
            var result = await base.RunTestCaseAsync(testCase);

            // Work out the final status of the test
            var status = result.Failed > 0 
                ? "FAILURE" 
                : (result.Skipped > 0 ? "SKIPPED" : "SUCCESS");

            // Write the result of the test to the output
            _diagnosticMessageSink.OnMessage(new DiagnosticMessage($"{status}: {test} ({result.Time}s)"));

            return result;
        }
        catch (Exception ex)
        {
            // Something went wrong trying to execute the test
            _diagnosticMessageSink.OnMessage(new DiagnosticMessage($"ERROR: {test} ({ex.Message})"));
            throw;
        }
    }
}

Hopefully the code in the snippet above is fairly easy to understand. The main question now is how to plug this into the CustomTestFramework previously. This is where things get a bit messy.

Creating the test framework class hierarchy

Currently we have implemented:

  • CustomTestFramework (an implementation of TestFramework)
  • CustomTestMethodRunner (an implementation of TestMethodRunner<IXunitTestCase>)

But to connect them, so that our CustomTestFramework uses the CustomTestMethodRunner, we also need to create the following types:

  • CustomExecutor (an implementation of TestFrameworkExecutor<IXunitTestCase>)
  • CustomAssemblyRunner (an implementation of TestAssemblyRunner<IXunitTestCase>)
  • CustomTestCollectionRunner (an implementation of TestCollectionRunner<IXunitTestCase>)
  • CustomTestClassRunner (an implementation of TestClassRunner<IXunitTestCase>)

The CustomTestFramework creates the CustomExecutor, which creates the CustomAsssemblyRunner, which creates the CustomTestCollectionRunner, which creates a CustomTestClassRunner which finally create the CustomTestMethodRunner! The sequence diagram looks something like this:

Sequence diagram for xunit custom framework

This is all boiler plate, there's nothing custom there, but due to the way the class structures are designed we have to implement all of them. The final complete hierarchy should look something like this:

public class CustomTestFramework : XunitTestFramework
{
    public CustomTestFramework(IMessageSink messageSink)
        : base(messageSink)
    {
        messageSink.OnMessage(new DiagnosticMessage("Using CustomTestFramework"));
    }

    protected override ITestFrameworkExecutor CreateExecutor(AssemblyName assemblyName)
        => new CustomExecutor(assemblyName, SourceInformationProvider, DiagnosticMessageSink);

    private class CustomExecutor : XunitTestFrameworkExecutor
    {
        public CustomExecutor(AssemblyName assemblyName, ISourceInformationProvider sourceInformationProvider, IMessageSink diagnosticMessageSink)
            : base(assemblyName, sourceInformationProvider, diagnosticMessageSink)
        {
        }

        protected override async void RunTestCases(IEnumerable<IXunitTestCase> testCases, IMessageSink executionMessageSink, ITestFrameworkExecutionOptions executionOptions)
        {
            using var assemblyRunner = new CustomAssemblyRunner(TestAssembly, testCases, DiagnosticMessageSink, executionMessageSink, executionOptions);
            await assemblyRunner.RunAsync();
        }
    }

    private class CustomAssemblyRunner : XunitTestAssemblyRunner
    {
        public CustomAssemblyRunner(ITestAssembly testAssembly, IEnumerable<IXunitTestCase> testCases, IMessageSink diagnosticMessageSink, IMessageSink executionMessageSink, ITestFrameworkExecutionOptions executionOptions)
            : base(testAssembly, testCases, diagnosticMessageSink, executionMessageSink, executionOptions)
        {
        }

        protected override Task<RunSummary> RunTestCollectionAsync(IMessageBus messageBus, ITestCollection testCollection, IEnumerable<IXunitTestCase> testCases, CancellationTokenSource cancellationTokenSource)
            => new CustomTestCollectionRunner(testCollection, testCases, DiagnosticMessageSink, messageBus, TestCaseOrderer, new ExceptionAggregator(Aggregator), cancellationTokenSource).RunAsync();
    }

    private class CustomTestCollectionRunner : XunitTestCollectionRunner
    {
        public CustomTestCollectionRunner(ITestCollection testCollection, IEnumerable<IXunitTestCase> testCases, IMessageSink diagnosticMessageSink, IMessageBus messageBus, ITestCaseOrderer testCaseOrderer, ExceptionAggregator aggregator, CancellationTokenSource cancellationTokenSource)
            : base(testCollection, testCases, diagnosticMessageSink, messageBus, testCaseOrderer, aggregator, cancellationTokenSource)
        {
        }

        protected override Task<RunSummary> RunTestClassAsync(ITestClass testClass, IReflectionTypeInfo @class, IEnumerable<IXunitTestCase> testCases)
            => new CustomTestClassRunner(testClass, @class, testCases, DiagnosticMessageSink, MessageBus, TestCaseOrderer, new ExceptionAggregator(Aggregator), CancellationTokenSource, CollectionFixtureMappings)
                .RunAsync();
    }

    private class CustomTestClassRunner : XunitTestClassRunner
    {
        public CustomTestClassRunner(ITestClass testClass, IReflectionTypeInfo @class, IEnumerable<IXunitTestCase> testCases, IMessageSink diagnosticMessageSink, IMessageBus messageBus, ITestCaseOrderer testCaseOrderer, ExceptionAggregator aggregator, CancellationTokenSource cancellationTokenSource, IDictionary<Type, object> collectionFixtureMappings)
            : base(testClass, @class, testCases, diagnosticMessageSink, messageBus, testCaseOrderer, aggregator, cancellationTokenSource, collectionFixtureMappings)
        {
        }

        protected override Task<RunSummary> RunTestMethodAsync(ITestMethod testMethod, IReflectionMethodInfo method, IEnumerable<IXunitTestCase> testCases, object[] constructorArguments)
            => new CustomTestMethodRunner(testMethod, this.Class, method, testCases, this.DiagnosticMessageSink, this.MessageBus, new ExceptionAggregator(this.Aggregator), this.CancellationTokenSource, constructorArguments)
                .RunAsync();
    }

    private class CustomTestMethodRunner : XunitTestMethodRunner
    {
        private readonly IMessageSink _diagnosticMessageSink;

        public CustomTestMethodRunner(ITestMethod testMethod, IReflectionTypeInfo @class, IReflectionMethodInfo method, IEnumerable<IXunitTestCase> testCases, IMessageSink diagnosticMessageSink, IMessageBus messageBus, ExceptionAggregator aggregator, CancellationTokenSource cancellationTokenSource, object[] constructorArguments)
            : base(testMethod, @class, method, testCases, diagnosticMessageSink, messageBus, aggregator, cancellationTokenSource, constructorArguments)
        {
            _diagnosticMessageSink = diagnosticMessageSink;
        }

        protected override async Task<RunSummary> RunTestCaseAsync(IXunitTestCase testCase)
        {
            var parameters = string.Empty;

            if (testCase.TestMethodArguments != null)
            {
                parameters = string.Join(", ", testCase.TestMethodArguments.Select(a => a?.ToString() ?? "null"));
            }

            var test = $"{TestMethod.TestClass.Class.Name}.{TestMethod.Method.Name}({parameters})";

            _diagnosticMessageSink.OnMessage(new DiagnosticMessage($"STARTED: {test}"));

            try
            {
                var result = await base.RunTestCaseAsync(testCase);

                var status = result.Failed > 0 
                    ? "FAILURE" 
                    : (result.Skipped > 0 ? "SKIPPED" : "SUCCESS");

                _diagnosticMessageSink.OnMessage(new DiagnosticMessage($"{status}: {test} ({result.Time}s)"));

                return result;
            }
            catch (Exception ex)
            {
                _diagnosticMessageSink.OnMessage(new DiagnosticMessage($"ERROR: {test} ({ex.Message})"));
                throw;
            }
        }
    }
}

With the hierarchy complete, if we now run dotnet test, we can see each test executing and completing:

> dotnet test
Test run for C:\repos\blog-examples\XunitCustomFramework\bin\Debug\net6.0\XunitCustomFramework.dll (.NETCoreApp,Version=v6.0)
Starting test execution, please wait...
A total of 1 test files matched the specified pattern.
[xUnit.net 00:00:00.43] XunitCustomFramework: Using CustomTestFramework
[xUnit.net 00:00:01.11] XunitCustomFramework: STARTED: XunitCustomFrameworkTests.CalculatorTests.ItWorks()
[xUnit.net 00:00:01.13] XunitCustomFramework: SUCCESS: XunitCustomFramework.CalculatorTests.ItWorks() (0.0075955s)

Passed!  - Failed:     0, Passed:    1, Skipped:     0, Total:    11, Duration: 11 ms - XunitCustomFramework.dll (net6.0)

With the custom test framework in place, we can now see which test has started and not finished when something hangs in CI.

Making it easier to identify hanging tests

Using the custom test framework to track currently executing tests is undoubtedly useful, but it still requires you to parse the output and try and spot which of the (potentially thousands) of tests doesn't have a matching end log.

We can improve on this somewhat by starting a timer for each test, and logging an explicit warning if the tests lasts for two long.

For example, we can update the CustomTestMethodRunner.RunTestCaseAsync() method to start a timer just before calling base.RunTestCaseAsync():

var deadlineMinutes = 2;
using var timer = new Timer(
    _ => _diagnosticMessageSink.OnMessage(new DiagnosticMessage($"WARNING: {test} has been running for more than {deadlineMinutes} minutes")),
    null,
    TimeSpan.FromMinutes(deadlineMinutes),
    Timeout.InfiniteTimeSpan);

If the test runs longer than the deadline (2 minutes in the example above), a warning is logged to the output. For example, if we create an intentionally long running test:

public class CalculatorTests
{
    [Fact]
    public void VerySlowTest()
    {
        Thread.Sleep(TimeSpan.FromMinutes(3));
    }
}

Then when we run dotnet test, we'll see a warning logged to the output:

> dotnet test
Test run for C:\repos\blog-examples\XunitCustomFramework\bin\Debug\net6.0\XunitCustomFramework.dll (.NETCoreApp,Version=v6.0)
Starting test execution, please wait...
A total of 1 test files matched the specified pattern.
[xUnit.net 00:00:00.43] XunitCustomFramework: Using CustomTestFramework
[xUnit.net 00:00:00.73] XunitCustomFramework: STARTED: XunitCustomFramework.CalculatorTests.VerySlowTest()
[xUnit.net 00:02:00.74] XunitCustomFramework: WARNING: XunitCustomFramework.CalculatorTests.VerySlowTest() has been running for more than 2 minutes

Now it's much easier to spot which of the tests has hung in CI without having to parse through a long list of started and completed tests.

Summary

In this post, I described how to create a custom xUnit TestFramework. This lets you insert "hooks" into the test running process, so you can keep track of which tests are running and which have completed. To help further, we can track when tests are running for longer than some threshold by starting a timer for each test, and logging a warning. The whole process is rather more work than I'd like, but hopefully this will help if you need to do something similar!

Working on two git branches at once with git worktree

$
0
0
Working on two git branches at once with git worktree

In this post I describe some scenarios in which you need to change git branches frequently and why this can sometimes be annoying. I then present some possible ways to avoid having to change branch. Finally I describe how git worktree allows you to check out multiple branches at once, so you can work on two branches simultaneously, without impacting each other.

Scenarios requiring frequent branch changes

Have you ever found yourself having to swap back and forth between different git branches, to work on two different features? Git makes this relatively easy to do, but it can still be a bit annoying and time consuming. There are various scenarios I have encountered that require me to switch from one branch to another.

Scenario 1: helping a colleague

The first scenario is when you're working on a feature, coding away on your my-feature branch, when a colleague sends you a message asking to give them a hand with something on their branch other-feature. You offer to checkout their branch to take a look, but that requires a number of steps:

  1. Save the code you're working on. You could use git stash --all to save the changes and any new files for all. Or you could create a "dummy" commit on your branch using git commit -m a "WIP" (which is my preference).
  2. Switch to the other branch. You could use the UI in your IDE (e.g. Visual Studio, Rider), or you could use the command line git checkout other-feature, or git switch other-feature.
  3. Wait for your IDE to catch up. I find this is often the most painful step, whether I'm using Visual Studio or Rider. For big solutions, it can take a while for the IDE to notice all the changes, reparse the files, and do whatever it needs to do.
  4. Make changes. From here you can work as normal, commit any changes and push them to the other-feature. Once you're done, it's time to switch back, goto 1.

This is a conceptually simple set of steps to follow, with the most painful step in my experience being 3—waiting for the IDE to finish doing what it needs to before you can be productive again—and the scenario probably happens rare enough that you don't worry about it too much.

Anecdotally, I've found IDEs get much less "confused" if you use their built-in support for switching git branches, instead of changing them from the command line and waiting for the IDE to "notice" the changes.

Scenario 2: fixing a bug

In this scenario, you've just finished a feature and pushed it out. Unfortunately, it has a bug, and you need to fix it quickly. Unfortunately, as you've already started working on my-feature, this involves the exact same steps as in the previous scenario.

Scenario 3: working on two features at once

This last scenario, working on two separate features at once, sounds like a bad idea. Aside from the technical issues we're describing in this post, there's a productivity cost to constant context-switching. Unfortunately, it's a scenario I find myself in relatively regularly.

In my day-job I often work on the CI build process. We're constantly trying to optimise and improve our builds, and while we use Nuke to ensure consistency between our local and CI builds, some things have to be tested in CI.

As anyone who has worked with CI will know, working on a CI branch leads to commits that look like this:

Git branch showing lots of commits indicating there were typos

Each of those commits fixes a tiny change, which then needs to be pushed to the server, and wait for a CI build to complete. Depending on your CI process, this could lead to a long cycle time, where you have to wait for an hour (for example) to see the results of your changes.

Due to this cycle time, I normally work on something else in the mean time while I wait to see the fruits of my CI labour. Which means going through the same steps as in scenario 1 above every hour or so. When the results of the CI change are back, I stash my work-in-progress, switch to the ci-feature branch, make my changes, trigger another build, and switch back to the my-feature branch.

Adding in the IDE branch-switching tax, that gets frustrating quickly. To avoid this, I looked around for ways to make it easier to work on two branches at once

Working on multiple git branches at once

Just to be clear, switching branches with git alone is quick and easy. The friction comes in when you're working in a large solution, as this makes branch changes more expensive for IDEs (as they have to do more work to look for changes and update their internal representations etc). That friction led me to consider ways to avoid having to switch branches.

Solution 1: Work in the GitHub UI

The easiest solution to avoiding the issues with changing branches locally is: don't change branches locally. That seems a strange suggestion, but often, especially when I'm working on CI, editing a branch directly using the GitHub CI is sufficient. This is especially true using the new github.dev experience built-in to GitHub.

To activate github.dev for a repository press the . key from the github.com repository.

https://github.dev gives you a browser-based VS Code editing experience which is far superior to the experience you get on https://github.com. From here you can create and switch branches, edit multiple files, and commit them. This is often more than enough for making a quick-edit or fixing a typo.

The github.dev UI

Where this falls down is with more complex tasks when you need that full IDE experience.

Solution 2: Clone the repository again

The brute-force way to work on two git branches at once is to clone the entire repository to a different folder, and check out a different branch in each clone. In the example below, the same repository is cloned in app-example and app-example-2:

Creating multiple clones of a repository

This certainly gets the job done. You can open the solution in each clone in a separate instance of the IDE, and never have to switch branches. Your IDE is happy as it doesn't have to keep re-parsing, and you switch branches as easily as switching windows.

Unfortunately, this has some downsides.

  • Duplication of data. As you can see in the image above, the two clones have their own .git folders, which contains all the history of the repository. This folder is essentially identical between the two clones
  • Duplication of the update process. As the two clones are completely independent, whenever you want to update your local clones by doing a git fetch or git pull, you have to repeat the process in the other clone if you want everything to be up to date.
  • No local sharing of branches. Again, as the two clones are independent, changes you make in a branch in app-example will not be visible in the associated branch in app-example-2. The only (sane) way to synchronise local branches between the two clones is by pushing the local branch as a remote and pulling it in the other clone. This can add some friction to something that feels like it shouldn't be so hard.

I say the only "sane" way, because you could add the app-example clone as another git remote source to the app-example-2 clone, but in this way madness lies.

Solution 3: git worktree

The last solution I'm aware of is to use git worktree. This is very similar to solution 2 in how you work with it, but it manages to solve all of the problems I listed above. For the remainder of this post I'll describe how to use git worktree, and how it lets you work on two git branches at once.

Multiple working trees with git worktree

git has the concept of the "working tree". These are the actual files you see in the folder when you checkout a branch (excluding the special .git folder). When you checkout a different branch, git updates all the files on disk to match the files in the new branch. You can have many branches in your repository, but only one of these will be "checked out" as the working-tree so that you can work on it and make changes.

git worktree adds the concept of additional working trees. This means you can have two (or more) branches checked-out at once. Each working tree is checked-out in a different folder, very similar to the "multiple clones" solution in the previous section. But in contrast to that solution, the working-trees are all linked to the same clone. We'll explore the implications of that shortly.

Managing working-trees with git worktree

As always with git there are a bunch of different ways to use git worktree, and a variety of switches you can provide. In this section I'll show the basics of using git worktree based on the scenarios I showed at the start of this post.

Creating a working tree from an existing branch

In the first scenario, a colleague asks you to take a look at an existing branch. You're in the middle of a big refactor in your branch, and rather than stash your changes, you decide to create a new worktree to take a look. The branch you need to look at is called other-feature, so you run the following from the root directory of your repository:

$ git worktree add ../app-example-2 other-feature
Preparing worktree (checking out 'other-feature')
HEAD is now at d6a507b Trying to fix

In this case, the git worktree command has three additional arguments:

  • add indicates want to create a new working tree
  • ../app-example-2 is the path to the folder where we want to create the working-tree. As we're running from the root-directory, this creates a folder called app-example-2 parallel to the clone folder.
  • other-feature is the name of the branch to check-out in the working tree

After running the command, you can see that git has created the app-example-2 directory, and that it contains the checked out files:

Using git worktree to checkout multiple directories

The eagle-eyed among you may notice that there isn't a .git directory in the app-example-2 working tree. Instead, there's a .git file. This file points to the git directory in the original clone, and it means that all your usual git commands work inside the app-example-2 directory, as well as in the original app-example directory.

I'm not going to go into the technical details of how this all works, see the manual for details if you're interested.

After helping out your colleague, you no longer need the other-feature working tree around. To remove it, run the following from your "main" working tree (in the app-example directory):

git worktree remove ../app-example-2

This will delete the app-example-2 directory. The branch it was pointing to is obviously not affected, it just won't be checked out any more.

If you have uncommitted changes in the linked working tree, git will block you from removing it. You can use --force to force the removal, if you're sure you want to lose the uncommitted changes.

Creating a working tree from a new branch

In the second scenario, imagine you need to make a quick bug fix. In this case, you don't have a new branch yet. git worktree has a handy -b option to both create a new branch and check it out in the new working tree:

> git worktree add ../app-example-2 origin/main -b bug-fix
Preparing worktree (new branch 'bug-fix')
Branch 'bug-fix' set up to track remote branch 'main' from 'origin'.
HEAD is now at 37ae55f Merge pull request #417 from some-natalie/main

This example creates a new branch, bug-fix from the origin/main branch, and then checks it out at ../app-example-2. It can be removed from the main working tree by running git worktree remove ../app-example-2, as before.

Switching branches inside a working

That brings us to the final scenario, where I have two long running branches I want to have open at once. From the git worktree point of view, this is the same as the previous scenarios. You simply create a new working tree (and optionally a new branch) at the other location. You can work on this from your IDE, and it will treat it just like a "normal" git clone.

In my case, I've tended to create "long-running" working trees. The "main" feature I'm working on goes in my "main" working tree; the side feature/CI feature I'm working on goes in the "linked" working tree. But instead of removing the linked working tree when I'm finished with it, I keep it around. So I have a "permanent" linked tree at app-example-2, that I can use to check out a different branch at any time I need.

It seems like a lot of overhead, but thankfully it's really not, as it solves most of the issues of dealing with multiple clones.

The advantages of git worktree

While it obviously is more confusing to have two working trees than just a single working tree, git worktree solves all the issues associated with having multiple clones.

  • Duplication of data. the linked working tree is using the same data (i.e. .git folder) as your main working tree, so there's no duplication
  • Duplication of the update process. If you do a fetch in one of your working trees, or if you rename a branch in the other working tree, the changes are immediately visible in all the working trees, as you're operating on the same underlying data.
  • No local sharing of branches. Again, as you're using the same data, it's easy to share local-only branches between working trees, so you have none of the issues you do when using multiple clones.

I've only shown some of the most basic usages of git worktree here, but there are many different things you can do if you want (create a working tree without checking out a branch, lock a working tree, add custom configuration etc.). For more details, see the manual.

Disadvantages/gotchas of git worktree

The biggest mark against git worktree is the simple overhead of having two "top-level" folders for a single repository. But this is a big mark against it. If this is a pattern you're going to use consistently, I suggest nesting all your workings tree inside a sub-directory, something like this:

Using git worktree with the main working tree also in a sub folder

I've suggested using _ as the main working tree folder name so it's generally going to be sorted at the top of the folder list in explorer.

Another thing to be aware of is that you can't checkout the same branch in more than working tree. For example, if you're checked out on main in one tree, and then try to check it out in another tree too you'll get an error something like the following:

$ git worktree add ../linked main
fatal: 'main' is already checked out at 'C:/repos/app-example/_'
Preparing worktree (checking out 'main')

Similarly, if you try to switch to a branch that's checked-out in a different working tree, you'll get an error:

$ git switch bug-fix
fatal: 'bug-fix' is already checked out at 'C:/repos/app-example/linked'

These are pretty minor issues generally, with obvious resolutions, they're just something to be aware of. The biggest downside is the cognitive overhead of having two folders associated with the same clone, but if you find yourself in need of it, I think git worktree can be a very handy solution.

Summary

In this post I described several git scenarios in which you need to switch branches back and forth. If you're in the middle of a big refactor or complex work then handling this scenario can be frustrating. git worktree provides an alternative solution to the problem, but allowing you to have additional a different branch checked-out in another folder, and "linking" the working tree to your repository. I have found this useful when I'm working on two separate feature branches simultaneously, though it does come with some cognitive overhead, so I only tend to use it in these "long running branch" scenarios.

Keeping up with .NET: learning about new features and APIs

$
0
0
Keeping up with .NET: learning about new features and APIs

In a recent post I looked at a new API, Task.WaitAsync(), introduced in .NET 6. This new API was pointed out to me by Andreas Gehrke on Twitter, but it raises an interesting point: how can you keep track of all the new APIs introduced in new versions of .NET? I received this question recently, so I thought I would quickly document some of the sources I use to stay up to date when a new version of .NET is released.

Read the blog posts

Every new release of .NET includes a bevy of blog posts. For example, this is the post for the .NET 6 release, which contains links to similar posts specific to ASP.NET Core, Entity Framework, .NET MAUI and more! These posts are often the best place to start, as they give you both a high-level overview and detailed instructions on many new features.

Watch the .NET Conf videos

I'm a big fan of blog posts, but if you prefer to learn from videos, all the recent .NET releases have been announced at the online-only .NET Conf. This consists of hours of content from presenters covering everything from what's new in the latest version of .NET, to getting started with your first application. There's a lot of community contributions too, so you can find a wide variety of speakers and content.

Check the documentation

In addition to the announcement blog posts, Microsoft provide upgrade guides and breaking change lists for each version of .NET on https://docs.microsoft.com. For example, this link shows the breaking changes between .NET 5 and .NET 6.

Some of the breaking changes in .NET 6

Each breaking change has its own link describing what changed, why, when it was introduced, and the recommend action. This list is invaluable when you're upgrading a new project. The majority of changes won't affect you, but I strongly recommend reading through the list and doing your due dilligence!

Listen to the community

The official channels (blog posts/documentation/.NET Conf) are a great way to find out about most of the features released in a new version of .NET, but you can always find additional content created by the community. This often has a different focus than the official Microsoft channels, so I strongly recommend keeping an eye out. Personally, I source most of my community content from Twitter, from RSS feeds, and from the .NET community standup.

I primarily consume written content, but there's plenty of .NET content available in other forms too. For example, Nick Chapsas has a huge following on YouTube while Jeff Fritz regularly streams on twitch. On the podcast side, I subscribe and listen to the following .NET-related podcasts (among others!)

Try out the previews

.NET is developed in the open on GitHub, and the first preview releases of the next version are shipped shortly after the previous stable version is released! The first previews of .NET 7 were shipped in February 2022, just 3 months after the release of .NET 6.

These releases always come with associated blog posts describing what's new, and can be a great way of staying on top of what's coming down the pipeline for the next version. Even if you don't actually install and use the preview versions, it can be handy to read these blog posts. Keeping on top of the changes in small chunks is often easier than trying to digest everything that's new in a stable release in one go. And if you do try out the preview builds, you can shape the final results by raising issues or comments on GitHub.

Following the GitHub repositories

As I already mentioned, .NET is developed in the open on GitHub, so you can see pretty much everything that happens by following the https://github.com/dotnet organisation. Depending on where your interests lie, you might want to watch one or more of the following:

There are many more libraries, but be warned, these are very high traffic repositories, trying to keep up with everything as it happens can be very tricky. But for digging into a new feature in depth, learning to navigate these repositories is hugely rewarding.

Viewing the API diffs for the base class libraries

This last point is one of the lesser known options for learning about changes in new versions of .NET. In the https://github.com/dotnet/core repository, you can find release notes for every versions of .NET. These include the usual links to downloaders and documentation, but one option I find incredibly useful is the api-diff list.

The api-diff describes all of the API changes for the core .NET libraries (and for ASP.NET Core / Windows desktop) for a given version. For example, if you check the api-diff for System.Threading.Tasks for .NET 6, you'll see all the WaitAsync() methods that were added to Task and Task<T> (as well as the new Parallel.ForEachAsync() method)

API diff for System.Threading.Tasks in .NET 6

It's certinaly not necessary to look through all of these API diffs when a new version of .NET comes out, but personally I find it very useful for turning up small quality-of-life improvements that aren't big enough to be mentioned elsewhere. For example, did you know that you can now control the behaviour of your app if a BackgroundService throws an exception? There's a breaking change in the documentation about it, but you could also spot it by looking at the api-diff for Microsoft.Extensions.Hosting:

API diff for Microsoft.Extensions.Hosting in .NET 6

If you want to learn how to use the new APIs, and how they interact with other features, then you'll inevitably need to dig into the code in the repository (or read the docs), but I really like the diffs for showing a high-level overview of what's changed, without getting bogged down in implementation details.

Summary

.NET is big, so keeping up with all the changes in a new release can be a big ask. In this post I described some of the content and resources I use to understand the high level features introduced in a new version, as well as the implementation details. I typically get my primary overview from the announcement blog posts and documentation, while I dig into implementation details on GitHub, and get alternative descriptions from the community. I also showed the api-diff feature on GitHub which lists the API changes in easily-consumable interface-like diffs.

Running JavaScript inside a .NET app with JavaScriptEngineSwitcher

$
0
0
Running JavaScript inside a .NET app with JavaScriptEngineSwitcher

I was working on a side project the other day, and realised I really needed to use some JavaScript functionality. The thought of dealing with Node.js and npm again totally put me off, so I decided to look into the possibility of running JavaScript inside a .NET application. Madness right? It's actually surprisingly easy!

Why would you do this?

As much as I like the .NET ecosystem, there are some things that the JavaScript ecosystem just does better. One of those things is having a library for everything, especially when it comes to the web.

Take syntax highlighting for example. This is possible to do with C# directly, but it's not an especially smooth experience. The TextMateSharp project, for example, provides an interpreter for TextMate grammar files. These are the files that VS Code uses to add basic syntax highlighting for a language. However it wraps a native dependency which adds some complexities if you're looking to deploy the app.

In contrast, JavaScript has a plethora of mature syntax highlighting libraries. To name a few, there's highlight.js, Prism.js (used on this blog), and shiki.js. The first two, in particular, are very mature, with multiple plugins and themes, and with simple APIs.

The obvious trouble with JavaScript as a .NET developer is that you need to learn and opt in to a whole separate tool chain, working with Node.js and NPM. That seems like a big overhead just to use one small feature.

So we are in a bit of a bind. We can either go the C# (+ native) route, or we have to jump out to JavaScript.

Or… we call JavaScript directly from our .NET app 🤯

Approaches to running JavaScript inside .NET

Once you've accepted that you want to run JavaScript from your .NET code, a couple of options come to mind. You could shell-out to a JavaScript engine (like Node.js) and ask it to run your JavaScript for you, but then you haven't really solved the problem; you would still need Node.js installed.

Another option is to bundle the JavaScript engine inside your library directly. This isn't quite as crazy as it sounds, and there are several NuGet packages that take this approach, which then expose a C# layer for interacting with the engine. The following is a collection of just some of the packages you could use to.

Jering.Javascript.NodeJS

This library takes the first of the above approaches. It doesn't include Node.js in the package. Instead, it provides a C# API for executing JavaScript code, and it calls out to the Node.js installed on your machine. This can be useful in environments where you know both are installed, but it doesn't really solve the logistics problem I was trying to avoid.

ChakraCore

ChakraCore was the original JavaScript engine used by Microsoft Edge, before Edge moved to be based on Chromium. According to the GitHub project:

ChakraCore is a JavaScript engine with a C API you can use to add support for JavaScript to any C or C compatible project. It can be compiled for x64 processors on Linux macOS and Windows. And x86 and ARM for Windows only.

So ChakraCore includes a native dependency, but as C# can P/Invoke into native libraries, that's not a problem per-se. But it can provide some deployment challenges.

ClearScript (V8)

The V8 JavaScript engine is what powers Node.JS, Chromium, Chrome, and the latest Edge. The Microsoft.ClearScript package provides a wrapper around the library, providing a C# interface for calling into the V8 library. Just as with ChakraCore, the V8 engine itself is a native dependency. The ClearScript library takes care of the P/Invoke calls, providing a nice C# API, but you still have to make sure you're deploying the correct native libraries based on your target platform.

Jint

Jint is interesting, as it's a JavaScript interpreter that runs entirely in .NET; there's no native dependencies to manage! It has full support for ECMAScript 5.1 (ES5) and supports .NET Standard 2.0, so you can use it in all your projects!

Jurassic

Jurassic is another .NET implementation of a JavaScript engine, similar to Jint. Also similar to Jint, it supports all of ES5, and it also appears to have partial support for ES6. In contrast to Jint, Jurassic is not an interpreter; it compiles JavaScript into IL, which makes it very fast, and it has no native dependencies!

So with all of these options, which should you choose?

JavaScriptEngineSwitcher: for when one JS engine isn't enough

I've been burying the lede a bit here, as there's another great project that makes it simple to try out any of them. While all of the libraries will allow you to run JavaScript, they all have slightly different C# APIs for interacting with them. That can make comparing them a bit of a pain, as you have to learn a different API for each one.

Enter JavaScriptEngineSwitcher. This library provides wrapper packages for all of the libraries I mentioned above and more:

Each of the libraries is supported in a separate package (with an additional native package required for engines with native dependencies), and a "Core" package, which provides the common API surface. Even if you have no intention of switching JS engines, I would be inclined to use the JavaScriptEngineSwitcher wrapper libraries where possible, just so that you don't have to figure out a new API if you need to switch engines later.

Unlike the old trope of "how often do you change your database", changing the JavaScript engine you use in your .NET project seems perfectly feasible to me. For example, I started with Jint, but when I needed to execute larger scripts I ran into performance problems and switched to Jurassic. JavaScriptEngineSwitcher made that as simple as adding a new package to my project and changing some initialization code.

I only discovered JavaScriptEngineSwitcher recently, but the latest version has nearly a million downloads, and it's used in the .NET static site builder Statiq. In the last part of this post, I'll give a quick example of the most basic usage.

A case study: running prism.js in a console app with JavaScriptEngineSwitcher

I started this post by discussing a specific scenario - syntax highlighting of code blocks. In this section I'll show how to highlight a small snippet of code using prism.js, running inside a console app.

To get started, add a reference to the JavaScriptEngineSwitcher.Jurassic NuGet package:

dotnet add package JavaScriptEngineSwitcher.Jurassic

Next, download the JavaScript file you want to run. For example, I downloaded the prism.js file from their website, and added c# to the default set of supported languages. After dropping the file in the root of the project folder, I updated the file to be an embedded resource. You can do this from your IDE, or manually by editing the project file.

<Project Sdk="Microsoft.NET.Sdk">

  <PropertyGroup>
    <OutputType>Exe</OutputType>
    <TargetFramework>net6.0</TargetFramework>
    <ImplicitUsings>enable</ImplicitUsings>
    <Nullable>enable</Nullable>
  </PropertyGroup>

  <ItemGroup>
    <PackageReference Include="JavaScriptEngineSwitcher.Jurassic" Version="3.17.4" />
  </ItemGroup>

  <!-- 👇 Make prism.js an embedded resource -->
  <ItemGroup>
    <None Remove="prism.js" />
    <EmbeddedResource Include="prism.js" />
  </ItemGroup>

</Project>

All that remains is to write the code to run the script in our program. The following snippet sets up the JavaScript engine, loads the embedded prism.js library from the assembly, and executes it.

using JavaScriptEngineSwitcher.Jurassic;

// Create an instance of the JavaScript engine
IJsEngine engine = new JurassicJsEngine();

// Execute the embedded resource called JsInDotnet.prism.js from the provided assembly
engine.ExecuteResource("JsInDotnet.prism.js", typeof(Program).Assembly);

Now we can run our own JavaScript commands within the same context. We can pass values from C# to the JavaScript engine by using SetVariableName, Execute, and Evaluate:

// This is the code we want to highlight
string code = @"
using System;

public class Test : ITest
{
    public int ID { get; set; }
    public string Name { get; set; }
}";

// set the JavaScript variable called "input" to the value of the c# variable "code"
engine.SetVariableValue("input", code);

// set the JavaScript variable called "lang" to the string "csharp"
engine.SetVariableValue("lang", "csharp");

// run the Prism.highlight() function, and set the result to the "highlighed" variable
engine.Execute($"highlighted = Prism.highlight(input, Prism.languages.csharp, lang)");

// "extract the value of "highlighted" from JavaScript to C#
string result = engine.Evaluate<string>("highlighted");

Console.WriteLine(result);

When you put it all together, the highlighted code is printed to the console:

<span class="token keyword">using</span> <span class="token namespace">System</span><span class="token punctuation">;</span>

<span class="token keyword">public</span> <span class="token keyword">class</span> <span class="token class-name">Test</span> <span class="token punctuation">:</span> <span class="token type-list"><span class="token class-name">ITest</span></span>
<span class="token punctuation">{</span>
    <span class="token keyword">public</span> <span class="token return-type class-name"><span class="token keyword">int</span></span> ID <span class="token punctuation">{</span> <span class="token keyword">get</span><span class="token punctuation">;</span> <span class="token keyword">set</span><span class="token punctuation">;</span> <span class="token punctuation">}</span>
    <span class="token keyword">public</span> <span class="token return-type class-name"><span class="token keyword">string</span></span> Name <span class="token punctuation">{</span> <span class="token keyword">get</span><span class="token punctuation">;</span> <span class="token keyword">set</span><span class="token punctuation">;</span> <span class="token punctuation">}</span>
<span class="token punctuation">}</span>

Which, when rendered, looks something like this:

using System;

public class Test : ITest
{
    public int ID { get; set; }
    public string Name { get; set; }
}

I was amazed by how simple this whole process was. Spinning up a new JavaScript engine, loading the prism.js file, and executing our custom code was so smooth. It was the perfect solution to my scenario.

I obviously wouldn't suggest doing this for all applications. If you need to run a lot of JavaScript then it's probably easier to use the idioms and tools from the Node.js ecosystem directly. But if you're just trying to leverage a small, self-contained tool (like prims.js) then this is a great option.

Summary

In this post I showed how you can use the JavaScriptEngineSwitcher NuGet package to run JavaScript from inside a .NET application. This package provides a consistent interface to many different JavaScript engines. Some of the engines (such as Chakra Core and V8) have a native component, while others (such as Jint and Jurassic) use managed code only. Finally, I showed how you could use JavaScriptEngineSwitcher to run the Prims.js code-highlighting library from inside a .NET app.

Why isn't my ASP.NET Core app in Docker working?

$
0
0
Why isn't my ASP.NET Core app in Docker working?

In this post I describe a problem I ran into the other day that had me stumped briefly—why doesn't my ASP.NET Core app running in Docker respond when I try and navigate to it? The problem was related to how ASP.NET Core binds to ports by default.

Background: testing ASP.NET Core on CentOS

I ran into my problem the other day while responding to an issue report related to CentOS. In order to diagnose the issue, I needed to run an ASP.NET Core application on CentOS. Unfortunately, while ASP.NET Core supports CentOS, they don't provide Docker images with it preinstalled. Currently, they provide Linux Docker images based on:

  • Debian
  • Ubuntu
  • Alpine

Additionally, while you can install CentOS in WSL, it's a lot more hassle than something like Ubuntu, which you can install directly from the Microsoft Store.

This left me with one obvious answer - build my own CentOS Docker image, and install ASP.NET Core in it "manually".

Creating the sample app with a Dockerfile.

I started by creating a sample web application using Visual Studio. I could have used the CLI to create the app, but I decided to use Visual Studio as I knew it would give me the option to auto-generate the Dockerfile as well. This would save a few minutes.

I chose ASP.NET Core Web API, used minimal APIs, disabled https, enabled Docker support (Linux) and generated the solution:

Creating a sample application using Visual Studio

This generates a Debian-based dockerfile by default (the mcr.microsoft.com/dotnet/aspnetcore:6.0 images are Debian based unless you select different tags), which looks like this:

FROM mcr.microsoft.com/dotnet/aspnet:6.0 AS base
WORKDIR /app
EXPOSE 80

FROM mcr.microsoft.com/dotnet/sdk:6.0 AS build
WORKDIR /src
COPY ["WebApplication1.csproj", "."]
RUN dotnet restore "./WebApplication1.csproj"
COPY . .
WORKDIR "/src/."
RUN dotnet build "WebApplication1.csproj" -c Release -o /app/build

FROM build AS publish
RUN dotnet publish "WebApplication1.csproj" -c Release -o /app/publish

FROM base AS final
WORKDIR /app
COPY --from=publish /app/publish .
ENTRYPOINT ["dotnet", "WebApplication1.dll"]

This Dockerfile uses the best practice of multi-staged builds to ensure your runtime images are as small as possible. It shows 4 distinct phases

  • mcr.microsoft.com/dotnet/aspnetcore:6.0 AS base. This stage defines the base image that will be used to run your application. It contains the minimal dependencies to run your application.
  • mcr.microsoft.com/dotnet/sdk:6.0 AS build. This stage defines the docker image that will be used to build your application. It includes the full .NET SDK, as well as various other dependencies. This stage actually builds your application.
  • FROM build AS publish. This stage is used to publish your application.
  • base AS final. The final stage is what you would actually deploy to production. It is based on the base image, but with the publish assets copied in.

Multi-stage builds are always best-practice when you're deploying to Docker, but this one is more complex than it needs to be in general. It has additional stages to make it quicker for Visual Studio to develop inside Docker images too, using "fast mode". If you're only deploying to Docker, not developing in Docker, then you can simplify this file.

Creating a CentOS-based ASP.NET Core image

For my testing, I only needed to run the application on CentOS, I didn't need to build on CentOS, so that meant I could leave the build stage as it was, building on Debian. It was only the first stage, base, that I would need to switch to a CentOS-based image.

I started by finding the instructions for how to install ASP.NET Core on CentOS. Each Linux distro is a little bit different, with some versions using package managers, others using Snap packages etc. For CentOS we can use the yum package manager.

Installing ASP.NET Core is thankfully, very simple. You need only to add the Microsoft package repository and install using YUM. Starting from the CentOS version 7 Docker image, we can build out ASP.NET Core Docker image:

FROM centos:7 AS base

# Add Microsoft package repository and install ASP.NET Core
RUN rpm -Uvh https://packages.microsoft.com/config/centos/7/packages-microsoft-prod.rpm \
    && yum install -y aspnetcore-runtime-6.0

WORKDIR /app

# ... remainder of dockerfile as before

With that change to the base image, we can now build and run our sample ASP.NET Core app on CentOS using a command like the following:

docker build -t centos-test .
docker run --rm -p 8000:5000 centos-test

Which, when you run it and navigate to http://localhost:8000/weatherforecast, looks something like this:

Image of not found

Oh dear.

Debugging why the app isn't responding

I hadn't expected that result. I thought that it would be a simple case of installing ASP.NET Core, and the app would just work. My first thought was that I had introduced a bug somewhere that was causing the app to fail to start, but the logs printed to the console suggested the app was listening:

info: Microsoft.Hosting.Lifetime[14]
      Now listening on: http://localhost:5000
info: Microsoft.Hosting.Lifetime[0]
      Application started. Press Ctrl+C to shut down.
info: Microsoft.Hosting.Lifetime[0]
      Hosting environment: Production
info: Microsoft.Hosting.Lifetime[0]
      Content root path: /app/

Additionally, I could see that the app was also listening on the correct port, port 5000. In my Docker command I specified that Docker should map port 5000 inside the container to port 8000 outside the container, so that also looked correct.

I double checked the documentation at this point, to make sure I had the 8000:5000 the correct way around, and yes, the format is host:container

This all seemed rather odd. Presumably, the application wasn't receiving the request at all, but just to be sure, I bumped up the logging to Debug level and tried again:

docker run --rm -p 8000:5000 `
    -e Logging__Loglevel__Default=Debug `
    -e Logging__Loglevel__Microsoft.AspNetCore=Debug `
    centos-test

Sure enough, the logs were more verbose, but there was no indication of a request making it through

dbug: Microsoft.Extensions.Hosting.Internal.Host[1]
      Hosting starting
info: Microsoft.AspNetCore.Server.Kestrel[0]
      Unable to bind to http://localhost:5000 on the IPv6 loopback interface: 'Cannot assign requested address'.
dbug: Microsoft.AspNetCore.Server.Kestrel.Core.KestrelServer[1]
      Unable to locate an appropriate development https certificate.
dbug: Microsoft.AspNetCore.Server.Kestrel[0]
      No listening endpoints were configured. Binding to http://localhost:5000 by default.
info: Microsoft.Hosting.Lifetime[14]
      Now listening on: http://localhost:5000
dbug: Microsoft.AspNetCore.Hosting.Diagnostics[13]
      Loaded hosting startup assembly WebApplication1
info: Microsoft.Hosting.Lifetime[0]
      Application started. Press Ctrl+C to shut down.
info: Microsoft.Hosting.Lifetime[0]
      Hosting environment: Production
info: Microsoft.Hosting.Lifetime[0]
      Content root path: /app/
dbug: Microsoft.Extensions.Hosting.Internal.Host[2]
      Hosting started

So at this point I had two possible scenarios

  • The app isn't working at all
  • The app isn't correctly exposed outside of the container

To test the first case I decided to exec into the container and curl the endpoint while it was running. This would tell me whether the app was running correctly inside the container, at the port I expected. I could have used the cli to do this using docker exec ..., but for simplicity I used Docker Desktop to open a command prompt inside the container, and to curl the endpoint:

Calling curl http://localhost:5000/weatherforecast inside the docker container

Sure enough, curl-ing the endpoint inside the container (using the container port, 5000) returned the data I expected. So the app was working and it was responding on the correct port. That narrowed down the possible failures modes.

At this point I was running out of options. Luckily, a word in the application logs suddenly caught my eye and pointed me in the right direction. Loopback.

ASP.NET Core URLs: loopback vs. IP Address

One of the most popular posts on my blog (two years after I wrote it) is "5 ways to set the URLs for an ASP.NET Core app". In that post I describe some of the ways you can control which URL ASP.NET Core binds to on startup, but the relevant section right now is titled"What URLs can you use?". This section mentions that there are essentially 3 types of URLs that you can bind:

  • The "loopback" hostname for IPv4 and IPv6 (e.g. http://localhost:5000), in the format: {scheme}://{loopbackAddress}:{port}
  • A specific IP address available on your machine (e.g. http://192.168.8.31:5005), in the format {scheme}://{IPAddress}:{port}
  • "Any" IP address for a given port (e.g. http://*:6264), in the format {scheme}://*:{port}

The "loopback" address is the network address that refers to "the current machine". So if you access http://localhost:5000, you're trying to access port 5000 on the current machine. This is typically what you want when you're developing, and this is the default URL that ASP.NET Core apps bind to. So when you run an ASP.NET Core app locally, and navigate to http://localhost:5000 in your browser, everything works, because everything is all coming from the same network interface, on the same machine.

However, when you're inside a Docker container requests aren't coming from the same network interface. Essentially, you can think of the Docker container as a separate machine. Binding to localhost inside the Docker container will mean your app is never exposed outside of the container, rendering it rather useless.

The way to fix this is to ensure your app binds to any IP Address, using the {scheme}://*:{port} syntax.

As noted in my previous post, you don't have to use * in this pattern, you can use anything that's not an IP address or localhost, so you can use http://*:5000, http://+:5000, or http://example.com:5000 etc. All of these behave identically.

By binding the ASP.NET Core application to any IP address, the request "makes it through" from the host, so it can be handled by your app. We can set the URL at runtime when we run the Docker image, using for example

docker run --rm -p 8000:5000 ` -e DOTNET_URLS=http://+:5000 centos-test

or we could bake it into the Dockerfile as shown below. The following is the complete final Dockerfile I used:

FROM centos:7 AS base

# Add Microsoft package repository and install ASP.NET Core
RUN rpm -Uvh https://packages.microsoft.com/config/centos/7/packages-microsoft-prod.rpm \
    && yum install -y aspnetcore-runtime-6.0

# Ensure we listen on any IP Address 
ENV DOTNET_URLS=http://+:5000

WORKDIR /app

# ... remainder of dockerfile as before
FROM mcr.microsoft.com/dotnet/sdk:6.0 AS build
WORKDIR /src
COPY ["WebApplication1.csproj", "."]
RUN dotnet restore "./WebApplication1.csproj"
COPY . .
WORKDIR "/src/."
RUN dotnet build "WebApplication1.csproj" -c Release -o /app/build

FROM build AS publish
RUN dotnet publish "WebApplication1.csproj" -c Release -o /app/publish

FROM base AS final
WORKDIR /app
COPY --from=publish /app/publish .
ENTRYPOINT ["dotnet", "WebApplication1.dll"]

With this change we can re-build the Docker image, and run the app again with

docker build -t centos-test .
docker run --rm -p 8000:5000 centos-test

and finally, we can call the endpoint from our browser:

Successfully calling the Ddocker endpoint from the host machine

So the important take away here is:

When you build your own ASP.NET Core Docker images, make sure to configure the app to bind to any IP address, not just localhost.

Of course, the official .NET Docker Images do that already, binding to port 80 by setting ASPNETCORE_URLS=http://+:80.

Summary

In this post I described a situation in which I was trying to build a CentOS Docker image to run ASP.NET Core. I described how I created the image by following the ASP.NET Core installation instructions, but that my ASP.NET Core app wasn't responding to requests. I walked through my debugging process to try to get to the root cause of the problem, and realised that I was binding to the loopback address. This meant the application was accessible from inside the Docker container, but not from outside it. To resolve the issue, I made sure to bind my ASP.NET Core app to any IP address, not just localhost.

Viewing all 759 articles
Browse latest View live